Transcripts
1. ALTERED TINS Introduction: It's pretty safe to
say that everybody knows fresh breath
should be a priority. Right? But does everybody know what to do with their empty mint tins? In this class, I'm going to
show you exactly what to do. I'm going to show
you how to take these empty mint tins and turn them into some amazing
products. Hi, I'm Zoe. And then this Skillshare
class altered Altoid tens. I'm going to show
you how to repurpose your empty Altoid
box or any tin, any size, any shape, any product, and turn it
into something amazing. I'm talking about travel
boxes for jewelry, pill boxes for vitamins
and medicines. Mini paint sets, perfect
for the traveling artists. Sewing stuff, college survival kits for
that student of yours. And you'd be surprised
how much stuff you can fit in their hair supplies. And now paraphernalia,
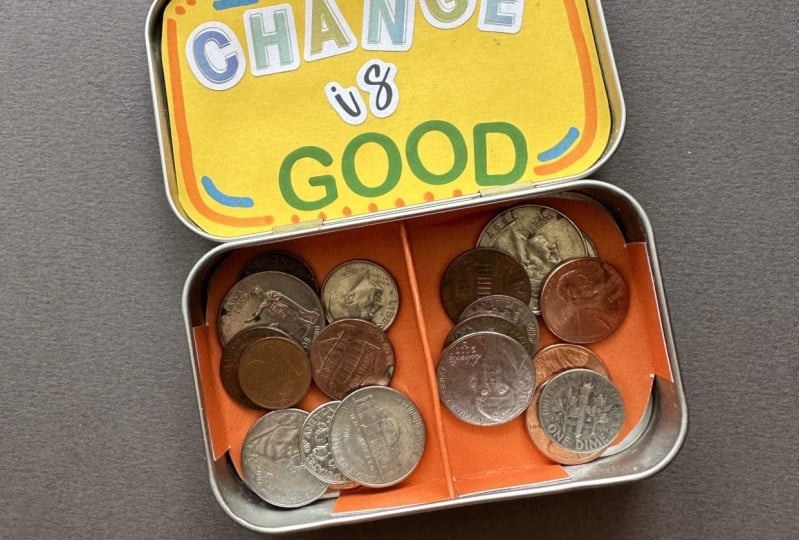
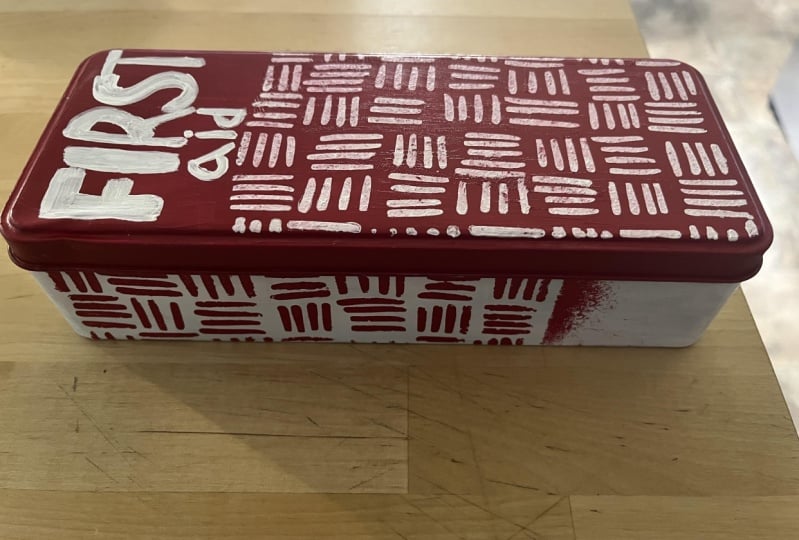
first aid kits, Valentine's Day gift
boxes, travel Games, little dioramas, fishing gear, the list goes on and on. These are great
gifts for anybody and everybody will appreciate
the personal touch. You will do some
out-of-the-box thinking for clever and creative ways to
repurpose these mint tens. I will spend time
showing you how to transform the exterior top, the bottom, the sides, the interior, the
top, the bottom. And I even have some
amazing ways to add partitions to the
inside of European. I'm a Skillshare
teacher and I have classes in quilt making, sewing, sewing pouches, other do-it-yourself
crafts, cards. I love art and I
love making things. I have a background in
graphic and web design, Fine Arts, and production. You don't have to have Matt art skills are
tons of supplies to finish this project and come out with an amazing product, or to gobble up those
mints and check out the class project and supply lessons so we can get started.
2. Class Project: When you finish this class,
altered Altoid tins, you're going to leave with at least one transformed tin
made into something amazing, a project you can choose. I use that you get to decide. There's so many
uses and ways to be creative about
re-purposing these tents. You don't have to be
super artsy or craft C, or have tons of
supplies, a promise. Anyone can do this. But if you are super
artsy and craft, see, you're definitely going
to have a good time coming up with new
uses for your tins. I have a lot of ideas
to share in this class, but I'd still love
to hear your ideas and suggestions and feedback. So make sure you share in the discussion section and
in the project section. The first part of
the class is about the exterior of the tin. The top, the bottom,
and the sides. On the exterior. We will work with Jesse to lay a foundation if
you want to cover the Altoid lettering or just paint right on with acrylic
multipurpose paint. We will also go over ways
to use paper and glue. Make many collages and add
fun lettering with stickers. Plus, we can add some other
interesting embellishments. Next up is the interior. Inside top. The inside bottom. Use paper, fell and some other
interesting fabric choices. And if you want partitions, which is a great way
to divide up the space and make little compartments
for all your things. Next up, I'll go over the
supply list for this class. It's also available in a
PDF in the project section.
3. Supplies: To get started with this
altered Altoid tin class, you're going to need,
you guessed it, an empty mint tin. It doesn't have to be deltoids. It can be any mint, and actually it can be
any candy or anything. You can even buy the tins blank from a craft
store or online. But it does need to be cleaned. So make sure you
take a wet cloth and clean out all that residue. I've noticed that in
America at Trader Joe's, they have an excellent
selection of mint and candy tens at
their checkout aisle, and I repurposed a
bunch of those myself. Other things you're
going to need, our tins, Altoid mint tins, any meant, any candy, any item. It can also be blank. You can use any size or shape. But in this class, we will mostly be using the bigger rectangle size
as the main example, papers, colored paper wrapping
paper, maps, postcard, scrapbook paper,
anything thicker papers will be useful for
making partitions, glues, hot glue gun is helpful for some Hardy and materials
like Belt and vinyl, you definitely need
either mod podge or acrylic matte gel medium or another craft
or collage glue. These can be matte
or glossy finish, or really any
texture you prefer. White acrylic gesso, which is useful as a foundation
to cover up old paint lettering or to give a blank white surface to paint on multi-service acrylic
paints in the colors you like. And paint brushes,
a bigger one for the surface areas and smaller
one for the side edges. Or if you're going to
paint letters or designs, Posca paint pens can be
helpful for details, stickers, decorative,
and letters, which are especially useful for labeling your tins
with fun fonts. Stencils for lettering
or decorating. A P touch label maker can be used for lettering
and also decor. Washi tape and other
decorative art shapes can be used on the sides. Fabrics such as felt with or without the
adhesive backing. And vinyl, denim or other
fabrics can be used to. Foam. Rollers can be used unconventionally to
make the partitions. A scissors, and an
exact dough knife. The supplies for this
class can be found in a PDF in the resources
section of this class. You don't need
everything I've listed. I'm sure you'll find some
other creative solutions to decorating your tint. And I would really
love to hear about them in the discussion
section of this class. Now that you know what you need, you can go and
gather it up by it, order it, find it, make it, and let's get started decorating the
exterior of your team.
4. The Exterior: Top & Bottom: Let's get started with
the exterior of our tins. I'm talking about the top, the bottom, and the sides. There are a few ways to go about altering the outside
of your tin. There's paint, there's paper, There's collage, there's glue, There's fabric, penciling, and pretty much anything
you can think of. As I mentioned, you can use
an Altoid tin or any ten, any meant, any candy, any item. Or you can order blank ones. You can find them at supply
stores or order them online. But whatever you do, make sure you take a before
and after pictures. It's so much fun to see that. Please share them in the
project section of this class. When you share before
and after shots with me, I'll make sure to share them on my Instagram account to with
your permission, of course, the exterior we will be
working with paint stencils, paper, collage, and glue. And when I say collage, I mean pretty much anything. Stickers and letters are great element to include
in these mini collages. Let's begin with paint. Using gesso as a foundation
before painting is an option. This helps hide any
marks or letters on the tin and also prepares the
surface for acrylic paint. I will use acrylic paint that
is good for any surface. I find that a few coats of paint works well
because as you can see, the white of the gesso is
still showing through it. You may need a smaller brush
to do the lip of the lid. After a few coats of paint, the tin really starts to look
vibrant and its new color. As I said, you do not have to
use gesso as a foundation. And here's an example
of me just painting acrylic paint
directly onto a tin. Of course, you still
see the streaks until more coats of acrylic
paint are applied. It's a lot of fun to pick the
colors and you can see how different pigments of acrylic
paint show up differently. I made a series of tens from my girlfriends and let
them choose their colors. Let's take a look
at using stencils. Once the tin is painted and dry, it's very easy to pick
a stencil and apply acrylic paint to the top
to add some texture. Letter stencils could be very
cool to moving onto paper. Paper can also be
applied right onto the gestural foundation or
to the naked eye itself. When looking at applying
paper to the exterior, we need to discuss glues. Later in the class. We will use a hot glue gun to apply
the interior elements. And we can use that
type for the exterior. But I do like using
either acrylic medium, matte gel or mod podge, either mat or satin finish. I will take any paper choice, trace the tin shape
on the backside of the paper and cut it
out along my line. I like to cut several at
once in case I use it on different parts of
the tin or as backup. I will take my mat
gel and apply it directly to the tin lid
using a palette knife. But you can use a brush to just make sure to
clean it afterwards. Make sure to spread
the glue to the edges. So the tin also then press
your paper down onto the top. Then I will smear coat of glue across the top of the paper to making sure to get the edges, but also avoiding the hinge. Then you can repeat
by applying the same or different paper to
the bottom over the ten. Once the paper is dry, I can add some letter stickers. Although stickers are sticky, I do like to add some
mod podge because extra reinforcement to make
sure nothing peels off. And you can use the mod podge or the acrylic matte gel mediums
either will work perfectly. I like using my finger to
smear the glue on the top of the stickers just for a smooth effect and to make
sure the sticker stay down. Since we started
on the stickers, it's a natural
transition to collaging. I said you can collage
anything and I mean it paper stickers, etc. And with this tin, I'm building my collage right onto
the top of the tin. Again, I will reinforce
with the mod podge. You can also build your
collages separately, working on a small piece of paper pre cut to the
size of the lid, and then using other papers, stickers and Posca paint pens. You can decorate the piece
of paper and then apply the mini collage onto
the top of the tin. We've been coding in. Other elements can also be applied onto the mini collages. Just to reiterate some of
the discussions about glow. The collages can be glued
right onto the surface of the tins with or without
gestural foundation. Feel free to use
the hot glue gun, the acrylic medium,
or the mod podge, whatever you have or
whatever your preferences. And the glue dries
clear so you don't have to worry about it showing up
after the project is dry. I like a coat of the glue
on the top surface of the mini collage as well to
keep the paper protected. I also like getting
my hands in there and smearing the glue
smoothly with my finger. Make sure to get enough
glue on the edges as well so they don't
peel up over time. Remember, these tins
may be in backpacks, purses, pockets, and there
will be some wear and tear. So you wanted as well
sealed as possible. Now that we've
completed the top and bottom of the
exterior of the tin. Let's take a look at the sides. If you want to leave
the size of your tins blank the way it came,
that's totally fine. Some tins came pre painted
in some pretty nice colors. So you might want to
leave them as is to, if you do decide to decorate
the sides of your tin, they're really some fun
ways to make them pop. Next up, we will tackle decorating the
sides of the tints. You can use washi tape, ribbons or other trimmings. And the P touch label
maker can be used as well.
5. The Exterior: Sides: Now that we've
completed the top and bottom of the
exterior of the tin. Let's take a look at the sides, grab some washi tape, ribbon according even your p.sit touch label
maker will work. Make sure the top
and bottom are dry. Before we get started
on the sides, you can always leave the
size of your chin blank. But if you want to take
that extra step and add some decoration,
that's great too. Let's begin with washi tape. Washi tape comes in many styles, textures, patterns, and widths. For this tin, I am using a matching gold tape that
happens to be on the thin side. This is helpful because it won't interfere with the
hinges on the bat. I start at the back, make my way around, smoothing it down along the way, then wrap around
to the back side. I like to use a
dab of glue where the tape closes to
ensure it stays down. For the Valentine box, I will use tape with hearts. In this case, you can
see the tape is a bit wider and so it will
interfere with the hinge. Here's a workaround for that. I will start the tape to
one side of the hinge, then wrap around and end on the other outside
edge of the hinge. Leaving the back blank. Then I will place a
smaller piece of tape in the backside blank spot and use my exacto knife to make sure the tape gets tucked
under the hinge. And you can see that teeny
piece of heart tape that I'm cutting away from the hinge
with my exacto knife. I will also add dabs of glue to make sure
everything stays put. In the case with the
wider star tape, I will actually trim it a bit
with my exact dough knife. There are so many colorful
tapes to choose from. When the tape is fatter and might get overlapped
by the lid of the tint. I will put some glue
all the way around so that every time the
tin opens and closes, it's not shredding the tape. Ribbon, lace, cording. They're all great options
for around the sides. A measure the piece, then systematically
start at the front and make my way evenly
around to the back. I'm going to attach this decorative coatings slash
ribbon with the hot glue gun because I do think
ACLU works well with Hardy or materials
such as this. I will reinforce
with the glue and push down with a
pencil or a stick. Remember, hot glue is hot. Lastly, let's check
out the P touch, which is a great solution if you don't have other
elements around. Many P touch machines have
decorative tape functions, and this is exactly what
I did for this tin. I just made sure to
print a ten inch piece. Now that the exterior of
your box is complete, it's time to move
on to the interior. Please take pictures
of your outside and share and let me know what
worked and didn't work. Share pictures of
your projects top, bottom, and sides in
the project section. And if you have some good
ideas or suggestions, wanted to open a discussion, I'd love to hear what
you're thinking. Next up, the interior
part of this project, we're going to look at the
interior top and bottom. You're going to need paper
and glue or Felton glue. And if you have some
other fabrics you want to bring along, please do so.
6. The Interior: Top & Bottom: Hello and welcome to the Interior Design
portion of this class. When I talk about the interior, I'm talking about the
inside of the lid, the inside of the bottom. And if you want ways to make
partitions inside your tin, partitions are useful
if you want to divide up the real
estate inside your tin. This is great for
pills, medicines, jewelry, fishing
gear, anything small. You can also leave this space
open without partitions. And that works great
for a lot of uses. Two will be working
with paper and glue as well as felt and glue. Or if you have felt that has adhesive on the back,
that works too. Let's start with the paper. I'm using wrapping
paper here and we'll do my tracing on the
backside of the paper. Once I have traced, I will cut on the inside
of the lines to make the size a tad bit smaller so it fits nicely in
the bottom of the tin. You can always trim
the paper a bit to make it a better
fit when necessary. But once I know it's a good fit, I may cut a few of the same
paper in case I want to repeat that paper pattern
on various parts of my ten. You can use any glue to attach the paper
to the inside lid. But I do like a hot glue gun. It's really easy
to mess free and I just need a couple of dots
to secure that paper. One pleasing aesthetic I like
to incorporate is matching the interior lid paper to
the exterior bottom paper. I think this adds
a polished look and a continuity to the project. The traveling paint set, I cut a piece of watercolor paper the size
of the interior lid, then drew some lines that
match the palate grid of the paint compartments and painted the paper to
match the palette. This works great for a
guide on the inside lid, which is useful
with watercolors. Let's move on to felt. Now. I won't use felt on
the inside lives because it'll be too thick and the tin won't be able
to close all the way. That's the same. To consider when you're
putting the glue dots down. You want to keep them in
the center area and not on the edge so that not too thick where the
chin needs to close. As I mentioned,
there's felt that comes with a sticky
adhesive backing. And then playing felt
with no adhesive. Both can work. The red has the adhesive and so I will just trace my tin shape on the backside with the paper protection and
then cut out my shape. I will make sure it fits nicely and trim
anything if needed. Then I will stick it down. I will peel back to
corners, place them down, and then slowly
roll out the paper, always pushing the red
felt down into place. So I don't get bumps or bubbles. It's the same process for
the felt without adhesive, except you will have
to lay down some glue. And it can be any glue. But I do like the hot glue
gun for this to remember, the glue can be very warm
even through the felt. Felt gives the tin of cozy interior, almost
like carpeting. And you can find felt
in many fun colors. And in fact, there are other fabrics and
materials that can be used which would add a nice element to the interior
design of your tin. It's time to get started on
those partitions if you want. In the next lesson, we will tackle partitions, which I also call compartments. For this part, you will need at least one of the following. Paper or felt and glue. Foam rollers or something similar can be
very useful to us.
7. The Interior: Partitions & Compartments: It's time to get started on
those partitions if you want. I love partitions
and found a variety of ways to go about
breaking up that space. You can use felt paper, foam rollers with felt. You can even purchase affordable pre-made
plastic inserts. And I'm going to share
that source with you. Let's start with
the felt partition. By using felt, we can break the rectangle space into
at least two areas. This can be useful if you are dividing up any
sort of supplies. When you cut the main flooring, make sure to cut another
piece the same width. This piece will be
folded like a tab. The two tails or ends
will stick down to the bottom and the middle
section we'll stick to itself. Makes sure that the folded
divider piece is not taller than half an inch or whatever the height
of your tin is, that it can close without
pushing the divider down. Let's work with
paper dividers now, when using paper to
make the dividers, I suggest a hardier, thick paper that will be a
bit stiffer and stronger. Print the guide I've provided
in the resources section, the PDF document is called
Altered tins paper partitions template and the size I provided works best for the
larger Altoid tin, I have two styles. One for the vertical layout
shown with the red paper, and one is the horizontal
layout shown in blue paper. Start by cutting
out the templates. Cut out the White
Paper templates using the solid lines as guides. The dotted lines will
be for the folds. Next, use the paper templates
to trace onto the paper. You're going to use
as the partitions, trace and then cut
them out carefully. You will be using
the white paper is a folding guide against
the colored paper. I suggest folding them in half first because that's
not a tricky fold. Then fold the tabs up. Then fold decreases where the middle partitions
will fold and stick up. Use your finger and
fingernail to press increase along the dotted
line. Then fold. Reinforce your folds. You can glue the middle
part together if you want. It may not be totally necessary. The paper will stay upright and in place without the glue. Do the same for the
other template version. Start with the fold in half. Then you take your
partition inserts and pop them into
your attendance. You can glue the tabs
to the inside sides of the ten and glue down the
bottom two, if you like. There is an even simpler
paper divider that doesn't use the template
or any side tabs. And it is similar to the
felt tab we started with, cut out two of the pieces of paper that will fit in
the bottom of the tin. Lay down the first one. The second one, you will
fold in half and then making sure to pay attention
to the height of your tin. Make more creases to
create that divider. You can use a clip to paste the middle divider together
and hold it in place. Then glue and paste
down in place. Now onto the foam
rollers and felt a little technique
I came up with to provide a safe
place for jewelry, like earrings and rings. In this example, I have
three roles and they work well to keep small
earrings in place. Hoop earrings or
rings work well, but you just have
to keep in mind that the bigger
the hoop or ring, the circumference
may be taller than the tin and then the
lid won't close. But if the gem on
your ring is too big, you can simply keep
it in place and the other flat area
of the tend to, this is great for
flatter earrings. This is also a good way to keep necklaces from tangling up. You just place the decorative
part of the necklace between the foam roles and
the chain can go to the side. I have three roles, but two would work well also by using the foam
part of foam hair rollers, you can make a little
cushion for your things. You can also use the
longer hair twist rollers and cut them down to size. They happen to be the
exact measurement to fit vertically into the tin, measure the width, and then cut a strip of felt that wide. In this case, it's about
two and a quarter inches. You will have to see how long
the strip is so that when it rolls around the
foam, it closes nicely. At the scene where the pieces
of felt come together, close it with hot glue. Once it has dried,
you can decide how you want to lay
it down in your tin. I had three along one side, but you could place one in the
middle or two to one side. With the longer form, you can make a piece
that lies horizontally. Cut and trim to size. Lay it against the felt to measure and cut the piece
of felt that will wrap around glue and place in your ten. Once you've decided
where you're putting it, attach it with hot glue. While I was figuring
out different ways to make partitions
and compartments. And my tin did some research
on Etsy and came across great company fabrication,
factory co.com. And they sell these
amazing inserts in all sorts of colors, all sorts of ways of
dividing up the space. I love this paint
palettes perfect for me. One thing about making your own watercolor travel kit is that you can pick
the colors you want. There's 11 slots. So I picked 11 colors. You can repeat or leave
some blank if you want. If you've used watercolors, you know, you don't need a lot, a little bit of watercolor, and a little bit of water
goes a really long way. If you're in America
and have access to Etsy or fabrication, factory code.com, specifically
seven stars products. I highly recommend
ordering some. They're very affordable
and they're really clever. They're well-made. You pop them in. And it's just a
great added bonus. Tell them, Zoe from
Skillshare sent you.
8. Close the Lid: Now that you've completely altered your Altoid
tin or any tin, the top, the bottom, the sides, the inside top, the inside bottom
partitions if you want it, it's time to share. I can't wait to see
the clever ways I know you came up with
to alter your tin. I would also love
to hear from you. So please share a review in the review section
of this class. Leaving teacher reviews is so helpful for us
Skillshare teachers. That way we know
how to improve or what's working best
for our students. So please take a minute
and do that for me. I'd really love to hear from
you and until next time. Stay fresh.
 Zoe Balsam Biggs, Memory Quilts & Other Fun Art Stuff