Transcripts
1. What to expect: Hello there and welcome
into my studio. In today's class, we're
going to be talking all about creating and marketing
fine art collections. If you're a hobbyist who's ready to become a
professional artist, or if you've been practicing and selling art for many years, creating a collection is a great way to hone
your skills and be able to market your work to your audience in a really
fun and interesting way. But first, who am I? My name is Shivani and I'm a naturalist gouache artist based in the sunny city of Chennai,
in the south of India. I've been painting
predominantly with gouache for over three years now, and I recently created and marketed my very first
collection of paintings. The collection had 21 pieces of original artwork and the theme of the collection
was The Rain Tree. I'm going to be telling you
a little bit more about my own collection as we
go through this class. But not just that,
I'm also going to guide you to create a
collection of your own. Like I mentioned, if you're a hobbyist ready to turn
professional with your art, a collection could
be a great place for you to get
started because it helps you build a
really holistic body of work and develop your style. And if you're an artist who has been creating collections
for a long time, this class is still good for
you because I'm going to take you through much more than just creating
the collection. I'm also going to give you important pointers in every other aspect of
creating collections, right from marketing your work, once it's ready to creating interesting lead magnets
in advance to get your collectors interested
early to creating a really effective website
to sell to your collectors. I'll also share with you some pointers on
packaging your work, pricing your work, all of it. So at the end,
you're going to be completely ready to release
your first collection, or your tenth collection, out into the world in a way
that you're really proud of. We'll also work on
a mini collection together as a part of
the class project, but I'm going to tell you
a little bit more about that in the next lesson.
So I'll see you then.
2. Here's what you'll create: As we go through the different
lessons in this class, I'm going to be
telling you all about the different steps that I take to develop a
collection. Right from finding inspiration
for your work, to coming up with a final theme that you
want to work with. We'll also talk
about how you can create a mood board
for the collection, after which you can create rough sketches and
your final work. Also, this class is really
not limited to painters. Even if you do
sculpting or anything else that falls into the
discipline of art as a whole, you can definitely put out your work in the form
of a collection. As the class project,
I want us to work together to come up with all
of these different things. A theme, a mood board, and finally, a mini collection. The mini collection can
be about three paintings, but if you want to do more, please feel free to do more. It's completely up to you. Also, keep in mind that the purpose of this
class is to teach you how to create a collection and how to
market the collection. We're not going to go over the details of creating
the actual paintings. This is not going to be a
painting tutorial class. I want you to be able to
create a collection that is completely your own
for the final project. Each of us are going to
be completely different. I'm going to take
you through how I create my collection
and you can follow the same steps and
framework to create a collection of your own that is completely of your own style. In the next lesson,
let's talk a little bit more about the materials
that you're going to need. There's a link in the description
where you can download a class workbook that's
going to be really helpful as you go through all
the lessons in this class. Go download that and I'll
see you in the next lesson.
3. What you'll need: Through this class, I'm
going to be sharing a lot of valuable
information with you. I would suggest having a
notebook handy so that you can jot down any of the information that
you'd like to save. This will also help you retain the information
a lot better. You'd also need a laptop handy because we're going to
use some softwares to create a mood board or look for inspiration. And for
the final project you can keep all the
materials and tools that you'd need for your own
art medium of choice. I'm leaving it completely
free to you. You can create it using whatever medium and style
that you're comfortable with. This could be watercolor,
gouache, acrylics, or even something
like pen and ink or pencil sketching.
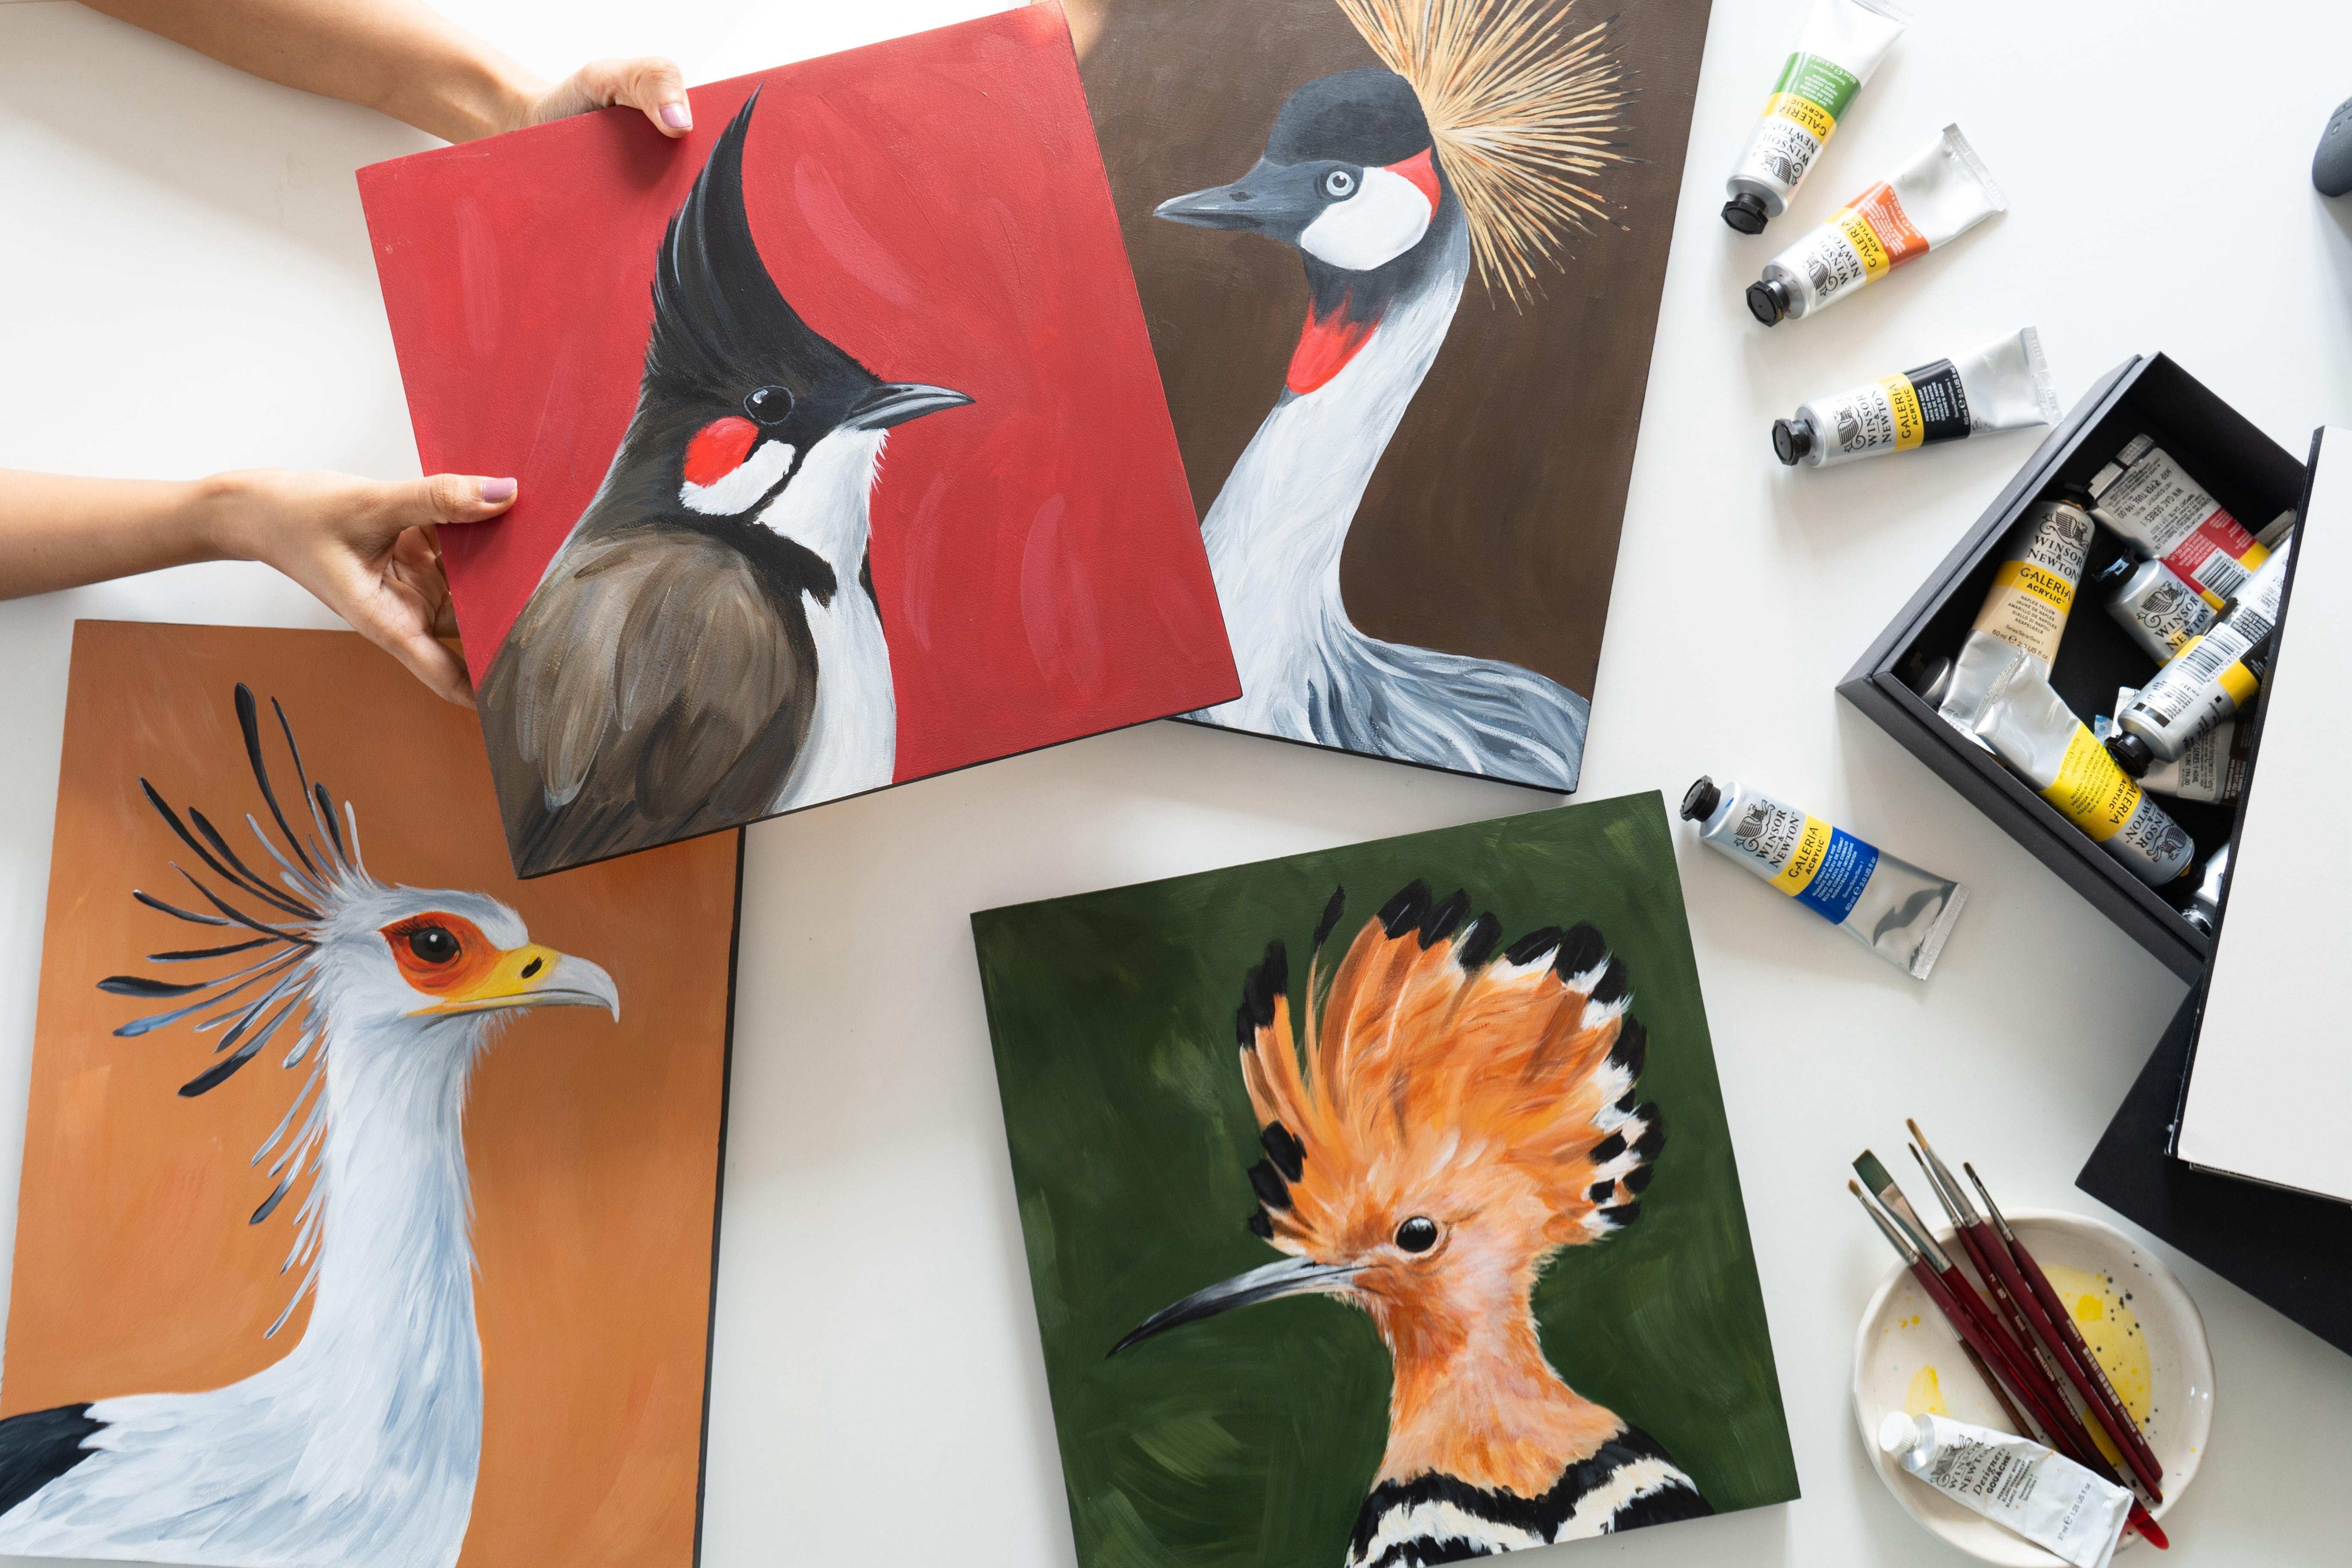
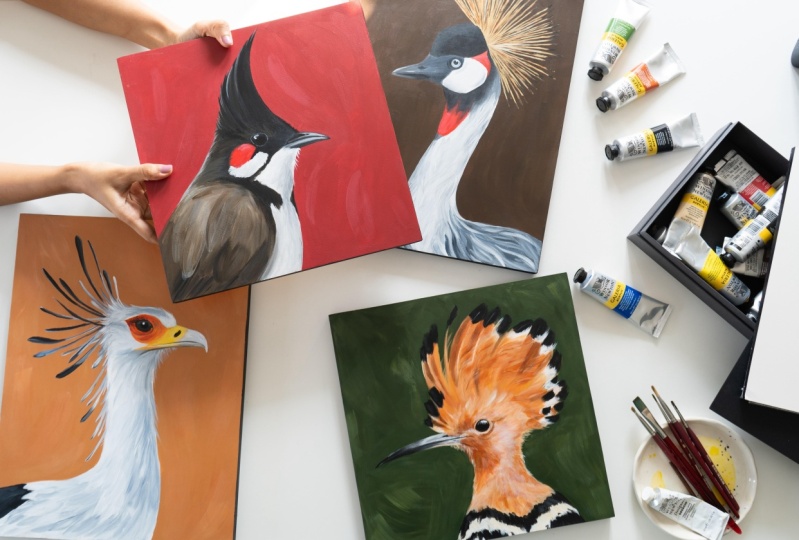
For my own project through this class, which I'll be using to demonstrate to you, I'm going to create
a mini collection of three acrylic paintings
on wood panels. Before we start diving into
creating the collection, let's start understanding what a collection is a little deeper. I'll see you in the next lesson where we're going to
discuss just that.
4. What is a collection?: What is a collection? A collection is usually the term given to a group of artworks of any kind that fall under some common theme or
inspiration, or mood. Collections are very
common in the world of fashion or even in the world
of surface pattern design. But even as a fine artist, it can be very useful to work
in terms of collections. There are a few different
things that could potentially tie your work
together form of a collection. This could be some commonalities
in the inspiration behind the collection or the style in which
you've painted them. It could be the
colors that you use. It could be your
own unique voice and message that you bring
into the collection, or it could even be the subject. Most often, it is a combination of a bunch of these things. Let's take my own
previous collection that I mentioned as an example. The collection was
titled The Rain Tree, and it was inspired by a very
specific moment in my life. The link to the landing
page of my collection is in the description in case you'd like to read the entire story, but I'm not going to get
into that right now. The main thing is that
it was inspired by a specific tree and a specific moment where that
tree was a part of my life. It was because of that tree and that experience that my
obsession with birds began. And now I paint almost exclusively birds because that's how much I love the subject. So like I said,
the collection was a combination of all
these different factors. There was, of course,
the inspiration that I brought into
the collection, which was the rain tree itself. Then there were the colors
that I used because of the species that I was
painting in that collection. Then of course, I brought my own unique style and my own voice and message
into the collection. I wanted to communicate the conversations between these different
birds in that tree. And the way in which
I brought that into the paintings was
uniquely my own voice and my own style of painting
which comes through in my brushwork and the way I compose the different
elements in my paintings. And then of course, there
is my core subject itself, which was these birds. So you'll also find that when you're
creating a collection, it's going to be a
combination of things that tie those together
as a collection. So there could be something in your own life or something
that you came across, or even a color palette
that inspired you. And you might bring that
through and communicate it in the form of vibrant
landscapes, for example. It comes through in the subject
that you paint as well. And every artist has their
own unique way of painting, which is something that ends up tying our entire body
of work together. Let's look at a few
examples of artists I admire and their collections so that we can look at
some of the commonalities. The first one is the
Horizons Collection by Emily Jeffords. I absolutely love her work. She usually paints the
really beautiful landscapes that have these very
swooping strokes, and that's her own style
that she brings in. When you look at this
collection specifically, you can see that there
are very specific colors that stand out across the
different pieces of work. There's also this
very specific way that she's painted the sky, which seems to be
a common thread across the entire collection. And when you place all
these pieces together, they look like they
belong together, which is another important
aspect of a collection. Then we've got Katherine Corden. I absolutely love her expressive and
minimalist way of painting, human portraits
and human figures. In this collection
called Beach Portraits, you can again see that there are a lot of commonalities
in the color palette. Even though she's used
a lot of bright tones, they are very warm tones. You hardly see many cool tones being used across
this collection. You can even see in
the way that she's treated the cooler
colors, like the blues, there is an underpainting of a warmer beige or ocher color
which is coming through the blue and it's
keeping that warmth across the painting intact.
And with the subject itself there's a lot of this
relationship between adult and child that's coming through across
the entire collection. Then we've got Tanya Val, who is an abstract painter in this collection
called Seaside. She's beautifully
used earth pigments and also seashell pigments. Again, she's brought in these
very swooping strokes that do give that feeling of
the frothiness of the sea. And you can see that she's used those strokes across the
different pieces of work. They end up tying the
collection together as a whole. There's also overlap
in the colors, the textures, and the technique that's
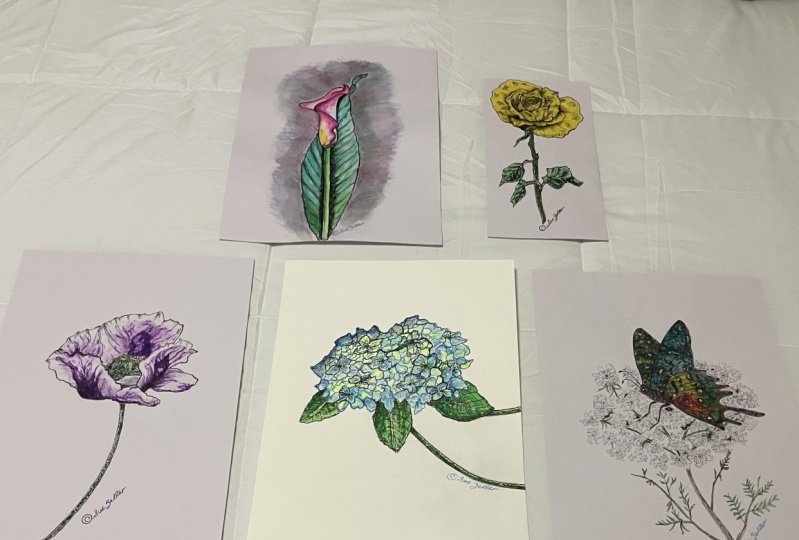
been used across it. Then we've got
Shealeen Louise with this really beautiful collection
of watercolor florals. She always paints a lot of
beautiful watercolor florals, but this collection
specifically has a very interesting story that's being told
through the florals. There is a lot of sharp detail, which is something that I think she's really
good at doing. But then she's also got these
very blurred out edges and this blurry background going on behind all of the
detailed florals. That brings a level of
interest to this collection. And again, it ties the
collection together as a whole. Finally, let's look at my collection that I mentioned
called The Rain Tree. I explained to you
the story behind the collection and
how I approached it. And if you're interested
in knowing more, the link is in the
description and you can check out the entire story
that I wrote about it. You'll find that
most artists have a really personal story behind the collections
that they create. That's just the nature
of our business. We are very emotional beings and we create art
from our souls. There's usually something that's really pulling you towards it, or some story that's waiting
to be born through you. It's important to pay
attention to that, and that's something we're
going to be talking about in a future lesson about
inspiration. For now, let's talk more
about collections.
5. Collection Vs Portfolio : What’s the difference?: A common question is, how is a collection
different from a portfolio? Think
of it this way. A collection, like I said, is a series of artworks that go together in
some common theme. Creating a collection with
multiple paintings is a really good way to bring
a certain idea to life. It's also a great way to
build up your body of work. The purpose of the
collection could be to make sales directly to your
collectors or through galleries. But the main thing
is that you want to display your work and you
want to make sales from them. Portfolio, however, is more like your entire body of work group
together in some format. Your portfolio is a great way to showcase exactly who
you are as an artist. This could be in the form of multiple different
collections being showcased in your portfolio. It could even include
some standalone pieces, which need not be
part of a collection, or even other kinds of
work that you've done. For example, commissions. All of it could be included
under one common roof, which is your portfolio. A portfolio could be useful to showcase your work
to art schools, or maybe art curators
to secure a show. Or it could be even
useful to showcase to collectors to secure a
commissioned project after that. So in today's class, we are talking strictly
about collections. We're not going to go into
too much about portfolios. But first, let's discuss why you should work
in a collection.
6. Why work in collections? : A collection is a
very common way of working in the
world of fashion, and also in the world of
surface pattern design. But even for fine artists, it could be really beneficial
to work in collections. Firstly, as a beginner artist, a collection could
be a great way to build up a holistic
body of work. If you're anything like me, your first few years
of creating art might include work that's
all over the place. You might be creating
a little of this, a little of that. You might be at a point
where you're still figuring out exactly which
path you want to take. While that is completely
fine and you can still continue figuring
out what you want to do, It's useful for you to be able to showcase multiple pieces of work that display what your
artistic style and voice is. This could help
you, for example, on social media
where you're trying to attract an audience who
connect with your work. If somebody visits your
Instagram profile and they see a bunch of work that
looks completely unrelated, it's unlikely that they
are going to press the follow button
because they're just not sure what
to expect from you. However, if you have
multiple pieces of work that are
able to demonstrate exactly what kind of
subjects you're drawn towards or your style
of painting is, it's more likely that
an audience that connects with that is going
to find you and follow you. Another thing is that for me as a creative entrepreneur who has multiple aspects
to my business, I found that creating a collection was a great
way to channel my energy. What I mean by that is I have multiple different sources of content creation and of bringing in income
to my business. When you're running
a creative business, it's very easy to
get caught up with all the different tasks on
your plate each and every day. And not be able to make enough
time for your art itself. But putting aside
the time to really focus and create a collection
allows you to do that. Creating a collection gave me some focused time where I could just paint and
worry about nothing else. That was the main project on my plate for that
duration of time. So I could completely focus on it and not have to worry about too much else. Before we get started on actually
creating a collection, It's important for us to be able to understand ourselves a little better as artists and
define our own art style. Let's discuss that
in the next lesson.
7. Defining your art style: Before you start creating
your first art collection, it's very important
for you to be able to generally define
your own art style. When I say that, I don't
mean that you need to box yourself in with any
particular style or subject, or limit yourself in any way. That's not what I mean at all. But when you start painting in the form of a collection
collectors and your audience need to be able to start recognizing those
paintings as yours. That happens when you have some understanding
of what your own art style is. You might be attracted a variety of different
styles and subjects. And like I said, when somebody visits your
Instagram profile, it's possible that your art at the moment is a little
all over the place. It could be that you're trying your hands at
watercolor florals, but also some landscapes, and also maybe some portraits. And you could be doing these in a variety of different
mediums and styles, but it's very difficult for collectors then to be able to identify
that work as yours. Creating a collection
is going to give you an opportunity
to clarify for yourself who you are as an artist and what kind of
path you want to go down. Like I said, I don't want you to feel boxed in at all because your art style is
something that's going to keep evolving as you
grow and develop as an artist. So don't feel like this is
limiting you at all. It's just going to give you
an understanding of who you are right now and what
you can bring into your art. Assuming that your art is a
little all over the place, what do you do in that case? A good place to start is to begin observing what kind of
art you're drawn towards, also what kind of
art you create. Chances are there are going
to be a few overlaps, and this is how I started thinking about this
for myself as well. A good activity is to create a Pinterest board and save whatever you feel
like into that board. This could be a mix of
some of your own art, it could be art
from other artists you're inspired by. Maybe
a few color palettes that you come across
on Pinterest, and you can save this
all in one place, then observe it from a distance. Try to notice the commonalities. You're probably going
to be drawn towards a specific kind of color palette or a
specific kind of subject, or a specific kind of painting,
like impressionist art. Spend some time noticing that. An important thing to go over at this stage is to make sure that you're not copying
from other artists. When we are beginners,
one of the reasons why our art doesn't tend to
feel like our own art, and it feels a little all
over the place is because we are taking tutorials and copying the art
of other artists. While this is perfectly
fine as a beginner, this is not what we
want to do when we are creating commercial work
to sell to our collectors. It's completely okay to take inspiration from other
artists but not copy. And how do you differentiate
those two things? When you're inspired by
somebody's work of art, it's not necessary
that you just recreate that art exactly like it
is. That's called copying. Inspiration is more like
you are inspired by their color palette or the brush strokes
that they're using, or maybe even the way that they are portraying
the subject that they see. That could be something that
you try to learn just by observing and then you put
aside that work of art. Don't keep it in front of
you while you're painting, and just try to
make it your own. This is typically how most
great artists are born. Nothing is 100% original
and that's completely fine. But it is 100%
original in the sense that we all create our own
unique concoction of things. We probably look at colors
from nature somewhere. And then we look at the style of painting of a particular artist. And then we look at the style of storytelling of a
writer, for example. And we bring in our own
unique combination of art with all of these disconnected
inspirations that come from all over the place. The way we communicate that into our art is what makes
our art unique. Have that confidence that you're going to be able to do that as well and be inspired without
copying. On that note, I have an important tip for you. One thing that
helped me a lot when I was ready to start
creating my collection, but I was feeling
a little unsure about what kind of style
I wanted to paint it in. I started by keeping a
sketchbook for one month. I practiced in my sketchbook
every single day. I knew I wanted to paint birds. I just looked at
pictures of birds without looking at art of birds because I didn't want to copy another artist's way of
communicating the subject. I just looked at different
pictures of birds. Some pictures that
I clicked myself and I started sketching in
my sketchbook regularly. Sometimes it wasn't even birds, sometimes I was just
painting random subjects. But this practice of
showing up in my sketchbook every single day helped me get an understanding of what I was particularly drawn towards. When you repeatedly
do something, you're going to see that
you're going to reject a few things and you're going to accept a few things more. You are going to see some
themes emerge for yourself, and chances are that's going to come through
in your collection. Now let's talk more about how to find and use inspiration
for your work. As you think about your
art style and as you explore other aspects of
creating your collection. I'd like to remind
you to download my free workbook through the
link in the description, because it's going to
give you a lot of space to brainstorm all
of these ideas.
8. Finding and Using Inspiration: As the author, Julia Cameron rightly points out in her book, The Artist's Way, it's very important for you to keep
filling your own cup. By that I mean that
it's important to constantly keep your eyes open and expose yourself to new things and
new experiences. Because all of that is
going to fuel your work. You don't need to
necessarily step out of your house and go
hunting for inspiration, because inspiration is
usually all around us. All we need to do
is pay attention. Make sure that you're
taking some time for yourself to do the
things that you enjoy doing. Be that watching
certain kinds of movies or listening to certain
music, reading certain books. Because inspiration can come
from just about anywhere. What do you do when inspiration
strikes you randomly? That's usually what happens. Inspiration tends to strike
us when we least expect it. What I find useful in that case is to keep
an inspiration bank. I use a tool called
Notion to do this, but you could do
this in any notebook or whatever is
comfortable for you. Whenever you think of an idea or see something interesting, make sure that you
take note of it. I also use Instagram to save pictures of
birds into a folder. That way, whenever I
want to paint birds, I can always go to that folder and find something interesting. Maintain an Inspiration Bank in whatever way is easy for you. Whenever you're ready to
paint or create something, pull up this inspiration bank and you're going to get
something to draw from it. Sometimes it's going to
feel like inspiration has suddenly struck and something desperately wants
to flow out of you. It's important to take note of that and pay attention
to those feelings. That's what recently happened for me and that's going to be the basis of the mini collection that I'm painting
for this class. To tell you a little
bit more about that, I recently decided
that I would try out acrylic paints for
the very first time. The medium was completely new to me and I really didn't
know what to expect, but I was very keen
to try it out. So I bought a canvas and I was painting on a canvas
after a really long time. And I just looked up bird
portraits on Pinterest, I found a really
interesting image that I decided to use as inspiration, and I painted a
portrait of a Pelican. Now, while I found
acrylic a really difficult medium to use
because I'm so used to gouache, I was quite pleasantly
surprised with the results. And that made me intrigued to try it out a little further. This time, I wanted to try
something slightly different. So I bought a wood panel, and I decided to do a
bird portrait on that. Simultaneously, on a
recent hill vacation, I had spotted a bird
which is a Common Hoopoe. It has this beautiful
crown of feathers. And I was taken in by that bird. That was the bird that
I decided to paint. And that's the painting that
you see behind me right now. I just spent an entire
weekend painting that because I got so
excited by the process. Now, that inspired me to create a mini collection
of bird portraits, all of which are going to have really interesting crowns
or crests on the birds, which is what
you're going to see me painting through this class. That's exactly what I mean. One thing led to
another, led to another. Finally, I had an inspiration
for my next collection. I also thought about
what I would call this. To do that, I actually
took Chat GPT's help. I knew that the subject
of my paintings was going to be
these crowned birds. I was thinking of
something along the lines of royalty or crowns, or I don't know,
something regal. And I asked chat GPT for help. And using its help I got
a few different ideas and I came up with the name Crowning Glory for
this collection. This is a great example of organic inspiration where I wasn't really looking
to create something, but I just paid attention to things that I was
getting drawn towards. And that gave me an
idea. So that's very organic. But sometimes you may have the idea to paint a collection. You might start with the idea that you want to
paint a collection and then you might go looking for inspiration for
that collection. That's a more planned
approach to inspiration. That's what I did for my
collection, titled The Rain Tree. I decided that I wanted
to create a collection. I spent some time
thinking about it, and then I drew on
this experience that I had of the rain tree
to create that collection. Whenever you're experiencing
things in life, just slow down, take note of it. Be sure to absorb
in those feelings. I know it sounds a little vague, but these are the kind
of experiences that we as creatives really have
the ability to tap into, and we need to make use of that. At the end of this lesson, I challenge you to think of your own inspiration and or
theme for your collection. You can either just
have an inspiration or you can have an inspiration
which is more like a subject. And then you can name
a theme based on that, which is what I did. Once you have an idea of
what you want to create, head to the project tab below. And create a project. And let us know what theme or inspiration that
you've come up with. As we go through the
next few lessons, we'll be creating a mood
board for the theme and then some rough sketches and
then the final artworks. You can keep uploading all of those into the same
project that you create. Now go ahead, create
that project. I can't wait to see it. And I'll see you in the next lesson.
9. Exercise : Create a Mood Board: Before I go into creating the
sketches for my collection, I like to create a mood board. A mood board gives me
a really good sense of direction as to where I want
to take this collection. A mood board can be
whatever you want it to be. It could be a collection of
images that inspire you. It could include keywords, it could include color swatches. I typically like to do a
mix of all of those things. Two softwares that I find
really useful when I'm creating moodboards are Pinterest
and Milanote. On Pinterest You could just
create a board and save a bunch of images that
inspire you over there. Milanote, on
the other hand, is useful if you want to create something
that's more like a collage of all the different
things that inspire you. Today I'll give you
a quick demo of how I use Milanote to
create my mode board. What you see on the screen
here is the mode board that I had created on Milanote
for my raintree collection. Here I added in a few different images
that were inspired by botanical naturalist
illustrations because that was one of the stylistic
inspirations for me. I also added in a few images that just
conveyed the subject, which is birds, and I added in a picture of raintree flower. Then I just have this one image which is technically a soap. But I just added it in
because I really liked the color palette and this
natural look that it had. Then I added in a few
lines of text that conveyed my mood or inspiration
behind the collection for me. That's very personal. I added a few color
swatches that I wanted to come through
through this collection. Let's do something similar
for the new collection. I'm just going to add
in a new board here and I'm going to name it
my collection name, which is Crowning Glory. You can use a template
on Milanote. There are a bunch of
different templates. If it's helpful,
you could do that. But I'm just going to
stick with an empty board. You can use this button
here to add images, and you can even look for stock images here.
In this collection, like I said, I'm mainly
featuring birds that have really interesting crowns
or crests on their head. I have an idea of the different species that I want to feature in
this collection. I'm looking for images of those particular species
and I can add those in. You can also separately look for images if
you're not finding what you need on the images being
provided within Milanote. I've found an image
that I like here. I'm just going to copy it
and paste it into my board. Now I've got all of my different potential
species to use. These are the ones that
I have in mind that I could possibly use
across the collection. I've yet to decide on which
ones I actually want to use. I'll probably take
a call on that once I do my rough sketches, but for now I'm just capturing these images with
the name of the species. I can also resize different
images if I'd like to, then I'm going to use
this color swatch option. I'll drag in a few swatches. Even these can be resized
if you'd like to, you can then select a color. I'm going to select colors
from the species themselves. I'm trying to pick out a
few colors that would be featured across the
entire collection so that it goes together, as one. Of course, I'm painting specific species so I need to go by the colors
that are on that species. But this just gives
me an idea of a few different colors that I could highlight across
the collection. It ties the collection
together as one, not just in the actual paintings. But I may want to highlight these colors in my marketing
materials later on. This just gives me some
direction on that. This could also help me decide what background colors I'd like to use behind these birds. I'll then drag in a few
text boxes where I may want to add a few keywords
or just a few lines of text that convey exactly
what's inspiring me to create this collection. Across the different birds that
I'm planning to paint in this collection, I selected a few colors or color groups
that are standing out to me. There's the tan,
there's a bright red, there's gray, and there's dark gray or an
almost black color. Now on the side here, I'm also selecting a few background colors
that I could work with. For example, this foresty
green that I've got. I want something that's a bit
more in the brown family. Of course, you don't
necessarily need to select the colors only from the
images that you've chosen. You could use any hex code that you like and you
could feature that. I'm happy with this
as my mood board. And my mood board is going
to be something that I keep referring to as I
paint this collection. Sometimes I even just keep
it in front of me so that I don't lose sight of what I set out to create
in the first place. And like everything else,
it's perfectly fine if you change your
mind about something, you can always come
back and edit this. Nothing is set in stone, so don't worry about
being perfect. Just try to put your
current ideas and thoughts into a moodboard
so that you have a place where you can
refer to all of it. Now that you have
your moodboard ready, you can download it
and upload it into the project gallery so that
I can have a look at it. I'll see you in the next lesson.
10. Designing your collection: A lot of artists approach
this step very intuitively. I, on the other hand, like to have a bit of a plan, so I know exactly what
direction I'm taking. You can choose which
way you want to work based on what works
for your personality. There are, of course, no rules. I consider myself
not just an artist, but also a designer. When I'm creating something
like a collection, I like to have a bit
of structure and a brief plan as to how
I'm going to go about it. I like to think about the composition of the
individual pieces, of course, but also how they're going to work
together as a collection. I also feel like setting certain constraints on how you're going to work
through a collection, helps you be more creative with it so that
you're not taking small decisions at every step of the way that's
hindering your progress. If you know in advance exactly how you want
to approach things, then that just makes your
process a lot more smooth. A great example of this is when I created my in collection, I knew there were going to
be about 20 paintings in the series and I knew there were about ten species that
I wanted to feature. I then thought
about how exactly I want to bring those species
to life in this collection. The first is I wanted to
do a set of paintings where I was just purely featuring the species
and nothing else. I wanted the species alone to
have all of the limelight. I then wanted to have a
series of compositions where these species are interacting with each
other in interesting ways. I wanted to showcase all of the communication that happens between all these
different species as they live in that ecosystem. I also decided that the individual species would be featured in eight
by ten paintings, and the compositions
would be in nine by 12. I visualized the
collection as a whole, and then I also decided to
add two portraits into it. This is a great time to think about the size of
your paintings, the density that you
want them to have, possibly the number of pieces across your
entire collection. Think of the
collection as a whole, because the whole is greater
than the sum of its parts. You want these to
work really well together when you showcase
them as a collection. Also, at this stage,
I want to tell you that none of this
is set in stone. We're just taking a few
decisions and placing a few constraints early on so that it makes our
process a lot smoother. But that doesn't
mean we should stop moving forward because
of decision paralysis. There are, of course, a lot of different options that may
be weighing on your mind. I'd suggest that you think of a simple plan and just stick
to it for the time being. You can and probably will change your mind multiple times
during this entire process. I can say that from
experience because I changed my mind many times while painting the
rain tree collection. I started off with one idea, and then as I kept doing my rough sketches and
then my final sketches, I refined it until it reached a point I was
really happy with. But none of that would
have happened if I stopped myself from moving
forward right from the get go. I urge you not to
make that mistake. I'm going to see you in the
next lesson where we'll talk a little bit about the rough
sketches for the collection. I'd like to remind you once again to click the link
in the Description, and my free workbook which is going to help you
explore all of your ideas. And there are a lot of prompts there which you can go through, you can print this workbook, or you can use it digitally and fill out all
of these sections. It's going to give you
a lot of direction as you're planning and
designing your collection.
11. Exercise : Rough Sketches: Now that we know our theme
or our inspiration or both, and we have a basic
structure and plan in place. It's a great time
to start creating some rough sketches or
some thumbnail sketches, which are just small sketches
that are very unrefined, just to give us an idea
of what our pieces are going to look like
and how they're going to come together
as a collection. This might also be a good time to start playing around with a few color compositions
and start thinking about the color balance that you'd want across your
entire collection. In my collection, I'm
going to be featuring four different species in
four different paintings. For the species themselves, I like to stay true to
the colors of the birds. So in my mood board, you did see the colors that
I pulled up from the birds. I tried to pick birds
that have a sort of consistent color palette also so that the collection
looks cohesive. But right now, what
I'm thinking about is the background color of
these four paintings. I can be flexible with
the background color. So I'm trying to think about four colors that would
complement each other well and also look different
from each other so that each painting in the
collection has a unique look. I tried out two
different variations of a color palette and whatever colors I
felt weren't working. I painted over
them, and finally, I reached a color composition that I was quite happy with, and that's what I'm going to be using for the
backgrounds of my birds.
12. Marketing a collection: When you're planning
to create a body of work to sell to your collectors, marketing becomes a very
important discussion. I'm bringing this
up even before we finish the project and before
we finish the collection, because it's important for you to start
marketing very early. Your audience is not just interested in your
finished pieces, they want to be a part of
your journey and they want to understand what it took
to get to where you got. I'd suggest taking notes at
every stage of your journey about how you're thinking and even how you're feeling
about the different pieces. At the end of the day, art is something that's
very subjective and what helps it connect to different people
is the story. It's our story and the
emotion that we put into our work that our audience
ends up connecting with. And that's what urges them to bring a piece
into their own home. They see a story in it
themselves and they end up associating certain
feelings with the paintings. It's very important
for you to be able to showcase your
own vulnerability and share all these emotions that come out as you are
creating your artworks. As an artist, marketing sometimes feels a
little sleazy to us. Feel like we don't want to come across as being too salesy, or we have these
negative associations with what that feels like. The way I like to
think of it is that my marketing is an
extension of my art itself. My audience is not going to be able to connect with my work unless I'm able to share
that story with them. That marketing and
that storytelling is a piece of art itself. Your paintings are living,
breathing entities. They are extensions
of your own self. And you need to be able to
bring their stories to life. With my Raintree collection, especially with
certain pieces in it, there were a lot of
thoughts that were coming up for me as I was
painting them. So what I did is I left
voice notes for myself as I was painting
them because I didn't want to forget those
things that I was feeling. I sent myself voice notes about those things that I was thinking through as I was painting them. And those formed the
basis of the story. I then, a few months
down the line, told my audience about that painting when it comes
to marketing your collection, here are three specific actionable tips that
I have for you. Firstly, share a lot of behind the scenes in advance.
As you're painting, as you're thinking
about your collection, keep sharing images of
your rough sketches, your incomplete paintings, little footage from the studio. All of those things are going to build anticipation in the
minds of your collectors. Secondly, share the launch
date multiple times. Once you have a timeline
in mind and you know exactly when you're going to be ready to release
the collection, make sure you announce
it immediately. You don't have to
do that as soon as you start creating
the collection. I did it when I was close
to finishing my collection. But the moment you do know when it's going to
be ready for sales, should announce that
to your audience and remind them of
it multiple times. Your audience needs
to be exposed to something multiple times until
they actually remember it. Don't be afraid or shy to keep repeating the
same information. And the third thing is to
create a lead magnet so that you're getting
email sign ups in advance. I'll talk to you
more about that in one of the bonus
lessons in this class. The class workbook
provides a lot of interesting and useful
tips that you could look at as you go about thinking about how you want to
market your collection. There's an entire
spread in the workbook dedicated to marketing ideas. And you can pick and choose what would work
for you from there. So make sure you
click the link in the description to
download this free guide.
13. Project : Creating the work: Now we've reached the
point where we're ready to start painting or
creating our collection. Until now, we've
really gone deep and understood what
exactly a collection is. We've thought about
our own collections. We've thought about how
to find inspiration, how to define our art style. And then we worked on
a mood board together. We also decided how many pieces we might want in our collection, how we're going to size them. And we have some rough
sketches that we came up with. We also discussed how to
build our collection story. And we discussed marketing
from a very early stage. Now, when it comes to the actual process of painting and creating
your collection, this part of the process
is very personal and how you choose to approach
it is completely your own. This is the truest and the most tender part of
this entire process. Until now, we allowed
inspiration to flow through us. We've done some thinking, we've allowed ourselves to generate this vision of
what we want to create. Now it's not only time to
execute on our vision, but also let go of
attachment to our vision. And I'll explain to you
exactly what I mean by that, as I'm painting my
own collection. In this video, I thought
I'd talked to you a little bit about how this
process might go for you. And before we dive deeper into the topic of flow state and
painting your collection, I'd like to remind you that
this is a good stage to really create some videos of your process. As you're painting, Just remember to set your camera or your phone
up so that you just get a few snippets from that Behind the scenes of
painting the collection, because that would be
really useful footage that you can use to
market your collection. So now let's continue talking
about it. At this stage, it's now time to enter
flow state and I'm also recording this voiceover after painting my collection. I didn't record it while I was actually painting because I was also working on my
own collection and I needed to get into
a state of flow. So at that point, I
find it very important to tune out any kind of
distractions or noise. You just want to do the things
that might energize you. You might even have some rituals that can help you at this stage. For me, when I like
to start painting, I like to just light a
scented candle in my studio. I play some music
that I really enjoy. I also like to have
a cup of coffee with me. For you, it
could be the same. Or maybe you like
listening to a podcast, or you like having
some Youtube videos of other painters running
in the background. Some people enjoy that, or maybe you just like
absolute silence. Whatever your rituals
are that help you get into that mental state
of flow and creation, I'd recommend doing
that right now, because you need to just put aside all distractions
and create your work. At this point, things might
end up slightly unexpected. And that's the beauty
of this entire process. So allow for a lack of structure. I know until now we've been talking all about
having structure, we've been talking
about planning, but now it's time to
let go of that a little bit. You need to allow
yourself to let go of any preconceived notions of what your work is going to be. Don't put that
pressure on your work. Allow yourself to create
for the sake of creation. Right now, I don't want you
to be thinking about sales, I don't want you to be
thinking about marketing. Yes, you can keep
your camera running if you'd like to record
parts of the process, but other than that, I
don't want you to be thinking about that part
of the process at all. Don't worry about sales. Don't worry about what's
going to happen next. Right now, there is no purpose. Create for creation's sake and create for your own expression. Be a little flexible at this stage, Try to work without any
rigid time constraints. Again, here, I'd
like to clarify that by this I do not
mean indefinitely procrastinate the
creation of your work because it's very easy to
go into that loop as well. That's not what I'm saying. You can tell yourself that you'd like to create
a certain number of paintings within
the week or within a couple of weeks or
whatever that is. But aside from that, allow a little freedom
in your schedule to just create every time that you're feeling
the urge to create. And once you sit down to paint, allow yourself to continue until the time that something
is flowing out of you. You don't want to interrupt that process with
something else. Try to reduce your
time constraints and have no limitations. Don't fight whatever
flows out of you just because it may not be what you
imagined that it would be. Again, going back to our vision, like I mentioned before, let go attachment to your
vision at this stage. Allow it to give you some sort of direction of where you're
going with your work. Allow it to help you create your rough sketches and maybe even like a rough color palette
that you want to work on. But just don't be
rigid about it, let go of that attachment because art isn't
bound by your vision. Art can be so much
more than that and it can expand into so
much more than that, if you allow it to. You need to give it your all. That is the input
that you can control, which is to give it
as much time, love, and attention as you can give
it so that you know that you're creating work that is the best that you
can create right now. Now as you might find that you might not like
something that you painted or you might
hit a roadblock, you might feel like you need to rethink your ideas and
that's completely fine. It is completely fine to go
back to the drawing board and rethink a few things and then come back
to your painting. You also might end with something entirely different
from what you started with. That is completely fine too. You might find
also that you need to adjust the theme
that you started with. Maybe you started
with the theme, and then once you've
actually created your work, maybe you need to modify
that theme a little bit. Maybe you need to
change that theme, because what ended up
coming out of you is slightly different from that initial idea that
you started with. That is completely fine too. Again, we don't
want to be rigid, we don't want to
follow any rules here. We are free to create whatever is ready to be
created by us right now. All of this is perfectly okay and it's perfectly
normal for it to happen. Most artists have
something like this happen to them at some
stage in the process. When I was creating my
Rain tree collection, there was so many points
at which I had to rethink my ideas that
I started off with. There were so many paintings
that I created that weren't part of my original
plan. As I was painting, I developed a new idea for a new painting and I just
had to bring it to life. That's fine. I even scrapped a few ideas that I had
after sketching them and after starting the
painting because weren't turning out in a way that I was
particularly pleased with, they weren't in line with
the rest of my collection. Through the process, I
scrapped a few paintings, I added a few
completely new ideas, and a lot of my ideas just kept changing and evolving
as I painted. That's completely fine. It's only once we
enter the process of doing it that all of these changes start happening and we can adapt and
adjust based on them. If you're being
drawn in a direction which may not be something
you even considered before, just allow that to happen
and continue creating the work. In the
downloadable PDF workbook that I've provided
with this class, you'll also find a few book
recommendations from me. These are a few of my
favorite books about the creative process and about the art of
being an artist. I think all of those
would help you really get into this mindset
of an artist. And they're just great reads. So I'd highly recommend them. If you haven't
downloaded the PDF yet, you can click the link in the description or you can go
to the class resources tab. As you're going through all
the previous exercises of your mood board and just thinking about how you want to market
your collection, it's possible that
you already had a few keywords and ideas
that you wrote out. You can draw on all of that. You can draw on all
the inspiration and the different moods that went into the creation
of this collection, that went into this entire
journey of creating it. Write out a beautiful story
that conveys how you feel about your collection and possibly what you
want it to convey. What do you want your collectors to feel when they
see this collection? Or what is the story that you want to tell them
through these pieces? Emotions and feelings do you see coming
through in your work? These are all great prompts for you to be able to work on. These are also added in the
downloadable PDF so you can work through it there.
As you go through it, write out a beautiful story
that just conveys how you feel about the collection and how you would
like to portray it. You can share all of this
in the project gallery. I expect by now you might
have already created a project. Add in your story also there because
I would love to read it. The story is also going to make a great addition
to your website once you're ready to start
selling your pieces. So make sure you don't
skip this step. In the next lesson,
we're going to talk about pricing your work. So I'll see you there.
14. Pricing your work: Pricing your artwork always feels like a very tricky
decision to make, especially if you're a beginner. And if you have not created collections or have not sold
original artwork before. Here are a few considerations while you begin to
price your own work. The first thing to keep in
mind is your experience level. Whether you're an
absolute beginner who has not marketed any collections
or artwork before, or if you're a
seasoned professional who has been doing
this for a long time, plays an important role in
how you price your work. The next thing to think about
is what market you're in. The pricing standards
for your artwork may vary based on which country
is your home market. One good way to gauge
this is to look at other artists who are in a similar boat as you and look at how they are
pricing their work. That would give you a good
approximation of what your market might perceive
your artwork to be valued at. The next are a few
practical considerations, like the size of your artwork. Larger artworks tend to be higher priced than
smaller artworks. That's not a hard and fast rule. Sometimes small
artworks which take a lot of detailed work
can be priced higher. Take that into consideration. The next is the cost of all the materials that
went into your painting. Whether you used a paper or a canvas or a wood board
to paint your artwork, factor the cost of that
material into your pricing, then there is the time that
you spent on your work. Sometimes it's also helpful to approximate what you might value 1 hour of
your own time at, and then see how many hours it took you to create a
particular piece of art. That is another way you
could value your work. Another important consideration, especially if you're planning to sell your work in galleries, is the commissions
of the gallery. Make sure that you factor that in while
you price your work, so that it's not eating into
your own profit margins. You can use all of
these different factors to approximate a costing
that might work for you, but at the end of the day, also try to use an
intuitive approach. Sometimes you might come up with a number that feels a
little too low to you, and you personally feel that your work should be
valued a little higher. That is completely fine, and that is totally up to you. You can value your
work as you see fit. And I know that's
a little vague, but as an artist, you are the one who knows exactly how much experience and expertise you have put into
the work that you've created. So don't discount that. An important thing is when somebody pays you for your work, you need to feel good about the amount that
you've received. Think about the
number that you've decided to charge and
how it makes you feel. If it feels comfortable to
you, then that's great. If it makes you
feel a little bad, then it's probably time
to increase your price.
15. Packaging and Shipping: Your collectors are going
to be spending some of their hard earned money on pieces of art that
you have created. So it's really important at
this stage that you give them a really good experience
of receiving your artwork. Now you've already put
in all the hard work that went behind actually
creating your pieces. You need to be able to convey exactly how
special your artwork is, not just in how you created
and how you market it, but also when
somebody receives it. Explore all of the
different packaging options that are locally
available to you. And think carefully
about what's going to keep your artwork
safe in transit. I'm not going to get into the details of this
right now because it completely depends on what
kind of art you've created. But the main thing is
to make sure that it is well protected and safely
reaches your customers. You have created something
that's one of a kind and getting it damaged in transit is not something
that you want. Talk to a few different
shipping companies and find out costs so that you can give your customers the
best deal possible. If the shipping cost in
your country is high, make sure that you're charging
shipping additionally. And make sure that
you're clearly communicating this
to your collectors. And when it comes to packaging, also think about collaterals. What can you add to
your artwork that's going to delight your customer
when they receive it? Think about potentially adding a certificate of authenticity. Think about adding
a thank you card, maybe some stickers with
your artwork on them. Or you could think about
adding a card which gives the customer a discount code
for their next purchase. All of these are really
good options and they're bound to delight your collectors when
they receive it. But of course, if you're
adding any of these options, make sure you factor them in when it comes
to your pricing. In the description below, I'm adding a link where
I'm sharing a format for a certificate of authenticity in case
you find that helpful. That covers all of
the main things that you need to know when
it comes to creating, marketing, and selling
your collections. In the next bonus lessons, I'm going to talk to you about a few more details, so
I'll see you there.
16. Bonus : Photographing your Work: When you're ready to start
selling your collection, you may want to put
it onto your website. At this stage, photographing your work well becomes
very important. Keep in mind that most of the points I'm going to cover in this lesson pertain mainly to fine art that's been
physically painted. This doesn't exactly
apply to digital art, although you can also print your digital art and
then photograph it, just to give you
a little context. I'm an accessory designer by education and I come from
the world of fashion. So photographing
my work well has always been something that
I put a lot of emphasis on. No matter what you're selling, When people are shopping online, seeing really good images really impacts their
purchasing decision. It's important for
you to showcase your work in the
best way possible. When you're
photographing your work, make sure that you use a
really well lit space. Natural light is usually
the best option. And make sure that your
work is getting evenly lit. You don't want one
part of your painting being more bright and one
part being in shadow. If you're unable to do this at home or if your artwork
is very large in size, then it might be a good idea to hire a professional
photographer. Or even take your work to a photography studio and get
the images clicked there. Make sure your art
is perfectly shaped. If you've painted on
a rectangle canvas, you want it looking like a perfect rectangle
with parallel sides. You don't want it converging on one end and looking
like a trapezium. This makes it look morphed when you put it up
on your website. It's perfectly okay to have a few angular shots
of your work as well, but your main image should
be clicked perfectly flat. You can then click a
few lifestyle images of your work where it's
hanging on a wall. Or you could do a flat lay, where you use some
relevant props to add interest to the pictures. When you put up the
pictures on your website, make sure you have a mix
of different images. One could be the
artwork as it is. Then you could have one
framed on the wall. You could have a couple
of close up images. You could also have a few
images from the process. In that case, you're going
to want to remember to click pictures of the work
while you're working on it. Capturing some details
like that really help people connect to your work
a lot better. At this stage, I would also suggest scanning or photographing your work for
the purpose of making prints. You may not want to make
prints immediately, but if you ever want to make reproductions of your
work in print format, you're going to want to have these high resolution
images ready. Once you sell your work and
ship it off to collectors, then it's going to be
impossible to get it back. If you're working on paper
and if it's under A4 size, then the best option
would be to use a home scanner to
scan your work. Scan it in the highest
possible resolution with a nice high file size so that you can even blow up
your work if you want to. But if you're painting
on a wood panel, like I did for my
mini collection, then doing it in a scanner
is not going to be possible. In this case, you're
going to want to use a really good camera with a high resolution and capture a good evenly lit
picture of your work. You can then take
this onto Photoshop, make any color corrections
that are required, and it's ready to be
used as a print file. Once you have all of
your images ready, it's time to put them up on a website so that you
can sell your work. Let's talk about that in
the next bonus lesson. If you haven't yet downloaded the supporting guide and
workbook for this class, I'd urge you to do that. As you go through all of
the lessons in the class, you'll find useful checklists and prompts there to
brainstorm all of your ideas. There's even a
checklist that you can use as you go about
your own photo shoots.
17. Bonus : Website: In this bonus lesson, I want to talk to you a
little bit about websites. In my last seven plus
years of running a creative business and my last two plus years of
running my art business, I've come to
understand one thing. It's crucial for you to have a website for your
creative business. Think of a website like
your online store front or your online studio
where people from across the globe can come and check out what
you have to offer. It's very important to have
an online presence like this. I know as beginner artists, many of us choose
to just work with a platform like Instagram
to showcase our work. But it's really
important to have a platform that
you own and where you're not completely
at the mercy of another platform's
algorithm changes. Now that we've established that it's important for you
to have a website, let's discuss some
platform options. Two that I have worked
closely with in the last few years are
Shopify and Square Space. I think both of these
are great options for any kind of art
or creative business. Depending on what you offer, where you're located, you can choose which platform
works out better for you. Both of them have very intuitive and easy to understand
interfaces. They're really easy
for a beginner to get started with and
to build a website. Even if you have never done anything remotely
similar in the past. Think about the
different features that you want on your website. And then pick a platform that
suits your needs perfectly. For me personally, I started
off with square space, but one year in I
migrated to Shopify. There were a few reasons
why I made that choice. Square space, of course, has
the most gorgeous templates. And like I said, they're
very easy to work with and it's very easy
to build out your site. However, I do feel that
square space caters better to the US and European markets than it does to the
Indian markets. And I'm based in India. Over the last few years, Shopify has added in a lot of key features tailored to
their customer base in India. So that was an important reason for me to make that choice. Now once you come down to
actually creating your website, let me give you a few pointers using the example
of my own site. This is the home
page of my website. When it comes to your own site, I would recommend that you make your information very clear
and very easy to find. You don't want somebody
to be searching all over your website for the information that they came looking for. Your website is going to
have a header where you might have links to the
different pages on your website. I recommend making these
in very simple language. While sometimes it
can be tempting to be a little fun or cutesy with
the kind of titles you use, I would recommend keeping it as straightforward as possible. When somebody comes
to your website, they need to know exactly
how to navigate it. I've kept words like shop, learn, about, and contact. Right now I am promoting
my 2024 desk calendars. So I decided to showcase that as the banner image
on my home page. When we go under
the shop section, I have originals and
fine art prints. This is what my collection page looks like for my
fine art prints. And once you click in, I make sure to add a few
different images of the artwork. There is, of course,
the artwork in full, then I show it
hanging on the wall. Then I add a few detailed shots usually, depending on which painting it is and what
I want to showcase. It's important to have a
few different images so that people know what to expect when they're
buying from you. Try to keep this clean, simple, and just convey as much
information as you can. Because somebody needs
to build trust for them to be able to go ahead and purchase something
like art from you. I then have a description of the inspiration
behind the painting, the sizing details, so that they know what
they can expect. I also tell them a little bit about the kind of
prints that I create. I want to tell them that
it's high quality and that I'm putting my best into
what I'm creating for them. I also have an FAQ section. Think of it this way. When
you walk into a store and when you're able to physically
experience products, you have a lot of
doubts that go away from your mind because you
can see it in front of you. There's also possibly somebody at the store who can answer the questions that you have. When somebody is shopping online, they need all of those questions to be answered for them in advance so that they know exactly what
they're getting into. They can't touch and
feel the product. But we want to come
as close as we can to providing that
experience online. When we go into the originals
section on my website, this is more of a
landing page format. The reason for this
is that I wanted to tell the entire story
of my collection. I wanted people to
be able to come into the world of my raintree
collection and look at it from the eyes of me
as the artist so that they are more connected
with the art and the story. From here I provide the
options to either collect an original or to
collect fine art prints. As you build your own website, keep all of these
points in mind. Don't overthink it, keep
it simple and just try to look at your
website from the eyes of your collectors
or your customers. Provide a great experience and answer as many
doubts as you can. Also make it really easy
for them to contact you in case there's anything
else they'd like to clarify. I hope you're excited about
building your own website and I'll see you in the
next lesson where we'll talk about
e mail marketing.
18. Bonus : Email Marketing: In this bonus lesson, we're talking about
email marketing and specifically
about lead magnets. For my own email marketing, I use a platform
called FloDesk. You can, of course, use any e mail service provider that works well for you and
your requirements. I like FloDesk
for its simplicity and it's really easy to create lead magnet landing
pages as well as your newsletters
on this platform. It's also easy for
you to segment your subscribers based on
the topics that they might be interested in or based on which lead magnet they
signed up to your list from. That helps you effectively
communicate with your subscribers in a way
that's targeted and meaningful. I'm going to show you a
quick demo of how I create a landing page on flodesk for one of my new lead magnets. You can apply this
to any kind of lead magnet that you
create or even if you just want to create a
simple landing page where you're offering collectors a discount on their
first purchase or early access to your
artwork or prints. This is a great way to do it. As you can see, it's
very easy for me to see the different sections on flodesk that I
can navigate to. I'm going to go into the forms section to
create this landing page, I'm going to create a new form. You can already see
here that I have a few different types of
forms that I've created. For example, this one is
for my collectors club, where I offer early access to either my prints or my
fine art collections. And 20% off print purchases. Let's now create a new form. There are all of these
different options on the left, but because I want it to be like a landing page that
occupies the entire screen, I'm going to say full page. There are some
beautiful templates in here and they're all completely customizable. For now, I'm going to pick this one
here and hit customize it. Here's where you can
decide how you want to sort the subscribers who sign up through
this lead magnet. I've already created
a whole bunch of segments based
on my own business. You can do what works for you. The landing page that
I'm going to create is for a lead magnet
that I've created that teaches complete
beginners how to use Pinterest for their
art or creative business. In this case, I want to sort those subscribers into this creative
entrepreneurs segment because these are all
people who are interested in converting their art
into some a business. That's the segment I'd
want to put them in. I'm going to hit Save. Now all of this is
completely customizable. The first thing I'll do is upload the cover image
that I want to show here. What I want to show
here is the cover of the actual PDF download that they received
through this sign up. I'm going to insert that there. I see that it's getting cropped a little bit, but I'm
going to fix that. Now here you can have a few
options if you'd like to, based on the option that
a person selects can be segmented into different
segments of your list. But in this particular
lead magnet, I don't really need that. I'm clicking the
background to get this page and I'm going
to turn off Preferences. All I want is to collect the first name and
the E mail address. You see already
that that's fixed, that cropping that was happening here, I'm going to
leave it at that. I'm going to change
the background color to one of my brand colors. I've inserted all of
my brand colors here, it's very easy for me
to pick from that. Then I'm going to type a title
and description for this. The next thing I'll do is just change the colors here as well, because I still want that to
be consistent with my brand. I'll change the text color too, I'll change the button color. As I said, all of this is
completely customizable. I prefer to have the
font on my buttons a little larger so that
it really stands out. Finally, because I prefer to
collect the first names of my subscribers so that I can customize my e mails
with their first name. I make sure I check this
as a required field. That's about it. I can now preview how it
looks on mobile. As you can see, the image
has disappeared on mobile, and I don't want that to happen. I'm going to go back to editing, Click the background again, and select Image on Mobile
to be turned on again. I'll preview it on mobile. Even though this is cropping, I'm still happy with how it
looks because it's showing the main text from the
image. And that's it. This is ready. Just
a few last settings and you can choose once
somebody submits the form, whether you want
to redirect them to a page where they can
download the freebie, or you want to just
display a success message. Usually I display
a success message and then I send the freebie as an automated e mail that goes once people
enter this list. Now we can go back and we can see that the form is ready here. You can choose Share Page link and you can copy the link and you can share
it wherever you'd like to. You can also just test it out
to make sure it's working. And I always recommend
entering your own name and email address to make sure everything's working
the way you want it. This is a great way
to start collecting email ID's from your
subscribers much in advance. You don't necessarily
have to provide them with a freebie like a PDF, but you can if you'd
like to. For example, in case of collectors, providing something like a framing guide
could be a great option. I personally prefer to
offer early access to artworks and a discount when people sign up to
my collectors club. Once you start collecting subscribers and
growing your list, e mail marketing can be a
great platform for you to make sales and build a real connection
with your audience. So have fun with this and I'll see you in
the next lesson.
19. Summing it up: Congratulations on reaching
the end of this class. I hope you learned a
lot out of this class. Let's just quickly recap
everything that we covered. We spoke about what
a collection is, how it's different
from a portfolio, and why it's beneficial
to work in collections. We then spoke about how you
can find and use inspiration. We spoke about how you can
define your own art style. We also spoke about how you can plan and design
your collection. You saw how I went about creating my own
collection right, from creating a mood board
to the final paintings. We also spoke about
pricing your work, marketing your work,
packaging and shipping. And then we had a
few bonus lessons where we spoke about
photographing your work, creating an effective
website to sell your work, and e mail marketing. I hope all of this gave you a really good
foundation to start creating and selling
collections of your own. I'm really excited to see
your very first collection, or your tenth collection, if that's what you created
during this class. So make sure you upload it to
the project gallery below. I'd be really happy to
provide my feedback. You can also use
the discussions tab below to ask me any
questions that you may have. It would mean the world
to me if you could use the review tab below to leave
a review for this class. Be sure to follow me
here on skill share so you don't miss any
of my future classes. You can also follow along with all the
behind the scenes from my studio and the daily artwork that I create over on Instagram. And you can join me over
on Youtube where I post a lot of tutorials and resources for creative
entrepreneurs. Thank you so much for watching, and I look forward to seeing you inside another one
of my classes. Bye.
 Shivani Patel, Gouache Artist | Creative Entrepreneur