Transcripts
1. Introduction: Hi, everyone, and welcome. My name's Louise, and I'm a digital marketing
strategist and educator with over 13
years of experience. And I specialize in helping creators and business owners use AI tools to help streamline their work and create
engaging content. Imagine having a chat GPT
that knows your goals, your style, and delivers exactly what you
need every time. In this course, you'll
learn how to take your custom chat GPT
to the next level. If you joined me for
my previous course, you learned the basics
of creating a custom chat GPT from scratch
in just 10 minutes. You haven't taken
that course yet, then I would recommend that you go back and take that
course first before you take this one so that you have a good understanding of the basics of creating
your own custom chat GPT. Today's course will follow
on from my previous course, and we'll be focusing purely on fine tuning your
custom chat GPT, with no coding required. Fine tuning allows you to make your GPT even more responsive, accurate, and tailored
to your unique needs. This means that it's
easier and faster to generate consistent,
high quality results. By the end of this
class, you'll know how to tailor a custom chat GPT, so it aligns with your goals. Whether it's for
content creation, productivity or
creative projects. This course is designed
for anyone who wants to take their custom chat
GPT to the next level. You're a business owner,
content creator, educator, student or just somebody
who wants their custom chat GPT to be more
personalized and effective. If you've set up a
custom chat GPT, but you want it to perform
more specific tasks, then this is the class for
you. Here's what we'll cover. Setting up context with
custom instructions, creative uses of
knowledge files, experimenting with
different types of prompts, and building templates
for consistency. And to make it practical, I'll show you exactly how I fine tune my own custom chat GPT, which I use to help me with
my skill share courses. Take this course,
you'll need a computer, an Internet connection, and
a paid Chat GPT account. So if you're ready,
let's get started.
2. Class Project: Welcome to the Class Project. The project for this
class is designed to help you apply
the techniques that you're learning and see
the difference that fine tuning can make to
your custom chat GPT. For the project, I'd
like you to choose one fine tuning technique from this course like
custom instructions, knowledge files, or templates, and apply it to your
custom chat GPT. For example, you could add a knowledge file relevant
to your industry, set up specific custom
instructions to match your tone or experiment with different
prompt templates for consistency. You've made these adjustments, try a few prompts to see how your custom chat GPTs
responses improve. After fine tuning, share a
description or screenshot of your GPTs responses
in the project gallery. This way, you can showcase
what you've accomplished, received feedback, and get inspired by the techniques
that others are using. As we go through each technique, you're free to try it out on
your own custom chat GPT, starting small and
refining as you go. Each adjustment will
bring your custom chat GPT closer to the
results that you want. Something to just watch out
for is that trying to apply too many techniques at once
can lead to confusion. Focus on one fine tuning
technique to start with, such as custom instructions and apply it to
see how it works. It's better to start small, see the impact, and then layer in more
adjustments as you go. In our first lesson, we'll
explore how to set up context using custom
instructions. I'll see you there.
3. Setting Up Context with Custom Instructions: Welcome to Lesson one. Our first step in fine
tuning is setting up clear context with
custom instructions. Custom instructions
essentially guide your custom GPT to
match your style, tone, and preferences, aligning its responses
to your needs. So let's go into the custom
instruction settings now where we can add specific details about
what your custom chat GPT should know and
how it should respond. So in my previous course, I created a skill share
course specialist GPT, and I gave it some instructions, but now I want to change these. So how do I get to the custom
instructions as a reminder? Once you've got your
custom GPT open, you would click this arrow
here and then edit GPT, and then you can
see the description and all of the custom
instructions here. These are the ones that
were created when I first made the GPT
in my last course. If I want to change these, I would just type in here,
I can delete things. I can add in further
instructions. Since I create skill
share courses, I would want my GPT
to give concise, actionable advice
in a friendly tone that's easy for
students to follow. So in this section is
where you would set the context or give your
GPT a role to play, as well as clarifying the
tone that it should use. Just be careful to overload your GPT with too many
detailed custom instructions. If you add in too many at once, it can lead to
inconsistent responses. So start by setting one
or two key instructions such as tone and roll, and then you can gradually
add more if needed. This way, your GPT
stays focused and follows your main preferences
without confusion. So since I'm using
this GPT to help with my marketing
skill share courses, I could type something act as an expert in online
course creation and content marketing, specifically for skill share. Use a friendly,
approachable tone and make sure responses are
clear and concise. So what I would do is probably
delete this first line here and then replace that a reminder that any
changes you make here, once you click Update and
save it, it's instant. It's really handy
for experimenting and refining
instructions on the fly. You can easily tweak the tone, style or specific
behaviors as needed. But always remember to
save after every time. So this instruction I've put in here basically helps GPT avoid complex language and ensures it explains concepts in a way that's accessible for beginners. It also covers just
two main areas here, the role and the tone, which is a great starting point without overwhelming the model. So starting with one or two key instructions like this helps GPT focus and produce responses that align
with your goals. You can always, of course, refine and add more
details later. So now I just wanted to
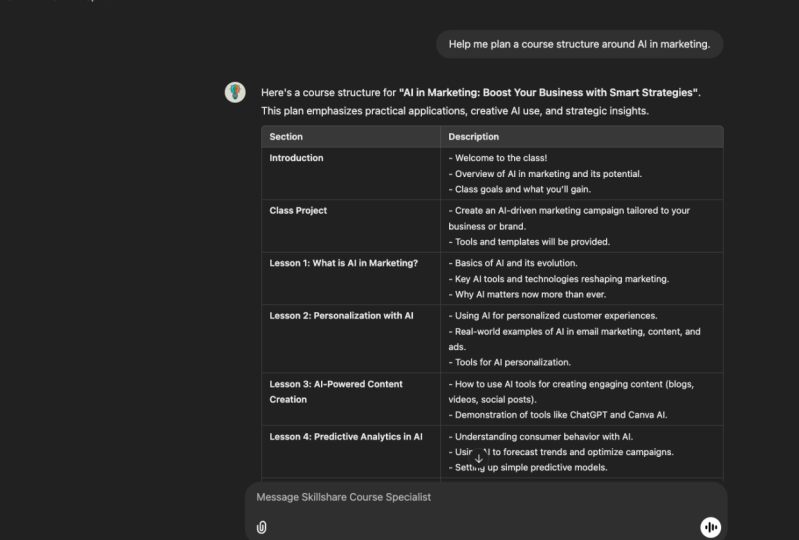
show you an example of how custom instructions
can refine responses. I asked it to help me to plan a course structure
around AI in marketing. And this is what it gave me. And this is with no
changes to the GPT, gave me an outline of a course, and it gave me some ideas for promoting the
course, as well. So then I went back and made the changes that we
just went through. And then I basically asked the exact same question just
to compare the differences. So the first one
before the changes, just said, Here's a
proposed course structure for AI in marketing. And it was very matter of fact. Then the second one after
I'd made the changes, was a lot more friendly
in its response. So it was saying,
creating a course in AI marketing is
an excellent idea. So it's a lot more engaging,
a lot more friendly. I also noticed that the outline of the course
was a lot more concise. There's a lot less text on there than the
previous version, and it also doesn't include the marketing plan
promotion at the end, because that wasn't
actually what I asked, so therefore, it's
a lot more concise. So you can see just with
that small we has changed the way that this GPT has responded to the
exact same question. And then once you're
comfortable with the tone and the role and
the style that it's using, you can go one step further and then add formatting
instructions as well, which can help to make
responses even more useful. For example, if I want my GPT to structure its
answers in a certain way, I could in the
custom instructions, I could ask it to use bullet
points or numbered steps when explaining instructions
or even to use tables. So as an example here, I can ask it to when
providing course plans to use a table format to improve readability and make
following the steps easier. Though I'll just update that, and then we can try it out. It's always really important
to test after adding new instructions to make sure that the responses
are what you want. Let's check whether
that has worked. So if I ask it to help me plan a course structure
around AI and marketing. So because we said in the custom instructions that
when providing course plans, we want it to use
a table format. This should technically use a
table format. So let's see. And and it has. So you can see it's put the
course structure in a table, which is exactly
what we asked for. Obviously, if I decided that I didn't want to have course
plans in a table anymore, I can obviously go back and edit those instructions or
delete those instructions. Another way that I could use
formatting is by setting up a consistent course outline with sections like introduction, class project, and conclusion. So let's try that out. I've just added into the instructions. I've just added this
bit onto the end that says after when
providing course plans, use a table format to
improve readability. I have then added on. Always
start with an introduction, followed by a class project, lessons, and a conclusion. Okay, so I've updated that. So let's see what it does now. So you can see, it's done
exactly what we asked for. It's kept the table format. And it's also put the
course in the right order. Introduction, class
project, followed by lessons and ending
with a conclusion. As you can see,
you can fine tune as you go along
to make sure that your GPT eventually gives you the exact information that
you want in the exact format, which will help you
save a lot of time, especially in my case when I'm developing multiple courses, it's good that the course
is exactly how I want it so that I don't have to
keep asking it to changes. There's so many
things that you can do with custom instructions. This is just an example of
a way that I could use it. They allow you to guide your GPT on both content
and presentation. Try experimenting by
setting up different tones, different styles,
different formats. As you can see,
small adjustments like these can help to ensure consistency and readability and remember that you
can always amend, refine and delete
instructions as you go along. Now you've learned a bit
about custom instructions. What custom instructions
do you think would help your GPT to better
serve your goals? Take a moment to think
about one or two and jot them down to
test after this lesson. Test out custom instructions with one detail about your tone or style and see how it
shapes your GPT's responses. In the next lesson,
we'll look at the creative use of knowledge
files. See you there.
4. Creative use of Knowledge Files: Next up, let's talk
about knowledge files. These files are a fantastic way to give your GPT access to specific expertise
without overwhelming it with too much information. Think of knowledge files as reference materials
for your GPT, like loading it with essential
background knowledge. For instance, if
you're a marketer, you might upload your
brand style guidelines or tone of voice guide or
if you're an educator, you could upload a syllabus
or lesson plan template. This way, GPT's responses stay aligned with your brand
or educational standards, delivering answers
that fit your needs. Be careful not to
overload GPT with too many or overly detailed
knowledge files at one. Too much information
can actually lead to less clear or even
contradictory responses. Stick to one or two essential
knowledge files per task. Helps to keep GPT's responses sharp, focused, and relevant. Now, let's walk
through an example. So for this demonstration, I'm going to upload a knowledge
file to my custom GPT that contains skill
share best practices for writing a class description. So this file has got guidelines
on writing, engaging, student focused
descriptions, and also what sections
should be included. So, for example, class overview, what you will learn,
why you should take this class, who
this class is for, materials and resources,
and also some ideas on how to maximize
engagement and readability. So this will help my GPT
provide better recommendations for skill share classes when I ask it for help with
writing description. As a side note here, this is a Word document. You can also upload
other document types. Could upload a text file, a PDF, and things like that. Make sure that it is
as clear as possible. So make sure you've got clear headings and a
clear structure to help the model understand it and also remove any
unnecessary information. So I've already been through
this file and deleted things that are not relevant
to avoid any confusion. Let's run through the process of uploading a knowledge
file to your custom GPT. If you go back to the
configure section of your GPT, and then if you scroll down below all of the instructions, then you can see the
knowledge section here. So this is where you would
upload your knowledge files. So I've uploaded the one
that we've just looked at, which is the best practices for writing skill
share descriptions, and then the other one
in there is one that I uploaded previous course, which is just a list of my
current skill share classes. So to upload a file here, you literally just
click upload files, find the file on your computer, and then upload it, and then just click Update. So now that's saved. I'm going to ask
my GPT to suggest a class description
outline for my course on AI marketing strategy that follows skill share
best practices. One tip is to make sure that you provide explicit instructions
for using knowledge files. So if you want the GPT to reference the knowledge file
that you've just uploaded, make sure that you tell your GPT to reference the knowledge
file when you're prompting, you can either do that when you're messaging
in the box here, or that's something
that you could add to your custom instructions so
that it does it every time. But just for an example, this
is what I could say now. So I'm going to
ask it to suggest a class description
outline for my course on AI marketing strategy that follows skill shares
best practices, using the knowledge file, best practice skill share class descriptions because
that's what I called it. So let's see what it
does. So as you can see, the hat GPT is now
referencing file, aligning its suggestions with skill shares suggested layout. So you've got the class
overview, what you will learn, why you should take this
class and who this class is for, materials,
additional notes. And it's also got some SEO
optimization suggestions because the document
also has that in. So that just shows
how this approach can work well for tasks that
require specific knowledge. Like, for example,
you could also use you wanted to make sure that the response adhered to specific brand voice guidelines, for example, or
industry standards. This can save a lot of time because the structures
already there, and I don't need to
keep asking the GPT, Oh, can you include
a section on who this class is for or can you include a section on materials? Because it should follow this
structure now every time. The way that you could use knowledge files
could be, let's say, you're managing multiple brands or have your own brand
messaging guidelines. You could upload a knowledge
file with each brand's tone, style, target audience,
and messaging guidelines. Then when you prompt your GPT to create content,
like, for example, a social media post, it will know to align with that brand's unique
voice and values. So this is really useful, especially if you need to switch between different brand voices. To sum up, knowledge
files allow you to equip GPT specific knowledge that
directly support your goals. Keeping its responses
accurate and aligned. Have a think about what
unique knowledge files may benefit your workflow. Do you have brand
guidelines, FAQs, or industry specific
resources that could help GPT craft
better responses? Take a moment to jot down one or two ideas to
try after this lesson. In the next lesson, we'll
explore techniques for fine tuning responses through effective prompting.
I'll see you there.
5. Prompting Techniques for Fine-Tuning Responses : Now let's move on to
prompting techniques. When it comes to getting the
best responses from GPT, being specific is key. The more specific your prompts, the more tailored and
useful the answers. These techniques will help
you to develop precise, structured and
creative responses. Broad prompts can lead to general answers which
may not be helpful. Always be specific. You need a detailed answer, then include elements
such as your audience, the purpose of the response, and the preferred format. So let's look at
an example and the difference between a broad
and a narrow prompt. Okay, so for an example, let's say I have created a Skillshare course on
Instagram marketing, and I want help with writing
the course description, so I ask my GPT. So I might say, write me
a course description. So this prompt here is very broad because I've not
included any context. I've not included what
the course is about. Not included the title. I've not included the audience. I've just kept it very vague. So because that's vague, that means that Chat GPT will probably return
quite a broad answer, and it probably won't be
what I actually want. So as you can see, I've created a course on Instagram
marketing in this example, but the course description
it's given me back is on AI. Marketing essentials, which is not what
I actually wanted. I wasn't specific enough. One thing it has done is it
has used the knowledge file that we uploaded in the
previous lesson because it's using the correct outlines, the correct sections for skill share best practices
for course descriptions. So it's got the class overview, what you will learn, why
you should take the class. And in the who this class
is for section, again, it's just guessed
the answer because I've not told it who
the audience is. To get a better response, that's more what
I actually need. It would be better
to narrow it down. So if I said, for example, write a course description
on Instagram marketing, then it's going to be
specific to Instagram. But still, it's not what I want because that's not
what my course is called. It's not what my
course is about. If I want to get
even more specific, then a good idea is to provide as much context and background
information as possible. So, for example, I might say, write a draft course description for my skill share
course called, and then give the title, and then put some
information about what the students will learn in that class and then who
the class is aimed at. The more information,
the better and more relevant this
description will be. For example, this is
the prompt, which is, write a draft course description for my skill share course, called, create an Instagram marketing strategy
in five steps. In this class,
students will learn about Instagram
marketing strategy, content planning,
setting objectives, hash tags, and SEO and AI tools. The class is aimed at small
businesses who are beginners. So you can see
there's a lot more context which should mean that the description that
it brings back is much more in line with
what I actually need. So you can see it's
used the title. It's used in the what
you will learn section. It's actually put in the things that I said we were going
to cover it in the course. And it's also said that it's ideal for small business
owners and beginners. So it's using all of the
information I provided. Now, the difference between
that that it's given me and the first one is
such a big difference, and it just goes to
show how narrowing down the prompts will get you a lot closer to what
you actually want. So a takeaway here is that the more relevant
details you provide, the more refined GPT's
responses will be. Another thing that
you could do is to provide a draft piece
of text, or in my case, I could provide a draft course description that I've
already written, and then I could ask
GPT how it could be improved or how it could
be made more engaging. Also, if you ask Chat
GPT to keep your tone, then that's a really
good way of making sure that the copy
sounds like you and is also as best as it can be and contains all of the information that you need it to include. So now let's go through some other useful
prompting techniques. First, we have step by step
instructions for clarity. So for things like
processes or guides, prompting GPT to provide numbered steps is
highly effective. For instance, you could say, explain how to set up a skill share profile
in five steps. This approach
structures the response in a clear sequential format. Match a specific tone, make sure you include
it in your prompt. So, for example, you could say, write an introduction
to a course on time management in a friendly
conversational tone. This technique ensures
GPTs style aligns with the intended
audience or purpose. For brainstorming or
generating new ideas, try open ended questions. For example, what are some unique ways to market
a new online course? These types of prompts
encourage GPT to think creatively and
provide a range of ideas. If the response needs tweaking, then you can always follow
up with a prompt like, can you make that more concise? When you specify a role, GPT can adapt responses
to that perspective, which make answers
more relevant. So, for instance,
you could say act as a history professor and explain the causes
of World War two. This will yield a
response that's more educational and in depth. More creative or
empathetic responses, try using imagine prompts. For example, you
could prompt GPT with Imagine you're a student taking this course
for the first time. What would you want to
know in the first lesson? This approach brings
out a more engaging and student focused
perspective in the answer. So let's try a quick example. So I'm going to prompt my
GPT with an imagine prompt. So let's say, I say, Imagine you're creating
a class project for beginners course
on digital art. What would be some fun
hands on activities? You can see here that using the imagined prompts
encourages GPT to produce engaging
creative ideas that would appeal to beginners. There's loads of ideas here. So that can be a useful
prompt to have a go with. Another technique
is that you can promote attention to
detail with your GPT. So you can incorporate things in your prompts like telling
your GPT to take its time, telling it to take
a deep breath, telling it to check their work. And this can encourage
the model to be thorough. So, for example, if we take the same prompt there,
but just add on, take your time and be sure
to check your answer, and let's see what it does. It looks like it's now included an objective to each
of the activities. It's also changed some
of the activities, and it's also added on
some additional notes, such as encouraging students to share progress and
providing feedback prompts. So asking students to share their favorite parts
of their artwork and what techniques are most
fun or challenging. So again, this highlights
how small tweaks to the prompt can
change the responses. A final tip, there's no right or wrong way
to prompt your GPT. The key is to experiment with these techniques
like I've been doing on this course and just
find out what prompts give you the best responses that help you to
meet your goals. Fine tuning your prompts
will help you to get the most precise
and useful answers. To recap, the more
specific your prompts, the more precise and helpful
the responses will be. Narrow your focus to
get the best results. Think about which
prompts would be most helpful for your unique needs. Try experimenting with
a few types of prompts. For example, specific step
by step or role based, and see which works
best for you. In the next lesson, we'll
have a look at how to utilize templates for
efficiency. I'll see you there.
6. Utilising Templates for Consistency and Efficiency : In this lesson, we're going
to talk about templates. Template is essentially
a structured prompt that you can reuse, giving your GPT guidance on
how to frame its response. For example, when writing
course descriptions, I might use a template light. Describe a type of course for a target audience that
covers main topics. This template ensures that every description
that GPT generates has a consistent
structure that's specific to the
audience and topic. Templates save time. For example, if you frequently
write social media posts, then you could save a
template like write a length post on topic for
audience in a tone style. This allows you
to get consistent on brand posts every time. Watch out for overcomplicating templates by making
them too rigid. Templates are meant
to provide structure, but if they're overly specific, they can limit
GPT's flexibility. Start with a simple format write a length post on topic for audience in a tone style
and adjust as needed to fit different contexts
without locking yourself into too much detail. So what are some ways that
you can save templates? So first, you can include template examples in
custom instructions. So if you often use
certain prompts, consider adding them as examples in your
custom instructions. This way, GPT knows to follow this structure whenever
I give similar prompts. Other approach is to save frequently used templates
in a document or note so that you
can quickly copy and paste them into GPT
whenever you need them. And even a faster
option is to save your templates as
conversation starters. This allows you to kick off an interaction with a
template already in place. For example, if
you frequently ask GPT to generate course outlines, you can set up a conversation
starter like create a ten minute skill
share course outline on the topic of marketing
with an introduction, three lessons, a class
project, and a conclusion. This way, you can jump
right into generating a structured outline each
time with just one click. Let's have a look
at this in action. So as you can see, I've created a new conversation starter here, and that will now be
saved to the homepage, essentially, of your GPT. So that's create a ten minute
skill share course outline on the topic of marketing
with an introduction, three lessons, a class
project, and a conclusion. So that's a template
now that I've saved. You can have several
templates here, and the first four will show on the main page when you
first open your GPT. So if I click that now, it's generated a ten minute
skill share course outline on the topic of marketing. So that's exactly what I wanted, and all I had to do was click rather than type in
that prompt each time. This is ideal if
you're working on multiple course outlines and want consistent
structure every time. The benefit is that
templates make it easy to maintain consistency across
projects and save time, especially if you're working
on similar tasks repeatedly. And conversation starters are particularly useful
for this because they keep your templates right at your fingertips within
the GPT interface. So templates are
ideal for anybody who regularly needs
consistent outputs. Whether you add them to
custom instructions, keep them as quick prompts or save them as
conversation starters. What templates
would be useful for you in your role or context? Try it out by creating a few template
prompts of your own.
7. Conclusion and Final Tips: There you have it.
In this class, we explored four powerful ways to fine tune your custom GPT. These included setting up
effective custom instructions, leveraging knowledge
files, using precise prompting and
creating templates. Each of these techniques
help you to tailor GPT specifically for your needs, making it a more valuable
tool in your workflow. Remember, fine
tuning is a journey. Here are a few
final tips to carry with you as you
continue to refine. Start small and build gradually. Apply one adjustment at
a time and test it out. Small consistent
changes can have a big impact on how your
GPT performs for you. Test and reflect often. Fine tuning is an
ongoing process, so keep testing prompts and
refining instructions to see what yields the best
results. Adapt as you grow. As your needs evolve, don't hesitate to revisit and edit your custom
instructions, knowledge files, or templates. GPT is a flexible tool
that can adapt with you. If you found this class helpful, please consider
leaving me a review. It really helps me out as
well as your fellow learners, and don't forget to share
your project in the gallery. Seeing how others apply
these techniques is a great way to get inspired
and learn new ideas. If you're new to custom GPTs, then check out my previous
course on how to create a custom chat GPT from
scratch in just 10 minutes.
 Louise Laurie, Marketing Strategy & Courses