Transcripts
1. Introduction: In this class, you will learn
how to make your own smock, Shirt or Dress
completely by hand. You will learn how
to measure yourself, how to cut all the pieces
and all the stitches you will need to create
this beautiful garment. Hi, my name is Laura. I'm a folk musician and
Seams dress and I design and make my own clothes and
toys for my little boy. I love making and wearing clothes I've made
because it really makes me appreciate clothing
and clothing production. Each piece takes hours and
hours to make and fits into the ethics of slow living with everything available
so quickly now, it can make us become
impatient and lazy. And through hand sewing, I've learned to
patience and hard work. In this class, you will be shown everything you need
to get started. This is not an
expensive hobby and you can get all the basics
very affordably. You don't need a sewing
machine for this class, but if you like using
a sewing machine, you could use it on
parts of this garment. In this class, I
film close-ups of each step and talk you
through the process. You can sew along with me. This class is for those of you with some basic experience of sewing or loads of
enthusiasm and patience. If you are totally
new to sewing, you might like to take
my Gathered Skirt Class first or my Palazzo
Pants Class to get you started saying that I have broken everything
down step-by-step. So if you're completely new to sewing, why not give it a go? By the end of this class, you will be equipped with
all the skills to design, measure, cut, and sew
your very own smock. You will require
some imagination and willingness to give it a go. A growth mindset is
definitely required. Once you learn how to
make your own smock, you can let your imagination run wild and create
your own designs. Okay, I'll see you
in the first lesson where I will explain why I Love Smocks so much and the
inspiration for this design. I'll see you in
the first lesson.
2. Why I Love Smocks!: Why I Love Smocks. I had been looking for
a way to connect with my heritage and learning to make historical clothing
seemed like a fawn way to connect with my ancestors
and a slower pace of living. I Love Smocks and when I first discovered how to
make this design, I got completely
obsessed, as you can see, and I've made it in so many
different styles and colors. This Smock you will learn
to make is part inspired by my English heritage
and Part inspired by my partners Slovak heritage. The shape is inspired by Eastern European folk costume and white linen
shirts they wear, their Lenin shirts are cut
in a style called polonium, which is four rectangles
of fabric which get gathered together to form
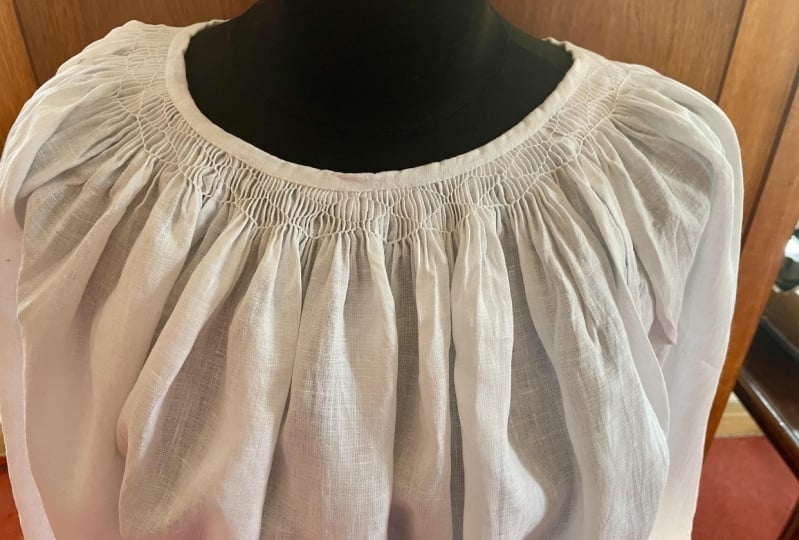
a loose shaped Smock. The smocking on the Neckline is inspired by the
traditional English Smock, which was a loose
over garment worn for work where in the
cheat sheet and tips document which you will find in the resources section
of this class. I have added some website links and some books if you'd like to learn more about smocking and
these beautiful garments. I Love Smocks because
they are loose and comfortable yet so
stylish and puffy. I also love the underarm GSA. I don't understand why he's ever got removed from clothing. Make your Smock really easy to move in and you
don't get that horrible, pinched feeling under
your armpits where all your clothes are squashed
in under your armpits. Once you learn how
to make a small can learn the
technique of smocking. You can go completely
wild with it. So in the next class, I'm going to show you my
collection of Smocks. And it will inspire you for
the Smock you will make. See you in the next lesson.
3. My Smock Collection: Hello and welcome to this
lesson where I am going to show you my beautiful
Smock Collection. Enjoy. I hope that seeing
my Collection will inspire you and it comes
to making your Smock. This orange two-piece,
the trousers made using my
Palazzo Pants Class and have plates at the front. The shirt. And the trials are made from
a 210 GSM pure linen fabric. Smoking is using Van ****
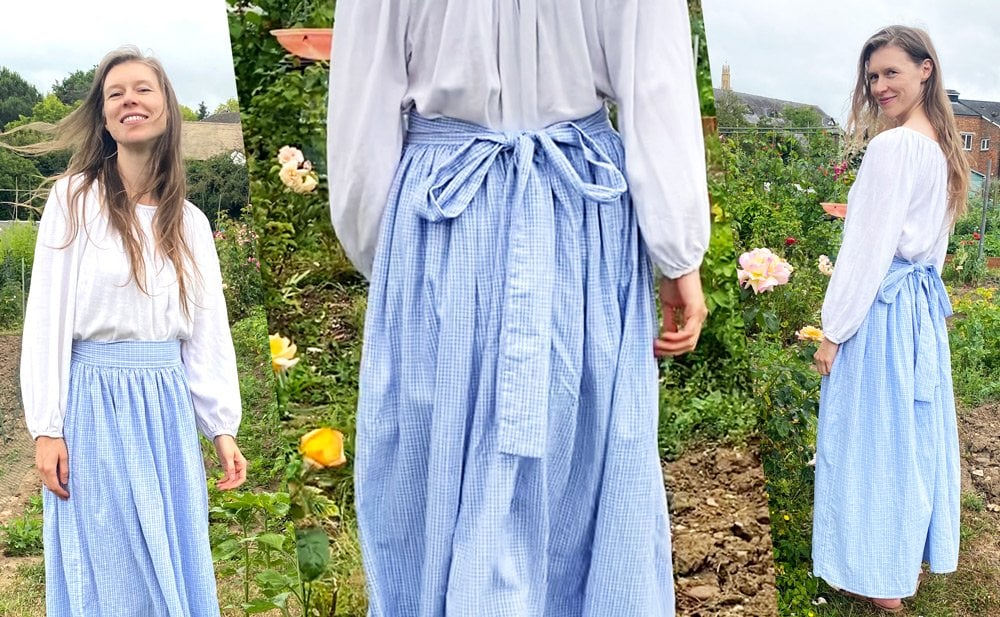
stitch and you can see the gussets there in the armpits at a very Gathered Sleeves. This pink dress Smock. I've added a tiered
Skirt at the bottom, which is when you get
a much wider piece of fabric gathering to get
a super Gathered Skirt. The Neckline has three rows
of wave and trellis smocking. And you can see the gussets
in the armpits there. I also made a tight belt. This piece to Gathered the
Smock in at the waistline. This red to piece. Again, the trousers
have been made using my Palazzo Pants Class. The Shirt has just
one row of smocking. The Sleeves haven't
been gathered in, they've been left open with
the gussets in the armpit. Again, it's from
a very heavy red. 210 GSM. This blue on might
be my favorite. Looked how puffy sleeves are. Again, the trousers using
the Palazzo Pants Class. The Shirt features embroidered
Sleeves that have been inspired by Victorian work where the symbols
indicated your job. These symbols have been
inspired by a milkmaid symbols. Using blue on blue embroidery. The neck coin isn't smoked, It's just heavily Gathered. It's just creates a notebook. And then this white smoke, which is the one we're
going to make in the class. I've made it from a very light, almost sheer white fabric,
white linen fabric. It's got three rows of wave and trellis smocking
on the Neckline, gussets in the armpit, and nice wide, heavily
Gathered Sleeves. In this class, I'm
actually going to show you this mini one I made for
my two-year-old son. Following the exact same design. He moves a lot, so it's hard
to capture him wearing it. Got a lovely feature here, the Button, one feature which you can put on the
back or the front. And here is me and my son in our matching rainbow Palazzo
trousers and Smock Shirt. Hope this little
video has inspired you for the smock you're make. This is the white smock
that we are going to sew along together
in this class. Right? Now you know everything
that's possible. I'll see you in the next
lesson where we'll give an overview of this class and find out exactly
what You Will Need. See you in the next lesson.
4. What You Will Need: Welcome back. In this lesson, we are going to run over everything
you need to complete this class and
how to navigate it. The first and most
important thing you're going to
need is patience, because this is a new
skill and it's fiddly. So be patient with yourself
as you run through the class. Unless you already
have a sewing kit, there will be a few
things you need to buy. In the about section
of this class, I've provided a list of
everything you need to buy. If you'd like to understand
that in more detail, you can go to lessons of my Hand Sew a
Gathered Skirt Class. I recommend heading over there
now and watching that so you can find out a bit more
about everything you need. And the only thing extra You Will Need that's not
included in that video is a teeny tiny button to fasten the front or the
back of your Smock. In this class, you
will also find in the resources section
a measurements and calculations document and a cheat sheet and tips document. I recommend downloading
those now and you can use them as you
follow along the class. Just a little note,
if you can't see the resources section and you're using the Skillshare app, you will need to go
on your browser, either on your desktop,
on your phone. And there you will
be able to access all the resources in the measurements and
calculations document. You will also see the
exact measurements and calculations for all the Smocks I showed you in my
Smock Collection. It will also show you
the composition, weight, and width of the fabric I used to make each
of the garments. In this class, you will
need a woven linen or cotton fabric or
linen cotton blend. I've even used a linen
viscose blend in the past, depending on the style
you're going for, you can get a lighter
fabric or a heavier fabric. If you'd like to find out
more about choosing a fabric, you can head to less
than five in my Hand, Sew a Gathered Skirt
class where I go over the five things
you need to think about when choosing a Fabric. Also, if you're
interested to know the fabric I've used
for my projects, they are all listed in the measurements and
calculations document. For example, this
pink linen dress is made from a linen cotton blend. And the fabric is 120 GSM, which stands for grams
per square meter. So it's quite a light
fabric in comparison to this orange to piece which
is made from 210 GSM. And it's 100% linen, which I find creases a bit
easier in this class you will get to see me make every
single step of this Smock. You learn by sitting with me
and going through each step, which makes it an
experiential class. If at any moment
you get confused, especially when it
comes to numbers, please refer to the
measurements and calculations document where everything is
spelled out step-by-step. Recommend watching
this whole class through and understanding
the process of how to make a Smock and then get
all your fabric together and get started and
sew along with me. And while you sew along, make sure that you've got the cheat sheet and
tips document and the measurements and
calculations document handy as that will
really help you. I'm a self-taught seamstress and everything I've learned
is from YouTube, books for museums and
from my own imagination. And for this reason,
I really love hearing your feedback and ideas. And there is a Discussions tab where you can ask
me any questions or leave any comments about the way I am making this Smock. One of my favorite things about Skillshare is the
community aspect. So that's why I loved the
Discussions tab where we can discuss different
bits of this class. One of the abstract
skills we learn, we start to Sew is our imagining and
visualizing faculties. And this is something that will develop as you start to
sew your own clothes. Next, we're going to get into the lesson where we
measure ourselves and understand a bit more about the construction of the smock. See you in the next lesson.
5. Understanding Construction and Measuring Yourself: Welcome back. In this lesson we're going to
learn the basics of Smock Construction and how
to measure ourselves so we can work out all the pieces that we need to cut from our fabric. This style of Smock
we're going to make is made out of four main
pieces of fabric. The front, the back, the right sleeve, and the
left sleeve, as well as this, we also have the gussets and small strips of fabric
for Neckline and Sleeves. Throughout this project,
we will always be using a 1 cm seam allowance. First of all, let's
explain the Construction. He is my first
ever drafts Smock. You might like to make a
draft if you are new to this, you do is you use
a Muslim fabric or an old bedsheets to test out all your measurements so that you know
you've got it right before you cut into
your precious linen. In this Panamanian style Smock, the wide Smock gathers
in it the Neckline to create a loose
but stylish smock, and then the Sleeves
gather into. Now let's get into how
to measure ourselves. A reminder, if you want
more help with this, do go to the
Resources section and download the measurements
and calculations document, which will really help
you with this bit. Firstly, the width you can measure around your widest part, which is usually your bust
if you are making a top, but if you are making
a long-term or Dress, this could be your hips. Once you have this
widest measurement, you will need to
add at least 5 cm. And that's what makes the Shirt have a bit of space to breathe. You'll also need to add a four centimeter seam
allowance because we have 12 here
and then 34 here. For example, around
my bust is 92 cm. And I would like a loose
fitting shirt like this. So I will add 10 cm and then I will add my 4 cm seam allowance. That total comes to 106. And the last step is then
dividing that number by two so that you get your front
piece and your back piece. So each, my front
piece will be 53 cm wide and my back piece
will be 53 cm wide. An extra note, if you're
going to make a dress, you want to have plenty
more width so that you have space for your legs
to open as you walk. You might even like to do a bit walking and measure around the width of your legs
because when I made my first long Smock, I didn't think about this and
then I ended up having to walk like a penguin
when I wore it. Have a look at the calculations
from my pink Smock, which we'll see is really wide. So I've got lots of movement
for dancing and walking in. Then the length of your
smock measure from your collar down to how long
you want your Smock to be, and then add 2 cm
for seam allowance. For example, if I was to
make a Smock like this, so the hem just can be
tucked into my trousers. I would take this measurement
of 52 cm and then add 2 cm, so 54 cm in total. Or if I wanted to make a dress, then I need to measure how long I would like
my dress to be, for example, reaching right
to my ankles like this, like my pink dress. Then onto the Sleeves. Firstly, we need to measure
the length of the Sleeves. We measure from our
Neckline at the top of our shoulder where the color
of our Shirt will be too, where you want your
sleeve to end. And then we add 2 cm. You might like to get
someone to help you with this as it can be a bit fiddly. For example, my measurement
from neck to wrist is 64 cm, so I will add 2 cm
for seam allowance. So 66 cm in total. Then the width of our Sleeves. It's a weird mathematical
feature that the width of our smock
here at the front, if you fold that in to, that is actually exactly the same width as the shirt sleeves. This normally works as quite a good guide for how
wide you like your Sleeves. But another way you can do it is just measure the widest part of your arm and then
add a large number. In this case, I've
added 24 cm so that I have lots
of puffiness and an extra 2 cm for
the seam allowance. I recommend gussets
to be 9 cm by 9 cm. You might like to do them
a little bit smaller if you're making a garment
for child, for example. So for Bobby Smock, he's two. I used a seven
centimeter Gosset. Then onto the Neckline. You can measure an
imaginary Neckline or use an existing top for this
Neckline on measuring 58 cm. And then I need to add 2
cm for seam allowance. So it will be 60 cm and the
strip will be 3 cm wide. Then the risk cuffs,
as with the Neckline, you can imagine your
ideal sleeve width or use an existing
garment for this Smock, I would like the risk
to gather in 220, 4 cm. So I need to add 2 cm
for seam allowance. So 26 cm. As with the Neckline
in this design, the cuffs are just 3 cm wide. That 3 cm allows you to fold around like this and make these very small and neat cuffs. Next we're going to
measure neck to armpit. This will determine the
first seam that we saw, which is this one here that
goes from neck and down. You will particularly
need this measurement in the attach Sleeves
part of this class. When you take this
measurement or you need to do is go from your color down to where you would
like your armpit to sit. Right. So that's all the
measurements we've need. Let's picture what we have done. By the end of this, we will have all the measurements to
cut all of these pieces. Head to the measurements and
calculations document to see the measurements for each Smock style and
my measurements, if you just so happened to
be the same size as me, which is a ten to 12 in the UK, you could just go to
the measurements and calculations document and use the exact measurements
that I have used to cut your pieces
for your Smock. Now, if you don't already
have your fabric, it's time to go to Lesson five of Hand Sew
a Gathered Skirt. We get some more idea about the fabric you will
choose for your project. And if you've already
got your fabric, then head to the
next lesson where we will start to cut off fabric. See you in the next lesson.
6. Cutting Fabric: In this lesson, you will
be cutting your fabric if you'd like a more
detailed lesson on how to prepare
and cut fabric, I recommend heading to Lesson six in the
Gathered Skirt Class, which will give a more
detailed method of how I like to prepare
and cut my fabric. But for now in this lesson
we will just be cutting. In this lesson, you will
need the measurements you made in the last lesson handy. And if you haven't already make sure
you've downloaded the measurements and
calculations guide and that you have that with you. Okay, so here is
my white fabric. All I'm doing is using my tape measure to mark
out the link so I need, and then I will be
using the method of pulling a thread
or drawing a thread, which you will find
more about and more in more detail in lesson six of
the Gathered Skirt Class. But basically
involves pulling out a little thread
and using that to create a line and your fabric so you get perfect straight lines. So here I am with my needle
carefully pulling out the thread along the full
length that I need to cut. And using it to pull, pull, pull along the fabric and it creates a little small
line that you can see. You need to do this
in very good light. So either you need
an open window with natural sunlight
or make sure you've got a good overhead lamp so that you can really
see your fabric close up. I recommend that in general, in this project
actually when you're doing really fine hand sewing, good light is crucial. So there I can see that line. And I follow that along with
my trusty Fabric scissors. Then we will have, our four main pieces will
have alright sleeve or left sleeve or front and
back of the Smock. I recommend marking this on your pieces now because it
can get very confusing later. You will also see
that I'm drawing an arrow on each of the pieces. You will definitely
need to do this as it will help you line
the pieces up. If you'd like more instructions on what these arrows mean, head to the measurements
and calculations document. So here we have our
four main pieces plus or too little
under arm gussets. Okay, I'll see you in the
next lesson where we will be attaching the Sleeves
to the front and the back
7. Attach Sleeves: In this lesson, we will start to construct our
garment by attaching the right sleeve and
the left Sleeves to the front and the
back of the Smock. The first thing we will
need to do is mark on our neck to
armpit measurement. For Bobby's Smock, that
measurement was 17 cm. Head to your measurements and calculations and get
your measurement. You will notice here
that the pieces are facing so that the arrow
is pointing downwards. So you will see there
that's the back piece. Now the arrow is
pointing downwards. And I marking from the
top of the piece down 17 cm on both the front
and the back of the smock. On both sides. Once you've completed
that on both sides, you're now ready to start
attaching your pieces. Here I've got the left sleeve
and the front of the shirt. And you can see my 17 cm, that'll mark, I've drawn there. What we'll do is pinch
those two pieces together. This might be a point where
you would use some pins. If you like to use pins
to attach your piece. Also, if you're a machine
Sewing Machine user, you could be just
running along this, this part on the sewing machine. But I will be using
running stitch. In one of my other
Skillshare classes, Somebody commented about
running stitch and they said it's not a
very strong stitch that I should be
using backstitch, but I use running stitch in all my garments and in
all the toys I make. And I did see a Bernadette banner video where she explained that in historical
garments they did often use running stitch. I find running stitch
just absolutely perfect for fixing my
garments together. Like I said, you might like
to use a sewing machine. Or if you really
like backstitch, you could use backstitch to
attach these two pieces. But for me, I use
running stitch and I find my garments
last perfectly well. And wearing a dress
right now that has been through the washing
machine many or many a time. And it was constructed
using running stitch, so I have no worries. So here we go is my lovely
neat running stitch. Running along. I do tiny little stitches
about a millimeter each. I go all the way to that
17 centimeter mark. And then I will be
doing a fastening not to fix that night one nice. Not actually. Why the heck not? Why
not do 2 kt for any of those people out there who say running stitch
isn't strong enough. That's why I like to do
2 kt to be extra secure. So there we go, my 2 kt on my running stitch. There we go. The left sleeve and the front of the
Garment are attached. So now we need to work around. So now we get all right
sleeve and we are attaching that to the front using exactly the same methods. So we line up, we pinch
those two pieces together. Again, this might be a
moment that you would use pins or you
might like to use your sewing machine if you are a machine lover and want
to speed up this process, I do everything by hand. So we will be attaching this front piece
and this right side piece using running stitch again in exactly
the same fashion. So there we go. Now
the left sleeve and the front and the
right sleeve have all been attached
using running stitch. Now, one more piece, we've now got the
back piece there. And we are going to attach
that to the right sleeve. So using the same method, we've got that mark with this 17 cm and that's
where we're going up to. So we'll do that again. Here we go. We have left sleeve, then the front, then
the right sleeve, and then the back. And then you'll
never guess what, you attempt attach the back to the left Sleeves so it
forms almost like a circle. Here I'm pulling up, there's the left sleeve. And then I bring the back
piece around and I will attach those to using my same $0.07,
17 centimeter marking. And using running stitch, again, fascinate with one
or 2 kt, either end. There we have it, the to Sleeves attached to the front and
the back of the garment. It starts to already
look like a Smock. There. You can see
it from both sides. I'll see you in the next lesson where we will be attaching the gussets and sewing
the Sleeves together. See you in the next lesson.
8. Gussets and Sleeves: Welcome back. In this lesson, we will be sewing the Sleeves together
and attaching the gussets. The garment is taking its shape. We have here the left sleeve
and the front of the smock. And that's where we're going to. So in our first Gosset, we take our small square
Gosset piece and we place it in this space. And what we need to
do first of all, is we need to fold a 1 cm seam. If you're new, you might
like to actually measure out 1 cm because I always
work with 1 cm Seams. I have 1 cm memorized
and just be able to see 1 cm when I see
it that you can use a little tape measure and
measure 1 cm from the end. And then you want to attach
this gas that you see, I've left that 1 cm gap
there on the right. And then the Gosset is right
into that 17 centimeter gap. I'm doing not there. So you'll see we've
got those 7 cm coming down and then
straight away from there, the goseq connect,
so there's no gap. It ends up looking
like one scene heading all the way from the neck down the Gossett
and then down the sleeve. So you'll see it
there, that 1 cm gap. And then same at the other end, we leave 1 cm gap. So again, if I think my thumb might exactly be 1 cm
and width thermodynamic. Anyway, let's leave a 1 cm
gap at that end as well. So fastening off with
a not in cutting it. There we've got one side
of the Gossett attached. We now attach the next side. So we've got the front seam. We did that first side which was attaching to the
left sleeve and now we attaching it to the
front part of the Smock. Just showing you
again where we are. So that was the left sleeve, this is the front of the smock. And the same thing
will happen here. Because we've wedged about
Gosset right in there. That's seam now can continue
on down into the Gossett. I'm going to leave that 1 cm gap from this side of the Gossett
and doing a 1 cm seen with doing my nice
secure fastening not I don't know why
gussets ever went out fashion because
they really are a brilliant having a bit of a gap from your armpit
rather than having your clothes right wedged up in your armpit doesn't
feel very nice. I'm doing running
stitch along here. My favorite stitch for
constructing garments. And always doing these
tiny little 1 mm stitches. And then I'll come back
here and I'll meet that 17 centimeter
neck armpit seam. And it will just all match up their seamlessly
corner to corner. Getting right in that corner
and then doing a fastening. Not again, you might
want to do too. I've just done one here. And this shirt has
lost it pretty well. So we're okay. Now we're carrying on
with our Gosset twin. You need to attach
it to the back. We've got it attached to the
front and the left sleeve. What we're going to do first
actually is we're going to attached exact mirror image. Attach this right Gossett, the front to the right Sleeves, doing the same methods. So we fold that 1
cm and we tuck it right up to where
that seam ended. We get that really
neat all matching up. At this point, you
might like to use pins. As you know, I'm
not a fan of pins, but that's something
you might like to do. So here we go, both sides done a mirror image with these two sides of the
gussets sewn on each one. Now, we need to attach
it to the back. So what I'm doing here I'm actually going to, so this Sleeves shot first and then go back and complete the other
sides of the Gossett. What I want to do is once
the sleeve is sewn up, then it's much easier to slot in the other side
of the Gossett. As with all of this garment, I'm using a 1 cm seam allowance. I'm going right to the
end of the sleeve. And I'm going to tie a
fastening not there. Then I will do running
stitch all the way up the sleeve Back to
meet the Gossett. So there you go. Lots of tiny, tiny little stitches coming all the
way back and you'll see I've I've folded the Gossett
there so that I can get in to that point so that it ends up looking
like all one scene. But it's specific illusionary
and because we've done it in lots of tiny little Seams. But in the end, it will be all one seam going away from
the neck down this theme, and then all the way down
from the neck down the body. So getting right to that point there and doing one or 2 kt. Let's have a look at what
that looks like now. Unfolding what we've done. So now we've got the left sleeve is there is all sewn together. And we've got two
sides of the Gosset. It's now we can carry
on to the back. First of all, we're just
doing exactly the same. In reality, I normally do one side and then
complete the next side. But to stop confusion here, I'm doing the mirror
image of each thing. So first of all, we did that sleeve and then
the right sleeve. Now attaching the front
and the back together. And meeting back at the gussets, you see that seam goes all
the way along with my tiny, tiny little running stitches. And then a bit like before
we fold that Gossett, we get the angle so that we
meet where the Gosset is. So it's like a illusion of
one scene going all the way that we go. So now we've sewn two sides of the Gossett sleeve and
the front and the bank. And all that's left is the other two sides
of the Gossett. It should start to
look a bit like this. Now, when I first had a
go and making gussets, it somehow went completely wonky and did not look
like this at all. So be patient with
yourself and just give it a few go's and just re-watch this video to see
how to do it step-by-step, step, and slot it altogether. So now I'm off doing that
front and back seam. I've gone right into the gussets
and now I can just carry on along the next
side of the Gossett. Always leaving that 1 cm gap, 1 cm seam along every edge. And if it's all been measured
correctly and all lines up, then all four sides of
the gussets should have that lovely 1 cm allowance and meet nicely in the corners. So there we go. That's
the third side. And then when we come back
to this corner again, just folding the Gossett in half so we get
that corner point. And then we want to get
all the way right up to where the Gossett
meets the scene. Sometimes when I turn
at a point like this, we'll do another not
just to make it secure. We've done three sides
of the Gossett now. Coming back into
the fourth side. Then we do running stitch
all the way along there. And there we go, 1234
sides of the Gossett. You'll see that
last corner there where the Gossett
meets the scene. From here, I will do a
little knot to secure that one or 2 kt. There we go. That is the front and the
left sleeve complete. It will look like this. Left sleeve. Then you've got to,
when you flip it up, you should have this square, diamond, round and
round, all four sides. That side is all done. Then let's have a look
at the other side. We're going to do exactly
the same on the other side. So rewind the video and follow those steps
for the other side. Now I like to do is I like to check that I've got
those corners meeting up really tight because this is where there will be some
strain on the garment. When you're first
time doing this, you might not get right
right in the corner. So then what I sometimes do, what I'm doing now
is I'm reversing the garment the other way. I'm just adding a few little
reinforcement stitches. First one was a naught
and then just doing a few more to close up that gap where I may
have left the corner, not exactly sewn right
in tight to the corner. So you can see
where there's this. We're talking about
millimeters here. I've missed it by a millimeter. But to make your
garment really precise, you can go back in and
just double-check that. I'm happy with that now. And then you'll see then
hide the high the thread is. We do so push it through
and then cut it off that will hide that thread
once we get to felling. Let's just have a look now. Oh, yes, looking
very, very neat. Right up to the edge. Spotted a little stray thread. Let's get rid of
that, but that is all looking good. All that one. Can you see you again? Tiny, tiny little 1 mm
could correct that. But generally this
is looking good and I've done both sides. So that is the gussets attached and the Sleeves all together. Well done for getting this far. I will see you in the
next lesson where we will start cutting in preparation
of felling or garment
9. Cut to Fell: Welcome back. In this lesson, we will be
slowly and methodically cutting our Seams in preparation
for doing felled Seams. Let's get stuck in. You will see here that we
have the garment with the front-facing us and then
that's the left sleeve there. And what we're going
to do is we're going to separate
the two Seams here. So we've got to 1 cm Seams. And then the top
one, you'll see, I'm just cutting nought
0.5 cm, 5 mm off. If you're new to this, you might like to actually measure out that looks like but
you're basically cutting the scene in half. We're going to do this in
a very specific pattern so that when it
comes to filling, it all fits together
beautifully. So if you watch
this video slowly through and follow
along with me. So whether you are
sewing along with this, or maybe you're going to
watch the whole video, whole Lesson,
whole-class through, and then go back and do it. But this will give you an
idea of what we're doing. If you have your own methods for how you like
to finish Seams, you could even do
that, but this is my favorite way to finish
themes as a felled seam. If you're unsure of what
felling actually is, in the next lesson, we will be showing
that step-by-step. So if you're a bit
confused about why we're cutting off pieces like this. Then you can go and
watch the next video and you'll see what
felling looks like. I'm showing you how I've
methodically done it. So I've gone all the
way along the front, from the bottom, along
the Gossett and up, take a nought 0.5
cm off the front. And now I do exactly
the same on the back. So I flipped the back. But this time we're going to do this sleeve rather
than the side. So there's the left
sleeve, There's the back. I'm going to cut nought 0.5 off all the way along the
length of the sleeve, along the Gossett and
then up towards the neck. You will see as you get to
the gas that you have to cut a little notch like this, and then that one comes off. Then we do the Gosset. Next. I've done along the bottom
of the left sleeve. Now I'm cutting
nought 0.5 cm off the Gossett, straight along there. And then we go up from the
sleeve up to the neck. So again, cutting a little notch into it exactly at that corner point so
that it meets up there. And then going all the way
along here, nought 0.5 cm. You've gotta be
careful with this. They don't cut both sides. You might like to use
smaller scissors. Or what I'm doing with
that left-hand is I'm holding that other
seam out the way, so I didn't cut both of
them at the same time. So there we go. That one is cut so the 1 cm exist at the back and the
naught 0.5 at the top, ready to fold over. And then the last
thing we need to do is the last two
sides of the gussets. So we've done the left and the right there
you can see now I'm gonna do the
top and the bottom. So because what
you want is all of the Gossett felled Seams
will fold inwards. You will see more clearly what
I mean in the next lesson. Carefully only taking
that top layer and leaving the back
at one centimeters. So let's recap on
what we've done. From the font there. We've taken nought
0.5 off that front, 1.5 of the Gossett nought, 0.5 up to the neck. And then we flipped it over. And from the front one
we've taken nought 0.5 off the Gossett of the sleeve there. And then we opened up the
Gossett and we did the last two and took nought 0.5 off the two that were
opposite each other. So just seeing it
more close up there, there's that nought 0.5. You can check this. And then we do exactly the same opposite a mirror, mirror image. So you'll see there, there nought 0.5 is off the
top. And then at the back. What I recommend doing is
carefully methodically watching this video through as you prepare to
Fell, you're Seams. And you might like to watch the next lesson first where you see what felling looks like
and then you might more clearly understand
why we're doing this. This is what it
will look like at the end so that you'll be
ready to Fell. You're Seams. Having one last look
at what we've done. Okay, I'll see you in the next lesson where we will be starting
to Fell off Seams
10. Felled Seams Part 1: Welcome back. In this lesson, we are going to Fell are Seams. The felled Seams portion is
split into two sections. So in this first one, we're going to Fell one
side of the garment. And in this second video we're going to Fell the other side. Let's go. You'll see here,
I've got my garment already from how we prepared
it in the last lesson, where we cut off all the
pieces that we need. So the first thing we're going to just double-check
those notches. Look, okay, because we're going to start with the Gossett. So notice which way
round the garment is. We're going to start with two
sides of the Gossett first. So just watching this and close out how we do this, going in. As always, doing a
nice secure fastening not and working our way along with a Fell stitch. So this is the first
time we've done Fell stitch in this class. So I'm doing a nice
close-up here. What you do is you scoop
a couple of threads, go along a bit and pull through. Scoop a couple of thirds, go along a bit and pull through. And the more you do
this flat Fell stitch, the neater it will get. And the more even. So, I've been doing this
stitch for a long time. I think it's two years now. Not that long is it? I guess some people have been
sewing their whole lives. But in just two years
I've managed to get this stitch absolutely
immaculate, so it looks very neat and even I'm sewing along the whole length
of that gas it and then doing a fastening, not one or two as you wish. So that's one side done. Check. And then twisting the
garment around against, you can see what
we've just done. So there's the front,
there's the left sleeve. And I have sewn that side there. That was the first
one I've done. And now I'm going to do this one here opposite the
other one. We did. So doing the same method, checking Oh look my notch, I didn't line it up
exactly with the gussets, so I'm going to take
a tiny bit more off. There you go. It should be
right on the corner there. Before you do this,
but you might like to cut off all your
loose threads. You'll see here I'm a little bit of loose thread chaos water, all these threads
hanging around. Okay, So exactly the
same method we just did. In the opposite, a
nice fastening, not. Then we're going
to practice that flat Fell stitch all the way along to get a nice neat
finish on this garments. There we go. I've gone
all the way along and I'm going to do a
nice not at the end. Okay, so now we've done those
two opposite each other. So let's just get a
picture again of what we've done to holding
the garment like this. We have done these two and
now we are going to go, we flip the garment upside down. Now we're going to
go from the neck all the way down to the
bottom of the garment. Starting off with
a nice fastening, not as we always do. So if you've not done
flat felled Seams before, you might be watching thinking, Oh my gosh, this is so fiddly, but it is really worth
it because at the end, your comment has such
a nice finished, you could actually weigh
your garment inside-out. And interestingly, when you went a smoked garment inside-out, you get the lovely effect on
the Neckline. So here we go. Let's see that Fell stitch. I did one not underneath
and one not on top. On 2 kt here. We're going to
travel all the way along. So I turn and hold my
comment like this. Another thing to mention
with this Fell stitch, it might take awhile to get away of holding your garment in a
way that feels comfortable. But just gently
persist with it and you'll find a way
that is easy for you. Also, I find if I'm doing
a lot of flack felling, I can get better cramping my left hand were in pinching
the garment together. So maybe don't plan to do all of your flat
filling in one session To break it up.
That's normally how I so I do a little bit every day, half an hour, an hour every day. Now we're getting to
where the gussets starts. You might like to do
a couple of notes here because there will be more strain on the
Garmin here again, but always at the scenes at the edges there's
more strain. So we're going to now
travel along the gussets. So we've done from the
neck to the Gossett. Now we're going along
the Gossett with our same flat Fell stitch. My favorite all stitches. Okay, so I've run
out thread here, so I'm going to show you
what it's like if you want to end and start again. So what you want
to do is do not. I'm actually going to do
2 kt one, not two nuts. There we go. And then you hide the thread by threading it
through and underneath. So it will be under
the felled seam. That is what that looks like. And then to get the
next one and you look at where the
next stitch would be. So I've been leaving. I
don't know each one of my stitches about
nought, 0.5, 0.7 mm. So then we go into
the next stitch and then we do and not here. And then it's your
choice if you want to do another not there as well. I've just done one
it looks like. And then we're coming around
this corner bit again, which as I said before, you might like to add some notes here just because
we're gonna get more strain on these corner
corners of the garment. I'm just talking all the
loose threads out of the way. You may like to take a moment to trim off
any loose threads. Before this stage. I normally save all the
trimming for the end. But it could be a bit of a
neater working process if you trimmed off any loose edges here so you don't get confused. So now we've done from
Neckline to gas it. We've gone along the Gossett
and now we're going from Gosset down the side
of the garment. Here I am doing a not
there where we switch from Gosset to side just to make
sure that's already secure. Carrying on the
method of folding that top piece around
and working down. And then we will get to the end. Finishing off as we always
do with a nice not there. Let's do two one-to-one do. There's no right or
wrong with all of this. I learned all these methods
from studying garments, from studying books, and from
studying YouTube videos. I'm self-taught artist. So if you see something, a thing actually I've got a
better way of doing that, then please do it your way because rule just making
it up and figuring it out. Now we've felled all the way along there and look
how pretty it looks. 0 is my garment inside or
outside, nobody knows. Now. We've done the two
sides of the Gossett. Then we've gone all
the way along here. Now we're going to flip
it and we're going to do the left sleeve from the neck onto the Gossett
and then the left Sleeves. So there's the back. And I'm going to carry on
exactly the same fashion. So flip this around. Just showing you again
there's the back and this where we start. So watch my knot method again. So I do one naught underneath, and then I flip it around
and do the other not on top. There we go. There's the second not going
through the loop and pull. Now we're going to travel
down from neck to Gosset. We've done it. Again,
getting to this corner, the goseq, just maybe we'd like to secure it with
one or 2 kt here. As this part of the garment
will get more strain. Now on to the Gossett. I'm doing another note here. So I've done one not one side, one not the other side. Like I said, I don't have
a specific rule with this. You can try what you like. I found that these garments
actually wash pretty well. The thing they don't like
is the tumble dryer. So you are okay putting them
in the washing machine. But it's the tumble
dry that really, really throws them about and I'm puts a lot of
strain on a garment. So if you want to keep
this Garment lasting, as long as it can, I recommend not to
tumble dry this comment. Okay, now we're getting
to the last bit, which is the sleeve. So I'm doing, I'm gonna
do another not here. We get to the sleeve. There we go. Nearly
finished this side. So we're just going to tuck
this and go all the way along the left sleeve in
our same Fell stitch. So we scoop a few, we go along a bit and pull, scoop a few, pull along a
bit and pull. There we go. And look how pretty
this next now, there's the Gossett, There's
the front as the back. And now it's time to
start on the next side. Let's see you in the next lesson where we will sew the other side
11. Felled Seams Part 2: Welcome back. In this lesson, we will be flat felling
the other side. So it will be an exact mirror
image of the right sleeve. But let's just work through
it a little bit so you can see how it's different when we reflect it the other side. So just having a look
at what we've done, that is the first
leave we've done. And then now we're going
to do this other side. So we always start
with the gussets. We're going to first of all to one and then the one opposite. So it's just have a
look where that is. It's this one. We're going to fold it under
and do Flatfile seam here. Always hiding the tail of our
thread when we attach Nazi, you see there I've hidden it under that seam which
will be flat felled, so that will disappear later. So starting with R naught
and then we work along and flat Fell the first
side of the Gosset, finishing with a nice fastening, not 1.2. Then we are going to
do the one opposite. Why did I do 3 kt? They're feeling of it
really going for it. So there's two
opposite each other. So once we've done
the two opposite, then it's very obvious
how we travel along because of the way we've
prepared it by cutting. So we're gonna go
along from the bottom. There we go. Look. Can you see all the
way to the Neckline? That's that part done. So we've done the two gussets and then all along the front, and then we flip the
garment all around. Once we've done that nice front. And then we work. You see here with arrows
facing that I'm at the bottom of this leave. So we worked from the bottom of the sleeve and we
travel all the way up. If you are confused, you might like to
go back and watch the first flat Fell Lesson
again and follow it through. I'd also like to say
that if you're just watching this and you're
not actually doing it, it might seem a little confusing
because you might think, how am I going to work
out which one goes where? Once you start doing
it by following along, it will be very simple and easy. You just need to follow with me. So here I am going
from the bottom of the sleeve and then we're
going to work all the way up. And in the end it
will look like this. So there's the
first slide we did. All beautiful and flat felled. And then here's the other side. Lovely, lovely, lovely. Looking, absolutely gorgeous. I will see you in the next
lesson where we will be working on the
neck Slit opening. See you in the next lesson?
12. Neck Slit: Welcome back. In this lesson, we'll
be cutting and sewing or opening at the
Neckline, vast Smock. Let's go. Okay. So here is my Smock laying out and that's the back there. I'm going to do my
opening on the back. You can choose
whether you like to do it on the back or the front. So first one, I'm getting
exact center here, the exact back center by folding it in half
meetings seem to seam. That line. I've done down
there is I measured how long I would like
my neck Slit to be. So now we know
where it's going to open from and then how
long it's going to be. In some of my comments, I've done a really long one. And then I wear a
little vest underneath. Or you might like to do a
very small little neck Slit. Well, you might even like
to not have one at all. If you're Neckline is big
enough to slip over your head. But I do think this adds a
really nice pretty feature. So now we're doing
similar to flat felling, but it's a kind of rolled
opening. I rolled. It's probably only
two or 3 mm each one. The way this is different. So first one just doing a
nice fastening not there. The way this is different is
to flat failing is rather than going right at the edge. You'll see in a second. I so this might be a point. We'd like to use
pins, but I just really like to pinch it. I scoop under and instead
of scooping up at the edge, I go in a bit further
to the middle of it. Let's see that again,
some scooping. And instead of going
right at the edge, I'm going into the middle
of that rolled opening. So it's really secure. That's watch that again,
really close up here. Scooping in these look nice. I'm using my little finger
to hold it in place and then going for the middle of that. And working alone. Just like with our
normal flat Fell stitch, it will take awhile for this
to get neat, to get even. Just be patient with yourself. What I start doing as I
get closer and closer to the bottom of the
Slit, I graduated in. So it's going from here, which is about two to 3 mm wide, the opening, and then it
goes down to nothing. Which just the open Slit. You see that slow fading. We just carry it on a long, this is just a tiny little
role at the end. I've let my fingers and
I've just the tiny, tiny little roll I
can millimeter now as it graduate's down. Then what we're going to do is once it gets really skinny, we're going to switch
to buttonhole stitch. So we go under, pull through to get a loop. When we get the
loop we pull away. And that makes our first
buttonhole stitch when we carry on along in the same fashion and
what you want to do, you want to do the stitches
so close to each other, they're nearly touching or
they might be one thread away. So you go down, you pull through the loop. So you can go either way. You can go down and
pull through the loop, will come up through it and
pull through that right down. I'm about 2 mm from the edge. And each stitch there
right next to each other. Because we're working
white on white. It can be a little
bit harder to see. For a more statement. Finished, you might like
to use a different color. Now you'll see we're getting to Where the Slit ends. And what we're going to
do is we're going to work around in a U-shape. Like so. Doing the buttonhole
stitch to reinforce this would be a very weak
part of the garment. The buttonhole stitches go all the way around in a U-shape. So watch me, I'm going in. You might even like to
draw a little you with your iron off pen that you
follow and work around. All the stitches are right
next to each other because I really want this
to be very secure. Can you see where we're
at? Teeny tiny stitches all next to each other. We're working around. It's about too many to
2 mm from the edge. And watch how I
pull away from it. And that's what
forms the nice not. So now we've done that
curved U-shape around. Now we head back up. The other side of the neck Slit. With all of these techniques
is just trial and error. You've got to give it a go
on your particular fabric. If you haven't even
lighter fabric, you might want to do your button hole stitches even longer than 2 mm might want to do them,
for example, 3 mm. So just give it a try.
You might like to even practice on a little
piece of fabric, cut a slit in it and have a go doing that U-shape
on the button hole. So you you get used to what that feels like
and what it looks like. We're doing the same
now in reverse. So we've rolled Slit and it's going to slowly go from a tiny, tiny 1 mm rolled Slit, which we're doing the button
hole stitches around. And it will gradually
progress to a two to three millimeter
rolled stitch. I'm and we will switch back to the variation of
flat Fell stitch. So you'll see, I'm just coming back up
and what You Can Do, you can line it up so
that this is where my buttonhole stitch
ended on that side. And I want to meet
up with that so that they're in a mirror image. Going round and round and round. Have a look, see here. Yes, creating a
lovely mirror image. When you see sometimes
I switch from going down or coming up with
the buttonhole stitch, it really doesn't matter. So now it's time
to switch back to the variation on flat
Fell stitch. There we go. We roll it a bit more. And then we start
working our way up in the same fashion. So scooping little bit then
coming through to the middle. And I will be
traveling all the way back up to the Neckline. Rolling as I go. You can't really use pins on this part because it's so fine. That is why I prefer hand
sewing machines sewing, you can just get that
really fine detail that you can't get
with a machine. It I just can't see how it be possible to get these
teeny tiny stitches. I'll get this beautiful
Neckline on a machine. So there we go. We work
all the way to the top. Look how nice That's looking. Lovely, lovely. Few more stitches
to get to the end. And then as always, on ice fastening not to
make that nice and secure. This part of the Neckline
will be gathered into our smoked Neckline. So we'd have to worry about
this loose bit thread. We're going to leave when
we cut it. There we go. Look how beautiful that looks. I will see you in the next
lesson where we will be starting to mark our garment
in preparation for smocking. I will see you in
the next lesson.
13. Marking to Smock: Welcome back. In this lesson, we are going to draw out our own ruler in preparation
to mark our garment. And then we are going
to go ahead and mark or garment for smocking. Please download the
measurements and calculations document to see the exact
measurements for the ruler. And then you will know
how to draw your ruler. You, depending on how
thick your fabric is, you might do your smocking
dots in a different widths. I explain this all thoroughly in the measurements and
calculations document. Let's get stuck in okay, so here we are. I've got a piece of
scrap cardboard here. And I am first of all going
to make a long thin ruler. Head to the measurements
and calculations document for an idea of how long your ruler should be and also how wide
your ruler should be. The width of your ruler
is very, very important. In this project, I actually made this ruler slightly too wide. And it caused me some problems
later because if you've got your gathers too wide apart, it can make it a bit tricky, but you can read about that in the measurements
and calculations. So for this particular Smock, I'm doing my dots 4 mm apart. So you will see me here doing
little marks at 4 mm apart. For my thicker Smocks. For the orange top
and the red top, I did nought 0.5 because the
fabric was a bit thicker. But for this project is a
very light and thin fabric. So I'm doing nought 0.4. You might like to do
a smocking test on your fabric and take a
small piece of fabric about 10 cm wide and just
Smock a little bit of it. So you can practice smocking before you do it
on your garment. Or if you're like me,
you just go for it. You can always unpick what you've done when
you do smocking. So nothing is set in stone
when it comes to fabric. So you now, you can see
now on my ruler there exactly opposite each
other, those marks. So we've done 4 mm all the
way along and then opposite. And now I've got my
garment and we're going to use that ruler to
actually mark on. So we will need or iron off pen. I've got my blue one here. What I'm going to
do is holding it right on the edge of the fabric. I am going to draw the little
dots on one dot to dot, three dot for dot. This is very relaxing
and meditative. It's not something to rush. If you've learned
anything so far. This is a slow project. It takes time. Takes me at least six weeks
to get one of these finished. Just doing a little
bit here and there. It can all be very relaxing
if you do it that way. If you're trying to rush, it
is not going to be PFK-1. So take a moment
to relax your jaw, relax your shoulders, relax your temples, soften your gaze. Make this relaxing and
enjoyable because this, this little bit does take a little while
because we've got to go all the way around with
this nought 0.4 dots. Here I go, traveling around the garment
from the Neckline. I am marking on the
inside of the garment. So the garment is
currently inside out. And we are working
inside out for this. Doesn't actually matter which
side you draw the dots on. But I'm doing it on the
inside of the garment. So you see now I've
worked all the way around and then I'll come back to the neck and the other side. So I go dilly, Dilly, dilly, Dilly do all the way around, all the way around,
all the way around. And back. There we go. And then we just need to
repeat that with our rows. So the width of our ruler will determine how high our rows are. And that's why it's
really important we get the width of
our ruler right? Like I said, in this project, I made my ruler
slightly too wide. And if you go to the measurements and
calculations document, you will find out the best size for the width of your ruler. So do go ahead and
download that. Now we're on our second row. We're lining up those dots that this is the reason
why there's dots on both sides of the
ruler because we want them to be matched up. So we match up the
dots, not the top. And then we are drawing
the dots at the bottom. And we carry on and
on and on the same. So now as your creative choice, how many rows do you want? So you can use your
ruler now to get an idea of how much
smocking you want, do just want a few centimeters
with smocking or do you want really big
Smock to Neckline? And that will determine
how many rows you do hit could also be determined by how much
patients you have. Because sometimes I might occur, I've done enough dots now, that is enough Rows. Here I am in this
project working around. I am doing three rows
and we just need to do exactly the same as
we did. There we go. Mine is just under 5 cm. But that remember that
the first centimeter will get swallowed up in the
edge of the Neckline. There we go, three dots
all the way around. Three rows all the way around. That is ready to go. Now, one more mark
we need to do. We need to work out the
halfway point on the Sleeves. The halfway point on the front and the
back of the garment. We already know the
halfway point at the bank because that's
where the neck Slit is. But we need to mark
on these other ones. So that is half of
the left sleeve. So I just folded it in half
and I've got that point. There we go. And then I'm going to do the front
of the garment. Like I said, I've
already done the back because the back's got the neck Slit and that indicates
where exactly half is. There is the front, the
halfway point for the front. We will use this later to make sure our smocking gathering is even because it can
be easy for it to go uneven if you don't
have some guide marks. And then lastly,
the final Sleeves. We want the halfway
point for that one. So we'll do the same. Fold in half. Get
the halfway point. Let's leave that we go. So that's our Smock
all marked up. Head into the next
lesson where we will start gathering or Neckline
14. Gathering: Welcome back. Now it's time to start gathering in
preparation for smocking. Let's go. Here's my garment laying out. It's still inside out. And I've got the slit at
the front there and I'm measuring a long
piece of thread, the whole width of the garment so that this thread can go
all the way around. Then I'm going to do what's
called a big hairy not. We do that by wrapping it and then we
use our fingers to twist, twist, twist, twist,
twist, twist with. So we get a really,
really nice big not because that is what's going to, we're going to use
for gathering. Also want to stress that this thread needs to be
really strong because it's going to get quite
a lot of strain on it as we pull it through,
as we gather. Then I've folded,
I've thread my needle and got it already to start
going in these little dots. I really enjoy this step because you don't have
to think about it. You've already done
all the marks. And now you just very
neatly going through and going into each dot, up, down, up, down. Remembering again,
elegance patients. Nice relaxed shoulders,
relaxed jaw. Enjoying the process. Going through dot-dot-dot. Pulling through as we go to the not will be
right at the end. We just slowly work our
way all the way around. Now when you get to
the flat felled Seams, then a bit of a bump. But we just treat them
exactly the same. When we Smock this bit as well. It will be slightly thicker
because of this scene. But I don't think
it's a problem. It all adds to the
character of the garment. Continuing to travel around, dot, dot, dot, dot, dot. Same again, we've
got to another seam. We treat it exactly the same. We go right in the middle
of it whether daughters, this process can be very
slow and meditative. Just following the
line along straight. Now I'm getting to the end. And I'm going to, You see how my thread
comes out exactly where my rolled edge ends? I want to replicate
that on this side. So what that means,
I'm going to slightly cheat it with my dots. I'm going to have to slightly
cheated on each line so that the thread
comes out exactly the same point on both
sides of the garment. All I've done is just
literally nudged along very slightly where those
gathering stitches are. And I'm going to have
to repeat the same. I wanna do the next
row. So now I'm gonna do another one
on my big hairy nuts. I wrap it around. Pinch my fingers.
I want you to lick my finger so it sticks. Twist it, twist it, twist it, twist it, and pull. There we go. We have
another big Harry Knox want one big hairy
not both ends. Then guess what
we're gonna do now. We're gonna do the next row. So what we need to do,
we do the same thing. We cut the full length of the, the full width of the
garment twice plus a little bit extra for naughts.
And then here we go. We're going to
thread your needle. Oh no, not for alanine or
naughty, naughty first, we got to that big, big hairy, not so twisting, twisting, twisting or look at that. You might even like to
do it twice if you want. You're not really, really big
so that it's not going to slip through the
holes. So there we go. Now we're going to follow
along the next row. What you might like
to do just to make sure that everything's
all evened up. Is that as you travel
along this second row, you really want
to make sure it's lined up with the first row. So once you've
pulled it through, you can use your
needle as a kind of measuring line to check because these are gonna
be our Smock Crows yes. Looking good. Straight. Next one,
yes, I can go straight. Yes, I can get and you
might want to just check that it after every time you
pull the thread through, just to check all your smocking Rows
are going to be nice. And even here I am
traveling around Again, check, check, check straight, straight,
straight. Lovely. Finding a nice
comfortable way to hold my garment and enjoying
this slow process. Getting all the way to the end. And like I said, I kind
of cheated it a bit. So I just went slightly
longer than the dots just for these last few stitches
because I wanted it to be a mirror image
of the other side. If you're like, What
are you talking about? Just ignore that and
just carry on the same. I really like it when the Smocks measure up exactly on both
sides of the garment. So there we go,
That's Row two down. Here comes another
big hairy naught. And then guess what? You never would've guessed. We're carrying on
the same again. So we need to get that
nice long length of thread and carry on. Here we are right at the end. Need to see me do
it all over again. Every time you just start a row, you start with a big hairy. Not every time you end a row, you end with a big hairy not so that your thread is not going to slip through either
end of your gathering. So there's our
last Harry naught. Now what we're going to do, like how lovely it looks. Now we're ready to
actually start gathering. So what we do is we hold
the three threads together. Or it might be more if
you've done a wider, wider amount of
smocking and you just slowly pull it along. This is where you
will notice where my smocking ruler was
a little bit too wide. And why that is, is there's two, each of
the channels in-between. Each row of gathering
is too long and it means it's not
gathering perfectly. You will see in the
next video I've actually gone back and
added another row because it was really annoying me that the channels weren't
really smooth because you need the the width between
each row to be just right, so that your channels
and nice and smooth and easy to work with. I just go round and I
gather from both sides, like in this fashion, until the garment is Gathered to the width of
the Neckline that we want. Really don't want
to pull too much in one go and just do this
very slowly because we don't want any of our gathering threads to snap because that would
mean we'd have to redo it also just being very slow gathering
a little bit at a time until our Neckline
is at the right width. Okay, so that's all
our gathering done. I will see you in
the next lesson where we will attach
the Neckline. See you in the next lesson.
15. Attach Neckline: Welcome back. In this lesson, we are going to attach the
Neckline to our Smock. In the measurements and
calculations document. It will show you how to work
out your Neckline or refer to the video lesson where we do the measuring
and calculations, but I'm just measuring it
against my son's T-shirt. It's very DIY option. And then adding 2 cm. Then once I have
that measurement, I need to mark out
onto my fabric. And I'm going to make
the Neckline 3 cm wide, which allows me to
be able to fold it around and attach it. So I'm going to
use the method we used very early on
in this process where we pull a thread or draw a thread so that
we get a straight line. For the Neckline. In
more modern garments, they use a bias cut. Sometimes four edges like this, which would be cutting
the fabric at an angle. But I always use, I just can't imagine ever doing that historically
because it'd be so wasteful to cut right along an angle like that if your fabric
so much gets wasted. And the very stiff neck client, I think, adds to the look in
the field of the garment. Then I'm now marking the 1 cm
seam allowance at the end. Sometimes I just do this by, by guesswork, but
in this case I'm, I am going to measure it. Then I'm going to get
the halfway point. We know the halfway point. Then once we've done that one, we're going to do it in
quarters and these will line up with the quarters that we
measured out on our Smock. If you remember earlier, we marked halfway
on the sleeve and halfway on the front and
the back of the Smock. So these, these notches
are going to match up so that we get a nice even
gathering our Neckline. If you want it to be
even more precise, you might like to do it in eighths and do the
same on the Smock. But I find quarters
to be just fine, especially in this case
when I'm working on a very small smock
for my two-year-old. When I'm doing it for myself. Much a much bigger Neckline,
a much bigger Smock. I might do eighths. So something to consider, just trying to get that
gathering nice and even. There we go. So now I have the quarters
marked out on both sides, front and back, and
also at top and bottom. So they're marked all the way along what it looked
like at the end. So 1 cm seam, halfway
quarters, etc. and then what we're
going to do now, we're going to fold that in preparation for attaching
it to the Neckline. I'm marking the halfway
point this way now. Then what I'm going to do is
I'm going to fold that 1 cm. Then I'm going to
meet in the middle. We're going to meet in that
halfway point like that. And they get a nice
stiff Neckline and then it attaches like so we sew it all the way around. So we are starting to get into more fiddly territory here. So just be patient
with yourself and no, you can't really do it wrong. Like I explained earlier
on, self-taught. And you can always
just go back and add more stitches and figure out. First of all, just attaching the very end of this
Neckline to the smock. And we really need to be careful
of these purple threads, of these gathering
threads because we don't want to sew them in, because they are
going to come out. We're going to pull them out. So just always being
careful to avoid those, those purple gathering threads. I'm working all the way
around this and I'll be doing quite a few notes
here because this is where we're securing
it at the end. And then we're
going to work along with a form of I guess I
could call it Fell stitch. I'm not exactly
sure if it's cold that when it's used in this way. But we are just attaching this
Neckline to the gathering. So again, if you're
not sure about what how much you need
to bend this over. I drew that halfway point
at the end and then I'm just doing it by eye. If you want to get
it really specific, you might like to measure
that all the way along So another thing you could
also do is you could also use an ion and you could
also use loads of pins now, but what I'm basically
doing is I'm getting that first mark that I drew on the first quarter
and marking it along the first quarter of the Smock. Then this bit, like I
said, is if Italy bit. What you want to do is you
want to get your gathers even. So. The way you do that
is by practice. And you do it by eye, because you're not going to
measure each two millimeter gather unless you
really want to make this an even more slow process. As you can see that it could
be useful to do eighths, do the Neckline in eights, and do the smocking eighths so that you can be more precise. But basically what you're
doing is you're squeezing it, you're taking the top
of the other gather and you're attaching it to
the Neckline, that is one. And then we carry
along like this. And you'll start
to get a feel for how far apart each gather is. Whether it's 1 mm or 2 mm. You just start to feel
what it'll be like. You'll see here. That's the the thick seam between the front
and the Neckline. Just treat it exactly the same. Can see mine are looking
really even and lovely there. That is just practice. So if you do it the first time and it seems
like they're uneven, just go back, unpick it. That's what you've
got your seam Ripper for and just redo it. We travel all the way along like that until we get
to our first notch. Then we remove the pin, and then we need to see
where the next fixing is. First one, I'm just going to get this as close as possible to that that notch or sewn up. I can really nice. And even so here's
my next notch. And here's the next
mark on the Smock, I can see it lining it up. You may also notice that
extra row of gathering I added in at the
end because it was really annoying me that the the pleats were so wobbly because my
ruler was too wide. So I added another row of purple just in there so that
they, they gather nicely. You can also use these lines as a bit of a ruler to follow along as you attach or Neckline. So you'll see that there's, say a four to five
millimeter gap from the, from that row, that purple
Row could even be less. That could be like three mill. In this kind of sewing. It's, it's not so specific
in the way that you measure. You know, with modern garments, you really cut out
very odd shapes and it's all by the
very, very fine. This style is very fine, but it's, I feel like
it's more forgiving. And any imperfections and wantonness or add
to the character. So my thread run out, so I do a little note on that, gather and push it through here. Then reattaching
I just attach to the next gather and do or not. There's me pulling the
loop through doing a not. So that's is losing one
thread and starting another. I'm just traveling
along the same, along to the next notch
around and around. And using my purple line as a guideline for where my
Neckline needs to be. If you want more
specific numbers, I've really gotten
into detail there and the measurements
and calculations. So head over there if you
want to see any more detail. But the main thing
I'd like to reiterate is I'm winging it
and you can wing it. And I've made many a beautiful
smock by winging it. And people making
these beautiful Smocks before they were computers. What very precise
measuring devices. And they still came
out very beautiful. So trust your own eye. So we're getting to the
end of this side now. So I just carry on
with my folding, make it nice and neat. And then we're getting
all the way to the end. So I need that end folded over the same as
I did at the beginning. So I'm folding over that 1 cm to get a nice neat edge at
the very end of the Neckline. Take a moment to regather
everything and just even out the Gathered
so they look nice. And even for when I saw them There we go, get all
the way to the end. In the same fashion,
just scooping up under one gather and
pulling it around. And like I said earlier, just being really careful those purple threads of your gathering thread because
you really don't want to sew them in because that'll make it much
harder at the end to remove them because we will not they will not be
existing on the garment. They just what we use this
as a ruler for our smocking. You see now I'm
pinching this bit in and attaching it
right to the end. So just really making sure
all these purple ones are out of my way,
get out of my way. Purple ones. This bit is fiddly. There's no way around it really either because you've
got to have your, your marking threads there. Just got to work around
it very carefully. Relaxing your jaw, relaxing your shoulders,
relaxing your eyes. Enjoying this slow and
meditative process. So I'm just cutting, I've knotted my gathers,
my gathering threads, and I've just cut a bit
off the end because it's annoying me all these extra
threads. So you can do that. Now we are heading
back the other way. This way is much
easier because you've already made the Gathered even. So you're just following
along what you've done on the other side. So I'm just folding that in half the Neckline
and attaching it. Get out of the way you
pesky gathering thread. Then we go exactly
the same as we did, but heading back the other way. So we scoot under a
gather and we pull it up. Carry on. We scoop
under a gather. We pulled up. We scoop under one
gather, and we pull up. And we repeat this
all the way around. So now we've done the front. I find the back is much easier because you've already done the hard work of
getting them even. So now you're just doing the
closing on the other side. Another question you
might be asking, hang on. Is the garment
inside or outside? I like to attach the Neckline on the inside first and then
do the outside second. There's no right or
wrong with this, but that's just how I
like doing it because I find that you get a need to finish on
the second row around. So now with, now we are doing
the outside of the garment. We did the inside of
the garment first and now we're going
around the outside. So we need to get into
the end of the Neckline. Now, we're just, this is
again another fiddly bit when we get to the end trying to stay away from all those
pesky threads. Tying a knot on making this
disappear into the Neckline. Snip. Voila. This is really starting
to look pretty now and, and starts to take shape. And now we already in the
next lesson where we are going to start smoking. Yes, that's going to take
this Smock to the next level. See you in the next
lesson where we're going to start smocking is garment
16. Smocking Row One: Welcome back. In this lesson, we will start
smoking or Garment. Just a little note, when I do smocking, I like it that the
zigzag pattern meets at an exact central point
at the front of my Smock. That is why you will see me start in the middle of my Smock. The other way you can do
it is start at the end, the way that we do in the second and third
row of smocking. You can head to the next lesson where you'll see me
starting from the end. But for this part, I will be starting
right at the middle. So you will have a perfect center point
For your zigzag design. So first of all, here I am at the exact
front and center point. And I, that's the
mark we did earlier. We drew that notch for
the front center point, so we already have it
marked out on our Smock. The right now the
Smock is inside out and I'm making
a little invisible, not the back, To
start the smocking. High, then very sneakily hide this thread down the back of one of the channels, ready to start. And I'm going to pop out just here on this line where we're going to
start the smocking from. The way we start is we first
of all join two together. That is our first Smock. Congratulations, you have
now done your first smock. And then we work down. This stitch is sometimes
called wave stitch, sometimes called Trellis stitch. This is what makes the
lovely zigzag design. And you can do whichever
variation of this that you like. You will see the
way that I complete the design and you
can exactly copy me. Well, you might like to adjust it a bit for your own design. So the way it works
is we go down for five stitches and then
up for five stitches. And you'll see what I mean. I'm just now tightening the purple thread so that all channels are all
even and ready to go. For this. I do
recommend watching both this lesson and
then smocking one. Here we go into count
stitches 12345, and then that bottom one
now becomes one again. So now we're on to
coming back up one to adjusting the
channels again here. Three, For every time I'm
just going up a tiny notch, 12345, and then that comes one. So now that's 11 234-511-2345. And just every time I go down, it's barely even a millimeter. It depends on what you want. Your, your zigzag will
your wave to look like. You can practice this. Also like to know that the
first time I did this, I found that it looked
really wonky and bad. And then I, I sort of
unpicked it on sauces again. But actually what I realized
is you just need to finish a whole row and then you
need to do the row after it. And that is when it
starts looking good. It doesn't look good when
you've just done a little bit, you have to get
it all, all done. In the next video, in smocking. In the next video with
smocking rows 2.3, I show my technique for how I hold it and get an even tension. So do you make sure that you
watch the next video before you actually start
your smocking. So now we're getting
to the end of this side and you'll see, I'm going to do a
little not at the end. And I'm just going to make
sure that everything's nice and tight as well. So there we go,
pulling that not. And then after that, who ipsi all got a bit
of that angle there. Loosen that out, and then make that thread disappear through
the back there. Now we're going to rejoin
from the middle and carry on the other direction so that the other side of our
Smock get smoked. Heading to the back again
to do a little fastening not I'm going to do the same technique before
I sort of sneakily go down the back of the channel to
meet up with where I was. Let's just wiggly,
wiggly, wiggly. Come through. I'm going to come out. You'll see where
I come out under that first first Smock so that we're ready
for the next one. So we've done that counts. The first one was already
done that counts as one. Now we're doing 2345 and then we're going
to flip back and go. There's exactly gonna come
back down the other way. Here is close up, near the end. So I've now got to the
end of this side. Now. We go. Let me just need to get the
last few stitches and then we will do a not. Here. There we go. All closed up. Then make that disappear. Let me trim that
off. There we go. That is all first row
of smocking, complete. Row starting to look
pretty already. I'll see you in the next
lesson where we will do the next two rows of smocking. See you in the next lesson.
17. Smocking More Rows: Welcome back. In this lesson, we will add further
Rows to our smocking. So here's where we left off. We've done our first
row of smocking. It looks very even
and beautiful. This time, rather than starting from the center of the Smock, we're going to
start from the end. And we're going to
use the last row of smoking as a guideline for how we are going
to zigzag this time. So starting with a couple
of fastening knots there. At the end. You'll see my comments the
right way round because we can see the smocking
at the front there. Then we're going to
create a diamond effect. So we're going to zigzag in, watch out for those
purple pesky threads. Notice how I've tightened or the purple threads so that the channels are really visible. So first of all, I'm coming down
towards that zigzag, then that last stitches almost touching the point
of the last zigzag. Then we traveled back out again. So that counted as stitch one. Now we're gonna go up
a bit and along one. Notice how I sometimes a bit fiddly to get in-between
the channels. You will get it in time. So that counts as stitch do. That's three. That's four. The last one there,
that is five. See how it's starting to close off the diamonds and then we
go back. So that was one. Now we're coming down 234. Then the last one
lines up with the top. The other Row, 55
then becomes a one. And carry on and on like so. Here I'm at the end lake. I'll see you could just
leave it like that. It looks really nice with just one diamond running
all the way along. I just going to finish off now. So we'll just get to the
end again making sure those pesky gathering
threads are out of your way. Pulling it tight. So the channels are easy
to see, an easy to get to. So we're going to do
our last few stitches to close off this Row. Little bit fiddly at the end, trying to tighten up all the channels. Last stitch. Now at the end, you can see here how it
got a bit loose. So then I just go through
and pull last thread and it will tighten it up much tighter. Now hold it, pull
it one more time. Getting the tension is something that takes a little
bit of practice. Practice makes perfect. We all know that one. Don't we? Just have to put the timing. Finishing off with
that last not there. And then making that
thread disappear. Abracadabra, one off. Now it's time for row three. So in this project, I just do three rows. You could do a lot
more than that. You could do a lot less. It's totally up to you. This design is yours
and you can choose how you want to do it for
this last zigzag. Rather than do another
diamond style, I'm going to zigzag
along in parallel. You will see what I
mean in just a moment. So tightening up again, pulling the purple
gathering thread so we get nice tight channels. And then I'm just
doing that first, not to get started on this Row. I do find it much easier
when you are just working from end-to-end in that first row where I
started from the middle, it's definitely more fiddly. But for me it's worth it because I really like having the, the zigzag to be at
a central point. But if you don't
mind about that, then you could just start at
the end for all of the rows, including the first row So there's that first not, and then I'm going to tighten all the channels and
traveled back the other way. And that will be our
third and final Row. As always, this is a slow
and meditative activity. You will encounter frustration. I still encounter
frustration on the daily. And it can become a
bit of a metaphor for life because we just breathe
through the frustration. Relax your jaw, relax
your shoulders. Might need to unpick
if necessary. Start again. Just carry on. So you'll see this
time I'm running the zigzags in parallel. So first of all, I've
gone down to reach the button and now I'm
slowly traveling back up. And I'm going to use Row two as a guide for how I want
this zigzag to go, you'll watch me slowly. I don't think it's
even a millimeter. It's such a tiny dash every time that you
move up the zigzag. And you'll get this
in your own time. Get it nice, looking nice. And even because you could
choose to do really big, tall zigzags or
barely there zigzags. It's called wave
stitch, so it doesn't need to actually even
be appointees exactly. It could be waving up and down. This is an experiment, but this is the way
I like to do it. I like the very
sharp zigzag look, and I like the diamonds. So that's how we've
done it on this design, but you can do it as
well as you wish. Little reminder to
relax your jaw, relax your shoulders, breathe, and enjoy the
process of smocking. Learning to Smock your clothes, how we do anything, how we do everything. We need to pay attention to this moment right here and now. So that's the last
one that's number five or number One
of the next one. Hold it Calvert. He is looking so we carry
on in just this way, tightening up all
the channels as we go and zigzagging up and
zigzagging back down. This is how I keep the tension. I've done a bit of a further
away shots so you can see. So I scooping or so
I'm going to do, I pull it and then I
use my left hand to get an get it nice and tight
before I do the next one. There, zoom out view here just shows you how I get the tension, get it nice and tight
for each stitch. Look how lovely It's looking. Nearly at the end.
Now. Gets a bit fiddly or doesn't hear the end. So we pull that purple
gathering thread, makes sure it's out of the way. To do those last few stitches. Using Row two as a guide
for this third zigzag Row. Making sure it's You see, what I was doing there is just making sure I can
get that tension. And when I film myself, I find it much harder to get it nice and tight because
I you'd normally have that using my left hand to
pull that when I'm filming. It's just a bit
trickier, so it will take while to get
the tension right. Be patient with yourself, keep trying it out and
you will get there. And the reward is a very beautifully smoked shirt that you will most definitely
get compliments on. People always notice
my Smock shirts. Think people can just
sense it on a level that it's been so carefully handmade. So now we've done all the rows and then
this is my favorite bit. This is really satisfying. So we get our purple big, hairy naught and we just snip, we don't need you anymore. Goodbye purple. All finished. And
then the other end, we just pull it out very
carefully because it might get caught if
we were a bit of a silly sausage and caught
that purple thread anywhere, this is where the truth
shall be revealed. How much did you avoid
the purple thread? Sometimes you'll hear
a little popping noise as you pull it through, which is a bit scary thing. Oh no, is it got caught? I do find that normally
I have caught it somewhere and I'm I have to go back and
double-check LET there. That's feeling a
bit tight in here. There we go. It's
coming through. This bit is just my
favorite bit ago that oh, it looks so pretty. There's the back. I'll see you in the next
lesson where we will be adding the button
Loop and the Button. See you in the next lesson.
18. Button Loop and Button: Welcome back. In this lesson, we will be attaching the button
Loop and the Button. Here's my little Button. And this is how
using the button, I measure how much length
I need for my button loop. Basically the loop needs to fit around the
button that you're going to be able to slip
it through that loop. And then you can have
a little bit extra to fix it to the Smock. This is how I
measure it by hand. And we want our loop
to be pretty narrow. If you go to the measurements
and calculations document, you can find out the exact
width of this belt loop. So head over there to
get that information. What I want to do is the
same as the Neckline. I'm folding it in half and
then folding those two pieces into the center to make
a little sandwich. But nothing is going to go in the middle of this sandwich. It's just the two pieces
of bread and no cheese. It's just the loop. So you see it just folds
like this and then we're basically just making a
strong piece of string. Alternatively, you might
have a pretty piece of ribbon or something that you might like to
use as your loop. But to make it match the
fabric of the garment. This is the technique I use. And now we are going
to use blanket stitch to fix this little
loop of fabric together. I think blanket stitch looks really nice when you do it
in a contrasting color. It can be such a statement. Look about because this is just a tiny little
detail on the garment. I am keeping the
same color thread for the stitching
as for the fabric. Just watching along here. As I do, the button is basically the same stitch as
buttonhole stitch, but you're leaving more of
a gap between each stitch. So you go in between. If you're someone
who really wants something explained
in a different way, you might even like
to Google blanket stitch that are so many
videos of people on YouTube doing blanket stitch on the edges of blankets, etc. so this is just my personal
choice here that I've, I've chosen blanket stitch and I like it for this little loop. Because we want to make this a strong little
piece of fabric. Because it's going to be under strain as it's going
to hold the button. So this stitch not
only looks neat, it is also really
strengthening the fabric. So you can see here I'm just
trying to get the Zoom, write little tiny stitches
going all the way along. And then at the end, good old fastening not and
that is the Loop complete. Beautiful scenario. We've got our Smock facing
the right way round. So you can see all the smocking detail
there on the front. And now we're going to attach, firstly, we are going
to attach our Button. So we're just going as close
as we can to the edge of our Smock without the button
hanging over the edge. And as I've said many
times in this class, I am self-taught and this is
my own way of doing buttons. And my buttons have
stuck on pretty strong. But if you want and a different
kind of Button technique, you could go onto YouTube and
search button techniques. I find this way to
be pretty strong. So basically I'm going
all the way through the Neckline and then coming
back up in the same point. And I'm just going
to do that a number of times till I've gone. Both crisscrosses
of the buttons. So my particular
button has four holes. Yours might have to. Or sex. Do you ever see buttons
with six holes? I don't think so. But someone's got
four, so I need to go round each crisscross. You can see there I've done two of that cross and now I'm
going to do another one. So there's the end, there's three stitches
on each cross. This button. This is a bit fiddly. How many times have
I said that as well? This whole process is
a little bit fiddly. You are learning and growing
as a person in patients. Perseverance. Perseverance is a very good
skill to have in life. I think that's another
skill that she sewing has taught
me perseverance because sometimes
it doesn't work the first time and just do it
differently next time. So after doing three stitches
on one way of the cross, now, I've done the three
stitches on the other way. Then I come up just where
the hang on one more. I think that's the third one. Now, I've lost count. I was giving you a motivational chat and I lost count of how many
stitches I've done. So now I come under, am I poke out where all those
stitches have come through? You'll see just here. Mind your fingernail. I have gone onto my fingernail before that way is not nice. Then we will wind around
here, Windy, Windy, Windy. And that just creates
a little bit of space between the button and the garment and also just strengthens all those threads
holding them together. Then once I've done that, we need to fasten it with
a nice strong naught. And I am doing it like this
by bringing it back behind, pull it nice and tight. And then I will do or not. That is a pretty
secure button there. You have another
way you do buttons. Have you seen other ways
I'd be quite interested. You can pop a note
in the Discussions tab if you have any, any thoughts on on
my buttons skills. So as always, making that thread disappear
by just pulling it through, snipping it off. There we go, There we go. Looking lovely. And now to attaching our loop, so we've got our
button on this side. Now we want to attach
the loop around the Button and then fix it. The Smock. Like. So. I'm measuring, rather than
using a tape to measure this, I'm doing everything
by eye and by working with the button
because basically you don't want it so loose that as button is going to fall
out and you don't want it so tight that you're
not gonna be able to fit your button
through the hole. So this is a little bit of trial and error to get it right. The way I fix the
loop is I fix it on the wrong side of the
Smock so you won't see it sewn on the back there. So now I've got my position
where I'm going to do it. Now, I just need to stitch
this firmly in place. And I will do that just by
going around and around these two ends of the loop and securing it
with a fastenings stitch. So I just travel pinching the button Loop and I just
travel around like so. Scooping a little bit of
the neck line and then pulling it around
the loops and I've got one side of it fixed. I'm just going to
double-check and confirm. I'm happy with my loop size. Before I say the other side,
okay, That's looking good. So now I will say
the other side down. I'm saying method
just going under the Neckline and then around the loop and pulling it down. And you can do as many stitches until you're satisfied that your
loop is held securely. Let's just test it again. Looking a little
bit too big now. So that's the great thing
about this when you do it by hand is quite easy just to
make little adjustments. So I'm just going to
pull a little bit more down and make my loop at millimeter smaller so that my button is not going to
slip through the whole. So here we go, Just pulling
that down and around Now, where we've attached
that loop to the back, It's a bit ugly with
lots of stitches. I like to attach a little
rectangle of fabric on top to hide all that mess. So I just fold a small
rectangular fabric to the right size of this
button loop and go around. Another thing I've
done in the past, which you might like
to try it as an idea, is the very end of the Smock. You can see where the
loop is poking out. Now, I've just left that open. Then talk to in there. And it's all sewn it into the hole at the
end of the Neckline. I forgot to do that
at the beginning, you need to leave that
gap there because if you start unpicking your neck line, once you've already
said it altogether, you're in danger of
weakening your garment. So I wouldn't unpick
that and slot that. And I think this
looks perfectly neat and lovely with this, this whole rectangle on top. So just traveling all
the way around it. So it's nice and secure. Then a little not at the end. Abracadabra, the thread
shall disappear. I actually know that what
before I caught it offline, going to do one more check. Measure twice, cut, once, checked twice before you finish. So I wanted my loop
that tiny bit smaller. What I'm actually going to
do is I'm just going to close the base of the Loop little bit to
make it smaller that way. So just adding millimeters worth of stitches
just at the end here. Just to pull that
loop in tighter. Because we are Hand Sewing, we can do everything was such precise detail and we can just adjust
things as we go. Why I love about hand sewing. So I'm just making that loop, that tiny, tiny 1 mm smaller. Let's test it again. Pop. That is looking much
nicer, fantastic. There we go. So there is our belt loop and belt loop or button loop
attached beautifully, Making, doing another naught and making it all disappeared. I'm really pleased with that. In some of my Smocks, I've chosen to put the
button at the front. This is a bit of a
statement to have it there, or you can just have
it at the back. In this particular design, this Smock is for my son
and it's to go at the back. There we go is looking
so lovely now. So now we are going to just all I'm doing a little
bit of clean up here. Noticed a few little
threads hanging around. Now we are going to
head to the next lesson where we will be
working on the cuffs, so well done for
getting this far. And I will see you
in the next lesson.
19. Cuffs: Welcome back. In this lesson, we are going to be cutting
and sewing our cuffs. So make sure you have your
measurements and calculations document handy with your
measurements for your cuffs. Here I am measuring out the cuffs for my Smock
for my two-year-old son. If you would like to know
the exact measurements that I used for this
particular Smock. Head to the measurements
and calculations document. And you will find
that all there. You'll see me using the same
method we used when we cut our original Smock pieces
that I am pulling a thread. So I get a nice, a straight line for
cutting my cough. In this style of Smock, I'm making a very
small, neat cuff. There's no reason
why you can't make a more wide statement cuff, but that won't be shown in
this particular lesson. This is a nice small cuff
that's designed for your wrist. So here are my two pieces. And first of all, I'm going to join the pieces into a circle. This is a 1 cm seam
I'm following here. And my usual method
of running stitch. So I will do a fastening
naught and then running stitch to create a
loop for my cuff. As always, keeping nice, neat, straight stitches and following the grain of your fabric so
you get a straight line. Or if you're finding
that a bit tricky, might like to measure 1
cm line to follow along. That's the first one done. Tying it off with a fastening not then we need to repeat the same on the other
cuff. So there we go. Now we have both of
them done like that. Now we can mark them. So we do that by festival, marking a halfway point
on both sides. Like so. And then my Fabric is
really a share so I can then transfer it through
to the other side. So on both sides. On both sides, if
that makes sense. And then we do the quarters. So we do that by meet, meeting the half
to the same point. This technique is
the same technique with that we used for the Neckline to get
nice even gathering. When I first started doing this, I didn't do this marking of notches and my
gathering was very, very uneven and looked
a little bit silly. So we do need to make sure
that we put these marks. That's both the cuffs marked up. And now we need to
mark our Smock. So my Smock is
currently inside out. And we'll start with the
first, first sleeve. And we need to make a matching quarters
that we will match our notches up with
using the same method. First of all, marking the
halfway point using the same, then matching the seam
to the halfway point. And that is how we
get our quarters. And once again, doing it on both sides so that we
definitely can see it. Same as with the Neckline. I like to attach on the inside of the cuff first
and then the outside later. Now we have our contrasting
gathering, gathering thread. Again, this is a bit like
the Neckline process. So making a big hairy naught
to start with by twisting, twisting, twisting
and then pulling. Now, when with these
particular cuffs, we're not smocking them, we're just gathering them. So we're not following
an exact we know we haven't done dots on this on these cuffs like we
did with the Neckline. We're just roughly
doing about 2 mm. And we really don't need to
be too specific with this. Is just gathering it all up. But you'll see my stitches
or 2 mm approximately. And we work our way around
the whole sleeve like so If you didn't want to
Smock your Neckline, you could actually
gather your Neckline in this exact way that I am gathering the Sleeves right now. I've actually done that
for a few of my garments. I don't want to do a
full Smock Neckline. It's nice just to have a
nice Gathered Neckline like the Sleeves being Gathered. So we twisty, twist
the, twist it, twist it, and then pull. Lovely. Then here are,
here are notches. I'm just making mine
a little bit longer so I know definitely
be able to see them. We are going to line
them up with our cuffs, so we line up seam to seam. See I've turned it inside out, so we've got that seam
running along there. And then a bit love
with the Neckline. We those two points meet in the middle and then we
fold it in half, like so. This is another sandwich. This time, the Sleeves shall be our cheese
for our sandwich. That's that halfway point if you want to measure it exactly. So seam to seam, line it up. Get all white thread going. And we want to match these
two up and join them with our trust,
the fastening not. And then the gathering
shall begin. Relaxing jaw,
relaxing, shoulders. A little sigh. Enjoying
the long slow process. What it's like to make
something by hand. Enjoying the whole journey. So we're going to
fold this all the way along and attach it in the same style that
we did for the Neckline. What we need to match
up is there notches. So we've matched
up seam to seam. So now we need to match up
notch one with notch one so that we know that our cuffs will be
Gathered Gathered evenly. So that's the first
one matched up. And then what we
need to do is pull the gathering thread
and hold it in place. Now, this method of these notches makes our
gathering more even, but we still need to
do a little bit by I and check that the
Gathered are looking good. So I just spend a moment
having a little fiddle around so that they
look pretty even. And then using a similar
technique for the Neckline. With the Neckline, it was
really obvious because we did one stitch for each gather. And we're basically
doing the same here. Just following
around, going under a gather and then
attaching it to the cuff. If it starts to loosen up, just pulling that gathering
thread, just rejecting it. So they're all even and just working our way around like so. So with these cuffs, I'm doing it in
quarters and I'm, I've done the Nazis
in quarters to get it even if you're new and you
want to get it even more, even you could do it in eighths. Just another suggestion for
when for new beginners. So we've sewn all the way up to that notch and then we just need to carry on around
doing the same thing. So folding it into the center, matching it up a notch to notch. I'm using my technique of using my gathering needle to
match those two notches. You might have some pins handy. You also, if you're a pin user, you might like to pin the
gap, the Gathered evenly. That might help. But as you will know by now, I'm not a big fan of pins. Then we do exactly the
same method and we go from that notch
to the next notch, checking that the gathers
or even as we go, we are doing so well
and have got so far. Whether you're just watching this and you're planning to make it later or planning to make
something similar later. Or whether you're sewing along, well done for getting this far. And these final touches
are really satisfying and you can enjoy and where
you're gorgeous garment, so don't give up now Say you will see me looping under and attaching that cuff. And just as I go read gigging,
getting everything even. And now I'm on to
that third notch. Always making sure that
the gathering thread is out of the way because
we do not want to. So that gathering thread because
it will disappear later. So just leaving a tiny gap so we don't so right next to it. Giving you a little bit more of a demonstration and
a feel for what it's like to keep working around. And then eventually we will
get back to the beginning. There's where we started. So now we just need to do
from our third notch back to the beginning. And lake. How lovely That's looking. A little not. Then we flip through because we're now gonna
do the other side. So we just bring the needle
through to the other side. And then we need to
flip our garment round. What I do is I just put the
needle there just to hold it. So it's all connected. And then flip it around. You've got ones leave. We
haven't even started yet. And then this is our sleeve
that we have half-done. We can get on needle. And then we can take this purple thread
out by cutting off the not on one side and then pulling it on the other side
if it gets caught anywhere. Oh, that's because you sold it. You might be able to pick
around it and get it out. But ideally, you
really just want to avoid that gathering thread. So it doesn't get stuck. This bit, as you can guess, it's pretty simple
that we're just following back around
the other way. So just to secure it this side, we're gonna do a
couple of knots. And then we travel around and
exactly the same fashion. Folding the cuff in half
and matching it up. When you look really closely, you will be able to see a few of your stitches coming through
from the other side. And you can use them
as a little bit of a guide Marker for the
line you want to follow along so that your
cuffs are nice and even looking close up there, you can just see tiny tiny stitches coming
through from the other side. And they on my markers for traveling around
nice and straight. I also want to make sure
that I fold my cuff evenly as the stitches
for me to follow along. Using the grain of my fabric
as a bit of a ruler as well. So it's really straight. You can see those
little stitches there. And I'm travelling
along like that. All the way back around. How lovely it looks. There's something so sweet about making small garments as well. I do love making clothes
for my little one. So they get this teeny, tiny, very sweet, puffy sleeve. Coming back to the, well we started and
a couple of knots make the thread disappear. And now we just need to repeat the same with the other Sleeves. You might like to
rewind the video and watch that back as you do. The other sleeve. Here's one I made earlier. Oh, sweet little Sleeves. So gorgeous. I will see you in the next
lesson where we will be hemming are smock. See you in the next lesson.
20. Hem Shirt: You are getting near to the finish line of
finishing your Smock. Well done. In this lesson, we are going to hem, are smock. Here is how beautiful our
Smock is looking right now. What we're going to do is
we're going to get right to the bottom of our smock
and roll it over. In this lesson, I'm just
going to make a very, very small as long, narrow hem like this. If you'd like more
wide statement hem. If for example, your Smock
is actually a smock dress, you might like to go to
my Gathered Skirt Class. And in there there
is a lesson with a very wide statement hem, which is quite a nice look. But for this, for this example, I am making a Shirt. I only want a very narrow hem. And what I'm doing. So when you have a linen
fabric like this or a cotton, you, if you're in good light, you should be able to see
the lines running along, particularly with this white
linen I'm working with because some of the threads are slightly
different thickness, you can follow the
lines very easily and that makes it very easy to stay on track when you're doing your hand because I'm just following a thread
all the way around. But if you're new to this,
you might like to actually measure your hem with
the statement hem. In the Gathered Skirt lesson, I definitely recommend measuring it because you're
doing it a lot wider. But in this case, I'm
just doing it by I. So look how crisp and
lovely that looks. So we're just getting
to the end. Now. Like all steps of this Smock
practice makes perfect. And if you do it the first time, you don't like it
looks a bit wonky. Don't be afraid to just
unpick it and try it again. Rome towards not built in a day. So here we alright, the end now, so we just get to the end. And as always do a couple of nice fastening knots to
get that nice and secure. Making that thread
disappear as we always do. And a snip. Wow, it's looking so beautiful. So I'll see you in the next lesson where we're
just going to use some absolutely final
finishing touches to finish our Smock. I'll see you in the next lesson.
21. Finishing: First of all, having
a close up look at our garment to notice if
there's any loose threads. And removing them carefully. You might even
need to snip some. Then pressing, this really
makes our garment crisp and it also removes any of the marks with our
heat erasable pen. So I go over and I I press the smocking and then I
press the the front back, the Sleeves, getting rid of the marks and making
it smooth and crisp. You'll see my marks
here on the cuffs. So we press them and
get rid of them. Pressing the Neckline, it's
really makes this smocking look nice when it's
all evenly pressed. Noticing more threads,
getting rid of them. Sleeves. We did some marks
on the Sleeves, so pressing them and
getting rid of them. And then admiring your
beautiful smock well done, fills me with such joy to
complete a hand sewn garment. And I'm very pleased with this beautiful smock for my son. You are complete, well-done for watching this class
all the way through. And if you're sewing
along with me, well done for making your Smock, it's a great idea now
to take a moment to celebrate and reflect
on the process. To celebrate, can
you wear your smock out to a party or
picnic to show off what You made or go out and do
your hair and makeup for a little Photoshop with a friend to show off what you've done. And then to reflect, you could write down in
your journal what worked, what didn't work,
what did you learn? Is there anything you'd
adjust next time? Would you make it
longer or shorter? Or would you make the
Sleeves wider or narrower? I also recommend making a note of all your
measurements and calculations so that when you want to make
your next Smock, you can use that as a reference. Every time I make a new Smock, I learned something new. So now we've celebrated
ourselves and reflected on the process is timed
to say goodbye. Thank you so much for taking
part in this class with me. Skillshare is all
about community. So if you've got any
questions about this class, please do pop your questions or comments in the
Discussions tab. It also really helps me if you write a review of my class. So even if you haven't got around to making the Smock yet, but you enjoyed watching
all this through. Please take a moment
to write me a review. You could just write
a comment about my teaching style or about what you learned
from the class. If you have made a Smock, I would absolutely
love to see it. Please share a photo in
the project section, or you can tag me on
Instagram using the hashtag, folk Sewing with laura. And also if you search
that hashtag on Instagram, you'll see all my
folk Sewing pieces. If you'd like to stay
in touch with me, you can go to my teacher
page and follow me, and that means you
will get updated on future classes on
my teacher page. You'll also find links to my
website and my social media. I have an email list
where I send out inspiring newsletters
once or twice a month. So if you'd like to stay
in touch with me and find out what I'm teaching and also
what I'm learning myself, please do, sign up over on
my Skillshare teacher page. May the magical Art of
sewing bring more intention, piece, patience, and
BUT into your life. Thanks for watching. Bye
 Laura Lamn, I light the Creative Spark