Transcripts
1. Introduction: Adding fluid in your blender
can seem scary if you're just starting to use fluid
simulation, but don't worry. Fluid simulation becomes really easy once you figure
out how does it work. In this class, I will teach you how does the fluid
simulation work. How to add it in
your sin in blender. How to make it look better
with the particles. How to add different density
values to your fluid. And a lot more other
interesting tools that will help you to make a
beautiful fluid simulation. So let me show you how to
make a fluid simulation. Now, just before we start, please forgive me
if my pronunciation of a certain words
is a little weird. English is second
language to me. And with that out of the way, let's jump into the
fluid simulation.
2. Seting up fluid simulation: Now this is how we are going to explain the
liquid simulation. We are going to make one
simple liquid simulation and then we will do a breakdown of that simulation to
explain how does it work. Open your blender and delete
everything in your sin. Now to make a liquid simulation, we will add a UV sphere. Now press three and type
quick liquid and select it. Okay? Now you can move
this time line a tiny bit up and now we have this
simple liquid simulation. Let's explain how does it work. You see, whenever you want to add a liquid simulation
in your sin, your simulation will
need two objects. One object that is going to be the flow and one object that
is going to be the domain. Now if we select this UV sphere and if we
go under the physics, you can see that
here this sphere has enabled fluid under the
type it is set to flow. When we used quickly quit to add this simulation
into our scene, blender automatically set this
sphere as the flow object. And we also got this cube. As you can see, this cube is set as the domain
under the physics. Now let's explain what each of these two
objects actually does. Let's explain the domain first. Now your domain represents the area in which your
liquid can function. If we play this simulation, you can see that this liquid
is flowing free until it touches the domain and it can't move any
further than that. Always make sure that
everything you want your liquid to interact
with is within the domain. Since your liquid will
only be able to work within the domain with
the domain explained. Let's move on to
the flow object. The flow objects are the
source of the liquid. All the liquid in
your simulation is going to come from
the flow object. Now this has been a very over simplified
explanation of these two objects. Let's explain them in a
tiny bit more detail. We will explain the
flow object first.
3. Flow object: Now guys, like I mentioned
in the previous lesson, the flow object is going to be the source of the liquid
in your simulation. All the liquid that is in your simulation will come
from your flow object. However, guys, flow objects have a few interesting
settings which can be used to get different
results for your simulation. We select our flow object, and if we go under the physics, you can see that we have this
flow behavior option here. By default it is
set to geometry. Now if we open this setting, you can see that we also have this Inflow and Outflow
option as well. Now let me explain what each
one of these options does. Now, like I said, geometry is the default
setting and what it will do is it will cause your flow object to be
filled with the liquid. And when you play
your animation, all that liquid is just going to drop straight down
out of your object. Now this option is good
if you always want to have the same amount of
liquid in your simulation. But what if you
want your object to keep adding liquid
into your simulation? Well, for that we have
this Inflow option. If we switch this flow behavior
from geometry to inflow, and if we play this simulation, now you can see this object is now constantly adding new
liquid into our simulation. Now this is really
useful if you want to increase the amount of
liquid in your simulation. But what if you want
your flow object to at a certain point stop adding
liquid into your simulation? Well, for that we have
this use flow option. Use flow controls,
whether or not is your object going to add new
liquid into your simulation. As long as it is enabled, this sphere will continue to add liquid into our simulation. Now this is how you can stop your object from
adding new liquid. Let's play this animation. Pose it at the frame eight. Now press this dot next to the Use Flow setting to
add a keyframe to it. Now move one frame forward
and disable this use Flow. Now press this dot to
add a new key frame. Now if we play this
simulation again, we can see that now this
object stops adding liquid into our simulation
when we reach the frame 18. Okay, with this explained, we covered everything we needed to cover with the
inflow setting. Now let's move on to the last
flow behavior, the outflow. However, to explain how
does the outflow work, we will need to add a new
object into our simulation. Let's add a cube and place it
right below the UV sphere. Now to set up this cube
as the flow object, we need to open the physics enable the fluid and switch
the type to the flow. Now switch the flow
type from smoke to liquid and switch
the flow behavior from geometry to outflow. Now that we have set up this
cube as the Outflow object, let's play this simulation
and see what will happen. As you can see, the liquid is disappearing the moment
it touches this cube. Basically, what Outflow
setting will do is it will cause your object
to behave like a sponge. The moment your liquid touches the object that is set
up as the outflow, your liquid will be
absorbed by that object. When it gets absorbed, it will disappear
from your simulation. This is very simple
way you can use to decrease the amount of
liquid in your simulation. Now, we added this cube just to explain how does the
outflow setting work. Now that that's explained, let's delete this cube. Let's play this
simulation also, guys, in case your liquid
doesn't follow all the changes you made
in your simulation. What you need to
do in order to fix that is you need to
reset your simulation. Now to do that, select your domain and under
the physics properties, simply change any settings and then change that setting back
to how it was previously. Now if we play this
simulation again, you can see that this liquid is once again moving correctly. With this, we have
explained the flow object. The next thing we need to
explain is the domain.
4. Domain and the effector: Now in the previous lesson, we explained the flow object. In this lesson, we will
explain the domain. Now with the domain, we have a lot to talk about. So let's just jump into it. The first important setting we need to explain is
the resolution. What resolution
controls is what is going to be the quality
of your liquid. The higher you set
up your resolution, the higher is going to be
the quality of your liquid. Now, by default, the
resolution is set to 32, and that is a really
low resolution. However, I recommend you to keep your resolution at this
low value for now, and I'll explain why later. The next setting we need to
talk about is the timescale. This does exactly
what it sounds like. It controls how fast is
your liquid going to move. The higher value is going to make your liquid move faster, as you can see here right now. The lower value is going to
make your liquid move slower, as you can also see with
this simulation here. Okay, now let's scroll down a bit until we reach
the mesh settings. And now listen to me carefully. Up until this point, our liquid has just been a
bunch of blue and green dots. But we need to give our
liquid an actual mesh. To do that, just enable
this mesh setting here, and now we have a mesh
for our simulation. Let's quickly play this
simulation with the mesh. This looks really, really good. Now we can move on to
the chase settings here. Now guys, listen to me carefully because this part is
really important. One thing you need to understand about liquid simulation is that your simulation is going to be saved as its own separate file. Sure, the blender scene
in which you'll use your simulation will be saved like any
other blender file, but your liquid
simulation will have its own save file separated from the
rest of your blender. What this chase area
will allow us to control is how will our
liquid simulation be saved? Now first we need to talk
about this button here. This button will allow
us to control where in our PC will our
simulation be saved. Simply press this
button and then pick a place where you want your
simulation to be saved, and then just press T. Now next we have the frame
start and frame end values. Here they are super simple. They control when will our simulation start
and when will it end. Frame start controls, when this simulation will
start and end controls, when is this simulation
going to be finished? Whenever you're using
liquid simulation, make sure that these
values are set up correctly so that
your simulation starts at the right
time and that it also ends at the
right time as well. Now it's time that we move
on this type setting here. Now guys, listen, whenever
you have liquid simulation, you will need to bake
that simulation. What this type setting here controls is how your
simulation will be baked. By default, this
is set to replay. What that means is that
this simulation is being baked in real time while
you're playing this animation. If we play this animation, you can see how this
simulation is moving. Because as long as this
type is set at replay, your simulation will be baked in real time while this
animation is playing. Now this replay type is really useful while you're setting
up your simulation, but it's not all that useful. Once you have set up your simulation for
the final render. For the final render, we will use one of the
other settings here, but we won't change this
type setting just yet. There is still one thing we need to set up on this simulation. Now that last thing
I still need to show you is how to make your liquid interact with
the other objects. Now you may think
that's pretty simple. You just add an
object to your sin, and boom, your liquid will
instantly interact with it. But it's not that simple. Let's add a cube in our sin, let's place it right
below the liquid. Now if we play this simulation, you can see that this liquid is not
interacting with this cube, it's just moving
straight through it. In order to make this liquid
interact with this cube, we need to set this cube
up as the effector. To do that, select your cube. Go under the physics here, enable the fluid and switch
the type to the effector. Now if we play this simulation, you can see that this liquid is nicely interacting
with this cube. Whenever you want your liquid to interact with
some other object, just make sure to set up that object as the
effect or under the physics guys in case your liquid doesn't
interact with your object. Even though you set up your
object as the effector. This is what you can do in
order to fix that problem. As you can see, this liquid is not interacting
with this plane, even though it is set
up as the effector. Now this is what I'm going
to do to fix that problem. I am going to move
these settings here. As you can see, the effector objects have this
surface thickness. What this surface thickness
controls is how close does your liquid needs to be
to your object in order for your liquid to
interact with your object. Now let's set this surface
thickness to a value of 0.5 Now if we play
this animation, now you can see that now this liquid is nicely
interacting with this plane. This is one simple
trick you can use if you have problems
with the effector. But you only need to
be careful not to set this surface
thickness value too high. Because if you do that, your liquid is going
to interact with your object before it actually
physically touches it. If I drastically increase the value of this
surface thickness, and if I play this
simulation now, you can see that this liquid is behaving like it already
touched the plane. But in actuality, it's
just floating in the air. Be careful not to set this surface thickness
too high and you won't have any problems
with this cube Set up, we are ready to prepare this
liquid for the final render. Now guys, what you need
to do is the following. Select your liquid and scroll
down under the chase here. Switch this type from
replay to modular. This modular type is what
you need when you're planning to bake your simulation
for the final render. Also guys, make sure
that you enable this is resumable
option down here. Now guys, let's
scroll up all the way to the top of the settings. Now it's time that we increased
the resolution value. Now guys, earlier
in this lesson, I told you not to touch your resolution until you finish setting up
your simulation. There are two reasons for that. The first reason is that the
higher your resolution is, the longer it will take for
your simulation to be baked. Now, up until this point, our simulation was
moving pretty fast. But remember, all this time the resolution was set
at a really low value. I am going to increase the
resolution to a value of 215. This value will give us the highest quality
for the liquid, but it is also going
to take some time for this liquid to be baked
with this high resolution. Just remember that the
higher the resolution is for your simulation, the longer it is going to take for your simulation to be baked. The second thing you need
to keep in mind about the resolution is that the
higher your resolution is, the bigger is going to
be the file size for your liquid if your PC is
short on the free space. Then you will run
into some problems if your PC runs out of the storage while you're
baking your simulation. Several times I was baking my liquid and my PC ran
out of storage because I wasn't careful and that caused my liquid to stop moving
midway through the animation. If you do run into the
problems like that, I recommend you to set your
resolution to a value of 175 or lower if needed. Setting your resolution to
a lower value will decrease the file size for your liquid and it will also speed
up the baking process. Also, I am going to decrease the length
of this simulation. To do that, I will
scroll down all the way to the chase
and I will set up the end value to 125 or simulation doesn't
need to be 250 frames long. And making this
simulation shorter will decrease the amount of time this simulation
will need to bake. If you want to, you can make your simulation even shorter. Now let's crawl back up again. And let's press this
bake data button. Now our simulation is
baking and now we only need to wait for this
process to finish guys. While we wait, I'm going to
show you one more thing now. You don't need to follow me
along as I show you this. This is just
something you can do while your simulation
is being baked. Now to show you what this is, I waited for this simulation to be baked up to the frame 23. Now I'm going to pause the
baking of this liquid. To do that, I am going to
press the escape button. Now that the baking
has been paused, I'm going to show
you my progress. To do that, I'll open this wires port and I'm also going to
move one frame back. Now you can see all
the progress on my liquid up until this point. But I did not pass my baking
to show you my progress. I pass it to show you this. Let's crawl down all
the way to the chase. Now if you're
wondering why I told you to enable this is
resumable option here. Well, to explain that we need
to scroll back up again. Now here where previously
was baked Data button, now there are the resume
and free buttons instead. Now what do they do If you
press the free button? All the progress you made
while baking will be deleted and you will need to bake this liquid all over again. This is what you press if you incorrectly set up your liquid. But if you press
this resume button, then Blender will
continue to bake this liquid as if you never
passed it in the first place. This resume button
is really useful if your simulation is
taking a long time to bake and if you want to just quickly
pass the baking just so you could see is your liquid
being baked correctly. But guys, you will only
have this resume option if you enabled is resumable
setting here under the chase, make sure that you
always enable this is resumable option so
you could continue to bake your simulation
whenever you posit it. Now I will press
this resume button. Now let's wait for
this to finish baking. Okay. Now that the data of our liquid has
finished baking, the last thing we need to do is we need to
give this liquid. To do that, let's
crawl under the mesh, open the mesh settings, and just press this
bake mesh button. Now we only need to wait for
this mesh to finish baking. All right, now that our
mesh has finished baking, we have this really
decent liquid simulation.
5. Fluid texture and viewport render: All right guys. In the
previous lesson we finished making this
liquid simulation guys. If you managed to get
a liquid simulation that looks like this,
then congratulation guys. You mastered the basics
of liquid simulation. All the knowledge you gained in the previous lesson is going to serve as the foundation for your skills with this
field in blender. And it will allow you to make more complicated
simulations in the future. However, guys, no
matter how good does this liquid
simulation looks, there is still one last thing I would like to teach you
about liquid simulation. That one thing is the texture. If we open this view port here, you can see that by
default Blender has given us this texture for
liquid simulation. Now to best explain how
does this texture look, we will need a cycles
render engine. Go here under the render enable ambient
inclusion and Bloom, switch this from B to cycles, switch this P from CPU to GPU. Set this noise threshold 2.5
enable the noise and set this start sample at the same value as your max sample here
under the viewport. Okay now open this viewport here where we can see
the textures in cycles. Now open the world. Press this next to the color, select the sky texture, three to ten, dust to zero, and er 2.25 Okay, now we have this
nice set up that allows us to decently see
how does this texture look. Now to best explain how
does this texture look, let's go here under
this shading viewport, let's open this final render
view port here as well. Okay, now let's wait for all these samples under this view part to
finish rendering. All right guys, this is how
our liquid simulation looks. If we move here,
you can see this is the set up blender made for the texture for our
liquid simulation. By default, this texture
already looks really good. Now this texture is really good if you want to make
something like a water, but if you want to
make something else, something that's not water, there are few settings
that you can use to get a different results
for your texture. First, we have this color. Color is pretty simple, controls what is going to be
the color of your liquid. Okay, let's return
this back setting. Next we have this roughness. What roughness is
going to control is how much you can see through
your liquid simulation. Right now, the
roughness is set to zero which makes this
liquid work like a glass. And by that I mean
that we can see everything through this
liquid simulation. But if we set this
roughness to one, let's wait for all the
samples to finish rendering. Okay, now you can see
this liquid is now white, the same color as set up here. More importantly, now we can't see anything through
this liquid. Keep this thing in mind. The roughness is going
to control how much you can see through your
liquid roughness of one will cause that you
can't see anything through your liquid roughness
of zero will cause that you can see
everything through your liquid. If the liquid you want to
make is somewhere in between, then just play with this value until you get the roughness
setting you like. Okay, now we have
this O setting here. Now I usually like to just leave this
setting the way it is. This setting is going to mostly control how does the light goes through your liquid and every liquid is going to
have a different IRL value. If you want to make water, then I recommend you to just leave this setting
the way it is here. But if you want to make something
like a honey or a milk, and if you want to give those
liquids a nice IRL value, then what I recommend you
is to just Google what the IRL values are
for milk and honey. Yeah, really? I'm not
joking. Just Google. Just type what is IRL
value for milk and honey. Google is going to
tell you that this is really simple solution
to get answer to what value you
need to set up here. Okay? Now we have
this volume here. This here, This is going
to be really simple. Let's just keep this quick. Let's just get
over this quickly. First, we have this color. Of course, as you can see, this color controls what is going to be the
color of your volume. However, as you can see, the volume is looking
a little weak. Now what this volume
controls is what is going to be the color of
the center of your liquid? And by that I mean where
you have the most liquid, this green color is going
to be the most visible. But where the liquid
is only surface level, then you are going to have a less amount of
this green color. Now to better
explain what I mean, let's go to this view port. As you can see, if we look at
this liquid from down here, you can see that this liquid, it's not fully covering
this domain right now. It's only covering
the edges of it. What I want you to do now, moved here to a frame 50. Okay, now as you can see, this green color is
immediately a lot stronger. If we open this view port here, now you can see that
this liquid is no longer just covering the
edges of the domain, now it's actually
completely filling up this bottom part
of the domain. Basically what you
need to understand about the volume is it is going to change color where you have the most liquid
in your simulation, but where your simulation
is relatively rare, where you don't have much
of your liquid simulation, then that liquid is going to
maintain its white color. I hope that this made
sense With this, we more or less covered
all the basics of your liquid simulation also. Guys, one more thing. I think that this
goes without saying, but in case you don't
want your flow object, in case you don't
want your sphere to be visible in
the final render. Then what you need to
do is you need to press this camera here under
Seal Scene Collection. What this is going to do is
it will cause your UV sphere, your flow object to be
invisible in the final render. Okay guys, with this, we have explained all the
basics of liquid simulation. Now let's go to
this viewpot here. Now guys, there is still one more thing I would like
to show you in this lesson. If we play this simulation, you can see that this
viewport is now really slow. This is another downside of giving high resolution
to your liquid. It is going to cause your
viewport to be really slow. Now, if you would like to see
how does your liquid look without this low frame rate before you actually
render your animation. One thing you can do
to achieve that is you can render the viewport
of your animation. Now, when I say
render the viewport, I don't mean that
we are going to make the final render
of your animation. No, I mean that when we
render the viewport, we are going to get the
video that will show us how our liquid simulation looks exactly as it is shown
here in the viewport. To render your viewport, this is what you need to do. First, we need to add a
camera and position it so that it is looking directly
at our simulation. Next, we need to set up the
output for your render. Let's go under the Render, and let's scroll under
the file format, and let's switch it to video. Now let's pick a
place where you want your blender to place
your Viewport render. After you do that, simply select the view and then select
Viewport Render animation. However guys, before
we actually do that, we will make this animation
a tiny bit shorter. Our simulation lasts only
until the frame 125. Let's set up the end of this animation at
that frame as well. Now you can select the view and press surrender
Viewport animation. Now just wait for this
to finish rendering. All right guys, my
Viewport has just finished rendering and this
is how my liquid looks. This is one really quick way you can use to
check out how does your liquid look before you start making the final render.
6. Fluid particels: In the previous lessons, we covered all the basics
of liquid simulation. In those lessons, we gained
the knowledge that is going to serve as the foundation for
your fluid simulation. However, guys, now
it's time that we move away from the basics and start talking about more advanced factors
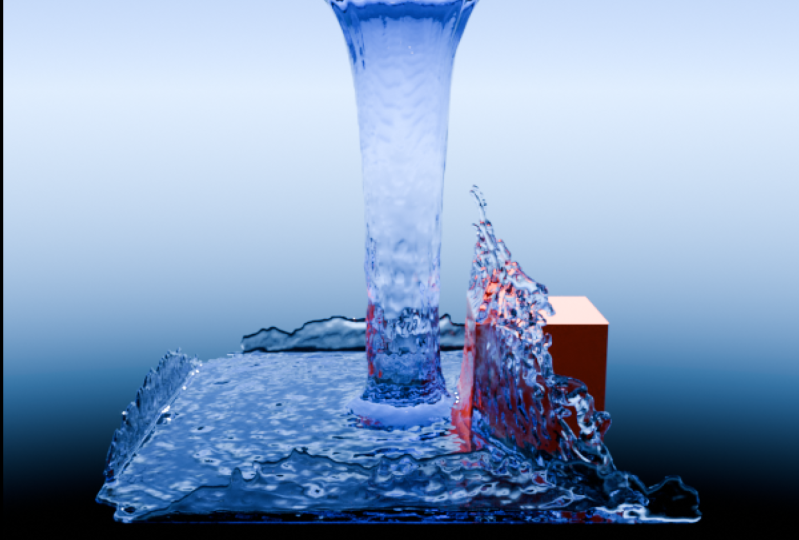
of liquid simulation. One of those factors
are the particles. Particles are the great
tool that will add more life into your simulation
and make it look a lot. This is how this simulation
looks without particles, and this is how it looks
with the particles. As you can see,
particles are making this simulation
look a lot better. Now, as great as
the particles are, people often rarely
talk about them online. In my research about
the particles, I only managed to find two tutorials that
talk about them, one on the Youtube and the
other on the skillshare. The question is, if the
particles are so useful, why people don't talk
about them more often? Well, the answer is simple. It's because particles are hard. Correctly, setting
up the particles can be a little difficult
and time consuming, which is why the many
people try to ignore them. However, guys, if you put a tiny bit more effort
into your work, if you're willing
to push that little bit further to set
up the particles, you're going to get the fluid
simulation that is going to be beautiful and worth
the extra effort. So let me show you how to add the particles to
your fluid simulation, how to use them to make your fluid simulation look
absolutely beautiful. Now guys, to best show you
how do the particles work, we will make a new
liquid simulation. Simply open a new
scene in blender. And let's delete everything
in our scene now guys, in order for our particles
to be the most visible, this new simulation
needs to be splashing. The easiest way to make our
simulation splashing is by adding a few objects that
the liquid is going to heat. So let's say a few objects in our scene and let's place them
all close to one another. Okay, now that we have these
few objects in our scene, we are going to set them up as the effectors so that the
liquid will interact with them. Now that these
objects are set up, we can make our simulation. Let's add a cube into our scene. Place it back here, and this cube will
be our flow object. Now guys, in order for this
example to be effective, we need to make sure
that all the liquid in our simulation is going to splash into these three objects. Now for that, we need
a lot of liquid in our simulation to make sure
we will get enough liquid. Let's use this scale tool to make this cube taller and wider. Now we need to make
sure that this cube is on the similar height
as these other objects. To do that, let's pull
this cube up here until it's in the line with
the rest of these objects. Okay, we placed this cube, but there is still one
more thing we need to do before we start setting
up our liquid simulation. You see guys, we changed
the scale of this cube. And guys, I recommend you that whenever you change the
scale of your object, that you reset the scale
of that same object. One way you can use to know
whether or not is your scale reset is by opening
these object properties here. And if not, all scale
values are set to one. Then you need to
reset the scale. To reset the scale, simply press control A, then select the scale. Now as you can see, all of the scale
values are set to one, which means that this cube
has a reset scale value. Liquid simulation
will look a lot better if your object
has a reset scale. Just keep this
simple step in mind. With this, we are ready to
add a liquid simulation. Simply select the cube, press three and
type quick liquid. Now we need to place all the objects in our
scene within this domain. Let's scale this domain up so that all of our
objects can fit in it. Now, just like we reset
the scale for our cube, let's also reset the scale
for this domain as well. Let's press control
and select the scale. All right, now that we
took care of our domain, we need to play with this
effector objects a little. They are way too small. Let's scale them up.
After you did that, you will need to reset the scale for every
one of these objects. After you did that, you
need to once again, nicely position them
in your domain. Let's make sure that all of these objects are
within the domain. Let's also make
sure that they're close to the bottom of
the domain as well. Actually, come to think of it, I'm also going to add a one more object
into this simulation. I will add this cone scale, it up, reset the scale and
nicely place it in the domain. Let's not forget that we need to set up this cone
as the effector. Now that we set up this liquid simulation
before we bake it, let's play it to see how does it look at the first glance. It looks good. But guys, just for better visibility, let's enable the mesh
under the domain. All right, this
simulation works. It's nicely interacting
with these objects and it has the splash
we're trying to achieve. Now it's time to start
baking this liquid. After we do that,
we will be able to set up the particles
for this simulation. First, under the chase, let's pick the place where
we will save this liquid. You can also move this
timeline a tiny bit up. Now switch this
type from replay to modular and enable is resumable. Now we need to set
up our resolution. However, guys, in the
previous example, we set up this resolution
at a value of 250, but in this example, we will set it up at
the value of 175. The reason for that
is the following. Remember guys, when in
the previous example I told you that the higher
your resolution is, the bigger is going to be the
file size for your liquid. Well, that rule applies double when the
particles are involved, the particles are going to make your file size liquid
simulation insanely huge. If you're not careful, your PC will run out of
storage and if that happens, your simulation will
not work correctly. When you're working
with the particles, it is crucial to cut corners on the file
size wherever you can. Decreasing your resolution will not only reduce the file
size for your liquid, but for your particles as well. Keep in mind that if your PC runs out of storage while
you're working with particles, one thing you can do to improve the situation is to
decrease the resolution. The resolution of 175 will decrease our file size and still give us a good
looking simulation. Now let's press this bake data. Let's wait for this
to finish baking. Okay, my data has
just finished baking. Let's quickly play
this simulation to see how does it look. It looks good. My
simulation would have had a good splash even
without these four objects. But now that they're here, let's just leave them there. Now let's bake the mesh as well. Okay guys, now that
the mesh is baked, now it's time to finally start playing with
the particles. The particles are
just above the mesh. So let's open these
particles settings here. Now guys with the
liquid simulation, you have three
types of particles, spray, foam, and bubbles. Each one of these
particle types have their own features that
makes them useful, each in their own unique way. Spray will cause your
particles to form everywhere your liquid
goes and splashes to foam will cause your particles
to form on the surface of your liquid and the
bubbles will cause your particles to be
formed within the liquid. Each one of these
three particle types is useful in their own way. For each simulation
that you will make, you will need to
decide which one of these particles is going
to be the most useful. One more thing to
keep in mind is that the faster
your liquid moves, the more dynamic it is, more particles you are going
to get in your simulation. Let's enable these spray
and foam options here. Now let's crawl down to the bottom of these
particles settings. Now guys with the particles, one thing that is crucial
that you understand is that you must never
have too many particles. If you add too many particles
in your simulation, you are running with the risk
of crushing your blender. Now to make sure
that we never have too many particles
in our simulation, we will play with
these four settings. These two settings control how many particles will be
added into our simulation. And these two control
what is going to be the lifetime
of those particles. Now to get the decent
looking particles and not to get too many of
them in our simulation, we will set the value to 40, this one to ten, this
one to ten as well. And this 123, this
set up usually gives me a good looking
and functioning particles. In case this set up is adding too many particles for
your blender to handle, I recommend you to
decrease these values. These values will
put less pressure on your blender and still make a good looking particles system. Now guys, after you have
set up these particles, I highly recommend you
to save your progress because now your blender is at the highest risk of crashing. Let's quickly save our file. Now that we did that, let's press the baked
particles button and let's wait for these
particles to finish baking. All right guys, now that our particles have
finished baking, we have to give these
particles a mesh. To do that, let's add
a simple icosphere. And this icosphere will become the mesh
for our particles. Now this pycosphere
is in the liquid, but before we move
it out of there, we need to do this. You see guys, Whenever you add a new object into your skin, you will get an icon
similar to this one here. If you press it, you will get a few extra options
for your object. Now the one we are looking for here is this
subdivision setting. Let's decrease this
setting to one. Doing so will
decrease the amount of faces we have
on our Icosphere. Trust me, our Icosphere needs to have as little
faces as possible. Now that we did that, we can move this Icosphere
out of this simulation. All right, now it's time we turn this icosphere into a
mesh for our particles. To do that, let's select our liquid and let's open
the particles properties. Now select these
spray particles here, and open the render. And switch the render
from halo to object. Next, increase this
scale random to one and set this
scale value to 0.02 Next, select this icon
and press your Icosphere. Now as you can see, all of our spray particles have taken this icosphere
for their mesh. Now guys, one thing you can
immediately notice is that these particles are
drastically slowing down our viewport to
fix that problem. Let's select this screen
next to the spray here that will hide the spray
particles in the viewport. Now let's set up
the foam particles the same way we set up
our spray particles. First, press the
screen to hide them. Switch this to object. Set up both of the scale values and select this icosphere
as the mesh. Now immediately save your file. Now the last thing
we still need to set up is the texture
for the particles. However, guys,
before we do that, we need to make sure that
we can use these particles. Now, you may be wondering, but we bake them. Why would we not be
able to use them? Well, simply put, because these particles still
may crush your blender. Now, I told you that if you have too many
particles in your skin, that your blender may crash. But just because we have baked these particles
doesn't mean that we are out of the danger
of crushing the blender. If one of the frames in this simulation has
too many particles, then the blender is going to crash when we come
to that frame. That can be especially bad if it happens while you're
rendering your animation. Now to make sure
that the blender will be able to handle
these particles, we will do one simple test. We will render the view
part of this simulation. If the blender can handle
rendering the viewport, it will also be able to
render the final render. But since rendering
the viewport is a lot lot faster than the
final render rendering, the Viewport will be a simple
way of making sure that our blender will be able to handle rendering
these particles. Now we will render the particles just like we
did in the previous lesson. We will add a camera
into our scene, position it so that it is looking directly
at the simulation. Let's also move
this icosphere out of the camera's view guys. In order for this test to work, we need to see the
particles in the viewport. Let's select this liquid, go under the particles
and simply press these two screens to make particles visible
in the viewport. Remember guys, we are
rendering the viewport. In order for this test to work, particles need to be
visible in the viewport so that there be visible in
the viewport render as well. Now go under the output, set up a correct file format, pick a nice place for
your viewport render. Now guys, if you did not
save your file, do it now, because if your Blender crashes, you need to make sure you won't lose any progress you have made. Now simply go under the view and select Render
Viewport Animation. Now let's wait for this
to finish rendering. If your blender can render this Viewport all
the way to the end, you can move on to the
next part of this lesson. But if your blender
crashes or if your recording doesn't
look how it should, then you will need to
rebake your particles with a set up that will add less
particles in your simulation. And then you need to
render the viewport again. All right guys, My
blender managed to render this viewport for this
animation and that is great. That means that my
Blender will also be able to render the
final render as well. If your Blender managed to
render your Viewport as well, you can simply continue
to watch this tutorial, but if your Blender crashed
or if your Viewport render Look good, then you should decrease the amount
of particles in your animation and bake your
particles all over again. Also, if your PC is running
out of free storage, I also recommend you to decrease the resolution of your
liquid a tiny bit. Now guys that we know that our blender will be able
to render this simulation, it's time for us to give a
texture to these particles. To do that, let's open this viewport so we
could see the textures. As you can see, the
blender has already given us this pretty decent
texture for the liquid, but we still need to
texture our particles. To do that, simply
select this icosphere, that is the mesh
for our particles, and go into the shading. Now press this new button
to make a new texture, and this is what
we will do next. Decrease this roughness of
this node all the way to zero. And then add mas grave texture. Plug its height into
the base color. Now on the mask grave texture, increase the details
to the maximum, all the way to the 15. Then increase the value of this dimension to a value
similar to this one. Now decrease the scale to a
value similar to this one. Next you need to add the color ramp and place it
between these two nodes. Now move this white color close to the other side
of this color ramp. Now that we have set up
this color ramp like this, you can improve it by changing this white
color to a really, really light blue color. Now simply duplicate
this color ramp and switch this blue color of this new color ramp
back to pure white. Then plug the height of the mass grave texture
into the color ramp. And then plug the color of the color ramp into the
alpha of this node here. With that, we finished making
this texture for particles. This is a really
good looking texture that will work really
nicely for our animation. Now guys, one more thing. If you don't want
your flow object to be visible in
the final render, you need to disable this camera next to
your flow object here. That will make your flow object invisible in the final render. Now guys, if you want to, you can also give the four
objects some texture as well. I won't add any fancy
looking texture to them. I will just set
this roughness to zero and give them
all different colors. These objects aren't
really the focus of this animation or this class. There is no point in giving
them a really fancy texture with all four of
the object texture, we are ready to render
this animation.
7. More useful tools: And with the
particles explained, we covered all that
you need to know in order to make a beautiful
fluid simulation. If you guys can make a fluid simulation
with the particles, then tap yourselves on the back. Because if you did that, you figured out
all that you need to know with fluid simulation. But there are still a few interesting things that you can do with
a fluid simulation. While you don't need to know these things in order to
make a fluid simulation, they are still good to know
since they can help you avoid some problems and get a better result with
the fluid simulation. In the rest of this class, we will be talking about those useful tools.
Let's get started.
8. Viscosity: Now the next thing I would
like to show you is how to add different density
values to your liquid. For that, I added
this monkey head, that is going to
be our effector. I added this UV sphere that
is moving left and right. This UV sphere is going
to be our flow object. Now let's quickly set up a very simple liquid
simulation for these objects. Make sure that the
domain is big enough to fit all of your
objects and the liquid, don't forget that
you need to set up your monkey head
as the effect. Also, one more thing we need
to do is we need to set this UV sphere as the inflow
under the flow settings. Now let's immediately enable the mesh for this liquid
under the domain. Now let's play this simulation. As you can see right now, this liquid is behaving like all other liquids
we made in this class. This liquid is
behaving like a water. But what if you want your liquid to be something
that's not water? If you want your liquid
to be slime, go. Or honey, something that
is a lot more thicker, a lot more denser than water. Well, for that we have
this viscosity value here. Let's enable it. We can also open the viscosity
settings immediately. Now guys, under viscosity, we have this strength value. And what this strength
value controls is how dense is going to be
your liquid simulation. The higher you set up
your viscosity strength, the higher is going to be the density of your
liquid simulation. Now if we play this
liquid simulation with viscosity enabled, you can immediately see that this liquid is a lot more
denser than it was before. Guys, don't forget, the higher you set up your
viscosity strength, the more denser is going
to be your liquid. Now here are a few examples of this liquid simulation with
different viscosity values. All these simulations have
exactly the same settings. The only thing that changed for them is their
viscosity strength. As you can see, the higher we set up the viscosity strength, the more denser the
liquids become. This is one simple
trick to keep in mind while you're working
with liquid simulation.
9. Substeps: Another thing that can be really useful to know are the substeps. What are the substeps? Well, for that we will need
a new liquid simulation. For this new liquid simulation, I added this UV sphere. Now let's just press Trim and let's add a simple
liquid simulation. Now in order for this
example to be effective, our domain needs to
be a really big, let's really quickly scale
up this domain like this. Now reset the scale now for a
slightly better visibility. Let's increase immediately
this resolution. Let's increase it to 64. We can also immediately enable
the mesh for this liquid. Now what we need to
do next is this. Let's move this
timeline a tiny bit up. Select our U sphere. Now press this dot here. And by doing this, we
set up the blender so that anytime we made
changes in this scene, blender will automatically add a key frame for that change. Now guys, what we need to
do the following, is this. Up until this point, our flow objects in our
simulation have either been completely still or they were moving really,
really slowly. However guys, if
your flow object is moving and if your flow
object is moving really fast, then you might have
a tiny problem. To demonstrate what
that problem is, we are going to quickly play this simulation. Then press G. Now, quickly, just move
your mouse around so that your UV sphere will
move within this domain. Now as you can see, we
have a new key frame for each one of these movements
we made with our UV sphere. Now make sure that your
flow object is the inflow. I'm going to quickly set this UV sphere as
the inflow object. Okay, now let's go back to the first frame and let's play this simulation from the start. As you can see, our liquid
simulation has a problem. You see this UVsphere
is not adding a consistent amount of liquid throughout this
entire simulation. Sometimes it's nicely adding
liquid into our simulation. But when this UVsphere
is fastly moving, then this UVsphere
is just adding the drops of liquid for every
frame of our simulation. Now guys, this is one problem that you are going to have with a fast moving flow object. Whenever your flow
object is moving fast, your blender is going to
struggle a tiny bit how to calculate your liquid now in
order to avoid this problem, In order to avoid having these drops of liquid
and instead to make cover flow object consistently add the
same amount of liquid. Throughout this
entire simulation, what we are going to do, we are going to
increase the sub steps. Now what these
substeps are going to control is they are going
to make or blender, calculate how would
this liquid move between each one
of these frames. Now let's simply
increase the substeps 0-3 Now if we play
this simulation again, now you can see we no longer
have the drops of liquid. Now this flow object
is consistently adding the same amount of liquid throughout this
entire simulation. Guys, just keep this in mind. If your flow object
is moving fast, then your blender might struggle
to calculate how should your flow object add liquid
into your simulation. If you have that problem, just increase the substeps
from zero to a higher value. And that will cause your
liquid to calculate how should this liquid move between each one
of these frames. And that will cause
your liquid simulation to look a lot, lot better.
10. Initial velocity: Now guys, this is one last thing I would like
to show you in this class. Now, for this example, I made this very simple
liquid simulation. Now guys, if we play
this liquid simulation, you can see that this liquid is behaving like it does in
any other simulation we made all the liquid
is just dropping straight down out of
your flow object. However, guys, what if
you don't want your um, flow object to just drop all of your liquid
straight down. What if you want your
flow object to throw your liquid out in a
specific direction? Well, in that case, you need to select
your flow object. If you go under the physics, you will see that
your flow object has this initial
velocity setting. What this initial velocity
setting will help you is it will allow you to throw your liquid in a
specific direction. If we enable this initial
velocity settings, you can see that they, the x, y, and z values. Now, each one of
these three values represents one of the three
axis we have in blender x, y, and z axis. By changing the values, we are telling blender
in which direction we want this flow object
to add this liquid. If we change this y value here, 0-10 you can see that
what this flow object is doing now is it is adding a liquid the direction
of this y axis. If you want this flow object to add this liquid in the
opposite direction, simply switch this ten value
from ten to minus ten. And as you can see, now this flow object is adding this liquid in the
opposite direction. If you want this
effect to be weaker, what you can do is you
can switch this value of minus ten to minus
five, as you can see. Now this flow object is still adding the
in this direction, but now it is putting
a much less strength into throwing the liquid into the direction of this y axis. Guys, you can totally add a multipolar values into
these settings here. Now what do I mean by that? If we look at this
simulation from above, if we switch this x
value here, 0-5 okay? Now you can see this
liquid is being thrown directly between
the x and y axis. These settings here are
really a nice way you can set up your flow object to add liquid into any
direction that you like. If you want your flow object to add a liquid in a
specific directions, just play with these
three values here and your flow object will add liquid in the direction
that you like. Okay guys, this has been a last interesting tool that I wanted to show you
in this class.
11. Outro: With this, you have
completed this class. Congratulations guys. I hope that this class
helped you learn a lot of cool new things
that you can do in blender. And that you are going to put the knowledge I gave
you to good use. And guys, don't be shy. Feel free to show all
of your beautiful work, all of your beautiful
fluid simulations you learned how to
make in this class, in the class projects
here at Skillshare. So that all may see and
enjoy your beautiful work. Guys, if you like this class, please leave a good review, and I hope to see you again
soon in the next class. A
 Cartony Life, I'll make you pro at Blender! :)