Transcripts
1. Intro0000 3937: Animation is a beautiful thing. It expresses so many ideas
and emotions and can touch the viewer in a way other forms of media
can only dream of. However, making the beauty
in animation isn't easy. There are a lot of different
features and things you need to learn in order to amaze people with
your beautiful work. In this class, I will
teach you one of those things that one
thing is Edit mode. Edit mode is one of the most important
features of the b***der, and once you learn
how to use it, you will be able to
make all sorts of different objects and
characters in letter. Now, just to make
one thing clear, in this class, I will only be teaching how to use edit mode. I will not be teaching how to read or texture your characters or objects since those topics
deserve their own classes, which I'll be making
in the near future. Please forgive me if my pronunciation of some
words sounds a little weird. English is second
language to me. Before we start, just to explain how this
class will work, in the first half of this class, I'll be teaching the basics of the edit mode and
in the other half, I'll be teaching how to make more complicated
characters with edit mode. If you have the basic
understanding of the edit mode, you can skip to the part
of the class where I'll be teaching how to make
complicated characters. But if you have little to
no experience in B***der, I recommend you to watch
this class from the start. With that being said, let me teach you how
to use edit mode.
2. Basics.1 Move, rotate and scale tools: Now in case you have absolutely no experience
with the b***der, we will start this class with
the basics of the basics. If you never opened a
b***der before in your life, this is the first thing
you need to know. First, in b***der, you will have three main tools
at your disposal. Those tools, Move tool, Rotate tool, and Scale tool. Now, move Tool is this. Press this button here
to select the Move tool. In case you can
see these arrows, just press this cube
and they will appear. Now what will move
Tool do exactly? Well, it does exactly
what its name says. It will allow you to move this cube or any other
object in B***der. How do we actually
use move tool? Do you see these arrows? By pressing these arrows, we are going to move this object the direction of this arrow. For example, if we
press this green arrow, you can see we can
move this cube back. And from if I select
this red arrow, we can move this
cube left and right. If I select this blue arrow, we can move this
cube up and down. Now, what can you actually do if you want to actually move your cube into a two or more
directions at the same time? Well, do you see this red plane here right between the
blue and green arrow? This red plane will
allow you to move this cube at the same time into the direction of the
blue and green arrow. If I hold this red
plane, as you can see, I can at the same time move this cube up and down
and back and from. The same thing applies
with the blue arrow. If I select the blue arrow, I can move this cube back and
front and left and right, and this green arrow with it. I can move this cube up and
down and left and right. Okay. Now, another
tool we have at our disposal is the Rotate tool. Rotate tool does exactly
what its name says. It will allow you to
rotate your object. If I select this red circle, you can see we can rotate this cube from this
angle like this. I select this green circle, we can, we can rotate this
cube from this angle. I select this blue circle. We can rotate this
from angle here. If you want to move
your cube from the perspective at which
you are looking at it, simply select this white circle. As you can see, we
can rotate this cube. The angle from which
we are rotating it is determined
by our viewport, by the angle from which we
are looking at this cube. Now, scale tool will allow you to change the
size of this object. It works very similarly
to the move tool. Like I said, we have the
arrows, but this time, instead of moving
the cube around, it will change in its scale
from the different angles. We can also use these planes to change the scale from two
angles at the same time. Now in case you want to change all the scales of your
object at the same time, press As you can
see, by doing this, all three scales of this cube are being changed
at the same time. We can also do similar
thing with the rotate tool, but this time instead
of pressing press, you can rotate your cube. And the angle from which you are rotating it is determined
by your position, by the way you are
looking at the cube. Last but not least, we also have the smooth tool to move this cube
on all directions. Press G. As you can see, we can move this cube like this. One more thing in case you. Want to have a bit
more detailed, a bit more specific
position for your object. You can go here under object. Here we have rotation,
rotate, and scale. Now this is pretty much the
other way you can use move, rotate and scale tool. For example, if I
change location x, you can see that this cube
is moving on the X radius. If I rotate this on the Y, you can see that this cube
is rotating on the Y radius. If I change the scale on the z, you can see this cube is
gaining scale on the z radius. This is just one
interesting feature that you can use if you want to have one specific position
for your object inflator. Now, how you can actually
control the viewport? How can you actually control
what are you looking at? Well, to rotate your viewport, press the wheel on your mouse button and
move your mouse around. By doing this, as you can see, we can change the angle from which we are
looking at this skube. If you want to scale in or out, simply move the mouse
swell up and down. If you want to move your
viewport altogether, hold shift mouse shell and
by moving mouse around, you can see that we are moving the viewport
in our b***der. Now this is also
a transform tool. Now, I never use this tool, but some of you may
found it useful. What this tool does
is pretty much, it will allow you to
change the location, rotation at the scale of your
object at the same time. For example, with the transform, I can change the rotation, the scale and the location of
the cube at the same time. Now, I never use this tool, but some of you may found the tube tool if you're
going to use it here it is. Now, last basic feature of the b***der that you need to
know are these tools here. Now what if you need to look at your object from
a specific angle? What if you need to look at your object from
straight from above? Or what if you need to
look at your object straight the left
or the right side? Well, these tools here will
allow you to do just that. Let's press this
blue button here. As you can see, what
this button does is changing our viewpoint in a way that is
looking straight up. As you can see when
we press this cube, our viewpoint changed the angle. Now we are looking at this
cube straight from above. If we press this button here, we'll be looking at this
straight from below. If we press this button here, we're looking at this
cube from the front. If we press this button, we are looking at this
from the left angle. If we press this
red button again, we are looking at this
from the right angle. This is another basic feature you need to know
about the b***der. Okay, with that, we covered the most basic features
of the b***der. Now we can move on
to the edit mode.
3. Basics.2 Edit mode tools: All right, so let's get started. Let me show you how you
can use edit mode to make all sorts of different
objects in B***der. First, we will need an object
when you open a b***der. B***der will give you
this cube by default. It will also give you
camera and light. I just delete those. Now. If you deleted your cube, you can simply press Go to Mesh. As you can see, you have all different objects you
can add to your b***der. Press Cube here, and
you will get cube. By the way, if you don't have as many extra objects and
meshes like I have here, what I recommend you
doing is to go to Edit Preferences, go to Add Ons, and simply type extra and enable a mesh extra objects
that will give you the additional
objects and meshes. Okay, now that we have a cube, how can we open edit mode? Well, there are two
ways to do that. First, select your cube. You can open edit mode by
pressing Modeling here, or you can press Object mode
here and press Edit mode, and boom we are
in edit mode now. Now, just to quickly explain
to you some features, some basic features
of edit mode. You see guys, the main thing we can edit in edit
mode are the faces, edges, and points
of the objects. Some people also
call points vertex. Now what exactly are
face edges and points? Well, to select faces, press this button here. As you can see. Now we can
select faces on this cube. Faces are basically the
planes which make this cube. Now edges to enable edges
press this pattern here. Edges are basically these lines where two or more faces meet. Points are really simple. Points are two ends of one edge. As you can see, they're here right at the
edges of this cube. Points are basically these
dots at the edge of this cube. Okay, now one quick
demonstration of how you can make all
interesting shapes in b***der. With edit mode, you
see in edit mode we have at our disposal move
rotate and scale tool, just like we have
them in object mode. However, unlike in object mode, in edit mode we can move
each of these points, edges and faces on these
objects individually in order to create all sorts of interesting shapes for this
cube or any other object. A quick demonstration, if I select this move tool
and select point, you can see that now I can
move it around like this. And same thing goes for
the edges, for the faces. Okay, now, now that,
that's out of the way, let me show you how
we can actually turn this cube into a glass. Now, how do we actually do that? Well, first we need to
squish down this cube a bit. Now the best way to
squish it is to press a. By doing so, we will select all faces and now
select the scale tool. Now just slightly squish down this cube till it
makes the shape like this. Okay, great, now that
we have this shape, let's actually start using some additional tools
the edit mode gives us, Let's use this inset phase. Make sure that you have
this phase option selected. Now select Inset phase. Now what Inset face
will do is it will basically place a phase
on a face selected. Now select this top
phase of our cube. Now press this yellow circle
and move it to the middle. Like this, move your
mouse to the middle. As you can see, this
inset phase two created an additional phase on top of this phase
that we selected. Now we not only have
this middle phase, we also have the four
additional phases on the edge of our top phase. Let's use another tool, let's use extrude
region tool now. Hold shift. And select these four faces at the edge
of the top of our cube. Now, hold this yellow arrow and move it up a bit like this. Okay, Now as you can see, we created this B shape that resembles a
glass, which is great. This is exactly what we wanted. But as I'm sure you are
ready to point out, this has one tiny problem. This cup of glass
is really blocking. It should be a
tiny bit smoother. How are we actually
going to fix this? Well, you see there are two ways we can smooth
out this cup of glass. First, let's go back
into the object mode. Actually not yet go back
into the edit mode. Now let me actually show you one trick you can use to
smooth out this cup of glass. You see this loop cut
tool if we selected. You can see that whenever we go with our mouse
over this cube, you can see that
the yellow circles are appearing all over it. Let's see what will happen if we this circle like this.
Now let's press it. Now as you can see, what look
at it did is it basically made a circle of edges
around this line we had. Now let's do the exact same
thing on this side as well. All right, now we have
additional sets of points and edges on all
sides of this object. Now we need to select
this extra edges we made. Now to do that, let's
select Scale tool. Let's go into the top view. To go into the top view, simply press this
arrow right here. Okay, now what we need to do next is we need to
enter the x ray mode. To enter the x ray mode, press this button here. As you can see now the walls of our object there see through, we can see through the
objects of this cube. Now let's go back
into the top view. Actually come to think of it, let's actually select
points for this. Now let's select the
points on the front, left, right, and the back
side of this cup of glass. Now let's simply use this scale tool to move
them a bit apart like this. As you can see, now we have this a lot smoother
cup of glass, but it's still a
tiny bit blocking. Now to make this
object even smoother, we can simply add new loop cuts on each of
these faces on this object. Then we can simply
select those new edges we made and use scale
tool to pull them apart. By doing that, we will make
this object even smoother. Okay? As you can see, now we have a really
smooth cup of glass. Now let's go back
into the object mode. Now you see guys in b***der, objects can have either
flat or smooth shading. Now objects are by default, going to be set to flat shading whenever you
add them to your scene. Now to switch the shading
from flat to smooth, press right click and
simply select shade Smooth. As you can see, the smoothed
out this cup of glass, it's a lot smoother. Now, however, there is one
problem with smooth shading. Smooth shading, it doesn't
really smooth anything. It only gives you the
illusion of smoothness. As I'm sure as you can
see, that this cap, despite looking a
lot smoother now has it looks like the mesh
is breaking at some parts. Now, if we want to actually
make this cap look smooth, we need to smooth the edges
of this cap even further. How are we going to do that? Well, simple go into
the edit mode and simply switch from
points to faces. Now select each one of these faces that are at
the top of this object. Now, we already used
this inset phase tool, but now I want you to
use this Bevel tool. We selected this Bevel tool and let's see what will
happen when we use it. As you can see, what
Bevel tool does is it smooths the edges of
any phase you selected. As you can see in these phases, we selected it, added these
additional pass around them. As a result, the top of this object is no longer
as flat as it was before. Now if you want to make
this even smoother, do see this segment number here, by default is set to one. But let's set this segment
number to something like a five if we use it. Now you can see that right now, this top of the Cp
is a lot smoother. But at the same time it has a lot more edges and
faces. You see guys. The number of segments
will basically determine how many new faces will be added around the edges
of the face you select. The more segments you add, the smoother your
object will be. Now considering that adding additional segments made
the edges look smoother, you might be tempted
to add a lot of segments to make the top of this object smooth as possible. But slow down a bit. There is one thing you
need to understand about adding additional points
and edges to your object. You see guys, never add more points and faces on
your object than you need. You need to be careful that
you never add too many faces, points, and edges
to your object. Why? Well, you see guys. Each time you add a new edge
or point to your object, your PC will need a lot more strength to keep
that extra phase loaded. And that can be problematic, because if you add too
many faces to your object, your PC might need so much strength in order
to keep all those faces loaded that your
b***der might begin to lag a lot and it
might even crash. If you're not careful, never add more faces on your
object than you need to add. Only as much edges and
faces as you need. And don't go too high. If you're careful with that, your PC will run the
b***der more smoothly. Okay, get it? Okay. We can move on now. This might be a
little complicated, but once you get to the hang
of b***der of edit mode, this will be a
child's play to you. Okay, now that we
smooth this top, let's go back quickly
into the object mode. As you can see, this top
of our cup is a lot. So let's actually
smooth out the bottom of this object as well. Select all these faces, smooth it out like
this looks better. But now it also wouldn't
hurt if we smoothed out these other sides of
our object as well. Just don't go too far so that they don't clip with
these faces we have here. Okay, we have a
pretty decent cup.
4. Basics.3 modefiers and more edit mode tools: Now this is one way you
can make a cup in b***der, but this is really
complicated way to do this. I mainly showed you
how you can make a cup this way to introduce you with all the tools
we have in edit mode, But there is another much
quicker and simpler way to make a smooth cup in b***der. Let's quickly add a new cube. Okay, now let's go back into the edit mode Now
let's squish it a bit. Let's use inset face to other additional faces
on top of this cube. Now let's use
Extrude Region tool to get the shape like this. Okay, now let me show you one really quick way you can use to get a smooth
shape for your object. Now go here under modifiers and here we have a lot of
modifiers at our disposal. Modifiers are pretty much
going to be your best friends. They're going to
drastically speed up the process of making
an object in b***der. Now I want to be showing you every single
modifier because you won't use every single
one of them in edit mode. But the one I want
you to use right now is this Subdivision
Surface modifier. Click it as you can see what
subdivision surface does. It automatically
adds extra faces on your mesh and it
equally ****** them out, making your object look
a lot lot smoother. Now to make this up
look even smoother, let's go over this level one and switch it to something like
a tree. Okay, like this. Now press right
click, shade smooth. As you can see,
right now we have this smooth shape for our cup. Now if you're wondering why I show you how to make
a cup this way? Well, like I said, I mainly made a cup this way
because I wanted to introduce you to all these tools you have at your
disposal in mode. One more thing, if you're wondering why are there
two numbers here? Well, let me quickly explain to you how
Subdivision surface works. You see Subdivision Surface, like I said, it subdivides
the faces on your object. And in doing so, it makes your object look a
lot lot smoother. And this number levels viewport basically determines
how many times your subdivision
surface modifier is going to subdivide
the mesh of your object. I set this number to three. As a result, this
subdivision surface is subdividing this
object three times. Basically what viewport
and render means. Well, you see guys, whenever you animate
something in B***der, you will need to render it. Render and Viewport, there
are two different things. Like for example,
if I said render to one and Viewport to three. You see in Viewport, this cup looks like this, but if we render it right now, it will look like this. You see because the subdivision in a render is set to one. In the final render, this Cup is going
to look like this. If you want in final render, your Cup to look more smooth, simply increase the render to three just like
it's set in Viewport. Your cup is going to look like
this in the final render, just like it does right
now. That makes sense. Okay. Just remember Viewport, how you see a cup right now, Render, how it is going to
look in the final render. Okay, now let me
actually show you how we can make this up
look a tiny bit better. Let's actually get
rid of this cup, we won't need it anymore. Let's select this up and
go into the edit mode. Okay, let me actually
show you how we can make this cup look
even better now. First we need to get a
different shape for this up. Let's select inset face. Let's select this object
here, this face here. Let's use inset face to get a new additional
face at the bottom. Now let's use Extrude region
tool to extrude this face. Let's extrude it one more time. Now we have a shape like this. Now let's select these
faces at the bottom. And let's use the scale tool
to make these faces wider. Okay? But this shape doesn't
really look all that good. How are we going to fix this? Well, we are going to
fix this with low cut. Let's select Look Cut. Okay, now previously
when we used Look Cut, we would just cover
them around our object. We would click and
that would create a new circle of edges
around our object. But this time I want
you to click and hold. And as you can see
now we can move this extra set of
edges up and down. Let's move them down here very closely to the
bottom of this object. Now let's use scale tool press. Simply scale these
edges down like this, okay, till we have
the shape like this. Okay, sweet. But now we would actually need to improve this shape
a bit, even more. To do that, let's
select inset face. Select this face here, make a new face. Okay, great. Now what I want you to do, select the faces
around the edge. Move them a tiny bit down. Okay, now we have this interesting shape
that is bended inwards, but I think that this shape
is a tiny bit too smooth. Let's actually quickly
select these faces that are sort of inside this shape at the
bottom of the cube. Move them just a tiny bit up. Okay, we have this
tiny bit sharper, more smoother shape for
the bottom of our cup, but this is still a tiny bit
too smooth in my opinion. So to fix that, let's
select loop cut. Let's drag one loop
cut down like this. One thing about loop cut and subdivision surface
that you need to understand is that whenever
you create a circle of edges with loop
cuts and when you put them really close
to other edges, that will result in the
mesh becoming really sharp. For example, let's add
a set of loop cuts. Let's use loop cut here and move it really closely
to this upper edge. As you can see this
shape of this cap here. It's not as smooth
as it was before. Now it's really,
really sharp and flat. This is just something
to keep in mind of while you work
with edit mode. I actually think
this bottom part is still a tiny bit too big. So I'm just going to scale
it down, maybe up a bit. Okay, now this looks good. Okay, now let me show you one more really cool
feature of the edit mode. Do you see the
three buttons here? These three buttons
are the mirror tools. Let's enable this X button here. Now let's select this face here. If we move it around, you can see what is happening, is that the left and
right side of our object, they're mirroring each other. When we enable this, we are basically telling b***der everything that I do
on one side of this object. I also want the
exact same thing to be done on the other side
of the object as well. Now if we actually use this
on a left and right side, you can see that
this works nicely. But if we actually try
using this back and forth, you can see nothing is changing. Well, nothing is changing. Because right now, the
b***der is set up to only mirror faces that
are on the x radius. If we switch this from X to Y, you can see that right now, the faces on the Y axis, basically those that are back in front are
mirroring each other. This can be really useful, but this feature actually
has one problem. One reason why I
don't like using it, basically all this
allows you to do is to mirror faces are basically moving along,
mirroring each other. But this doesn't actually work when you actually
create new faces. For example, let's
select inset faces. If we add new faces here, you can see that
this mirror option didn't create this new
face on the other side. Let's undo this with control Z. With control Z, you can undo
any of your moves in B***der because this feature
only allows you to move faces but not
to create new ones. I really don't like using this mirror option we
have in edit mode. I more prefer to use mirror option that is offered
to us by a new modifier. But in order to use this
new modifier first, we need to cut this
object in half. To do that, let's
select loop Cut. Let's use it to cut
this object in half. Now let's enable mirror mode. Select faces. Did I say mirror? I
meant to say x ray mode. Now let's select all faces
on one half of this object. Press right click, and
let's delete them. Okay, by doing this,
as you can see, we deleted this one
half of our object. Now let's add a new modifier. Let's press Add Modifier. And this time let's
add mirror modifier. Okay, what mirror
modifier will do? It is basically going to copy
one side of your object and it is going to recreate that exact same mesh on the
other side of your object. As well as you can
see this mirror tool, this mirror modifier right now created this other
half for our object. Now if I use Extrude
Region tool, you can see that it
is not only moving the edges but is also
creating new edges as well. That is why I prefer using mirror modifier instead of
this mirror tool in edit mode. However, guys, there is
another thing you need to understand with mirror modifier and with modifiers in general. You see guys, whenever you apply multiple modifiers
on a single object, those modifiers won't be
calculated all at the same time. What am I trying to say by this? They're going to be
calculated one by one. The order in which
they're going to be calculated is top to the bottom. Subdivision surface is
being calculated first, followed by mirror modifier. Now you might be thinking, what does the order in which the modifiers are being
calculated really matter? Well, yeah, actually
it matters a lot because depending on which
order these modifiers are set, you're going to have
different results. You see guys whenever you
use mirror mode fire. I usually think that it is best to keep mirror modifier first. That way it's going to
work most efficiently Whenever you actually try to use mirror modifier secondly, or third or last,
or anywhere else. You may run the risk of running a few issues like left and
right side of your object, not merging correctly
or something like that. To avoid those issues, I recommend you that you always keep mirror modifiers first. How do we actually place
mirror modifier to the top? Well, to do that,
simply hold this thing here and pull
mirror modifier up. Okay? As you can see, this works really, really well. Now also, in case your mirror modifier doesn't
work correctly, well, you see on this mirror option, we can set up whether or not
we want this to work on X, Y, or Z X's. We pretty much need to set up the exact same thing on the
mirror modifier as well. For example, if I cut this object with loop
cut from this angle. And then if I just delete
this half of the object, you can see mirror modifier is not mirroring or recreating this half Y because this is the half that
goes on the Y axis. And mirror modifier is set to only copy to mirror the
half that is on the X axis. If we enable Y axis, you can see that now
mirror modifier is copying this on the Y axis as well. Okay, now it's actually select all faces of this
subject by pressing A. Now let's move these
faces on the x. X is a little to separate the left and the
right half of this object. Now I did this on purpose, but while you work in edit mode, you may accidentally separate the left and the right
half of your object. In case you accidentally separated the left and the
right half of your object, how can you correctly
put them back together? Now you may think that
you can just move these pieces back into
their place with move tool. Yes, you can do that, but there are a few
things that might help you to do that
a little bit better. Let me show you what
those things are. If we move these faces
back to the middle, you can see that they are once again being
put back together. But now we actually have
a different problem. As you can see, when we
actually move these faces, you can see that our faces are clipping through each other. They're no longer merging together as well as
they did before. How can we actually fix this? Well, this is one
way to do that. Let's actually keep faces
very closely to each other. Here at Mirror Modifier, we actually have a few
additional settings now. First, we have this merge. If we have merge enabled, and merge is enabled by default, the left and the right
side of your object, they're going to merge together once they're close
enough to each other. How close do they need
to be in order to merge together is the term
by this number here. If I actually increase
this number 2.1 you can see how these left
and right side are now really nicely
merged together. Because right now, they
don't really need to be as close as they were before in order
for them to merge. But as soon as I
pull them apart, you can see that they are
once again separated. If I set this merge
to 1 meter to two, you can see that right now they're merged
together one more time. Because right now they're
going to merge together once they're within the 2 meters
of distance from each other. Understand if they are
2 meters or closer, they're going to merge. Let's actually switch this to 0.001 like it is at a default. Let me actually show
you one method of merging the left and
right side that is, in my opinion, more
effective than merging. Let's enable clipping. This is basically what
clipping will do, okay, Pull them close to each
other and once you see once the left and the right side of your
object are touching, they're going to fuse together. Right now, no matter how
much I pull them apart, they're not going to separate. They're stuck together. If I disable clipping, you can see that once
again I can separate them, but as long as the
clipping is enable, as long as they're touching, they're not going to be
pulled apart from each other. Yeah, that is one
really useful tool you can use in b***der. Okay, now that we explained
and covered mirror modifier, let me actually show you a few more interesting features
you can use in edit mode. Now we're going to cover
this Spin option here. Now let's actually
quickly set up the stage for the
Spin option now. First let's select this
face here, like this. Now let's use inset face option. Let's create a new phase. Okay? Somewhat like this. Okay, Sweet. Now let's actually
select this spin tool. Now what will this
spin tool actually do? Well, you see this spin tool
gave us this circular thing. If you look here, we have this x, y, and z radius. Let's actually set
this to y radius. Now let me actually
show you what this tool will do if we move this thing. You can see that the
b***der is creating this spiral shape that is going around the angle of
this yellow thing. Once we created it, we can edit the
shape of it a bit. We have these arrows which
we can use to move it on the x radius or
on the y radius. And we can also
rotate this tool, these extra faces like this. Okay, But one more thing
you need to understand. Let's actually
create a new shape. Do you see actually
the edges here? Do you think the number of these edges is being
randomly selected? Now, do you see
this step number, step number is selected to 12. If you count these edges, you will see that there are
12 edges on this shape here. If I undo this with control Z and set this to
something like a five, you can see now we have only five edges on
this shape here. Yeah, that is just one thing
you need to keep in mind. Make sure the number
of steps isn't too high so your b***der is
running more smoothly. But now another really
important thing you need to understand
about the spin tool. You see the spin tool, if you use it, you can
make an entire circle. But you see where is the
center of that circle? Well, the center of that
circle is where the cursor is. The cursor is this
red white circle in the middle of the scene, in case you didn't know this, wherever your cursor is present, that is where new objects are going to appear
once you add them. If I select this object
going to the edit mode, you can see that now the
center of this circle is here, where this cursor is. In order for us to more
effectively use this spin tool, we need to constantly have
control over where cursor is. How can we set up where we are
going to place the cursor? Well, you see that's
really simple. All you need to do, select the face where you want
your cursor to appear. Shift and select
cursor to selected. As you can see, now
your cursor has appeared here at the
center of this face. As you can see, now we
have shape like this. Now we have more control
over how this circle, this spin is going to look like. With Spin tool, you can
create interesting shapes for your object and have this to
handle looking thing here. Okay. Now if you can make
something like this, then I would say that
you already have the basics of edit mode
pretty figured out, but there are actually
few more features of the edit mode that I
think are really useful, but they are going
to be a little tricky to explain on
this subject here. We are going to make a new
object on that object. I'm going to explain to you the new features
of the edit mode.
5. Basics.4 Propotional editing: Those new features
that I want to show you are called
proportional editing. Now ideally for
proportional editing we will need a cube like this. Now just select scale tool, let's make this cube a
tiny bit wider and longer. Okay, like this. Now
going to the edit mode. And what you need
to do next is we need to add some
additional points and paces to this cube. Now to do that, select
all phases by pressing A. Now press right
click and subdivide. As you can see, by
choosing subdivide, we are adding extra points
and paces to this subject. Whenever you choose to
subdivide something, you will have this
subdivide box here. Click it, and that will open
the additional settings. Now this number of cuts
is by default set to one. It is going to determine how many new points and
pass you are going. If we increase this to ten, you can see that now we
have a lot more new faces. If we increase this to 100, you can see how much
more faces we have. Okay, this is going
to work just fine. Now what actually
proportional editing is. Well, to enable
proportional editing, let's press this button here. Now, press one phase
at your object. It doesn't matter which phase
it is, it can be any phase. Now press to move
that pace around and now move mouse well up and
down to increase this effect. As you can see, what proportional
editing will do is it will move the faces that are around the faces
that you selected. That will allow you to create the smoother shapes like heels. Now, not all shapes
that you're going to get with proportional
editing need to look like this. If we press this pattern, we have a lot of different settings that
are going to determine how differently our shape with proportional
editing to look. By default this is set to smooth and you saw how
that is going to look. Now switch this sphere. Now we have this more
rounder spherical shape for the loop cut. If we switch this to sharp, you can see we have
a lot sharper shape. If we switch to constant, we have this chunk of object
that is sticking out. We also have this random option here is going to move the faces around
your object randomly. Now this random option is
really useful if you want to make spiky shape or something that looks
like a mountain, But as you can see, this
looks pretty broken. To smooth this out, we can add subdivision
surface modifier, increase its strength a bit. As you can see, by doing this, we are making these shapes. We made a lot, lot smoother. Okay. Now this is one thing you can do with
proportional editing. But let me actually show you one other feature of proportional editing that
is also pretty useful. Now let's delete this object. Now let's add a cube. Go into the edit mode. Add loop, cut here and here, select these two faces. Oops, let's disable proportional
editing. Move them out. Select the points,
Move them out, Select these points,
Move them out. And select these points. Move them out as well. Now let's extrude Region tool. Let's select these
faces on our object, and let's extrude them to
create a shape like this. Now select each one of these faces at the top and
pull them up like this. Now what you need to do next, let's select loop cut. We will need to add ten loop cuts on each of
these shapes we made. Now we could place each of
these loop cuts one by one. But one quicker way to do this, if we switch this number of cuts 1-10 as you can see by doing so, this look cut will
automatically add ten circles of edges on our
objects instead of one. Now let's enable
proportional editing, and let's switch
this back to smooth. Now let's select this phase. Now express to move it. As you can see, proportional
editing is once again moving these shapes
in a particular way. But as you can see, pretty much all phases on this object
are being affected. But what if you
want only the faces that are connected to the pace you selected to be affected
by proportional editing. Well, to do that, simply enable connected only
if we move this. Now you can see that only
faces that are connected to the pace we selected are being affected by the
proportional editing. Now proportional editing works with more than just move to, you can scale this down
and as you can see it's making this really spiky
shape with this object. So yeah, proportional editing is really useful tool
that works with both move rotate and scale tool. But now let me actually
show you one more feature of the edit mode that is really
important to understand. Let's select these
face, these four faces. What if you want all four of these faces to be really
sharp like spikes? Well, you could press
S and scale them down. But as you can see,
if we do that, all these faces are tilting toward the middle. Why is that? Well, you see, let's
press this button here. By default, this is
set to median point. Now, what exactly does
the median point mean? Well, you see guys, whenever you selected
multiple faces in mode, B***der will calculate where is the middle point between all
those faces you selected. And it's going to count all
those ****** as one object. That is why when we press S
to scale these faces down, they're being moved
toward the middle. Because right now, B***der is seeing them as single object. But that is not what we want. We want these shapes
to be really sticky, but at the same time we want
them to keep the position. They already have
to change that. Let's switch this from median point to
individual origins. If we press S to
scale this down now. Now as you can see, the
faces are being scaled down, but at the same time they're remaining where
they were before. Well, you see guys by switching this from median point
to individual origins. B***der is basically now seeing
each one of these face as their own independent objects
and it's treating them as if only one of them was selected
at the time you get it. Basically all of these faces are being treated
independently, okay? Now, all these ******
are looking straight up, But what if you
actually want them to have a more interesting shape? Let's select rotate tool. If we rotate this, you can see that these faces
now have this spiral shape. This actually looks funny. Let's actually add
subdivision surface to give these shapes a
bit more smoother shape. But now what if you
want these faces to spin around each other? Well, to do that, let's switch
this back to media Point. So that way B***der
will once again understand all these
faces as one object. Now if we use Rotate tool, you can see that these faces are spinning around each
other like this. We can use this to make a lot of interesting shapes like this. Now if you want to, once you get the shape
that you are happy with, you can press S tool to make all these faces moved toward the middle to get
the shape like this. Okay? This is the
proportional editing. You have been able to figure out proportional editing and
if you know how to use it, then you are ready to move on to the more complicated shapes and to make more
complicated characters in edit mode with b***d.
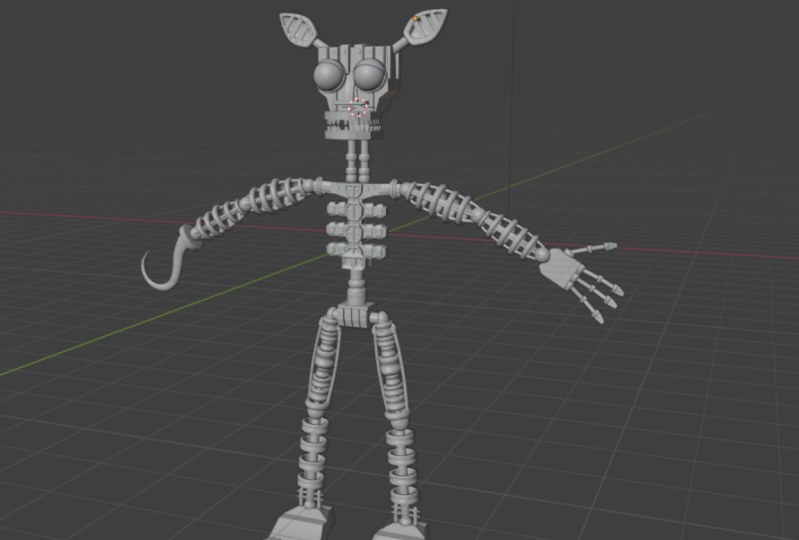
6. Refrence images: Now that we've
covered the basics, we can move on to the
more complicated lessons. In the rest of this class, I'll be teaching how to make
a character with it mode. The character we are
going to make is withered foxy from
five nights at predio. Now just before we start
making this character, I need to introduce you to one important step in making
an object or a character, a step called reference image. We will use reference images as a blueprint that will guide
us while we make foxing. Without the reference image, it's really difficult to make
a good looking character. That same character probably won't look all that
well in the end, when you want to make
a character first, you need to get a
reference image. If you're planning to make a character from
the imagination, I still recommend to do
a little research with a reference images
so that you have a better idea of how your character is
supposed to look like. For example, if
you're planning to make a character
that is a troll, I recommend you to
just Google the troll, and then to just look at the
different images of trolls. Doing so will give
you a better idea of how creature like a troll
is supposed to look like. If you're planning
to make a ghost, just Google ghost to get an idea of how ghost
should look like. Now don't misunderstood what
I'm trying to tell you. Googling reference
images doesn't mean copying someone
else's design. If you want to make
a ghost and on some reference image you see that a ghost
has some chains, adding chains to your
own ghost is okay. But if you're just
making your ghost look exactly the same as the one
on the reference image, that is plagiarizing
and that is not okay. Now, to add a reference image to b***der is really simple. First, find the image that
you like and download it. Then, while you're in b***der, open the folder in which
your reference image is. Hold it, and drag it into
your scene in B***der. And by doing so, you will add a reference image to a b***der. Just make sure that
your image is saved in a format that
b***der can recognize. With that being said, let me show you how to make
a character with edit mode.
7. Foxy's mask part 1: Now, making a character like Fox might seem a little
intimidating. But don't worry. Just take it nice and slowly, and you'll figure it out. I'll be showing you everything you need to do step by step. Now, the most
difficult part about Fox will be making his head. Everything else will
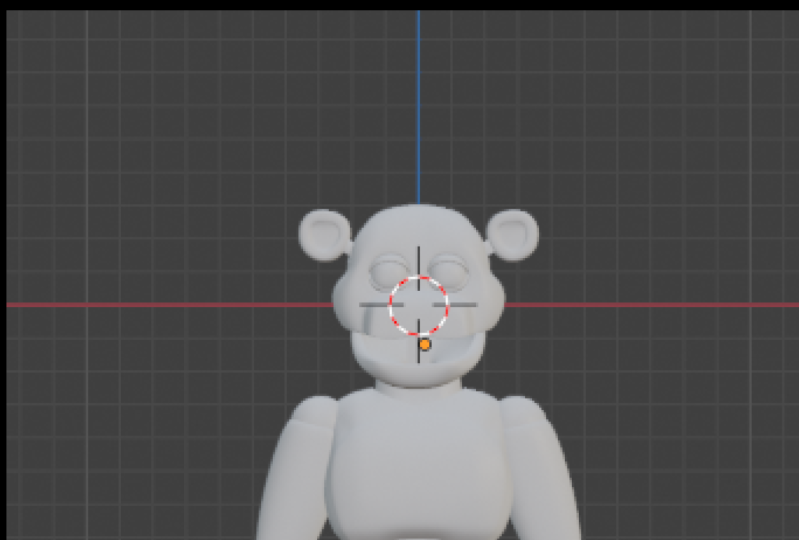
be really easy. Let's get started. First,
we need to make sure that Fox's head is in same line
with three de cursor. Let's move this image down until Fox's head is
in line with Pred cursor. Now, another problem this image
has is that Fox's head is a tiny bit tilted to the side when you
use reference image. Ideally, your character should be looking up straight without tilt his head neither to
the left nor to the right. We are just going
to quickly rotate Fox's head that way it
is looking up straight. Maybe rotate this a tiny
bit more. Okay, great. Now let's add a cube. Let's scale it down with, now let's go into
the edit mode now. First, we will need to
cut this cube in half. We will do that with loop cut. Cut this cube in half. Now let's delete this
one half of the cube. Now let's bring back that other half with
mirror modifier. And let's also enable
clipping on mirror modifier. Okay, Now first what we need
to do is we need to create the shape that more or less matches the outline
of Fox's head. To do that, let's also add
subdivision surface modifier. Let's crank it up to
three. Okay, great. Now let's open the x ray mode, and let's move these points around so that they're more or less matching
this reference image. Now we will need to add a few additional look cuts
to create a better shape. Let's place a new look cut
somewhere around here. Now let's move them around. Let's move these
old points as well. That way they are matching
this reference image. Okay, like this. Let's actually add a few loop cuts around here, and let's move them
around like this. Now let's actually select this face at the
side of Fox's head. Now let's use
Extrude Region tool to pull this new face alphabet. Let's scale this face down with S. Let's place this shape, let's move the points
around that way. This mesh is matching
the shape Fox's head. Okay, Nice and
steady, like this. Okay, great. Now that
we have this shape that more or less matches
the shape of fox's head, we need to take care
of the fox's job. But before we actually do that, Fox's head is actually a mask at the bottom
of this object, we need to make an
opening that is going to be for the
Fox's endoskeleton. To do that, let's select these
two faces at the bottom. Now, press right click, and just select the lead faces. Now we have this nice
opening for the Fox's head. Okay. Now, I said that we are going to take
care of the Fox's job, let's actually do that now. Making the job will
be relatively easy. Simply use Extrude Region tool, select this face and
pull it out like this. Okay? Actually come to think of it, I think I made one tiny mistake. Yeah, I rushed a bit
with Extrude region. Let's press control Z to
undo what we just did. To control Z is basically going to undo your latest
moving b***der. Before we actually
start extruding, let's actually re arrange
these ****** so that they're more suitable
for the Fox job. To do that, let's actually
enable x ray mode. Now what we need to do
is this select loop cut. And let's start a
loop cut around here, where Fox's jaw
starts around here. And let's start a new look
cut somewhere around here, around the middle
of the Fox's job. Now let's start a third
look, cut around here. And place it somewhere
around here, where the Fox's jab is
reaching its middle. Okay, Now that we
rearrange these ******, what we need to do is following. Let's select these ******. Let's select these three
faces we made for the jaw. Now select Extrude Region Tool. Now we can pull these faces out. Okay, now this
looks a lot better and more suitable for
the fox's upper jaw. Let's just delete
these two faces at the bottom, like this, okay? Now we need to improve the general shape
of the fox's job, especially near the fox's nose. However, that is going to be a little tricky, you see guys. It will be really difficult
for us to see what we are doing when we are re arranging these faces
around the jaw, even with the x ray turned on. Simply because there is
so much mesh in the way, what we are going to do is we are going to hide
some of this mesh. Let's select all these ****** that are on the back
of the fox head. Now let's press H to hide them by pressing H. We
didn't delete anything. We only hit these faces. If we press old H, you can see that
these faces are back. We only hit them, which is great, because now
that we hit these faces, it's going to be a lot easier to see what we are doing
with the Fox job. But come to think of it, I think that we will need
to actually hide all faces, except the ones for the job. Let's just select them. Press H to hide them. Okay? Okay. Now that
only our jaw is visible, now we can nicely re
arrange it so that it's nicely matching the
fox reference image. Let's enable the x ray mode, and let's start
moving these points around so that they
are better matching the reference image
of like this. Okay, let's maybe move
this down as well. Okay? Okay. Okay. Okay, Maybe move this point tiny bit down. Okay? Like this. Let's press salt H to see how
this looks, Okay? This doesn't look that bad, but we will need to move
these two points down. And this points at the bottom. A tiny bit up like this. Okay, Now we have a new problem. If you look at the
bottom of this mess, you will notice that
this object is paper. We need to give this
object some thickness. How are we going to do that? Well, we are going to
use a new modifier. We will use Solidify Modifier. Go under Modifiers, press side New modifier and
select Solidify Modifier. Okay, now solidify
Modifier is at the bottom. What solidify
modifier does is it will basically give your
object a little thickness. Let's increase offset to one. If we move this thickness
setting around, you can see that this mask is
gaining a little thickness. And now guys, remember
when I told you that the order in which you set up your modifiers is
really important. Well, this is a good example
to demonstrate that you see, like I said, modifiers when you have multiple modifiers
on one object. They're not being calculated
all at the same time. They're being
calculated one by one. And the order in which
they're being calculated, this top to the bottom
mirror modifier is creating this other
half of this mask. First subdivision surface
is then subdividing. It Only then is
solidify modifier, adding thickness to this object. But let's see what
will happen if we move solidify modifier last. To do that, call this area and drag
solidify modifier down. Can you see this mask
still has thickness, but now this thickness
is a lot smoother. Well you see this
is because now when mirror modifier creates
this other half solidify modifier is then giving this mass a little
thickness and then subdivision surface is
subdividing everything including this thickness that was added with
solidify modifier. Okay, just keep this in mind and this is a
good example how changing the order of modifiers can give you a lot of
different results.
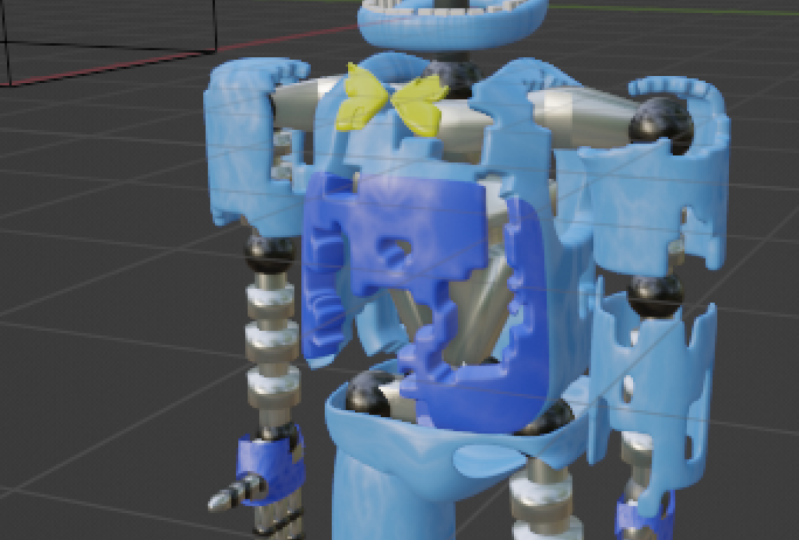
8. Foxy's mask part 2: Okay, now that we have this
jaw more or less finished, let's actually take,
actually there is still one detail around the jaw that we need
to take care of. If you look at this
reference image, you will know that there
is this sort of line around this area where the
jaw is merging with the face. How are we going to
create that line? Well, that is really simple. First, let's enable x ray mode, and now let's select loop cut. Let's use loop cut
on this jaw and drag it really
closely to this face. As you can see as we did this, now we have this line in this area where the jaw
is merging with the face. Now let's actually improve
this shape a little bit. Let's select these four points
around the top of the Ja. Let's pull them up
a bit like this. Now, to improve
this even better, let's select these two
points and move them down. Okay? Okay. Now that we more or less took
care of the fox's jump, let's actually give fox si. But first we will
once again need to hide the back of the fox's head. But right now, all these
modifiers we added, they're actually making it difficult to see
what we're doing. To fix that, we will temporarily disable
solidify modifier. Now to disable
solidify modifier, simply press this edit
mode button here. And that is going to
hide the effect of solidify modifier while
we're in edit mode. Now that we took care of that, let's select all faces on
the back of the Fox's head, and let's press H to hide them. Okay? Now what we need
to do next is we need to create a new shape
for the fox's eyes. To do that, let's
actually select these two faces around fox eyes. Now let's use Inset faces
tool to reshape them, to recreate them, to add these
new faces in the middle. Now with these two
new faces selected, press right click,
and delete them. Okay, now we have this
opening for the Fox's eyes. But this opening,
as you can see, doesn't match the fox's eyes in the reference image at all. To fix that, let's just
select these points that are around fox eyes like this. Move them tiny bit
around until they are matching fox shape for
the fox's eyes. Okay. Something like this. Yeah,
something like this will work. Okay. Now, let's press a H to bring back these
faces that we selected. Okay? Now, Fox's head, for now looks good, but it still has a few problems. Fox's head is a
tiny bit too flat. We need to bend it a bit. To do that, let's
actually select these faces on the back
of the Fox's head, and let's pull them out a bit. Now, select the faces at the middle of the back
of the fox's head. Move them back. Okay?
Okay. This looks good. Now, we also need to, and the front side of
the Fox's head as well. Let's actually disable
subdivision surface as well. Just to have a clearer
view of what we are doing, let's select these faces in the, that are in front
of the fox's head, and let's pull them forward. Okay? Now, come to think of it, let's select these edges, and pull them back as well, these edges at the corner
of the fox's head. Okay, this looks better, but there is still room
for some improvement. Now, first, I think
that we should improve the top of
the Fox's head a bit. Now, some areas on Fox's head
are a tiny bit too wide. Let's select this face right
at the middle of Fox's head. And scale it down on
the y axis like this. Okay? Now, let's
select this face here. Scale it down on
the Y axis as well. Okay? Maybe move this edge a tiny bit away from the middle. Okay, This looks better. Now, what we need to do next, let's also move the
points around Fox. Move them around
just a tiny bit, that way. This looks good. Let's move some of these
faces around the eyes back. Okay? Okay. Okay.
Okay. This will pass. Now. Let's actually
once again hide these faces on the back
of the fox's head. The eyes still match with
the reference image. Actually, they do. They are a bit too small. We will rearrange these
points around the eyes a bit, make sure that they're matching the shape for the foxes eyes on the reference image, okay? Okay. This looks really good. Now, what we need to do next, let's actually move a
tiny bit back as well. Move this point here, back a tiny bit as well. Now we need to make an
opening for the fox's ears. Now, Fox's should come
out somewhere here, somewhere in the middle
between these two faces. Let's select those faces inset phase tool to
create a new phase here. Let's delete these two phases. Okay? Now we have the opening
for the fox ears, okay? Now that we have this opening, just move its points around
until we get an opening for the ears that is a tiny
bit smaller and more rounder. Okay, this is more or less the decent shape
for the fox's mask. Let's actually lower the
thickness a tiny bit. Maybe let's make the inside
of the fox's mask thicker. Now, right click,
smooth shading, we have a decent mask
for the fox's head. The last touch, let's go
back into the edit mode. Let's make this jaw a tiny bit smoother by moving the
faces in and back a bit. Okay, now that we
smoothed out this shape, we can move on to the
next part of the fox. Just so you know, head is
the most difficult part. If you can make head, everything else will
be a lot easier. Okay. We will now take
care of Fox's lower job. Let's actually quickly
take care of that first, add new object, but this time, instead of adding a cube, let's add a plane. Okay, move it down here. Now press to scale
this plane down a bit. Okay, now go into the edit mode. Let's cut this plane
in half like this. Let's bring this other half
back with mirror modifier, and let's enable clicking. Okay. Now let's also add
Subdivision Surface. Crank this up to now. We need to create the shape with this plane that is going to
nicely match the Fox's job. Let's pull these two
points in front. Move these points around. Okay. Move the points
tiny bit to the back. Okay? Now let's also add
loop, cut around here. Move points around, okay. Okay. Now select
this middle point, pull it down a bit. Okay, like this. Let's actually now go
into the object mode. Let's rotate this plane so
that Fox's jaw is opened. Now let's go back
into the edit mode. Let's reshape the points
around until they are nicely matching this shape
for the reference image. Maybe let's add one
look cut around here. Let's move this plane around. Okay, like this. Now what we need to do next, let's
solidify modifier. Let's set up the
thickness of this job and make sure to place
subdivision surface last. Okay. Now we will need to
extrude some of these points. Let's select all the
points that are around the edges of the John
press to extrude, right click to snap
them back into a place. Now move them up on the
Z axis like this, okay? Okay, now these ****** are clipping a bit
here on the back. Let's select these
points, move them down. Okay, this will work
nicely as the job, okay?
9. Foxy's thorso: Okay, now the next piece we need to take care
of is the torso. But right now the
reference image is set up in a way that
the torso is bended. Let's rotate torso into
the straight up position. Okay, how are we going to
make the torso for Fox? It's really simple.
Let's add a new cube. Move it down, press to
scale it down like this. It's really simple. Now let's go into the edit mode. Let's cut this cube in half. Now let's just add
mirror modifier, enable clipping, and let's
also add subdivision surface. Okay, now let's nicely recreate
this shape for the torso. Enable the x ray mode, select all these points at the
bottom and pull them down. Okay, now let's
move these points. Let's actually start adding
a few additional points and loop cuts to give the
torso a bit better shape. Let's add a loop
cut around here. Let's move these
points around a bit, that way they're matching
the shape for the F. Let's add a loop cut here. Move these points
around as well. Okay? Okay. Now, what we
need to do next, we need to make an opening
for the Fox's endoskeleton. So, to do that, let's select this space at the
bottom and delete it. Now let's select this face here, at the upper corner, on the edge deleted. Okay, Now what we need to
do next, Let's select Look. Cut open the x ray mode. Let's add a look cut
somewhere around here. Let's delete this
face in the middle, on the top of the Fox store. Okay, Now that we
made the openings for Fox Neck shoulders
and the wait, now we need to rearrange them that way they are
matching the reference image, because as you can
see right now, they're not matching it. To take care of that,
let's add a loop cut. And let's add a loop cut around here where
the shoulders are. With extra mode enabled, let's select these
two points around the shoulders and
pull them back. Oops, I forgot. We also need to do
a loop cut here at the front of the Fox store. Now select these two points, and move them back.
Okay, Like this. Okay? Now they are nicely
matching the Fox shoulders. Now we need to do the same
thing around the neck. Select these two points in the middle, and
move them back. Let's keep moving points. Okay, this will work. Let's just quickly, let's add a new loop cut around
here, around the waist. Let's select these
two points around the edge and move them a
bit closer to the middle to give Fox slim waist, Okay? Now, form is nearly finished, but there are still two things we need to
take care of first, Fox torso is a
tiny bit too flat. Let's select these faces on
the back around the middle. These faces in front
around the middle as well. Let's select scale tool
and use it to pull these faces out a bit like this. Okay, great. Now there is one last thing we need to take
care of around the torso. If you look carefully, you'll notice that Fox has this. Shape around his belly, that sort is being
pointed outwards. To recreate that shape, let's select these faces here around Fox's belly,
around Fox's chest. Now, select in set faces and use it to create new faces
here in the Fox's chest. But now we have
one tiny problem. We should use extrude region two to make that shape
that sticks out. But as you can see, if we do this right now, we have this unnatural
looking shape. To fix that, let's also select these faces around the middle, and at the bottom
of the fox's chest. Now extrude these faces. Maybe this is sticking
out a bit too much. Let's pull it a tiny bit
closer to the fox's chest. So now we need to give
these extra faces, we made a little more
better shape shape that matches this
reference image. To do that, we will need to hide everything except these
new faces we made. How are we going to do that? You may think that
we can just select all faces and presage
to hide them. Yeah, we can actually do that, but there is another
much quicker way to solve this problem. Let's disable quickly subdivision
surface for the moment. Now we already have all faces
that are in front selected. But let's also select these
faces around the edges where the belly faces
and the torso meet. Okay, like this. Now that we have all these
faces selected, press Select Option
and select inward. As you can see now, all other faces are selected. If we just press he, now everything is hidden except the faces we want,
which is great. Now that we only have
these faces for the belly, what we can do is simple, open the x ray mode. Let's pull the face
until they are matching this shape on Fox reference image like this. Okay, Let's press old to bring all these
other faces back. Let's actually bring back
subdivision surface. This actually looks pretty good. Now I think that we
should still make this torso more smoother. To do that, go into
the front view, enable x ray mode. Now select all these points around the middle and use
scale tool to pull them apart. Okay, like this. Now let's select all faces next to
it in the front view. Now move them around
with move tool, let's move these points
next to it as well. Who looks like I
missed one point here? Move it a bit forward. Okay, this is looking
really, really good. Now let's only select
these points here. Move them back, these
points around the neck. Okay? Pull this up a bit. Okay? This is great. Now that this has
been taken care of, what we can do
following is we can start taking care
of the fox's limbs.
10. Foxy's limbs: Limps are going to be
really easy to make. Let's simply add a cube. Scale it down, move
it around here. Now go into the edit mode. Now let's enable
subdivision surface. We won't need meter
modifier not yet. Anyway, let's simply
use the x ray mode. Let's move these points around until they are matching
this reference image. Now let's just add a loop
cut here in the middle. Scale it up with. Now let's disable
mirror modifier. What we need to do now. This face in this
press right click. Let's delete these faces. Okay, this looks pretty good. A tiny bit too wide. Let's press, say, to
select all faces. Now let's use scale to make this not so wide and
a bit more circular. Okay, now that this has
been taken care of, let's give this smooth
shading in object mode. Now let's add solidify modifier to give this
object a little thickness. Let's actually move solidify
modifier to the top. This. Now what we
need to do next, let's scale this maybe
a tiny bit up on the x radius, okay? Now, how are we going to get this new custom plate on the
other side of Fox's body? Now, you may think
that we are going to duplicate this object and
place it on the other side, but there is actually a much quicker and more
accurate way to do this. Mirror modifier has
one more feature. Let's add mirror modifier when
we are using this feature. It's okay if mirror
modifier is at the bottom. Now, do you see
this mirror object? Press the cycle here. Now select the fox torso. Now, as you can see, what mirror modifier did is
pretty much created the copy this plate and place it on the other
side of Fox's body. This is another
really useful feature of the mirror modifier. In this case, it's OK if mirror modifier
is at the bottom. Okay, now let's just quickly press shift to
duplicate this object. Now let's place this object in a position where it should be according to this
reference image. Now what we need to do next? We need to actually make a new object object
for the fox hook. This position of arms
is a little awkward. Let's actually fix this. Let's select this object. This first plan for the arms. Press shift test and
select cursor to selected. To move three de cursor here. Now select this other object, press shift test and
select selection to cursor to move the object to the position of
a three de cursor. Now let's move this object away. Let's rotate this a bit. Okay, Like this.
Okay. Okay, this is better for Fox arms. Now let's quickly
create Fox's hook. Let's add a cube. Scale it down a bit, move it around here. Now, going to the edit mode, let's add subdivision, Crank subdivision
surface up to three. Let's move the points of
this hook around until it's nicely matching this
shape shape for the hook. Okay, now let's add
three loop cuts in this subject to make
this features more sharper. Now let's select inst face, add a new face at the top. Let's extrude this
face like this. Okay, Now let's add three additional loop
cuts here as well, to make this a bit more sharper. This is going to be a good
place to use this spin tool, But before we actually do that, let's extrude this
space one more time. Now let's add a new cube. Scale it down. Let's place this
cube around here, around the middle
of the fox hook. Now shift cursor to selected. Now we can delete this cube. Now select this object
we made for the hook. Go into the edit mode. Let's actually change
the points of this up so that it goes into the
direction of this hook. Remember the reason why we needed to place three Dec cursor here is because whenever
you use spin tool, spin tool is going
to use the position of three de cursor as
the center of your spin. Now let's switch the
spin from Z to y radius. Now with the three de cursor
at the center of the hook, this tool is going to make a shape that nicely
goes around this hook. Now of course, we will still need to make some
small adjustments, but more or less this is
going to be real easy. Now let's switch
these two points, enable the x ray mode. Now very simply,
let's place each of these points into the position
of the reference image. After that, we will have
a pretty decent hook. Okay? Okay, now that we have this pretty decent
shape for the hook, let's give it some
smooth shading. Now we only need to make this
hook appear more sharper. So to do that, enable edit mode. Select this face and now
enable proportional editing. Make sure connected
only is enabled. Now process to scale it down. Actually select this scale tool. Let's scale this down
on the y radius. As you can see, by moving
the mouse wheel up and down, we are affecting the
other edges as well. Okay, this looks really good. Okay, this will pass. Okay. Now let's place fox hook in appropriate
position like this. Okay, Now let's quickly select these objects
for the arms. Let's duplicate them, and we are just
going to use them to quickly make this
shape for fox legs. Let's scale them up, and let's rotate them a bit. Okay, like this. Now,
let's make the heap. Let's give fox a heap. Heap is going to be really easy to place this cube down here. Let's go into the edit mode. Cut it in half, bring the other half
with mirror modifier. This is pretty standard
procedure by now. Then we are going to add smooth shading
subdivision surface, but we will give this object
a smooth shading in the end. Now what we need to do
disabled proportional editing. Let's delete this face at the top to make an
opening for the waste. Let's move this points
around like this. Okay, let's add a loop cut here, okay? Okay, let's make this object tiny bit
more wider like this. Now actually you remember
how we hit faces on objects. Well, we can also hide
the objects as well. Let's simply select the press to hide them. They're hidden. To make them come back, simply press a while we
are still in object mode, let's also give this
heap a smooth shading. Now what we need to do next, Let's select this face right
click. Let's delete it. Okay, like this. Now let's use loop cut
to add a loop cut here. Now move the faces a bit inwards to make
this shape more smoother. Now select these two edges and scale tool to
pull them apart. And let's select these two points as well, these two edges. And use scale tool to
pull them apart as well. Now let's just
quickly move these points so that they're better matching this reference image. Okay, press H to bring
all these objects back. Okay, this will work.
11. Foxy's endo part 1: Okay, now Fox's body is
more or less finished. We still need to do some
tweaking on this subject, but the only thing that's still missing is Fox's endoskeleton. After we've done
some tweaking on these objects we already made, Fox's body will be
finished. Let's keep going. Now, first part about Fox's end that we need to
take care of are the legs. Let's actually make the end
of skeleton for Fox's legs. First we're going to
use a new object. We are going to use a cylinder. Let's move it down here. Scale it down with, let's automatically give
it a smooth shading. Okay, Make it a bit
longer and thinner. Now let's place this object. Let's rotate this
in the right order. Let's bring the
predecursor here. Now if you look carefully
at this reference image, you will notice that fox has the disc like shapes
all over his legs. We will recreate that shape for the legs of our fox as well. First fox has the spheres
around his joints. Let's the spheres around
these areas where the joints are duplicate. Pull them around here. Okay. Now let's make a few more
additional cylinders. Let's give them smooth shading. Let's also rotate them
a bit, okay, Like this. Let's place it around here. Okay. Now, let's
make this cylinder thinner on the Z axis. Also, I think that this ring, it should have hole in it. To do that, let's
select the inst face. Use it on these two faces. Now let's use this tool. Now let's press right click. Let's delete the faces. Now we need to
fill up this hole. How are we actually
going to do this? How are we actually
going to fill up this hole? Really simple. Let's select these edges, one at the top, one at the bottom. Then press F, just like that. They're going to be merged. Now let's actually
keep going emerging, these faces, okay? Okay, now that we
have this circle, we should actually make this
circle a tiny bit smoother. You see guys, there is one
thing you need to understand. In real life, you
are rarely going to find anything that has
these sharp edges. Almost any objects, even
those that are sharp, have the edges that are a tiny bit smooth, just a little bit. Now to recreate that
smoothness of the edges, we are going to use
a new modifier. We are going to use
Bevel modifier. Bevel modifier will pretty much smooth out the edges
of any objects. Now the segment segment will control the strength
of smoothness. How strong the smoothness
effect is going to be. Let's set it up to three at the amount will pretty much determine what is the
range of this effect. I think 0.23 works
really nice for me. Okay, now let's just
keep duplicating this. Actually, you know
what? Not yet. There is still one
more thing we need to do around this
object in edit mode. Let's select a loop cut. Let's switch number
of cuts here, 1-2 Then when we use loop cut, it will create two circle
of edges instead of one. Now what we need to
do next is this. Let's select all faces in this middle circle
like this, okay? Okay, Nice and steady. Okay, Now press right
click and delete them. Now what I want you to do next, let's let all edges around
this edge of this hole, and we will do the exact same thing on
the lower edges as well. Let's like these
slower edges as well. Okay, let's press to
extrude these faces. Right click to snap
them in place. Now let's use a
scale tool to pull these edges closer to
the middle of this disc. Now what we need to do
next is really simple. We are going to pretty
much this hole, let's actually hide Babble
Tool for better visibility. We are pretty much
going to close this hole between these
two sets of ages. Then this subject will
more or less be finished. Now let's bring back
this Bevel tool now that you enabled
the Bevel modifier. If you have some issues with
your mesh like I do here, there are two ways to fix that. First, you can simply delete the faces where the
mesh is breaking, and then you can select
the edges next to it. Press F to merge them to bring
those missing faces back. Or you can decrease the amount on the Bevel
modifier setting. As you can see, I needed to do that second option
in order to fix the issue I have with
the Bevel modifier. Okay, now what we need to do next is we are
pretty much going to duplicate these
objects and place them on this area just
like they should be. Okay, now let's take
care of the foot. Foot will be really simple, let's add a cube. Scale it down. Okay, let's immediately just start the Bevel tool increase
at the segments to three. Okay, let's give this
subject a smooth shading. Now let's cut this
subject in half. Set the number of cuts
and loop cut to one, delete one half, use
mirror modifier. All the standard procedure. Move mirror modifier
first, enable clipping. Okay? Now move these faces down. Okay, move them apart like this. Let's make this tiny bit wider. Okay? Okay. Okay.
Okay. Okay. Now let's use Extrude Region tool. Let's extrude these faces. Move these edges a tiny
bit apart from each other. Okay? Maybe to make
this look better, let's increase the amount
of the Bevel tool. Now what we need to do next. Let's select this loop cut switch the number
of cuts to two. Add those two loop cuts here. Now select extrude
region to extrude it. Now let's make this face
as a tiny bit slimmer. Let's select this face, move it closer to the middle. Now let's do the
same thing here. Let's actually temporarily
disable battle tool. Okay, Okay, now we have
a better visibility. Now let's select
these two faces, scale them down a bit like this. And last but not least, let's also do the same
thing with this face here. Scale this face down. Let's scale these two
faces down as well. Now what we need to do next, let's bring back ball and it looks like we
have some issues. Let's actually delete
bevel tool for now. Do this by pressing
this X button here. Now what we need to do next, let's add a lot switch
number of cuts to one, add loop cut around here. Now let's select
these top faces. Pull them a tiny bit down. Now select these edges. Move them down as
well and back a bit. Okay, so let's select these
three faces for the toe. Let's pull them out a bit. Okay, now what we
need to do next, let's select this loop cut. And let's add a loop cut
on each of these toes very closely to edge of the
finger of the toe. Now what I want you to do, select each of these faces
that are here around the. Now select this button and switch these to
individual origins. That way when we scale up, each of these dose will
gain mass independently. Okay? Okay, this looks really, really good, but
now we only need to make these fingers a
tiny bit more smoother. So to do that, let's select
these faces, extrude them. Now select these
edges at the top. Move them a tiny bit down. Let's move these edges
here down as well. Okay, now let's select
Bevel tool one more time, switch the segments
to three, Okay, like this, we still have some issues with clipping
here, but it doesn't matter. We will easily fix that
whenever you have. This effect. Means that your points and faces are
clipping through each other. In those cases, just
move points around, move them a bit away
from each other, and then they won't clip
through one another anymore. Okay? Now I think that Fox should have a
bit more longer leg. It should be a tiny bit, a tiny bit narrower
around the heel. Okay? Maybe this is a bit too long. Okay? Something like this. Now let's add loop,
cut around here. Let's select these three faces. Let's use extrude region
to extrude them and now process to scale
them down like this. Okay? Okay. Move them around so that it
matches the fox's leg. Okay? We have the
leg for our fox, now that we took
care of this leg. Now we can quickly add a
new leg on the other side. We are going to use this
with mirror modifier. Let's add or modifier on
each of these subjects. And then we are going
to use it to recreate, to create a new copy of it on the other side of our Fox body. Okay, now that Fox's
legs are taken care of, well, they're taken
care of halfway. They should go all the
way up to Fox's hip. To recreate this, let's duplicate these
objects for their leg. Now let's switch this from individual origin
to media point. Press shift to duplicate. Let's place these objects in
their place in Fox's body. Now that we took
care of the legs, let's give our Fox some
pretty decent arms as well. Let's select all these
objects that are in the leg. Let's duplicate them. We are going to use them
to pretty much make this endoskeleton for the arms. Now, one problem we have that the discs are a tiny bit
too big for the fox's arms. We will need to scale
them down a bit. Now let's actually just
select these circles. Let's switch this back
to individual origin. Now let's scale them down
with a bit. Okay, like this. Now press old H to bring back
everything that was hidden. Yeah, now we are just
going to duplicate this subject and place it here. Let's switch this back
into media point. Okay, Place it here. Let's duplicate this
sphere. Place it here. Okay, We have these arms. Now what we need to
do is we need to give Fox some hand as well. Hand on his left arm. This is how we are
going to do this.
12. Foxy's endo part 2: Let's actually move
Fox reference image somewhere around here. Let's create a cube. Let's scale the cube down. Okay, scale it
somewhere like this. Now go into the edit mode now let's extrude
this face here. Scale, scale it down
with scale tool. Now shift to bring three de
cursor here around this time. Now what we are going
to do next is this. Let's get cylinder,
give it smooth shading. Let's press to scale
this cylinder down. Okay, Now let's rotate this, make sure it's a
90 degree angle. We can scale this
up a bit as well. Now Fox has three fingers. We will need three
more cylinders on E23. Now these cylinders are
a tiny bit too big. Let's select all three of them. Switch this to individual origin and press says to
scale this down. Okay, now we can go
back to median point. Now what we need to do next, let's bring this cube. Scale it down like this, make it a tiny bit wider,
longer, and wider. Place it somewhere around
here. We copied this. Just like we have
three cylinders, we will also need three
cubes for the finger. Now let's duplicate these
cylinders and cube, duplicate these cylinders
and place them here. Okay, Now what we
need to do next, let's duplicate one
of these cubes. Let's go into the edit mode. Now we need to do some
adjustments on this cube. Let's add a one loop cut here. Let's select this face. Scale it down a
bit and squish it. Okay? Scale it down. Scale it down on
the y radius, okay? Now, let's duplicate
these objects like this. For each, for each
of these fingers. Maybe we should scale these
three objects up a bit. On y radius, just a tiny bit. Now, I think that we should make these cylinders a
tiny bit bigger, or should I say wider? That way they will match this
object a tiny bit better. Let's switch this from media
point to individual origin. Let's scale them down
on Y and Z radius. Okay? Now that we have
object like this, let's duplicate
all these objects. Let's switch this
back to median point. Let's place this subject here, where the thumb should be. Okay, let's switch this back. It's already on media point. Great. Now scale
all these objects for the arm a tiny bit down. What we need to do now, let's place it around here. Okay? Maybe scale it
down a tiny bit as well. Okay? Okay. Okay, Great. Now that we took care
of the fox's arms, now we need to make an endo for the foxes and for
the fox's head. Okay? So, let's do that. But first, before we actually do for the Fox's
torso and the head, let's actually re,
arrange the arms a bit. Select all the objects for
the Fox's arms and place them here where they're better
meeting with this opening we made on the torso
for the Fox's arms. If you need to, you can
move this hand separately. Okay, now we can start making
an endo for the torso. Now let's bring a pred cursor
here where the torso is. Now we can hide the torso. Okay, let's bring the cube. Scale it down a bit. Now we are going
to turn this cube into the endoskeleton
for the chest. Now let's go into the edit mode. Let's cut this object in half. Now, add mirror modifier. Okay, now how are we going to make a shape
for an endoskeleton? Well, pretty simply, Let's
select Extrude Region tool. Select this subject and
extrude it a bit like this. This face at the bottom
extrude it Again, select this face at the side, close to the bottom
of this object. And extrude, but don't extrude it as much as you did
with the face above it. Then just repeat this
process until you reach all the way
to the Fox's heap. We don't need to make the chest really all
that much detailed, since majority of it will
be covered by the costume. There's really no reason for us to go into detail with it. But we can use Bbl tool to make the subject a bit more
smoother like this. Now let's actually make one
quick shape for the hips. The end of the hips, let's add a UV sphere for this. Scale it down. Okay,
move it around here. Now what we need to do is let's hide this
custom for the hip. Let's add the cube. Scale it down, go
into the edit mode. Let's cut this cube in a half, add mirror mode, fare to
bring this other half back. Now what we need to do is this. Let's select this bottom
face extrude region. Select this face at the side
extrude region as well. Now let's just use barrel tool, increase the segments 1-3 maybe increase the
amount a bit, okay? Not so much. This
will be good enough. Let's pull this
subject tiny bit down press to unhide
everything, okay? This end will be good
enough for the torso. Now, let's actually make a new end for the neck
and for the head. After that, we just need to do some adjustments on Fox costume. Then more or less, our character will be finished. Okay, first I want you to
duplicate this sphere, and bring the copy up here. Now, scale this copy down with what we need
to do next is this. Let's select, let's
start cylinder, give it smooth shading. And let's scale this
down a bit like this. Now let's scale
this cylinder down on x and y axis and
make it taller, bigger on the axis, okay, maybe it's a bit too long. Now move this cylinder
around here at the side. Now let's add mirror modifier and select the chest of
end as the mirror object. Now we have this snack that is made from these
two cylinders. Which is great, because if you look at the Fox's
reference image, you will notice that Fox has the snack that is made
from these two cylinders. Now we can move on to the
rest of the Fox's head. But first, we need to take
care of the Fox's job. We need to make an opening for the Fox's neck on this job. This is how we are
going to do this. Let's select the job, go into the edit mode. The job, let's set the
loop cut around here. Okay, now let's
delete this face. By doing so, we pretty
much made the opening, the hole through which an end of skeleton can pass,
which is great. Now let's move these
edges around like this. Move them around
that way they're more easily matching
this hole we made. What we need to do next is this. Let's add a new loop cut
somewhere around here. Now let's this point extrude it, let's make it meet with this other point that is
coming from mirror modifier, from this half created
by the mirror modifier. Once the two points meet, let's select these four points. Now press to close them. Okay, now we have
this nicely set up call for the jaw
of our character. Okay, now what we need
to take care of next, let's actually move
this jaw around a bit. It's a bit too wide,
in my opinion. Let's just quickly
take care of that. Okay, Now we need to make
the endo for the fox head. Now, how are we
going to do that? Well, really simply, actually, let's actually first take
care of the fox's eyes first. Let's add a UV sphere. Let's immediately give
it a smooth shading. Let's pull it somewhere around here where Fox's should be. No actually has two eyes. One is just covered
with an eye patch. We will make that each as well, but for now let's just
take care of the eyes. Let's add a mirror modifier. Select the head as the mirrored
object. Okay, like this. Now let's select these size, duplicate them,
and pull them up. Now go into the edit mode. Now what you need to do, select all faces and points at the bottom of this
sphere and delete them. Then go back into
the object mode. Now we need to give this
object some thickness. These objects are basically
going to be the eyelids. And eyelids should
have some thickness. To do that, let's add
Solidify modifier. Let's give this eyelid
some thickness and pull it down onto the
eyes of the Fox. Fox now has the eyelids. Let's duplicate this object to give him the lower
eyelids as well. Okay, this will work
really, really good. Let's actually quickly
say this project. Now we can give
Fox an eye patch. Now to add Fox eye patch, let's add a plane. Let's scale it down like this. Okay? Let's rotate this. Okay? Now let's actually add subdivision surface
to this plane. Let's increase subdivision
surface to three. Let's also add
Solidify modifier. To give this side patch some thickness and let's put subdivision
surface to the top. Okay, Now go into the edit mode. Now we need to move this plane around so that it
covers this entire I. Let's actually do that. Move these points
around so that they are nicely covering the. Now let's add
additional loop cuts. With loop cut or should
I say additional points. Just move them around. Okay, like this. Let's actually add the loop cut from
this angle as well. Select this point that
is right in the middle. Let's pull it out,
okay, Like this. Okay? This e patch is more
or less covering Fox's eye, But it's a bit too
big. In my opinion. Fox's eye patch isn't this big. Let's move these points
of this eye patch around so that the Epatch
is still covering the eye, but it's not as big
as it was before. Okay, this will pass. Now we need to make
an object that is going to keep this eye
patch attached to the eye. If you look at the fox
on this reference image, you will notice that fox
has this black object that keeps the eye patch
attached to his eye. We will do that as well. First we will add
a new plane plane. That is going to
be our string that keeps the eye patch
attached to the eye. Now what we need to
do next is this. This plane should be stuck right on the surface of Fox's head. There is one way we can
actually set up this plane so that it is stuck directly on
the surface of Fox's head. Let's first go into
the edit mode. We are going to cause
this plane to be stuck on Fox's head with something
called the snapping. Now, setting up the
snapping is really simple. Press this magnet here
that is going to turn on snapping and
under this button, open this to open additional settings for
the snapping switch. This to face project snap. Switch from closest to active. Now simply enable project
individual elements. Now let's see what will happen when we move the
points of this object. You can see when
we move the points of this object with
snapping enable, those points are
automatically getting stuck on the surface
of the focuses, which is great, this is
exactly what we want. We want this string, for the patch to be stuck
exactly on the Fox's head. And with snapping, we
can do that easily. Let's just quickly
save this file, but now we have a new problem. Now we don't actually have a good visibility of this plane. Well, this is going to
be really easy to fix. Go here under object
under view for display, open it and enable in front. This will allow you to
easily see your plane even when that plane is clipping through
some other object. Now let's give this patch
a bit better shape. Let's select loop cut. Let's add a loop cut here. Move these points
around so that they're stuck onto the surface
of this character. Let's make the rest
of this string. Now, how are we going to do? Select these two point points. Now duplicate them. Shift D, move these two points here on the other side
of this eye patch. Now select these two points. Now proceed to extrude. As you can see, now
we are creating additional faces
that are going to cover the rest of
the fox's head. They're going to serve pretty nicely as the string
for the eye patch. Let's actually drag
this all the way to the ear, okay? Like this. Okay? This
will be good enough. Now go back into
the object mode. Disable, snapping,
and disable in front. Now we need to make sure that this object actually
looks decently. To do that, let's first start
solidify modifier to give this object thickness this let's subdivision surface. Crank it up to smooth
this shape around a bit. Okay, This actually
looks pretty decently. Let's actually re enable snap. Let's save, let's
move these points around like this so that they are actually
touching the eye. Touch, okay, Like this. Okay. This is pretty good. Now what we need to do next, we pretty much only
need to take care of the end of the head, and with that, we
only need to do some adjustments
on the Fox custom.
13. Foxy's ears: Now first thing
around Fox's head that we need to do pena
one and pen to eran. Metronic usually have
these metallic mounts for their endoskeletons
within their costumes. For the start we will be making a inner mouths like
that for the fox. Now, this shouldn't
be too difficult. Let's select the,
let's select the cube. Scale it down, and move it up here to this area where
the neck pipes end. Now let's add subdivision
surface, smooth shading. Now let's actually cut
this object in half and then bring the other half
with mirror modifier. Okay? Just make sure to place mirror modifier to the top
and to enable clicking. Okay, this is what
we need to do. Let's select this
space at the side. Extrude it like this. We can extrude this again. Actually, come to think of it, let's select these faces
and pull them up a bit. Okay, Like this.
This face extrude. Let's place it somewhere here. Okay? Sweet. Now let's use loop cut to add
this new face around here. Let's actually delete this face. Now what we need to do next, Select the edges
around this hole. Wrong edge now
pressed to extrude. If you enabled clipping
on your mirror modifier, the left and right side
should merge together nicely. Okay, now I think this is
actually a tiny bit too big. So let's select these faces, and let's pull them back
into the fox's mouth. Let's pull it out a bit, okay? Now, I actually don't
like how this looks. It's way too smooth. Let's actually delete
subdivision surface, and let's add bevel modifier and increase segments
to three, okay? Now, another problem
this endo has. It's a bit way too thick. We need to reduce its volume. Select all faces at the
top and pull them down. Okay, Now this
actually looks better. Now what we are
going to do next, let's actually move these
faces at the bottom up as well, like this face. Move it up. Okay,
Like this. Okay. Now we only need to add an additional upper jam and
upper head for the end of. To do that, let's actually
duplicate this subject, pull it like this. Now let's open edit mode. And let's reshape these points
in a way that will allow us to make a shape for the upper job that is going to look really,
really nicely. Okay, this will work. Now we only need to create one additional shape for
the head of the endo. Let's actually quickly
hide the mask. Let's select this upper. Now let's these three
points like this. Now let's select
these three points. The top, pull them up like this. Okay, This will work. We don't really need to work all that hard
around the end of, since like I said, majority
of the endo will be hidden, hidden by the costume of fox. Now we only need to merge this upper and lower um of the end. To do that, let's
actually select these cylinders and
let's duplicate them. Let's place it somewhere on the sides around here like this. Let's actually maybe
go into the edit mode. Select this face, pull it up. Okay, this will work for now. Now let's actually give Fox
some ears and the teeth, and that should be
more or less okay. Now for the ears, let's actually pull the
reference image around here. Rotate this. Now let's use it to give the foxes
some decent tears. Let's get this cube. Scale it down, okay,
Let's rotate this. Let's add subdivision surface. Okay? Now go into the edit mode. Let's start moving
these points around so that we get a nice
shape for the ears. Let's add a loop cut here. Scale this up with, okay, let's maybe make
this a little less wide. Press to select all points. Make this ear a tiny bit wider. Now select this inset phase, and select these two phases. Scale them down,
okay, like this. I think we can press to scale the faces down even further. And now use extrude region tool, pull the faces into this object. Now let's just make this
face here a bit bigger here. This one as well. Okay, this
will work nicely as the ear. Let's give it a proper position. Okay, Like this. Now, let's add a cube. Scale it down, make
it a tiny bit wider. Okay, let's actually
add Bevel tool. Whoops, wrong modifier. I meant to say Bevel tool, three segments, smooth shading. Let's place this tool
nicely into the fox head. We can actually use
mirror modifier to put this cube on the other
side of the head as well. Now we need to make another. However, as you can see, Fox's left ear has no costume. We will be making that other ear a little
bit differently. Let's add a new cube. Scale it down, and we can actually hide this
metal part for the ear. We can honestly hide
the mask as well. Okay, now let's give Fox an ear. Let's select this cube. Okay, let's rotate this a bit. And let's also add
subdivision surface. Let's crank this up to three. Okay? Now, let's
re, arrange this, this cube so that it nicely matches this shape for the ear. Okay, like this. Now
let's use loop cut. Okay, Looks like I
made one mistake. I forgot to enable
remote and as a result, Only the front faces
and points were moved, but not those on the back. Doesn't matter.
It's an easy fix. Okay, pull these faces here. Now let's add a loop cut
to cut this ear in half. And let's just keep adding
faces and points until we get the shape that matches the ear on
the reference image. Okay, like this. Okay, great. Now we need to open a hole
for the inside of this. Now to do that, simply select all phases that are in front and let's use inset phase tool to make a few pass
here in the middle. We can actually scale
them down with. Now let's use
Extrude Region tool to pull these faces
a little bit in, into the center of this object. Okay, this looks pretty good, but now let's actually take a better look at this
reference image. Now as you can see on
this reference image, Fox's left ear has this sort of three lines that
run inside of it. We will need to recreate those
lines on our ear as well. Now, this lesson might get
a little confusing here, but take it slowly one step at the time and you'll
get the hang of it. Let's actually first quickly
disable subdivision surface. Let's select all these faces
that are inside of our ear, all these faces, and let's
delete them like this, okay? Now, select all these
faces that are around the back and press to
hide them. Okay, great. Now what we need to
do next is we need to add a few loop cuts around these areas where these
lines are, okay, like this. Now what we need to do next, let's delete these faces from which these lines
are going to come. Now let's select let's, I actually made one mistake. Let's bring these faces
back with control Z. Let's add a loop,
cut around here and pull it closely to
the end of the face. Okay, now select these two faces at the back and delete them. Now what we need to do next, select this edge
and this one here. Now press to merge them. Now let's select this edge and this one here. Merge them with. Now select these two
edges and merge them. Okay, now let's do the exact same thing
here with the edges. Let's do it here with
these faces as well. Now let's select
these two phases. Press F to merge them. Let's select these two phases. Merge them with these
two phases as well. Let's just keep going until we close this hole here, okay? Okay. This will work nicely. Now let's press old H. Okay. To bring all pass back. Let's see how does this look
with subdivision surface. It looks good but we will still need to do
some adjustments. So let's once again temporarily disable
subdivision surface. Let's select these
faces on the back, let's hide them once again. Now we need to close this hole, this side of the ear. That is really simple. Let's select these edges around this hole and just
press F to close them. Let's do the same
thing here. Here. Here. Now let's press a H to
unhide the face as we hit. Now let's see how does this look with subdivision surface. It looks good, but we should make some of these
features a tiny bit. They shouldn't be so smooth. Let's actually delete subdivision surface,
or actually no, let's bring subdivision
surface back, okay? Like this. This is how we are going to smooth out these edges. We're just going
to use loop cut. Pull it closely here and
here, around the corners. Now let's also use
look cuts around the bumpy lines we made to make these lines a
bit more sharper. Okay? Like this. Okay. This
is going to look really good. Let's actually give
this smooth shading. Now we only need to
really smooth out these bumpy lines at
the back of the ear. How are we going to do this? Now? The main reason why we
have these bumpy lines is because we have too many edges at the back of the fox's ears. We will need to
get rid of some of these edges at the
back of the fox's ear, but we won't actually
delete these edges. If we do, we will just make a hole at the back
of the fox's ears. We will get rid of these
edges by dissolving them. Simply select some of these
edges at the back of the ear, and select some that are at the upper and lower
side of the ear press, right click, And
dissolve these edges. As you can see, by doing this, we pretty much smoothed out
this shape at the fox's ears. Let's also dissolve some of
these other edges as well. Just one friendly advice. I recommend you to keep some edges that are in the
middle of the fox's ear, because without
them, the shape of the fox's ear is going to look
really flat and unnatural. Okay, Get it? Okay. Let's start to dissolving now. Let's select these
faces around the back. Let's pull them out a bit. Okay? Now we have this
pretty decent shape for the fox's ear.
14. Foxy's teeth: Let's bring back this mask. Now, the last thing I think
we still need to do is we need to place some
teeth into the Fox's jaw. This is how we are
going to do this. Let's add a new
cube. Scale it down. Let's add subdivision surface. Crank it up to three. Let's give it a smooth shading. Now go into the edit mode, and this is what
we're going to do. Select extrude region,
select this top face, pull it up like this. Now press S to scale it down. By doing so, we created this
sharp tooth like object. Let's scale it down. What we are going to do
is we are going to place this in the fox's mouth. Okay, somewhere like this. Maybe scale this down a little. Now, let duplicate this second teeth
somewhere around here, in its appropriate place. Now, let's keep duplicating these objects and
placing them in a mouth until our fox has a
good looking teeth and a jar. Okay, let's keep duplicating and placing some teeth. Okay? Now let's place some teeth on the other side
of the J as well. And then we will place
teeth on the upper J too. Okay, now let's select each
of these teeth we made. Then we are going
to duplicate them. And place them nicely on the upper jaw to press
shift, to duplicate. Now let's select this, switch it to individual origin. Now select Rotate Tool, and let's rotate each of
these teeth upside down. Okay, now your job is simply place each of these teeth in the appropriate position
in the upper jaw. All right, now
let's actually make one additional teeth
for this gap here, and let's do the same
thing around here as well. Okay? Okay. Okay, We have
more or less of teeth, but I think that this
have one problem now. When we are looking at this
from an outside perspective, these teeth are good. But when we are looking at how
they look from the inside, this looks a little weird. To fix this, we are going to move the position
of the teeth. Let's move them around
here so that they are on this mask we
made for fox lower jaw. And we are also going to move all teeth that are on
the upper jar as well. So let's get started. All right, now that
we moved this, we should just quickly fill
up the few gaps we have between them on the upper
and lower, like this. Okay, now let's do the same
thing around here as well. Let's clean up this
gap we have here. Let's, let's fill up this
gap we have here as well. Okay, great. We have this
teeth for Fox's head. But now we also need to
give Fox's endoskeleton, a set of teeth as well. Now, the teeth for the endo are going to be
a tiny bit differently. They're not going to
be all that sharp. There be like cubes. Let's add a cube. Let's scale it down. Let's make this a bit flatter and a tiny
bit narrower as well. Now let's add boy
bevel modifier. Give it three segments. Add smooth shading. Okay, let's bring
this teeth down here. Let's actually scale
this te, down like this. Let's nicely place it here in the jar of the
fox's endoskeleton. Okay? This, and then we are going to do
the exact same thing we did it for this
regular teeth. We are going to keep adding
them one by one until we fill out an entire mouth with
this teeth like this. Okay? So let's get started. 0, Okay? Now that we nicely placed
this step in the fox's mouth, now the last thing we
need to do is we need to take care of the
damaged parts on the fox.
15. Foxy's broken costume: Okay, now that we nicely placed this teeth
in the Fox's mouth. Now the last thing we need to
do is we need to take care of the damaged parts on
the Fox, for example, Fox. Here, his costume is more
or less looking fine, but as you can see on
this reference image, his costume is quite beaten up. We will now take the
last few details and we are going to
break the Fox's costume. However, just one
more drink that you need to know before we
actually started doing that. You see guys when. In order to actually
break the costume, we will need to apply
some of these modifiers we added on the
subjects you see guys. Whenever I'm about
to apply modifiers, I like to duplicate
the object with modifiers just in case I make a mistake and
need to fix something. Okay, what we are
going to do is we are going to select all
objects that make this Fox. Now, we are going to duplicate these objects with shift D. Now, let's pull them
back like this. Okay, now that we
took care of that, we can start breaking
Fox's costume. Let's actually start
with the head. Fox's head is the most broken. First, we will need to
apply a few modifiers. Let's apply mirror modifier. We can actually
also save as well. If we go into the edit mode, you can see that the both
sides of Fox's mask now have their own faces and meshes and they're no longer
mirroring one another. Okay, Now what we
need to do next is let's apply subdivision
Surface as well. If we go into the edit mode, you can see that
now we have a lot of faces at our disposal. This is basically what
Subdivision Surface does. It subdivide your
mesh multiple times, creating a lot of new
faces in a process. Now, the next thing we
need to do is this. If you take a look at the
Fox's reference image, you will notice
that Fox's mask is breaking around Fox's left ear. We will need to make that
broken area on our Fox as well. This is how we will do this. Simply go into the edit mode. Select some of the faces
that a fox's left ear, and then delete them. Then just keep deleting
faces until we have this nice hole for
the fox's left ear. Okay, now we have this hole. But if you take a closer
look at the reference image, you will see that fox. That this hole on
the fox's mask is actually going all the way to
the fox's left eye as well. We will select these faces that go all the way
to the left eye, and then we will delete them. Then we will delete a few
more additional faces, and then we will have this
proper hole on the Fox's mask. Now let's delete
these phases, okay? Now we have this hole around Fox's head and
subdivision surfaces, automatically smoothing
out this hole, making it a bit smoother
in the process. Now you should just play
around deleting pass here and there just to see what kinds
of results you are get. You are also totally allowed to move points and
edges as well, just to see what kind of
result you are going to get. Now let's delete some
faces around here, because Fox has a piece
of his mask missing down around this area, okay? Okay. Now that we took
care of this area, now let's take
care of the foxes. So, now we have quite a lot
of work here right now, I noticed that when I
actually was making torso, I forgot to add a
solidify modifier. Let's place subdivision
surface last. Let's also set up a
solidify modifier as well. Okay? Like this. Okay. Now we need to do some rearrangements
around the belly of fox. We need to move
these points a bit. Move them around to get this better looking shape for the belly, okay? Like this. Now, to
make this look better, let's actually select these
points on the Foxtrot. Move them away from
the middle to give this area a bit
better shape. Okay? Like this. Okay. Now let's
apply mirror modifier. We can also applied
subdivision surface. Now let's go into the edit mode. Now we need to make this
torso appear broken. If we look at this
reference image, you will notice that
the entire bottom of Fox torso is missing. That all that is left are these sharp pieces
that are sticking out. This is how we are going
to recreate that shape. First we will select these faces at the
bottom and delete them. Now we are going
to select some of these faces at the
bottom of the object, then we are going
to delete them. We are going to keep
making these holes around the torso until we make an
entire circle with them. Then we are going to use
proportional editing to make these pieces we
made appear sharper. Also make some of these holes a tiny bit bigger and some
of them a bit smaller. Their size needs to be random. That way it's going
to look natural. Okay. Now when I
actually look at this, I noticed that the
thickness which selected by modifier
is way too strong. Let's weaken it a bit. Now, how do we make these pieces that are sticking
out a bit more sharper? Well, this is, let's select. All these points down
here around this area. Now let's enable
proportional editing press to scale it down and
move mouse up and down. As you can see as
we're doing this, we're making this area appear a bit more sharper
than it was before. Okay, like this. Now,
let's just keep adding. Okay? Okay. Now that we made these broken
pieces a bit sharper, one problem is that they're all pretty much looking at
the same direction, they're all looking
straight down. Let's keep proportional
editing enabled, and let's use proportional
editing to bend the pieces into
different directions. Now some of them can keep
looking straight down, but some of them should
be a little bended. Okay? Like this. Okay? Now if you still want to have more
additional sharp pieces, what you can do is you can
select these two points, proceed to extrude them. You can use loop cut to
add a few more points, scale them down, move it around. And you can do this until you have the shape that
you are happy with. And okay, this is pretty
easy way to make the torso, the broken torso for Fox, just to make this broken
area around the chest. Let's also select some
faces around here and delete them, okay? Like this, Okay? Like this. Let's keep breaking, okay? Like this. Maybe one more around here, okay? We have this broken area now, come to think of it, we can add one more
subdivision surface. Actually, let's place
this one down, okay? Now we have this broken
looking area for the torso, but we should also
break this area, a fox's neck and shoulders. This is how we are
going to do that. It is really simple. We will just select few
faces around the neck. Okay? We will delete few faces around
the shoulders like this. Okay? Let's delete some
faces on the back as well. Okay? Maybe a few
faces here as well. Okay? We have this
broken area now. We also need to break the areas around
Fox's arms and legs. This is how we are
going to do that. First, let's apply
mirror modifier on these objects for the arms, because they're going to be
broken in different areas. We we can also apply subdivision surface
on these two as well. That out of the way. Now
let's go into the edit mode. Now this part is really simple. Just select a bunch of
faces on this object to make a hole that is
going to appear like this object is breaking
something like this. Okay, great, let's do a little breaking on the
other side as well. Now I think that this
thickness is a bit too strong. Let's weaken it a bit, and let's also add subdivision surface to smooth
out this hole as well. Okay? Now, let's
do a little bit of deleting and breaking on
the other arm as well, something like this, okay? Sweet, sweet, sweet,
sweet, sweet. Last but not least, let's take care of
the areas as well, like this, let's
subdivision surface. Let's also weaken the thickness
of this object as well. Now let's delete a few faces
on the other side too, to make this look
broken and okay. Okay, We have now this fox that looks like he's pretty
broken, which is great. This is exactly what we want. Okay? Now, we only need to take care of Fox's hip and the legs. After that, we just
need to give Fox nose. Let's actually take care
of this heap first. First all we need
to do is to add, solidify modifier, place
subdivision surface last. Now, give this heap
a proper thickness. Okay, Now let's take
care of the legs first, let's apply mirror modifier and let's take care of
subdivision surface as well. Now let's go into the
edit mode with the legs. We have similar situation
we have here for the torso. This is what we will
do for the legs first, let's delete all
faces that are here. Closely at the
bottom of the legs, Okay. Now, similarly
to the torso, we will select some
phases that go up here. Okay, and delete them
to get this sharp edge, let's just solidify
modifier a bit. Now let's keep deleting, making this sharp sharp
shape, okay? Like this. Now, foxes legs have a few holes around
this area as well. We will make a few additional
holes too, like this. All right, Now let's enable
proportional editing. Let's select these points here, scale them down to make
them appear sharper. Let's do the same
thing here as well. 0 k, okay, here as well. Now let's just move these points around to get more randomized
shape for the leg, just like we did
it for this leg. Let's do the same thing on
this other leg as well. Delete the faces. Okay, let's make a
few sharp shapes. Use proportional editing to
make them appear sharper. Okay, let's bend these
shapes a bit like this. Now let's make a
few holes inside this leg. One more here. Okay, now go into
the object mode. Let's side solidify modifier. Okay, this will work. Now let's just quickly
give a nose as well. Let's side a cube, scale it down, place it
somewhere around here. Now let's add
subdivision surface. Okay. Now simply go into the edit mode and move these faces around until we
get a shape for the nose. Let's move this face. Whoops, let's disable
proportional editing. Move this face back a bit. Now select these
two faces and use scale tool to move them
away from each other a bit. Now select this face. Move it somewhere
around here. Okay? We have this decent shape
for the fox's nose. Now, the last problem we
have with this fox is this. As you can see, this
object that is connecting Fox's ear with his head is
clipping through the ear. We will need to fix this. Well, first, as you can see, we use mirror modifier to make this object appear on
both sides of the foxes. If we take a look, you will see that this piece, this part of this object that is connecting this
ear with the head, doesn't have problems
with the clipping. We only need to edit this here. To do that, let's
supply mirror modifier. Now going to the edit mode, let's select this face, a new move tool to
place it here where it's no longer clipping
through the ear of our focus. Okay, our focus is finished.
16. Ending: And with that, we reached
the end of this class. Congratulations guys. Now you can use
edit mode to make all sorts of different objects
and characters in B***der. Now that you finish this, it's time for me to
give you your homework. Your homework will be simple. Make one or more
characters in edit mode, and then put your handiwork on class projects for all to see. I hope you are going to put the skills and
knowledge I gave you to good use and see
them in the next class.
 Cartony Life, I'll make you pro at Blender! :)