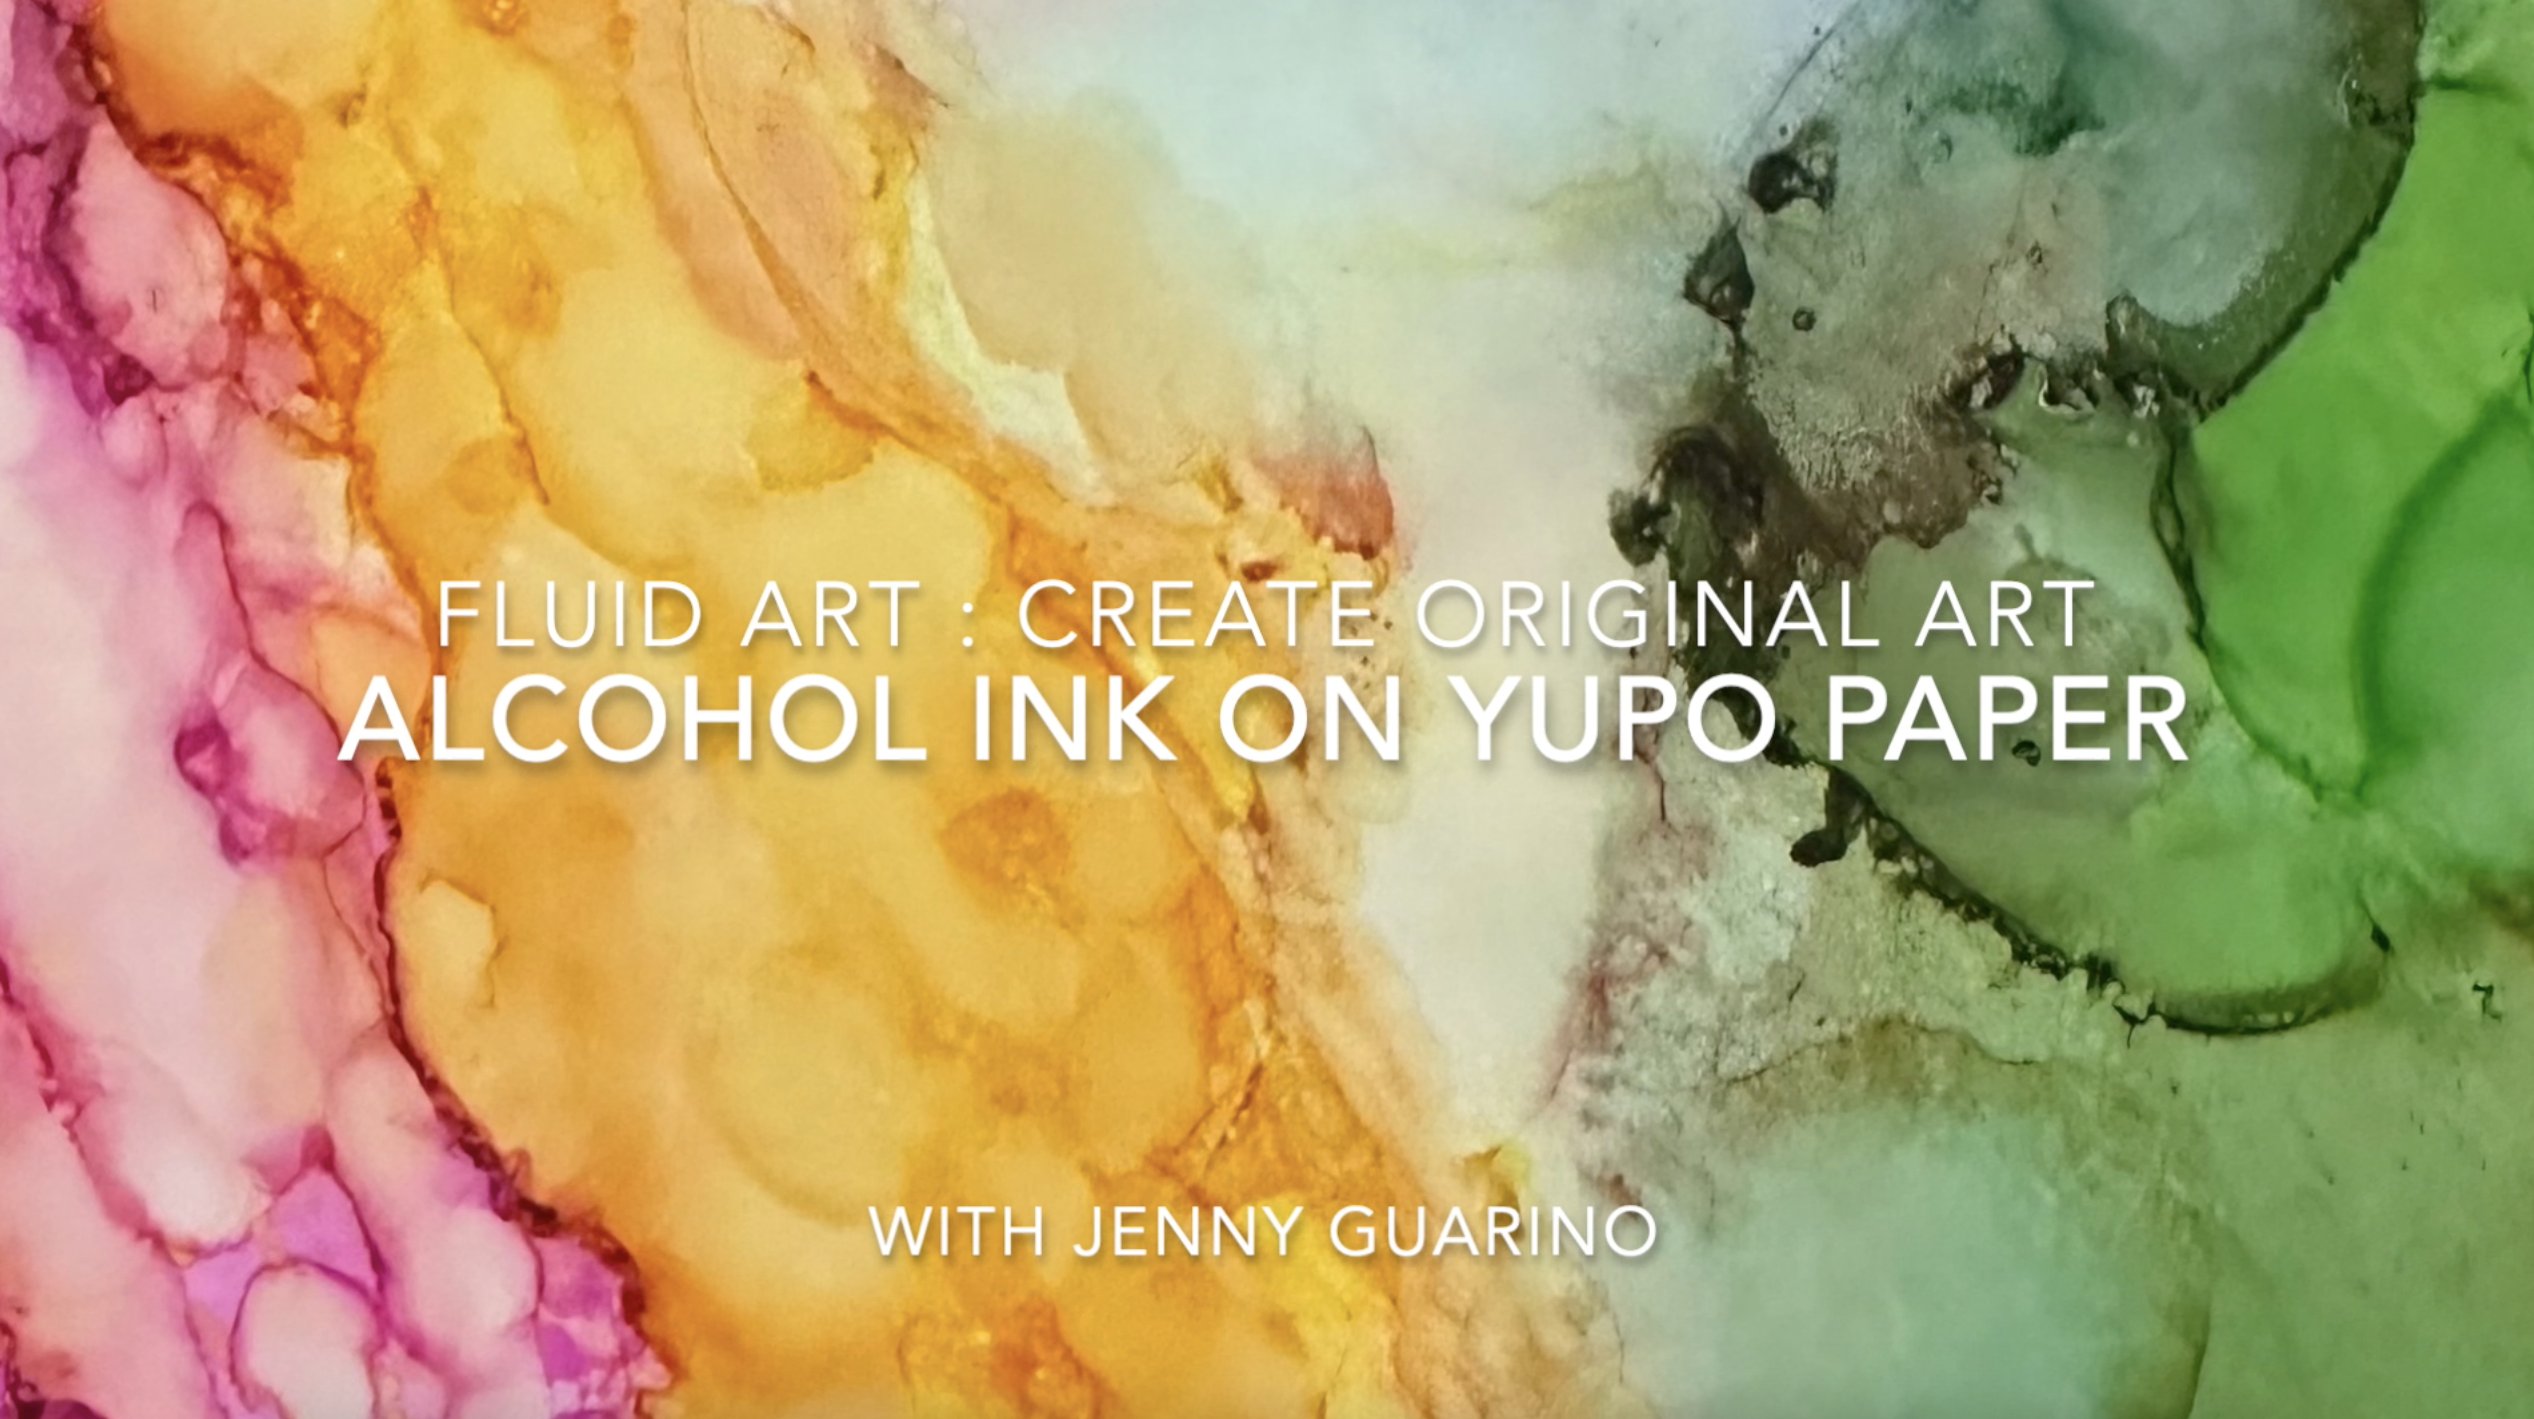
Transcripts
1. Introduction : Hi, I'm Jenny Guarino and I'm fluid artist working in my
studio here in Houston. I teach fluid art classes
out of my studio and I'm pleased now to be
sharing my techniques with the Skillshare
online community. A recent diptyche
that I created, cloud waves is in the city
of Houston art collection. In this class, we're going to
make poured paint Coasters with a coat of acrylic resin. look at this. Aren't they,
beautiful! Look at them. On the back. We've got these. And of course in my classes, we choose your own colors and
you choose your own shapes and designs and which
techniques you use and you make your
own unique artwork. This is my second
Skillshare class, and it follows on from my previous class
on acrylic pouring. This time we're pouring
on a ceramic tile. And then we'll put
a coating of resin. And I'll take you
through all the steps to make these beautiful coasters from the very beginning
to the very end. In my classes, I give
detailed instructions on techniques to make
your artwork successful, but I also give you
choices along the way. I believe that everyone's
work is unique and we have our own viewpoint
of the world and colors, shapes, and you need to make the artwork that
makes you happy. I always want you to create your own unique pieces of art. And I find it exciting to see, given an understanding of
what needs to be done, what different
students can create. I can't wait to see
your project work. I can't wait to
see the tiles that you create in this class. I'll also give you
tips and tricks on resin and how to redo the
resin if there are any issues. The resin gives it a beautiful, glossy, shiny finish. It also is very
durable for coasters, so it's perfect if
you were to put a cup of coffee or
something on it, your artwork is
protected by the resin. In this class, we're going to create some
beautiful tiles. They're going to be a
great gift for someone or a beautiful
addition to your home. I will cover all you need to
know in this class to make the coasters. At the
appropriate time, I'll refer you to lessons in my previous classes if you
want more information. So join me as I guide
you step-by-step through the processes to create your own beautiful
ceramic coasters. I'll see you in the next lesson where I describ the project.
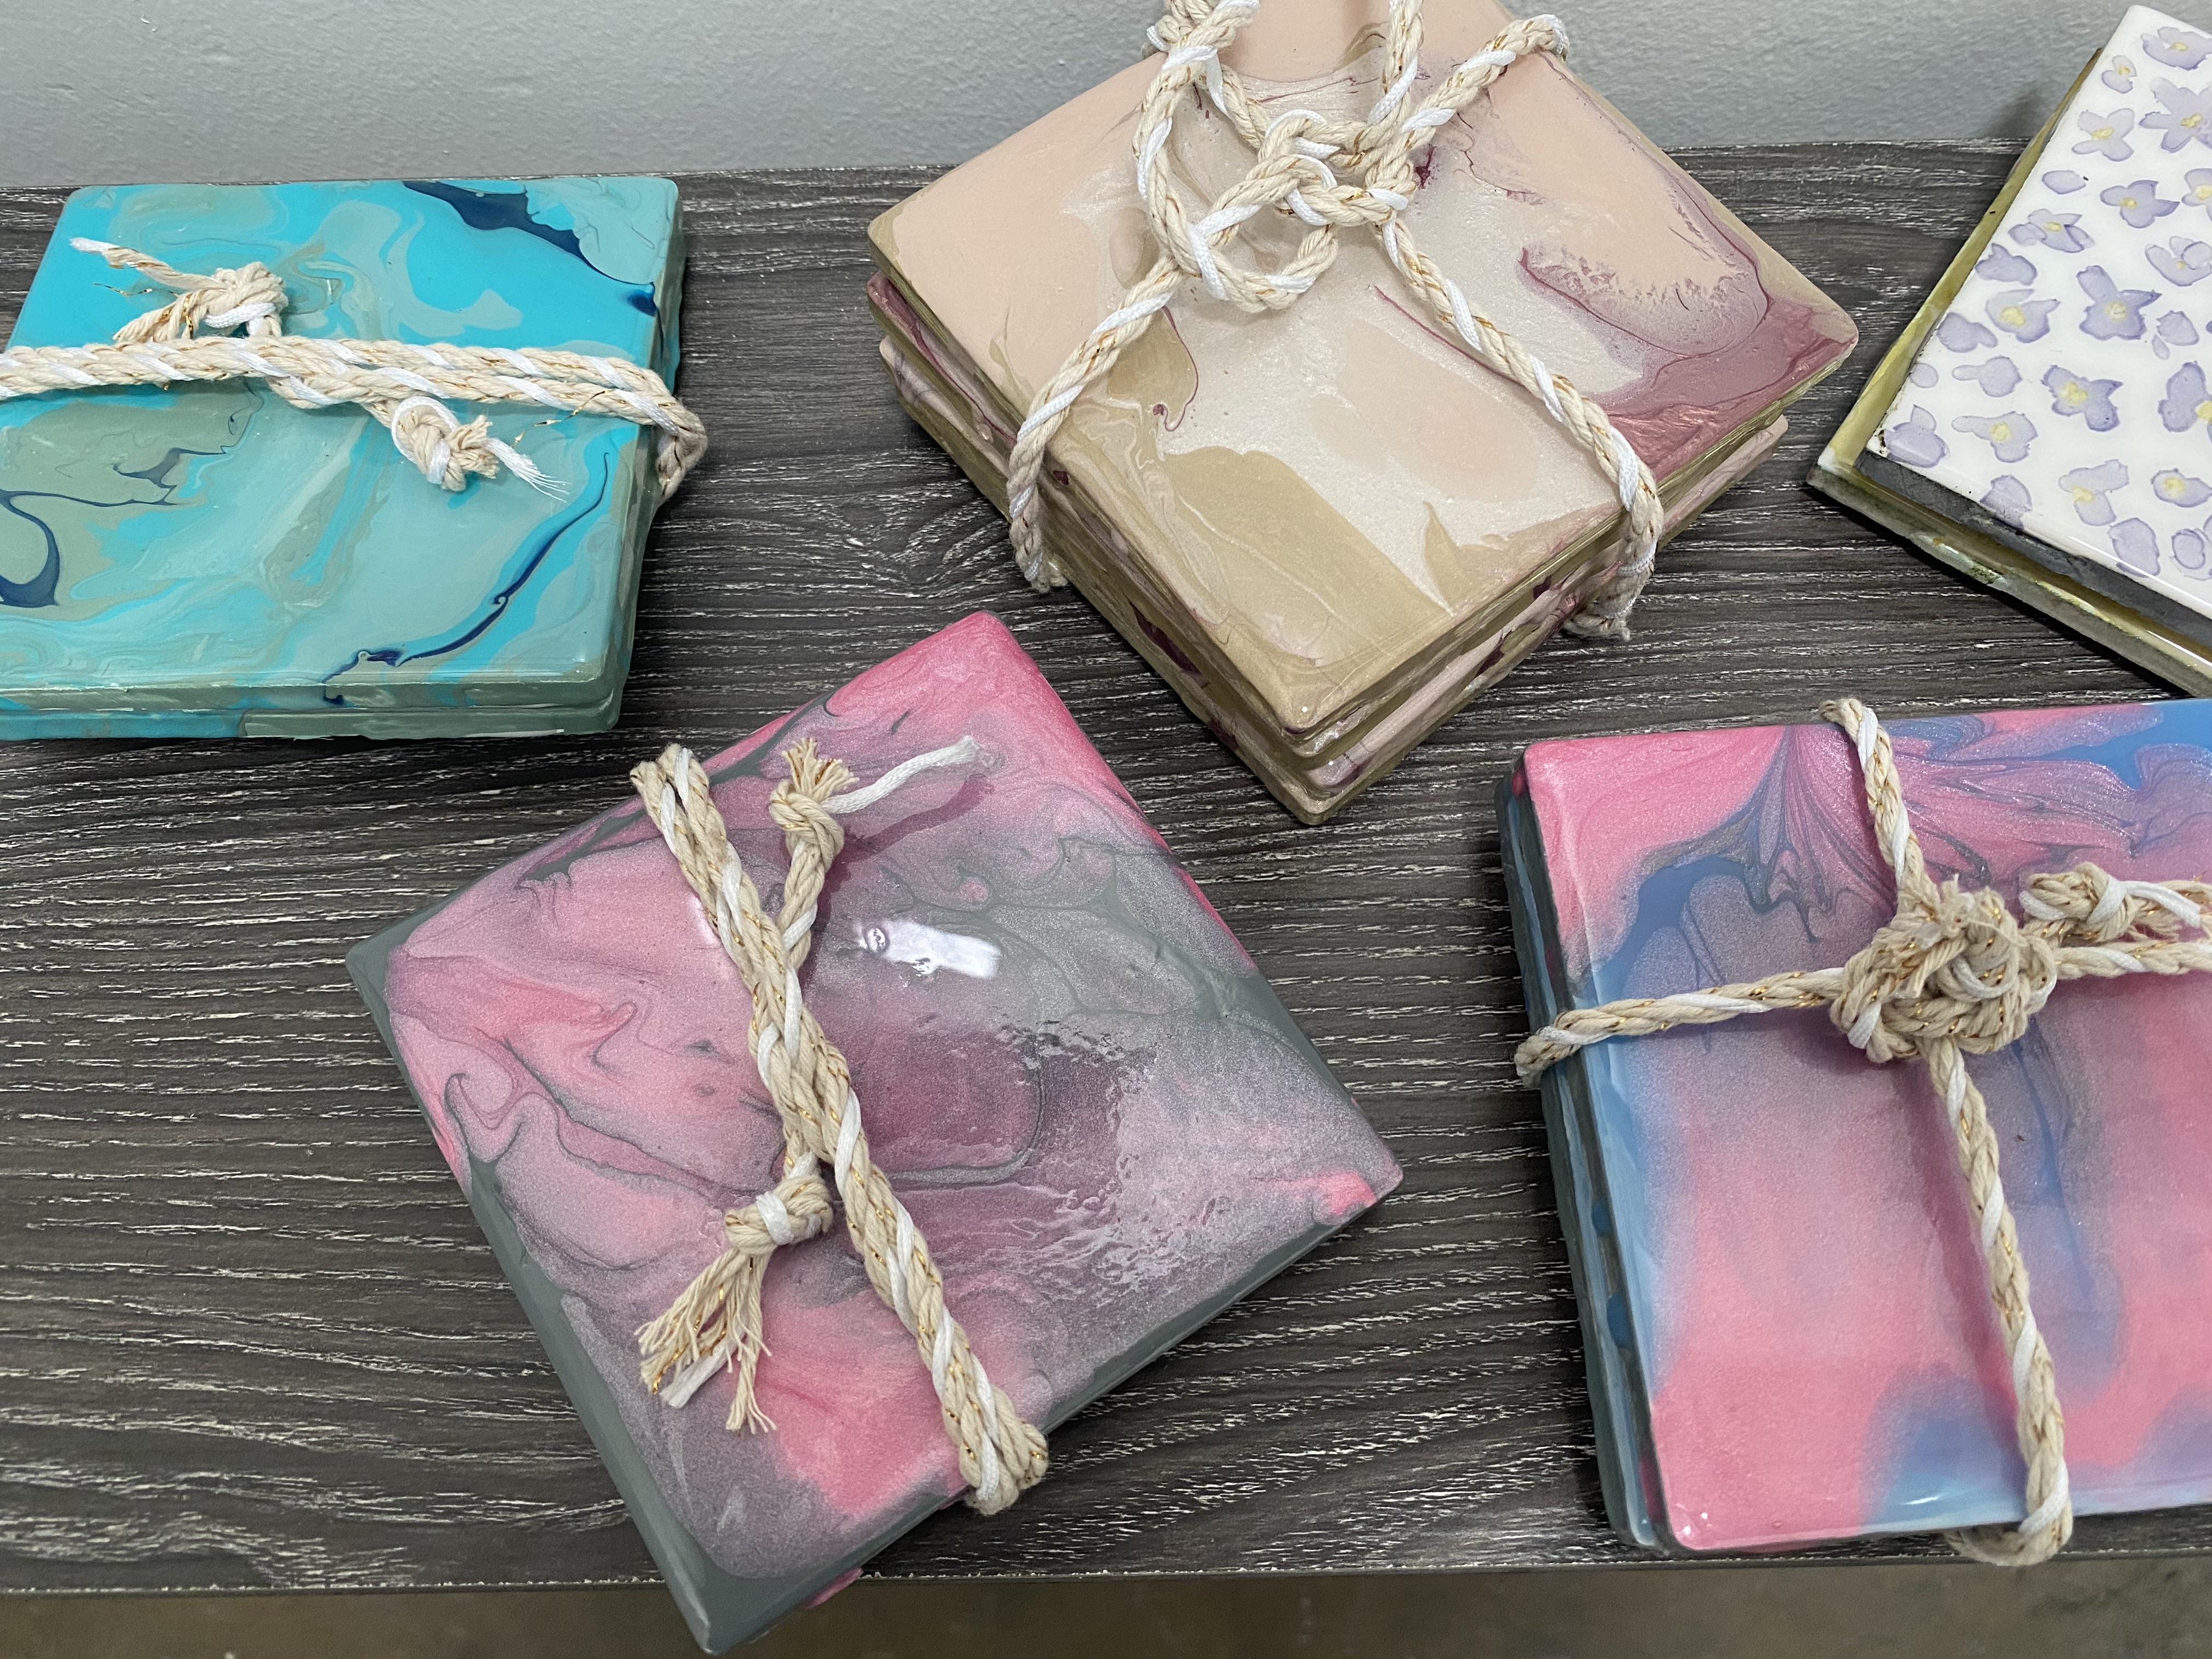
2. Project: Your class project is to make some poured paint coasters in your colors and coat
them with some resin. I made eight coasters
so I could try a few different color
combinations and styles. You can make as
many as you want. I suggest a minimum of
two and a maximum of ten, just so that you can
learn the techniques. I worked in pairs as well. So I made four
pairs of coasters. You can work in twos or do singles or sets
of four coasters. It's totally up to you and
it's what you want to create. In this class. I'm
going to take you through a bit more
detailed mixing process. I'm going to spend less time on the actual choice of colors. You can refer back to my
previous class for that. The exciting addition
to this class is the techniques on resin. Resin can be tricky. I'll teach you everything
you need to know to make a nice shiny
code of resin. Your class project is
to make some coasters. Something like this.
This is a pair. This is another
pair in the blues. This is one, this is
the soft gray one, which unfortunately I
actually dropped these. The other one is just totally smashed. I totally managed to shatter it. This one's corner is damaged But I want to show you it
because the soft colors still look very pretty and they look pretty from
a distance as well. They still catch your
eye because there's a block of color here and here. And then there's a three color, one which is the blue, the blue and the
pink and the gray. At times, I'll refer back to the previous class for
details in particular, that we won't
cover again. We're going to go through
the following steps. Choosing colors,
choose a main color and a couple of other
colors to work with. High contrast and simple
spontaneous design. Materials in my previous class I covered materials needed
for poured paintings. In this lesson, I also
include the ceramic tiles, the cork backing,
and the materials to mix and apply the resin, preparation of the tile, the taping the sides, the painting of the sides, mixing the colors with a focus on creating
your own colors. In this class I will show you four
different pours using different color combinations
before you go ahead and do your own pour, and resin them. I'll show you all you
need to know to apply a clear coat of shiny resin. Second code of resin. If there are issues
with your first layer, I'll show you how to add
another layer on top. Finishing Your piece is
almost complete. Take the tape off the
back if you haven't already. Put some cork backing on then sign the back and wrap it in your style or put it out on display
in your home. Like all classes I teach I like
to give you all the tools and techniques to create
your own artwork in your style and colors. This is no different. I will give you options and ideas for creation and tools and techniques to solve
any problems that may arise along the way. So start thinking about
what coasters you like. I can't wait to see
the coasters you create when you upload them
to the project gallery. Next up, we'll talk
about choosing colors.
3. Choosing Your Colors: In this lesson,
I'm going to talk about choosing the colors. You have a couple of options, look through your
previous paints and find some colors or
purchase some new ones. If you're looking at
purchasing some new ones and need more help with
choosing your colors. Then please refer to my
previous class on acrylic pouring and the lesson on color inspiration if
you need additional help. because coasters are small, a couple of contrasting colors are the best thing to choose. So think about that when
you're choosing your colors, you only need to have two. Could be because you can
have blends of those 2 and a bit of white to make some
pale colors if you want to, but you can get many colors
just from mixing two colors. The other thing
I'd like to do in my work is put some
metallics in there. So many beautiful metallics. You can have a favorite
color and you add them now the metallic color and
make a totally new color. You can just play with them
forever and they give it a beautiful sparkly texture. This is a gray. It's actually a matt
gray where I put some, I've put the
metallic through it. And so I've got to
spark a sparkly gray. I also, because in this class I'm going to show you
how to mix colors. Just once again, you
just have to have a couple. I'll show you how to
tone them down or make them lighter or
darker or different, not as bright or brighter. And I'm going to work through
that as part of this class. I'm also going to challenge
you to make your own colors. This is about making your
own unique artworks. So the colors that
appeal to you, That's what I'd like you to
create these tiles with. I've got a bucket
of paints here. And say, say today, I do use a lot of
blue in my paintings. You can see there, behind there, I am just grabbing
a couple of tubes, a really, really dark blue. So I've got my dark color. This can be strong but
still a lighter blue. And then I might use mix it
with this pearlescent white. So I just have those colors. So there's the paints I'm
going to work through. These plus a white
is going to add that metallic look to
it and the sparkle. But really you choose
the colors you want. And as I said, just
choose a couple of colors that you really love. My first color idea
that I tried was a Lumiere metallic silver
drawn across the paper, then crossing that some golden fluid sample
colors that I had, a green, a red, a blue, or purple,
and an orange. Looking at it. I decided that none of
that really excited me, but I'm thinking I'll
do a darker gray to contrast with some pastels
of a few of the colors. Are you starting to
get some ideas now? there's nothing wrong
with changing up totally from what you
originally had planned. I decided I'd try this
beautiful gray that I'd found at an Italian
hardware store. And also starting pastels and the beautiful pink
roses out in the yard. So that became my theme. Pink roses, blue sky, green grass
that I wanted to try. Here, I'm mixing in a bit
of red to make a pink. Another trick to make sure
the colors work together is to put a little bit of each
color in with the others. Not too much, just a hint. So I mixed the pink and the blue and I'm
making beautiful mauve. It also could be
used as your blue. It's really just a warm blue. The other thing is
with your whites, instead of having a
stark bright white, you can mix a little, just a few drops of, or a
little bit of paint with a white and get a slightly
warmer soft-white as well. You can see I'm just doing
it on a bit of paper, so I'm just playing around
with a palette knife and paper and just making a little, little test to see what
colors I'm going to choose. I can also use this as a
guide when I mix the paints. Here are the colors,
tertiary colors, and I'll see you in the
next lesson where we sort through the materials
that are needed to create the coasters.
4. Materials: You have your colors chosen and maybe you've got
your paints chosen. What are the materials you need to create these coasters? If you did my last
class on pouring, you'll have most
of the materials. In addition, you'll
need the ceramic tiles, the backing, and the
resin supplies. I've attached a list to this class with details of what you need
to create the coasters. So make sure you
have a look at that for the more detailed
information. In this lesson on materials, I'm going to discuss
the new materials that you'll need to purchase. The tiles, which can be
unglazed or glazed, the cork backing and the resin. The resin mixing materials
and the safety gear. If you need help with the
actual paint you're going to purchase or setting
up the workspace, please go to my previous lesson on materials in my "Create an original acrylic
pour artwork" class. You have two options.
You have glazed tiles, which you can get from your local building
place or order online. And so they've got
a shiny front and the back has a
standard tile back. Then if you order
them, if you buy them, you will need to get separate order a separate Cork backings online. And you can see how
this fits on here. I flip that over. Fits on pretty well with
a bit of a space around. It will still sit
up off the table and protect your table. Another option is to
buy unglazed tiles, which you ordered online. They look the same
on either side, so you can actually
pour on either side. And they come, or
these ones came, make sure you check
when you buy them. But these ones came
with the Cork, which is different
than the other one, but its still a self stick. And you stick that on the back. Just peeling stick and
it's a closer fit. The only other thing to note, when you look at them,
is there are slightly. So these are both
sold as four inch tiles. The glaze tells are
slightly bigger. There are a number, different types of resin. You can buy from different suppliers. I use Art Resin and
generally in Italy I used another one
called ICrystal. Makes sure that the ones for creating a nice clear thin coating and
you'll be all set. I'll go over calculating resin quantities in
more detail later. But for the purposes
of ordering, for every two four-inch Coasters, you need 1 oz of resin
the small containers of art resin that were
eight ounces would actually cover 16 tiles. Another tip is to use this calculation for
your pouring medium. Although with a pouring mediums, there's more wastage because
you're going to pour and, or maybe you're
going to save some. So you actually can
use maybe twice as much as what was
calculated for the resin. So I just find it
helpful as a guide, especially when I'm mixing larger quantities. Consider
safety and protective gear. If you have health issues or
if your resin that you've chosen safety
requirements recommends it. For Art Resin and mixing. That's why I liked the
product, is it's non-toxic. But some people who are using it a lot and are working with
a lot for long times, will still use a respirator that's totally up to you for the amounts that we're
creating and for the time you need to be
in that environment. For me, I don't
find it necessary, but it's really your choice and make sure that you consider that aspect very carefully. The plastic
cups needed for the pour. If were doing a larger pool. I would actually
use a graduated mug like this one where the
measurements are on the side. And I just, because
it's two parts, 4 oz of one, 8 oz of the other. And actually I'm
usually mixing up to 60 oz of resin at a time, so I would use that
for large pour. But for these little ones, what I find is really good is these little three
ounce clear cups. So I will use two of
these to measure. And because normally I'm
making more than 3 oz. If you're making less
than three answers, you can just use two cups, put half in one. So while I explain it later, but you can just use
two to three ounce cups if you're going to mix
two ounces or less If you're going to mix
more than you'll need then two cups and
another larger cap. Preferably clear. This
one's not so clear. They're all different, you can get them from all over the place. This one is clear, so
it'd be slightly better, but it'll still work
in this other one. Everything here is disposable. There are also so we can
Options and re-usable options. If you want to go
down that route. This is my box of
resin supplies. You can see I've got
to blow torches. One is this chef brand that I that I have from
a cooking store. The other is the art resin, one that I ordered
through art resin. Both of them work well, I have to because especially
for larger pieces, if I've run out and I'm
in the middle of a pour, I just want to blow
torch and I can quickly use the other one for refills. I have these bottles of butane, some of them I've
ordered online, some of them I've got it
the local hardware store, very easy enough to use. Just refer to the
instructions you can see. You just have to flip over. Your blow torch and fill them. The other thing I
wanted to show you is my scraping tools. I actually use
the Art resin scrapers. They reusable, they've
got jagged edges. Depending on what you wanna do. I mostly use the straight edge. It's like people
use credit cards. These are pretty sturdy and I've used them many, many times. Once I've finished, I let the resin dry
and I wait till it's hard and then I can easily
just scrape the resin off the scraper and reuse it. Before you order. Make sure you download and check my materials listed
I've put there for you. It has all the
details of what you need and what you don't
need and what to look for. So go ahead, place your order, gather your supplies and I'll
see you in the next lesson, which is getting the
tiles ready for the pour.
5. Preparing Your Tiles: In this lesson,
we're going to get the tiles ready for the pour. Do you have your tiles? You take your scissors and you're ready to
prepare the tiles. Also, if you have the
main color paint, you can paint the sides. It's much easier to do it now, and it makes the
finishing a lot easier. Let's get started. If you took my previous
class, you know what to do? Tape the back of your
coaster and gesso the front and you'll be all set. Otherwise, here's a
little video of me taping the back of the coaster and
then trimming the sides. Just make sure you cut back as close as you can to
the side of the tile. I usually just push
back a little bit. So just away from
the edge and getting my scissors right against the tile when you see the back, it's just inside the tile. That's done. I'm going to apply
a code of gesso. A coat or two would be great. It provides a barrier
and gives you clean, crisp colors on top. And just a reminder to make sure that your surface area is level now because it's probably on a table and you're going
to have multiple tiles. You're going to
have to make sure that the table's level here. I had to put cards under one of the legs to make sure that
it's lined up properly. Another thing to do
to make it easier for yourself is to
paint the sides, my main color,
that beautiful gray. So I'm painting all the
sides gray then when I pour, they'll just run
over those edges. So the tiles are ready Have you got your paint
and pouring mediums? Well then we're ready
for the next lesson, which is mixing the paint.
6. Mixing the Paint: You have your painting,
your pouring medium, and we're ready to
mix the paints. This lesson is on mixing colors, which is always the
fun part for me. I love to spend the time to make the colors mine and get
them just the right color. I'm really trying
to make my work different and interesting, even if I'm just
using two colors. So you can see in this lesson
that I'm really mixing. Just ignore it. I just have a few colors
that I'm playing with. I'm spending quite a lot of
time mixing them and thinking about what sort of thickness
consistency I want. And I'm also at the same time, there's a lot of thinking
and going backwards and forwards with which
paint should I have? slightly thicker
so because then it won't move or do I want
them all the same? In these tests, you'll see my process for working through and mixing the
paint for those tiles. You've chosen your colors. Your tiles are
prepared and you have the pouring medium ready
and your workspace setup. So let's get started mixing. The main color that I'm using is this beautiful gray that I'm going to use in all of my tiles. I'm just putting a
little bit of it in. You can see it's a thick, quite a thick consistency. So I need to get it to the right consistency with by mixing in some
pouring medium. So you can see I'm
just squeezing that in there until it's ready. Then there's some stirring until it's all really
well blended in. And we check the consistency. I want this to be
reasonably fluid. This particular color. But not so much.
Not so much because I've made it a bit too fluid. So let's thicken it up again. Once you do a bit of
this, you'll find that this process
is really, it's, it's really about
you and your art and how much you want
to paint to move. So if it's thicker, it won't move around as much. If it's really
thin, it will run. If it's too thin, it'll
run off the tile. Next I'm going to
mix up the white. This is White out of a tube. So because it's thicker, I don't need as much, but I'll need to
add quite a bit of pouring medium to get it
to that same consistency. We do the same thing stir it
through until it's properly mixed through into the
pouring medium, making sure that
there's no lumps. And what you can do
is either squeeze the lumps or just
pull that piece out. If there's a chunk in there, I'm going to use the ones
I've mixed the white I'm going to use it to make the colors I've
chosen into pastels. So I split it up between
the different cups. So I'm going to have a pink. Once again, I do the same
thing with this one. I'm using high fluid, golden high fluid acrylics
so you don't need much. So it's best to just
add a few drops stirred through until you get the right color
that you want. And you can see now I've
put a drop of the pink in another container that's
already got the white. Because I'm going to
use that later before I thin down this pink even more for my pink pour. These little three
ounce cups are just perfect for
what we're doing. We're just doing a few tiles are probably have
some paint leftover, but I haven't mixed too much, so it controls the
amount I'm going to mix. So I tip that piece out because I want to make
an even stronger color. So I got rid of it
with a lighter color back into the other container. I'm liking the way this is. I want a bright pink, so I like the way this is
bright but not too bright. So it was looking
pretty good right now. Now I'm going to work on
this little bit of that. It's got white and a bit of a pink in it, so
it's a light pink. So I'm going to make
it a bit thinner. And then because I want to a lilacy color, I'm
going to add the blue. So when you do this,
just think about what colors you trying
to achieve at the end. And have fun playing around with different colors and take the time to get the
consistency right, because that will
make a difference to what you're doing
when you're pouring. What you're looking for is
something that runs off the spoon or the fork or
the knife in this case, like a creamy consistency. That's a very pale blue. And I'm looking
for pink and blue. So I'm going to add a bit
more of the pink into it. I find that it's really good
to cross mix the different. If I'm working on a small set of colors which I am to cross mix the colors between
between each other. Even if it's still going to be a pink to add a bit of one
of the other colors in. And then I find they
really go well together. And also I've made
the colors my own. It's important to
have your own set of colors for the artwork
that you're creating. Now I'm making the blue. Once again, I'm just
gradually adding those drops of the fluid paint. If you're not using
the high flow liquids, if you're using tube of paint, you just follow
the same process. You just doing
different quantities. A chunk of the paint like
I did with the white and then gradually
adding in your medium. Now Im working with the green, which is a very bright green. Here I go through the same
process with the green, it's a bright green, so I've toned it down by mixing my color, my gray color into the green and
added some white. And then I'll need some pouring medium because
that was a paint out of a tube so
it'll be quite thick, so I need to get it to
the right consistency. I like that color, so put
some of it to the side. Then I start playing
with the blue. You can see that
now I'm really just mixing one color
with another and toning them down to get the blend of colors
that will work together. So I've got, I'm getting close to really liking
what I have here. Then I'm going to add this
beautiful pearlescent Lumiere color to all of
them to make them metallic. So it gives a really
pretty sparkly effect. And of course, because it's another paint not as
thick as tube paint, not as runny e as
the fluid paint. I'm going to need to add pouring medium in with that as well. So it's just
continuous adjustment. And looking at the
different colors. My initial plan I said was to put pearlescent in
to all of them, but I decided not
to put it in the gray and let the gray
being matte and be a contrast and generally you seeing on the tiles because
the gray I had more fluid. It would run over
and absorb and it would get a bit of the
metallic in it anyway. So there'll be some
interesting contrast there. So here we have our
six colors mixed. And here's the color
test that I did have those finished colors. I left them overnight and the next morning I came in
and decided I needed, I really would like
a brighter pink when I looked at the colors. I could have poured on the day, but I'd had enough that day, so I decided to leave it. And then I've come
in and thought, Oh, I should change
it up a bit. I really wanted a
bright look so I'm adjusting it to make it brighter and also changing that, toning down that lilac a bit
as well. Here's, here's
where we just play around with it a bit
and adjust the colors. Depending on
how you feel on the day and what will
look good next to each other when you're
using just a couple of colors with against
that gray color. In this case. Isn't a blue
color looking really nice now, it's an interesting
color of blue. It's not a bright
blue its a shade of lilac like and now that I have
worked with it and I like it, I'm really just making it
the right consistency. I've put that off to the
side and now I'm making going back and making a lilac kind of a little
bit of that blue. I'm just making a
group of colors that I think work together. I haven't decided yet
exactly which ones I'm going to pair up
together with the gray. I'll decide that just
before I pull the tiles. Now I've added some white and you'll see it's
made it thick, so I'll need to add some
pouring medium as well. Just to lighten up
that color a bit. I'm thinking about
the contrast with the gray and the darks
and the lights. And finally the final set of
colors here with the gray. And my final little
test pours of colors. So go ahead and mix your paints. Once you've mixed
them and you've got the colors that express You, and you
like the look of them. You can test, as I said, by painting on a bit of paper just to double-check that when they dry, you
still like them. So once you paints are mixed, you can let them sit
covered in Glad Wrap and you can then pour straight away. Or you can wait
till the next day if you feel like it's enough that you've
just mix the paints, and prepared the tiles or the tile isn't dry
yet from the gesso, then you can wait
a little while. You can wait till
tomorrow as long as they are totally covered and you
can use the paints then Then I'll see you in
the next demonstration, which is a gray and blue
of the pool.
7. Demonstration: Gray Blue Pour: This lesson is the first of four demonstrations where I show you different
combinations of colors and ways to create your course. As always, have you
Charles prepared and level before you
pour in this pore, I'm just using two colors, the blue and the gray. So firstly, I'm getting, making sure that the, and double-checking
that the blue is the right consistency
for the poor. I've got this extended
speed just so you can see the time I take
to get it right. And you can see there's drips
falling on the Charles, but I don't worry about that because I'm going to cover them. And also I'm using a
plastic knife this time I stood and mixed with it and
I'm using it to spread. And this is a fairly thick paint that's just going to sit there and not move around too much. And that's what I'm
trying to do this time. And I'm just doing
two tiles at once. They're going to be
sitting together. So I want them to
look pretty balanced, but each one and individual
artwork in its own, right. So I'm just moving it
around so that the different shapes of blue. And just, it's just having fun and it's sort of like
doodling with paint. So you're doing a doodled almost a doodle
poured paint here. It's time to add the gray. I think this blue is blue actually occupying at least half of the tiles on each side. And you can say actually I
can see a running man on the right side or the tail of a dinosaur or a
dog or something, or the back half of adults. So you see all sorts of
things in these pores. Now the gray, I've
got a lot runny. You can see it's
flowing off that for a lot faster than the blue deed. So it's going to blend with the blue and dissipate a little
bit into the balloon. And I've got, I like
to do splashes. And if you flick for knife
backwards and forwards, so you can get some nice thin
lines as well, which is, which will be interesting as it mixes with a little
bit more with the blue. And then we'll sit. Remember that often
these acrylic will dry a little bit darker, so the end result will
be slightly darker. So I splashed it all on there. And now I'm going to
just lift up the towel. I've got my plastic
gloves on so I'm not going to make
too much miss on me. And I'm just going
to let the paint move around to fill
the rest of the tile. So you can see already that
the gray is becoming a little bit more dominant as
it spreads out over the blue. But it's still retaining some of those flicks and splashes
that I had before. So I'm really just lifting it, moving it around in directions that I think
look interesting. So you, you will do
this when you pour, you want to do the same thing. It's like what shapes look
interesting to you as you sit and stand and play
with these tiles. I'm just letting it flow. So because the blue, you can see it because
the blue was quite thick. It's really not
moving a whole lot. It's the gray that's
filling space. Now I'm putting the Charles back down and just looking them. I study them a lot. As I'm working in, there
are pauses which I've edited out because I'll
stand and look at it. And now I'm filling in some
of those gaps of the white, some gray and also
some blue splashes. So it's, now it's
a balancing act. You can see I flick the
knife back and forth to get some interesting lines
and scrape a lot. Although the paints are
slightly different consistency, the difference isn't
enough and then mixed with the pouring medium while they sit and dry,
they'll self level. I do like lines in my work. You'll see that a lot
in my larger pieces. So it's also an
opportunity to practice techniques for larger
pieces as well. So you can see I'm filling
in around the edges, just working my
way and balancing the blue and the gray
and looking at both of them as almost as
one composition and making sure the grays
and the blues are balanced. I have edited out some
pauses along the way and just try to pick the little bit so
you can see I'm touching up along the edges. Now. I want to make sure I
look down at the sides of the tile and make sure I am covering paint
right to the edges. So that's why you can see
I'm diving because I don't mind the paint dripping
down the side, but I don't really
want a white paste showing on the front edge. It looks like it's done. Aren't they beautiful?
They look stunning. You can also see
how the more fluid gray spread over the
top of the blue. The blue is, has
the metallic in it, which means it's sink smooth. I'll see you the
next demonstration, which is gray and pink. Cool.
8. Demonstration Gray Pink Pour: The second demonstration
is a pink and gray. pour. I have my tiles prepared
and set up and level and I'm checking the consistency
of the pink and gray. That's that bright pink
with the duller gray. So they're going to look really
good together with these, I'm just pouring straight
from the cup onto the tiles first with the gray. This time I've decided
to start with the gray and I'll add
the pink later. And so I'm pouring with
the cup and also using a knife to spread the paint
a little round and drip but in different
drips and drops. These are looking more like big splashes or
puddles of paint. And now I'm swirling the
pink and you can see I've swirled the pink
over the top of the gray in some places as well. And both of these paints
are about a similar consistency. So both fairly thick, Neither is really runny, there's not the
difference there was in the last set of tiles. And you can see, I'm just
sitting thinking about things. Then I decide, well, those
ones are going to sit, now I'll thin this up a bit more so it spreads a bit more. You can do that with yours too, so you can change the consistency
as you're going to if you want to get
more thin lines or drizzle it more then thinner if you want the larger blobs
that won't move as much, that'll hold the paint, then you haven't just
slightly thicker. There's not a
significant difference. a slight difference. And I love it when I get little splashes of
paint that fall in. So you see those two drops of
pink fell into the gray. Sort of accidentally
wasn't deliberate, but I liked the look
of that so i leave it. If I didn't like it, I can get the knife and swirl that around. And as in the last, as in the last pour, what I'm doing now
is lifting them up and turning the
tiles around and rotating them to spread the paint in the direction
that I wanted to just spread. I could have scraped with a
knife and done it that way, but I'm enjoying just
letting it move slowly across the tile and
fill the space that way. Now I'm filling the space
and filling the space of the pink in some of those
white areas in the corner. So often I think
about it that I might have the gray touching,
say two edges. And in this case
I'm thinking I just want the pink around
most of the edges here. But often I might
do like three edges that have really got mostly
pink and one has more gray. So that's one way of
thinking about it. But once again, it's
really up to you. If I want it to spread a
bit more and not just sit. If I were filling a space, then I'll put more
pouring medium. So you can see I'm just
continually doing that. So that's making it
easier to spread and make sure it flows
over those edges. And I do want to make sure I
really do cover the edges. I've left the sound on so
that you can hear the sound of the tiles scraping don't be afraid to push hard on the tile. It's very sturdy so
you can actually get it can have nice marks if
you're using thicker paint. You can actually scrape, scrape some paint away and have just a thin
coat as well. In this case, because
we're making coasters, just make sure if you do
have any holes they're on the inside they're not
on an edge you want a nice clean edge on the sides. so when we put the
resin on later. It'll fill any holes. I'm really liking the
way this looks now. So what I'm doing is just doing some final touch ups
on the composition. Filling in spots,
looking all over, trying to see where I can
make it more interesting. Eventually I'm going to
come to a place where I think I'm looking at all that
and I'm satisfied by that. And it just feels right. And that's really the end point when you need to stop
because you can keep on fiddling forever
without making a lot of difference or you can keep on fiddling and make
a big mess of it. So I know now to sit back if I'm really not sure
what I'm doing, then or whether
I'm happy with it. I'll stop and take a photo
and look at the photo and see if there's anything that
looks a bit off to me or not. Also, I have to
remember that they may change and be
there as they dry. I've decided to stop. That looks great. Here they are. After they dry, don't
they look wonderful? Once again, the gray, which is slightly runnier
and less metallic, has merged into the pink. I'll see the next demonstration, which is a gray,
pink, and blue pour.
9. Demonstration: Gray Pink Blue Pour: This third demonstration is a gray, pink, and blue pour. In the next pour, I
cut the bottom of the cup and let the paint drizzle through
the hole in the cup. I've done this in a
number of different ways. Some with a bigger hole, just a hole, not a cut, but for the purpose of showing you this process on the tiles, I've just made a cut
in the small cup. So it's fun thing to do. It was a lot slower because the paint is just
going through drip, drip through the cup. So some sections of this, I've sped up. With this pour. I decide to cut a hole in the
bottom of the plastic cap. Let the paint drip. Now I'm going to tape
the hole while I pour the painting
just so that it doesn't come out
until I want it to. You'll see me continually
checking the consistency of the paint to make sure it's
just right for the pouring. Then I'm going to put some
blue in the bottom of the cup and also some pink. So it's just the two
colors in the cup and it's like a dirty pour.
You just pouring them in. You're not actually mixing them, but you're going to let them
flow out of the bottom of the cup instead of
flipping the cap. And so you need to
take the tape off now so that if you have
a runnier mixture, you put the taping to stop it from flowing out
before you want it to. In this case, you can
just see this small drip, drip, drip, drip coming out
of the bottom of the cup. I left that little
section just to show you the speed
of the dripping. It's really slow. And so that's what this
is going to be like. It's, it's very slow, but when you get close up, it starts to make some very
delicate, pretty patterns. But once again, I'm
going to adjust as I go. And here I'm adding some gray to add to the color mix to get
some gray dripping out. And I'm shaking the
cup a little bit. So once again, this just
depends on your patience. And I have got a rig set up for my larger pieces where I have
the cup sitting overhead, then I can just leave
it and let it drip slowly and I get some
beautiful effects that way. But for the small tiles, I'm just holding it
and moving the cup around in different
spots gradually. You can hold it in the same spot or you can move it around. And I've actually also
tipping the cup in different directions to get one color at first because
when you look in the top, you can see which colors are on top or inside or whatever. So it's just a matter
of letting it drip. And once again, this
is totally up to you. It's what you think
is interesting. But I'm seeing some
really beautiful effects as I let it drip slowly. I've decided it's
time to add some blue back into the mix and
change the composition. You can see with what
I've got there is one, that's the first one
which is mainly pink. The other one's got to
be more gray in it. And now I'm adding a
bit of blue back in. And shaking it will give you some drops so you
can try shaking it. You can flick it as well. You can make a bigger
hole if you want to. If you think that it's
coming out to slowly, well, you can have a
more fluid mixture and you'll come out runnier. It's just harder to control so many choices,
what would you do? This is building
up the composition quite slowly as you can see. Now I'm going to work on
the other tile a little bit and let some of the colors
flow there as well. Looking back at the other tile, you remember we had
more pink on the tile, so I'm adding some
pink back into my cup to let some pink, um, be more predominant
as well here. Now I'm getting a bit impatient, so I'm going to cut the a
bit more off the bottom of the cup also because the
paint is drying a little bit, some of it down the
bottom is more stuck , so I'm cutting it to release the paint a little bit
faster out of the cups, you can see the drips
are going a little bit faster than they were before. Now, the cups almost empty, so I'm going to
put some more pink in and I'm actually
going to make the pink a little
bit runny as I'm adding pouring medium to it. And then the blue I'm
adjusting as well, just making sure it's a good
consistency that I want. Now because I've got those
patterns in the middle, I'm going to do
what I like to do, which is to fill in
around the edges, even the pure color. And I'm lifting and letting
it spread just a little bit. The main composition colors with the blends and
the solid color. And just once again, trying to move the
composition around. It's not, it's not really
runny like some pours. This is still reasonably thick, so it's moving slowly
as sort of a big blob. And I'm letting some drips
run off the sides as well. And I like the way that I like, the way that's looking with
the colors that drip together and the pink around the edges as it flows around the tile. Now filling in with
that beautiful blue in the gaps again. And using my knife to spread
the blue just a little bit, not as much and leaving
still leaving a gap, the white because I'm
deciding whether I'm going to come back and put a bit more
pink or what I'm gonna do, I'm not sure what I'm
gonna do with that. I'll just start a bit later. I'm swapping between
the tiles as I balance the colors
and work with them, looking at the two
of them together and also as individual artworks. Because I want them
to work together, either individually or
together as a pair. I love the way the
blue is popping out, the pink and those edges between the blue and
the pink or great. So I've decided to fill in that area that I'd left
white with the blue. And you can see it's really making a nice contrast between
the blue and the pink. And just the final touches, just filling in
any areas that are white and looking at
it overall again, in deciding and checking those edges of the tile and
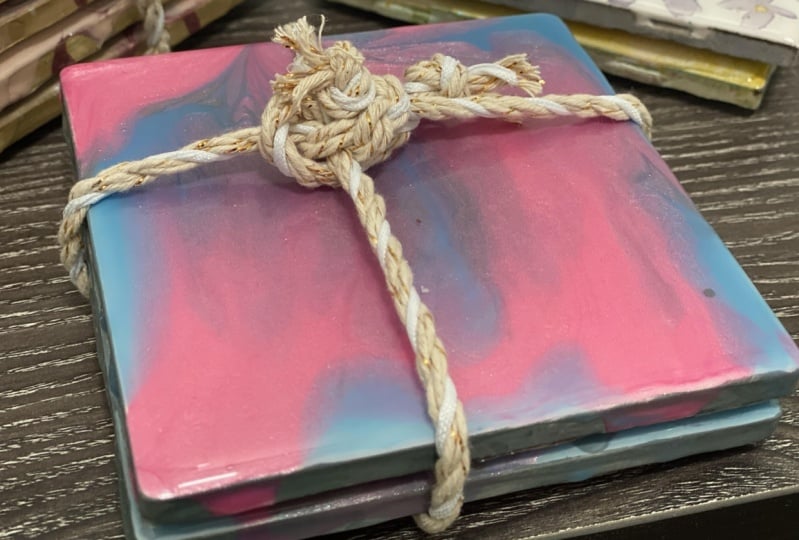
make sure there's no gaps. Here we are the finished pieces. Don't they
look wonderful, really nice, and there
they are, actually dry. So that's the dried look. I'll see you the
next demonstration, which is a soft gray and blue pour
10. Demonstration: Soft GrayBlue Green Lilac Pour: The final demonstration
is really quite quick. It's a soft gray and blue pour. This example is a dirty poul where I put the
paints in the cup, but then
instead of flipping it and doing the whole thing, I really just
drizzle it over and you still get some
really lovely effects. My tiles are level, and I'm
going to use three colors. The blue and lilac
color thats the light, That's the light color, and then the gray,
gray, green color. So there's three colors, pour it into the one
on top of each other. That I'm then going to drizzle drizzle out of
the cup over the tile. So just directly out the
green is going to come at first i, then the lilac
then the blue. And I'm just leaving
that drizzle and adding a few
drops on top as well. Then what I'm gonna do here is just dripped from one
tile to the other. So those colors are now going
to go on the other tile. So I'm really, this one was
just a quick fun one with some colors that don't
contrast quite as much, but I still do have
a lighter color. So you can see as it's moving
around the tile there, there is still enough
contrast to make an interesting composition
of artwork on the coaster. Holding it at an angle
where the paint is and the paint is my paint
is slightly thicker so it's moving relatively
slowly over the tile. And also it was made
a little while ago, so it's a little
bit thicker anyway. So I've just got those two
blobby things and now I'm going to use the palette knife to get rid of the blob
because I don't like it. That's just a chunk
of paint that was in there that hadn't
been mixed through properly. So you can scrape
that out or you can mix it on the
spot like I did. And now I'm looking at the color and I really do like this gray, soft gray green color. So I'm filling in with it. I've got to that lilac
in the middle with some of the mixed
blue on the edges and balancing out that soft gray green on the
other tile as well. Once again, moving it around with a plastic knife and you can use anything you like to add a bit of interest
to the left-hand tile. I've poured a little bit
of lilac along it. It also does go with
the right-hand tile, which has got that solid bit
of lilac in the middle. So I'm moving letting
that move around the tile a little bit
with the other paints. Just filling it in and
checking it as I go. I filled in all the edges. And now I'm just swirling a
little bit of blue back in over the lilac to get that pattern that I
find interesting. So you can see what
I've decided to do is the soft gray green is sort of like diagonal
across both tiles in a corner. And then the blue is more
dominant on the other side with the lilac
blue mix in the middle. Now you've got all
these ideas from different pours and the colors that I've used and the way i've
mixed them, go, back and look at your colors and what you've
created from your mixing, making any adjustments
as necessary. So I'll see you in
the next lesson, which is the pour,
which is your pour.
11. Your Pour: So you have your paints mixed
and your workspace setup and you're now ready to pour. Don't forget to make sure
those tiles are level, it's very important
as in this case, because it's such a
small surface area. If it's off at all you'll
have all the paints sliding off one end, depending on the thickness
of your paint, of course. But it is annoying to
come in the next day and there's just like
a thin, thin layer. It's not the nice design
that you left it with. So go ahead, level it up, get those plastic gloves on and for your paints in
whatever method you've decided to pour, just remember to have
fun and to splash around and not take yourself
too seriously here. Experiment, adjust the colors. Add more pouring
medium if you need to, and just getting the
flow and the feel of it. And let's see what
you create.
00:00:49.265 --> 00:00:50.660
You've got a beautiful pour. Let it sit, don't touch it. You can also cover it
with a box to make sure nothing no dust
or anything get in. Make sure no one knocks
it and let it sit at least 8 h, 12 h until it's hard. Make sure
you leave the tape on. You'll need that for
the resin coating. And really you need to make sure that the paint
is really dry. Before you put the
resin coating, I've had instances
where I've had one instance where
I was using a white, I didn't let it totally dry and it actually
changed color on me. Not immediately, but
a little bit later. So it is important to
make sure it's dry. You can check your
pouring medium. Suppliers instructions on how long before it's fully cured. But it's a good idea to
leave it at least 24 h. I'll see you in the next lesson. Applying the resin.
12. Applying the Resin: Before you resin, it really does depend on
how thick your paint is. I recommend at least 24
to 48 h before you apply. The reason to make sure
that paint is dry. I've had one case
where I was in a rush and I I do spray a lot
of water on my work. So that was part of
the reason as well. But I was using a white that didn't change
color immediately, but it did a few months later. so did't want a yellow color, so just make sure your
paints are fully dry before you apply the resin.
Leave the tape on. Don't rip the tape off because you will need that
if you have ripped the tape off go ahead
and put some more tape back on to protect the
back from the resin. For the brand resin you have, make sure you read
the instructions very carefully before you start. Make sure you also have all of your protective gear
that's necessary for you. And in the space that you're in, it should be a well
ventilated area when you're working with resin. Also make sure you wear
the gloves because skin to skin contact with resin can also be an irritant
for some people. Besides, it's sticky and messy. You've got your protective gear, you've calculated
the amount of resin and you're ready to mix the measure the resin and your cups are out and you've
got your workspace ready. I'm using one that has
a two-to-one ratio. Some of the others
are one-to-one. I'm making 9 oz, which is six ounces of A
and 3 oz of B. I've got two oz measuring cup, so I'll need three cups of A measured and tipped into that larger see-through
plastic cup. And then I'll measure
one-and-a-half cups of the B into the same plastic cup and
then all the resin and the hardener is in the
one cup ready to mix. Once they're in the cup, you need to mix it for
the recommended time. So just stir it slowly about
the speed that I'm doing. Make sure you scrape
the bottom and get all the mixture together.
Check your time. 3 min is usually the time, but make sure you've checked your manufacturers and
suppliers recommendations. The thing to do is
you'll see after a few, after few seconds, it'll
start to get cloudy, which means the reactions happening and it's
starting to mix. And I've sped it up here. So you don't want to
mix that fast at all, just slowly stir it
until it combines. And you'll see it's
starting to get clear. And it's really when, when you have a clear mixture that you can basically
see through the bottom. So you can see that
this is about ready. And it is it about the
three-minute mark? It because it's
like crystal clear. It may take longer depending
on the temperature. If you look at once
again at your bottle, there'll be recommended
temperatures for mixing it. If it's too cold, you'll get extra
bubbles which can be, which can be a problem. But for what we're doing, which is thin work
when you can blow torch the bubbles there,
it'll be just fine. It'll still work fine. So stop mixing when
it's nice and clear, you can see how clear that is. The other thing to remember is that you have about
half an hour, 45 min to do your work. And that's gonna be
plenty of time for the tiles because they
just small pieces. But on larger pieces, you do have to be aware
of the time constraints. Once you have your resin mixed, check again that your tiles
are level because they may have moved if you'd
already set them up. So just double-check and make sure they level
because there's nothing worse than not having an even coat of reason
on the coaster. So it'd be sloping at
which won't be good. So make sure it's level because resin is going to
self level itself. So as long as your
coaster is level, you'll have a nice
level coat of resin. Then we apply the resin. It's really just a matter of
putting a spoonful of resin in the middle of the tile and spreading it out from there, making sure that you
cover every area. But I really recommend working from the middle
out as , then you don't get
holes in the resin. And it'll just make sure that
it flows over each edge. And also really wanted to make sure it's flowing
over the edges, the four edges as well, so that you get a
nice level coat. Take your time here. This is really important because it'll save
you another coat if you manage to make sure you spread it all over that tile. Here's the fun part using the blow torch to
blow the bubbles. Just make sure you
know how to use it and test it off to the side
first before you use it. And then the main
thing is just to cover the whole, entire tile. And if you get the right angle, you will see the
bubbles popping. So go ahead and apply
your resin, let it sit. Cover it. If there's a lot of dust
in the area Cover it with a box to protect it from
dust or bugs or whatever. Don't touch it or
move it at all. It won't be hard
until at least 8 h, at least that is the
brand I use Art Resin. And fully hard is not until 72
hours after the eight are up, you can look at the resin and get up to it very
closely and just make sure there's no dimples or holes or something that you
might not be happy with. You actually might like, a dimple effect. I don't know. That's fine, but if you don't, then I'll show you
in the next lesson how to put another coat on. It's a simple It's a
simple process and quick. And I actually i did it
with one of these tiles. That was too, it had too thin a coating and you'll
see that in the next lesson. This lesson for applying
the first coat of resin, I showed you the
use of I crystal, which is two to one ratio
because I was in Italy, That's what I got. Back in Houston studio
for the second coat, I used Art resin, which is a one-to-one ratio. So in the next lesson,
I'll show you Art resin one-to-one ratio and also a few other tips that I
didn't cover in this lesson. So I'll see you in
the next lesson, which is applying a second coat. If you're happy with your coat and don't feel you
need to do that. Then you can go on to the
lesson on finishing the piece.
13. Applying a Second Coat of Resin: You've got some issues
with your resin coating. It's might be dimpled
or thin on one side. What we're gonna do here is
do a light sand and really follow the same process we did before to put a new
resin coat. That doesn't sound too hard, does it? It's not. It's just more time
and a bit more resin. If you ripped the tape off, then you're all set If you have ripped the tape off, then you need to reapply it. In this case, I'd also already
stuck the coaster backing on, so I had to put the tape over
the cork backing and I've got to be really careful to
push it down as much as I can so the resin doesn't
get onto the cork. And it's a matter of cutting
back the tape off the sides. As we did last time. The next step is
the most important step and it is to rough up the top of that
old resin surface that you want to correct? Just rough it up and
it's really sanded so the next coat will
adhere to it easily. So just rough it up and make
sure if you're doing two, if any one of them is faulty, you still do both of
them so that you have the resin on the coaster
at the same height. The next steps are all
the same as previously. You start out by calculating how much resin is needed and then you're going to mix and pour the resin. I'm using the art resin calculator to
check how much resin I need. So it's 8 " by 4 ", which is an ounce of
resin needs to be mixed, which would be half
an ounce of each of the parts A and part B, as well as using my plastic cups to measure the resin
used for pouring. I also use them to raise, lift up the tiles so that they don't stick to
the parchment paper. So I'll put the cups
under the tiles. And then as usual, I'll check the level
before I apply the resin. I only need 1 oz of resin
to cover the two tiles. And I'm using a resin
which is equal parts. So I'm going to mark off, I'm actually decided I'm
going to make twice as much. So I need need to make
2 oz of the resin, which is twice as
much as I need. So I'm marking off
approximately 1 oz on each of the cups. And they don't
measure their parts, aim equal parts into each cup, then put them together. I'm putting the two together into one cap and then
I've got a stir them for 3 min until the resin is mixed together
and crystal-clear. This step is exactly the same
as the first coat of resin, the mixing process and the
way you're going to apply it. So just carefully mix it, taking your time to get all of the hardener
mixed with the resin. Now just keep on
mixing the resin. You can see it's
still pretty cloudy. My hands are sticky It's just really quite annoying. Make sure you wear your gloves. The stickiness is hard
to get off and also it could be a problem
with your skin. You could have some
reaction to it. So I'm watching it
actually watching this back and re voicing
and over in my no, I was really annoyed
at the time and I probably should've stopped
and put the glove on. But once you've got
your hands sticky, it's sort of hard to put
the gloves back on anyway. The other thing you can see here is there's quite a few
bubbles in the resin. Keep on mixing. If you're really
concerned about it, I know I'm gonna be
able to blow torch. It's only a thin layer
that we're pouring of resin and then blow
torch the bubbles out. But if it's, if it's
really a problem for you, you can put it in a warm bath. It's all to do with the
temperature that it's curing at. And it's a bit cool in
my studio at the moment. But I'm just going to
keep on stirring for another few minutes
until it turns clear. The other thing I'm thinking
about while I'm doing this is what I'm gonna
do with the extra resin. It's a good idea to have some other side projects or things that you
want to try with any leftover resin
and just have it on standby so you could be filling a coaster with different r, leftover bits of resin or a
mold or something like that. If just, just for playing. I'm lifting up the
craft stick just to check that it's clear
and it is getting clearer. So I'll stir it a
little bit more, but I know it's really ready The three-minute time is up. So I know I'm ready to
apply the resin now. And as before, pour
it into the middle of the tile and apply the
resin with the stick. Pushing it out from the center to the edge very carefully. This is a bit thicker, this resin mixed than the
one I used in easily. And that can be due to the temperature that
it was mixed at. But also, if you do, if your mixture is a bit
too runny for your liking. Just let it sit for
a little bit and let it cure a little bit longer. Because remember
there's that window of 30 to 45 min and it will become slightly
thicker to work with. I'm just taking my time
spreading that resin out to cover every little bit
of each of the tiles. Now when you apply resin,
you've got to decide, well, what do I want to do
with the edges as well? These edges are painted gray. That's what I did in Italy. They have a color on them. There you go. So I've got
good coverage if you want. So you can see there's about I used about half of
it, There's about half-left. Which one way to do it. And then if you want to just leave the resin on the edges, It's still going to
keep on dropping as it sorts itself out anyway. But if you want to just
smooth off the edges, you can do that now or
you can just leave it. Okay, so that's the resin
checked from all angles, just to make sure we
haven't gotten any, any, you've got good coverage. So now you're ready to ship. So when I do the blow torching, I have a couple of
blow torches. I filled them up with gas. And there's a safety
which you have to safety on. They're
all different. You need to practice
before you do the reason to make sure
you know how to use it. I'm just going to do a
quick check to see can you turn the safety off? And then I'm going to worry about shiny surface. You'll see even more strip off. But it looks very good. Let's see it now. You can cover it if
you're worried about just leave it for 8
hours without moving it. So now I'm not
going to move this, I'm just going to leave
that there to dry. And in 8 hours
rip off the tape. And in 72 hours will be fully hard and cured r in-between
that time you've to be really careful
because you can put scratches and dings
and things in it. It's just sitting there. Drip, drip dripping. You
can see it's like it that shine and I have
got rid of all the blemishes. And now we've got on extra
resin only to which is good. Okay, so let's look at
these this morning. You can see the
drip of the resin. It's all in there. And we lift these
up, turn them over. And it looks the tile looks
much better and smoother. And it's got a nice coat of resin
and it's not quite hard, so gotta be gentle. But now is the time to
pull off the resin. Although because I
pushed the tape down, it might be a little
bit tricky to get off. So I'm going to start
this time from the middle. And if you can get an edge, that's the best way
to pull it off. But this is going to
be one bit at a time. And we'll see whether because
I went over the cork, maybe it looks something maybe a little bit of absorption
into the cork. But see how I'm peeling
off here and I get the whole and it comes off
cleanly and that's because it's just that
whole eight hour thing. It's not totally sets
that still soft, so it comes off much easier. And all you have
to do is be really careful that you don't
damage the front because it still is a
little bit soft so you can you can see the
cork is pretty good. I'll decide later whether I rip this off and put another
bit of cork on that's still a bit wet so you
can see that it looks a bit darker and lighter
in some spots, probably going to dry darker. But overall, the tile looks looks much
better than before. And it's ready to go. Let's do the other one. And looking good. Just have to make sure
before you pull the tape off that it is okay because you may
need to do another coat, but this looks really good now. So much better. There's
a much evener coat of resin. The sides look good too. There's a little some bits of blue tape that I still
haven't got yet, but get them off with my fingers or if not an exacto knife would
be what you would use. Let's see it. So now I
have my pair of tiles. And they vary because of the reason they're very reflective. So you've seen
that in the video. Beautiful. Onto the next one. Alright, so the same as before, that resin sit and go through the whole
check-in process again before you join me in the next lesson,
which is finishing.
14. Finishing Your Coasters: Been through a lot of steps. We've got, we've got
tiles used, resin, chosen their own colors, made the tiles with resin, and now we're ready
to finish them off. Okay. So your resin is nice and hard. You've left them for a few days. You coasters are
looking beautiful. It's time to remove the tape. So turn it over to the back
and carefully peel it off. It's often it's hard to get started sometime you got
to start in the middle. But I try and pull as much
as I can along the edge, you can see me ripping
close to the edge and it should come off
really cleanly them. So I'm trying to get
as large a piece of tape off around
the edge as I can. So it's just a
matter of patience and any bits that don't come off in that first go
you come back and pick up with and try
and go with a finger. Or you can use a palette knife. Or even as long as you
do it away from you, an exacto knife or a
Stanley knife will be fine. Once the tapes off? There
might be a few bubbles along the sides so you can see I can cut them off with scissors. You can sand back if
you really want to, just carefully along that edge and you can use an
exacto knife is your other option. This stage, what we wanna do is apply the cork on the back. Just remove the backing,
line up and stick it on. I also have a jennyguarino.com
stamps stamp on the back. You can sign with a
permanent marker and then you can wrap them how
you would like . I do like to tie mine up in some sort of ribbon or string because then you can
still see the coaster But they, if they're in
sets of two or four, they, they stay together. Or if your coasters
are for yourself, put them on display
in your home where everyone can see what
you have created. Don't forget to take photos of your coasters and upload them
to the project gallery. I'd love to see what you create. Also keep a record of the colors you've used so
that if you need to recreate some effects, you can.
Lets move on to the final lesson, which is what next? What are you going
to create next?
15. What Next: So what are you going to do next now that you've
created these tiles? What other ideas has
this process given you? I know I always have a lot of ideas and I can't possibly do them in just the
number of tiles. So I always have something
new that I'm working off. In fact, I really liked my color tests of the poured
paint in that last set. And there has to be something new that I
can do in the future, whether it's the coasters or something
bigger, I'm not sure. You use those ideas. Will you use resin in other works that you've made
that you think a nice, glossy protective
surface would be nice. Or you could try different
shaped tiles : round. Hexa, hexagonal. What sorts of different tiles? There's, you don't just have
to go with ceramic tiles. You can also get
wooden blanks as well. So there's plenty of
things you can do now and I'd love to hear what ideas taking this class has given you for
future projects. I've really enjoyed
sharing my techniques with you and I have more ideas for
future Skillshare classes. Please let me know
if you also have some ideas and if you have any problems along the way with this class, please let me know. I'm only too happy to help. Don't forget to load
your project up to the project library
so that we can all see what beautiful original tiles you've created using
your own color palette. Take care. Be creative, and I look forward
to seeing you next time.
 Jenny Guarino, Traveling Creator Inspired by Color