Transcripts
1. Introduction: You've heard it time and time again email marketing matters, especially for small
business owners. But when you actually
sit down to do it, where do you even begin? You might spend hours trying
to figure out what to share, how to design it, all
the tech involved. But then you come to
realize you don't even have anyone to send emails
to in the first place. If this sounds like
you, don't worry. I'm here to help. Hello, hello. I am Sheryl Chen. I run a brand and
website design studio, a YouTube channel
called Made on Sundays, and I'm a top teacher
here on Skillshare. I've been in the digital
entrepreneurship space for over six years now, and I still find that
email marketing is still one of the most effective ways to connect with my audience. In a world of ever changing algorithms and saturated
social platforms, email marketing really allows
you to own your audience, helping you to show
up consistently, build trust, and eventually
even showcase your offerings. We are going to start
from the very beginning. We're going to head into your class workbook and map
out your strategy together, and then we're going to
head into Flow Desk, and we're going to set up
your four part email flow. Part number one will
be your opt in forms. This is how people are going to find you and enter your list. Second part is your
lead magnet delivery. This is how you're going to deliver value and
grow your list. The third part is your
welcome sequence. This is how you're
going to nurture your audience through an
automated email sequence. And last but not least is
part four your newsletter. This is how you're going
to continuously connect with your audience through
branded consistent content. By the end of this
class, you will have a beautiful and working
email marketing system launched and running
with no tech overwhelm. If you're an artist, a maker, a freelancer, or any kind
of creative entrepreneur, and you're ready to design
an intentional, beautiful, and effective email
marketing system for your business,
let's get started.
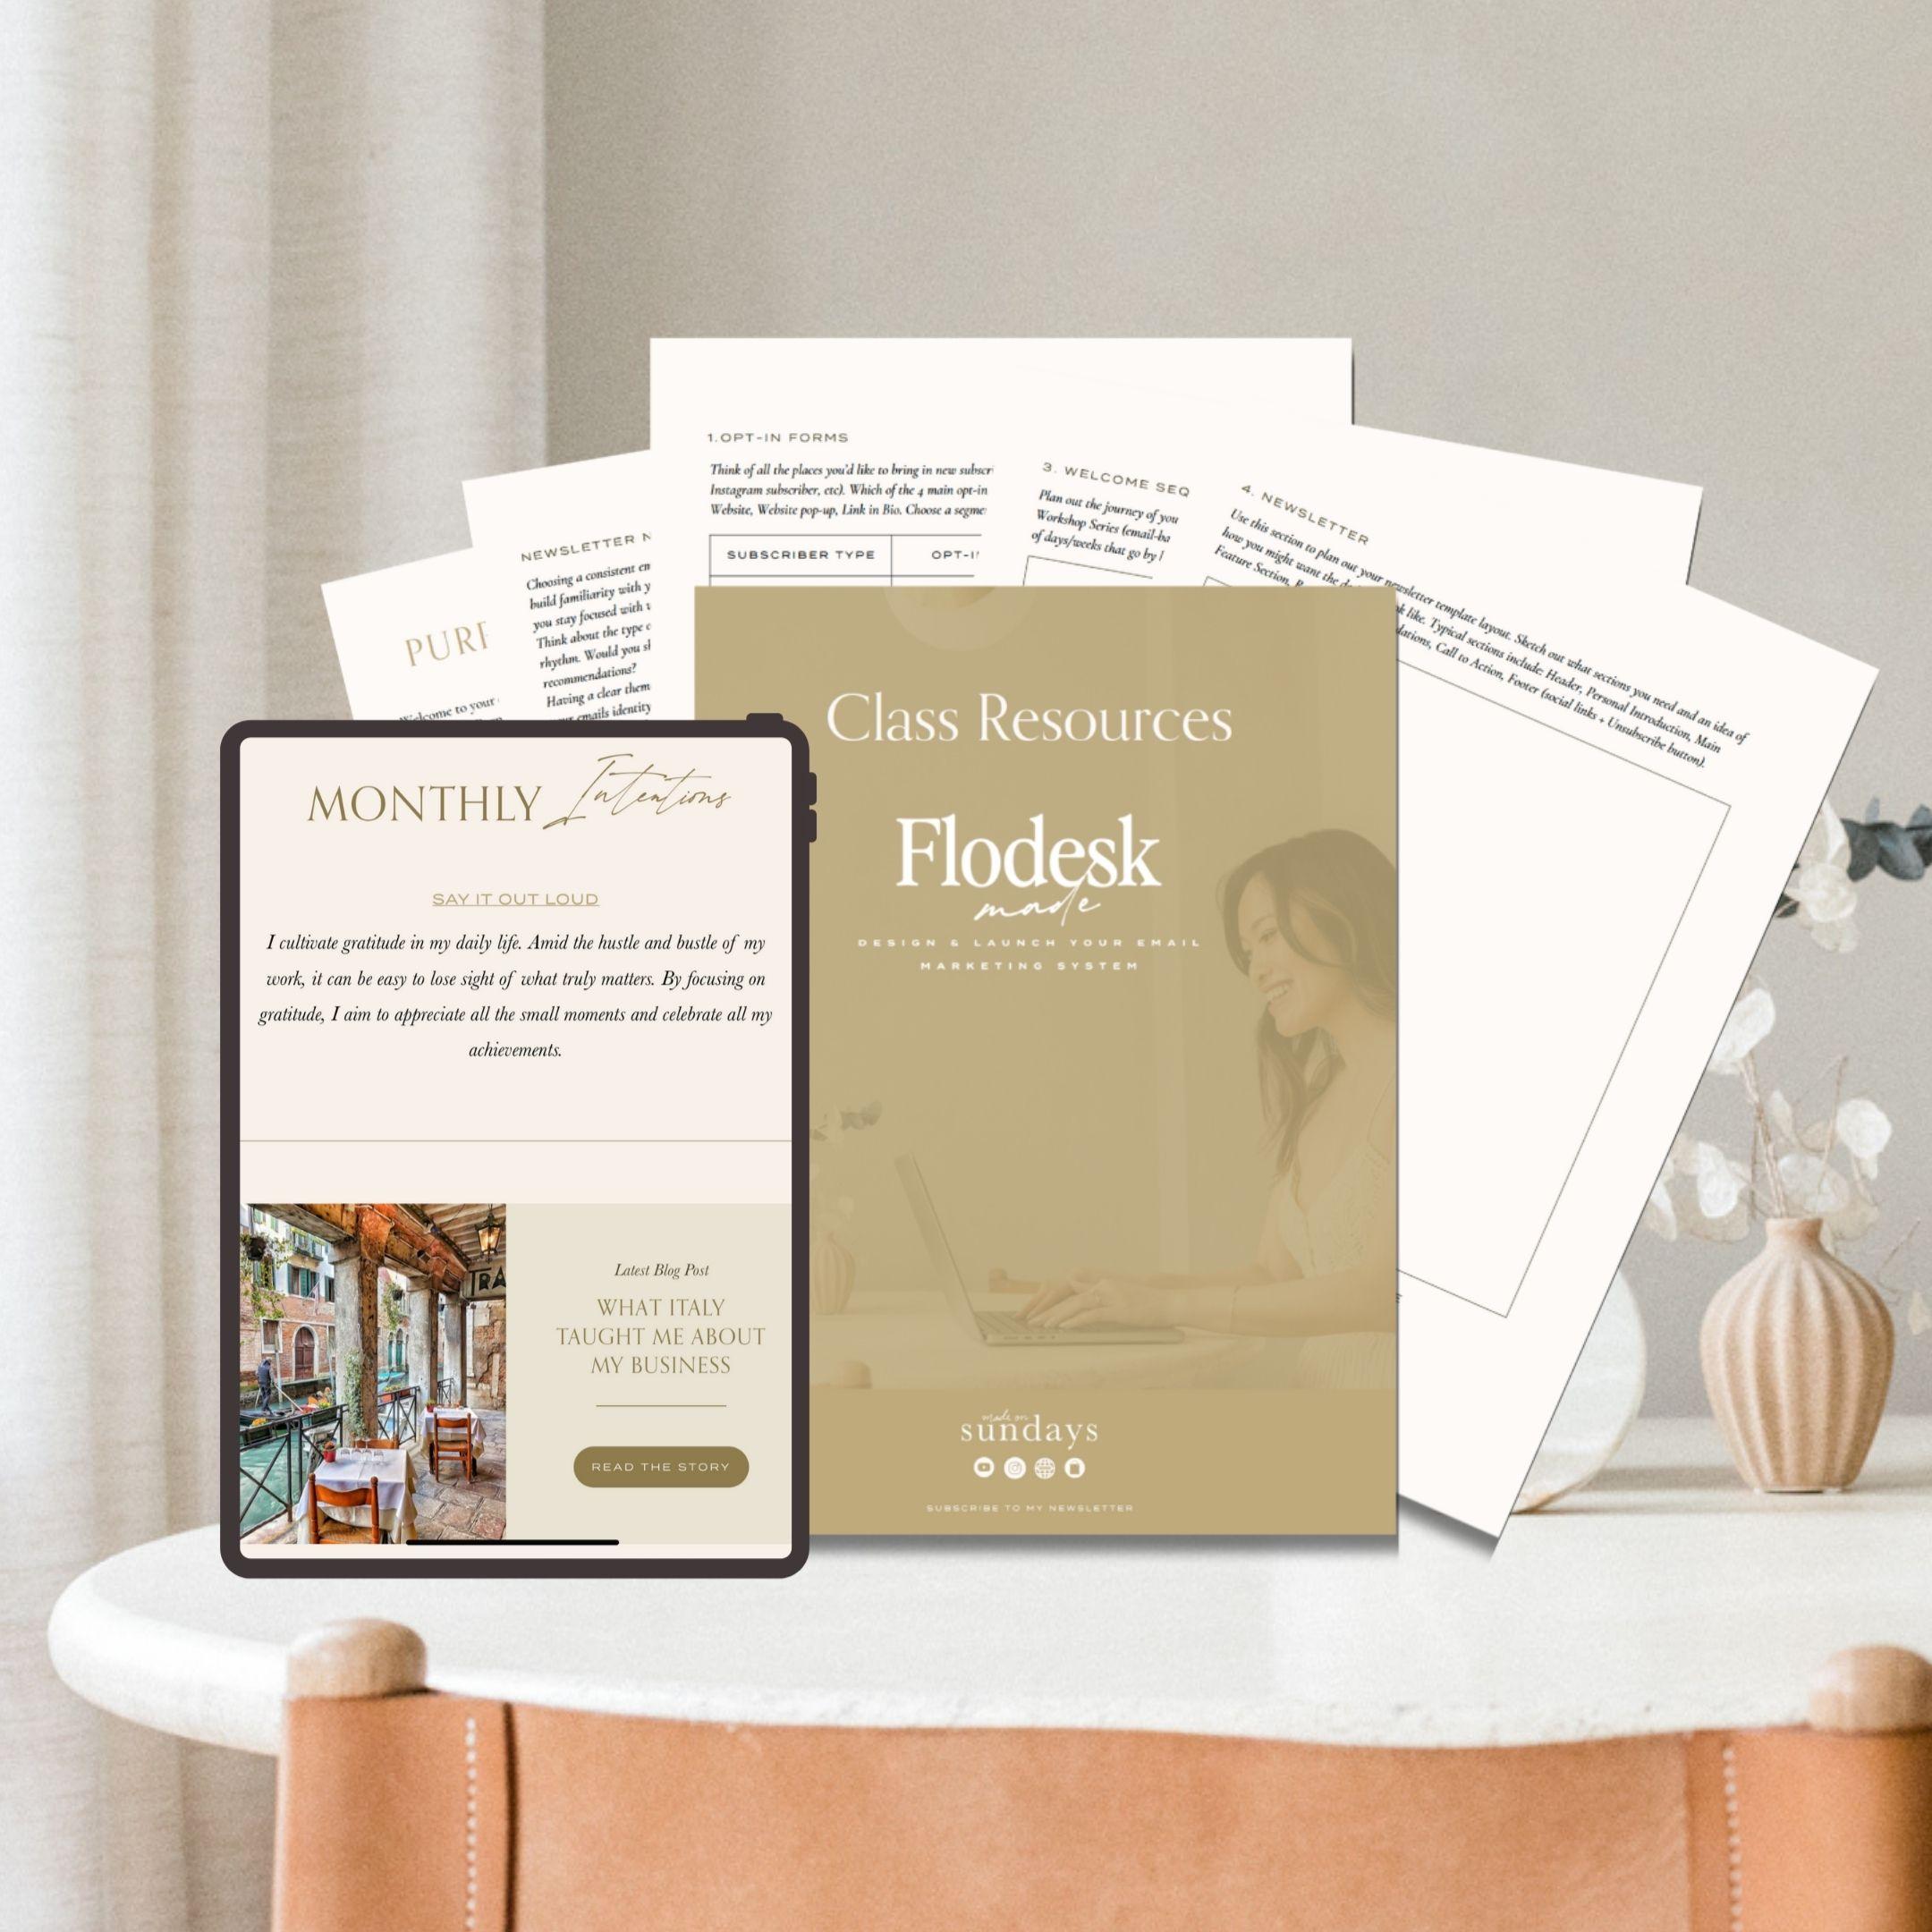
2. Class Project: This lesson, let's talk
about your class project. Throughout the class, we're
going to be learning how to build your foundational
email marketing system. An important part of this system is your
email newsletter. We'll be designing a
template that you can reuse again and again to save you
time and ensure consistency. I would love for you to
share your template design with me and the community in the project section.
Here's how you do it. Once you've designed your
template on Flow desk, let's say this is your
template right here, you can click on
the three dots at the very top right and
you can get preview Link, and you can just copy this link and share it in the
project section. Otherwise, you can
also just take a screenshot of your email and share it as
an image as well. By the way, I've
actually created a free flow Ds email
newsletter template for you to use as you wish. This is the template right here. This is very similar to
what I use for my business. You can actually download this free template in the
class projects workbook. It's under the
newsletter section. So it's waiting there for you. Once you click on the link, it will prompt you to
create a flots account. And if once you have
your flots account, it will open this newsletter
template right into your flots account
and you can use it as a starting point
for your newsletter, or you can just use it
as inspiration as well. I cannot wait to see
your email designs. In the next lesson, let's design your purpose
led email system.
3. Map Our Your Email Marketing System: In this lesson, we
are going to be mapping out your email
marketing system. We're not just going
to be sending out random emails out to your
customers and your audience. We are actually going to build
a meaningful flow to guide your audience from that first hello to a long term
connection with you. So, first off, head to the resources section and
download that class workbook. We are going to be filling
that out together right now. All right, so, first off, we have your define
your purpose section. What role does email marketing
play in your business? You really want to think about, you know, why you want to start sending emails
in the first place. What outcomes do
you want to create? By sending these emails, do you want to build a
connection with your audience? You want to increase sales
and bookings, et cetera? Then we have the NIC section, which is define your
target audience. Who are you speaking to? Describe your ideal subscriber. What stage of the
journey are they in? What do they need most from you? If you already have
a target audience, your business, then that's probably a really
good starting point. You want to start
listing that out here, but also then go into
more detail about exactly what part of
their journey they're in when they are
subscribing to you. Next up, we have your
newsletter, name, and themes. Now, by choosing a
consistent email topic or theme and giving your
newsletter you know, a name. I can really help
anchor your message and build familiarity
with your audience. A theme format really gives readers and yourself
something to look forward to and helps
you really stay focused with what you're sharing
week after week. Now, think about what kind of content you typically
share in your business already and how that can really translate
into a weekly rhythm. Would you share tips or updates in your
business, inspiration, reflections, behind
the scenes content, or curated recommendations? Do you usually post YouTube
videos or blog posts? How can you kind of formulate that into a
short email newsletter. Having a clear theme or recognizable name,
like, for example, Sunday studio Thoughts
or Monday morning Muse, it really gives your
emails an identity and makes your audience more likely to open and
connect with them. So use the space here
to start listing out content themes that you feel like can align to your brand, and then brainstorm
newsletter names that can go with those
according themes. Alright, so now that we've established your
purpose, your audience, and your theme and
newsletter name, let me introduce you to the four part email flow for
a purpose led email system. We have four parts here. The first part here
is your Optin. This is how people will find you and be able to sign up
for your newsletter. Next, we have your
lead magnet delivery. This is where you're going
to provide immediate value and be able to build
trust with your audience. Then the third part is
your welcome sequence. This is your first few
emails that you're going to send out to
your audience automated, and this is going to help
nurture your relationship. Then part four is
your newsletter. This is going to be
your ongoing connection with them after your
welcome sequence ends. Alright, so let's go through
each of these steps and start planning it out for
your specific business. So first part of the flow
is your opt in forms. You want to think about all
the different places that you want to invite people to subscribe to your email list. For example, are
people going to come in from your general website? They going to come in through certain freebies that
you're offering? Are they going to
subscribe through your Instagram or Pintris? Think about all those
different places, and we're actually going
to segment them out. For example, maybe we
have the first part here is website subscriber. And then think about what kind of opt in type
you're going to use. So there's four main
opt in options. There is the Landing page, which is basically just
a link that opens up a landing page with a form
to sign up for your email. There is an inline in website. So this is a script that
you put onto your website, and it's going to be within
a section of your website. We have website pop up, very self explanatory,
a pop up on your website or Lincoln Bio. And this is usually used
for Instagram subscribers. You probably have
seen that before. Choose which segment works for that kind of
subscriber type. For this example, because
it's coming from my website, I'm actually going to
just do a landing page, and then we're going to
give it a segment name. Some people call this tagging. Basically, it helps you
organize your subscribers based on how they signed up or what they're interested
in hearing from you. Think of them like labels for different groups
of subscribers, like a freebie downloader or a client or a workshop attendee. If they sign up and get tagged with this specific segment name, and you can make sure
that the next time you're sending out emails to
specific groups of people, you can just select
that segment, and it'll only send to
that segment of people. So for this example, we're just going to be calling this website,
probably subscriber. Next, we have your
lead magnet delivery. Now, this is the second part. We want to start brainstorming your freebie or
your lead magnet. So you don't know what
a lead magnet is. It is just a freebie. It can be a free PDF. It could be a notion template. It could be a flow
desk template. It can be a Canva template, a checklist of some
sort, a workbook. It's basically a free
offering that's of high value that you can put
together really quickly to offer to your subscribers. It's an incentive to
subscribe to your email list. The most important
thing to think about when creating your
lead magnet is to make sure that it is very specific to your niche
target audience. So look back at the
target audience that we wrote earlier and think about a lead magnet
that will really speak to that specific
target audience. All right, next up is
your welcome sequence. Now, what will happen is once they sign up
for your newsletter, they might you know, get that freebie delivery, and then they'll start this
welcome email sequence. So this is a very important automated sequence because it's going to be the first
few interactions they have with your email list. A few ideas for a sequence is to create a
storytelling series. I really like that. I usually
do that for my newsletter. It really tells your story, your background, what you
offer, that kind of thing. And then another option is
a mini workshop series, for example, an
email based course. So if you're an educator, then this might be a great
first email series for you. Okay, so as an example, let's pretend that we're
doing a storytelling series. So you want to use a space
and write out each email. So, for example,
email one is probably going to be your
freebie delivery, and then you want
to then write out how many days or time
between each emails. For example, this one
might be two days goes by. And then on the third day, they will get email two. So email two, for example, if you're doing a
storytelling series can be where you share a story, maybe your background, how
you started your business. I like to talk about why, why I started my business, a little bit about your
brand values, maybe. And then another
maybe two days go by and then we're going
to send out Email three. And then Email
three can be maybe some sort of turning
point in your business. Maybe you started
off in corporate, and that's what you talk
about in email two, maybe you learned
a lesson from it. In Email three, maybe you talk about a turning
point in your business. This is to create some tension and build excitement
and curiosity, and then you can
maybe offer some sort of thing to build trust. So maybe a tip or
something to offer, like a quick value
add to your audience. Email four is going to be the
last email in this series, and maybe this last email can be a soft pitch
of some sort. Maybe you just talk
about your offerings, your YouTube video or channel, your services that you provide. All right, so we are now in the last part of your
email four part flow, and we are now planning
out your email newsletter. This is going to be
the ongoing connection that you have with
your subscriber. We're going to draw out an
example, newsletter here. And typically, what I like to do is I will have a
header at the top, so maybe some sort of logo, and then the next
section usually is some sort of personal
introduction section. So this is usually a little write up, like
a paragraph, I'll. Maybe what I did on the weekend, something that inspired me, maybe something that I learned
that week or that month, a little personal update. It's going to be like
a paragraph section, so it'll look
something like that. And then the next
section might be your main feature section. This can be maybe
a tip of the week, client Spotlight, maybe a new blog post that
you're sharing. I think you can draw it out. Maybe you have an image here, and then you have a title. And then a little, like,
written section there. And then the next
section might be resources as an example. This can be maybe a
recommendation section, one thing you're loving in the moment or a product that
you're loving in the moment, a recent favorite read, whatever it is, maybe, like, a 33 images here, and then we have a little text. And then we maybe do a little call to action
in this last section, and then we have our footer. Usually in your footer,
we'll have your like, social icons, and then maybe
an unsubscribe link here. Now, as you can see here
in this last section here, we have my bonus flots
Newsletter template. So you can go ahead, just click on Download Free template, and it's going to lead you to my free newsletter template. So feel free to use this as a base or starting
point for your newsletter, or you can use it just as
inspiration, whatever you like. Alright, so before I
close out this lesson, I just really wanted to quickly talk about
email compliance. It is super, super
important once you start your email
newsletter to read up and be familiar with email compliancy it is
different around the world, so it really depends on where your subscribers
are coming from. So if you have email
subscribers coming from Europe, then you want to read
up on GDPR in the EU. If you have email subscribers
coming from the US, then you want to
read up on CNSPAM. It is really easy to
find this information. Just do a quick, like,
search on the Internet, and I'm sure you can
lay it out or even ask HachiBT and I'm sure HHIBT can probably list it all out for you in a more
understandable way. Alright, so now
that we've mapped everything out and
the next lesson, we are going to be finally setting up your flow Ds account.
4. Sign up for Flodesk: This lesson, let's
sign up for flowdes. Now, do note we will
be primarily using flowds as our email
marketing platform of choice in this class. But the overall concepts and how our email
marketing system works can definitely be executed on most email marketing
platforms that you choose. Feel free to stick with any
platform that works for you. All right. But with
that being said, Flo Des is what I've
been using for many, many years now and it's one of the tools that I can't
run my business without. In my opinion, it really is the best in class
for simplicity, design and user experience. And that's why I've chosen to
do this class with Flodes. Now to sign up for FloDes
you can follow the links in the description or
in your workbook or just go to flodes.com. Once you sign up,
you are most likely going to get a 14
day free trial. I definitely recommend using your free trial to go
through the class. Now, the memberships on each
email platform do vary. In the case of FloDes, currently they are
offering a set price per month and you get unlimited emails and
subscribers with them. I'm offering a code
in the workbook, which you can use to sign
up and enjoy discounts. More details are available
in the workbook. This is currently
their plans right now. I think these prices do vary depending on which country
you're signing up from, but these are the
prices if you sign up for monthly or if you're
committing to an annual plan, this is how much
it would cost per month on an annual basis. All right, so get your account and let's get started
with a class.
5. Basic Flodesk Setup: Alright. In this lesson, we are going to be setting
up your FloDS account. Hop into your FloDS account, login and you're going to
see something like this. If you've been using
FloDS for a while, then you'll have all of the
emails that you've sent out in the past in
this homepage area. But if you are just setting
it up for the first time, then you're probably not
going to see much here. Uptop are your navigation. So you can check
out your emails, the forms that you've
created in the past, the flows that you've created. Check out if you're
subscribe to FloDS Checkout. You can see your audience, who subscribe to you, and then
also your Analytics panel. Right on the right side here is where we are going to
set up your accounts. We're going to head to overview, and on the overview, on the left hand side is where all your navigation
for your settings are. The first four sections here is actually just very
general setups. I'm not going to go through
these four sections just as they're pretty
straightforward, go through them and fill out what it tells
you to fill out. We're going to head
straight to branding here, and this is where
you can customize the general branding
of your emails. So at the very top
here is your logo. Here you can just upload
your logo in here. What I actually like
to do is I created on Canva a little image that represents my brand
and my company, and then I put my
newsletter name at the middle here and my logo
at the very bottom right. What you put here
will show up at the top of every single
email that you write. Just keep that in mind. I
find it nicer that there is a nice banner at the
very top of my emails. That's what I personally prefer. So if you prefer that, you might also want to create that for your
newsletter as well. Just so you know
the dimensions is 600 pixels for your
emails horizontally, it can be as high as you want. I wouldn't recommend super high, but horizontally,
it is 600 pixels. Alright. Then the next
section is your brand colors. You have actually a
lot more choices now. Previously, there were only five colors that you can upload, but now you can
upload ten colors. So I haven't even used up all of these brand color options. So go ahead and click into
this section and you can actually type in and copy and paste your hex codes into here. And then these are the colors that you can easily just
click on it when you are designing your
emails so that they are on then the next section
here is your brand fonts. Again, you can go into manage and you can
add a new font here, and then this is where you
can upload your font files here and you'll be able to use your brand
fonts in your emails. The NIC section is just your general
business information. We can go ahead and
fill those out as well. The NIC section we have
here is your optins. Double Optin here
just means that if someone subscribes
to your email list, if you enable Double Optin, you will automatically send
them an email confirmation, and if they click Accept
confirm my subscription, then they will be able to
start receiving emails from you before they except, which is the double
confirmation, they won't be able to
receive any emails from you. This is actually
really important and highly recommended as a best practices to opt
in for double Optin. If you are in Europe, it is actually a legal requirement
in a lot of countries. So just as a best practice, I do recommend doing
double opt ins. It also makes your
list a lot more clean, takes out all the bots who just subscribe and don't
double opt in. So yeah, I definitely
recommend setting this up. And for me, I just put
a little language here, cute little Jiff, and I said, just to remind them that it is the law because I'm from
the Netherlands to double opt in and click Join the list because if they
don't click on this, they won't be receiving
any emails from me. It's important to put that
reminder wherever you can on your website where
they're subscribing or even in this
double Opt in email. It's a good reminder for them to make sure that
they know that they have to double opt in
before they receive emails because I
have in the past, when I don't put
these reminders, people email me back that they're not getting
emails from me, and it is better to remind them so that they will
receive the first email. This is your thank you page. Once they have subscribed, if you have a double opt in, once they have double opted in, they will get this
thank you page. It is super important for you to customize this
thank you page. I just put a little language here to thank them
for joining my list. This is also a
great place to add a little discount code or you can upload your best
freebie in here or whatever value you
can give them upfront. You can also put it into
this thank you email. Then we have your
preferences page. Again, you can just customize this with your logo and
you're all good there. Last but not least
is integration. One very important
thing that you do want to connect to is Canva. You want to scroll
all the way down to connect with Canva here. We are going to if you
have a Canva account, hopefully you do because
later on in this course, we are going to
show you how to use Canva designs right in
your flow Desk email. You definitely want to turn on this integration and log
into your Canva account. In the next lesson,
we are going to be creating your opt in forms.
6. Design your Opt-in form: All right. In this lesson, we are going to be setting
up your opt in forms. We are going to first,
before you set up your form, we have to set up all
of your segments. Now, go on to your workbook
that you filled out. Look at the whole
segment name list, and we're going to get all
of those segments set up. So we're going into audience
here, click on segments, and we're going to click
on New segment here and go through
your segment names and add them one by one. So just as an example, I'm just going to call
this flow des made example so that I know
what the segment is. I'm going to assign
it this blue color, and I'm going to click on Save. So go through all of your segment names and go and
create those segments now. Just as a reminder, if you
don't know what a segment is, a segment is a group of subscribers who share
common characteristics. These can be interest or your purchase history or engagement with previous
emails of yours. It's just groups of people who have
subscribed to you so that you can personalize
your emails moving forward and send it to the
appropriate groups of people. Just as an example, I have segment here called
All Skillshare students. So when people are subscribing to my email
list through Skillshare, I'll know that I tag them with this segment called All
Skillshare students so that I know that this person that is subscribed to my email is
indeed a Skillshare student. So in the future, if I wanted to send out an email just for my
Skillshare students, I can choose this segment, and it'll only go to
that group of people. So again, set up all
of your segments, and once you have that all done, we're going to head to form. So click on Forms here, and we are going to
create a new form. So we're going to click on New Form here and
there are lots of different templates that
you can choose from and also the different
types of opt in ways. If you look in your
workbook again, you have your Opt in types
that we talked about. We have the Link in Bio, we have the website pop up. We have the website in line, within a section
of your website. We have the full page and then other types of
full page opt in forms. One with a video in it, one with a spinner. These are fun little
different types of opt ins, as well as one with
a countdown timer. Just to keep it simple
for this class, we are going to be
creating a full page one. So basically, if they
click on this link, it'll open this
page so that they can fill out the opt
in form on this page. So there are a couple of
different templates here. So the one that is actually my favorite is one of the
ones with the checkboxes, and I'll explain
that in a second. So maybe we'll just choose I think I like
this one right here. We'll customize this one, and here is where you're
going to choose your segment. So we made the floats
made example segment, so I'm going to click on that. What that means is
anyone who signs up for this Optin will get
assigned that segment. All right, so a couple of
things you can fill out here. So, first off, you
can upload an image. This is where you upload
a mockup, let's say, of your freebie and write
your little title here. So a headline in your headline, you might want to highlight some key benefits or
solutions for your audience. For example, get my free
PDF or example here, get my top three secrets
to organic gardening. You really want to come out
right away and tell them exactly the benefit that they're going to get by
signing up for this email. Then in this
description section, you can explain about the
freebie or the newsletter, what they're going to get,
what they can expect, what they're going to
achieve by signing up? Are they going to get inspired? Are they going to
learn something? Are they going to be able
to join a community? What exactly are
they signing up for? Then in the section, you can add whatever field
that they need to fill out. So email address, first name, or other fields,
custom fields as well. Then right here is your selection for them to
opt into specific things. The reason why I like to choose
these templates that have these checkboxes is because
it is GDPR compliant. Again, GDPR compliance is a European email
compliance standard. Um, if you by any chance, have a subscriber
that is from Europe, it doesn't matter if you
yourself are from Europe or not. If you have a
subscriber from Europe, you need to be GDPR compliant. And in order to do that, you need to make sure that your subscriber knows exactly what they
are signing up for. So as an example, if this opt in is
for your freebie, then like all of this
copy right here, get my freebie da da da,
and then description. This is what the
freebie is about. Fill out your email address
to get this freebie. Then the only thing
that they are signing up for is your freebie, not your newsletter, not
your three P course, not anything else,
just your freebie. So if you want them to sign up for all of these
other things, you need to make sure that they have opt into it separately. So for example, this section
might say your freebie. So, oops, you have
to type it here. So let's say this
is for the freebie. Let's say this is specifically signing up
for your newsletter. Maybe I'll just say very
specifically weekly newsletter. And then this might be, I don't know, something else. Maybe you only have
two of them, right? You have your freebie opten and then you have your
weekly newsletter. If you want to remove them, you can go here and delete it. So by doing this, they get to choose exactly what
they're signing up for, and that makes sure that
you are GDP compliant. This right here, you name it, you also have to tie
it to a segment. So for example, this was
tied to that freebie, right? So the flotsmd example. This one, however, you
might need to create a separate segment that's
called weekly newsletters. Whoever gets tagged with the weekly newsletter segment will get your weekly newsletter. You want to make sure to create all the different segments that you need tied to the information
that you're sending out. If you click into
settings right here, you can also do all of the
settings for your opt in form. I would recommend
doing a double opt in. This is optional. If you
have a lot of subscribers, you might want to toggle
this off so that you don't get lots and lots of emails. Make sure you have the
right segment picked here. The link, you can actually
change the link name. So if you want to share this link to people directly and you want
it to look nice, you can change the name of it. Then the link preview, you definitely want to edit this change up the photo and all of the
description and stuff, especially if you're
going to be sharing it on social platforms like
Facebook or something. This is going to
be that generate photo and, you
know, information. But after that, you're
going to click on Share, and it's going to
show you this link. So basically, you can
create a button on your website and make sure this link is tied
to that button, or if you have an image or whatever you
want to share this directly to your audience through your social
platforms or like I said, on Facebook, you can also copy this link and share it there. Alright. That is
your opt in form. In the next lesson,
we are going to be delivering your freebie, as well as setting up
your welcome sequence.
7. Deliver your Lead Magnet + Welcome Email Sequence: This lesson, we are
going to be setting up your workflows to deliver
your lead magnet or freebies, as well as your
welcome sequence. We are going to head
to your workflows here and we're going to
choose your desired sequence. They have a lot of different
templates for you. You can just click on
New workflow here. Again, there are so
many different types of sequence templates for you. Definitely go ahead and
scroll through and see if there's one that works
best for your needs. If you are just sending out
or automating a lead magnet, then you can choose
lead magnet delivery. But for this class, we
are going to be using the welcome sequence
because we are going to not only
deliver your freebie, but we're also going to deliver
a couple of first emails, which is going to become
your welcome sequence. So I'm going to choose
welcome sequence here. Can take a look at it and
then click on Customize. All right. First off, you definitely want to
go back to your workbook and make sure that you have
filled out the late magnet, as well as the welcome
sequence section so that you can now go into Flo Desk to recreate those sequences
and those emails. The first thing you're
going to do is we are going to add your trigger. So again, this is the segment
that you want to choose. So this is probably fine. A subscriber who is added to this specific segment will
then start this sequence. And the sequence that we
created for this class as an example is your
flow as made sequence. So in this sense, whoever signs up for that opt in form that you created that's
tagged with this segment. They are then going to
start this sequence. Right now, if you
scroll through, you can see the different
emails that will happen. Once they get this trigger, they're going to receive
this email right away. If you don't want them to
receive the email right away, then you can add a time delay. There's a couple of
things you can app. The most important thing that you can do here is a time delay. So maybe you wait
a certain hours, minutes or days if you click on one day after 24
hours or one day, they are going to receive the next thing in this sequence. For now, I'm going
to delete this. First they're going to
receive this email, this email will most likely be your lead magnet or
your freebie delivery, and then we are going
to have a time delay. You can change this to whatever. I wouldn't recommend 30 days. That's a pretty long time,
maybe two to three days. And then they're
going to receive their first email within the Welcome sequence,
and then there'll be, again, a time delay, and then they're going
to get the next email and then so on and so forth. So you can make the sequence
as long as you like. But for now, let's just focus on the content and the
sequence itself. Go back to your workbook and look at the sequence
that you drafted out, and we're going to now
create this on Flow Desk. The first one right here, let me just head into it. So you can change
the subject line. This is the subject line of
the email that goes out, so maybe it'll be something
like your freebie is here, and then you can write
the preview text. This is that little preview
text that you see in your inbox of kind of like a little blurP of
what's inside the email. So it might be like, we're
excited or I'm excited to share with you your freebie, d dot or whatever it might be. And then we're going
to edit the email. You can look at the editor here, and this is where you
can literally just go in and change up the text. So you can be like your freebie is here or is waiting for you, and then you can change
up the content here. In the style editor, which is where we are right now, you can add in
different sections. So the most important one
is probably your layouts. Flotas has a ton of incredible like premade
layouts for you. Definitely scroll through
them and see which one might fit your style better
or the section better. You can also just do very
plain texts as well, but a lot of these will help you have an image and
some text laid over. For example, this
one right here, you can upload an image
for the background, and then you can
write the text here. Within the layouts, sometimes
you can adjust the block. This right here is the block. You can change maybe
the background color of the block here. You can change the font style. You can even change the padding. Let's say the top here, you might want to have some
more padding or less padding. Definitely play around with it. There's so much flexibility
with these layouts that it's just really incredible and making emails
so much faster. So right here, you
can maybe even just upload an image
of your freebie. Again, in a later chapter, I'm going to show you how
to create, let's say, a mock up on Canada, and then you can
integrate it with your Cava account and put it into this section right here. So that is your
different layouts. You can add different things
like images, logo, video. When you're done
writing out all of the content and you're ready
to upload your freebie. Let's just say
this is the button for them to actually
upload the freebie. You can put all the images
here and the text here, and then you can say
download freebie here. And then you can click into
it and make it a link, and you can either
upload your file. So if it's a PDF, you can upload the file of the PDF here. If it's, let's say, a notion template or
a Canva template, you can put the link of
that here, and that's it. So that's how they
would receive it. All I have to do is click on this button and they
will get their freebie. Once you're finished
with your email, you can go on and click Finish, and this will be saved
onto your sequence. So go on and fill out
this whole sequence out, look back on your workbook
and make sure that you have built out all of your sequences
that you want to create. Now I do want to give
you a couple of tips when creating this
welcome sequence. The first thing is you
really do want to focus on quick wins and building trust and confidence
in your brand. This email sequence
tends to be short. It's also the first time that people are introduced to
your brand, possibly. So you want to really
make sure that they are seeing the value in being part of your email
list right away, quick wins can be simply
getting a freebie or seeing your YouTube content or reading really valuable blog posts or really getting to
know more about you. Those quick wins can
really help you build trust in these early stages
of your relationship. Now, another tip is, at the beginning of your email, you could sometimes mention something that they will get
at the end of the email, and at the end of the email, you can actually kind of tease the next email
that they'll get. For example, in the beginning of the email, you can be like, Oh, remember to read to
the end to get your free. And then at the
end of the email, you can tease and be like, I'll be back in
two days with XYZ, kind of tease the next email. My third tip for you
is to make sure that the emails feel really
easy and fun to read. You can style it
with some images, break it up with some graphics, or you can even make
the paragraphs shorter, maybe bold certain
words or italicize certain words to kind of
guide people into reading. I mean, you know, we all have really short
attention spans these days, and having more
stylized short emails really helps people to digest
your information quickly. Next tip that I have is to use personalized
recipient name. What I mean is if you're
adding some text here, let's just say this email. You're saying hi there. This is Cheryl. You can actually,
instead of saying there, you can add right here, add personalization, and then you can add
their first name. So it will I first
name is available, it will say the first name here. Otherwise, it will display, you can write whatever else. So there is now a personalized
text right there. So every time someone
gets an email, it'll say hi, Cheryl, hi, Susan or whoever
is getting the email. And if they didn't provide
you with the first name, they will get hi there. This adds just a little bit more of a
personal touch to it. It sounds like you're
talking directly to them. My next tip is to encourage micro actions
in these emails. Now, micro actions could be hit reply or watch this, read this. These are just tiny
little things that you can encourage them to
engage with your email. I love using hit Reply in these first emails in
the email sequence or the welcome sequence
because it encourages them to email you back and start a
more personal conversation. For example, in my
welcome sequence, I encourage them to reply
to what their why is. Why did they start their
business in the first place? And this really starts, again, a more personable conversation
so that I can reply back. And this back and forth, really adds a lot of
value to your email list. And the next lesson,
we are going to be creating your
newsletter template.
8. Create Your Newsletter Template: This lesson, we are going to be designing your
newsletter template. Go into your workbook and
hopefully you have filled out your draft design
for your newsletter. So definitely bring
that back out. If you create a new email, you'll also see all of those
design templates again. So you can definitely
choose one of these. But I'm actually going to be
providing you with one of my own templates as well so that you can start from
that template as well. So this is the template
that I will share with you. We're going to edit it. I'll just provide the link of this in your workbook as well, so you can start either from scratch or from one
of the flots layouts, or you can start from
this layout right here. Go ahead and look at
your workbook and start creating the different
sections of your newsletter. Now, I do have a couple of tips for you for creating
your newsletter. You want to try to be as
personal as possible. Don't be afraid to be personal
in these newsletters. This is your way to have a consistent connection
with your subscribers. I always love to start off my newsletters with a
little personal story. Maybe you can talk about
what you did on the weekend, a little story about your
baby or your family or something a conversation
that you had with a friend or just something
you learned this week. That really helps
sets the mood of the email and also obviously have that
personal connection. So hopefully, it ties on the
main purpose of the email, that would be even better. After you have created that personal connection
in this first section, you really want to
lead with value. Can you offer in this section, we have our monthly intentions, but can you offer something
that they can take away really quickly and get
some value out of your email. For example, in this section, we might have the
latest blog post, so they can click on to read the story or
read the blog post, or watch the YouTube video
or whatever it might be. Maybe it'll give
them inspiration. You really want to lead with
value in these newsletters. One thing that's
really important about these weekly or monthly
connections is in general, you want to pitch less so that when you do
actually have to pitch, let's say you have a
launch coming up or a product that you're
about to list, you want to feel comfortable about making those
pitches once in a while. If you offer a lot of free value in your weekly newsletters
or monthly newsletters, you actually feel
a lot better about pitches because I know,
especially for me, sometimes I feel
really uncomfortable with my email pitches because, you know, I feel like
I'm always selling. So by having really
value added free value added emails consistently, you feel a lot more comfortable with those pitches
when you have to do them. Now I was talking about
weekly or monthly. The most important thing about email newsletters is not necessarily how
often you send them, but how consistent can you be. So if you can only
stick to once a week or once every two
weeks or once every month, that's totally fine as long
as you stay consistent, choose something that
you can commit to and then try to stay
consistent with it and give your subscribers
an expectation of how often they're going
to be hearing from you. Now, often people struggle with figuring out what to share. First off, having
a template really helps because every month, you can be sharing
your intentions. You just need to
figure out what is your intention of the month
and then write that out. Or every month, you
have a new blog post, then or a new YouTube video. Then you can have those sections already
built out for you. All you have to do every
time you send a newsletter, you're just updating
this template, and that really gives you
a quick way to remember, oh, yeah, this is the type of information that
I usually share. Um, not only is it easy for you, but it's also more consumable for your audience because they kind of already
have an expectation of what is part of
these newsletters. Once you do have this
template all built out, what you're going to
do is you're going to click on Save to Favorites, and this you can name it your
weekly newsletter template, and you can click on Save and that design like this design will automatically be ready for you when you are
creating your NIC email. What you do is the next time you want to send out your
newsletter with that template, you go to new email and you can click on MFavorites
right here and it will show that template that you just created
and all you have to do is click into it
and you can start your email by customizing
it right here. That's how you create your weekly, biweekly
monthly newsletter. I hope this template is going to help you create
your template really quickly. Yeah, be sure to download this. You can click on the
link on the workbook and it will directly open up this template into your flots account and you can start editing it as you go. Hopefully, you're
going to replace all of the branding the colors, the fonts, the logo
with your own business, and then you can just create your different sections here. In the next lesson,
we are going to be finally designing your email. Now that you have
them all written out and workflows created, I'm going to show you how
to add in your brand fonts, add in your brand colors, how to use the Kanda
integration to make these even more
personalized to your brand.
9. Branding Your Emails + Canva Integration: This lesson, let's go over how to design your emails
to match your brand, as well as go over the amazing Canva integration
to help with your designs. We are going to head into the weekly newsletter
template that we built. We can use this as
our base while we learn how to design your emails. This has already been pre
designed with my brand. I'm just going to show you
a little how I did it all. I like to create a
the settings area when you're uploading your logo. I like to actually create a graphic that is the full span, like a whole banner instead
of just having your logo. I think it looks nicer,
more put together, almost like a little frame for your email, all of your emails. So just so you know,
anything you design, let's say you're
designing on Canva, the dimensions of emails are
usually 600 pixels across. Whenever you're
creating a new graphic, just make the
horizontal dimension, 600 pixels and then guestimate how high you would need it to and
just adjust as you need. So this dimension
here is probably around 600 pixels across and
then probably around 250, I'm guessing here, 250 or yeah, probably 200 to 250 vertically. And then what I did was I just created an image with one of
my brand photos on the back, and then you can just put your logo right
in the middle and then upload it onto Flo Ds. Now, I also like to create
a little background color. Now, if you just click
on the side areas here, you can choose your
background color here. If you've already set up your brand colors on Slots
and makes it super easy, your brand colors actually show up here at the very bottom, just click on whichever
one you want to use. In my case, I like to
have the green sides, or you can just literally copy and paste your
hex codes into this area and um yeah,
it's super easy. You can also change
your canvas color, which is this
background right here. For me, I like it a little
bit like a beige color, main font color, as well
as your link color. If you have a link
within your text, this would be the default
color that it will make it. You can also change the borders to create a little border. You see how it created
a little border here. Personally, I like to have no border and just
have it clean, but you can add that if you
like, as well as padding. So those are the main colors
for the base of your email. Within each section, you
can also change the color. For example, if you want to add a background color to
this layout right here, you can choose a
background for that. Typically, I like to
keep my backgrounds for the emails as close
to white as possible. Even for this one,
I would probably typically choose a
lighter white color. I just think it's
easier to read. But for this specific example, I did a beige color,
which is also fine. Um, yeah, that's how you
change brand colors. You can also change
the colors of your text as well per section. So as you can see here, you can change the
font color here to whatever color you like. Again, I typically like to have a darker font and then
a lighter background. You can also change colors of fonts for specific sections, so you can just um put your
cursor over it and then change the font color of
just that specific section. Just one note about the fonts, um, you two notes, actually. So if you've already uploaded your brand fonts in your
brand setting section, then you'll be able
to find all of your brand fonts
here up at the top. You'll see the
section for brand, and then they also have
a lot of beautiful in house fonts that they
already have on the system, so you can also use those. I typically do use
my own brand fonts, do note that some layouts, you aren't able to
use your brand fonts. For example, if you add a
text layout right here, these cannot use your
own brand fonts. So if you go into fonts here, you'll see that it'll say this block uses
only websafe fonts, no brand fonts are allowed. I typically would like to choose an in house
font that looks similar to my own brand
fonts as a second option in case I use a layout where
I cannot use my brand fonts. The other thing is you
can save font style. For example, you really like how you style this font right here. You can go ahead and
save this font style. Let's just say I save
this one and then I want to change this one
to that font style. Then you can click
on this and it will mimic the font style
that you save. That really saves
you a lot of time. Um, I really love that feature, and then you can also
save button style. So let's say you really like how you style this
button right here, you can go ahead and save this button style and then I'll save it into
this list here, which is so great because styling buttons does
take some time. There's a lot of
things you can do. You can change the shape of it, change the fill color and the border color
and the font style. So it does take some work. So now that they
have this feature, you can just click with
one button and restyle it to how you typically
like your buttons to look. The next thing I really
wanted to talk about, which is super
exciting with styling your emails now is the
Canva integration. Sometimes you might
want to bring in an image or a graphic
or I don't know, you want to bring in a
mockup and you want to do your own custom buttons
or maybe sections, and you want to
style that on Canva because it's just easier
to create it on Canva. You can't do all the design
things within Flow Desk. You can now use the Canva
integration to do that. Let's just as an example, we want to create
our own button. These buttons are just not how we want our
buttons to look like. You can go ahead and
add an image here. And then when you
click on the image, you can click on Add Image from, and then you're going
to choose Canva, and I'm going to add my design. If you're designing your
buttons for the first time, you can go ahead and create a new Canvas and just
as a reminder again, it's going to be a graphic that is 600 pixels horizontally, and then you can choose the
height of your graphic. Make it as tight as possible. So probably for a button like 100 height is
probably good enough. I did preme some buttons
here just as an example. Let's import this as an image. We're going to click on this one that I pre made recently. Here you go. I
basically made a design with a background
that's the same color as the rest of my
email backgrounds and then an image here with
whatever text I want. To make this an actual
interactive button, you can go ahead and click
on it and add a link. If they click on this
block right here, it will automatically
send them to the link. Here is the actual Canva
graphic that I made, just so you can see here, I basically just had
a background where I changed the color to
my email backgrounds, and then this graphic
here is actually a frame. I'm going to choose a frame here like any shape
that you want. I usually just go with a rectangle one
because that's easy, and then you can put
any image in here. If you have some brand textures that you want to pop in
here, you can do that. What I did for this one
is I actually just looked up a gene print, I just chose one of them. I think it's probably this
one here and I just pop this image into the frame and
then I added text on top. I just go wild with
the creativity here. It's so much fun to create your own custom buttons, I find. Another idea is to create
section dividers on Canva. Let's just say you want it instead of just a
plain line here, you wanted to create a
whole different section, title, and divider. I'm going to add
another image here. Again, I created something in advance so you can
take a look at. I'm going to go on Canva
and as an example, we can bring in this
image right here. Again, 600 pixel dimensions horizontally and then you choose how high
you need it to be. But this is an example of a graphic that I made that I can continue to use for
all of my newsletters. Maybe it's just a really
cute section divider, something that you can't
really create on flots itself, but definitely you can create
it on Canva and then just bring it over into your
sections on flots. The only tip is remember to
make the background color the same color as the rest of your email so that it matches. Another thing you can
create are images. Let's just say, instead
of this right here, you want to create
your own mockup. Let's go into Cava and let's
create that from scratch. Because this image won't
go from left to right, it will be a vertical image. We're going to change the
dimensions a little bit. So just any vertical
dimension is probably fine. It's going to be a default, um I think squares. So you can edit the size of this canvas and just go to
resize and custom size. I mean, this is just going to fit into that graphic dimension. So size itself doesn't
really matter too much. You just need to make
sure it's vertical. Okay, resize this design. Okay, so let's just
look up a background. So let's maybe put office desk. I do have Canva Pro, which makes things a lot
easier when you want to use their graphics. So I do recommend it. But you can do probably similar things with
the free version. And then we're going
to look up a mockup. There is actually an
app here for mockups. Mockups. All right. Let's look for a phone mockup. Smartphones. Let's just
choose this one right here and then oh,
that was weird. We're going to choose the image. I actually took this image, but we're going to
drag in another image. So let's just drag in let's just say this
image right here. You can also take a
screenshot of your phone, and then we're going to make
this the background as well. We're going to put
this to the back, position it to back, perfect. Then we have your phone, obviously you're probably
going to use a screenshot of your website or
whatever it is. Then once this is done, let's say this looks perfect, you can add some text here,
a bubble or whatever, and then you can return
to flow Des this will immediately import it
into flots. There you go. Immediately import it
into flots which is so convenient and that
looks really great. Yeah, I really, really love
this Canva integration. You can do so many fun
things with it and it makes designing your email much
faster and much easier, especially if you already
are a Canva user. One tip that I do
have with designing your different sections
for Flo Ds is I would always name
those Canva documents, something that's
easy to search for because when you are adding
the image through Canva, let's say you add design, um if it was an old design, you have to scroll
all the way to the bottom to find those images. If you just name it
something like flow Desk, then you'll see all
of those images pop up so that it's
easier to access. Name all of your
canvases that are for flow Desk with the
name flowdsk on it or another word where
it's easy to search for. In the next lesson, we are going to be
wrapping things up and look at the
analytics on flow Desk.
10. Email Analytics: All right, so at this point, it is also really important to start understanding the
analytics on Flo DS. So as you start sending
more and more emails, you're going to be able to look into the analytics overall, but also per email. So let's hop into Flo
DS and look at what the options are for analytics. So for each email, let's just say this
email right here. I can actually click into this button right
here to look at the analytics details
for this specific email. Right here, you can check out the open rate or how many people opened it and how many people clicked on it. For this particular email, I have an open rate of 36%. For most creative entrepreneurs, I would probably expect about a 30 to 40%
average open rate. Then for click rates, you can I have 1.8%
for this email, but you can probably on average
expect about 1.5% to 3%. If you're below that range, you might want to look
into that email and see what is not working. Maybe your list isn't engaged or that particular
email wasn't very engaging and see how you can change that
for the next time. You can even click into
here to see more details. For example, the link clicks. That one actually
is pretty helpful. You can see all of
the different links that are within that email and see which links people are actually clicking into
and how many times. For example, for
this particular one, most people were clicking
into this link right here, which is the main call to action on that email,
which is perfect. But if you're testing
something, for example, for this email, I listed out three or four different blog posts that people can check out. You can see which
blog posts people are more interested in reading
and clicking into, and then next time
you send an email, you have data to be like, Okay, these are the types
of things that people are really
looking into reading, and that's the type of information I can
share for next time. At the very bottom, you can
also see the unsubscribe, how many people unsubscribe
due to this email. As you get more and
more subscribers, this email went out to
almost 5,000 people. So of 5,000 people, 81 people unsubscribe, that
rate is actually not bad. I mean, I prefer people
not to unsubscribe, but as you get more subscribers, you're going to see this
unsubscription number go up. And my only tip here is to just embrace
unsubscribers and realize that it's perfectly
fine that people decide that this is not the information that
they want to receive. We constantly want to attract those that really
resonate with our message, and we want to then let go of those who don't anymore
and that's totally fine. This actually helps us
create a much healthier list so that it ensures the right people are actually
getting your emails. A lot of email
providers actually do price based on the size of your subscription
list as well. So we want to try our best to keep those who want
to listen and then embrace those who want to leave so that you can keep your
subscription list small, efficient and the right people who actually want to
listen to your message. The next thing that you
can look at is actually the details of your
workflow analytics. If you click into workflows, you can go into, let's just say this
workflow right here. You can actually click onto
the Analytics button as well and view the details
of your workflow. If you click into
details right here, you can actually
see the breakdown by email or part of the flow. So you can compare, okay, this click rate and open rate
on this particular email in the sequence actually was working better than
let's say this email. You can see where people
are dropping off, where people are not
interested anymore, not clicking through anymore, and maybe those are the
places where you can make those emails a little
bit more engaging and fix them so that
they have a better rate. The next section
where you can see your analytics is in the
analytics section right here. It breaks it down
by subscribers, emails forms, workflows, and checkouts, if
you have checkouts. You can definitely
scroll through them to see what kind of analytics
you want to check out. But the two sections that are actually my favorite
are within emails. Click into Analytics, and if
you click on emails here, you're going to see,
all of those totals, how many emails you sent out, deliverability and
subscriber, click rate, that kind of thing. My favorite section is
actually right here, Best days to send email. So if you look at AT, which is best for me
because I've been on maternity leave
and I haven't been sending emails during
my maternity leave. But in this section, you're going to get to see which days are the best
days to send your emails. The darker the color, the better rate it is. For example, these are
the total volumes of how many emails I sent on
those days and it looks like the best days to actually
send those emails with higher open rates
and click rates is Thursday and Saturdays. Um, so maybe moving forward, the best days for me
to actually email out is Thursdays and Saturdays. What I would do is if you're in the beginning part of your
journey of sending emails out, I would for the next 90 days, you can try out sending emails on different days
and different times. And test out after 90 days, come back and see which
days are actually working best for you to have the highest open rates
and click rates. You can also do it
by time of the day, test out sending out those emails on different
days and different times, whether it's the
morning, afternoon, evening or night for
me in particular, this makes sense that evenings work best for me because I'm in Eastern Time and a lot of my subscribers are
actually in North America. So when I send out the
emails at evening time, people are usually reading
it in the morning. So this is probably
the best time for me, but definitely test it
out yourself and after 90 days experiment
and see which days and times you actually get a bigger or better lick
rate and open rate. The Nick favorite section of
mine is the form section. Here you can see which forms
OptinFms are working best. You can scroll down here and they will actually list out which forms
are doing best, the first ones doing the best. For me, people are
definitely really into my free Notion
dashboard template. The next time I'm creating
a freebie opt in, then I might create
something notion related. To really put all of my eggs on what's working for
my business. All right. So those are my two favorite
sections and analytics. Definitely go through
all of the sections and see what kind of information
you're looking for. All right. And that is flow
desk Analytics for you.
11. Final thoughts: Congratulations on completing
this class with me. By now, you have created a foundational Em marketing
system for your business. This method will help invite
people into your ecosystem, helping you to continuously nurture and build
trust with them, giving you a super
niche community that's excited to learn and hear
about your offerings. Remember to share
your newsletter, design template with me and the Skillshare community
in the project section. Cannot wait to see your designs. And if you enjoyed this class, I would be so appreciative
for you to leave a review. There is so much to learn in the world
of email marketing, and this is just the beginning. So if you have any questions
or follow up or comments, let's continue that conversation
in the discussions. You can also connect
with me directly on Instagram at Made
on Sunday Studio. And if you're interested
in watching some of my free content for
creative entrepreneurs, you can find me on
YouTube at Mt on Sundays. Again, thank you so much for spending time with
me here today, and I will see you in
the next class. Bye.