Transcripts
1. Introduction: If you're building a business
or creative brand online, you've probably
considered video, especially YouTube
as a meaningful part of your content strategy. But for a lot of people, editing videos can feel
super complicated, expensive, and
completely out of reach. For the longest time, making YouTube videos meant learning professional editing
software with a steep learning curve, and it often felt completely unrealistic if you weren't
quote unquote a video editor. That's exactly what this
class is designed to change. Welcome to the Kanda Edit. In this class, I will
teach you how to edit video on Canva in a way
that feels structured, intentional, and
actually doable. We'll focus on building
a real workflow from planning your videos to
editing your base clips, adding your rolls, motion,
music, voiceovers, animations, texts,
and styling it in a way that feels very
much still on brand. And when it comes to AI, we'll be super
intentional I'll only show you the AI features that I genuinely feel will
save you time, work reliably, and
still support a highly thoughtful and
personalized visual aesthetic. Hello, hello. I am Cheryl. I'm a brand and
website designer, and you may have seen some of my YouTube videos over on
my channel made on Sundays. I've been creating
YouTube videos as the main marketing channel for my business for
almost six years now. So trust me when I
tell you that I know exactly how daunting and
challenge beginning can feel. But the good news is there is much easier ways to
get started now. With Canvas new video editor, it has never been easier to start editing videos.
And here's the thing. If you can design in Canva, you can absolutely
edit in Canva, too. By the end of this class, you will have a
finished YouTube video, a repeatable editing process, and creative momentum to keep editing video in a way that
feels sustainable and fun. If video has been sitting
at the back of your mind as something you know can really strengthen your
content strategy, you've been putting
it off because editing just felt too much. Well, I'm really
excited to show you in this class just how approachable and easy
it can really be. Let's get started.
2. Class Project: Let's talk about the
class project real quick. I'd love for you to create a YouTube style video using
Canvas new video editor. Whether you want
to film yourself talking to the camera or do a screen recording or whatever the content is,
it doesn't really matter. What I'm really
looking for is you practicing using
the editing process we talk about in this class. Project isn't about creating a viral video or
perfection of any sort. It's about building a process, taking actionable progress and just enjoying the creative
process of editing video. So quickly film some videos, maybe even some role clips, throw them into Canva's
new video editor, and follow the steps
in this class. By the end, you will have a finished polished
on brand video, and I would love to see it. So simply share the
YouTube video link if you have uploaded onto YouTube or even just
the Canvas Shareink into the project section. I'll be reviewing and providing feedback to every
single project. I cannot wait to see your work.
3. Plan your Video with Intention: Alright, before we even start filming or
editing anything, let's use this lesson to
plan out your video content. I think it's so
important to take even just a little bit of time to do a little
bit of planning before you create any type of content definitely
for YouTube videos. We don't have time
to waste to create something that doesn't align
with our business goals, our intentions or
most importantly, actually delivers the message that we're intending to deliver. Plus, it'll just make filming
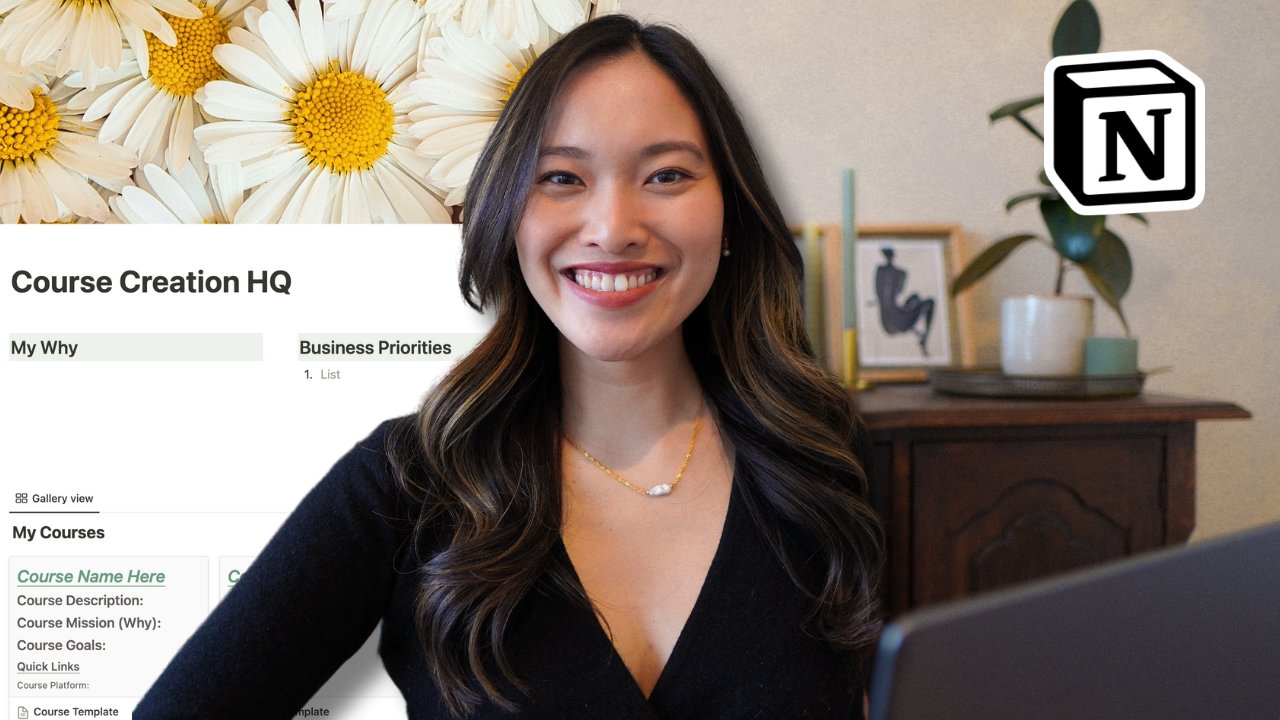
and editing so much faster. I personally like to do this on notion because I'm
a notion girlie. I actually created a
free notion template for you to use in your
workbook so you can download that in
the workbook as well. Um if you don't like
to use Notion or you already have somewhere else that you're
planning YouTube videos, then go ahead and use that as
well or in place of Notion. But in the notion template, this is what I'm going to
walk you through right now. So on the top
right, you're going to see the duplicate put in. So make sure to just click on that and duplicate this right into your own notion account. This is a whole hub, right? So it's not just to plan
the specific video, but it's actually to plan all of your YouTube content
moving forward. Um, so customizes as you like. Obviously, this is
just a template, so use it as you need. Typically, I like to kind of have different
sections for my hubs. You can add your channel link, type in who your main
target audience is, and maybe a couple
of primary goals that you have set
for your channel. Um, this is also where you would put your content pillars. I think it's so important
to kind of plan out what your main content
pillars on YouTube are. Some examples of content
pillars might be like, education, um, behind the
scenes and lifestyle. These are kind of
more broader content. Pillars, and then we have
your brand tone words, which I am a brand
designer, right? Make sure that everything
is still on brand, including your YouTube channel
and all the videos in it. For example, for my brand, it'll be words like calm, elegant, Sunday vibes,
that kind of thing. So write words that we'll explain the tone and visual aesthetic of your
channel and your brand. Then right here is
where you would plan each of your videos. This is a database. In the first view, you have
a list of pretty much all of the video ideas that you have that have not
been published yet. I have a filter
here that will say, videos that have
not been published. Then you can view these
in a calendar view or all of your videos in calendar
view in board view, as well as this is all of the videos that
have been published. Once they are published, it will go into this little
database right here. It's one database just
filtered in different ways. So you can go ahead
and add a new page, and that is like a new
video topic or video idea. For the examples that we are
going to show in this class, I'm going to make a video
about how to use Flow Desk, which is an email
marketing platform to create your Link in Bio. So this is an example of that we're going to
see in a little bit. But there's also a template for this video content
planning space. So if you click on a new page, you're going to click on
Open and you're going to see this new
scripts template. So you're just going
to click on it. And within here, I'm going
to show you in here, but you are going
to see your status, which you can select, which status it's at, whether it's published,
you're still writing it, whether you filmed it or not, and then you can write the month that this was filmed
or published. Your filming date,
published date, the YouTube link that you
get once you upload it, and then you can write
any tags that you need. Um, and then as you
toggle these out, these are all like, I guess, triangles that you
can toggle out. You can write down all
of your title ideas. This is the general
planning area. So you can write
down things like your main business goals for this video up space to
define your audience, any kind of brainstorming
you can put into here. And then what I like
to do is write down some keywords or tags
for each of your videos. So then you know these are
kind of words that you have to keep in mind when
you're filming or writing the description
for your video. Then the Nick section is
the most important section. It is your script. I like to typically split out
my script by introduction, body content, and
then conclusion. Then you can decide how detailed do you want
these scripts to be? For me, I like to
typically write down exactly what I'll
say for the introduction and the conclusion because those are more formal
talking heads and I really want to make
sure that I don't ramble um in these sections. Whereas in the body content, I typically is for my videos, it's usually a
tutorial of some sort. So I'm not going to
write down everything I'm going to say
in the tutorial, so I'm just going to
write down kind of key speaking points
or point forms of what I will need to show in the body content
or in the tutorial. If there are key highlights
that I must include, then I'll also write those down to make sure that I
don't forget about it. And then right here
is where you can also jot down all of your
B roll shots needed, and this essentially
becomes a checklist. Then in the next section, I typically like to
write let's say I am downloading a background music and it has credits that
I need to include, then I'll write those
all down there, or whatever you need, you can also add it into
this extra bonus section. Then at the end, I also like to upload my cover image here, then I have a record of
this video with this link has this cover image and you can direct that
image right into this space. And that's it. This is your official YouTube
content planner on Notion. Feel free again to tweak it, add things to it to fit
your planning style and what kind of notes
that you need to write for when you're planning your
YouTube videos. All right. For the purposes of this class, get in here, create a new page, plan out an example video that you're going to work
on in this class, and let's head into the NIC section where
we start filming.
4. How to Film a Screen Recording with Talking Bubble: Alright, now that you have
planned out your video, let's get to actually
filming your videos. So because this class is
more focused on editing and not on the filming
aspect of content creation, I'm not going to actually show you how to record yourself, whether it's on your phone
or on your camera like that. There are ton and ton of amazing classes on that that you can watch talking
about filming. But there is one
thing that I want to show you is how to record a screen recording because we can actually do that
right in Canva now. What we're going to show
exactly is how to record a screen recording with a little talking
bubble just like you see in this
video right here. I'm not currently using Canva to do my screen recording
for this class. I'm using another third party
app called screen Studios, but I also love to
use Loom to do this. But Canva came up with this
free option pretty recently, maybe the last year
or so and it's actually a great
free option to use. I will include the links of all the other screen
recorder screen studio and Loom in my workbook. If you want referral codes
to those or just check out those types of
screen recorders to do more professional shooting, then you can go check out
those in the workbook as well. But otherwise, on Canva, you can do something
similar for free. One note, though, if you are going to screen
record your desktop, the only way to do that
is with the desktop app. You do need to download the
free Canva desktop app, which I will also include
the link of in the workbook. And then once you have that, you can go ahead and go to
uploads and record yourself. This is where there are two options that
look really similar. There's record a talking head, and then there is screen
recorder for desktop. This is more so to
record a presentation, let's say you have
a Cava presentation and you want to talk
through the slides. This is the one you pick. But if you want to record your actual screen
and then of you talking about this is the one that you're
going to click on. Now, if you have a free account, you can still use this, but you can only record up to, I believe, 25 minutes. But if you have a pro account, you can record up to 2 hours, which is pretty amazing. All right. Now you're going to click on screen
recorder for desktop. I can actually choose
which camera to choose. Right here, you can
click on camera and we can choose right now it's
using my iPhone camera, but we can also use my FaceTime camera
that's on my computer. As you can see right here, the iPhone camera is so much better than
my MacBook camera, and this is actually a new hack that I discovered where you can use your iPhone and
pair it with your laptop, your MacBook in order to use
your iPhone as a webcam. It's a really amazing hack. All you need to
do is you do need the newer MacBooks and the newer iPhones in order to do that and make sure
your phone is updated. Then you can actually make
sure that they both have Bluetooth on and they're both on the same
Wi Fi connection. Then you're going to head
into your iPhone settings, go to general, then
airplay and continuity, and then you make
sure to click on handoff and continuity camera and make sure that's turned on. Then once that's turned on, it's all going to sync. And when you turn
on the camera here, you're going to see your
iPhone camera show up and you can just click on it and it will use your iPhone camera. Then if you want to
make your audio better, you can also plug in your mic. And then right now, I'm just going to
use my MacBook mic and I'm going to
click on that one. But if you want
better audio quality, you can also plug in your mic. And then when you're ready,
you can click on record. And then you can go ahead
and record what you want. You can move your
bubble around and then, you know, do your tutorial, and then you can pause
it if you need to pause. Once you're finished
with a recording, you can click on Finish. And this will actually
automatically generate a new video file with your
screen recording there. So you can kind of see this
video is now popping up here, and this video will automatically be in
your uploads as well. So you can actually go
back to this video here, and let's say you want to bring this screen
recording here, you can go to uploads, and it should show up there. If you ever see that
it's not showing up, you can go on
Command R and it'll actually refresh the file, and then you can
go back to uploads and then video, and there we go. So your video is right here. I'm going to put it right here and then we can
watch it from there. Go ahead and record
what you want. You can move your bubble around. Okay, there you go. That's how you'd create a screen
recording right in Canva. In the Nix lesson, we are
going to look at B rolls.
5. Build a B-roll Library: This lesson, let's talk
about creating B rolls and creating a B roll
library right within Canva. Now, first off,
what is a B roll? A B roll is any kind
of video footage that goes right on top
of your main footage. It could be a cutaway shot. It can be a screen recording. It could be a lifestyle shot, and it all goes right on top
of your main footage to kind of help you visualize what you're talking
about in the video. A super simple way
to not only make your video look more
interesting and nice. Also, it's a great way to keep your audience engaged in
what you're talking about, especially with such short
attention span these days. Now, in the beginning,
you will probably be planning out your B roll
shots video by video. But after creating some
videos for some time, like, after your
tenth or 15th video, you might start to realize
that you are needing the same type of Broll
shots over and over again, whether that be typing
on your computer, looking like you're filming, any kind of lifestyle
shot of you drinking coffee or making your
coffee in the morning. In this case, it's
actually very, very helpful to create a B roll library or collection of some
sort so that you can draw back on all of those B rolls that you
have already filmed and you can use them again and again in your videos
moving forward. It saves you so, so much time. And honestly, you can
reuse B roll shots, and people will
probably never notice. Are actually so many ways to creatively organize all
of your Broll shots. You can save it into
a hard drive or on your just folders
in your computer. But a really interesting way to actually create
your BRL library, especially if you are
planning to edit on Canva is to create
it right in Canva. Let's hop onto my laptop
now and let's see how to create your BRL
library right in Canva. In order to make your B
Roll library and Canva, we are going to head
to the Canva homepage. I'm specifically using
the Canva desktop app, but you can do this on the
browser as well. No problem. On the regular homepage, we are in projects right now. You can go ahead and
click the Plus button, which starts a new project
or whatever you'd like. For me, we're going to
start a new folder, and we're going to
click on this and you can name this folder, you role library, catalog, whatever you want to call
it, and go to Continue. That would actually open
up a new folder here. I've already created
one ahead of time, so it looks a little
bit like this. Within this folder, you
can create subfolders. Really think about how
you can categorize all of these different
B roles that you typically film for your videos. For me, specifically,
things that I typically might need B roles
for are product shots. Working, so like me typing
on a laptop or me filming, that kind of thing, or me
writing in the notebook, that would all go under working. And then we have travel. So if I'm doing any
traveling and I take some role shots of me
like walking across the street or packing my
backpack or something, that might go into travel. And then lifestyle is just like general lifestyle stuff
of me in Amsterdam, me with my son with my husband walking around
town, holding flowers, whatever it is,
those kind of B roll shots will go within the
lifestyle subfolder. When you have your video clips, you can then basically
drag those photos in. Let's say it's a product shot, you can go ahead and just add new and then you can
import files right here, and here you can dragon
all of your videos. I believe you can literally
just drag and drop into the folder as well and
that would work as well. Now, once you have your
video clip in here, you want to make sure
to rename all of your video clips in a way that's easy for
you to search for. For example, if it's a video
of me typing on my laptop, then I will probably
write typing on MacBook and then desk shot
or something like that. It's just easier for
me to be able to find all of the videos
that I might need. As a quick example,
I have a video here of me just
working at my desk, and I'm just going
to drag it in here. It's a video of me
actually speaking to my laptop as if I am on
a call with a client. Okay, so I'm going to
click on the three dots. I'm going to click on this and then just call
this client presentation, and then that will be easier for me to
find in the future. You can also click on the three dots here
and go to details. And right at the bottom here, you can actually add some tags. So if there are other
keywords that you think might help you find this
video in the future, then you can also type
those tags in, let's say, working or laptop or whatever that keyword might be that will help you search for
the video later on. That will come up when you type it in the search
bar at the top. Right, last but not least, you can go ahead and
start this folder. And whenever you are
working on a new project, you can find this folder
on the left hand bar, so then it's easy to
find in the future. That is how you create your
BRL collection in Canva. In the next lesson,
let's finally hop into the Canva video editor
and start editing.
6. Getting Started with Canva's Video Editor: Before we start editing, I wanted to use this
lesson to walk you through Cava's video editor and
give you a little bit of a tour so that you feel
familiar with the software. Now, if you've used Canva
for video editing before, you will probably know that it used to look very slide based. So you would open new pages, which are new slides, and then you would insert videos within each slide and
they would kind of play, one after the other to
create a long video. Instead of that, as
of October of 2025, Canva has now transitioned
into a timeline based editor, which is actually comparable to most video editing
softwares out there. Even all of the professional
ones are timeline based. This is a huge improvement compared to what it was before, making it feel very professional and
profound and actually capable of editing things like YouTube videos and
other long form videos. Now one note about whether you
need a pro account or not, the video editor itself
is a free feature, you can use it on
any free account. But just like any
other Canva design, if you want to use
any pro feature, including any of the AI features and any premium assets
that you want to export, you will then need to
either pay for those assets or you need to upgrade
to the pro account. Um, on the free account, you can only export, I think, about 30 minutes of
footage as well, and only at ten ADP. So if any of those things are important for you in
your video editing process, then I would highly recommend considering upgrading
to their pro account. Alright. With that being said, let's head on to Canva Now and create a new video project. Now, I am using the
Canva desktop app for this whole class because if you are considering doing
a screen recording, let's say, you can
only do that with their desktop app and not
with their browser version. But for just video editing, you can definitely do this
on a regular Canva browser. First off, we're
going to go to Create here and we can head to videos. Right here is where you can
pick your landscape video. If you're creating
an Instagram story or other types of videos, you can go ahead and click
on those dimensions, but we are going to be focusing on creating YouTube video. Once you press on that, you're going to create
a new video project. And right here, let's talk about the left
hand navigation first. So if you've used Canva before, you can totally just
skip through this. It's pretty obvious
where everything is. You can find video templates
that can be super helpful, all of the elements like
photos and mockups and Audio, pretty much everything
you want to add on top of your main video, you can find it here,
text, your branding, all of your brand colors
are still available for you to use in your videos, your uploads and other tools
as well as your projects. Any folder that you have
starred in the past will show up here at the end
of your navigation as well. For example, that BRL collection
that we created earlier, that will be available right at the very bottom because
we have started together. It just makes the process easier when you are finally
within your project file. All right, so right here
is where you're going to be able to view your actual
video that you're editing. And right down here is
your video timeline. This is where you're
going to be dragging in all of your files to edit. Let's just give you an example. So if you go to your uploads, here is where you can start uploading some
of your video files. You can definitely just drag and drop your
video files in here. Otherwise, I think it is also better if you can
literally just create a folder. If you go all the
way to folders, I would typically
create a folder for every project that
I'm creating and then put all of those video files within that folder just because
it's then all organized and it's just easier to find
everything in case something gets lost because if you upload it into the
video upload section, it's just all going to
one big upload folder. So, it's just easier. Best practices is to open a folder. You
can create a folder. For this class, I
have created a folder with all of the footage that
we're going to be using. The first thing that
you want to drag into your timeline is
your main video. For me, I believe this
one is the intro. Let's just watch
it really quickly. Today, I'm going to show
you how to use the flip. That is my first video. Let's go to our B Roll folder, and let's say I want to drag this B roll on top of
this section right here. You can go ahead
and literally drag and drop this video
where you want it to go and you can see that it's created another
layer on top of it. You can see this video is
layered on top and if you want, you can just make sure it covers the whole screen.
You can keep doing that. I don't know if there's
an actual limit on how many layers you can
have? I don't think there is. But for anything
that you're adding, let's say, a little graphic, you can just keep
putting it onto another layer as long as it needs to go on top
of the bottom layer. All right, so that is how you layer in different footages. And if you want to add audio, you do the same thing, but audio will always
go under video. So if you go to uploads, or I can just go
right into audio, and let's say we
want to add this into our background music, you can just go ahead
and drag it in, and it will go kind of as a bottom layer
under your video. If you ever want to zoom in, just to make it closer, you can see your
footage a little bit better by zooming in there, or you can zoom into
your timeline as well. You can also I actually use my trackpad to edit
because I've got used to using my trackpad and
you can go ahead and just zoom in and out as
well with your trackpad. The top here, as you add
in different elements, you're also going to
see another navigation here where you can
edit your footage, but we'll go through that in more detail as we start
editing the video. As always, if you want
to preview your work, you can go ahead and click on preview there or you
can click on Share, and this is where
you would download your video when you have
completed your video. Now, one note that I
did want to make about uploads when you're uploading videos and any kind of assets, there is actually a maximum size of what your video can be. So I would actually
recommend filming your video footage in ten
ADP instead of in four K, especially when I
film with my camera, like my full on camera, in four K footage, it makes files
extremely big and it actually will not
upload into Canva. So if you have decided to use Canva as your
main video editor, it's actually better
to just film in ten ADP because it
actually edits in ten ADP. And while you can export in
four K on a Pro account, it's just you edit in ten ADP and they kind of
just expand it into a four K footage side. So it's not necessarily
clearer footage. It's just a bigger file. So if you are deciding
to edit in Canva, it's better to just
keep everything in ten ADP, by the way, if you are uploading
this to YouTube, I think it's pretty
common to upload ten ADP dimensions
on YouTube anyways. So it's not really
a big deal that you can't do it in
four K. All right, so that is it with this lesson. Go ahead and create a folder, upload all of your footage that you need for this
project that you're creating. Then in the next lesson, we're going to start
actually editing this video.
7. Editing Your Base Video Structure: All right, now that
you have all of your video footage dragged
into your timeline in order, let's start editing the base
structure of your video. No music, no graphics, any kind of add
ons to your video. Let's just focus on making
sure all of the visuals are correct and cut down
in your core video. Okay, first things
first, so one thing that I do like to do
before I start cutting down my footage is to correct the audio on your main footage. So what I mean is sometimes your footage
have different audio. Maybe one footage, you
filmed it with one mic, one video is filmed with
a mic on your laptop. Um, so then the
audio levels might be a little bit
different on each one. We want to make sure that
people don't have to adjust their audio just to
watch your one video. So we need to balance
it out so that all of the footage kind of sounds
at a similar volume. So how you can do
that on Canvas is actually click on any of your video footage and
click on this volume bar. And they actually have a
button here called Balance A. Now, I feel like this might be a pro feature because
it is an AI thing. So if this doesn't work for you, then you can also adjust
your footage manually and just go ahead. Edit the volume. Typically, I like to have my
audio on my computer when I'm editing to be at
about the 70% range. And if it sounds to me like it's loud enough
at the 70% range, then for me, it's
the correct volume. So right now, my audio is
at about that 70% range. You can use this balance all, so we're going
to click on that, and we can just listen
to it right now to make sure everything
sounds good. Okay. Let's be honest here. Is your Instagram so that
should have adjusted. A lot of the volumes. If any of the footage
still sounds a bit too not loud enough, then you can also just go ahead
and adjust that manually. All right, so we have
your volume balanced. One other AI feature that
Canva has before we move forward with cutting
your footage is you can enhance voice, especially if there is a lot of background noise in
one of your footage. You can go ahead
and just click on this enhance voice button
and it's supposed to make your voice be more clear and put all of the background
noise a little bit softer. Typically, I do
record with a mic on, and this actually helps
a lot with all of the external noise because this mic is pointed
very close to my mouth, and so that does help a lot. But let's say if I had my son at the background crying
a lot or he's playing, you can go ahead and try to use this AI feature to enhance
the voice clarity. You can't really edit it, not like you can make it
more clear or less clear. So it's really just
liking on it and just your best that it did
something for your audios. The reason why I like to
do all of these audio fixing things first is because once you start
cutting up your footage, especially if you
make a lot of cuts, you don't have to fix
this audio clip by clip. You're just doing it
footage by footage. So then even if you
cut it up later, you don't have to fix the
audio again and again. So let's get to
editing your footage. A couple of shortcuts
that will help you with this process.
I'm using a Mac. So if you're using
something different, then these shortcuts might
be slightly different, but I'm sure you can look it
up on the Canva help pages. You can grab onto this
little timeline bar. You can see this
arrow right here. You can drag your
cursor to where you need to edit
in this footage. If you press on here play or the space bar
on your computer, it will start playing the video. So that will like,
whenever I'm editing, I want to press the
space bar because it's just faster than
going here to click here. You can also use
your arrow keys. So if you want to go back a few milliseconds or
forward a few milliseconds, then you can go ahead
and use your arrow keys, left and right to do that. Sometimes it helps also
to zoom in and out. So if you wanted to just
zoom into your footage to really get to the micro
milliseconds of editing, then that is also helpful. Um, just like you do anything on Canva, if you make a mistake, let's say you split or cut your footage somehow and that's not what
you wanted to do, you can just go to Command Z, and that will backspace it. I'll remove whatever
action you perform. If you are, let's say, scrolling right here, let's
just play this footage. Okay. You see there was a split second before
I started talking. I want to cut out
that split second. If you go to the footage
and you press S, it will actually
split the footage up. This is the footage
that I want to cut out. Let's do that and see
if it looks okay. Okay. Okay, perfect. Most of the time,
you're going to have some pauses at the beginning of your footage and
then maybe some ums and s that you might
want to cut out. Or for example,
when I'm filming, if I say something incorrect, I'll actually go back
to the same, like, hand motion and re
film those parts. So you're going to
have to, like, cut out all the extra footage that
you film that's incorrect. So what I would do is I would just watch through
the whole footage and kind of try to edit all
those parts out quickly. So let's do that really quickly
for this first footage, and then I'm going
to do the rest of them in my own time. Okay. Let's be honest here. Is
your Intround Lincoln bio? Just a generic page
with a list of links? Maybe you go on Linktree,
maybe somewhere else, but if so, you might
be missing your up. So right here is
where I messed up. So I'm going to probably say it a few times
before I get it right. So I'm going to cut that part right before
I made the mistake. And create a branded
experience for your audience. Okay, so that's where
I corrected myself. Oh, but it's so. Okay, so I corrected myself at but it's so. So I'm
going to cut that out. Maybe somewhere else. Right here is where I
start saying, but if so, so I'm going to split that
footage and then I'm going to go to the opportunities
to grow your so. Right here. I'm going to
split that and I'm going to delete that footage and hopefully I've cut it
at the right spot. I'm going to if you
want to delete, you just click on the
footage and click on Delete. I just realize I went
through that really quickly. Let's watch this back and see if I cut it
at the right spot. Entree, maybe somewhere else, but if so, you're
probably missing out. Perfect. So right here
is where I pause and I look away because I'm
probably reading my script. I'm definitely going to
cut that part out too. Experience for your audience. Right before my eye starts
looking somewhere else, which is probably my script, that's where I'm going
to split the footage. This is all a repeat, so
I'm going to delete that. That is how you would go
through your footage, cut out all the
ums the beginning, where I don't talk
or the split seconds where I look away
from my camera. Um, you want to make
sure that you do that for all of your footage and using those shortcuts
I told you about will actually make this
process a lot faster. As you edit over time, this process will be
a lot faster and also you'll have more practice
filming and you'll know exactly where
you made mistakes and you'll remember when you're editing so they can go
back to it and delete. So once you have split up and edited all of
your main footage, this is a time where you can
add in your B roll clips. So if you did a screen recording and that needs to be
shown as a B roll clip, then you can add
those in right now. Actually, I did want to show you really quickly how
you might do that. This footage right here
is talking about, like, showcasing an example of this
flow Desk Lincoln Tree bio. So what your list of links. Here's a little example. Okay, so I'm just going to
here's a split that up. Here's a little example of what your Lincoln Bio could look like and what we'll
be building on today. Okay. So right there is
actually where I want to put in a screen recording
of the Lincoln Bio example, and previously, I already filmed that with
the Canvas screen recorder. So it's in my uploads
already right here. So I'm going to bring that
in and drag that right on top of where I talk about it. Here's a When I say
here's a little example, I want this video to appear. Here's a little exam. This example right here, I'm going to cut this to the screenshot that
I want and I'm going to put it here and you
can actually adjust it. If this was a full
page screenshot, obviously, you can full page it. But for me, it's just
a little screenshot that I still want my face in it. So we can do that. Let's just watch this and then A here. Here's a little example of this screenshot
actually does scroll. So I do want to cut out the part where it's not
scrolling right there. So I'm going to just cut
that out from the beginning. I'm going to play of what your Lincoln Bio could look like and what we'll
be building on today. And I want this to
end right there. And so there we go. Example of what your Lincn Bio look like and what we'll
be building on today. Alright, so make sure to add in all of your B rolls on top, and you can also cut and
split those up as well. If your video is for YouTube, you'll also want to add in an screen photo at the
end of your video. If you watch any YouTube videos, you'll probably see at
the very end there's like this background video
with like, some links. To do that, you can just go
ahead and upload your photo. So for me, I'm
going to I usually use this image right here, I like to pick a photo where there's a lot
of space where I can add those links
and it's not going to cover my face per se. I'm going to use
this photo right here and you just want to adjust this photo timing to
no more than 20 seconds. Anywhere 15-20 seconds is fine. At this point, you can also add transitions
between your clips. For example, if you want
to go from this footage to my screen recording footage and you want to add
a transition there, you can go ahead and your cursor right here and you'll see this little add transition button, and then there are all
different types of transitions you can
experiment with. The most common one is probably just your
typical dissolve, which goes like this, does a fade in, fade out effect. I personally like to keep all of my video footage very
clean with no transitions, just like clear cut from
one footage to the next. Um, for some certain
visual effects, you might want to add
something fun or quirky. But personally, I think
it's just more clean to just have a clean cut from
one shot to the next. So do consider what your brand visuals are before
you add transitions in. Alright, so once you have
all of your cuts made, you want to make sure
that you are previewing it from the beginning, all the way to the end in preview mode and see if
everything looks good. I do want to note that I
have noticed sometimes in preview mode or even when you're watching
on the timeline, sometimes it can look a little
bit glitchy in some spots. Luckily, when you export it, if you have edit it correctly, when you export Everything typically seems to look
fine once you export. So if you're having
issues with the preview, first thing I would do
is go to Command R, which actually
refreshes this page and then rewatch it again and see if it still looks glitchy. If it still looks glitchy, but you know that you've done nothing wrong and
the edit is clean, go ahead and export it and
just watch it through, and most likely it looks
fine in the final export. All right, now
that you have your base cut in the next lesson, we are going to make your video look a bit more
aesthetic, more on brand.
8. Create Your On-Brand Video Aesthetic: This video, let's talk
about how to adjust your video footage so that it looks a little
bit more on brand, more aesthetic, through
color and slight adjustments to the visual look
of your videos. Now, we're not looking
to dramatically change or restyle your video
and how it looks, but let's see how we can add these little subtle upgrades. Keep in mind, this version of the Canva video
editor is very new. It's only been out for five
months since filming this. I'm sure there are going to be way more adjustment
possibilities and ways to make your video
footage look nicer later. I will make an effort to kind of update this video as
those updates come out. But for right now, let's
see what we can do already. Now, typically on more
robust video editors, you're able to
actually color grade. So if you look at
the footage here, maybe sometimes, I mean, this looks not bad, to be honest, the skin color. But if you want to kind
of adjust the skin color, and how it reflects off of
the background and stuff. You can use color grading on other more robust video
editors to adjust that, but we can't really do
that or pin out like a specific spot and
kind of just edit that. You kind of there are
very limited ways to do that on Canva right now. So one way you can edit the color of your
video is to go to edit and we are going to
scroll all the way down to filters here and we're
going to click on S More. Now, there are a lot of filters like if you were editing this video on
Instagram or something, you're probably used
to seeing filters. You just click on it and basically adjust the
intensity of the filter. One filter that I like to
personally use out of all of these is probably Sandy because it is,
as you can see here, we're not going to do it
at 100 intensity, but um, you can see that there are
these warmer red tones and yellow tones
that are applied to the video footage,
which I really like. It makes the video not
too yellow or too red. So I would like to lower the intensity all the way
down to about the ties, 20s to 30s depending
on the footage. But you can test it out,
play around and see, at which point it
looks too much, but I like to keep it at around the 25 range for
this specific video. You can see the before and after by looking at
the new footage. You can see it's so much warmer. I look a little bit more
tanned and in general, the footage just seems warmer, whereas this one looks a
little bit more sterile, I guess, in that space. Yeah, I'm going to
show you. This is the before and then this is
the after a lot more warm. And I actually really think that enhances the video a lot. One other thing you can
do is to go to adjust. Let's just say this footage
wasn't bright enough, then I can also make
those slight adjustments here by increasing the
brightness of the video. I think it looks
fine for this video, so I'm not going to adjust
it for this footage, and there's all the other
things that you can tweak. You can use this to adjust
the footage manually. One thing to keep in mind
when you are picking these filters is really
think about the vibe. Of your video and your brand. So if you're creating this video for your business or your brand, really go back to the brand
strategy that you've done or if you've done any branding
work for your business, then you really want to revisit
those and see what kind of video editing style would fit the branding
of your business. So for my business, it's
called Made on Sundays. It's all about
having a cozy warm, aesthetic, just very, like,
welcoming warm vibes. So that's why I
particularly like this filter because it makes the footage a little
bit more dreamy, a little bit more
warm and welcoming. So yeah, think about, you know, all of those things
when you are picking your filters and editing
your video footage. All right, once you've made
that edit on one footage, then you want to go ahead and do that for all of your footage. Go to Edit again, go to filter, and then pick your filter and
instead of using the thing, you can just type it in
it's probably faster. Now remember, small
adjustments can go a long way. We don't want to go crazy on
all of these adjustments. We want to make sure that
everything still looks natural and clean and just
visually polished. In the next lesson, we are
going to record a voiceover.
9. Record a Voiceover: This lesson, let's
talk about voiceovers. Did you know you can
actually film or record your voice
overs right in Canva. Let's see how to do that. Let's say I wanted to talk over this little photo
that I have right here. To do that, I can actually
move this playhead, this arrow right here to where you want the
voice over to begin. Let's say it should go right
where this video begins. I'm going to go to audio. Here. Then here's where you
can record a voiceover. You can click on
record VoiceOver, and you can actually choose
which microphone to use. To make a voiceover
even more clear, you can use an external mic. But because I'm using the
external mic right now to film this video I'm in right now, I'm not
going to do that, so I'm going to use
just my built in MacBook microphone and then just click on record
and start recording. It's going to count down,
let's do that. Say hello. This is my Canva
voice over recording. Let's see how it sounds. You can pause it, and
when you're done, you can also just click on
Finish, or you can resume. All right. Let's hear
that really quick. Said, hello, this is my
Canva voiceover recording. Let's see how it sounds. Okay, so it sounds
pretty good, honestly. What I would just
suggest is make sure to delete what's unnecessary. So if I made any mistakes, you might want to
cut that up just like you did with the video. Let's say there was a pause
here or something like that. You can also go to split and you can do the same thing
as you would with video. But I think this
recording was fine, so I'm going to code command Z, and I'm just going to
delete the beginning ish. Because I didn't start at
the beginning of the video, I'm going to move this over and match it with the beginning
of the video. Hello. This is my Cava
voiceover recording. I don't know why that say hello, but anyways, that is how
you record a voiceover. In the next lesson, let's
add in your background.
10. Add Background Music and Sound Effects: This lesson, let's talk
about background music. But in order to
talk about music, we do need to understand
music licensing first, especially if we are planning
to use it for YouTube. It's very important that you review all of your music
licenses that you plan to upload onto YouTube because if it gets flecked
for whatever reason, you're not allowed
to use that music. Your video can get demonetized
or taken off completely. So just be sure that you are
reading and understanding the licenses that you're using before you upload
anything onto YouTube. Now, for Canvas specifically, there are so many music as well as sound effects that are already available
on the app. So if you go down to
audio right here, you'll see there's popular music and different
categories of music. They have both free
and pro music. So if you have a free account, you'll only be able to use the ones that don't
have a crown on. And then anything
that has a crown, you can only use it if
you have a pro account. Anything in this
popular music category, these are actual songs that you cannot use anywhere, really. As on YouTube, you cannot use popular music because you don't have a license
to use that. But for all other music, if it is a free song, then from what I understand, you can use it commercially anywhere for whatever
purpose you like, because they are
typically copyright free. Or any of your pro music, if you're not sure
whether you can use it for commercial
purposes on YouTube, you can click on the
three dots here, and typically it would
say commercial use aloud. And if this is there, then typically, yes, you
can use it for YouTube. So you can go ahead and drag
those into your timeline. One note, I am not
licensing expert here. This is just from what I
understand from reading this. You can also click into
this and it'll also show you more information about where you can and cannot use it. Licensing information
changes all the time and Canva actually has it
written out very well, be sure to just Google it. Google Canva music license, and they have a page
that talks about all of the latest information about how you can use their
music licenses. All right, so that's
music licensing. Let's look at the categories and how to find actual music. Now, just like with finding a filter that makes
your video looks nice, you also want to
do that when you are selecting your
audio and your music. What kind of vibe is your
video? Is it calming? Is it bold? Is it quirky? Is it sad? Like, really think about what kind of emotion
you're trying to create in your video and pick music based on that feeling that
you're trying to create. Again, with my
videos, typically, I pick instrumental
music, first of all, because I'm speaking, so I don't want any vocals in the music. I typically like to pick
classical, maybe piano. Sometimes I like to use Bossa
Nova if I'm doing a vlog. Very chill, relaxed, kind
of Sunday brunch vibes. So I will look at all of
these categories and see what kind of video categories might fit into what
I need to use. To be honest, I don't use Canva music because I have
already paid for epidemic, which is my preferred
website to get commercial free music choices because it's just a
lot more choices, and I'm absolutely sure about the license because
I pay for it. I can use any song
that's on epidemic. I will include a link, a referral link on the
workbook to epidemic, which is where I get my music. So if you're interested
in looking for music outside of Canva, you can also do that
and then upload those songs into
Canva to use as well. So once you find your song, one way to make it easier to look for audio
is to use filters. So if you know that you want only instrumentals and
a free or pro song, then you can also
filter it that way. Or also have incredible
sound effects. So if you want certain
sound effects, like a pop sound or something. So let's look for some music. I'm going to look
for instrumental. I'm going to use pro music
because I have a pro accounts. And then I am going to look up piano and let's
listen to this one. I definitely like something
that's a bit more relaxing and I think this
one sounds pretty good. I like this one so far. Let's just test it out
and see if we like it. I'm going to scroll to
the beginning of my video and I'm going to drag
it into my timeline. Typically, I like to add
audio to the beginning of my video and then it phases
out when the tutorial starts. Let's listen to it right now and see how it sounds
with my video clip. Let's be honest here, is your
Instagram Lincoln Bog Okay, the song clearly sounds nice, but it's too loud, right? You want to make sure
that you are reducing the volume so then you can
hear your actual main footage. So I'm going to
go to volume here and I'm going to
decrease this volume lower and then we'll
decrease it into a spot where I can
hear my voice clearly. Okay. Is your
Instagram Link and Bio just a generic page
with a list of links? Okay, I think this sounds good. I do think it's still
a little bit loud, so we're going to
reduce it even more. You kind of want that
sweet spot where you don't really notice that
the background music is there until it stops. So let's listen to it again. Tree may be somewhere
else, but if so, you're probably
missing out on one of your biggest opportunities
to grow your em Okay, I think that sounds really good. One thing you can do to
create an effect for audio. I like to fade the music out as I'm transitioning
into my tutorial. So first, I'm going to cut this to where you want
the audio to end. I'm just going to listen
to this really quick. And what we'll be
building on today. Okay, first off, you
will obviously need. So I want this to fade out, and how you can do
that is you can actually click on this
fade button right here, and then we're going
to go to fade Out. We're going to do
maybe 2.5 seconds, just play with that for now
and see how that sounds. The Lincoln Bio can look like and what we'll be
building on today. Okay, first off, you
will obviously you can hear that music dim
down automatically. You can also see that
visually by seeing that line right
there where there's the darker purple and
the lighter purple. So yeah, that's a really,
really cool feature. If you want it to
fade even more, you can just increase the fade time and that
you'll see it starts cutting out where this video
ends, which is perfect. All right, so you can
do the same thing with sound effects. So let's just look for a quick sound effect and then we're going to
look maybe just like a pop. For example, when this shows up, maybe I want a little
pop sound that goes right when this appears. Okay. Let's see.
That sounds good. We're going to bring this
in and I'm going to put it in a new audio layer right here. Let's see how that sounds. This pop effect does need
to coordinate with this. I'm going to make sure
that it is aligned to this sample of Okay, drag this back down,
see how that looks. Here's a little example of Okay, so there is a bit of a delay, so I'm just going to
move this over a bit. Making sure that
this audio line, you can see this audio line
here matches with this. It's a little
example of Perfect. So when that kind
of sound comes up, that's when this
pops up as well. Little example of There we go. That's really cool. Alright, so that is your background
music and sound effects. In the next lesson, let's look at animated text and graphics.
11. Add Animated Text and Graphics: In this lesson, let's add
some motion, some animation, or even just static graphics
and text onto your video. So everything that
you can typically do on your regular
Canva designs, you can actually
do the same thing on your video editor,
which is amazing. If you are already familiar with creating designs on Canva, then this is going to be super easy and intuitive for you. Let's start with text. You can head into text
right here and typically, I would like to usually
use my own brand fonts. But you can also scroll
down here and see all different types of that's
available to use for free. Let's zoom in a bit so
we can see this a bit better and then we're going
to make this text bicker. Let's call this
Plots Link in bio. And I'm going to put this
text right here at the top. But as you can see, you can
still read it decently. But for text and video, I like to make the text
really, really easy to read. So you can go into
effects and all of the different effects that you are previously able to put, you can add it on to
these videos as well. The ones that I like to
use usually are lift. Like a really subtle shadow behind the text so then you
can see the text bigger. But in this case, I
think I'm going to use background and let's
choose a background color, probably just one
of my brand fonts, and then I'm going to change the color of my font
as well to white. Now it's a lot easier to
read and I think I want to make it a little bit
more round. There we go. That's how you would add text. Make sure that when
you are adding layers, whether it is text or graphics to adjust how long this
graphic will show up for. For me, because it
should only show up until when this
screenshot ends, this is where the
screenshot ends here. I'm going to actually zoom in here so I can
see a little bit better and then drag this out until it matches with
this graphic right here and same with
this right here so that it appears the same time. All right, it is the same if
you want to add an element, so you can head into
elements here or upload your own elements and add
graphics that way as well. Let's just go into
graphics and maybe I'll choose an accent of
some sort. Let's see. This little flower looking
thing looks really cute. I'm going to zoom in here and I'm going to add
this right here uptp. I'm going to make sure
to go into position. Layers, and I'm going to
drag this flower icon up so that it appears right
on top of my text right here. I'm going to change the
color of this so it's a little bit easier
to see as well. This is the color
and I'm going to do maybe a bright white
color like this. Again, I'm going to adjust how long this graphic
shows up and it should show up right when this comes out right here.
Then you know what? Maybe we'll add a little
background to this right here. I'm just going to type in Plaid. I'm just going to choose first one right here
and I'm going to put this graphic right
behind my screenshot. Super cute and maybe we'll just round out
the corners as well. Just little tweaks to
make things look cuter. Now that this is done, we can actually animate
these graphics too. If you want to make
this flower animate, you can click on
animate right here, and a few my favorite one of my favorite is
this little wiggle thing. Maybe we'll choose that, but it's wiggling very
aggressively right now, so I'm going to make
the intensity a little lower and it should just bobble a little
bit, like that. Okay. One thing to
note is let's say these graphics go together and you want it to
animate at the same time. Let's say it shows
up at the same time, then you have to actually
group these together, so you can kind of
click on both of them, and then we're going to
go and click on group. And when you animate
these as a group, they will then do the
animation together. So I'm just going to make
these pop out like this, and I'm going to do a faster, maybe that one. Let's
watch it again. Example. Now coordinates with the sound effect that we
added in in the last lesson, and I think that
looks really good. That is how you add graphics, texts, and add animation
to all of these things. I think it's really,
really fun to experiment and be
creative with adding and using Canvas database
of graphics and beautiful fonts to layer in all of these different aspects and then create some animation. All right? That's it.
In the next lesson, let's look at some advanced
layering technique.
12. Advanced Layering Technique: In this lesson, let's look at some more advanced
layering techniques. I think just by using the
layering feature on Canva, there's so many
creative things that you can do to just make something visually look
more special or unique. There is one thing
that I do like to do that I have
seen a lot as well on other YouTube videos is to layer text in between
you and the background. Imagine if there was some text right here right behind me, but in front of the background. So let's try to do
that right here. Right, where these two
clips are right now, I'm going to position this
text to show in front of it. I'm just going to
actually create duplicates of these
footages right here. I'm going to click on this little three dots
right here and I'm going to duplicate it and it's actually
going to automatically duplicate it into right
after this footage. I'm going to drag
this actually to match so that it's right
on top of each other. I'm going to do the
same right here, go to duplicate, and then I'm going to drag
this right here. In fact, because I
want the text to be in this middle
layer right here, I'm actually going to move
it up one more layer, and then the text will go here. So now that I have two layers, I am going to actually
grab this video right now, and I'm going to remove the sound on this top layer
because if I don't do that, there'll be two videos with the same audio at the same
time, and we don't want that. Then next, we're going to use
background remover feature, which is a pro feature
because it's using AI. And so you won't be able to do the specific technique
with the free account, but if you have a pro account, then this will work for you. So I'm going to remove
the background. I am just going to drag my playhead to where
I want the text to start. I'm going to click on the text and I'm going to just drag this into the
middle layer right here. Then let's just
make this bicker. You can already see
that the text is now overlaying behind this
person right here. I'm going to drag
that back in later. I'm just going to say flow desk and then let's change
out the color. To white, and then maybe we'll make this even
bigger, really, really big. Perfect. And then
this layer will now go in between
these two layers, and I'm going to drag this to where it ends,
which is right here. There we go. Let's just watch
this really quickly. Today, I'm going to
show you how to use the flow desk Link
and Bio feature to not only design a page that
feels like your brand, it's also going to help you
turn your followers Okay, you see how there was a bit
of a glitch kind of looking thing when it switched to
this clip to this clip. Now, I do want to note
that sometimes when you're doing more advanced layering
like this on Canva, I have noticed that
in the preview mode, it does glitch a bit. Typically, what I've experienced
is once you export it, this issue kind of goes away. So it's really just the
preview that does that. So hopefully, if all goes well, you can export it, and then
it won't show that little, kind of, like,
glitch right there. Um, but again, Canva, again, this program has only
been out for five months. So I assume that things are going to be a little
bit smoother down the road. They'll see these issues and
bugs and people report them. And eventually, these
bugs will go away. I mean, it seems like it
would be a really quick fix. From my experience so far, using it a couple of times now, every time I exported it, those glitches did go away, and it was just solely in the preview that was
showing these glitches. I think these advanced
laying techniques can create so much creativity in your videos just to give it a little bit of some
visual interest and keep people engaged. Definitely use this
idea to add it into different places
in your video and see how you can bring
your video to life. In the next lesson,
let's look at all of the AI video and image
generation options on Canva.
13. Using AI Image and Video Generation Thoughtfully: AI is everywhere right
now, and I get it. We want to use AI in a way that will
help us work quicker, more efficiently,
more productively, and ideally, even
more creatively. But I do want to preface before
we start this lesson that the AI image and
video generation on Canva is still at its
very early stages right now. I hope to see a lot more
improvement over time, and the creativity options
are less right now. But the quality of the image
and video generation right now is still at its
amateur state right now. Personally, I wouldn't use
AI generated images as a realistic background or to replace full
video scenes on os. For my design and brand style, it just doesn't match. I prefer more realistic, more human looking, more clean, something that just
doesn't distract from the main message
of the video, which is usually me or what I
am displaying on my screen. But with that said, AI
generated images and videos can be really useful when used intentionally
and thoughtfully. In fact, I think
the best way to use Canva image and video
generation is to use it to show visual representations of what
you're explaining. This can be a little image that pops up on your screen
to kind of showcase, like, Okay, this is
what I'm talking about, or it can be even
Like a B roll shop. Why don't we start with
testing out a B role? I am going to head
into magic media here. And what you can do here is you can create AI generated images, graphics, videos, or
three D graphics. Let's start with videos. There is already a note
down here that says, This is experimental
new technology. Scenes with people and animals
may not look quite right, and I agree with it, but let's test it anyways, just to see what
it comes up with. Now, for writing
prompts in Canva, I actually like to ask my
friend ChachiPT to write it for me because who understands how AI reads the
AI itself, right? For this specific prom, I wrote to Chachi
BT can you help me write a prompt for
Canva Video generation? I would like a B
roll style video of a female entrepreneur
typing on her computer. It would look clean,
minimalistic, and realistic, no face, no text, and no brand. After typing that,
ChaGPT actually came up with this right here, a realistic Bole video, female entrepreneur typing on a laptop, blah, blah blah blah. I think you get the point.
Then I'm going to click on Generate video and
let's see what happens. Alright, looks like
Canva is done. So let's just watch this really quickly and
see how it looks. I'm going to drag
this right into here, and then let's see how it looks. Any of your biggest
opportunities to grow your email list. Okay, so it's actually it doesn't look too
bad of a video. You know, what you
can do, though, is you can go to
Edit and you can select the same filter that
we did for my other videos. So that might help to make those look a little
bit more aligned. So we're going to pick Sandy, and we're going to
dreg this all the way down to 25 again. To kind of match my other scenes and see how that looks now. Or else. But if so, you're probably missing out on one of your biggest videos. Actually, I'd say
that is not bad. It's still very obvious
that it's AI generated, so it doesn't look like
something that I films, but I would say for AI, not bad. So that is a video generation. Let's look at image
generation really quickly. Let's just pretend that you
are an interior designer. And in your video,
you're talking about different interior
design styles. And you want to
visually represent those different styles
as you talk about it. Let's just say those
three design styles are modern vintage and bold. I literally told ha Chipt
what I just told you. I'm an interior designer, and I want to visually represent these
three design styles. So I did create a prompt for
each of these design styles. This is the one for modern, so I'm going to generate the image and see
how that one looks. So the options that
it came up with, I think they all look
pretty good, actually. I definitely looks like
a modern design style. So I'm going to bring this in, and I'm going to put it here. I'm going to actually
layer these side by side, so I'm going to put
this one on this layer. The next one was vintage. So again, I went back to ChachiBT and I got into write the prompt
for vintage style, and we're going to
generate it again. These are the styles
that came up. Okay, this actually looks
really, really good. I'm going to drag
one of these in, and I'm going to put them
in the footage right here. Again, I want them to
show up at the same time, so I'm going to make sure
that they are layered on different layers and
not on top of each other. Then we have the last one. I'm going to delete this
and it is the bold style. We're going to generate
this image as well. This is the bold
style. Pretty cool. I'm going to bring this in, and again, we're going to layer it where the other ones are. I'm going to just
put this one here. All right, so that is
what it's looking so far. Let's just preview it really
quick so you can see. Okay, I think these actually came out
really, really good. As you can see, when it comes to image and video
generation on Canva, if you're trying to
show something too realistic with a living thing, like an animal or person, it's going to be not super accurate and obviously
AI generated. When it comes to things that are not living like
interior design style, and it's clearly for
visual reference. You're not trying
to pretend it's actually you typing or
something like that, then these images
can be super useful. Instead of having to source them on Google and then
use them illegally, you can actually just generate them through AI and prompt it. So it's exactly how you
want the image to look. Again, it is hard to adjust the actual design
style once it is generated. I'm sure you can generate
it a few times and tweak the prompt to make it
as best as possible. But in terms of
changing little things, it's still really, really
hard to do that on Canva. Generally, I would use AI generation and video
generation sparingly. Again, use it mostly
for visual explanation. Remember, taste matters. It's what makes you unique
as a content creator, use that to your advantage and that's how you're
going to show up differently from all of the other AI generated
content out there. The next lesson, let's
look at caption.
14. Creating Captions with AI: All right. In this
lesson, let's talk about captions. Do we need it? Do we just rely on the YouTube
auto generated captions? Well, it depends. If you're doing a
short form video, then I think you definitely need to add your own captions in. So if you're using
Canva video editor to create reels or shorts, then yes, you definitely need to add your
own captions in. It just pops out more and
it will be more stylized, so then it really captures
attention in that short form. If you're creating
long form video, that's a different thing. I would say if you're just doing a regular talking head with, let's say my videos, I usually
do tutorials, then no, I typically just rely on the YouTube auto generated
captions and you can easily go into YouTube to edit
those afterwards as well. So it really saves
you time there. But if you really want more stylized captions and you want to add in
your own captions, let's say you are speaking
in a different language and you want to translate
it itself to make sure it shows correctly, then here's how you do it. On Canva, I am going to
already had this open one, so it's going to show this
captions app will show up. If it's not showing
up on your toolbar, you can go to apps here
and just type in captions. And then this first one is the in house Canva app
for caption generation. We are going to select
which videos need captions, pretty much all of them, but I'm just going to
do the first video so that we just see from the
first video right here, maybe I'll do the first too. All right. We're
going to generate captions and we're just
going to let it load. Okay. So it has
generated some captions. I did come across some
issues with it saying I can't generate the captions at that time because
for some reason, it was taking too long. I don't know what
was happening there. So I did take a break from it, maybe 15 minutes, and
then I came back to it, and then it did
generate the captions. So let's just watch it
really quick and see. Let's be honest
here. If it's good is your Instagram Link and Vo, just a generic page
with a list of links. Maybe you built it on Ling
tree, maybe somewhere else. But if so, you're probably missing out on one of
your biggest opportune. Okay, so it all
looks pretty good. If you wanted to make
any adjustments, let's say there was a spelling
error or I don't know, for some reason, didn't
record the right thing, you can actually go right
into it and change it. And then to style it, you can actually go
change your font, change the color of the text. Bold it, a lot of different
things that you can do. If you click on
captions right here, it'll actually show
all of the captions, and then you can edit
it from here as well, which I think is probably
faster to do that. Right now, it already
has an effect. It has a little background. So if you want to change the
color of this background, you can do that as well, and then just make sure
that once you do it on one, you are actually editing
that styling on each of them as well
because it doesn't automatically do it
for all of them. All right, so one note about captions on Canva that's really frustrating is that
it can only generate captions for audio
within a video. So if you just have a voiceover
like this one right here, it will not generate a
caption for this voiceover. One way to combat
this is to record your captions in a video
format and then just um, remove the screen and
just keep the audio. So you can do that and
then just drag it in and then it will create
captions for it. Another way, if you've already
filmed your audio, um, you can also export the whole thing with
the video on top of it. Let's say you export this
whole footage and then you put it as a second layer and then generate the caption. I will generate a caption for that full video because it
has a video layer on top, essentially. So pretty annoying. But generally saying
most YouTube videos, you won't need to create
your own captions, and then I wouldn't
use a caption feature. There are definitely still
bugs with it right now, and it's not the best on Canva, but I'm hoping because
this is so new that eventually they will get better with this captions feature. And if there are any updates, I will also let you know, and hopefully I'll be able to
update this video as well. All right, so that is captions. And the next lesson,
we are ready to finally export our video.
15. Exporting your YouTube Video: This lesson, we have your completed video and
we are ready to export. So in order to
export onto YouTube, there are actually
two options on Canva. And the top right here,
you can click on Share, and then you can scroll down. You can actually see
YouTube right here, and this directly
uploads to YouTube. So it's pretty cool. You can
just connect your account. I'll prepare a video, and then you can press
upload and then it will actually upload directly
to your YouTube account. But generally, I like to just export it as
a regular video because then I'll have a copy of and then I can save
it in my documents. So I would recommend doing that instead if you
want to do the same. One thing is, if
you want to, again, use this for YouTube
and if you're using any music from Canva, then you want to
make sure that you connect to your YouTube
account right here. So if you connect to socials, you need to connect it
to your YouTube account, make sure you're logged
into your YouTube account and then you connect
it right here, just follow all of these steps. It will actually
make sure that all of the music that
you have used on your video will be linked to this account so that it won't be flagged on
the YouTube side. So make sure to do that.
It's really important. And then you can go ahead
and just pick MP four video. And here is where you can also choose the quality and
the size of your videos. So the two most popular sizes
is ten ADP and four K. Now, if you have a free account, you can only export in ten ADP. And then if you have a procount
you can go all the way up to four K. But one thing that I do want to note here is that when you're
editing on Canva, it is actually bringing
all of your footage and editing in a ten
ADP dimension size. When it exports in four K, if you choose four K, it doesn't actually make the
image quality better. It only expands the ten ADP
video into four k dimensions, not necessarily making
it higher quality. So every time I create a video
on Canva and for YouTube, I actually would recommend
just exporting in ten ADP. It is totally big
enough for YouTube. Most videos on YouTube are in ten ADP, don't worry about that. It's quite standard and it also keeps your
file size smaller. When you're ready, you
can go ahead and click on Download and your video will be downloaded onto
your files and you can upload it right into YouTube. You can add in all of your
details on the YouTube site, upload your cover image, also create those on Canva, and then you'll be
ready to publish
16. Thank you: Thank you so much for
taking this class with me. If you've made it this far, I hope you are walking away with more than just
a finished video. My goal with this class was really to help you
build confidence, skills, and a process you
can actually stick with. Video, especially YouTube
is all about the long game. It's not about having the perfect upload
every single time. It's about showing up
consistently, refining your style, and making those little
tweaks every single time to your process to make
things easier and easier. Why in this class, we focus so much on workflow, structure, and making those intentional
decisions rather than focusing just on
tools and features. I'd love for you to share a class project with me
if you feel comfortable, whether it is your first video or the tenth video you've made, it's all part of the
learning process. And if you have any questions
as you keep working, please ask me in the
class discussions, I look at those regularly and answer to pretty much all of
the discussion questions. If you enjoyed this class, please consider
leaving a review. It means a lot, and it also helps other students
find the class as well. You can also connect
with me on Instagram at Made on Sundays
Studios and find all of my free creative
entrepreneurship content over on my YouTube channel
at Made on Sundays. Again, thank you, thank you so much for spending
time with me, and I will see you in
the next video. Bye.
 Cheryl Chan, Brand Designer / YouTuber