Transcripts
1. intro: In this class we
are going to create a digital notebook
with flipping tabs. Hi, I'm cell and I
have been sharing my digital planning journey
over in my YouTube channel. And since I started this
journey a few years ago, I have been creating my own digital
planners from scratch. And here are some of
the digital planners I have already created. One of the most asked
question I received in my videos is on how to
make a digital notebook with tabs that moves
from one side of the digital notebook
to the other side of the pig, a
realistic notebook. In this class, I will be showing you the
step-by-step process, a use when creating a realistic digital notebook
with flipping tabs. So if you're ready to create this digital notebook
with me, Let's begin.
2. things you will need: Follow this class. You will be needing
a device where you can create a presentation and an app that will enable you
to add links for the device. I will be using my iPad, but you can also use your phone, desktop, or your laptop. For the app, I will be
using the Keynote app, which is free in the iPad, but you can use other apps like Microsoft PowerPoint
or a Canva and alike, if those are what you have, the instruction
for this class is specifically for the iPad users. But you can still follow along since I will
be showing you the overall process
which you can apply when using similarity devices
and applications. If you have a digital pen or a stylus such as
the Apple pencil, I recommend that you
should use it too. If you don't, that's okay. You can still create your
digital notebook without it. So if you are
ready, let's begin.
3. setting the dimension: Now let's start on creating our digital notebook
with flipping taps. Let's open the
Keynote app and let's first create our presentation. So tap on the plus icon here with the create
presentation, and you will see
this pop-up window and select, choose a theme. You can use any of the themes available here for
your base design. But if you want to
start on a blank slate, choose the basic white. The first thing that we're
going to do is to set up the dimensions of
the digital notebook. If you already have
a particular set of dimensions you use for
your digital notebooks, you can use that here. If not, you can use my digital notebook
dimensions to set that up, go to the More option icon
and then documents setup, and then slide size. And then cost. I usually create my digital
planners with a width of 1024 and height of 690. And then tap Done and
then tap Done again. Here. We have now set up the dimensions of our
digital notebook. So in the next lesson, we are going to create the foundations of your
notebook template.
4. creating the notebook page template, the covers: In this lesson, we are going
to create the covers of our notebook page
template to start tap anywhere in your screen and
then edit slide layout. This is the slide
layout where we are going to create the
notebook templates. I'm going to show you how
to begin from scratch. So we are not going
to be needing this. So to delete, tap on the element and tap the
Select Objects option, and then select all, and then done, and
then choose Delete. Now that we have removed those, Let's first customize the
background of our slide, which will be the background
of the digital notebook. And to do that, tap the brush
icon, then backgrounds. You can choose whatever
color you want from the different
categories here, like here in the presets, and also in the color, in the color categories. You can choose from the
different presets here, or you can swipe to the
left and you can choose any color you want
from this color wheel. You can also use the gradient. You can customize the
colors and the angle of the gradients by
adjusting the slider, you can change the start color here and customize the
end color if you want. You can also add an image here. If that is what you
prefer for my design, I will be using a preset
from the color category. I will be using this color here. The design of this
digital notebook is an open notebook
with flipping tabs. So the first element
that we're going to add is the cover
of the notebook. To add an object, tap the Plus icon,
and then shapes. And I'm going to choose the
rounded corners square. If this guy is not
appearing in your screen, you can tap Done. In the More Options icon, go to the guides and then
turn on the guides here, the edge center and
the spacing guide. Let's go back to this slide
layout to edit our design, resize this shape
and make sure that it is centered in this slide. We're going to add
the tabs here, so make sure that there is
enough space for those. If you're also going
to add tabs in the upper or lower
part of the notebook. Make sure to add
a space for them. But since I'm not
going to add them, I'm going to maximize
the vertical space. Now, let's change the
color of the cover page by going to the brush
icon and then feel, then select the color
you want to use. You can use the color
wheel if the color that you want is not
in the color preset. And you can also
use the gradient and add an image if you like. It is the same options
that were available when we were customizing
the background color. You can also add a
border if you like. I'm going to add a border
to my notebook cover design and I'm going to try
a great color for this. If we zoom in, you can also see this coordinate and we can adjust how much the curve
by using the blue dot here, the other corners will be
automatically adjusted. So you can just adjust one. Since I want this
notebook to look more realistic and in
three-dimension, I'm going to add a shadow. I'm going to use this shadow, but you can try it
out the other options and check out which
one you prefer. The inside of the
cover page usually has a sticker cover that hides the edges of the
front-page cover. So let's add another
rounded corners square. This is smaller in size compared to the cover page
that we have created. I'm going to resize this so that there is a small gap
between the two. The guide, sorry not letting me adjust the size of this further. So I'm going to turn them off. In the presentation mode, go to the More Options
icon and in the guides, during the guides of four now, then go back to
this slide layer. And let's adjust one
side of the shape. I'm just going to leave a
small gap between the shapes. I'm also going to adjust
the bottom part two. Then tap Done again, and let's go back to the presentation mode
and turn on the guides. Then go back to the
slide layout again. Now let's resize the other
sides and using the guides, we can make sure that the
shape is properly centered. Then let's customize this
and change the color. I'm going to change mine
to a grayish white. I'm also going to add a border and set
the color to white. In the next lesson, we
are going to continue on the creation of the
notebook page templates. See you there.
5. creating the notebook page templates, the pages: In this lesson, we
are going to add the pages of the
notebook page template. So let's add the element
using the plus icon. And this time we are going
to use a normal square. Using the guides, make sure that this is centered in the page. I want to further adjust
the size of this, but the drawing guide is
restricting me again. So let's go back to the presentation mode
and turn of the guide. Then tap on the screen and go
back to this slide layout. The same process as
what we did awhile ago. Let's adjust one horizontal
side and one in the vertical. Then let's turn on
the guides again. Then go back to the slide layout and adjust their meanings sides. Since this is the page, I want this to be
in color white, but you can choose whatever
color you want to use. We're also going to add a
shadow for this element. And since it is a page, I want it to look like
it curves a lethal and you can either use
this one or this. But I think I'm going to use this one to avoid accidentally resizing or repositioning
this elements that we have already created. First, tap on the element, then select objects, and
then select all then done. Then in the brush icon under
arrange, turn on luck. This will ensure that we don't accidentally moves the elements. The Notebook design,
I'm imagining it is binded using threads. So let's add a line in
the middle to show that. In the shapes at the line. Use the guides to make sure
that this line is centered. I'm not really a fan of
the style of this slide, so I'm going to the
style option and try out the different styles available and change the current style. And I'm going to add a shadow
to make the binder look 3D. You can check out
these other options here to see which
of them you prefer. For me, I'm going
to use this one. So that is the style. I'm also going to change
the color of the line. I'm using the color
wheel to have more choices in the
color available. And I'm going to change
the color to a muddy gold. I'm also going to play with the opacity and adjusted
the 60 per cent. It's okay if you don't want to adjust the opacity of your line, if you're already
satisfied with it. After customizing the
style of the line, make sure to zoom in and see if the element is within the
boundary of the page. And if not, adjust the
size until it does, I also don't want
to accidentally adjust this elements,
so that's lucky. You seeing the lock option in the brush icon under
the Arrange options, when a real notebook is opened, some of the succeeding pages will be picking a
lethal to the sides. To this show the volume of
the notebook digitally. Let's unlock the first page we have created and then copy. Then go back to the Brush
icon again and luck this, then tap the screen and paste
with this page element. We are going to reposition
it so that a part of the other page is
speaking from the side. We do this to show the
volume and to make it look like this notebook
has a lot of pages. I want the gap between
the two pages to be a little smaller and the guides
are restricting me again, so I'm going to
temporarily disable them. Then go back to this
slide layout again. And let's adjust the
size of the page. You can zoom in to the screen to make sure that the
gap is in there. I've made the gap
narrower just so I can maximize the writing
space later. Just set up one of the sides
of the page and then go back to the presentation mode
again and turn on the guides. After turning on the guides, Let's go back to this
slide layout again. As you can see, there are
a lot of switching from the slide layout and the presentation mode to
turn on and off the guides. But this makes sure is
that the elements are properly positions to the
way we want them to be. After turning on the guides, adjust the other side of
the page and makes sure that it is centered
after adjusting, copy this page element and go to the Brush icon and under
arrange lack the element. Again. Here is what it looks
like right now. You can repeat that process
as many times as you like to make the notebook
look more realistic, I'm going to repeat it a
few more times for me, paste the copy of the
design of the page element. And since we already
have two pages, we won't be needing
to go back to the presentation mode and
turn on and off the guides, because it already established a new spacing guide
after setting it up, copy the element, and then make sure to lock this element, avoid accidentally resizing
or repositioning it, then paste, then adjust
the size again as what we did in the
previous other pages. Then repeat the process again. Since the middle line was covered by the new
patient assignment, we need to change the
arrangement of the elements, zoom in and select the
page elements by tapping on one of the elements
and then select objects, then select each of the
pages we have added. Then done, go to the Brush icon and in the Arrange options
and lock the elements, then adjust the slider here
to send the selected elements backward in position until
the middle line is visible. It makes sure to
lock them again. So this is the page design for the digital notebook we are going to work on in
the next lesson, we're going to work on the first flipping
tabs page template for the digital planner. See you there.
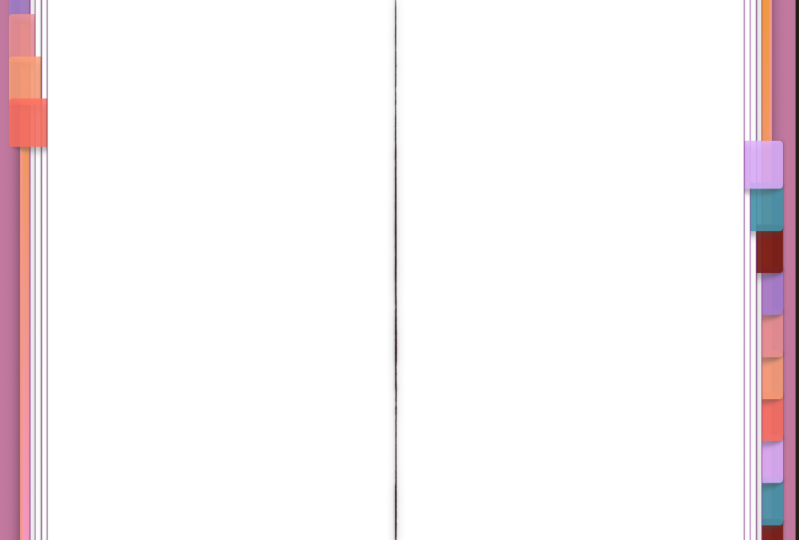
6. flipping tabs page template, part 1: Before we start in this lesson, decided how many tabs
you are going to add on your digital notebook
and how you're going to set up the
different subsections. For me, I'm going to add 13 tabs in the side
and I want it to flip and the tab to
transfer here as you go further in the
digital notebook. For this digital notebook, each of those tabs will
be for one subsections. We'll also be adding a secret
sub section which will be accessed from any of the pages
in the digital notebook. To create the tab, go to the blast icon and select the style of the tab
we're going to use. There are different categories
of available shapes here, so just explore them until
you find the one you like. For me, I will be using
this one, then resize it. I want to add 13 of this. And for now, I'm just going to estimate their size to
fit all of them here, the design of the flipping
tabs will be overlapping. So first, let's change the
color of this first tab. You can choose whichever
colors you like. Then let's add a shadow. The shadow will be in the
right and lower parts if the light comes from
the upper left side. So I'm going to use this one, then resize the top. For now, just focus on the
width of the tab and just estimate the height
because we are going to perfect the height later on. So now I'm just going
to eyeball the height. Just make sure that the
spacing here from the top of the page and the top of the tab is where
you want it to be. Then let's create
the remaining tabs by duplicating the first one. For this duplicate, Let's change the color of the second
flipping tab so we can differentiate where
the first sub S and the other one begins. Then reposition
this tab so that it will be overlapping
the first one, then select these two
tabs we have created, then tap, Done, copy,
and then paste. Then paste again. To make this faster, select the six steps and then
done copy and then paste, then reposition it, then add
the last step to make it 13. When repositioning the tabs, make sure to utilize the guides. Now that we have added the
correct number of tabs, there are still a
space at the bottom, so let's select all the tabs, then tap Done, and
then select group. Now, adjust the size
of the entire group. Since the guides are turned on and we have already
set the spacing between the top of the page and the top of the
first tab awhile ago, we can just resize this
so that it is centered. Once you are satisfied
with the size of the tabs, tap on them and then ungroup. So to make this stubs look more three-dimensional and that
they are between the pages. Let's rearrange them up on the first step and then
go to the Brush icon. Under arrange, adjust
the slider here. This tab will be
behind the first page. The second tab will be
behind the second page. The next step will be
behind the third page. Then the fourth one will
be behind the fourth page. Since I only added four pages in the design of the
notebook template, the remaining tabs
will just be on top of one another behind
the fourth beach. And that is the flipping
tabs border right side of the digital notebook. In the next lesson,
we're going to customize the different tabs. So see you there.
7. customizing the tabs : After creating the tabs, Let's change the color
to their final colors. To change the color,
select the tab, and then in the brush
icon go to fill. And then change the color here. Then do this in all of the tabs. In the next lesson, we are going to create the second flipping tabs page
templates. See you there.
8. flipping tabs page template, part 2: In this lesson, we
are going to create the flipping tabs for the left side of the
digital notebook. Now that we have created this, Let's duplicate
this slide layout. And in the duplicates
select the tabs by using the select objects. Then tap Done and then copy, and then paste, then
reposition the set of tabs to the left side of
the digital notebook. Make sure that the tabs are
aligned with the tabs in the right side of
the digital notebook by using the guides, since this is the left side, the first tab from
the right will be the first one that will
transfer to the left. So the lowest tab
will be at the top. So let's change the arrangement
of each of the tabs. Select the tab and
go to the Arrange in the brush icon and
adjust the slider. The lowest tab will be
behind the first page. The next lowest will be
behind the second page. The next step will be
behind the third page. Then the fourth tab will
be behind the fourth page, similar to what we did to
the right side a while ago. The remaining tabs
will all be behind a fourth page and they will all be overlapping with each other. Just make sure that the
highest tab will be at the bottom of the
tab arrangement. This is the template
we are going to use in the creation of the
digital notebook with the flipping tabs. In the next lesson, we are going to create the individual page templates
for the digital notebook. Since See you there.
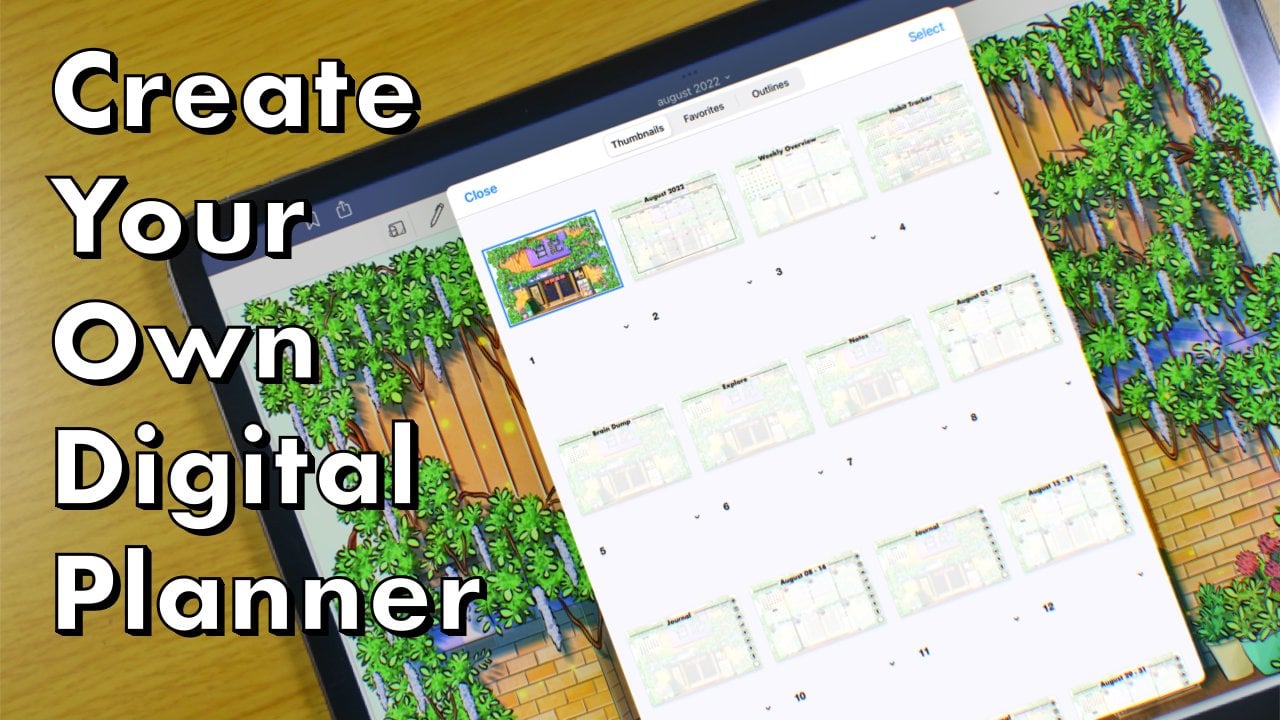
9. digital notebook page templates: In this lesson, we
are going to create the individual page templates
for the digital notebook. Here is the slide layout we have created in the last lesson. And let's rename
this as template. And then we are going
to duplicate it. For the first speech of
the digital notebook. It will look like this. So let's rename this as one. To change the arrangement
of the slide layout here. Just drag it like this. In this first page. If we flip it, this
tab will move here and this tab will come
forward by a page. And also the next two tabs. The remaining tabs
will not move since we have placed them behind
the fourth page. So to create the page, go to the template copy. Let's rename this slide layout. As to NSA said, this stub will move to the left. So let's delete this one. Also, since these tabs will
stay here in the right side, then these other tabs
will be deleted, tap on the tab, and
then select objects. And let's select
all of these tabs. And then done, then delete. I also am going to move this forward behind the first speech. We should also move
this tab forward. And also this one. And this one do. That is the second page template for our digital notebook. For the next one, Let's duplicate the template
again and rename as a three. Then reposition this
slide layout by dragging it from the second page. If we are going to flip
this to the next page, this tab will transfer to the left side of the
digital notebook. This one will move backwards and this one will move upwards, also this one and this one. So let's do that in the third page template
using the select objects, Let's delete these two tabs. And all of this will
also be deleted. And then this tab will be
behind the first page. And this one will be
behind the second. This takes create
the illusion that this tab was flipped
first and then this one. Let's also change the
arrangement on the other side. So this one will move forward
and behind the first page. This one will be behind
the second page, and this one will be
behind the third page. The remaining tabs
will stay as is. We are going to
repeat that process again for the rest of the page templates until the last tab has been transferred
to the other side. For the fourth template, the first three tabs
in the right side of the digital notebook
will be deleted. And in the left side, all except the three
tabs will be deleted. The arrangement for the
tabs in the left side is the third tab is
behind the first page. The second tab is
behind the second page, and the third tab is
behind the third page. For the right side tabs. This tab is behind
the first page. This one is behind
the second page, and this one is behind
the third beach. Then leave the rest of the tabs. S is. Also don't forget to
rename this slide layout. Let's duplicate the templates
slide layout again, and this will be the fifth page. The tabs from the fifth
tab in the left side. The tabs from the fifth
tab in the left side, it should be deleted. And the first four tabs in the right side should
also be deleted. If you're getting confused
on which tab delete, just refer to the previous
slide layouts we have created. For the arrangement. This tab should be
behind the first page, this next step behind
the second page, then this behind the third page. For the dads in the right side, this should be behind the first page than this
to the second page. This one behind the third page. For the next page that bleeds, we are going to
repeat this process. You can do it on your own
or you can follow along. As I show you. We have now created
the 14 page templates. In the next lesson, we are going to finally
create the digital notebook. So see you there.
10. the digital notebook: In this lesson, we are now going to create the digital notebook. Let's go to the presentation
mode by tapping Done. And here is the
first page already. So let's use the plus
icon here to add the other pages at the
page template 2345, 6789, 1011, 1213, and 14. Here you can check if the arrangement of the
slides are correct. While doing this, you can see
the movement of the tabs. If you want more pages in each subsection of
your digital notebook, you can add more than one copy of the templates
we have created. But since I want to only add
a page for each section, I will be leaving this as
is in the next lesson, we are going to work on the links of the
digital notebook. So see you in the next lesson.
11. adding the links: Now that we have created the
digital notebook set up, Let's go back to the slide
layout and add the links. This tab will be for the first subsection of
the digital notebook, which is the first page that
is already the default link. For the second tab. This will be linked
to slide two. Then this one is Slide three. Slides 4, slides 5, slide six, slide seven, slide eight. Then Slide nine. This is slide slide 11, and then 12. And lastly, slide 13. And for the secret page, which is the last subsection
in the digital notebook, I'm going to use the line in the middle to access
that subsection, the line, and then unlock
and then add the link, which is the slide. For. Now we're going to repeat that process
in the other page. Templates that we have created.
12. check and confirm: In the last lesson, we have added all the links
in the digital notebook. So now let's check
and confirm if all the tabs are properly linked in the presentation mode, tap display icon, then check if all the links that we have
added works properly. You have to check that each of the links that are available in each of the page works
properly and linked correctly. In the next lesson, we will be exploiting this
digital planner so you can use it in any PDF annotating
app like GoodNotes. And I will also
show you how I use this notebook to create a
monthly digital planner. So see you there.
13. export and application: Now that you have checked
and confirm that all of your links are working
and are linked properly. You can now export this as a PDF file if you want
to use this as it is. But if you want to
further customize it and add different elements
in each of the pages. You can do that too. And that is actually what I did for this digital notebook. I further customized it and created a monthly
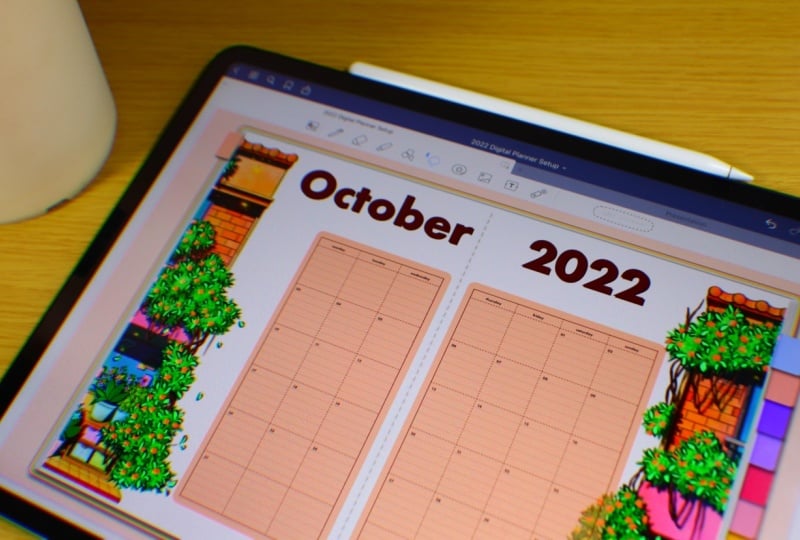
digital planner. Here is the flip through of the digital planner
I created using this digital notebook
if you wanted to see the process and how I made
this digital planner, you can check out my October
2022 digital planner set up in my YouTube channel. I cannot wait to
see your projects, so make sure to submit them. And if you wanted to
connect with me and see more digital planning and
illustration contents, you can check out my
YouTube channel or say hi in Instagram at six B pixel. This is Kaizala and
until next time, bye.
 Keizle, digital planners ・digital illustrations