Transcripts
1. Demo: Hi guys, I'm Aga Kobylińska, surface pattern designer from Poland. In this class, I would like to share with you my latest Photoshop trick which helps to optimize the process of preparing images to different Internet media sizes This will be a perfect solution for all of you who often share your photographs, patterns, graphics and other artworks on different social media platforms. We all know that Instagram, Facebook, Pinterest, your blog all of them require different image dimensions and the purpose of this class is to make this process really easy and quick. so we will work with very basic features Artboards and Actions Step by step I will guide you through the process of preparing your media template and recording the action that will put your logo on many Artboards with just one click. Sounds great? Let's get started! This class is designed for the beginning Photoshop users
2. Intro & schedule: Hi, guys. Welcome to the class I'm really happy you have decided to join it as I'm sure it will be very, very useful for you. We all know how important it is to keep your social media presence, to share your work in progress, to share your work. Um, but we also know how it can be time consuming. to remember all these needed dimensions, to put your logo in the right place, to keep consistency and that's why I "invented" this process to make all this process in Photoshop easy. Yeah. So before we dive into the class, I just want to show you a brief class schedule so you exactly know what to expect. So First of all, I will give you some tips on preparing all the needed materials in the right place. Then I will show you how the Artboards in Photoshop work and how they can be used for our purpose. Then we will record two actions that will make your life easier. One, the action that makes your image or pattern appear on all the Artboards at once, and the second action that places your logo on all the Artboards in the position you want. I will also show how to export all the Artboards as images ready to put on the web. Looks great? Let's start.
3. Few words on organizing: okay. As promised, few words about preparing and organizing files for this class, I recommend that you create a special folder in the place that is intuitive for you. There you will keep all your templates, information about media sizes and other useful elements such a your logo in one place. It's important that you don't change the name and location of this folder later, especially after recording actions, so make sure it's where it should be. If you use some cloud solutions to store your files such a Adobe Cloud or Dropbox, you may want to put your folder there. This way, you can have access to your media template and logo types on any device. For the purpose of this class, I created the folder in the Skillshare class folder. Ensure that you put there the graphic files that you want to use to watermark your pictures. I use my signature on the transparent background, but you may use a lago. web page or email address, whatever information you want to put on your graphics. Then write down the media dimensions that you use more often. We will prepare a media templates for them. I've chosen Instagram square. Facebook post and image sizes needed for my blog, blog post header and blog image, you might want to use more or different media dimensions. It's up to you. Just have been prepared for the next class chapters.
4. Create your media template (Presets & Artboards): Okay, Once we have our folder, logo and media dimensions prepared, we are ready to work with Adobe Photoshop. We will work on multiple Artboards which is a great feature in Creative Cloud version of Photoshop. Before we go inside, let's save all our needed dimensions as presets. It takes few minutes longer now, but it saves you time in future. Today I create 4 presets: 2 for the social media use Instagram and Facebook posts and 2 for the picture formats needed for my blog. Let's start with Instagram. The recommended image size for the square format is 1080 per 1080 pixels. So put these values in the right boxes and check the multiple artboards. Click this icon right down the preset name and press safe percent. As you can see it automatically lands in a panel here under the "saved" label. So you have easy access to your preferred media sizes anytime you create a new Photoshop document. Um, repeat this process for all your needed picture dimensions. Once we have it all done, let's create a new document. I use Instagram posts as a starting point. It will be my first Artboard. I called the document Social Media templates. Ah, you can name your file as you wants. Make sure you have Artboard box selected and press create. We finally see our new document so it's time to play a little bit with art boards All your art boards can be found in the layers panel. Right now we have only one. I changed its name into Instagram Here under the move tool you will find the art board tool. It can be also activated by selected any art board title placed above it. When this tool is in use little plus signs show up around the Artboard. By pressing one of them, you create a new art board of the same size as the original one. If you want to change its dimensions, just go to the size panel here and choose one of your presets. I'm selecting blog header, you can see the selected Artboard changes its size automatically. I repeat this for blog and Facebook post. I forgotten to rename the art board systematically, so let me do this now. Okay? Now I can see all different sizes in one workspace and work with them all together. So convenient, isn't it? Before we go the next modul, let's stop for a moment at art board feature. You already know how to create, new once by using the plus signs and presets. but you have much more freedom with them. Actually, they are really intuitive and work similar to layers. You can move the chosen art board using its title as a handle around the workspace. Copy it together with its content by simply dragging, and holding "ALT", easily delete and rename. With the Artboard tool selected, you can draw a rectangle anywhere on your workspace and it automatically becomes a new Artboard. You can change the dimensions of the selected art board anytime by stretching corners or by putting their custom dimensions in the box here You can even easily change the position from horizontal to the right and back just by clicking on one of these icons. Take few minutes to explore and get used to this feature, It is really worth it. Everything is clear? Perfect. Now leave only the art boards that you need for your media template and be sure they're rightly named. It's very important for the next modul. There we will record our actions and if you change the Artsboard names after creating actions, they will not work. I will explain it later. but now just ensure names are just as you want. Once we have our template ready, let's save it in our special folder so we can use it any time. Um, we will work with some graphics now. So I will create the copy of the template to work on, and changed its name. Uh, I recommend to keep the template clean.
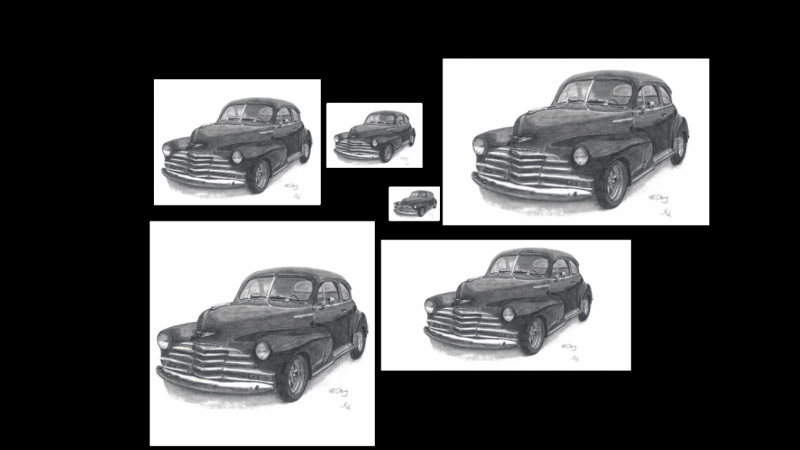
5. Action1: One picture on many artboards: Now it's time to start playing with actions. This is a Photoshop feature enabling you to record a sequence of your Photoshop activities and then realize them all with one click. They can be used for many purposes, but now we will use them to copy one image on multiple art boards. This way, your only job later will be to adjust it to your ideas and needs. Open your actions panel, you will find it here under the window. Um, let's start with creating a new action sets that can be easily findable for you. I will call mine The Social Media Workflow Actions. Now place your chosen picture. Here I used a beautiful picture by Eli Defaria from unsplash, so it's time to record our first Action. Click "new action" in the action panel, It's this icon here, call your action the way it's understandable for you, I call mine "one picture multiple artboards" and press record. Most of the operations happen in the layers panel, so select the picture layer, copy it with "CTR+C" then select next art board, a blog header in my case and pace the image with "Car + V" shortcut As you see the picture is automatically clipped to the art board size. Repeat this process forward the other art boars. Remember to always select the art board name before pasting your picture inside. Stop recording by pressing the proper icon. That's all. Our action is ready. Now, when your picture is placed on every art board, you can adjust its size and position as you like. Okay, so let's check how the action works using another picture. This time I used the lovely photo by Chris Child. I place it on my first art board. Look for the action in action panel and press "play". Voila! our picture is placed everywhere. Okay, let's delete this image and check if the same trick will work with a pattern. This is something for my fellow surface pattern designers. Creates a new layer with pattern, choose the action and press "play". Tadam! Magic has just happened!
6. Action2: Your logo on multiple artboards: um, we have our first action recorded, so now it's time to add watermark or a logo on every art board. So let's create a new action. I will call mine "watermark it all" and press "record". In the Layers panel select the first art board, in my case it is the Instagram one, go to file, place, place embedded or linked. (It doesn't really matter) and look for the special folder we had created at the beginning of the class. Find your logo. In my case, it's my signature and click "place". Accept placing the file and only now start to resize or move um, your logo to place you want it to be. Once you're happy with the results, repeat the same steps. with the next art board. So select your art board, place your logo, resize it or move. Uh, when everything is done, click "stop" to stop the recording. Let's check if the sequence work. For this purpose, I will use the empty template. So choose the action, press play and it should run smoothly... .... but oops! A little window appears with the information that the command "select" is not currently is not currently available Press "continue" and we will check in a minute what is the problem. The action runs smoothly, our signature appears everywhere. that's cool but I will check what has gone wrong. To do this, I open my action folder and look inside. Oh, you see? While recording my action I selected by accident the layer that doesn't exist in this blank document. I just delete this element and it will not bother us anymore. Uh, the action is modified everywhere so I can play it on any document created on the basis of our template. So let's check the magic. Um, so here I Pattern a new layer and play both our actions. One to Yeah, One, two and with the picture the same One, two Tadam! You see how quickly you can prepare your pictures or product photos or mockups, or maybe patterns for Web purposes. Before we go further, two things to remember. If you want to enjoy your freshly recorded action, remember, never change your logo file name and location on drive .If you do, Photoshop will lose it. And never change the artboards name in your template or its copy before playing actions. It's the same. If you remember this two things everything should be great. So let's go to exporting our artboards or Web.
7. Exporting artboards to files: We have our graphics beautifully adjusted to the needed sizes and signed with our logo. It's time to export our graphics so they can be used online. When you go to file export, you have several options to choose from. For our purposes For our purposes today, To that work the best are quick export as PNG or art boards to files. Let me show what's the difference between this two. When you choose the option "quick export as PNG" you just choose the folder where the pictures should be exported and they land there. Let's do this and check if it happened. Yeah, in my folder there 4 PNG's named just as the art boards were before. Perfect, so this is the fastest option. When you choose the option art boards to files you firstly need to choose the place where the pictures should be exported and then you have a really nice additional feature which is file name prefix. It's just great, because this way you can ensure that your files are described properly. I used to prefix featuring my name "Aga Kobylińska" the design name which is "branches" and add a dash at the end to separate the prefix from the art board name Click "run" and let's check what happens. When you go to your folder the result is quite rewarding. All your graphics contain both my name and the graphic purpose You can use them right away. I think this option is really convenient and I would rather use this one. So yeah, that's all. If for any reasons, you want to have a PNG with all your graphics in one place, just like on your work space, you can use "Safe for Web" feature. Here you can choose if you want your graphics on white or transparent background. Once exported, the graphics will look like this. You can use it, for example, in order to upload it in the project section for other students to see.
8. Bye: Okay, that's al. Thank you for watching. I hope you have enjoyed the class and that the things you have learned will be useful for you in future. Please share your image set I would like to see what you have prepared If my class inspired you to look for your own actions in the class project section. I would be very, very happy to know it So please share it. also in the class discussion or in the class project section. I would just like to encourage to experiment, to look for your own solutions and yeah, to have fun. So good luck! Bye :)
 Aga Kobylinska, Surface pattern designer