Transcripts
1. Welcome to Class: Hello, Skillshare. Let's fill a
sketchbook together. This time we're doing
peaceful paneled pages. In my previous fill
sketchbook classes, I went over my basics of sketchbooking in a way
that makes sense to me, shared how I create
pretty spreads, and we even did a
people edition, too. This time I'm going
to be sharing a very chill and
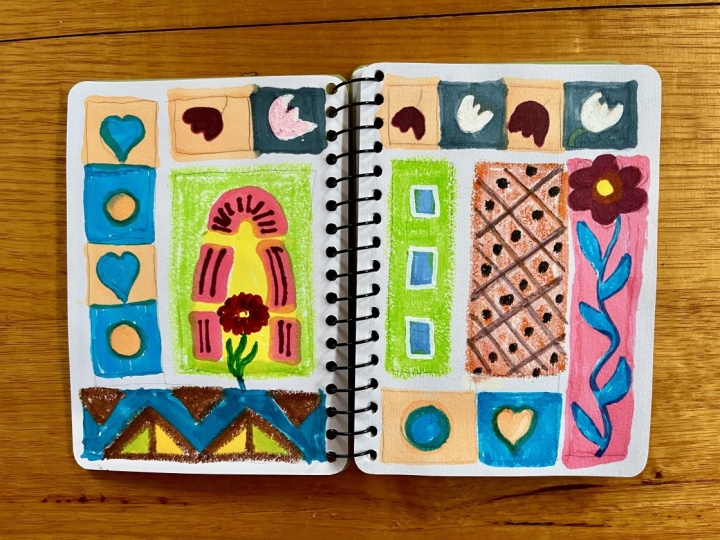
mindful sketchbook page spread that I've named
peaceful paneled pages. These pages are a great way
to fill your sketchbook when you just want to
use your art materials, but you don't want the
challenge of drawing from reference or your
own imagination. These pages are
quiet and mindful, but they can also really
help you to understand layering and color
combinations. It's a win win. In this class, I will be
taking you through how to create beautiful
paneled pages filled with simple graphic
elements that you can calmly fill in with the
materials of your choice. Hi, everyone. I'm
Christina Hotkrenz an illustrator and
surface designer from Marie Fried Sweden. Welcome to my CheeryPink Studio. So I'm mainly a
digital illustrator, and I've worked
with an agent since 2019 Pinkight Studio and I've had the pleasure
of working with companies like Hobby Lobby and pink studio fabrics and Orne
Circle Studio to name a few. But I have found sketch booking is something
that I can do just for me, and that's just such
a wonderful thing. I think that it has
really helped me develop my digital illustration
skills at the same time and just make me
feel like a more fulfilled, creative
artisty person. This class is great
for anyone who loves working in a
sketchbook and would like a simple but fun
exercise to come back to time and again
when you just want to take it easy and color. So let's get started.
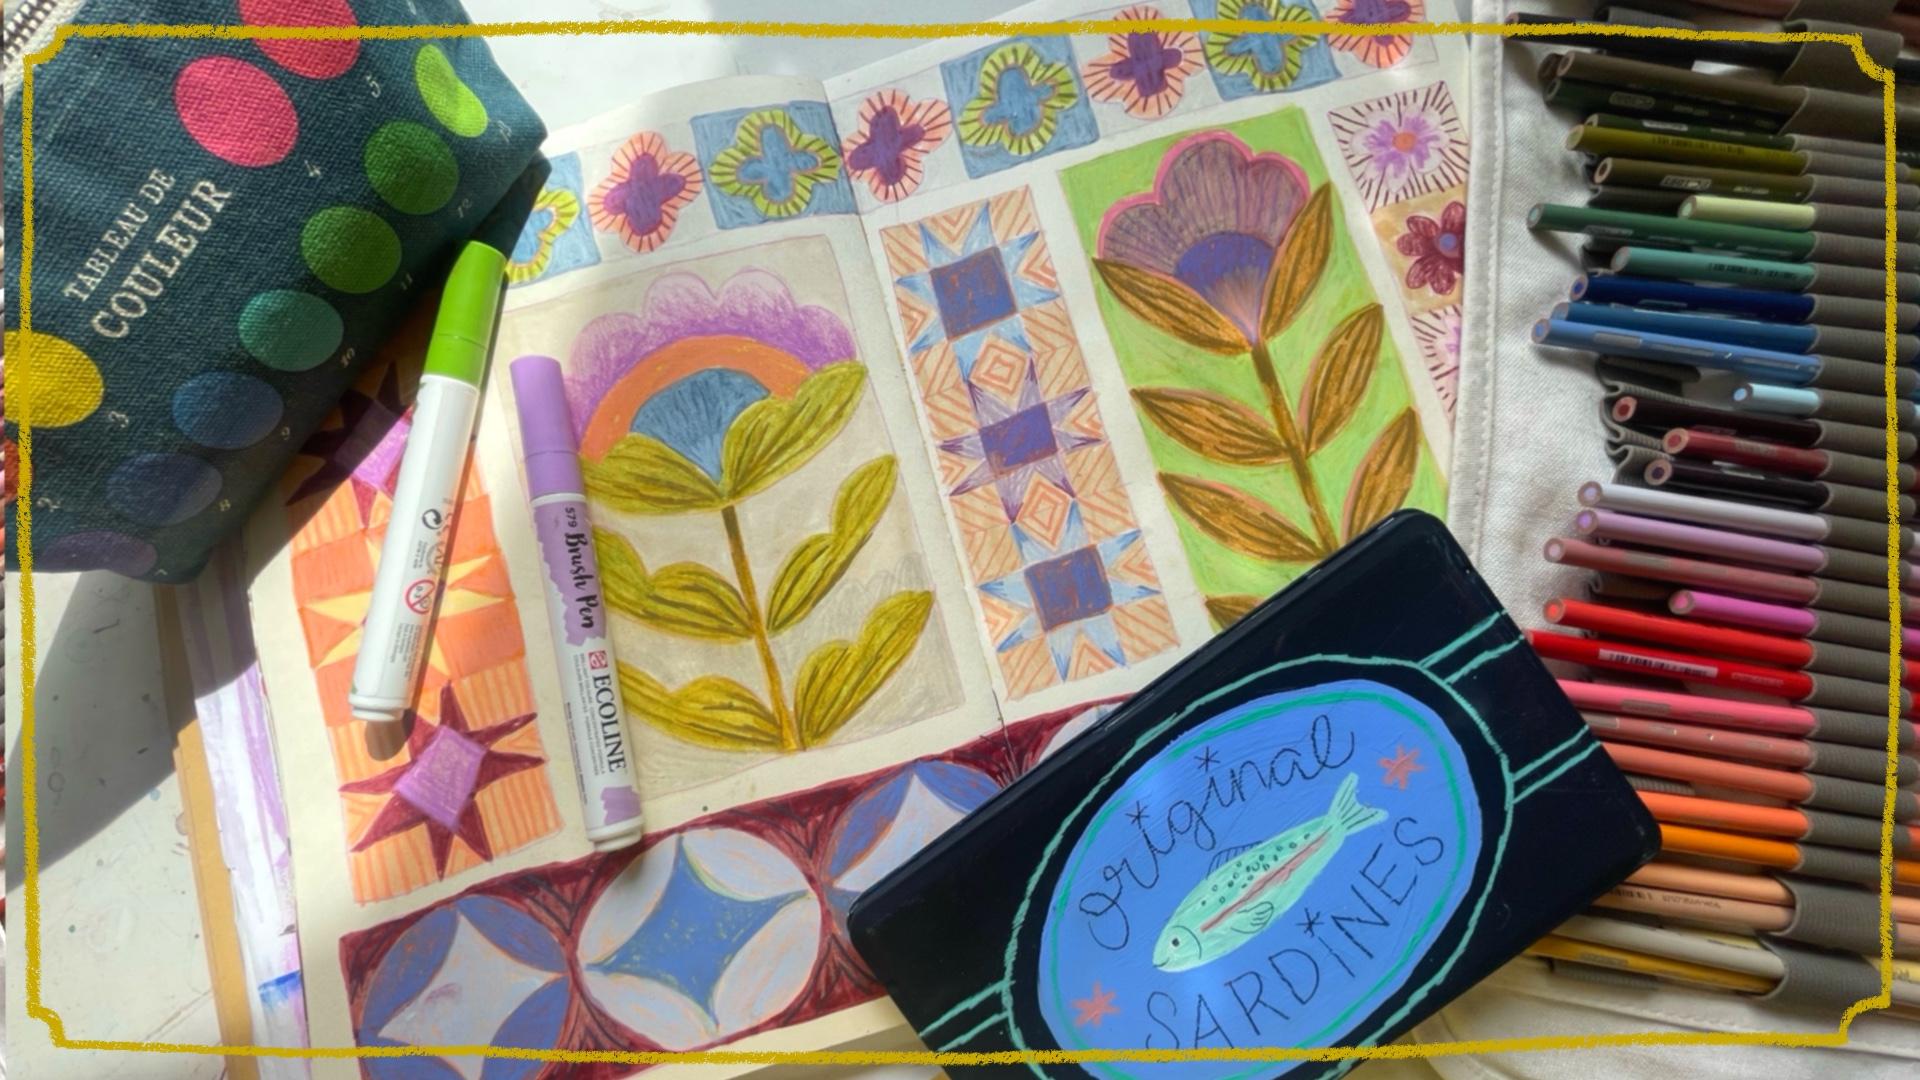
2. Supplies and Class Project: All right. In order
to do this class, I suggest that you
have a sketchbook ready and any and all art
supplies that you have, you can use whatever you
feel most comfortable with, whether that's markers,
colored pencils, paints, all of the above. I will share in the next section the materials that
I plan on using, but it's completely up to you. And if you don't even
have a sketchbook, just do this on a
plain piece of paper. The class project will
of course be to share your final paneled page and with all the different colors and
layering techniques that you tried and the different graphic elements
that you tested out. I can't wait to
see them already.
3. Intro to Panels: Before we get into
the class project, which is creating
a paneled page, I really want to go through
some of the examples from my portfolio so that you can get an idea of what
they can look like, inspiration that you can do, different variations you
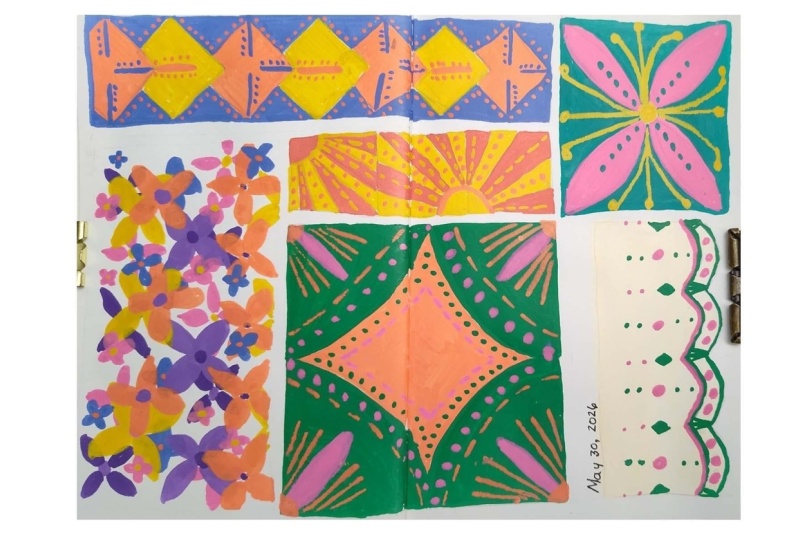
can try, all of the above. Alright, so in a previous class, my full sketchbook
pretty spreads edition, I shared with you how to create spreads that are a
little bit more curated. And I introduced
these little sections that have a decorative element, and I just really
fell in love with creating those even more
than the rest of the spread. So I started creating these paneled pages with just
the decorative elements. It was started out being just as a place for me to
reference for other pages, but then they became so
much fun to create that I just I just couldn't
stop doing them. So here are some more
inspiration for you. These are the kind of colors
that I enjoy working with, and even though it seems
like you're just coloring in or just creating
something decorative, I do learn a lot about color and layering and
you could turn this into an exercise where
you are learning about what materials you like to play with and what colors you like to layer
on top of other colors. So even though it
feels like kind of a peaceful kind of exercise, it doesn't really
teach you anything, I would beg to differ. It does teach you a lot.
This one's not my favorite. I don't know. Just but, you know, all of them
can't be perfect. So, yeah, this is what we're going to be doing in this class. I will show you my full process of doing these kinds
of paneled pages. They're just so much fun, and they secretly
teach you a lot about layering and color
and stuff like that.
4. Materials: In this section, we get to
talk quickly about materials. I know I talk about
materials way too much, so I'm going to keep it
short and sweet this time. Promise. What kind of materials
should you use for these? Well, you can, of course, use whatever materials
you prefer using, but I like having some kind of base layer, and that
could be paint. But I have been enjoying using markers because it's quick and easy and it's a little bit more you can get
into fine lines. You can do that
with a paintbrush, but I think the paintbrush
takes a longer time. And for these, I just
kind of want to do them. I don't want to spend hours
and hours doing them. But, I mean, that's
totally up to you. So watercolor would
be a great option. Paint pens, like acrylic pens. These are more of the
watercolor type of pens. These are from Ecolina
and they yeah, just have a nice wash of color. But, yeah, again, up to you. And then once I've done
a base layer of color, either in paint or marker, then I love to add details
either with colored pencils. These are a selection from Prisma color that I really
enjoy working with. So that's an obvious
choice, I would say. And then I love also working
with Karen dash NeoclorTs. And here I have lots of
colors and little stubs. And then I like that
they are quite blunt, but if you do want to
sharpen them, that is, of course, possible because they're so expensive
and I don't like waste. I like saving the shavings. I use the Derwent
pastel sharpener. And if you just sharpen
I have different areas. Here's more like a yellow, so if you just sharpen
the little shavings onto your old watercolor pan and then just sprits it
with water and the settle, and then you can later put a lot more water and
mix them around. Then you get a little
a free paint pen, and you can use them as paints, which is really fun. So yeah, I could
just show you that. Take a little water
spritzer so that they kind of settle and sink in
and turn into paint, and then it will dry and
turn into more of a paint. Really fun. So that's like
a little bonus for you. Okay, so those are the
materials I'm gonna be using. But like I said, feel free to use whatever materials
you like using.
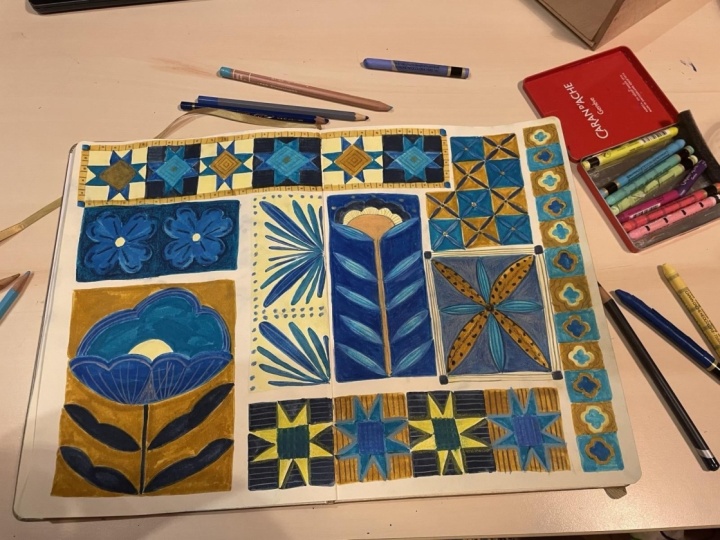
5. Page Planning and Quilt Inspiration: All right, we're starting to
get into our class project, and before we jump into creating our page and I know that it's always scary with
the blank page, I'm going to show
you how to plan your pages so that
they look good. That's important. Before we
actually start on our page, I love doing some preparation. I like being prepared. Like with most people, I find the blank page
a little bit scary, so it's nice to have
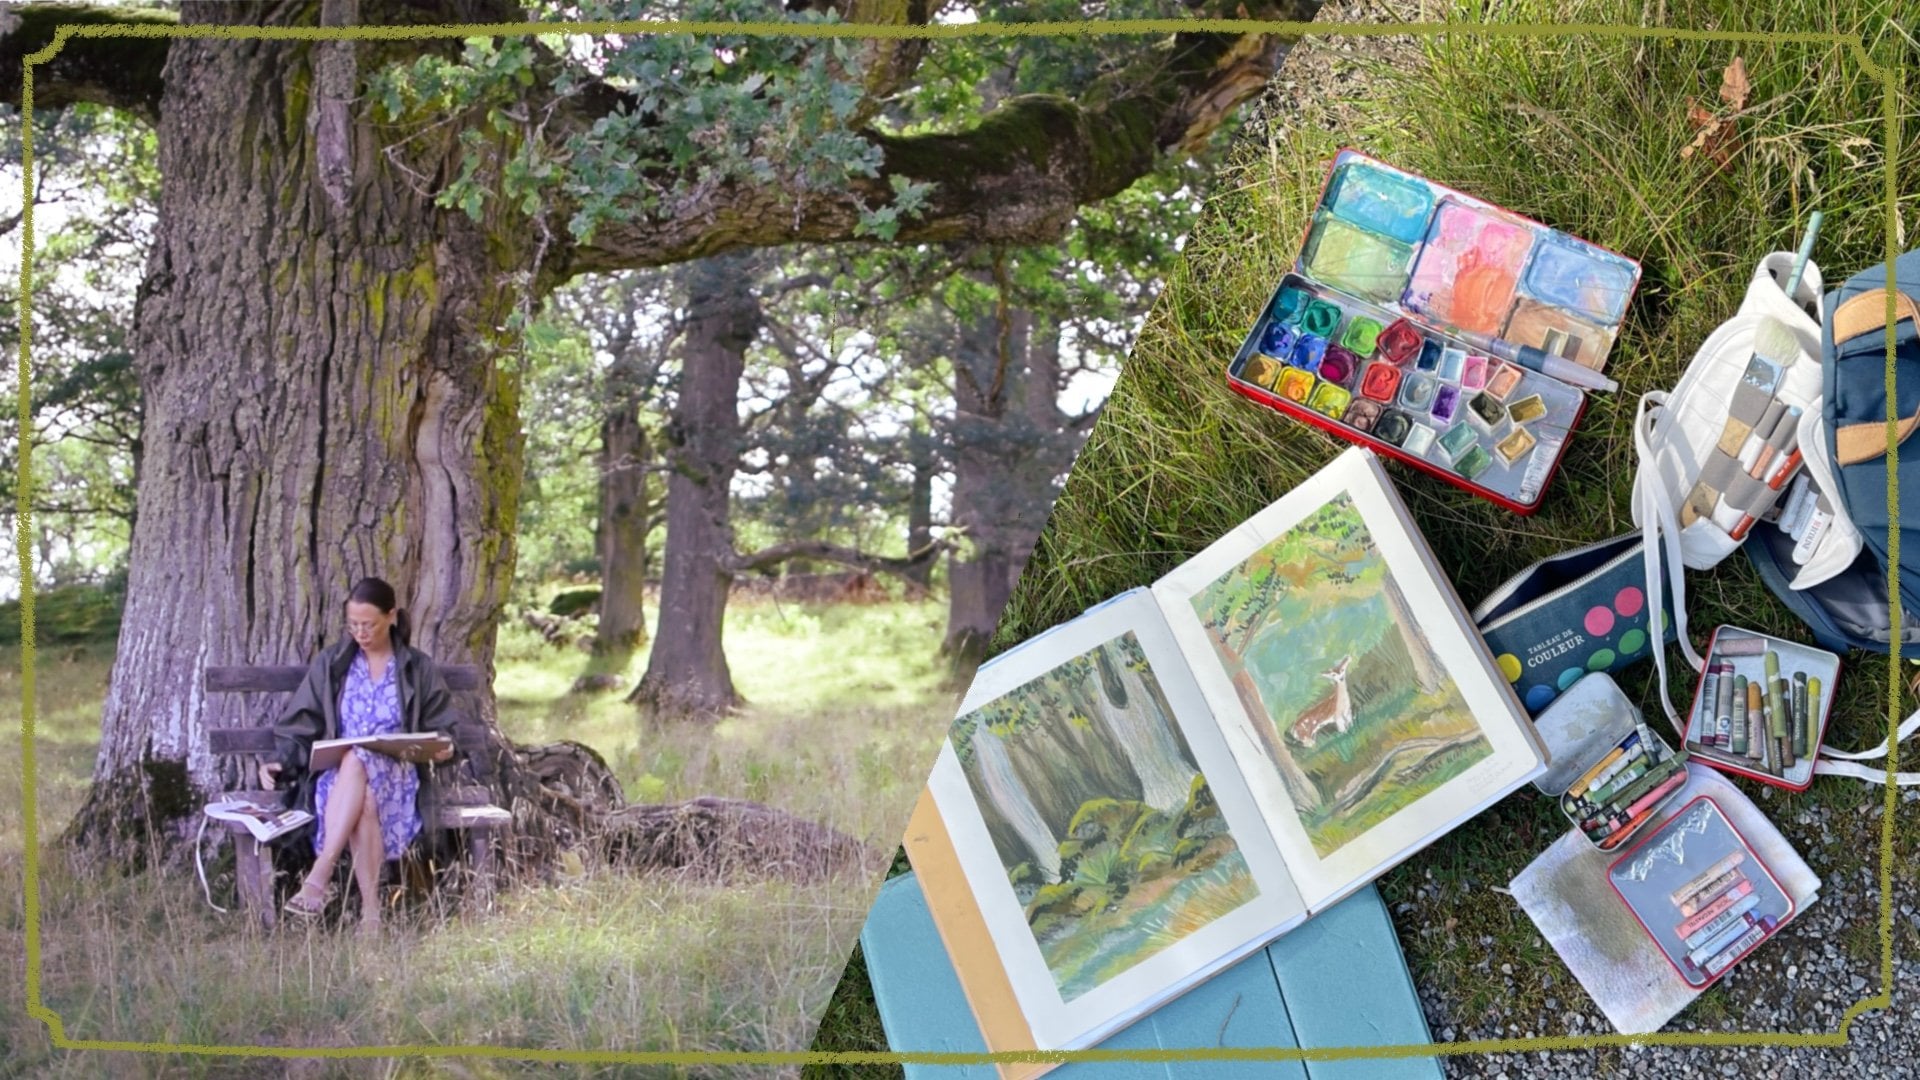
reference material. So I one day, since I was so inspired
by these designs, and they are very,
like, quilting based, so I went on to Pinterest, and I looked up quilt designs. And I found all of these beautiful geometric
shapes and things. So I highly suggest that you take an hour or so, 30 minutes, maybe just and comb through Pinterest or Google
or some other website that you like using and
just look up quilts or geometric designs and sketch out some of them
for your reference. So here I have some of the standard classic
quilt like stars, they're called
Aunt Eliza Star or the Sawtooth Star or Rose
City or pinwheel or fans. We have other designs that
are more modern with circles and flowers and I
really like diamonds. I just think that they are so
much so much fun to create. And you can start once you
start getting reference, you can start making your own, of course, and figure out how you want to
decorate your pages. It's just nice to have
something to look at. So when you are trying to figure out how you
want to do your page, you can, yeah, have
something to look at. So I really highly suggest
doing some reference pages. I have it in a separate
sketchbook so that when I'm using my main sketchbook that I
can reference it easily. But you can of course, do it in the same sketchbook. All right. Now that we have some
reference material, we know what materials
we're going to be using to draw with, how can actually get started.
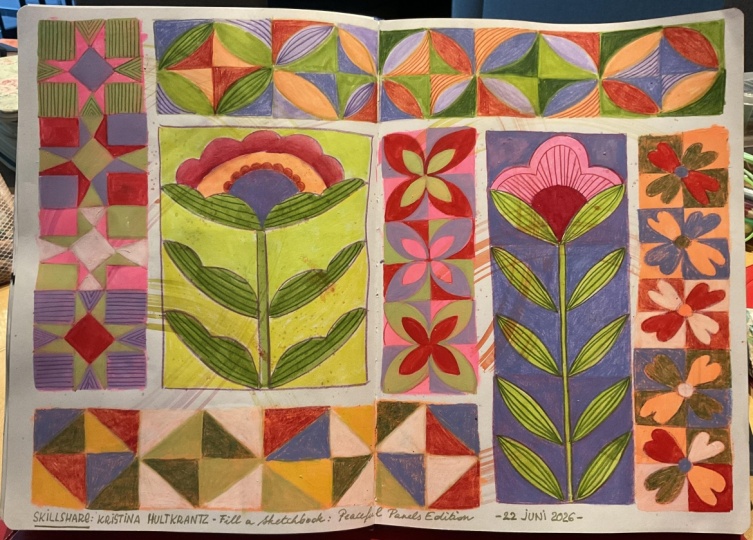
6. Project Sketch: All right, it's time
to get started for real on our class project, which is creating
a paneled page. So in these next sections, I'm going to be sharing with you my full process of putting together a peaceful
paneled page spread. Okay. Alright, it's time to get started on our paneled page. And I have my notebook
over here to the side, but I can bring it in front and we can kind of figure out how
we want to do this. Remember, this is supposed to be peaceful and nice and not
stressful experience. So it's, just take it easy
when you're creating this. So I'm using a colored
pencil to mark in my lines. You can use a regular pencil, but I think regular pencil
gets quite muddy sometimes. When you paint over it,
everything turns kind of gray. So a colored pencil
of some kind of color that you like.
Something quite light. If I wasn't doing
this on camera, I'd probably choose
something quite beige that that melts quite into the page, but so that you'll be
able to see I'm going to use this beautiful
lilac color. All right. We need
to figure out what our grid is going to look like and I like to make sure
that for the most part, I don't go over the seam
because if you have one of your blocks right there in the middle, it's
kind of annoying. But other than that,
it's kind of fine. I don't mind if it goes
over a little bit. So what should we
do? I've clamped down my page because I
wasn't wanting to sit flat. So just go for it. I'm going to create a
panel here at the bottom. I'm going to overlap
that a little bit cause a little
overlapping is nice. And then maybe like
one square worth. And I'm not going to measure. I'm going to use
eyeball measurements. So pretty big squares here. And then just gonna whoops, move around my page. Maybe I'll do a thinner section up at the top that goes
a little bit longer. Maybe like that. Looks good. You can use a ruler if you want, but again, this is supposed
to be fun, not ruler time. L There we go. We have another section.
And for the most part, most of my designs were
based around a square, so that's why I'm doing squares. Again, it's just nice
to have some kind of parameter to hold it together. Here we have another section. Let's do a section that goes along here that goes
down to this section. I have some of those
nice floral elements. Maybe I'll keep that one open and we can do a nice
flower over there. I also Maybe we can do another
flower over here as well, 'cause they're so fun to do. So I'm going to do a big
fat flower section here. So we can do a really big one. Feel free to do exactly
what I'm doing. Usually, I'm always
like, do your own thing. But for this class, these are just geometric
shapes. Feel free. If you just want to turn your
brain off and follow along and do the same thing as I'm
doing, please feel free. Okay. And that's another one with Um W W squares. And we'll do another
thin one here. And again, I don't want to
do anything on that crease, so I will just do here. And how many can we get in here? Three. Okay, and then we
have one main section here. We could do one big block, but I feel like
we're already doing, like, a big flower here. I don't know, or should
we do one big flower here and one long flower, and this could be
more gemetc shapes. That's something we could
do, and let's do that. Okay, so then I'll turn this
one into a block of design. So now we have our grid
set up and it feels nice, and I'm excited to fill it in. So then we have to figure out what kind of designs we want. These ones I want to be
these geometric flowers. So again, I'm going to
bring out my design here. And for this one, I definitely want to do
that one with the leaves. So, um, I kind of it's kind of nice to have the grid here so I can figure this out. Oops, like that. And that and a section in
the middle for the stem. A nice big graphic leaves. Or was it like that?
No, it was like this. You can't really
erase colored pencil, but maybe a little bit. It doesn't matter, 'cause
we're gonna color over it, but it's annoying
to make mistakes, but that's how it goes. Okay. And then we have
the top floral bit. And then we have this.
And then I think I'll do a nice scallop here. Okay. So there we have
one graphic flower. So then we're going to
figure out what we're going to do for the other side. We'll do something
similar as well, but I'll try to switch
it up a little bit. So I'm going to make a nice
scalloped edge for the top, and then we can do more layers
of color for the flower. I'm doing a scallop kind
of edge with the leaves. There it goes. There's
another main one. So that is fun. Okay, now we're going
to add in our designs. Definitely I need to do one of these aunt Eliza's
Eliza Eliza's star. So that one, we can just do
a diamond in the middle. Again, I don't mind
the wonkiness. I embrace it, and
I think it's fun. So once you have your
diamonds in there, you take the middle point and you create little
squares like that. And then great triangles from to the points
of the diamond. There we go. So we
have one star pattern. And then I also I really like these kinds
of patterns as well, the really circular ones. We can do the big circles
here at the bottom. So here I'm going to do circles
around the whole thing, and then connecting them
with diamonds in the middle. Again, it doesn't matter if
your circles a little wonky. Okay, and then
continue like that. Okay. And then let's do these little clover
kind of designs. Let's do that at the top. So just making a
clover on each one. And then the second one
that goes to the edge. That one I didn't do
in the center at all. Okay, so there's another
section completed. Okay, we just have two more. So what do we like? We like
the little flower ones. I also quite like the diamonds. This one. Fans,
pinwheels are fun. The other type of
quilted star that's a little bit more square, we
could do that one here. And then flowers
down the last edge? Let's do that. Or fans? No. Let's do the sawtooth stars. So that one's more straightforward with a
square in the middle. And then edges down like that. You could, I assume, go like this and make it a lot neater. Yes. And then create
the little triangles. And, so there we have our saw tooth star. And then the last one
we're going to do we're going to do little flowers. So here we have a little
circle in each one. This one is almost a little easier if you have
a little guide. So I'm going to create
a little guide here, a little cross through all of them without going
through the center. Okay, sen and then within those, we make little almost
heart shaped petals. All right. So now
my page is planned, and now we get to do the fun
part of filling it all in.
7. Project Base Color: Alright, so now it is time
to color in the page, and this is just really
relaxing and lovely. But there's some things that
I'd like you to think about. So with markers, I
got a whole set, and of course, there are going to be certain colors that you
don't really like, and I think that's kind of
an interesting challenge. So I'm not very drawn to orange, but there's two oranges in this set. And a yellow as well. So those are kind of interesting for me to figure out how can I use those up and make
them how I like them. One thing that I have
discovered is that I love the orange and then putting a
complimentary color on top, like, purple on top, and that just becomes so
vibrant and interesting. So that is something
I've discovered. Also, this, mahogany, brownish red looks beautiful also with
pinks and purples on top. So you can really really discover things
when you're doing this. My bag here was really
dirty, so that's nice. Get rid of that. So that's just something I
thought you say. Don't just pick, like, 'cause these aren't going to be the final colors necessarily. You're gonna add texture, and you can put
other colors on top. So just kind of
randomly put in colors. Choose some that are
darker backgrounds. Think about contrast. You can do all the blocks come
different for each one or, like, alternating or the
same. Just go for it. And for me, I just
like to fill it in and not think about
creating any final details. Those are gonna be done
with my other materials. So I'm going to put this on time laps and feel
free to enjoy. Yeah, enjoy filling in with me. Okay, so everything
is filled in. Some are light and or here,
no, I forgot this one. I. One last one. Gosh. Okay, now
everything is filled in. And as you can see, I don't
do super perfectly because I'm going to be filling
everything in on top of this. So this is just my underlayer. So now it kind of looks
like a messy kids drawing. Not that that's bad, but, I mean, not the
look I'm going for, but this is how they
start look a bit messy, and we're gonna
clean it all up with fun layers of different colors, and it's going to
be so much fun. So and also, like, these aren't the color
palette that I like. There's so many oranges. Again, orange is, I think, my least favorite color. But it's fun to give yourself a challenge and how you can make it into something
that you really like. So we're gonna bring this to
life in the next section.
8. Project Details: Alright. Now it's time to
move on to the fun bit. So we have the markers
dry really quickly, so you can pretty much
just continue on. But if you are using paint, make sure that you are
waiting until it's completely dry so that it
feels like paper again. Otherwise, you're gonna
rip up your paper. Just to give you some
inspiration again for what I like to do here is like I just mainly go over
once with a new color. Think about sometimes with
those contrast colors. And other than that, maybe I'll add little line work
here and there. But otherwise, I keep
it pretty simple. But you can go and do shading and other colors and designs
and just go all out. But this is what I
like to do. Just like simple shading on some areas. It's a little line work,
but mainly just filling it in with another coat of color. So that's where we're
going to be doing. And I like, like I said, I like the neocolor. So I have those over
here to the side. So the neocolor and I
have my colored pencils, and these ones are
from Prisma color. So I'll just go for it. I want to show you
how it looks with the orange when I put
purples and blues on top, and I think it looks so good. And again, I'm being
maybe a little bit more careful than I was
when I did the markers. I was a little sloppy in areas. But now I at least
try a little bit. So when you color
in and you leave a little bit of
that orange behind, I think it just
looks really nice. It makes it more interesting and makes it pop a
little bit more. There's with the
more bluish color. This one's called sky blue. And then I can try the purple. I don't know which ones this
is because it's so small. Doesn't it just look so much more vibrant
and interesting. I prefer how colors look when they sit on top of another color rather
than the paper. When the paper is underneath, everything looks
unfinished, I feel. When you have when you're coloring and you're
leaving space behind. I thought that we could do
one of the flowers together. So my yellow marker
was running out, so it didn't color as
nicely, but that's right. But I thought I
could go over with a little bit of this artichoke. No, this is lime peel. Lime peel that'll do. So I can just go over. So I can do a
pretty light layer, and then both of them combine, and that becomes more
interesting. I hope you think so. Here on the leaves, I could potentially do a
little bit of shadow, so I could, if I wanted to
bring out another color. So what? Artichoke.
Is this one it? Yeah, here's artichoke,
and that's, like, even darker version
of the lime peel. So I can add a little shadow
just to play with shadowing. I can also do veining
in the leaves. Just to give them more of
structure and interest. And here, maybe I'll
make the stem a lot. Darker so I'll do
the whole thing in this artichoke color. Where's that. And
sometimes if you think that the color pencils
aren't going over so well, you can jump in with
the neocolor and they definitely go over
everything and make everything a little
bit more intense. So if you want some
areas that are a little bit more saturated, darker colors, and these
are a great option. They are just very difficult to go over once you
have those down. So once you have figured out
how you want things to look, then then you can have neocolor as a final layer because they're
so deep and rich, but they're very
waxy, so Alright, so then we're just
gonna keep going. And I want to mention also that light colors on top of dark
colors are really good, and you don't always have to use the colored pencils first. You can go in with Let's try this creamy yellow on top of this color and just mute it down. What
does that look like? Kind of interesting. Kind of messy. I
kind of like it. Looks chalky, interesting. Again, I'm going to
use that purple. I like how that looks and maybe draw this time a
little bit more thick, that's really intense there. It's nice to keep
some little hints of that orange in there. Here we can do some
decorative elements in here. And maybe a pop of
pink at the top. Okay, so I'm just gonna
continue on like that. I'm gonna put on some
nice music again. I hope that you'll join
me filling in your page, and we'll see what
we come up with. Okay, so I've finished my page. I am sure I could
continue adding details and smudging things
and things like that, but just I think
we're good for now. I don't It's not my favorite
page that I've ever done. But that's also a part of this to figure out what
you do and don't like. I definitely like how my
flower over here turned out. I like this area.
It's quite fun. Some of this is
quite interesting. I don't like this green in the background,
but it's alright. Also, like, you know,
just I don't know, could try and change it. But what's done is kind of done. So yeah, that's the class. I really hope that you
feel kind of calm. It's so nice to just
sit here coloring it such a beautiful practice
having a sketchbook and then having these kinds of
pages that you can go back to time and
time again when you just want to
maybe you're having a rough day where you're having a great day when
you just want to color, you know, put on your
favorite TV show or your favorite music and
just sit and enjoy like 40. This took me about 42
minutes to complete. So I mean, I could
have taken way longer. And I could have
done this quicker. So yeah, I just really hope that you've enjoyed watching this. I can't help, like, just
try adding more details. At a point, you
have to figure out, like, when do you stop. Anyways, here we go. Thanks so much for taking
this class with me.
9. Next Steps: All right, so I
really hope that you enjoyed creating a
paneled page of your own. And in this quick
little section, I just want to go
over some next steps. Feel free to do this exercise as many times as you want to
however often as you want to, if you found it really relaxing, you can set up lots of pages, like sketch out the framework the panels one day
when you're feeling quite motivated and creative and keep those for other days when you just want to sit down and color, fill in the lines, you know. So that's one thing
that you can do. Just remember to have fun
with your sketchbook. Remember that you
don't have to do it page by page in order. You can flip to the 50th
page in your sketchbook and create a paneled little section that will be a nice
surprise for you later. I just really want
you to feel like this is a creative
outlet for you that's a safe space and essentially,
you don't have to share it. I would love for you to
share it in this class, but other than that, I
mean, you don't have to.
10. Where Else Can You Learn with Me: That's it, everyone. Thanks so much for taking
this class with me. I really do hope
that you found it peaceful or mindful or fun, actually, and that
you want to share your final paneled page with me in the
class project area. It's gonna be so much fun to see what materials you chose to use, which graphic
elements you enjoyed. Which panel was your favorite? Did you do, like, three of them 'cause you
couldn't stop, like me. Like when I got
started with these, I was just like, I just
have to do more and more. That's going to be
really fun to see. If you'd like to hang out with
me outside of Skillshare, you can find me on Instagram
at Kristina Hultkrantz. My website is Kristina
hultkrantz.com. I have a beautiful supportive patron community that
you could check out. It's a monthly membership. I have one Section
four surface design, if that's more of your thing, if you like commercial
illustration and you'd like to
develop your portfolio with themed collections
every single month and you need that motivation. I also have Fun Friday, which in the name
it says it's fun. So it's all about art play and discovery and
experimentation. We work with themes
there to develop our art, mainly in sketchbooks. So yeah, hopefully I'll
see you there one day. Until next time, please make sure that you're
following me here on Skillshare so that you'll be notified when I come
up with my next class. And if you haven't already, make sure to go to my
profile and see that I have 40 plus something classes
that you can check out. Yeah. So there's way more to see, and there's way more to come. I can't wait to create
more classes for you. Bye.
 Kristina Hultkrantz, Illustrator & Surface Pattern Designer