Transcripts
1. INTRO: Hi, and welcome to this class. My name is Ala, and I'm a fashion illustrator. And in this class, I'm going
to show you a clear, simple, and intuitive way of
drawing fashion faces without too much anatomy and
too many academic roles. We'll focus on shape and different unique
facial features, and we will base everything
on a simple egg shape. And then I'll show you
how you can change it to draw a face at
different angles. We will also practice drawing different facial features such
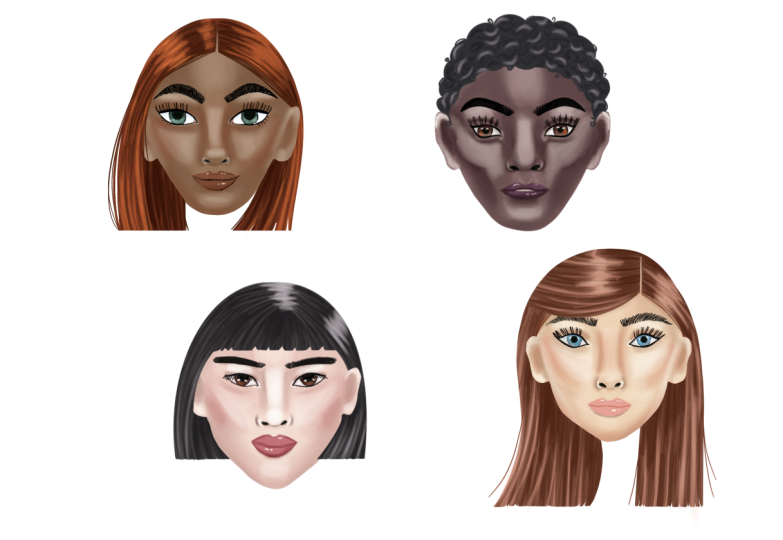
as lips, noses, and eyes. Will also show you how to render different skin tones with
different temperatures. For example, dark, cool skin tone or a warm light skin tone. Everything is demonstrated
clearly appropriate, but you can apply the same
techniques in any medium, even if you draw with
pencils and markers because we are talking about
basics such as highlights, shadows, and the forms. So this class is actually for anyone who's interested
in fashion drawing. I believe that
everyone is an artist. So grab your iPad, pencil, and let's start drawing.
2. TOOLS & SETUP: So first, let's
quickly go through the pro creols we'll be
using in this class. So I have four drawings
on different layers, and let's say I want
to select L three, it says empty layer. Why? Because I'm
now on layer four, so I need to go to layer three, and now I can select L three and move it and
do anything with it. When you tap on a layer, you can rename it and perform
many different actions. Here, where you see
this capital letter N, you can change the mode. Now it's N because
it's in a normal mode. I can also drag a layer to the right to select
multiple layers at once and I can move and transform everything
that belong to those layers. I also can group several layers. Close the group. And now I'm working with everything that belongs to all
these layers in one group. So here's our group. You can also rename it. You can duplicate it by
dragging it to the left. When I tap this checkbox, I hide the selected
layers or groups. If I want everything inside a group to become
one single layer, I can tap flatten. Now it's not a group anymore, it's one single layer. I'll delete that layer
and show the group again. If I tap on it and choose group, all the layers inside
become separate again. Now, for example, if I have
layer four above layer three, I can choose merge down. These two layers then
become one layer. Now let's talk about how
we'll usually organize our layers when
drawing and rendering faces, bodies, garments, later. So first layer that I have at the very base is a base
layer of base color. Above it, I create a
layer called shadows. Above the shadows
will have highlights. Usually above that
will be the linework. Then I click plus icon and create one more layer
and cool it details. It's for anything extra, we want to add to the sketch. As you can see, most
of these layers are set to normal blending mode. We'll change shadows
layer to multiply mode and highlights
layer to screen mode. Very often the shadows
layer will also be clipped to the base layer. It's above the base layer
and I click clipping mask. I do the same for the
highlights layer. It's very important that they
are above the base layer. Let me show you what that means. I'm now working on
the base layer. I create this circle selection. When holding my
finger on the screen, the circle becomes
a perfect circle. Then fill it in with color by dragging the
color into the selection. Now I switch to
the shadows layer. Which is clipped
to the base layer. When I draw this clipped layer, I can't draw outside the
shape of the base layer. When I try to draw anything, I draw within that circle only. This is extremely handy when
you want to work only on a specific surface
like skin or fabric. It works in the same
way for highlights because highlights
also clipped layer. If I drawn a layer that is not clipped like layer
three or layer four, you'll see that the stroke appears even outside the circle. Next, let's look at how to
activate the drawing guide. I go to Actions menu, Canvas drawing guide, and usually by default,
we have a grid. So I tap Edi drawing guide because we need a symmetry tool. I click on symmetry and I get this vertical line that
I can move around. So what this tool gives me? Now I go to layers and my base layer is assisted.
I don't need that. I use base layer for color only, so I deactivate the
assist and I go to, for example, linework
layer and click assist. Now, when I draw anything
on a linework layer, the drawing gets mirrored on
the other side of the line. This is very useful
for things like nose bridge or eyebrows that need to be
mostly symmetrical. To deactivate it, I
simply go back to the layer and turn the
drawing assist off. You'll immediately see that my drawing is no
longer mirrored. I also turn the drawing guide
off from the actions menu. We only use a few
brushes in this class. The first one is a six B
pencil from the sketching set. The second is Jasinski
brush from the inking set. We'll also use a monoline
brush from calligraphy. Finally, we'll have
a shadow brush, so I created in the drawing set. In a stroke path, I change
the space into 10%. Then I go to grain, tap edit, choose import, source library, and pick B noble. Then I tap done. Next, I go to scale
and reduce it to 13%. In wet mix, I change the
grade to minus four. And that's it. You can tap and hold the brush to open the
menu and rename it. I call mine simply shadow brush. We'll be working with four
colors for each skin tone. Bye skin color, shadow color, transitional red,
and highlight color. This structure stays the
same four skin tones. I already have these
palettes prepet. So this is base cool
light skin tone, then shadows, transitional
red and highlights. Here we have the palette
for dark cool skin tone. This is warm light skin tone. And warm dark skin tone. All four of them are here. So you click Plus, and then you upload
from the folder. Usually, it's a
downloads folder if you download the palette
using your iPad. Another very handy tool
is the color picker. It's located right between the brush size and
brush opacity controls. And there are other ways
of selecting colors. You can explore a
bit procreate and find many useful features. Next, let's look at
the selection tool. This is a freehand selection, and it's extremely
useful when you want to recolor or just a
very specific shape. For example, if I want
to recolor your lips, I select them using the
freehand selection. Then I go to adjustments, choose hue saturation
brightness, and here I can change the hue. And here I control
the saturation, and I also can adjust
the brightness, making a daka or lighter. You can also make
selections using a rectangle or an ellipse. Another very useful option
here is the add function. For example, I
select one object, then tab ad, select
another object, and add another one. Then I have all
of them selected. Let's talk about
transformation tool. I select your head. If uniform is activated, the object scales
proportionally. If I switch to free form, I can transform it in one direction only
horizontally or vertically. I can also flip
objects horizontally. Another tool we'll be
using is a smudge tool. I can make a stroke, then switch to smudge
and work with the edges. This tool is very
important when you're shaping forms and blending
shadows and highlights. The eraser tool is also more
versatile than it seems. You can use different
brushes as eraser. For example, Jasinski ink and create this
interesting edge. Now a few useful
finger gestures, two finger taps to undo, three finger taps to redo, and a three finger swipe
opens a quick menu. You can customize it in
settings. And that's it. These are all the tools we'll
be using in this class. You don't need to memorize
everything right now. I'll remind you of each tool
exactly when we need it. For now, just make sure
your color palette is imported and your shadow
brush is created. I'll see you in the next video.
3. NOSE: Here's our nose practice. I have four examples
of different noses. I'm creating a new
layer and I'll pick a red color just to make
everything clear and visible. First, I draw a triangle
right between the nostrils. In this example, we
have a wider nose, so the triangle is more
stretched horizontally. In the third example, the triangle is also
flat in the last one, the triangle is a bit
longer at the bottom because the tissue between
the nostrils is longer, so the bottom of the nose. Now I'm repositioning
these triangles a bit lower so we can actually start building our
noses on top of them. Next pay attention to the
shape of the nostril wings. Here they look more like the classic bracket
shape we're used to. In this example, the wings are longer and much more stretched
than in the first one. Here they are straight at
first and then curved softly. Let me show that
with green color. You can see that the sides
are straight and then curved, quite similar to
the other example. Now let's look at the shape
of the nostrils themselves. In this case, they
look like tiny drops. Here we barely see
the nostrils at all. And in this example, they also resemble
drops or small seeds, rounded on one side and
chapa on the other. And here they look more like
tiny rounded triangles. Triangles of this shape. And here we have this
drop or seed like shape. In this first case, I would draw those triangles
at a slight angle. Okay, now let's look at the outline of the
nose at the bottom, taking everything into account, including the
nostrils themselves. If you imagine this outline
like bicycle handles, you'll notice that each one has a slightly different shape. To make this easier to see, I'll go to adjustments menu
and reduce the brightness. Then I'll just move
all these outlines downwards towards the triangles. So I'm moving this
one separately. Next, let's draw the nostrils. I usually draw them a bit closer together than they
are in reality. So here you see the distance between nostrils and
the nostril wings. In reality, they
are a bit further. So I'm adding nostrils here. These nostral wings are a bit similar in the second
and third examples. And here we draw
them a bit longer. Now let's talk about
the nose bridge. In the first and
second examples, the breech is flat, but we still add shadows because they are not
completely flat. The shadows will be more subtle. To define the nose bridge, we have these highlights that help us see those shadows too. So in the third and
fourth example, noses are more prominent
and we have deeper shadows. When there is a
bump on the nose, the highlights and
shadows change. They are not just
straight line anymore. The area with the bump becomes slightly
thicker in the middle. So we differ the shape of
the shadows and highlights. In the fourth nose, the breach is narrower, so the shadows are deeper
at the top as well. To make the shadow placement
easier at the draft stage, you can simplify the nose
into a crystal like shape, basically adding extra triangle on the top of the existing one. This additional triangle helps guide your shadows and
highlights later on. You will see how wide the nose is if it has or
doesn't have a bump. Here is the extra triangle
that I'm talking about. Here's where we
would add shadows. Here we have our noses. You can draw as many
variations as you want, keep them as references, and reuse them later
in your drawings.
4. EYES: Let's practice drawing
these eyes together. You can simply follow
along with me. I'm starting by choosing
a six B pencil in black and we'll analyze
the eyes before drawing. I'll create a new
layer and I'll use a green color so you can clearly see the points
I'm indicating. We have two main points, the inner corner and the
outer corner of the eyes. When we connect
these two points, we can immediately see the
difference in their position. The outer corner sits slightly higher than
the inner corner. Now look at the line
connecting them at the top. This is the upper eyelid. It's flat near the
outer corner and becomes more curved as it
approaches the inner corner. If we look at the lower eyelid, we see the opposite picture. The line is flat near the inner corner and it becomes more curved
towards the outer corner. You look at all these
things when you see some image that you
want to redraw, and then you can actually
draw that type of the eyes. Now I'm drawing the iris. Notice that the top of the iris is hidden under
the upper eyelid. The same applies to the pupil. We don't draw a full circle. I'm showing some
shadows closer to the upper eyelid to
enhance the depth. I'm also adding
small details like subtle strokes along
the lower eyelid. This tiny details, they
make face look more unique. If you see some lower eyelids, some tiny freckles or
moles, you can add them. When drawing the inner
and outer corners, try to keep them slightly sharp, so the eye is not too wide
open closer to those corners. In this example, the eyelashes
are facing downwards, so I draw them directly along the upper eyelid line just
as I'm showing right now. The first model is
Asian and often we see straight eyebrows
with less dramatic curve. I'm just going to copy
and paste this eyebrows. With uniform selected
in the lower menu, I can resize the eyebrows proportionally by dragging
any of the blue points. Let's look at the second eye. Here the inn and
outcas are almost on the same level with only
a very subtle difference. The overall shape is soft. I resembles fish or a leaf. We have a gentle curve on the top and wave like
shape on the bottom. This wave changes direction roughly in the center
of the lower eyelid, it curves outwards toward the outoca and inwards
toward the inner cone. Now I'm making this
incona look more natural. In this example, the
top and the bottom of the iris are both partially
hidden under the eyelids, but the pupil is visible. The eyebrows here
are more curved, thicker and have
more dramatic shape. Again, I copy and paste
them just for the sake of the speed and we'll add some details later
when we draw faces. My eyebrows on a separate layer and then I want to merge down. The eyes and eyebrows are on the same layer and just going to select the whole thing and make it on the same level
as the previous eyes. The third pair of eyes
is very similar to the second one but
slightly more reclined, creating a cat eye effect. The outca the outer
corners are higher, but the overall
shape still feels like fish like and soft. I make the outcas
again, a bit sharper. The eyelid line follows the same upper shape
we identified earlier. Here again, part of the iris is hidden under
the upper eyelid, which keeps the
expression relaxed. I add eyeliner and eyelashes. Remembering that the eyelashes,
they change direction. They are more reclined towards the out core and
then they change direction as they come
closer to the inner core. In this example, we can see soft shadows near
the nose bridge. I show them with
very light strokes and then draw the eyebrows. Here I also want to adjust the length of this
part of the eyebrows. I can select them separately
and just stretch. The last eye, I start by observing the position of
the corners of the eyes, the shape of the upper line, the shape of the low line. The low line is quite flat, but it has a strong curve
near the outer corner. I draw the eye shape
based on my observations. Then add the up eyelid. Finally, I draw the iris. These eyes are bigger
and more open. As you can see, we even have some space left at the
bottom of the iris. Next, I'm drawing the eyebrows and they also curved
more dramatic. Now I'm adding the eyelashes and you'll notice
that in this example, the lower eyelid is prominent and I'm adding
some shadows to show that. That's it. Now we have four different eye
types and you can create as many
variations as you like. Slowly build your own library of eyes that you can use
in the future drawings.
5. LIPS: Let's start by
analyzing the lips. First, look at the overall
shape of the lips. The lips can curve inward
or outward and you can see how different these curves
across all four examples. Here's a bit flatter and next pay attention
to the cupid bow, the top center part
of the upper lip. The corners of the
cupid bows can be different too.
They can be sharp. They can be softly curved. They can be deep or flat
as in this example. And you can see that we're
getting shape like in a mama, and those s that
we're getting right now drawing this up lip
line, they're all different. Another important thing to observe is the
thickness of the lips, how thick the lower lip is in
relation to the upper lip. Sometimes the thickness
is more or less equal and very often we have the lower lip a bit thicker
than the upper lip. Then we have the line
between the lips. This central line can be
straight, softly curved, or you can have a double line in the center if the
mouth is a bit open. When I draw the lower lip, I look at it as a bowl, so it can be rounded bowl, bow with straight
sides and flat bottom. Now I'm going to turn
on a drawing guide. I go to Actions menu, select drawing guide, and then tap the edit drawing guide. I choose symmetry and drag the blue line to the
center of the first nose. You'll notice that the
lay I'm drawing on now has drawing assist enabled, which means everything
I draw will be mirrored along that center line. Drawing the first lips, first I mark the thickness
of the upper low laps. Then I draw the central line. Next, I draw the sides
of the upper lip, curving them slightly inward and then shape the lower
lip as a rounded bowl. I want to adjust the corners of the upper lip a little bit, making them slightly
more rounded. Now I reposition the symmetry
guide for the second lip. Here, the central
line is shaped like a bow and the lips are fuller
and more rounded overall. The upper lip has a
more rounded shape. If you want to change the
thickness of the lips, you can simply select
those lips and just resize them or you
can select just one part, for example, the lower lip
and adjust it independently. Let's move on to the
third set of lips. Again, I mark the thickness. Here, the low elip is
thicker than the upper lip. The central line has
slightly lifted corners. I draw the shape of the
upper lip and the cupid bow. I have a sharp corners. Then I add the
lollipTing again of that bowl shape with a bit straighter sides
and flat bottom. Now for the last example, here the mouse is slightly open, so we see two lines
in the center. I draw the first line. It's a bit lifted in the center. Then I go down. Let's lift the
corners a little bit. Then I'm drawing the top. We have the cupid bow and
a bit more straight lines. I'm drawing second line in the center to show that
the mouth is open, and I'm drawing the lower
line as a rounded bowl. That's it. You can
practice drawing many different lip
shapes and just to draw them better and have a
library of lips that you can reuse later to make
the process faster. We'll also learn how to mix different facial features
late in the class.
6. FEATURE MIX: In this lesson, we're
going to learn how to mix the facial features
that we created earlier. I open nose library and
pick all the noses, then go to Actions menu tab, copy, go to gallery, choose my new project, paste. So I have everything copied
already and I create a new layer and activate
the drawing guide. I pick the symmetry guide, and it's important that
this layer is assisted. I activate the drawing assist. Now I draw an egg shape. Sorry about my hair
on the screen. I divide the egg
shape in half and then I divide the lower
half into three parts. You can see that
the upper section is slightly bigger
than the others. I select the first nose, make sure that you on
nose layer, then copy, then paste and position it so the triangle sits just
below the first guideline. Then I go to the eye layer, select the eye that I want. The first one copy and paste it, and then I adjust the size. In the bottom menu, I have uniform
transformation turned on, the eye scales proportionally. I also slightly adjust the angle copy paste and
flip it horizontally. I position it in the
center of the left half. I merge the left and right
eye layers together. Next, I go to the lip layer, select the first lips, copy, and paste them, and position
them below the nose. I position all these
facial features of this exact face
just below each other. I duplicate the egg shape and then this copy is not assisted in just changing its position.
I'll need it later. Go back to my face and I just want to change a
bit the shape of this face. So I merging down the face with all these facial features that located just below the eyes, nose, and lips belonging
to this phase. I erase the eyebrows because
I want to redraw them. Now I keep them very
simple just as a line. I select the nose. I want to make it a bit
smaller and adjusting its position and changing the position of
the lips as well. Now I draw the
shape of your face. I want to change here as well. Here is hairline. And I'm drawing your ears again, above the eyeline and the bottom of your ears
at your nose tip level. The first phase is ready. Now I deactivate the
drawing assistance. I select the face and using
uniform transformation, scaling it down and moving to the site to create space
for another phase. As you remember, we have a
duplicate of this egg shape. I'm activating the
drawing assist and by accident is just in the
middle of this egg shape. I'm opening the I layer, picking this hose,
copying and pasting it. Scaling it down,
changing the angle, and making it a bit flatter
than copying and pasting. Flip it horizontally, position the middle
of the left half. Then I'm picking
the second nose, copying and pasting it. Make sure that you're
on the nose layer. I'm doing the same
with the lips, positioning the lips,
scaling them down. Okay. Good. Now I merge down all the layers that
belong to this phase. First, I need to position
them just under each other before merging
it with the egg shape, I make a duplicate of
it for our next phase. Then picking the layer with my current egg shape
and working on the face. This time, I want more
prominent cheek bones and flat, stronger jaw line. You can see that the jaw
line moves diagonally and then turns toward the cheek
bone around the mouse level. Next, I'm drawing the headline. And let's have the ears. Okay, I just want to change a
bit the shape of your ears, and then finishing your skull. And let's erase
unnecessary lines. Deactivating the drawing
assist here as well, and merging down this egg shape with other facial features. Using uniform transformation,
I'm scaling down the face and moving it
next to my other face. Working with the third
phase, I do the same. I just pick the facial features. The third eye Then copying it, flipping
horizontally. Next, I go to the nose layer
and pick the third nose. Then I move to the mouth layer and
choose the third mouth, transforming it to fit the face. Now, I redraw this egg shape. Again, you can see
that the jaw line has a corner around mouth level. In this example, I make
everything more prominent shape, the jaw line, the cheek bones, and a strong chin. I draw the ears. They can be more rounded or more angular depending
on the character. Now, I scale down
the third phase and move on to my last
duplicated egg shape. I'm activating drawing assist. Again, symmetry just
in the middle of this egg shape and make sure
this layer is assisted. This time I'm actually
going to draw the features instead of
copying and pasting them. Right in the middle
of each half, I draw these fish like
shapes for the eyes. I draw the iris, so the top part is hidden
under the upper eyelid. I draw the upper eyelid by
repeating the top eyeline, keeping the corners sharper, the pupils are also partially
hidden under the eyelid. Below the nosline I
draw small triangle, and then I add nostrils. Next, I draw this
upper triangle for the nose bridge and
then cupid bowl. I pick the size of the lips. The lower lips are
a bit thicker. Draw the middle line, then I add this rounded
ball underneath. Finally, I draw the upper lip. Here I want to adjust
the nose bridge a bit. I make the tip rounded and
the bridge itself narrower. Then I draw the eyebrows, just following this
nose bridge line. Now I shape the face. At the eyeline, I'm
adding the cheek bones. From there, I draw
diagonal lines that turn towards the
chin at mouth level, defining the jaw line. At eye level, I draw the ears, then I draw the skull. And let's erase this. And finally, I draw
your hairline. I decide to adjust
the eyes again. I just want to change
the shape and make them less rounded and more angular
with a sharp cornice. And that's what I like
about digital drawing that you can always
make changes. You can completely change the facial features
if you want to. Okay. I'm also
adding the eyeliner. I tweak the lips, making them a bit flatter and just changing
the position a bit. A bit lower. I also want to adjust the
middle part of your nose, lowering it a bit. Now I like it. Let's add the nostrils to make the nostrils less
visible, that's it. We've created four
different faces.
7. FRONT VIEW: We already drew a pace
in the previous class, but in this lesson, I want to fully clarify front
face drawing. We'll go through the
process step by step so you can really understand it
and remember it long term. I start by choosing a
six B pencil in black. Okay. So it's in a
sketching set of brushes. Then I activate
the drawing guide, go to the actions menu, turn on drawing guides, and then tap edit drawing
guide, then select symmetry. Now everything I draw on one side will be
mirrored on the other. I begin with an egg shape, just a simple egg like form. Then I divide it horizontally in the center and then divide the lower half into
three equal sections. Next, I draw the ears
starting slightly above the middle line and ending around the first section
of the lower half. We've already practiced
drawing eyes, as you remember, eyes can vary a lot depending on the
position of the inna and outacornas and on the curves of the lines connecting them. There can be many
different shapes. You can draw any
eye shape you like. So really there are
infinite possibilities. Here I'm going to draw
eyes with a soft, slightly angled fish like shape. I add the eyelids following the eye shape and then
draw the eyebrows. Now, let's erase this. Next, I draw a
triangle for the nose. This triangle can be flatter, wide or taller depending on
the proportions you want. On the sides of the
triangle, I add nostrils, which can also vary
in shape and size, larger, smaller,
rounded, triangular. This connects directly to what we practiced in the
nose drawing lesson. The outline of the bottom of
the nose can also change. It can be flatter and softer or sharper and more dramatic
depending on the type of nose. So here you can see many, many different noses,
eyes that you can draw. Now, I go back to
my black pencil. Just below the nosline, I draw a triangle and add
the nostrils on the sides. In this case, I'm
creating a small nose. Then I add a second
stretched triangle on top to define
the nose bridge. Next, I draw the cupid's bow. It can be longer or
shorter, deeper or softer. A deeper cupid's bow usually
means stronger shadows later while a soft one
stays more subtle. I draw the top
corners of the lips, making them slightly around it. Then define the thickness of the lips and draw
the middle line. This middle line can
be curved like a bow or almost straight you can
open her mouth if you want, then you'll have two
lines in the center. Again, we practice
lip drawing earlier, so this should feel familiar. When you draw the lips, you can already start deciding
where the chin will be. It doesn't have to strictly
follow the egg shape. Next, I draw the cheek bones, placing them just
below the eyeline, and then I draw the jaw line. If the sidelines
are more vertical, the jaw becomes wider. If you add more slope here, the face becomes narrower. You can also increase or
reduce the size of the chin. All of this depends on the type of face
you want to create. For more dramatic face, you can add stronger
structure, a bigger nose, maybe a bump on the nose, sharp features, thinner
lips, sharper cheek bones. For more romantic or
soft baby like face, you keep everything
round softer jaw line, smaller mouth, but
rounder lips and so on. Finally, I deactivate
the drawing guide, and now we have a
front phase ready. Using this technique, you can build and draw any
face you want.
8. SIDE VIEW: In this video, we're going to learn how to draw a
side view of the face. I have a reference image here and we'll use it to
understand the structure. We already have
front view head that we drew earlier based
on an egg shape. Now the question is, what changes when we want to
draw the face from the side? I create an extra
layer on top and mark the same guidelines
we used before. The ey eline and the division of the lower part of the
face into three sections. I create a layer above this. Next, I draw a vertical
line on the side where the face will be a
curved line at the angle. For a side view, we need to increase the width of the skull in the upper half. So here I'm going to
increase the skull. Once that's done, I connect
everything with the chin. This gives us a new
base shape adapted from the original egg specifically for drawing a side
view of the face. Now we have our guidelines, I deactivate the layer below it. Let's just show these
lines on our guidelines. Layer. Next, I lower the
opacity of this layer. Then I pick my six
B pencil in black. On a new layer, I start
drawing the side view. I begin with the forehead. At the eye level, there is a slight indentation
or depression, which helps define the socket of the eyes and the nose bridge. Slightly behind that, I suggest the eyelids on
the far side of the face. Then a bit further inward, I draw the I itself. Here the I is built using
two diagonal lines. The upper line has
a gentler slope, while the lower line is steeper. I draw the upper eyelid
following the top line, then place the iris and
finally add the pupil. It's important to remember
that the pupil is not drawn on the
surface of the iris. It sits inside it,
slightly recessed. These small details makes the eye look much more
realistic in profile. I continue by drawing
the upper eyelid, adding the eyelashes, next, just like in the front view, we use a triangle
to build the nose. In the side view, this
triangle is usually more stretched because the nose appears longer from the profile. I add the nostrils and then
define the tip of the nose. The shape of the nose, the nostril wings
and the length of the tip all depends on the
type of nose you're drawing. You can make the nose longer or shorter and sharper
or more rounded, flatter or more prominent. Below the nose line, I draw the triangle. Add nostrils and then wings, and then finish the nose shape. This nose bridge can be
straight or it can have a bump. Here I slightly reposition the nose and stretch it a bit
to make it more prominent. Next, I draw the cupid's bow. When drawing the lips
and chin in profile, it's important not to place them all on one straight
vertical line. We need this slope. There should be a subtle angle. The lower lip sits slightly inward and the chin sits
even further inward. We draw everything at the angle. If this angle is too strong, the face will look like
it has a receding chin, we should remember that too. I feel like my line is too
strong, but let's see. Let's look at the result and then we can always adjust it. I'm drawing the middle line
and then drawing the lips. In a relaxed neutral expression, this middle line
can appear slightly angled downward in the
side view. It's okay. And it would look differently in the front view
if you did that. At the center guideline, and then I divide the back
part into two sections. This helps me position the ear. Let's lower it down. But its position is
similar to the front view. Just the top is a bit higher than the eyes and the bottom
is at the nose level. I feel like I want to slightly adjust the angle of
the lips and the chin. I make a small correction here. Next, I connect this line
back toward the ear, which gives us the jaw line. Now I draw your eyebrows. When you're drawing a side view, there is an important difference compared to the front view. In the front view, the
part of the eyebrow closer to the nose bridge
usually looks longer. In a side view, that
inner part becomes shorter while the more exposed
outside appears longer. You can stop the
eyebrow earlier on the inner side, just like this. We can finish here, but I decide to make
her nose a bit longer. I pick all this part and just move a bit to the
front and a bit lower. Then I close that nose bridge and finish drawing
your jaw line. Once I'm happy with
the proportions, I move on to the head. You can start the headline
a bit lower if you want to create the impression
of a smaller forehead. Next, I draw the neck. I place it roughly in the
middle of the jaw line, slightly closer to the chin. On the backside,
pay attention to the distance between
the jaw line, the ear, and the
back of the neck. That's it. We finish drawing
the side view of the head.
9. THREE QUARTER: For the three quarters angle, I'm creating a new layer above
the face drawing we made before there I'm showing this middle line and
these two lines, dividing the lower
half into three. Now I'm shifting your
chin to the left and then following the shape
of your skull and just connect everything
with the chin. On the other side, I slightly increase the
size of the skull. Pay attention to the
difference between the side view and the
three quarters angle. For the side view, we
significantly increased skull. Here you can see the new
position of the chin. Next, I turn off the face underneath and lower the
opacity of my structure. I create a new layer and
select a black six B pencil. I briefly go back to the structure layer to
draw a central line, then return to my drawing layer. I start by drawing the I. This is how we usually draw
an e in the front view, more or less centered in
relation to the middle line. When we move slightly to the
side, the shape changes, the outer side
stretches more and the pad closer to the inner
corner becomes narrower. Pay attention to the difference between these two eye shapes. I divide the left half
into three sections and in one section that is
closer to the central line, I draw the I with
this adjusted shape. I draw the eyelid following
the shape of the eye. Next is the nose. As you remember, we usually
start with a triangle and then we add the nostrils
and the nostral wings. In this case, we are using
the same approach as in the side view.
Still a triangle. This is a side view of the nose. Let's just flip it horizontally, and let's draw one more triangle for the three quarters angle. For the three quarters view, the nose is very similar
to the side view, just a bit less stretched. I draw the triangle
below the nose line. I want just change
the angle a bit. I adjust it a little
and then draw the nostrils following
the reference image. I'm drawing the nose bridge. You can see small bump here. And then I add nostril wings. I want the nose to
be slightly longer, so I lower the tip a bit
and then finish the bridge. Just below the nostrils
around the middle area, I draw the cupid's bow, then I pek the thickness of the lips and add
the middle line. In the front view, we often show this corner of the mouse that I showed with a
dashed line here. At three quarters angle, we just remove that far side. We round the lips on the side and don't draw that
distant corner of the mouth. I'm not completing
the lips fully, I'm just softly rounding them. Next, I slightly adjust the nose again moving the nostrils a
bit closer to the tip. Y. Okay. Then I refine the angle once
more and draw the chin. We'll have the chin
below her mouth. Actually, I want to
stretch her lips slightly and place
them a bit lower. Now I can draw your chin. Now, I drop the second I. You can copy and
paste the first I, then flip it horizontally. Then erase the out
corner and round it off. That's all you need to
do to get the second I. Just like in the side view, I draw the forehead, then create a slight
indentation at eye level, show the cheek bone, and connect everything
down to the chin. If you divide the right
side into three parts, the ear starts around
the second division. I draw the ear there and connect it smoothly with
the jaw and chin. Next, I draw the eyebrows. At this stage, it's just
important to draw the shape. For the second eyebrow, usually don't see
the second half. Then I add the iris and pupils. Again, the top of the iris is slightly
hidden under the eyelid. I add the eyeliner
and eyelashes. Finally, I refine the nostrils to better march the reference. Adding soft shadows. So I'm darkening that triangle that we used to build this nose. Okay, so I'm fixing your chin a bit and softening
this side line. Next, adding a hairline
showing some hair. I want to make your
eyes less open. I select one eye then tab Ed and select the
second eye as well. Both eyes are selected together. Using the freeform
transform tool, I gently push the upper
blue note downward. I also adjust the angle a bit. Here is too much, so I pull
it back just slightly. That feels more natural. And this is our three
quarters angle. In the next video, we
learn how to show the head from below and from
a top down view.
10. LINEWORK: Now we have four
different phases ready. I select all of them, group them, and then
flatten the group. So everything is
on a single layer. Next, I lower the opacity of that layer and create
a new layer above it. I choose a six B pencil
from the sketching brush set and I start outlining
everything we've done so far. When you work with a pencil
or a charcoal brush, the natural texture and
noise of these brushes makes the drawing feel more
handmade and less polished. We'll use this six B pencil
for the first two heads. If you love texture and
want a more organic look, a pencil is a great
choice for the outline. Here I'm adding strokes to show the shadows on the
sides of your nose bridge. Also, try to vary the
thickness of your strokes. So for example, here, when I'm drawing the eyelid, the central fragment of
this line is thicker than the beginning and
the end of the stroke. Feel free to rotate your canvas to make the
strokes more comfortable. Whenever two lines meet, that's a good place
to press a bit hard. For example, where the line of the iris meets the
upper eyelid line, those intersections can
be slightly thicker. Moving on to the nostrils, I shade the circular part. But for the thinner areas, I gently lift the pencil
from the surface so the line tapers into
a soft thin ending. Next, I outline the lips. You don't have to use
black for the outline. You can choose a color closer to the lip tone if you prefer. You can also skip
outlines entirely. They can look beautiful too and we'll have a separate
class dedicated to stylizing your artwork and experimenting with
different approaches, including drawing
without outlines. For now, though,
outlines make things easier by giving us clear
boundaries to work within. So so now I'm outlining your eyebrows.
Showing some hair. I continue outlining the ears. You can show some
details of the ears. Then the hairline and
then the cheek bones. For the hairline, you can keep the line very
soft and subtle, especially above the forehead. Y. I outlined the first two
models using the six B pencil. For the third and fourth models, I switch to the Jasinski pen
from the inking brush set. Here again, I use pressure variation to
control line thickness, pressing Hazle where lines meet and easing off
where they separate. For small details, I use very light pressure
by smaller details, I mean any wrinkles like the lower eyelid
or nostril wings because those are
not deep faults. Also, this line
connecting nostrils, I try not to make it too dark. You can also choose brown instead of black
for your outlines. This could be a cooler or warmer brown depending
on the skin tone. You can even choose
a shade that's just slightly darker
than the skin, almost blending into it. Now I focus on the eyebrows. I draw the shape, adjust the angle and size. Once I'm happy, I copy paste and flip the
eyebrow horizontally. Then I merge the two
eyebrow layers together. Next I move on to
the head outline. Again, where two lines
meet, I press harder. As I move down the face line, I reduce pressure, and then I can press hada where the ear
line connects to the face. At that intersection, both face outline and ear outline
can be a bit thicker. Those lines can be thicker. The ink brush gives Asap a
slightly comic style look. I'm going to use
the same approach for the fourth phase as well. Now our faces are ready, and the next lessons we'll
move on to rendering the skin and learning how to work with
different skin tones.
11. DARK COOL SKIN: Okay. So for each skin tone, we're going to use four colors, a base color for the skin, a shadow color, reds for
transitions and highlights. So this is the shadows, how we make those shadows if
you pick your own skin tone. As you can see here, we have the medium saturation, more or less medium
brightness for the skin tone. This is how everything looks
different for the shadows. We have less saturation
and higher brightness. When you pick the shadows
for the lighter skin tone, you also decrease
the saturation, but you also decrease
the brightness a bit. You get some gray that is a little bit
similar to the skin tone. Now I have my linework layer. And below that, I create a new layer and
call it base layer. Then I create another
layer above it, tap clipping mask,
and name it shadows. This means it's clipped to the base color layer and will
only affect the skin area. Next, I create one
more clipped layer and call it highlights. You can see those little arrows on the left of the layers. That shows that
they are clipped. Finally, I create the last layer I'll need called details. Details. I place it
at the very top. I use this layer for
anything extra I want to add to the
face like makeup, small details or
additional highlights. Now let's go to the
base color layer and pick out base skin color. I'm using the monoline brush at 100% opacity and I make it a bit smaller so it's
more comfortable to use. I outline the shape of the entire head and
fill everything in. You can do so by dragging that circle to your
head and dropping. After that, I pick a
slightly bluish white and color the whites
of your eyes. Next, I go back to the outline layer and erase the lines that
I don't need anymore. Here I don't need these lines. Then I move to the shadow layer, pick the shadow color, set the opacity to around 20%, and use a medium
sized shadow brush. Yeah. I also change the blending mode of the shadow layer to multiply. Then I'm starting to add
soft subtle shadows. I define the shape of your nose, add shadows along the eyelids and on the sides of your face. Notice the triangle shape
I'm living under your eyes, the one that I'm not coloring, and how I keep the middle
of the forehead lighter. Try to think of shadows
as bigger shapes, not just individual
brush strokes. Just look at the shapes that
I'm creating on your face. This is how we start
giving structure and definition of
volume to your face. I work more freely
and confidently on this layer because the
shadows are quite light. Whenever you need to
add smaller details, just reduce the size of
your brush and uh Here, I want to work on her nose. I'm working with a smaller brush defining the shape of her nose. Some shadows in the cupid bowl. You can also use
the smudge tool. I'm using the same
shadow brush to gently smudge the edges between
the light and dark areas, softening the transitions, making everything
blend more naturally. Give a mi. Next, I increase the
size of my brush and add more shadows on top of
what I already have. As you can see, when I draw
over the same areas again, the shadows become darker. I focus mostly on the sides of the face and on the deeper
areas like the eyelids, anywhere that naturally looks deeper or darker on the face. Make sure that your shadow layer is clipped because of that, none of my brush strokes
go outside the skin area. Now I'm increasing
the opacity of my brush and add dark
shadows under the nose, especially in the crease around the wings
of the nostrils. On the eyelids, here we have a fold. I also add a very small amount of shadow in the cupid bow, being careful not to overdo it so it doesn't look
like a mustache. Next, I add a bit of shadows inside the ears to
show the depth and dimensions. Can add some dark shadows on the sides of
the face as well, but be very careful with this. If you use too many dark
shadows or make them too large, the face can start to look unnatural as if there were
deep holes in the skin. These dark shadows should only
be used in small amounts. Then I add shadows on the lips, under the upper lip and under the lower lip to
give them volume. So just defining the nose more. Now, pick the third color in our palette, transitional red. Using the same shadow
brush at a low opacity, I gently add some blush. I work mostly along the bodics also between
light and shadow. Anywhere there is a
transition between darker and lighter areas. I'm not pressing hard
with my pencil at all. Wherever you see contrast, you can softly
introduce a bit of red. I slightly increased
the brush size for this. I like it. After that, I pick
my shadow color again and add a bit
of extra shadows, not too dark between
your eyebrows. I just feel like this
area lacks some shading. Now I go to the base color
layer to work on the lips. I pick just monoline brush and use this transitional red
that I have in my palette. I just color
everything with that. I feel like this pink
is a bit too light. I'm using free hand selection
and I select her lips only. Remember that this
is base color layer. Then I go to adjustments, hue saturation brightness and
I decrease the brightness. You can also play with the hue as well if you want to change the color
of your lips. Now I go to the highlights, then I use my shadow brush. And I just add
highlights on her nose. Pay attention to the opacity. It's around 20% and
medium size brush. I add highlights under her lower eyelid that triangle
shaped area that is lit. So I place highlights in
areas where there are fewer shadows under
your eyebrows, chin, with a narrower brush, I'm adding highlights
on her cupid bow, some extra highlights
on the tip of her nose, and some stronger
highlights on your lips. Finally, I go back to the base color layer
to color your eyes. I usually start with a dark
tone for the eye color. In this case, a dark brown. I add it on the top, and then I pick a
lighter version of that color and add it. So let's say lighter
orange like brown. After that, I slightly
shift the hue keeping it close and add one more
tone for the variation. So you can see the difference. Now I feel like it's too much. I will pick the same
colors, but a bit darker. You can see dark at the
top of this iris and two similar but slightly
different colors next to each other
at the bottom. This is how I color the
iris on the base layer. Now I'm going to
the shadows layer and picking a bluish gray color. I set opacity to 100% and add shadows along
your upper eyelid. Next, I pick some dark a pink. Just choose one that
feels suitable and draw this pinkish
area inside the eyes. I usually add eye highlights
on the details layer, but you can also do this
on the highlights layer. It really doesn't
matter that much. Now, I pick black or dark gray and move to the details layer. I draw the eyeliner first
and then the eyelashes. Notice that lashes
are more curved and angled closer to the
outer corners of the eyes, and they become straighter
as you approach the center. I also use the eyeliner to narrow the corners
of the eyes a bit, making them sharper, so the eyes don't look too
wide open on the side. Choose the brush size
depending on whether you want thicker or
thinner eye lashes. You can decide what you prefer. Personally, I like to
keep just a few lashes. Next, I colour the eyebrows. First, I fill them in with
any base color I like. Then using a much smaller brush, I draw individual hairs. I repeat the same process
on the other eyebrow. I usually add more hair details closer to the breach of the nose and keep the
rest more filled in. But Now, I go back to the shadows layer and pick the transitional red. I add the details to your ears. After that, I move to
the highlights layer, pick the color for the highlights and
increase the opacity, decrease the brush size, and add strong highlights on your ears and on the
wings of your nostrils. That if the highlights
feel too bright, you can always select
them separately, go to adjustments, hue saturation brightness
and decrease the brightness. I also add small highlights near the inner
corners of your eyes. At this point, it's helpful to zoom out and look at
the face as a whole. I feel like I want
to add more shadows. I go to shadows layer and just add extra shadows
with my shadow brush, a bit less opacity. And I want to smart the highlights on the
highlights layer. Okay, now I'm happy
with this phase. Before we start rendering
other skin tones, let's select all the layers for this phase and group
them together. I'm selecting all of them because this group
contains the linework, we'll treat it as our line
layer for the next phase. This is going to be a linework. I'm creating a new layer
below it for the base color. Above it, we create a clipped layer for shadows
just as we did before. And I set it to multiply mode. Then we add another clipped
layer for highlights. Changing the mode to screen. Then finally above
the line work, we create one more
layer for details, and in the next class, we'll render another skin tone.
12. DARK WARM SKIN: Okay. Now we are working
with a dark warm skin tone. I start by selecting
my shadow brush, then choosing the shadow color. I reduce the opacity
to around 25, 30% and use a
medium sized brush. Just like in the
previous examples, I go to my shadows layer, which is set to multiply and begin adding very
subtle shadows. I follow the same processes
before making sure to leave highlights in the
middle of your forehead, in that triangular area
below your eyelids, nose bridge, middle
of your chin. And just pay attention
to the shape of those areas that are shadow and those ones
that are highlighted. You see there's more or
less circle on the chin, like ellipse on her forehead, then I'm going to activate
the drawing guide. I go to Actions
menu, then Canvas, and then activate
the drawing guide, then tap Eddie drawing guide. I pick the symmetry and move the vertical line to
the center of the face. Now I slightly reduce
the brush size and start adding shadows
to the sides of her nose, as well as to the upper
and lower eyelids. In this case, she has a
small bump on her nose. And you can see that the
shape of the shadows change. I follow the shape of your nose bridge and make
that bump area a bit wider. I continue adding shadows
along the sides of your face. When I color on the top of the shadows that
I've already made, they become a bit darker. It works in a similar way
as markers work a bit. Next, I increase the opacity and reduce the brush size again, continuing to work on
the nose and eyelids. I add stronger shadows
under her nose, including the triangle
shape between her nostrils. I define your lower eyelids, add more shadows to the
eyelid fold inside your ears, a bit on the cupid's bow, very subtle under the lower lip, and a bit at the
corners of her mouth. Then I deactivate
the drawing assist and add shadows under the lips, both under the upper lip
and under the lower lip. After that, I pick a bluish
gray and add shadows under her upper eyelid line to
create more depth in her eyes. Next, I choose a soft, not very saturated pink and color the flesh
inside her eyes. You can do that either on the base color layer or
on the shadows layer. It's a small detail,
so both works. Now I move on to
transitional red. It's our third color in the palette and
start adding blush. I reduce the brush
size and opacity and work along the borders between lighter
and darker areas. Wherever there is a
visible transition, I add a bit of red on top. If it's too obvious, that red just reduce opacity. I also softly add red
into the darker areas, keeping it very
light and gentle. Next with a higher opacity
and a smaller brush, I place more red into the
folds of your eyelids. Then I pick a slightly
dark gray and add shadows under her nose and into the
creases of the nostrils. That's too strong. Now I
go to the outline layer. You might remember
that we started with a pencil outline
for this sketch, so I erase some of the
strokes I made earlier. I I don't want them. After that, I move to
the highlights layer. I select my highlight color and using the shadow
brush with low opacity, I add highlights to the triangle
under your lower eyelid. And then to the nose bridge
and the tip of her nose. Okay. Here we have the
bump, so I'm showing it. This out edge under the
eyebrows is brighter, I'm showing that because
it's more prominent. I continue adding
highlights under the eyelids on the chin
and then on the forehead. If you want to make the
eyebrow area more prominent, you can also add a
horizontal highlight just above the eyebrows. Finally, I gently smudge the edges so the highlights
look soft and more natural. And you can adjust the brush
size for the smudge too. H. Next, I go back to my rush and
start adding highlights on her cupid's bow and around the inner
corners of your eyes. I want these highlights
to feel a bit soft and less bright,
so I select them, go to adjustments, hue saturation brightness and slightly reduce the brightness. After that, I add
highlights to her lips and then some highlights on
her ears and on her chin. I also place a few highlights along the sides of your face. Just do this to suggest
that light is bouncing back from surrounding
environment. This reflected highlights help the face feel more
three dimensional and prevent the darker areas from looking flat or too heavy. Finally, I add a few stronger
highlights in key areas to bring back contrast and
focus, and that's it. This is how we render
a dark warm skin tone.
13. LIGHT COOL SKIN: Right now we are working
with a light cool skin tone. I'm starting by picking my shadow color and going
to the shadows layer. I have my shadow brush
selected and it's a medium size brush and I select opacity at
around 25, 30%. Just like we did before, I'm adding very subtle
shadows to the sides of your forehead to the
sides of your face, and also inside the ears. I go to Actions menu, Canvas, activating the drawing guide, and then tab Eddie
drawing guide. I'm choosing the symmetry and positioning the vertical line
in the center of the face. With the narrower brush, I'm starting to define
the shape of the nose, some soft shadows on
the lower eyelids, and then shadows along
the sides of her nose. As you can see, I'm adding
shadows throughout the face, but I'm intentionally leaving
some areas untouched. These small triangles
under the lower eyelids, the middle of the forehead, the nose bridge, and
the center of the chin. Now I'm deactivating
the drawing guide, both on the layer
and in the menu. Next, I'm going to
add darker shadows. I'm focusing on deeper
creases and forms. Oh defining the nose bridge more clearly, emphasizing the lower eyelid, adding shadows under the
inner part of the eyebrows, inside of the ear, under her lips, cheek bones, jawline, temples Then I decrease the brush size and
increase the opacity to 100% and add shadows
to your lips. I also notice that
on the base layer, some areas of the skin
still need color, so I have to fix that. Next using a dark gray, I add shadows under the
upper eyelid to your eyes. Now I'm picking my
transitional red, which in this case is color pink with a low
opacity around 20%, I start by adding blush, and then I softly work along the bodice between light
and dark areas of the face, adding a gentle flush. I lower the opacity even more and switch to
a bigger brush, working over larger areas to keep everything
soft and blended. After that, I go back
to my shadow color and add a bit more depth
between the eyebrows. If you look at the
face from the side, this area is slightly
inclined inward. Next, I move to the
highlights layer. I just my brush and
add highlights to the nose bridge and
the tip of your nose. Then adding highlights
on your upper eyelids. There's this
highlighted area under your eyes forehead, and then chin. With a narrower brush
and a higher opacity, I add stronger highlights to the ears and the wings
of the nostrils. Then I go back to
the shadows layer, pick my shadow color again and choose an even darker shade. I add deeper shadows under the nose and a bit more
depth inside the ears. Anywhere you feel like you
want to add more shadows, you can just use
some daka shade. I go to the base color layer, and I really like
the red that we have for the blush
and transition. So I'm going to use it
to fill in your lips. You can use Jasinski brush for that or monoline brush, just any now I want to show you how a different outline
looks on the lips. In a detailed layer, I'm picking this darker red that is in the
shadows of her lips and coloring on the top of the outline with
Jasinski ink brush. Then after finishing,
I'm erasing the lip outline from the
layer with the linework. I'm also erasing this
middle line and drawing a new middle line in the details layer with
a similar darker red. So now I keep working on the details layer that is
above all the other layers. I'm adding the eyeliner. Then actually, I want to draw eyelashes
that are facing downward. Next, I fill in your eyebrows. So all this is happening
on the details layer. I go back to the
outline layer and erase the eyebrows that
were there before. Then I add highlights
to her eyes. And then some
highlights on her lips. I go back to the base
color layer and add a bit of pink to the inner
corners of her eyes. Then I add some pink to her eyes and we are
done with this face. This is a light cool skin tone.
14. SKIN LIGHT WARM: Now we are working with
a light warm skin tone. First, I want to
change her lips. I go to the lips library, choose the lips I want, select them, copy them. Go back to the head, and then I paste and adjust
the size to fit the face. I place them slightly lower
and once it feels right. Okay, that's perfect. Next, I go to the linework layer and erase the mouse
I had before. Then I drag the new lips layer above the linework layer
and tap merge down. So they are all on one layer. Let's close the group and
go to our base color. As you can see, I already
have everything prepared. My base color, I used
dark grayish blue at the top and then add two slightly different
blue hues at the bottom, just as I did in the
previous example. Next, I activate
the drawing guide and then tap edit drawing guide. Turn on symmetry placing the vertical line right in
the middle of your face. Now I can see that my base
color layer is assisted and I need my shadows layer to be assisted because now I'm going
to work with the shadows. Now, before starting
with shadows, I go to details layer and turn on drawing as it's
mirrored as well. I want to draw your eyebrows. Anything I draw is
mirrored on both sides. So it's very convenient
when you draw eyebrows. Once the eyebrows are done, I turn off the
drawing assist for this layer and move back
to the shadows layer. On the shadows layer, I pick my shadow color and reduce the
opacity to around 20, 25%, choose a medium sized shadow
brush and start working. As before, I begin with
larger shadow areas, softly shading the sides of the forehead and the
sides of the face. You can see this elongated triangle shape along the sides. These are very light,
subtle shadows. I add gentle shadows
to the lower eyelid. And start shaping the nose. Now I define the nose bridge. In this case, the nose
bridge is more prominent, so I use slightly darker shadows and work more confidently. I add shadows around the
wings of the nostrils, fill in the small triangle under the nose that we actually
used to build the nose. If the nose has any
shadows on top plane, you can define
them here as well. I add a bit more shadows, again, mostly on the sides using
a slightly smaller brush. I add shadows to the ears. Just a touch to the cupets bow. And then I increase the
opacity to around 80%. With a narrow brush, I add stronger shadows inside the eyelid folds and along the lower lash line to
define the lower eyelids. At this point, I turn
off drawing assist. I don't want the dark
shadows to be perfectly symmetrical and since the face structure
is already clear, I'm not worried about
creating strong asymmetry. I add a few stronger shadows
in folds and deeper areas, including under the lips. Then I use smudge tool to work on the transitions
between light and dark. I soften and stretch the shadows so the brush
strokes don't stop abruptly, blending the transitions
more naturally. I like how the shadows look
nice when you stretch them. The ones, for example, on her lower eyelid, y. With high opacity
and a small brush, I add a few extra shadows to define the details
inside the ears. Next, I pick my third
color, transitional red. In this case, it's a warm red, more like a warm pink or salmon. I lower the opacity and
start by adding blush. Then I work along
the bodice where the skin tone transitions
from darker to lighter. I'm gently introducing some red. If the color feels too strong, simply reduce opacity and
don't press too hard. This step adds life and warmth almost like
blood under the skin. After that, with higher opacity, I add a bit more red
in the darker areas. And Now I move to the highlights layer and
pick my highlight color. With around 25% opacity
and a smaller brush, I add highlights to
the nose bridge, the tip of the nose, the inner corners of the eyes, then we have the cupis bow. You can also lightly smudge these highlights to make
them look more natural. I personally like to keep the face relatively simple
in fashion drawings. When there are too many details, the face starts to look
like a portrait while the body remains more silized and I don't
like that contrast. I add soft highlights in
that light triangle below the low eyelids and in the
center of your forehead. And then use the smudge tool again to blur the edges
and soften everything. Finally, I add highlights
to the chin and a few subtle
reflected highlights along the sides of her face. This soft reflections
help balance the lighting and add dimensions. On the base color layer, using the monoline brush
and warm red tone, I fill in her lips then I move to the
shadows layer. Here you can use the same
red for the shadows or you can use the color that
we have for the shadows. I'm adding shadows under
your upper and lower lips. Next, I go to the
highlights layer, pick my highlight color, lower the opacity, and gently add
highlights to your lips. I also add a small highlight
on the top of the lips. If the highlights
feel too bright, I select just the
highlights on the lips, go to adjustments, hue saturation brightness
and reduce the brightness. After that, I move
to the detail layer, pick an off white color and add small highlights
to your eyes. Then I return to the
base color layer and add a touch of pink inside the eye to make them
feel more natural. Finally, I go back to the shadow layer and add a
bit of extra shadow under her nose to strengthen
the form because the nose is more prominent and it has more
shadows underneath. I create a new layer above
the details layer because the details layer
already contains my previous eyebrows and I want to draw new ones
with more details. I choose the Jasinski brush from the inking brush set and
pick a darker gray color. Now I start drawing
the eyebrows, making them more detailed. You can rotate the canvas if
that feels more comfortable. It often makes it easier
to control the shape. I mostly fell in the
eyebrow shape and then add a bit of texture closer
to the breach of the nose. You can add more individual
hair details if you like, but I prefer this cleaner filled in look with
just a few strokes. Next, I go back to
the details layer and erase the eyebrows
I drew earlier. I go back to my layer
with a new eyebrows. I switch to the eraser using the same Jasinski brush and softly erase along the
edges with similar strokes. This helps soften the shape and gives the eyebrows
more natural look. You can move back and
forth between the brush and the eraser as you
refine the shape. To save time, I copy
and paste this eyebrow. Flip it horizontally and
position it on the left side. After that, I merge the
two eyebrow layers, and now I have to erase the
old eyebrow on the left, and then I merge the new eyebrows down
into the details layer. With that, we are done with
the light warm skin tone. You can always take more time to refine the details
further if you'd like. But for now, this
face is complete.
15. FINAL PROJECT: All right, so you've reached the final
step. Congratulations. So here is our final project. You'll have to draw
four to six faces on a digital A four
paper in Procreate. You can imagine that you
have a model agency, and that's your test shots. So draw faces at
different angles with different unique facial
features and skin tones. Then upload your work
to a project gallery. I'm looking forward
to see your works. I hope that you
enjoy this class, share your questions
and suggestions, and see you in the next class.
 Aliya Uten, teaches fashion drawing