Transcripts
1. Introduction: Have you ever wanted to design fashion and clothing
for your characters? In this course, I'll guide
you through drawing and decorating and extravagant Day of the Dead inspired outfit. In this series of lessons, we'll draw a simple cartoon
character and choose a theme before designing the outfit and accessories will add color, highlights and simple
shading techniques to make the character
really pop. By the end of this course, you'll have designed a
character that is ready for the Day of the Dead
celebration or any festival, event or theme that you choose
to design your character. You're welcome to follow
along with me step-by-step. If you're a beginner, otherwise, feel free to choose a
different character or theme and freestyle to design
your own original outfit. I'll be working digitally, but you can draw in the
medium of your choice. I'd love to see what
you create at the end. So please share
your artwork with our community of fun in class.
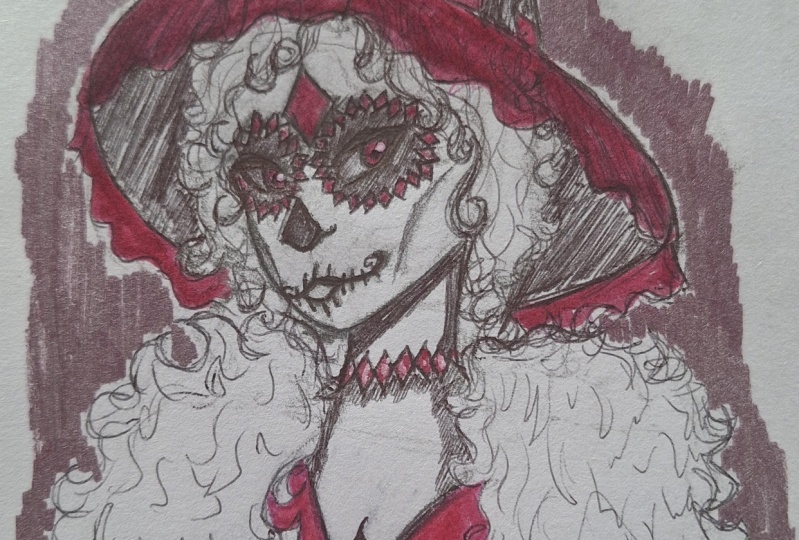
2. Brainstorming and Sketching the Character: Today we're going to draw
a traditional dance or carnival outfit from a
foreign cultural festival. We will be looking at
how to make clothing and fabric and just a little bit about costume design as well. This is a example of the
Day of the Dead festival. They have really
great vibrant colors, great fluffy dresses. Their face paint is in almost like a representation
of a sugar skulls. They like to decorate skull
heads with gems paint and make them look
really beautiful to honor people who have passed
away and their families. So here's another example
of the Day of the Dead. So again, very similar
dresses to the first one. Very ruffled and fluffy. Lots of different colors, so very, very bright. And they also have
some head pieces on there than males in
the back have some, some red arrows, so some
really big brimmed hats. So they both have very
colorful outfits. I'm going to take some
inspiration from the movie, The Book of Life. I will get started by
creating my mannequin or character figure that I'm
going to put the outfit on. Let's get started
on this figure. So I'm going to do this
lady's head here first. I'm just gonna make some
simple shapes to get started. This is going to
be a somewhat in the style of the book of life. So cartoony little things here, and I'll do the neck here. Here I have the neck
bringing it down to its little
shoulder area here. We have the top portion
of my character here. And since this is in
the style of the movie, they almost look like
little wooden dolls. They are not going to have the proper proportions
of a Cuban. They have very
skinny wastes here. I'm going to have
her wearing a dress. So similar to the
examples that I've shown. I'm going to make a nice skirt, a little round skirt
from the top on her hips and I'm going to
bring it down to the bottom. And this will be the basic
shape of my dress so far. But since this is a sketch, I'm just going to do
basic lines first and then go into it a
little bit more later. I'm going to have this
girl's dress kind of come to the floor. So that's why I'm draping
it down at the bottom. We'll have a little
round bit here, almost like a large puddle
that it kinda falls into. Mine is going to be a nice round shape at the bottom here. Almost looks like a
vase of some sort. Back to this lady's arms, breaking them up into shapes. Since this is a
little wooden doll. He's going to have her hand on her hip out a couple of fingers. And then down here, I'm just going to continue with the arm here and it's going to come down here to where
her hand will be. Another one on her hip. Here I have my lady with her
hands on her hips. And now I can give some
more details on tour. So I'm gonna do her hair. I'm not going to hide a too
much of her face though, since I want to have
that face paint you. A part of my design will have her hair kinda thumb up to a part here, roll down a little. These will be my girls bangs. And since I have the head
kinda cut off there, I can go ahead and erase that part since I will
no longer need it. I have the hair covering it now. I did make her a little big. I'm just going to
shrink or down a bit. Maybe I'll do her long hair. He's got some curls
kinda eking out as well. I gotta make sure that there's some air on this side as well. Doesn't look too empty. Alright, let's zoom in here. Now that I have my sketch for the bass part of my drawing, I'm gonna do some
interesting face paint. Let's draw these eyes and big, cartoony eyes, maybe
even bigger than that. Eyebrows. Do some lips here. I'm grabbing inspiration
from lots of things today. Putting my own thin onto things, but also getting reference for sure for this
face paint here, I'm going to create a
circle around the eyes. This is where I'll add
some sugar skull designs, maybe a flower petal
design around it. I'm creating some loops, follow that shape I just made, and I'll do the same
with my other eye. Let's finish up my
little face paint here. I'll simplify this
drawing a little bit. I'm going to have
a little bit of a jewelry on my
little girl here, little neck Clay Center, and we're going to have
some puffy sleeves. But now that I have
those sleeves on there, I can erase my
sketch that I got. And again on the
other side as well. I'm going to have lots of flowers on a little
character here. Look kind of all
overlapping each other. That's why there's
some that are tucked underneath and some
that are over top, which is just the one
on the left side there. And I think I'm
going to add some at the bottom here as well, all along the rim of her
dress along that edge. Thinking about what other
kind of patterns I'd like. Maybe I have some
more that are on the side of her dress here. Great big ones. Let's maybe
some smaller ones around. Going over some
of my lines here, making them a little darker, kind of securing that shape. And now that I know
what I want it to look like, I'll draw some, some little lines
here that are showing these clothing folds here. Mine is almost skin
tight by the hips, but there won't be as many
and many tugs or pulls on it.
3. Colouring the Character: I will start coloring
now here let me grab another layer so I
can color this in. Let's think about in colors. I want to do maybe some red, so I'm thinking red, reds, maybe some darker colors still
want to be very vibrant, since this is the
Day of the Dead, there'll be some nice,
beautiful, vibrant colors, or maybe red and
yellow and an orange, Something like that, might add some teal in there as well. I see some teal on
this character's eyes. And I really like how the
colors are clashing there. I like the red, yellow
teal underneath. Let's see, let's do a dark teal. And I'll make these sleeves
maybe a different color. I'll just get the color
down first and then I can always change
it at anytime. I can make it a
little lighter and I'll add some yellow are warm colors here
for these flowers. In the middle, maybe I'll
have that little part of the flower white just to
make it a little simple. And then for the
rim of the sleeves, I'll also have yellow
designed to it. Again, adding lots of color. I'm just making her
little fingers here, continuing this
hand, I'm leaving a little gap in between
the arm as well, since there will be
little joint there. This is a wooden doll will
there will be a little bit of a butt joint here kinda
showing that there's a ball that's attaching
the two limbs together, almost like a bowl
joints on ourselves. I can do lovely long hair. I'm gonna do a brown
color for her hair. I'm going to zoom in
here just so I can see edge of her hair
a little better. And I'm always changing
the size of my brush as well there to get
those small edges. I like to turn the
brush size down a bit. And then if there's
a large area, I want to cover it fast. I like to grab a
larger brush size. I want to go right on the
edge of her face here. I like to move around my
layers when I color as well. So just in case I
don't have to color over top of this dress here. So I'm making my hair layer
go underneath of everything. Since my hair is
right at the back. My character here, and just
these last curls here, one at the bottom as well. I'm going to add
some more colors to these little details as well. These flowers will be a mix
of yellow, some weight. My weight will be a little
bit of a pink color, so I don't have to
make it too bright. If I chose a pure white, it might look too much. It's a kind of tones
it down a little. And I'll make these flowers
at the bottom a yellow color. And we'll also do
and girls face paint here also kinda do
the same colors. Yellow, maybe some teal as well. These little bubbles here I
want to be yellow though, just kinda drawing on the
line and then going back and filling in those
round little edges, taken our little lips pink. I'm also going to add some
teal on here as well. Inside will be a lighter teal, little diamond shapes
into these little dots. I'll do some dark some late. Just filling in this eye part a lighter color since this won't be the same
color as her skin, not making it pure white. Like I said, again,
I know the toning it down a little
That's more of a pink. Make sure that this
part is covered by the hair and a miss a
little portion here. Want to add some shading? Here we go. Thank you all
for joining today as we did these really interesting
festival outfits. Bye everyone.
 Winged Canvas, Classes for Art Nerds