Transcripts
1. Introduction: You love designing
your own characters with cute animal traits. In this course, you'll be guided through the
steps to design your own style characters inspired by the popular
video game Animal Crossing. My name is Felicia and I am a concept artist and
instructor at when Canvas. In the next set of lessons, you'll develop a rough sketch
of your character design. Refine the line art drawing, then apply color and emphasize your character with
shadows and light. By the end of this course, you'll have created a hybrid
character of your choice. I'll be guiding you
through my process so you're welcome to
follow along with me. If you're a beginner. Otherwise, feel free to apply the techniques to design
your own original character. Although this class
is taught digitally, you're free to use the
medium of your choice. I'd love to see what
you create at the end. So please share your
artwork with our community. Have fun in class.
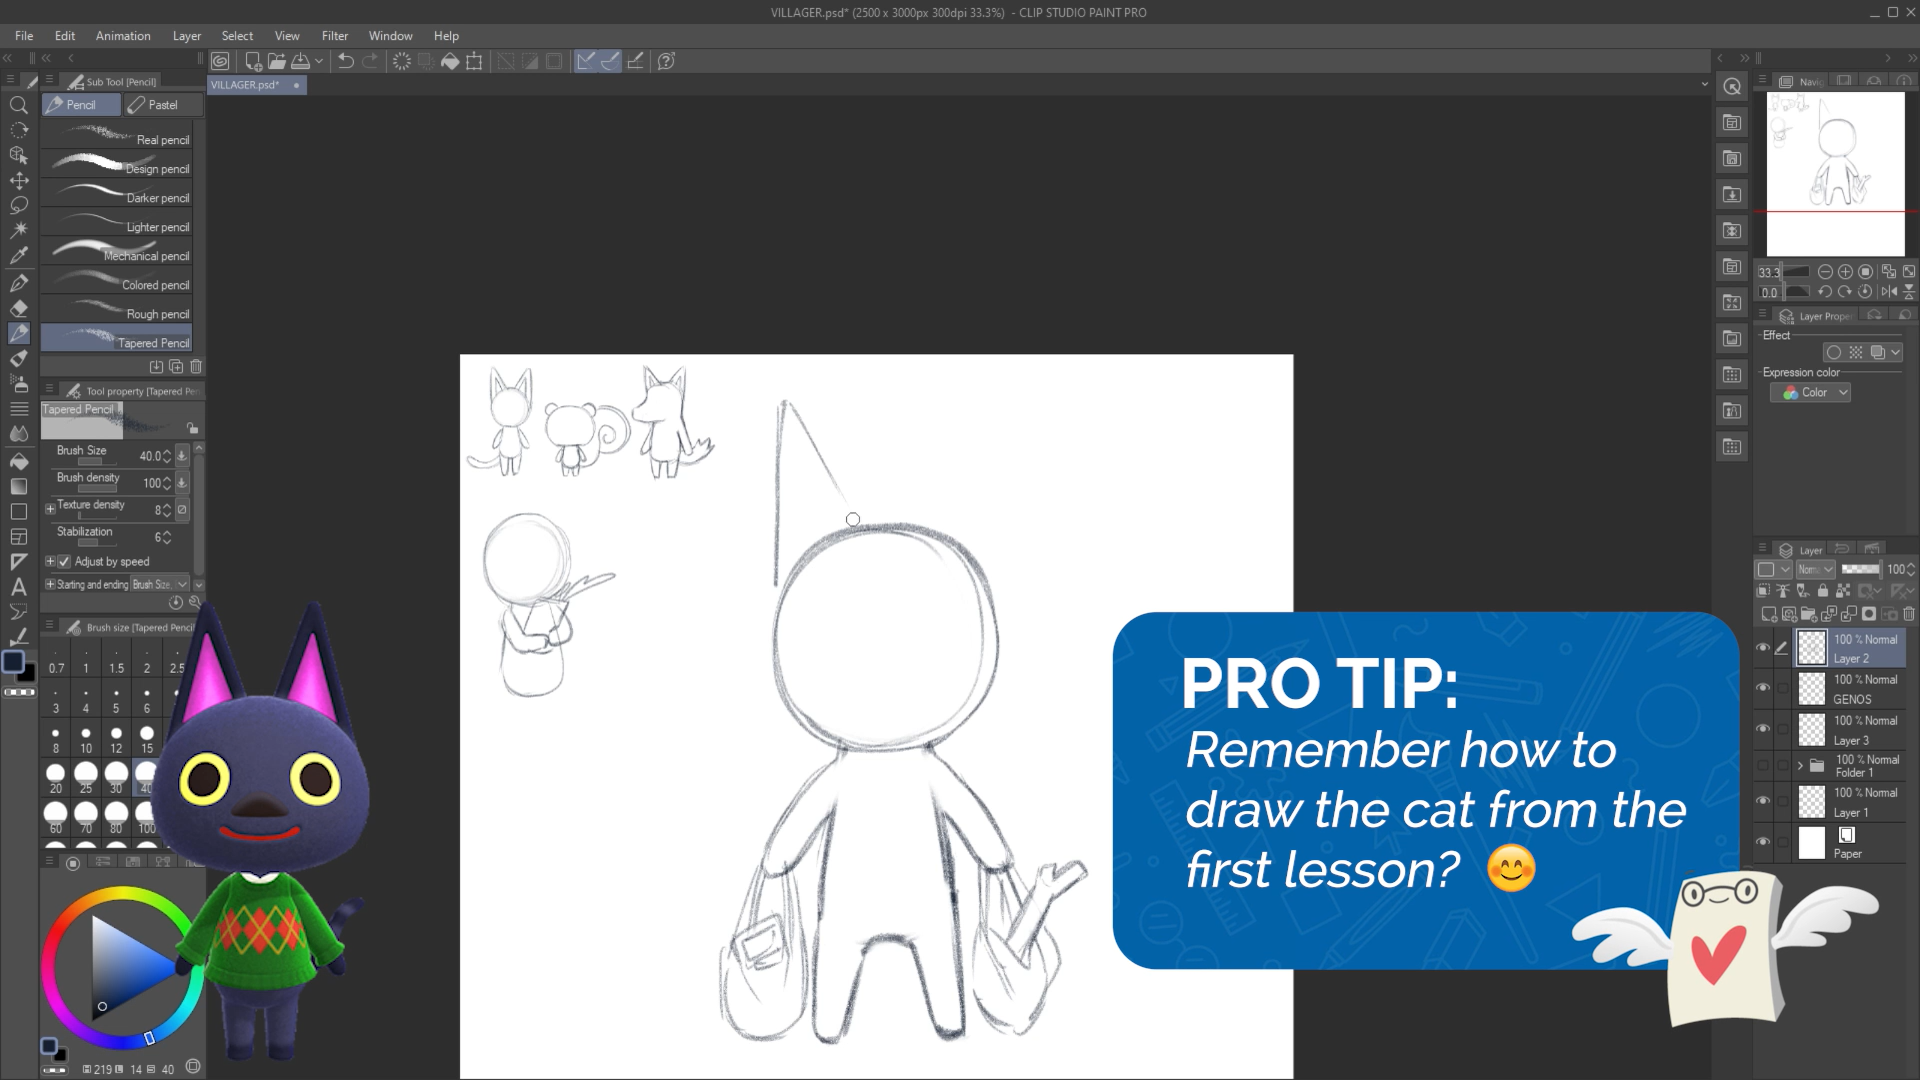
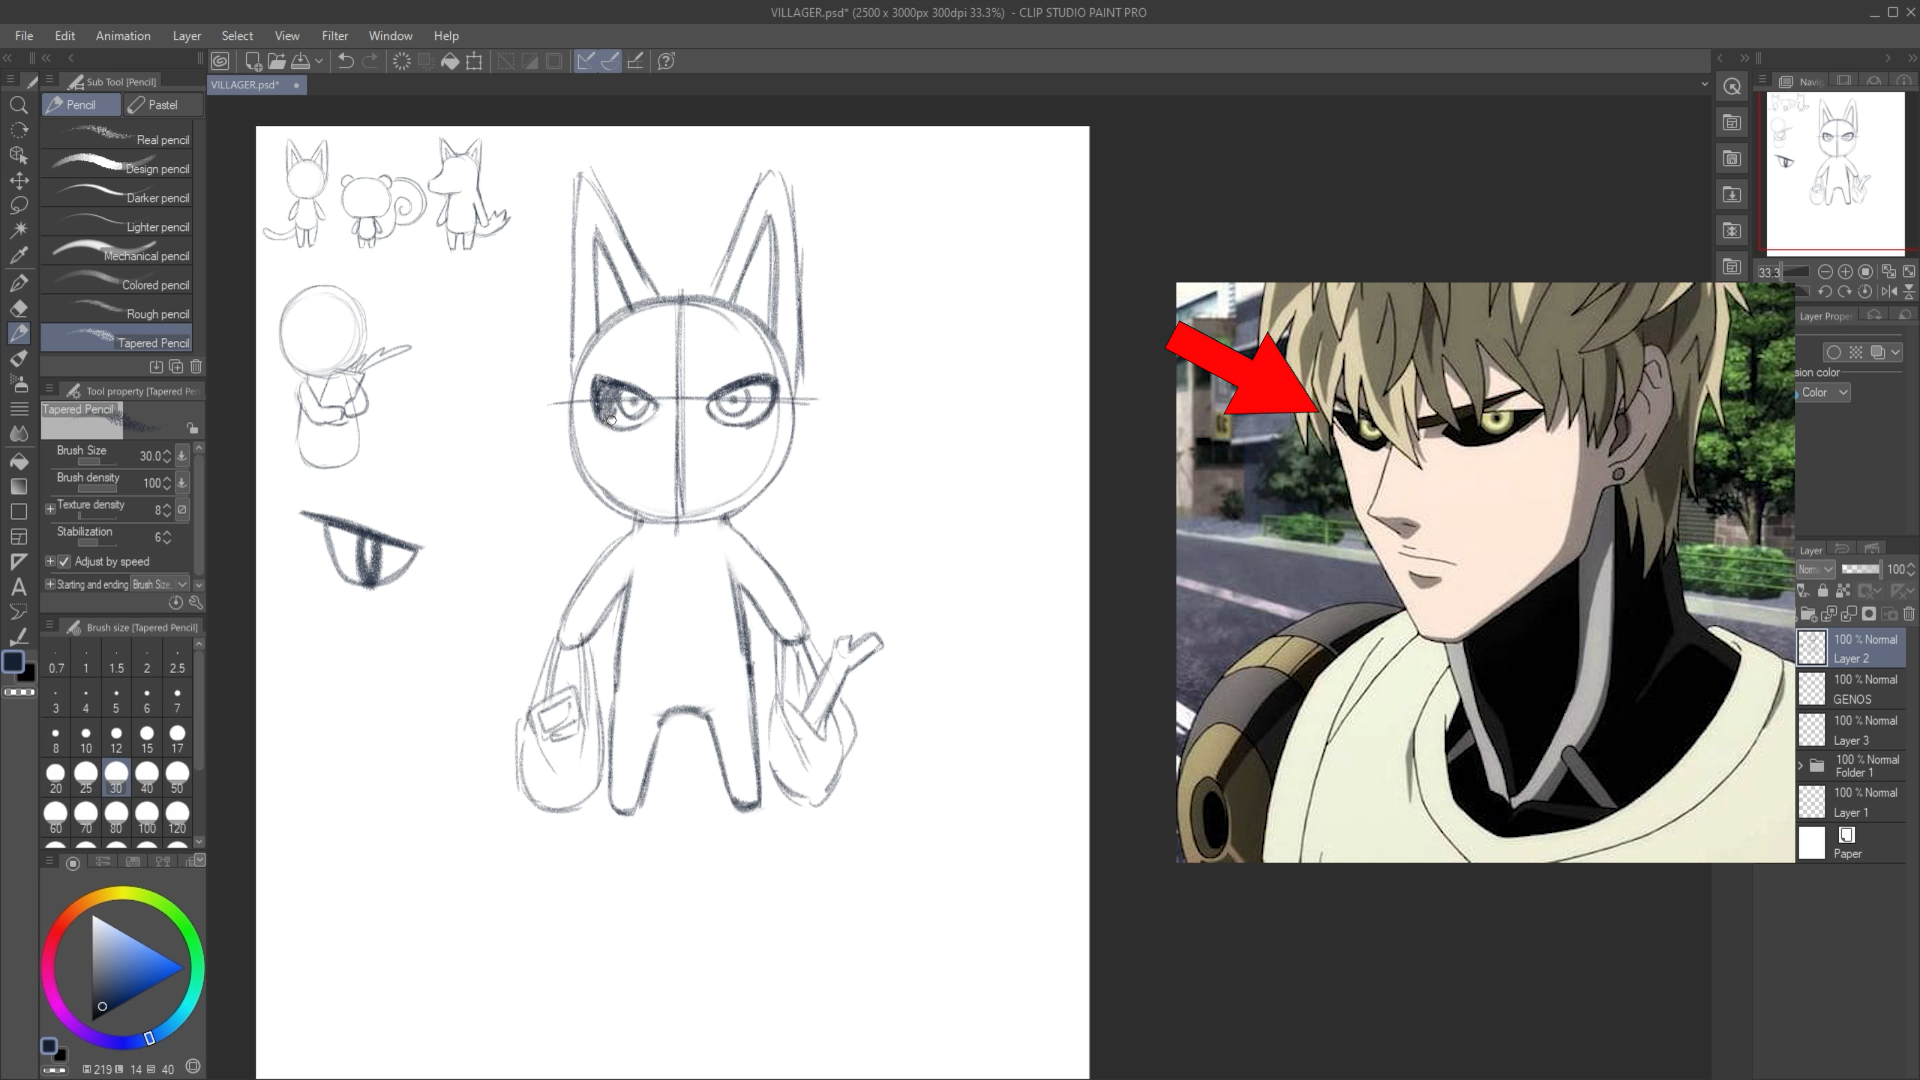
2. Exploring Different Body Types: We are going to be
drawing anime character slash cartoon characters as
Animal Crossing villagers. So you can choose your
favorite character and then turn them into a villager or design your own like completely
original villager. I'll show some examples now. So here's one. This is actually a villager, Sona, meaning it's a
completely original villager. And it is a wolf. Pretty cool. Here's another one. Octopus are always cool. And yeah. So as you can clearly tell, Animal Crossing has tons
of different species. So you can already
start to think about what kind of
species you want to do. And then for this class, I'm going to draw several
types of species. So we can learn how to
draw different kinds. And then you can
choose your favorite one for your good copy. So it's a kind of two parts. And this is one that I did of Leon from Pokemon
sword and shield. So I turned him into
a lion villager. Anya. I thought that was
fitting for him. It's literally his name, but one letter off anyway. And this is one I did
for a different class. Her name is candy. I made a wolf villager
completely original. It was a villager sewn up, but I don't look like this. So it's not really, I just thought it would
be cute to have pink and sparkles and block scoping. So I'm going to close these. So these are examples for today. And now, let's get started with exploring some
different body types, some different village
or body types. I'm going to start with a cat. So you can just start
sketching like a circle. And again, here
we're just exploring different species of villagers. I'll do maybe three species. So a cat is a super popular one. The head is a circle. Here's our triangles.
And Animal Crossing. Ears on cats are
pretty tall like that. Then another triangle
for the inner circle. I'm going to end up doing a cat. Because I'm thinking of one. What anime characters that
I like at the same time, I might do a curl from high IQ or someone
from One Punch Man. My outdated and who may taste. So there's the
head for the body. Think of a bean shape. So again, just to
remind you guys, this is just sketching
and exploring, not are good copy. It's a little bean
shape. And then legs. The legs are like pegs
or like this shape. Hands. I just put them out as a little pegs on the side or
little nubs on the side. And then that is pretty
much the cat body. And the village or bodies
themselves are pretty simple. That's why I think
it's nice to explore a couple of them that way you really know
what you want to do. I really liked squirrels. So I'm gonna do is scroll next. So for squirrel, they're a lot shorter and then their
heads are really big. Then it's kinda like
a squashed circle. Or you can think of,
it's a very subtle bean. It doesn't go inward
like this so much, but just a little bit. And then for the body, same thing like the
cat but a lot smaller. So this is like if you were to take that bean shape
and structure and this one is if you were
to shrink it in words. And then some little
pegs for the legs, peg legs and little arms. So I think I drew the body
away to close actually. So I'm just going
to move that down. I want us to draw
squirrel as an example, not, not for my
actual good copy. Because my favorite villagers, Marshall, he the squirrel. So same thing. Arms are. A little knobs on the side. And then for the ears, think of like a bear. I nearly forgot
squirrels half tails. So their tails are kinda
like these big, big roles. I would start by drawing
a little swirly like this and then going around it. With this like backward
C. There's a squirrel. Let me go over a wolf body type. So a wolf it's a little bit of a special
case because if you were, if you were to draw a
wolf facing the front, it doesn't look
that cool, right? It looks real, really squished. So what I would do is draw, if I were drawing
a wolf villager is start with a circle
and then put, put a cone like this and this
represents their muzzle. So it's like you're
taking a cup. If you ever stick a
cup over your mouth, kind of like that. And then that
creates the muzzle. And notice that this is
a three-quarter view. We wanna do this for a wolf
just because, like I said, if it was facing the
front, it looks weird. You can't really
tell it's a wolf. And then here I can just
erase any overlapping lines. We're still left with
this little weird cone-shaped can
erase that as well. Then this is where
the nose would go. The reason why I'm not drawing
faces is because faces in Animal Crossing villagers
are super diverse. Some of them look normal, some of them don't. So some might have like
a heart shape nose, a triangle nose, whatever. It's all customizable. You don't have to make
it look 100% the same. So going back, the body, bean shape, all the
Animal Crossing, villager bodies
are very similar. They're all the
same basic shapes. And then for the
wolf, I would add just a little bit on a trough. Little knobs for the legs. The head looks too big, so I might shrink that down. And then when we
create our villager, we're going to be adding
clothes on top of them. So these are just like
the base drawings. The ears are also
triangles like a cat. And then if you see any parts of the body that
looks weird to you, you can fix it. So I find that this head
is like way too round, so I'm going to start
carving out the shape. This muscle looks
wait, way too simple, like it's not thin
enough at the tip, so I'm going to fix that. Suffer the tail. I can just start with a simple
It's kinda like a moon. Think of it as a moon and
then add some spikes to it. Then there, there we
go, more or less. Are Wolf. These are
our base bodies.
3. Sketching the Character Design: If this was a separate page, what I wanna do is
start my good copy. And so I'm working digitally and I can work
all in the same file. But for you guys to
start your good copy, you just take out a new
piece of paper or move to the next page in your sketchbook and then
we can get started. I'm going to leave these
guys up for reference. And then I'm going to search up the character that I want
to turn into a villager. I want to turn generals from One Punch Man as a, into a cat. Because I saw an animation
of him as a cat. This is who I want to
turn into a villager. So with that in mind, I could think of a pose. I'm thinking what do
I want him to do? Because remember these bodies
that we practice with, they're all kinda
just standing there and an arrow pose or a T-Pose. They're not doing
anything interesting. But for your good copy, you can put your
village or in a post. They can be doing
something getting fruit. So it's kinda funny
in one puncture and gentle is kinda, does. Say toma, the bold guy, his groceries and like
Aaron's and stuff. So maybe I can have him hold
like a bag of groceries. So for here, I can
start with a head. Just like our practice cat body is. Next. I have a bean shape. And then I want him to have a bag of groceries
so I could just have I'm just thinking
about what kind of groceries Do I want
him to hold like that brown bag or a regular plastic bag?
Maybe a brown bag. I think that will be
fun because I can have his arms go go across his body. So you guys can't
see me doing it, but I'm like holding my
hands together and then imagining what it would
look like if I were to hold hold a bag in my hands. So it kinda wrap
around his body. I could do something like that. Then the other one here. Let me try that again. So they looked a
little too thick. So I'm just going
to there we go. Better. I gave him a bit of an elbow joint because
sometimes I forget Animal Crossing
villagers do have elbows and knees, surprisingly. And then I could draw in a paper bag, groceries
or whatever. But now that I think about it, this poses a little
too invasive. So we can't really
see his designs. So maybe I'll leave
that for another time. I'll move that off to the side. And I'll stick with
the grocery bag. Regular grocery bag. So facto circle, a
bean shape isn't why? I don't mind if like say, you guys want to change
your idea halfway along because drawing a villager
is pretty simple. But if you are starting
your good copy, like you have your
drawing all done and not a lot of time left. Then I say stick with it. So I'm just going to draw
on his feet and I think it would make more sense if his feet were at
like a wider stance. Let's he's always on the guard or alert. So it helps if you're
drawing a existing character to try to incorporate
their personality. So not only their clothes, try and show their personality
through their pose, through their facial expression. You may have noticed that I just erase that rough line I had of that bean shape because
I don't need it anymore. So since this is still
the sketching stage, make sure if you're drawing on paper that you're
drawing very lightly. I could have one arm. If you've ever carried
groceries or help their help your parents carry groceries and
they're super heavy. And in both arms. That's kinda what
I'm thinking about. Okay. So I have him here. Now. He looks menacing. Not really. Then I could block out like, what would his grocery
bags look like? So so I could draw the handles and then
the rest of the bag. And then I could have
certain groceries sticking out of here. The first thing I think of is
like a leak or green onion. Spring onion actually. Maybe like a pack of meat. I'm just drawing the
first groceries, like come to my head. Groceries is not the important
part of this lesson. The important part is we
learned how to draw bodies. And then we are now
drawing it in a pose. That's the main part. Don't worry about groceries
if you're not drawing them. Since he is a cat, I
can't forget his ears. Super tall triangle ears. So I'm going to start
drawing his face and again, faces and features and
your Animal Crossing villager are pretty diverse
like there's no yes or no. I would say, however, try not to do
something too simple, like I'm thinking
of adventure time. Try not to do like
little dot eyes, just because I want
you to challenge yourself just a little bit. Even though this is more
like a fun project. For the face, since my
character is facing the front, I could put in a little
plus sign or a cross shape. So I know where I
want the eyes to go. For genitals I'm thinking
of I shapes like this. That's just how his eyes look. I can play around with
different eyes too, if I'm not sure what
I want to commit to. And if I were drawing on paper all of this testing
I would do on another piece of paper
and not on my good copy. So I'm going to try this
eye shape and then see, do I like it or not? And then if I don't, I can adjust it as I go. I know I mentioned
it a lot, but yeah, don't be afraid to make changes and nothing has to
be super final. Unless if you're
outlining your drawing, if you're at that stage, then it's pretty final. I quite like the eye
shape that I planned out. I just want to close
off the eyes like that. Then I could have her
looking off to the side. Well, let's see. What
would he look like if he's just facing the front? I think that's fine too. And generals whose eyes are
pretty fun because the, the whites of his
eyes are actually block is sclera is
a different color. So I could sketch that
in to remind myself. And then for his mouth, if I wanted a bit of a nose and then his mouth. It could be like that
typical cat mouth or I can try something like something
more disconnected. Or I could try no nose and
then see how does that look? I quite like the no-nos look. It's pretty fun. I'm just looking
at a reference of what kind of clothing
I want him to have. I can't remember what this is. Outfit look like. I think he has a hood. He has different outfits. In the, in the anime, I think he changes his
clothes like three times. The one that I'm looking at, the outfit that I
wanted to do is like it's a blue hoodie and it has his name on the inner inner
lapel of his jacket. For a hoodie, I'm just doing these little teardrop
shapes like this. So after I've drawn these
little hoodie parts, I am erasing any
overlapping lines. For the inside of his hoodie. It crosses over like this. And then here, How's this inner
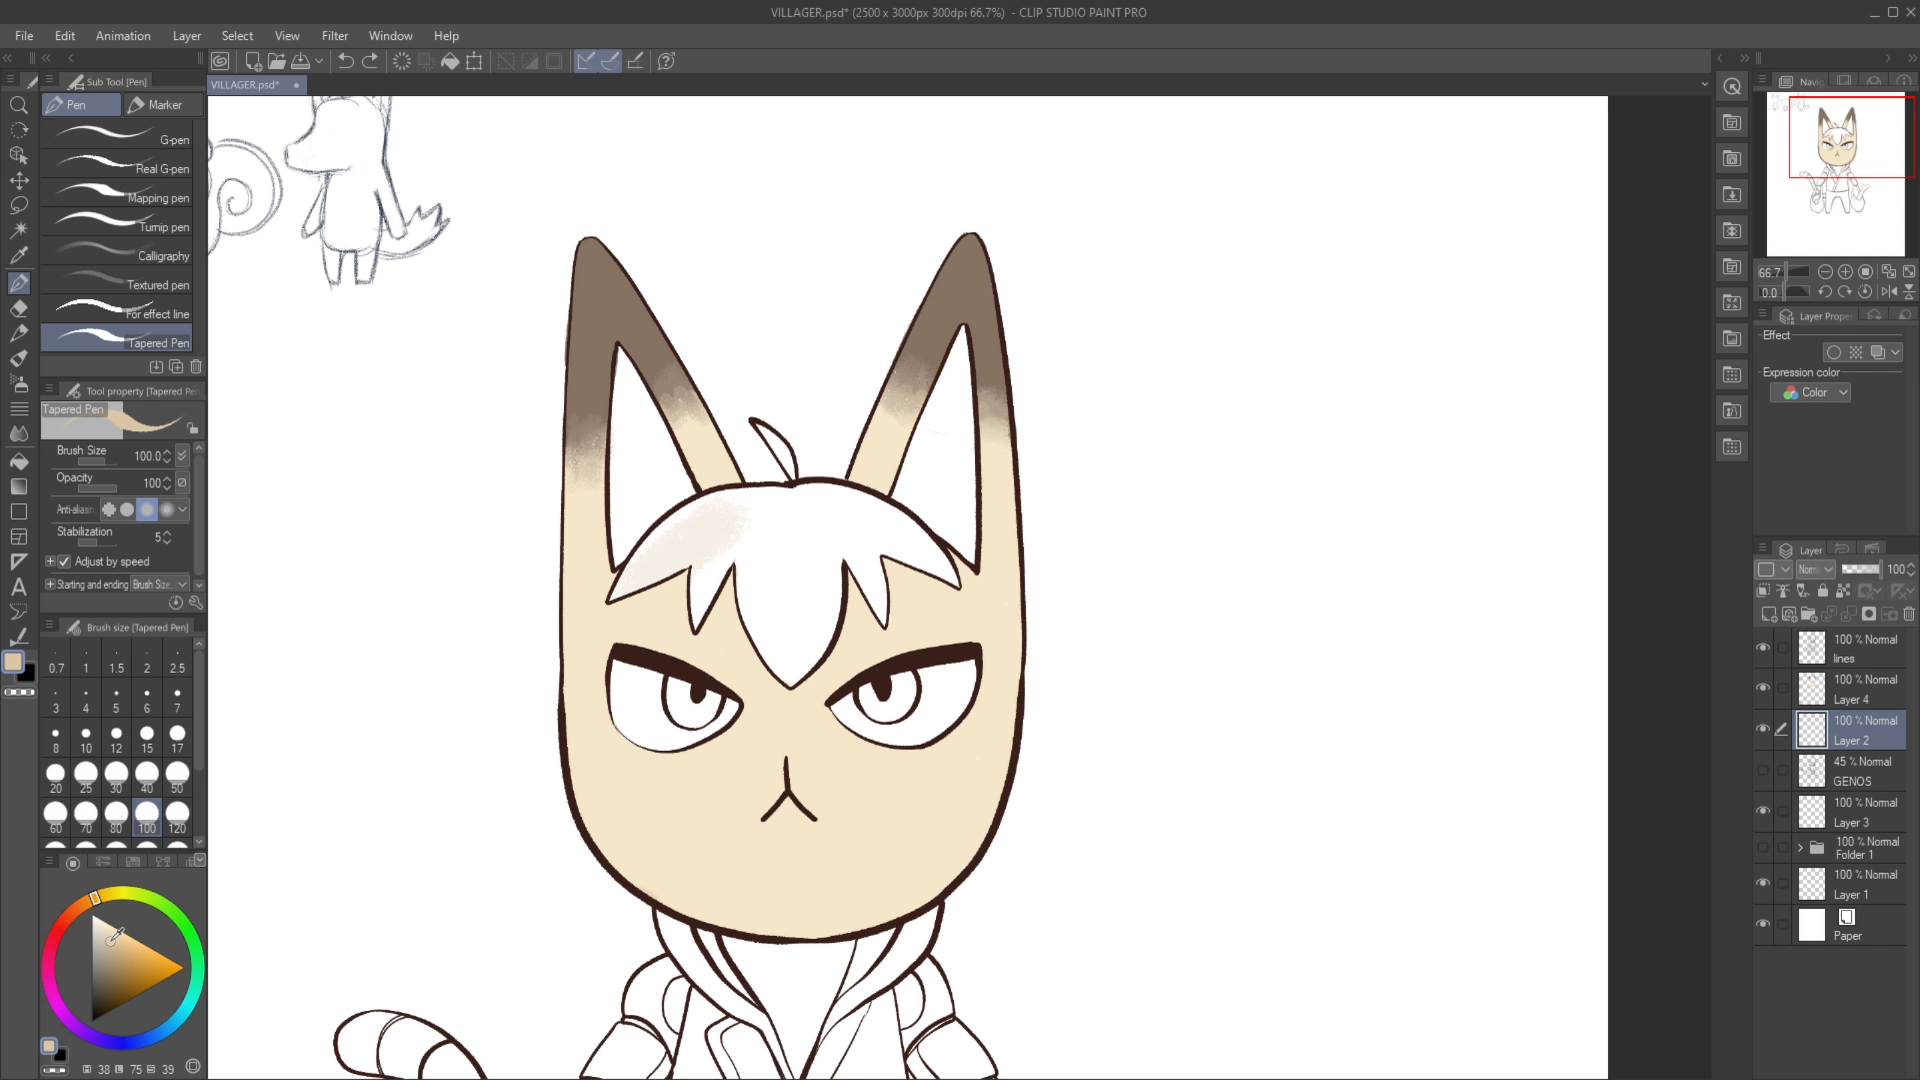
inner flap of his hoodie? And it actually says
his name on here. So it would be GE and whatever, but i'll I'll add that in later. Right now we're just focusing on the basic shape of the hoodie. And then a little blob here. I'll just simplify it. And then there is his body. He also has cyborg arm. So I want to incorporate that I must that as
part of his character. So since he is an Animal
Crossing villager, I have to simplify
as arms quite a bit. I think something
like that is okay. It just looks like two fingers. I forgot he has a tail. So what I can do is
kinda draw through the body and see where
that tail would go. And then erase any
overlapping lines. And then there he is. I think it would make a ton of sense if he had
like a robotic tail to I'm just doing that by creating these
segments for the metal. It seems like he should have hair or at least
a fringe of some kind. I'm also erasing a bit of those guidelines that
I put in for the face. Hair on Animal
Crossing villagers don't really stick out there. They're kind of more like a pattern on the body
so I could add it. What does this hair look like? Something, something like that. Kinda looks like a fruit. Now, if I added a little thing on his head, I think
that would be funny. Yeah, sure. There he is. Okay. So from here, I can start
outlining my drawing.
4. Outlining the Sketch: I'm going to knock back the
opacity and then I do have some outlining tips
that help digitally. And traditionally,
if you're working digitally and you're not too
confident with line art, if your program has
a stabilization tool that will slow down your lines, I'm going to start
outlining first. And then I have some other
line art tips as we go. I'm going to start by
outlining his eyes. Just want to darken
up this top lid of his eye pupil of his eye for the
whites of his eyes. I can if I turn off
my sketch layer, you can see what it looks
like with just the lines. I can leave that and then
color that in dark gray liter. And then if you're doing
line art on paper, you do need to be careful. Just because once you've
outlined something, there's, there's no
going back right? With digital art you can erase. I'm just going to thicken
up some lines over there. And adding his cat mouth. Want to make them look
like extra grumpy. And then next I can start outlining his ears and his face. I just kept it simple
because again, remember Animal Crossing
style is simple. So those are my lines so far. Now I can start
outlining his body. And then the cool thing about doing while, I don't
want to say cool. But the thing about doing
a line art is that you can always make changes
in your line art. Like maybe there isn't, there's something
about your sketch you don't really like, and then you can fix it with
your ally or add to it. Outlining his vest on the sides. And then his robo arm. And these little rings
are just like segment. Since they are metal pieces that just look like big finger. And I add a little bit of
the hoops line going down the side because it
adds more detail to create that like robotic
metal, metal feel. And I'm just doing
the other arm. Same thing. I'm adding a line, the middle. That arm actually look
shorter than the other. I could simply
copy and paste it, but I shall not cheat. So I'm going to fix this myself. All I need to outline left is his grocery bags and then I will be ready
to start coloring. I don't want to make these
bags to over complicated because they are not the
focal point. Oh, yes. Another digital art trick because you can't exactly
do this on paper. So I apologize because I'm just outlining
through everything. And then I can erase my lights. Pieces of meat that will look more like
meat one eye color it. So I'm going to erase parts of this tail that are overlapping. I would suggest maybe next time, try drawing a bit bigger. I know some of us might
be afraid to draw bigger. But one really big reason
why the project might, might feel too short or
your drawing too fast is because the drawing
is pretty small. So if I were drawing
on a piece of paper, my drawing would
be, you can always use your hand as a guide. So place your hand on your paper and then that's about as big
as your drawing should be. It does make coloring a
little more time-consuming. I have is other bag. And that is pretty
much my lines. So I can turn off my sketch. There he is. In all of
his tiny, tiny glory. Then now I can
start coloring it.
5. Colouring the Character: So when I, when I look
at what genitals, his overall color palette, excluding his
clothes on his arms. It's just a bunch of
light, light yellows. So I can pick out a
light, a pale yellow. And then I can
fill in this area. And then only it only
has had in his ears. That's still a little dark, so let me fix that. Then. I would just color
in this entire area. If your character has certain
markings on their face. If they're, if
they're darker than the than the skin
tone or base color, then you can simply put it over. I was kind of thinking
about it because then at 1 in the anomie he does have
kind of like cat marks, but he kinda loses them
pretty quickly to his, his design is always changing. And then I think it
would be cool if I had the tips of his ears
like a darker color. So I can have a
bit of a gradient. I know for those
of you working on paper, this isn't there. There is some blending
technique involved. So what I'm going to
try to do is blend this out like I would on paper. So here you can notice that I'm only bringing
my light color up to where where would meet the darker color,
the darkest color. So I'm not coloring this
in the light yellow yet. So for anyone wondering, you're working
digitally, couldn't you just bucket fill
everything? Yes. I could I could I have tons
of shortcuts I could use, but since most of us are
working traditionally, I want to limit the amount of digital shortcuts that I use. Just filling in his hair here. Okay, and then I will show you how I would
approach a gradient. So it's like I'm
just going to grab a darker brown brown
color. Let me see. I might regret this
later, but that's okay. I'm just going to place
that dark color in here. And then you can notice there's absolutely no blending going on. And then I'm just
filling in this area. And then from here, what I can do is start to blend out those,
those two parts. So here, hold on. Here, I'm just taking my two colors and now I'm
going to blow back and forth. Just so it doesn't
look like two bricks of color next to each other. So even just a tiny bit
of blending like that, It's perfectly fine with me. I'm just going to blend out
a bit of this area too. I'm actually not a huge
fan of how this looks, but if I were working on paper, I'd have to commit to this. I'm not going to change it.
I might change that later, but I will change it now. I made him look
really, really yellow, so I'm just going to knock back the
saturation a little bit. Next, I'm going to
add in his hair. Is hair color. Needs to be lighter. Needs to be even lighter. I'm trying to eyeball the colors so they might
not be super accurate. Just gonna do some quick fixes. Okay. I'm I'm happier with that. So I have lot. And then next, I can
color in his eyes. So what I would
actually do first, the way that I would
call her in his eyes. So the inside of his
eyes are yellow and the whites of his eyes
are actually black. So since black is the, is the darkest color
you could use, or a dark gray, I'm going to color it
in with yellow first. The ideas that we always want to work with your colors,
light to dark. Just because if we
ever make a mistake, it's a lot easier to
cover a light color versus trying to
get rid of a dark, a really dark pigmented color. So I have two eyes and then
I'm going to get a dark gray that's a little too dark. Then I can fill in his eyes. And then once I
fill in his eyes, it looks a lot more
like his character, the inside of his ears. I'm actually not a 100% sure what do I want the color to be? I might just stick
with yellow with his yellow color scheme.
See how that looks. I'm just going to use the
same color that I use for his eyes, for his arms. I'm just going to bring out the digital art tricks just
to speed up a little bit. So you guys can continue
to take your time. But since I want to have a
demo done by the end of class, I'm just going to
speed up a little bit. So that way I can move
on to some shading. And then you guys can
you didn't learn how to shade next his hoodie. And again, I'm just
going to speed through this in case it looks a
little messy right now. Inside of it, hoodie is white. So a lot of my day should old tricks is like just
using the fill button. And then I could
also write his name. So if I were to
do this on paper, I would avoid coloring in
this area or use a white pen. Then I'll just give him like black or darker,
darker colored legs. I want it to be quite
a bit darker compared to the rest of his body.
This part as well. That is fine. And then next I can I
can color in his tail. Okay. Let me try to fill this in. I just want to color in
this plastic bag and then leak or spring onion. I can make the tip
just a little green. Fill this in red meat or fish, who knows, maybe it's fish.
And then there he is. So what I would do at
the end is shaded in.
6. Shading the Character: Whenever you're
shading something, it really helps if you look
for the light source first. So where's the
light coming from? I'm going to choose
this, the top bright. The light can come from there. So when I shade, I know that the shadows
should be on the left side. So again, light source is
coming from the right, which means shadows
are on the left. And then I'm making sure to shade in any overlapping parts. So like a little
flap in his hoodie. I have a shadow down there and shadow under his head a little bit
on the side like this. Just because our
villagers, they are in 3D. They're not they're not completely flat,
just like people. People are also 3D. I have a little bit of
shadow going there. Here. There we go. I can add a bit of
shadow under his eyes. So that's one way to really add depth to your eyes
is to have a shadow. Because in real life
we have that as well. It comes from the eyelid. So if anyone has the
whites of their eyes, of their characters
like completely empty, take a super light gray and then just add a little
bit of a shadow. Then that's something
else you can try. A little bit of
shadow for his mouth. The way that I think
when I shade is, again, it all goes back
to thinking in 3D. That's how I know. To
shade on one side. And the other cases
you would also be adding shadows if you, if you have overlapping objects. So this leak is kinda like a
cylinder so I could have it like a little bit
of a cast shadow. And there he is. I'm
covering this entire tail at the back here in shadow just because there's so much
overlapping going on. But on this side, I would
only shade the bottom side. There he is. There we go. Afterwards. I'm pretty fine
with this. I could add like a little
platform for him. Just like in my other examples
that I showed you guys, where I have that layer, that little bit of Ireland. So let me let me try that again. Like he has a little
bit of Ireland. I'm just going to blur
the bottom out of it. Then what I could do is add
those triangle patterns. You would see an
Animal Crossing. I'm just quickly
adding some triangles. There we go. So that's like a
simple background that I would add or backdrop. And then from here, I could
add any special effects. Or if I were working on paper, I could take my white Jelly
Roll pen or white pen, white marker, and then
add any highlights. So for like his arms, they're made out of metal, so I do want some
sharp highlights so that at least a
little more glossy. Shiny. Same thing with his tail. I could add some highlights going down the middle like that. And then he looks a lot shinier. I could also add a
highlight for his eyes, maybe even a highlight
for his hair. So similarly to animate hair, I'm just thinking of
the letter H and then sweeping it across the hair in the circular motion in
this circular shape. Okay. Maybe I could add even a little bit of
a highlight for the meat. Just because it's like a
packaged packaged product. I could add a little
bit of gloss, little bit of shine. So it looks like it's
in that plastic wrap. There we go. There
is my Genoese. So a recap for today. We created a Animal
Crossing villager. When we created it based
off an anime character, a cartoon character, or a
completely original character. And we turn them into an
Animal Crossing villager. So here I have generals
from One Punch Man and I turned him into a
cat doing groceries. That is all for
today. I will see you all in the next class. Bye.
 Winged Canvas, Classes for Art Nerds