Transcripts
1. WELCOME!: Hi, guys. Welcome to my class. My name is Kate Lawrence,
but you can call me Kate. I'm a self taught illustrator based on Long Island, New York. This class is all about
using your imagination to capture the essence of
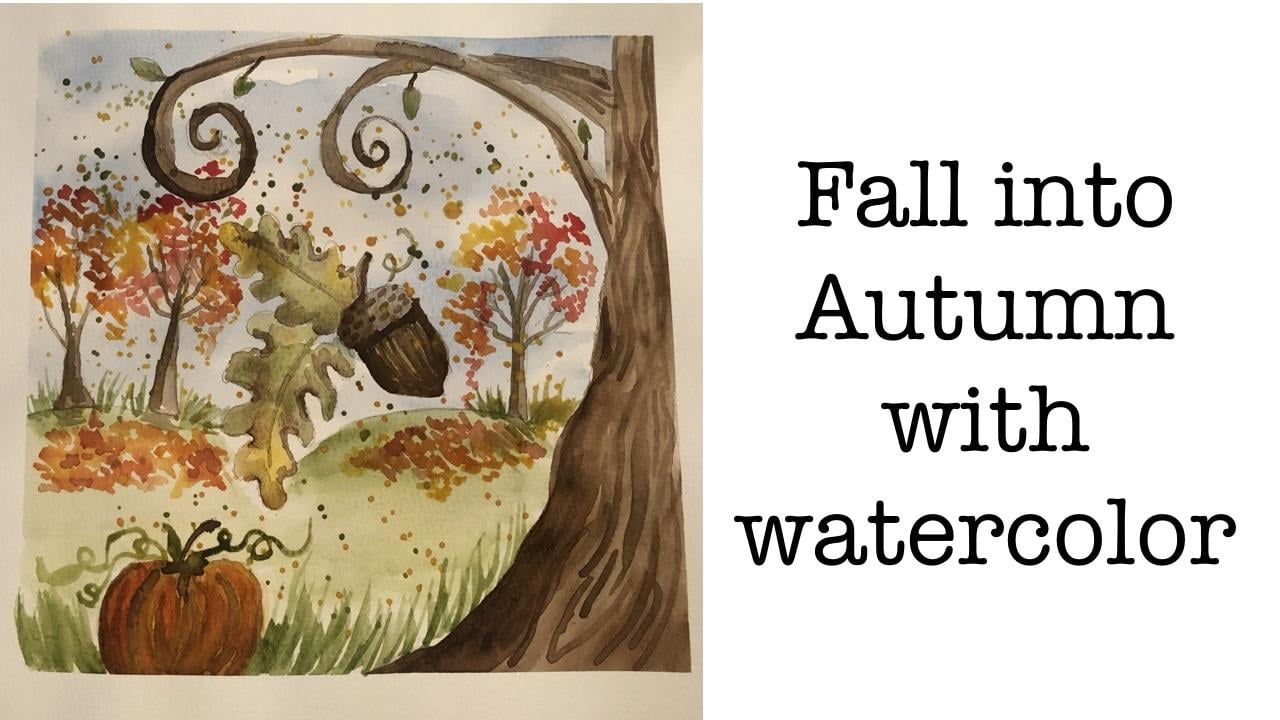
fall with watercolor. We will create a whimsical
landscape together. In this class, we use a
minimal color palette and three brushes. That's right? Just three. For me, painting is an escape and a total
relaxation time. I hope you feel at ease and at peace while
taking this class.
2. Class Project!: Do you want to
capture the essence of fall, but don't
know where to begin? In this class, we learn my personal technique for
illustrating all things fall. I've broken down this
project into small lessons, so it's easy to follow along. I teach step by step how to
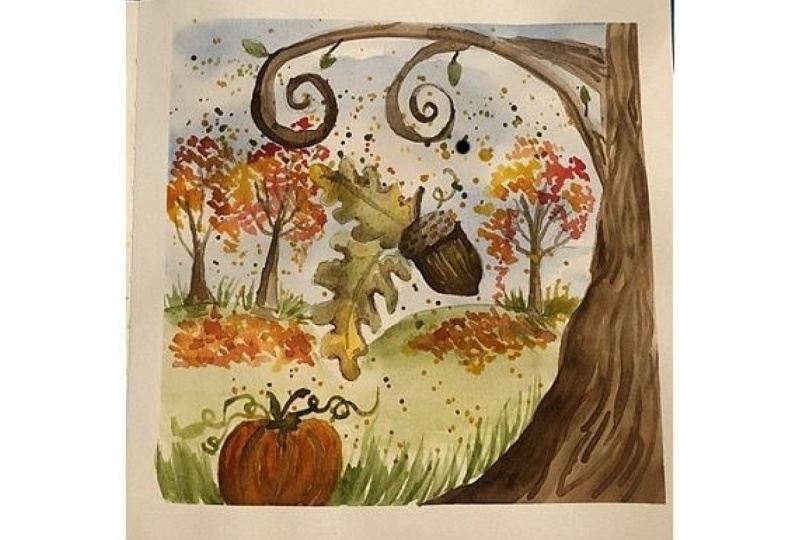
paint an autumn landscape, while encouraging you to take risks and make your own choices. For our project resources, I've attached my
previous paintings as references. Hope to
see you in class. Bye.
3. Supplies & Setup: Here's a list of
what you will need. We're using 8.5 by 8.5. Paper is 110 pounds
and it's cold pressed. Alright, next, we're going
to be using a color palette. Washi tape or painter's
tape, whatever you have. Scissors, a pencil. The brushes. We're
gonna be using a 12 round, this
one in the middle. A two rigger and a
six bestie wedge. Only three brushes for
the entire painting. Here's the paint
pala that I'm using. We're only gonna be
using five colors. So a paper towel
and a cup of water. To start, we're going to get our washi tape or painter's
tape or masking tape. Whatever your personal favorite is for watercolors, grab that. And I'm just gonna
stretch it out. And then I push it down, and then I cut the edge
off with my scissors. We're gonna do that
all the way around Make sure to push down. If it starts to curl, apply a little bit of
pressure, and it should stick. People always ask, how
do I get Crisp blinds? And the secret is so
simple. It's just tape. And then your fourth one gonna cut that and we
are ready to sketch.
4. The Color Palette: The color palette. Okay, so I am using
this gravy set. We are starting off
with orange yellow. You can just mix together
permanent yellow with a little bit orange and you'll have
this perfect orange yellow. Next, we're going to use orange. Any bright orange
over your choice works perfectly for this. M next is vermilion. It's like a candy apple red. Very pretty color.
Then olive green. Or if you have sap green,
that will work as well. Next is Van **** brown. Now, we're gonna use
quite a lot of this, so feel free to fill up your well with quite a bit
of pain for Van **** Brown. And last for the sky
is ultramarine Blue. So we have five mean colors
and one color for the sky.
5. The Sketch: Welcome to the sketch. So to begin, we are going to use I'm using a
mechanical pencil. You can use whatever you
feel most comfortable with. We're using a very
light pressure, and we're starting from about the middle of the
bottom of the page. And we're just drawing
right now like a swirl. This is going to
be our big tree. So it's going to be one
of our focal points. All right. And then you're
going to want to draw a straight line up like a
continuation of the bark. Now for this section, we are going to draw
thickness in the swirls. So whenever the line goes down, you want to make it a parallel line of thickness
right next to it. Next, we're going to
draw our pumpkins. Now, feel free if you
want to draw a scarecrow, if you want to draw
a barn, go for it. I love pumpkins. I love gourds. I feel like they're
just so festive. So I'm adding one in
right now very gently just drawing the
outline and the stem. And I'm going to draw
three curve lines just to resemble some
roundness in the pumpkin. Next, we're going to
draw some grass and don't be afraid to
draw it all the way up the tree to the right and to the left
of the pumpkin, as well. Okay. Now we're going
to draw the top hat, as I like to call
it to the acorn. Kind of looks like a lima bean. You're going to draw
a straight line down and a little curve in and make sure that there's
a peak at the bottom. And you're just going to
connect it at the top. Add a stem. Okay, we're going to draw a curve
line going towards the top swirl and another curve line going
towards the pumpkin. These are going to
be our oak leaves. So very gently just
going up and down in and out to create that
crisp leaf look. I go to the next one. And again, you can make your leaves really
big, really small. You can make them. Maybe they have holes in them
if you want to draw, like, a little section on the
leaf where there's holes. You can totally
do that, as well. I like how this looking so far. Alright, now we're just drawing the grass line where we're going to put
our distant trees. And I'm gonna start
on the right. Just drawing a straight line
up with a little bit of a curve right next to it. When I'm sketching trees, I'm always using it just
as a guideline for size, for shape, and for position. So you don't have to worry
about it looking perfect. It's just to help guide you. We're gonna draw another tree. Kind of like an
elongated triangle and then some branches
coming out of the top. And we're gonna make another
one right next to it. This one's gonna be a little
bit smaller, not as tall. Ad variation definitely
helps it feel more natural. Variation of sizes. All right. Let's draw, like,
a little curly cue coming out of the acorn. And also another branch behind the one that
we previously drew. I'm going to draw
the swirl again, and we're going to
use the same method. Wherever the line
starts going down, you make another line
and you make it thicker. And then just connecting the top portion I hear this is totally optional. I just felt like it needed
a little something up top. So I'm drawing little
straight lines that will be stems for leaves that are
coming off of the branches. And that, my friends, is it? A
6. Sky : To get started, we're
going to work on our sky. So the first thing
that you want to do is you want to get
your water ready, and we're using a
size 12 round brush, and I'm just going
to apply water to the top portion of the
canvas here, the paper. And I'm just going
back and forth. I'm wetting the paper, but
I'm not saturating it. I don't want to have
puddles everywhere. So you want to use water
but not too too much. Alright. Then when I feel like I've got everything
kind of covered, I'm going to go in with
my ultramarine blue, and I'm just going to
swipe from left to right. I'm leaving white spots in between to just kind
of resemble clouds. Now, if you want to
have a lot of clouds, you want to use less blue
in this section here. Don't get worried when
you're painting over your sketch because Doug we are still going to be able to see everything after this is dry. Watercolor always dries a little bit lighter than
it is when it's wet. So I'm just kind of filling in some spots that I want some
sky to be showing through. Then once you're happy with it, feel free to tilt it around, swirl around the
paint a little bit. I'll give you a
nice natural blend. I'm going to add a little bit more of the ultramarine blue. Above the distant trees. And then a little bit above
the branches that we created. Once you're happy
with the amount of blue that you have,
you can just stop. Right now, I'm just
filling in some spaces in between where the
branches are going to be, and also I'm making sure that I don't have any awkward gaps. So I'm kind of just
taking my time and stepping back
and looking at it. Now we're gonna let it dry. Yes
7. The BIG Tree: Okay. Alright, so to
get this tree started, we are going to be using
our Vandyke brown, and we're going to be also using our best wedge brush
in the size six. Now, you don't have
to have this brush. You can use a round
brush in the size six, and you can get a pretty
fairly similar effect. But we're just taking the paint, starting from the bottom
and working our way up. I want it to be slightly more concentrated towards
the edge on the left. So that's why I'm
doing it a lot darker. And then I'm just
pulling that paint out. Almost doing, like, a glaze. We don't want it to be too dark because afterwards, we're
going to go back in, and we're going to do a
wood green texture on top, which is gonna be really fun. Alright, right here, I'm
just filling in the corner. Now, the darker, the
closer it is to you, the darker you want
the pigment to be. So that's why I'm using less
water and more paint here. And this is just our base. So just get it how you like it. And when you're happy with that, we're going to start
working on our branches. No, I'm just adding a little
bit more to the edge. I'm trying to make
it really defined. Alright. Now, here
I'm just testing out the paper to see
how wet it is, how dry. It's definitely good to
start painting over. So we're going to go ahead
and do one smooth stroke. And that's going to be
one of our branches. And when you're doing the
swirls, here's the trick. For thickness, you want to push down on the belly of the
paintbrush straight down. For a thinness, you want to pull the paint brush up a little bit. So when you're
doing these curves, it's a little tricky, but I like a challenge,
and I know you can do it. I kind of just take
my time and work my way work my way around. And again, we want that to be blended in the
middle of the tree, but more of a harsher
edge towards the left. Alright, now we're going to
work on our second branch. This is going to be a little bit darker than the one
that we just did. So we're using a
thicker consistency, less water, more paint. And then just blending
it into the tree. Great. We're gonna work
on a second swirl. Oops, I need more paint. I'm going to tilt the
brush, applying pressure. Get some more paint on there. And then using the tip of
the brush very lightly, just tracing over our sketch. And again, take your time
with these. No rush. I am gonna go back
in and smooth out the first one because I feel like it looks a little choppy. I just use a little bit
of water just to smooth it out. That's it.
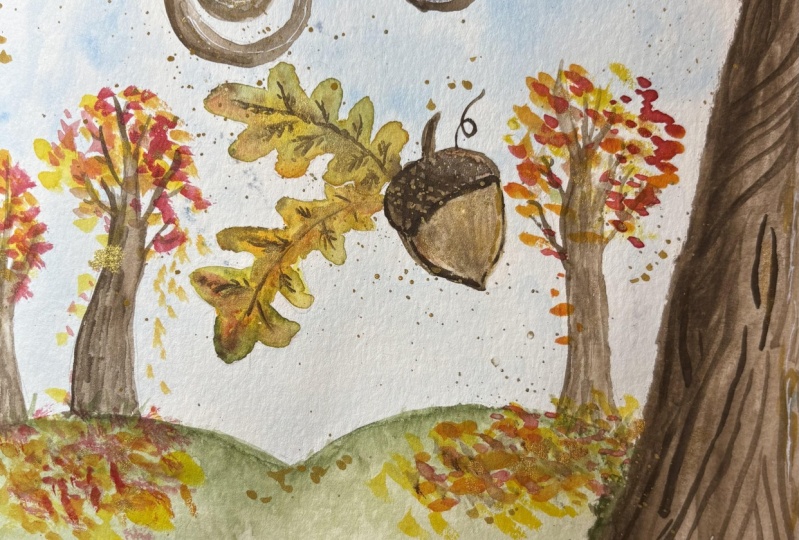
8. Center Leaves & Acorn: Okay, so for this section, we are going to be working on the oak tree leaves
and the acorn. We are going to be
using our rigger brush. Mine is in the size two, and I like to hold it down towards the center
for better control. I'm starting with
my orange yellow and a pretty thick consistency for the pain because I
want it to be very bright. And I'm just filling in where I think the yellow might be
the highlights of the leaf. Next, I'm going to
switch to my green, my olive green or sap green,
whatever you're using. And we're just going to go to the next section of it and make sure that the orange
yellow and the green are touching because you want these colors to bleed
into each other. I'm gonna go back to my yellow. And this is all preference. If you want to do your whole
leaf one color, go for it. Back to green. And I kind of just
pushing it around, letting the colors
blend into one another. And then adding some more yellow to the very
bottom of the leaf. Because I want to accentuate the crispness of it because it's going to be
sitting next to the acorn, so we just want to kind of pop. And I'm using, like, an up
and down motion just tapping. Alright, we're gonna get ready to work on the next section, which is just adding andyke
brown to all the curves, the inner curves of the leaf. And then again, just
using the brush very lightly to blend
the colors together. Alright. This looking pretty good. Now we're going to use
the orange yellow, and we're going to start on the second leaf at the bottom, just like we did at the top. And I'm making this
pretty bright. I love using the color yellow. It brings warmth and it
makes everything just pop. Now I grabbed my olive green, and I'm just feeling
in the leaves. Here Here we go. Feel free to add darkness, where you think
shadows might be? Were you think maybe there might be a little
hole in the leaf. Use your imagination. Get creative. Alright, now I'm adding more green to the very bottom of the leaf
or in this case, the top. And I'm making sure that
the two leaves aren't connecting because they'll bleed together,
and we don't want. Now let's take some
vandyke brown, and in the corners, we're
just dropping it in. Just tapping in the brown. And we're letting the
colors run together. No stress. That's the beauty of
watercolor, right? It kind of does its
own thing. So now, I like to pick it up and tilt it around to let the colors
naturally bleed together. This is looking pretty good. I want this area to dry,
but we have to wait. So we're gonna start
working on our acorn. I'm gonna grab our yellow and just fill in the bottom portion of the acorn with
all of the yellow. I kind of use, like,
a back and forth. Some people call it
scraping or dry brushing. When I do my first layer, I
like to do it very light. Okay. We're gonna let that dry. Okay, once your acorn is dry, we are going to go
back in and add more yellow to the top. Excuse me once the
leaves are dry. And I'm kind of just
using this yellow to tie all three
elements together, both the leaves and acorn. You know, I just
grabbed a little bit of my vandyke brown with a very light consistency.
So a lot of water. And I'm just filling in that
little top hat to the acorn. I love this rigor brush for all this detailed
work because it just kind of allows you to get into the places
that you want to. And you can apply as much
paint as you'd like. Now here you're going to
see that I'm just adding a little bit more Vandyke brown to the left side of the acorn, and I'm also doing the stem. I like how it's looking so far. I can't wait to see
what you all make. Alright. Using Vandyke brown, we're just going to add a
little bit around the edges. And then up and down motions, just making stripes, adding a little bit of
depth to that yellow. And we're gonna have
to let that dry. Right now we're going to do this little
curlicue with the green. Following the sketch.
9. Distant Trees: Okay, guys, so we're
going to work on our distant trees in this video, we're going to be using
our rigor brush again, and we're using a Vandyke brown. We're just going to start. We're just going
to jump right in. We're going to draw
a straight line up and then another one kind
of coming out of the side, and then we're attaching
it at the bottom, thicker at the bottom,
pointy at the top. And I'm basically just going
over my sketch very loosely. Okay. It's a cute little tree. Let's work on the
next one to the left. Again, we're starting at the basically the
middle, drawing, like, a skinny triangle, and then filling that whole
thing in with Vandyke brown. And we're going do the branches. I'm using a very
light pressure here. I'm barely touching the page. I'm just kind of
letting it glide along the paper and just
following the sketch. We're going to do our last
tree in the same way. You're gonna fill in the base. And then very lightly, make
some branches coming out of the top and try to do
them in different shapes, different widths, that'll
make it feel more realistic.
10. Grassy Hill: Alright, let's start
with our grassy hill. So we're gonna use our green, and we're just gonna load up our besti wedge brush or
whatever brush you're using, you can use a round brush for this size six that I'm using. And I'm just sweeping across
and dragging the color down. So concentrated towards the top, and then just dragging
whatever is left on the brush back and
forth all the way down. Now we're going to
do the other side, load up your brush again. One smooth stroke
across the top, and then back and
forth. Left to right. I'm getting a little
ambitious here, and I'm adding some
more green in. I felt like it was
a little too dull. And we're gonna mix
up some more paint. Almost there, I
promise. All right. Gonna go back up to
the top of the tree, the tree line, and we're
just gonna darken it again. And same motions back and
forth. Left or right. I'm kind of just painting
around the leaves around the tree and around
the pumpkin right now. The smaller the brush, the easier it'll be to
do, like, cuttings, so I'm liking how it's looking. Definitely bringing
some life into our little landscape here. And I'm bringing
the green all the way down to the
bottom of the peach, just to blend it
out a little bit.
11. Foreground: Alright, let's start
with our foreground. So we are going to use
our bestie wedge brush, and we are going to fill in the pumpkin with our first
layer using the orange yellow. And again, we're going to do a similar technique that
we did with the acorn. So we're gonna paint
another layer on top after this dries. Make sure to get all the
little nooks and crannies. Alright, now we're going
to wash out a brush. And we are going to do the grass that's
surrounding the pumpkin. So with your green color, you're just going to do swooping
motions up like flicks. So starting at the bottom, flicking the brush upwards. This is where the wedge brush is useful because it has a tip. So it gives you that
nice, sharp, crisp point. And then you're gonna also do it to the left of the
pumpkin, as well. Just really darkening that up in the front, giving it some life. That's it. Alright, so we are going to bring our pumpkin
to life finally. We're going to add orange on top of the yellow that
we previously painted, and we are using our
best wedge brush. And I'm starting from
the bottom and just slowly making my way
around and then doing, like, a big stripe
down the middle. And I'm kind of leaving
some of this yellow peeking through. I think
that's kind of fun. Not too much, just a little bit. And I'm just kind of making some darker spots and
some lighter spots. It's gonna be darker towards the bottom, lighter
towards the top. And then we're gonna
grab our Vandyke brown and using the very
tip of the brush, light pressure, you're
gonna make the stem. Now, I didn't wait
until it fully dried. That's why there's a bloom. We can still work with
it. It's my worries. I'm just kind of pushing
the paint around. And I'm doing curves to make the pumpkin
look like it's round. And then just blotting
off some excess paint. It's always good to have
a paper towel handy. You never know when
you're gonna need it.
12. Wood grain & details: For this section, we're going to be using
the rigor brush. We are using the same brown, more paint, less water, so it's going to be a
thicker consistency because we want it to
be a little bit darker. Now, I'm just going to make very random brush strokes that are close together
and that are curved. So you can kind of see
that one will be thick. The next one will be thin. And I'm also holding the brush very close
to the bristles, so I can really drag the long bristles and load up the brush
with a lot of heat. Now, I'm making some sections
that are, like, thicker. Maybe they could be,
like, a hole in the tree. Use your imagination as always. And I'm just going around
making these lines. But they're not really touching. They're just next to each other. Oops. That one touched. If you run, paint, go
ahead and load up. I'm doing some darker ones, some darker lines towards
the left side of the tree. Again, just to show the shadow. So I kind of like to do a light line and then a
dark line next to it. I think that looks kind of cool. And remember to
bring it all the way up to the tip top of the tree. 'Cause it's kind of light, but the bark is
still going all the way up to the top of the paper. And this is one of the good times where you really want to paint and then step
back and take a look, see how you feel,
see what you need. So this wood green is very
easy to do. Anybody can do it. Now I'm just extending that onto one of the
branches. So darkness. Mm and I'm just gonna
add a little more paint. Now, we're going to
do the little leaves that are sticking out
of the big branch. So using the vandyke brown, we're just drawing little lines, painting little lines and then grab your green when you're ready and just fill
that little leaf in. I chose to do this shape in, like, a tear drop. And there's painting
the last one. Now we'll let those leaves dry. That's all we're doing to them. We're not going to
add anything else. Alright. Oops, I forgot to do a
little bit of texture on this branch behind the one
we were just working on. So I'm just kind of
going back and forth, making the same pattern. When you're done with that,
you're just going to add little tiny dots onto the
acorn using the same brown. And I kind of like to
do it in, like, threes.
13. Adding depth: Okay, so we are going to
add depth to this piece. We're using our
rigor brush sill. And we're going to start with our little pumpkin
in the foreground. So using Vandyke brown, that's all we're gonna use
for this little section here. We are making curved lines on the pumpkin to resemble some curves making
nice and round. Now, I'm doing these
three lines in brown. If you'd like to stop after
this, you totally can. Totally up to you. I'm also adding some lines
towards the bottom, and then just kind of going around to make
sure it's blended. Alright. After that, oops, I have a
little bit too much paint, so I'm just gonna dab that off. They're handy, uh, paper towel. I'm gonna grab some
orange because I would like this pumpkin to be a
little bit brighter than it is. And I'm just going in between the brown lines that we painted. They might blend together because everything is
still wet. That's okay. But I like how that orange kind of made it
pop a little bit. Now I'm going back in with
a little bit more brown. And I'm tilting it just to get that better blend. Alright. With your green, you
are just gonna make little flicks at the bottom
of the base of the trees. I do about one, two, three, four, five, six. Um just filling up some space, getting the eye a
little something extra to look at when
it glances at the tree. And I'm doing it on all sides,
making it nice and full. Alright, we're gonna
load up our brush again, and now we're going
to do long flicking motions in the grass, kind of bringing it up the tree and doing different heights from what we had previously painted. A whenever you do a
variation of heights, I feel like it really makes
things come together. Alright, grab that
Vandyke brown, and we're just doing
one long strain line up the tree to the left. Adding a little bit of depth. I'm doing it fairly
darker than what we have. Don't let that scare you. Contrast is a good thing. And I'm doing just little flicks underneath the tree just to
give a little bit of shadow. Air it out. We want this to dry. Alright. Get ready
to do the branches. We're gonna add depth so
we get your vandyke brown. And starting on the
big one, the big curl, towards the bottom,
you're just gonna go all the way around. Just like so. And take your time on this, go as slow as you
need to. No rush. I'm just bring it all the way
to the top so it's blended. We're gonna do the same thing to the one right next to it. Making that thickness
a little bit darker and adding some value. Using Bandike brown,
we're going to go to our leaves and just around the tips of them
where it's coming out, that's where we're
going to add the brown. Taking a look. Alright, let's work on
the leaf underneath. And again, we're using
very light pressure here. Very little paint. Taking a step back. And I'm still trying to get that
pumpkins values, right. So if you're done with your
pumpkin, that's totally fine.
14. Finishing Touches: Okay, you've made it to
finishing touches. So exciting. Now that everything
is completely dry, we can go in and do a little
bit more of detail work. So using our Vandyke brown
on my bestie wedge brush, I am just trying to add a little bit more
value to the pumpkin. I need a little bit more paint. And I'm actually going to switch over to the
rigger. I'm sorry. Doing some curve lines that
kind of got lost before. And I'm also adding little lines to the
stem just at the top. Sort around the bottom,
making a curve up. And I just feel like this brown. I know we've used it for everything in the
pumpkin and the tree. But it's just the
perfect color for fall. I love it. So Now I'm
doing little flicks, curve flicks from the
bottom to the top. And I think that's
pretty much it for that. You can add more
orange if you want, but um, I'm just rounding
it out a little bit. So then I was thinking, we have all this negative
space above the pumpkin, and it would be fun
if we could add some vines and maybe,
like, a little leaf. So after we're done with this, we're going to start
start on our vines. I'm just adding that
little extra orange. Now it's a good time to refill, any of your paints,
if you need to. Okay. So here we go with our vine, using our olive green
that we've used this entire time, old faithful. And you're just going around
using very light pressure. When you get to the loop, you're picking your
hand up a little bit. So that way, there isn't pressure on the paper,
and it's nice and thin. Can make our little
leaf, just paint it out. Doesn't have to be perfect. I'm gonna grab some more green. And we're gonna add another vine to the
left of the pumpkin. And again, we're just using the negative space that we have. Gonna do one more on the
bottom, on the left. Just like one loop and
connecting it to the pumpkin. And then I'm just darkening
up the leaf a little bit 'cause it was too light. Mm Alright, now I'm
just grabbing the red, and I'm tapping in like a little stream of
falling leaves. Now, here's the fun part.
Using your rigor brush, we're going to
start with yellow, and you are going to just tap. You're going to tap with
you're using minimal paint, minimal water because we don't
want splatters everywhere, and we don't want them
to be too big and too overpowering for the peas. So just go up and down. And I chose the Ricker because I want them
to be very small. I just tapping all around, but I am avoiding the acorn and the two oak leaves in
the middle of the painting. Okay, I'm switching over
to my 12 round because I need them to be a little bit
bigger than what they are. If you get the
splatter where you don't want it, it's okay. You could pick it up
with a paper towel or you can just let it dry. No worries. Now, the 12 round is going to
give us much more splatter. So be prepared. Now I'm just adding some beneath the trees and above the pumpkin. And that's one of the
reasons why we taped in the beginning is because
when we take the tape off, we're gonna have these
nice crisp lines on this beautiful
little landscape. I'm switching over to
green to do splatters. I'm not going to do a
lot just a little bit. And I'm still using
the 12 round. And I think once this dries, we can take off our tap, and it's gonna be beautiful. Alright. The last step here is we're
using the Vandyke brown, and you're just kind of
going underneath the top of the acorn hot to the left of
the acorn and the bottom. And then just doing, like,
a flicking motion again. And then I'm adding a little
more depth to the top hat by doing a curve like a C
shape on the left hand side. And we are finished.
15. Thank You!!: Congratulations. You
finished the class. I hope you enjoyed
creating and learning. I can't wait to see
what you want to make. Make sure to upload
your finished landscapes to the
project gallery. Here, I can provide feedback,
encouragement and support. Thank you so much
for taking my class, and I hope to see
you again soon. Bye.
 Caitlin Lawrence, Illustrator