Transcripts
1. Introduction: Hey, how are you doing?
It's Clayton here. And in this lesson,
we're going to be learning all about how to tell story through the
faces of your characters. And believe it or not,
the human face is one of the best ways to tell a story, especially when it comes to the personality of
your characters, the emotional experience that they're going through
within the story. But also on top of that, we can lay the context, the mood down for
what's happening within the scene by lighting the face in specific
ways and also capturing from certain angles. I'm going to show you
how to do all that. In this lesson. I see that we jump straight into
this and get started.
2. Standard Head Construction: So here we are in
Clip Studio Paint. My favorite drawing
application of choice. It's just beautiful. It gives you a
really traditional feel when it comes to drawing, especially if you're using the Mark Brent
Legendary Linear brush, which you can download
for free from cube brush. Amazing little tool gives a very just natural feel not only to the
action of drawing, but also the drawing itself. Okay, well, we're
just going to jump straight into this and we're going to warm up with
a few different heads. All right, I'm going
to show you the simple structure of a head, how to actually draw
it fairly quickly, in fact, and just get
something down onto the page. And also do some
tighter heads later on. These ones just to start
off with are going to be a little bit more loose. Alright, so let's warm up here. The basic head, whether you're drawing a male or
a female is always going to consist of a cranium, which is basically
nothing more complex or complicated than just a sphere that we're going to draw
down onto the page. You can see that the
spheres that I'm drawing down are
a little wobbly. So if you need to just practice some spheres to get started, then by all means, do that. But once we've got a circle down onto the page,
you know what? It doesn't really have
to be super perfect. I've said that it needs to
be perfect in the past, but you can kind of just
sculpt this stuff out. As time goes on. Now, you do
want to establish an axis. So see this little
line I'm putting through the top and the bottom? That's like the
tilt of the head. Think of it like the Earth. The Earth has a tilt
that it rotates on. Alrighty. So we
call that the axis. Then we establish the
front of the head. That's this line that runs
right down the middle. And then we have
another line that intersects That's going to ultimately be the eyebrow line. You'll see how that
works out in a second. But at this point,
we have a ball essentially that's been
divided up in two quarters, and then we establish
the side of the head, which is the temporal area. It's flattened out there, so we're really just lopping off a side of the head there. You can see how that
appears flat now and you can bring this sit in a little bit too
if you want to. Just make sure that
you've got an even amount of space on either side
of the face there. Now, I know I'm running
through this fairly quickly. I'm giving you a
bit of a recap here just because the
aim of the game, the main theme of this lesson is more
about expression, okay? Emoting through the face. And so if we can just get
the basic foundations down for the head
right off the bat, do a little bit of a
warm up exercise here, we will be able to
jump onto that ASAP. Alright, from here, we extend the front of the
face down to the chin. Alright. I'm gonna lay
it down about there. Now, how long do
you take it down? Well, you know, these days I
can just kind of eyeball it, but really the idea
is that if we've got the full length
of the cranium here. Alright, we're going to go boom and then we're going
to measure that out. We're going to run a
line down to about here. Okay? And it's kind
of a straight line, kind of not, but that's okay. We divide that in half. And then we take the top half and we
divide that into thirds. Okay, that's not
very good so far. Let's try that again, so divide this into thirds. All right. That looks about right.
And then we divide the bottom half into thirds. And then you see the third
at the top and the bottom, that's like one third in, right, from the top
and the bottom. Well, we run a line across here. That should give us
basically the base of temporal area of the skull. We'll run another
line across here. That gives us the top
al area of the skull. Okay? And then if we continue that line across to the
other side of the head, you'll notice that we get these squares in the
middle of the face. The idea here is that all we got to do to find
the length of the head is measure the front of the face down one more of these squares. Okay? So we want to try to keep them as
equal as possible. We measure it down
one more square, and that should give
us a proportionally accurate length for the face. Okay? So pretty simple. You just lay down a measurement
stick for the head, divide it up into two halves. Up half will be
divided up into serge, bottom half will be divided
up into Serds as well. You take the the topmost third, draw a line across
that'll give you the upper area of the temporal
portion of the cranium, and then you do the same
thing at the bottom. The bottommost third, boom,
put a line across there. That'll give you the length
of the temporal area. It's very, very technical. I promise you, it's not
that technical after a little while because you can just guess your way
there at a victory, but that's how we get
this next segment. Anyway, I'll leave that there as a little
reference for you. But once we've got the length
of the face established, we can draw in the
jaw line like so. Jaw line is pretty simple. We've got the back
edge of the jaw, this edge in between, the back and the chin,
and that's really it. You'll notice that there
is two corners here. Where the corner
of the jaw is and the corner of the chin resides, and that becomes
pretty important later on when you
want to start to tilt the head into
multiple positions. All right, I'm going to do
the same thing on this side. Now, what happens
next is I like to lay in my facial planes or
at least just sketch in, like, a representation of the cheek bones and the
muzzle area of the mouth. Okay? And that looks
kind of like this. What that does, especially on a three quarter
representation of the head, is it allows me to
be able to shape this far side of the face
a little bit easier. Because at a certain
point as you rotate the head away from you on the far side of the face, you'll notice that the
muzzle of the mouth area, it actually starts to form
part of the silhouette. Once that's done, we're well on our way to
wrapping up the head. I'm just going to bring in
the back there, some more. Keep in mind some sculpting
will be necessary here as we bring the head
through to completion. Going to give him
a neck. So we're just going to sketch
that in real quick. And then we start to
draw in the eyes. Now, as I said before, this
is the brow line here, that initial line that we
laid in around the cranium. What you can do is place
a little line just below that brow line if you want to if you need a
little bit of a guide, but the eyes are usually
going to sit at about the midway point of the
overall length of the head. So if you take the
full length of the head from the top to
the bottom of the chin, and you divide it in half, it's at that halfway
point that we're going to find the eyes. Okay? And we can just
sketch those in like that. We're going to keep
it fairly rough. This isn't going to be a
polished drawing or anything. We're not trying to create
a masterpiece here. We're just trying to
sort of go through the overall construction process that you'd execute whenever
you want to draw a head. Now, there's variations
of this, of course. There's looser approaches,
there's tighter approaches. You find the one that
works best for you. You might even notice
that over time, as you become more
accustomed to drawing the head that your approach
to it actually shifts, and you wind up going for a looser look going to
sketching the eyebrows. Okay. Got an eyebrow over
there. Eyebrow here. Okay, we're just keeping those
fairly brushy and messy, too. And then we got the nose. Now, the nose is going to
sit on this line, okay? So we're at the bottom of the temporal flattened out
area of the cranium stopped. We get the nose line.
Nosline also sits between the brow line and the chin
as you might have noticed. Once we've done
that, by the way, we can go ahead and divide
this bottom section up into thirds because on this top third, we're
going to find the mouth. Once that's done, we
can draw in the nose. Nose is going to look a
little bit like that. Okay. Et me redo
that nose, actually. Not super happy with that one. All right, that'll do. And then we got the mouth,
as I said before. We just draw that in. We start out with the opening
of the mouth. Opening of the mouth
is usually going to run out to the corners, which will stop at the
midway point of the eyes. Then for Gaius, really, you just want to
define a bottom lip, maybe add some
shadow in underneath that and be pretty
much good to go. That's the hardest
part. Once that's done, we got the ears. Now the ears are going to align at the top of
them with the brow, then they're going to
drop down to the nose. This is the basic proportions
of the human face. Obviously, it can vary from one character to the
next, but now, typically, if you don't want your
characters to look too odd and weird, then you'll be sticking fairly closely to those standard
idealized proportions. It's really just more
unique characters like villains, for example, that you might want
to change the shape of the head for or more wacky cartoonia looking characters because you'll notice that further you veer away from these
idealized proportions, the stranger your characters
might end up looking. And once we're happy
with what we've got, we can just kind of go
over the top of what we've sketched down there and
define it some more, okay? Sculpt it out a little bit
if we feel that we need to. All right, little detail there, maybe add in some definition
for the cheek bones. But that's really about
it. Now, of course, we can jump down to the neck and add in a little
bit of neck anatomy. You know, I like to think of the head and the neck as being one sort of I guess mechanism within the human body because as the head
turns as it moves, you'll notice that the
neck moves with it. There's also a lot of gesture
that comes through with the neck as the
head moves around. Okay? So that's head number one, done and dusted, right? So that's the warm up that
we've completed there.
3. Expressive Female Faces: Now, let's do one more warm up. This one's going to
be of a female head. Alright? My as will
cover all bases here. We will give this one a little bit of an
expression, though. So we're going to take this as an opportunity to
start incorporating a little bit of emotion
personality within the head. So in order to do that, there's a few different chicks
that tricks rather, not chicks even though we're
going to be drawing one, tricks that we can employ. Alright, so we'll start out
with the cranium again. And I really wanted to do a male and a female
here just to show you that it's always going
to be the same, right? Like, no matter what kind
of head you're drawing, I want to start out
with this cranium. Sometimes you can
get away with, like, just a really basic oval head, but because we're
going through it for a little bit more of a
structured approach here, reason being that we're really focusing in on heads
at this point, the cranium really works
quite well just to establish the orientation of
the head right off the bat. Okay. And just as before, we're going to place down the tilt of the
head, and this time, we're going to mix things up
a little bit because we're actually going to
tilt the head in a downward direction while also being on an angle
in the other axes. So in order to figure
out whether or not the head is
looking up or down. That is determined by this horizontal line that runs around the equator
of the cranium. All right. There we have it. So you can see because it's dipping down that this suggests the head is indeed faced
in a downward direction. But if we were curving
this line upward, like so, then that
would suggest that it was tilted in an
upward direction. So pretty easy to get
that established. Now for this head,
we're going to have it facing toward us a
little bit more. Okay, towards the front. Now, you might notice that there is still a slight three
quarter view applied to it, but for the most
part, we're really looking at the front
of the face here. And then when going to
chop off the sides, you might find that when
you first start learning how to draw the head and you're trying to
figure it all out, that there's a certain amount of stiffness that comes with it. As an artist becomes more confident in the subject
matter that they're drawing, you'll find that loosen
they'll find that they loosen up quite a lot.
And that's a good thing. In fact, what you want to do is as you become
more competent, you want to speed things along
and not think about it too much because the
more that you think about it after you've
already learned something, it tricks your brain into
believing that, well, you don't already know it and starts to make you
second guess yourself. All right? Like, you think
about it too much and you can very much indeed overthink
things as an artist. As I'm sure you've probably
well encountered before. Regardless of the
level that you're at. So I've lopped up
the sides here. We're going to drop down
the front of the face at a certain point you have to ignore some of the structure
that you've drawn, trade that out for actually capturing what you want to
see in the drawing itself. Like, sometimes
that structure can be confining if you
stick too rigidly to it. So I'm sort of ignoring this
upper side area right now because I'm feeling like I'm
going to need to sculpt that out anyway in the final artwork. Okay, cool. So now that
we've got sides chopped off, we've got the bottom of
the face established. Now, as you can
imagine, all those measurements we
talked about before as far as figuring out how
long the face needs to be, they're all going to
be foreshortened. So, you know, there'll be a little bit
more space up here. They'll be You know, you can see that it recedes. As we move toward the chin. Why? Because we're looking
at the top of the head here, and I'm going to add a
little dash up the top just to show where the center of the top of the head
is going to be. Okay, wonderful. So I've got kind of
like an abstract looking face set up so far. Funnly enough, I'm going to
add in the ears here now, and then I'm going to
draw out the neck. That neck's a little bit too thick for a female character. It's not going to
look quiet right, so let's go ahead and just wonder what we
can come up with here. You know, maybe her neck is actually facing in
that direction. We'll bring it in
some more there. And you can see that she's doing a little bit
of a neck turn. So that neck positioning
really does introduce a little bit more context to the actual pose that
we've given the head. And you can even add in
the shoulders sometimes if you really want to get some personality
happening in there. Okay? So I notice that I'm
going to go through here now with the eraser and just do a little bit of
rejigging as we work. And the reason for that
is just because this is one of the stages that I
typically will go through, which is sculpting,
just working the image, shaping it into what
I want it to be. So you can think of that
initial foundation as just like a generic
ball of clay that you're using to place down the base foundational
building blocks of what it is you want to draw. And then you've got to go in and actually start to
refine it some more. Just as with the guy,
we're going to lay in some cheek bones and
just a little bit of an idea for where we might
want the mouth muzzle to be. This brow line has
almost become more like an eyeline where I might
want to position the eyes, and sometimes it happens for me, just because I don't know. I picture it as the eyeline
more so than the brow line. But usually, I'll just get
a little bit of an idea of where I want to
position the eyes based upon that guideline, and sort of, again, I somewhat ignore it and end up doing my
own thing anyway. So let's ask ourselves
just to get an idea, what kind of expression
do we want to give her? I'm just going to draw
one out the hat here and say something a little
bit more seductive. Okay? So we're gonna
draw in her eyes, they're going to have this nice, like, seductive look to them. Now, you could practice these facial expressions
on their own for sure. This is less about
facial expressions, as you'll see soon
and more about, you know, telling a
story through the face. So we're going to go through
quite a few examples here. But just as a starting point, this is how we start
to construct the face and really lay down the facial features
in a particular way. So how does the eyebrows
of a seductive face look? Well, I'm going to
have the eyebrows sort of raised up here, okay? So you can see they almost look like angry
eyebrows in a way. And then I'm going to add a little bit of variation to the
eyebrow on this side. Okay. So we might lower
this one even a little bit. There's a slight amount
of variation there. Sometimes you don't want to keep things entirely symmetrical. Now, keep in mind that this is supposed to be her
forehead area here. So I'm actually going to
undo that for just a minute, place down where I think
the hairline should be, which will allow me
to make sure that these eyebrows don't
go up too high, which I think is what
was happening there. So almost had an Osi daisy, but I caught that pretty
early on, which is good. Always be cross
checking your image, make sure that things are coming together in the way
that you want them to. And, you know, when it
comes to female characters, you do want to really push the amount of eyeline or M
mascara that you're seeing. So at least for me, I'm going to go ahead and add some of those nice eyelashes in pupils in the IRS will be right up against
the top of the eye there. And then just as before, we're going to divide
the brow line and the length or the distance between it and the chin in half. Okay, like so. And then we'll divide these up into
thirds down here. That's done, we're going
to draw in the nose. Now, the noise really doesn't do a whole lot in terms
of its expression, unless you've got a
very, like, angry, enraged character that's
flaring their nostrils. The nose isn't a super
expressive facial feature. Now, because the head
is looking down, we might notice that the
nose actually protrudes beyond that initial point
that we laid down for it. Okay. Like so. And then the mouth, this is where we're really
going to hit things home. We're going to give
her a little smirk. Okay, and that's
going to give us that nice seductive appearance. She has some nice full lips, although the top lips
are going to be a little thinner since we're looking down at the
character here. Okay, add a little
bit a shine there. Beautiful. You'll notice that added some rendering
to the lips, too, just to emulate lipstick. And then once that's done, what we're going to
do is a tiny bit of erasing here just to
clean up the face. Bring that nostril in some more. Especially on a female face, you do want to try
to keep things kind of clean, even on a sketch. All right. And for her hair, because hair is another
really big important sort of asset that we've got
when it comes to expression through
the human head, we're just going to lay
something down real quick here. Nothing too fancy because hair
wow it can really increase the amount of time you might find yourself spending
drawing the head. So we're just going to lay something down
like this, okay? Just a very basic shape, a really rough gesture of the kind of hairstyle that we might
want to go with, right? We're gonna wrap
that hair around her shoulder there.
Really beautiful. Okay. And you know what? I'm going to see if I can
maybe just, you know, the shape of the hairstyle is really what you have to worry about when
it comes to the hair. So I'm going to
bring it over here a little bit more, okay? Just the flow of it. But I'll take it over there, like so. And, ah, right? Like, you can see that even without a whole lot of
detail in rendering, we've got a bit of a
hairstyle going on there that sort of does the trick, gives us what we're looking for. If you want to erase
parts of the hair, and this is the thing
you can easily get stuck doing on
focusing on the hair, then by all means, spend
a bit of time on it. I'm not going to spend too
much time on it here since this isn't a hair
drawing tutorial. But once you're done
with everything, you can go right in
over the top and start to lay down a more
refined line for your face. Remember, we're
just doing sketches here so it doesn't have
to be ultra clean. However, that's not
to say that you can't take any of the heads
that you draw here throughout this
demonstration through a more refined finish level. By all means, if you
want to do that, go right ahead and do it. I definitely encourage you to. But remember, this is more about just getting some
expression down. And that's the
important thing here. We want to bring our
characters to life. We don't just want to give them the same facial expression from one panel to the next.
That's not what we want. That's going to make
things very, very generic. We do not want generic. Okay, so as you can see, this head kind of
boring, static, generic. This head has a
lot of life to it. So you can see the difference. You can see the power here. Now, how many times do you see a comic book where you're looking at a head
like this, right? Just some guy, you know, very default with a very
default expression. That's not what we want.
4. Expressive Male Faces: Alright, let's move
this to the side here, and we'll come up
with another example. This time, we're going to do a male face with a little
bit of expression. And then we're going to draw out some panels after
that that actually take us through a
sequence of events that changes a
character's personality, takes from one emotional
state to the other, which is really what
this whole lessons about telling story through
facial expressions. Okay. So for this next example, we're going to draw
out a character that's sort of looking
in an upward direction. Okay? So again, a male
character this time. All right. Remember that if we can get this horizontal line that wraps around the equator of the cranium in
right off the bat, that gives us an idea
as to what the Well, both the axis is going
to be and also from which direction
the head is going to placed in as far as
looking down or up. So we place the camera now below the head or either that or it's tilted up away from
the camera lens, whichever is going
to be the case here. And now we're ready to establish
the front of the face. Now, the front of
the face, this time, we could have it placed
around, you know what? Why don't we place
it around here? So we'll have looking to
the left, right? Like, so. Hmm. Will that work,
yeah, that'll work. Then this will be the
side cranium area. Now you'll notice that
I've actually positioned the head on the side a
little bit more here. Notice how when I lay this line in down the side of the cranium, I'm following that axis. That's going to be
very important. We want all vertical lines
to follow that axis. The front of the face,
we're going to run it down that same trajectory to where we want the chin to be. Now remember that
there's going to be some foreshortening
applied to the head here as we're looking
at it from the bottom up. Corrections will need to
be made along the way. This is one of those quirky
angles that the head is sometimes presented on that just requires a lot of re jigging
for it to look correct. Now, the more you practice it, the easier it's going to be
for you in the long run. You'll notice here that I'm
really starting to sketch in a little bit of the
anatomy there just to help me get the shape right. All right. I'm going to
get rid of that chin line. Do you notice, I am working
quite quickly here. Just if you need to slow down the recording of the
lesson once it's, you know, available on demand, and you'll be able to go through this at a much steadier
pace if you need to. I'd highly suggest
you do that, too, if you're looking to really
get a handle on drawing these heads and mastering
them because, you know, it's certainly one
of those things when it comes to comic
book illustration, where you're not going
to be able to get all of this properly processed
in one fell swoop. Like, it's going to take time. And I think that's
probably one of the hardest things for most
artists is just having the patience for themselves
to learn and to develop. It's not an easy thing, okay? And don't worry. I completely understand
how that can be sometimes. Now, that's going to twist
his head around way too far. So we're going to
have the center of his collar bone be about here. Okay. And yeah, as I was saying, you've just got to make
sure that you give yourself that opportunity to
actually learn this stuff, because let me tell you, I
am not the fastest learner, and I truly mean that. And one of the reasons I'm not the fastest learner in
the whole wide world is because I I don't see the, you know, the revelations that I get as a learner aren't
always super obvious. You know, I don't take notice of them as much as
I probably should. And so, you know, for me, I have to do things the wrong
way a lot of times before I realize that that particular
way I'm approaching it just isn't working, okay? And this applies to
multiple areas in my life, not just drawing, by the way. So, yeah, I had to have a lot of patience in order
to get to this point. But after a while, the learning
process becomes less of a a thinking activity and more of a feeling
activity, okay? And that's a really good
place to be in as an artist. It really is the most
ideal place to be as an artist is to
go with your gut, because that's where
I think we get the most satisfaction
as artists. Like, we're not supposed
to be technical drawers, necessarily, even though we might find ourselves
in that position, especially when we're drawing
more man made elements such as buildings and mex
and that kind of thing. But, you know, even
when it comes to human beings, drawing
the head here, you can see that
we're using a lot of construction techniques in
order to create some of this. And you do become, as a result, a bit of a
draftsman, and you really are. You really are a draftsman. You've got to be able
to look at things, kind of perceive them
on different angles, get them right, adjust
the proportions, adjust the foreshortening of whatever forms it is
you're working with. And, you know, eventually, you do that so many times
that it just becomes a well, it becomes actually
something that's fun more than anything else. You know, the challenge is
always going to be there, but it becomes a fun challenge. So what I'm doing here is
I'm just laying in the eyes, I'm placing them where I think
they should probably go. It doesn't mean that I
won't adjust them later on. There's a high likelihood
that I will unless I kind of, for some reason, just happen to be lucky
enough to nail this. You know, I think the
brow line, honestly, more often than not
becomes an eyeline for me is what I've noticed. So I'm going to draw in his nose now just because it's going to, for the most part, be obscuring a lot of the far
side of the face. In order to draw the
nose from this angle, I like to establish the
base plane of the nose. So you'll see me placing that onto the
front of the face there. Okay, now, why would
I be showing you how to draw these
tricky angles in a story telling through
facial expressions lesson. Well, it's because
the human head, depending on its angle, can also tell somewhat
of a story, right? It can set an emotional context. Like, when you're looking
up at this head right now, he kind of looks majestic, doesn't he? You know? And the lady with
the seductive look, the fact that she's tilting her head in a
downward direction, it enhances the seductive feel of the emotion that's
coming through there. So yeah, head tilt and the mic presentations that you place the head on,
they're quite important. Very, very important.
Now, obviously, you need to know how to
draw the facial features themselves from a variety
of angles in order to increase your confidence in drawing the human head
on a position such as this. So if you do find it difficult, then make sure that you go through and find a
lesson specifically on, drawing the human nose, and that's going to
take you through, ideally, how it looks from a variety of
different viewpoints. All right. And then we're going to place
in the mouth here. Now, the interesting thing about the muzzle of the mouth is that it's actually quite cylindrical. So there's a curvature
to it, right? I like to lay that shape in sometimes if I need to
remind myself of that. So what we're going to see is an upward curve
here of the mouth, and the corners are going
to land right about there. So the actual width of the mouth expands on
an angle like this. Why? Because well, of the foreshortening
that's occurring, as we well know, when it
comes to perspective, anything that's closer to us
actually expands in scale. Now, we actually
should add an emotion, some personality to
this guy's face here. What we're going to give
him is a look of surprise, let me get the
eyebrows in there and then we'll jump
back to the mouth. The eyebrows are going
to land about here. They're going to be raised up
off of the top of the eye, especially because
we are looking up at the at the head
here, and, you know, there is a plane that runs down from the brow into
the top of the eye, which sometimes we can't quite see from the direct front view. All right. But here
in this angle, we get a much better
look at it, for sure. Alright, so we got his
eyebrows raised up there, and now we'll jump
back to the mouth. Now, if he's surprised, we might have his mouth
slightly open here. It might not be as
stretched across his face. You know, I might be
something more like this. If you're wondering, how
do you just draw down different facial
expressions Well, I think that it's important to when you're watching a movie, notice the facial
expressions that the characters are exhibiting. If you're out in public,
if you're, you know, just taking a walk in the park, if you're on the train to work, look at people's facial
expressions and see as a challenge whether or not you can tell how
they're feeling, what they're thinking, you know, because that's really what
you're trying to get across to the audience in your
comic book when you put your characters
and their faces into these different
emotional presentations, you know, you want some level of emotional relatability that the audience experiences when they're reading your
book because it makes it feel like they
are the character. And so there's this idea in psychology that is sort of
related to mirroring, I guess. It's called state transference. And what that means
is that when you walk into a room and somebody
is feeling a certain way, you know, maybe they're
really, really angry. Uh, you'll start to feel
that coming off of them, and it might even
start to make you feel kind of angry as well, because they are in that state. You, you know, if you
live with somebody, you might be able to
kind of just take note right now and ask yourself whether or not that
actually happens to you. I know it happens for me
as well, with my partner. So that's definitely
something to take note of. But ultimately, how
that relates to your comic book art is well, you're going to find
that as the reader is taking in your
story and they're seeing the characters be sad or angry, they
feel that anger. They feel that sadness. And that just makes
it a more immersive, more memorable experience for the audience as they
read your comic book. So it's not just the nose, by the way, that
you need to know how to draw from certain angles. It's also the ears, of course, and the mouth, et cetera. So right now, you're
just kind of going through and probably
copying what you see, which is a really,
really good start. But later on,
actually study all of these different facial
features and see whether or not you're able to really become a more
dynamic artist with them. Now, what I've gone ahead
here and done is I'm placing down where I think the
mouth muzzle should be and then drawing
in the cheekbone. Okay? So I'm just sketching
that in there really lightly. Once that's done, we
can give this guy a little bit of hairdo. Why not? Okay? Similar
to the female character. Now, we're not going to
go too crazy on this. Let's give him a little
bit of a fringe here. You know, something like
this. Maybe there's been some kind of
explosion, right? And again, I like to add hair
into the equation here just because it increases
the emotional impact of the human face. It really does add to it. And it's just a matter of getting the hairstyle
to look good. The overall silhouette, I
think, most of the time. And then you can just
add in the details of the hair once you've
got that down. That's looking pretty good.
I think we'll you know, that's a good start
for the hair anyway. Maybe you'd have,
like, his fringe or something blowing
across there. You know, once we've got a
bit of a hairdo going on, we can erase everything underneath those
construction lines, you know, around the neck area as well. Just get rid of those. Kat the sketch up somewhat, make it look kind
of presentable. L when it comes to sketching, you still want to have
some level of clarity to what it is you're laying
down onto the page, I think. And so, you know, that
really does require you sometimes to just go back over the top of what
you've already done, like we did with the female character like we're
kind of doing with the male character here and defining the
shape of the face, defining the shape of the hair. There we go. All right. And then we'll think
about, Alright, well, what direction is the hair going to be going back in here? So we'll lay that in, give him a bit of
a side burn there. Feeling like some hair needs to come out in this direction. I can't tell you why I did that. It's a feeling
thing, like I said, after a certain amount of time, you just start to
feel this stuff out, and it comes from experience. It's why a lot of
experienced artists can't really tell you why
it is they do what they do, because it comes about it really does come about
naturally on its own. It's not something that
can necessarily be taught. You can be mimicked,
but it won't truly assimilate until enough practice has
been had with it. Okay, cool. So Gay's
pupil drawn in there. Great. All right. I'm going to scale this up just for presentation purposes. Alright. There we go. So we got our three
head examples there. They're
looking pretty good. What we're going
to do next up in just a moment is we're
actually going to go ahead, as I said before
and just whip up a few panels with some heads in them and come up
with a narrative. Maybe we'll have someone who
starts out happy and gets told some bad news and all of a sudden is quite sad
about said bad news. We'll see how we go
with that. All right. Let's jump down here.
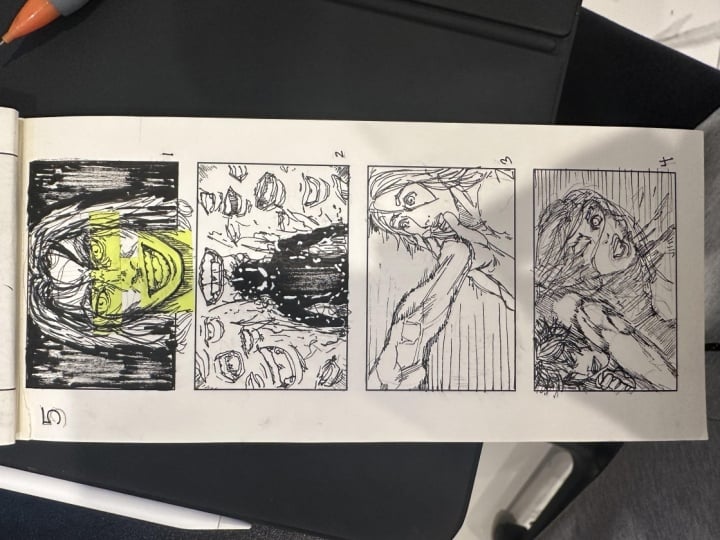
5. Panel Layouts: First things first.
We're going to grab our ruler if you've got one handy and you're
working traditionally, or you can use a
digital ruler like I'm using here in order
to do up some panels. So we're going to have
panel number one. Panel number two. Make pedal number two. Look,
let's try to You know what? We're going to try to keep these pretty much the same size. So here's what I'm going
to do. Center this in the middle of the page here. Let's say around about there. Alright, great. And now we'll go ahead and give this really
nice, obvious dark frame. I'm gonna delete that ruler. You know what? Let's make
that frame a little thinner. I feel like that's a tiny bit
too thick for what we want. Even thinner than
that. You know, I don't like this idea of doing really thick
frames around panels. Said it before, but I feel
like it's very distracting. Distracts from the interior art. Okay. Beautiful.
Now we're going to control see this
and control V it. If you're working on
a mac or something, then you'll want to hold
down Command Shift instead. Okay, you'll want to hold down command and hit C
and Control B, rather. And if you're doing
it traditionally, then you'll just need to
manually rule up these panels. I'm sorry to tell you, digital
does make things faster. That's the reality
of the situation. Okay. Now we're going to
merge these together. I'm going to create a
sction around all of them. Once again, centering
them on the canvas. There we go. And we
are ready to roll. So we've got a three
panel sequence here. Now, if this was a comic book
page, of course, you know, these panels could be designed and placed down and laid out
in whatever way you want. But just to keep things simple, we've got three panels lined up beautifully in a straight
line next to one another. Next up, I'm going to take
a sip of hot cocoa here. Because it's important to keep yourself hydrated as you're drawing and clear your throat if you're teaching
people how to draw. Now, let's figure out
first up what we want to actually show in the
sequence, as I said. Now, I'm thinking it would
be good to show a character sad going from happy to sad
maybe or even sad to angry. What would be the most fun here? Maybe we could start them out. Hm. Yeah, this is where I go to use my imagination a little bit. And I think it'd be
cool to incorporate multiple characters here just
to show them interacting. So we're going to have
one head over here, and I'm going to use ovals
just to begin this process, by the way, and we're going
to place those ovals onto a whole different
layer so that we can maneuver them around freely without ruining our
beautiful panels here.
6. Drafting The Sequence: All right. So what I'm gonna do because I'm a big fan of Dragon Ball Z is I'm going to do like maybe, like, a cocky character
who's really, like, powerful and strong, and they think that they've
got their opponent just beaten already, but then maybe their
opponent powers up, and ultimately, they end up being a little bit shocked by that power level. So we'll do something like that, right? So start out. This will be the character with the really big power level. He's gonna be looking down, kind of all confident. And if you're a fan
of Dragon Ball Z, I'm thinking of Sal right now. All confident and kind of
feeling good about himself. Like he doesn't have
a worry in the world. Okay, now, the good thing
about using the oval it kind of establishes
the proportions or the length of the head. It's a bit more of an
advanced technique, though, I would say. And you know what?
We're going to focus this all the way in on the head. Alrighty. Just to start off with. And then in the next panel, we're going to have a
female character, right? So we're going to have him here. And we can just say that she's over here in the
background, right? We're just going to do something
really basic over here. Gonna be powering up, like, so give her a nice
hourglass type figure. All right. We'll work on that. I'll just get rid of it for now, and we'll work on this guy's
face in just a moment. But what I like to
do is actually lay everything out before I start
to jump into the details. So it's kind of like
drafting the sequence. You'll see me flip back and forth on
different decisions as I work here because that's what the creative process
for me entails. All right. So I am going to put a little bit more effort
into this figure. That's why I wasn't
happy with it initially is I just wasn't thinking
about it enough. All right, so we're going
to have a powering up that. It's a little bit close to
the side of the frame there, so I'm going to maneuver her in. Well, let's just look, I know this isn't about
figure drawing this lesson, but we're going to
incorporate it in here, with comics, there's usually going to be multiple elements. And then what we're going to do is jump over to this next panel, and we're going to have a close up of this female character. And for this one, we're going
to be looking up at her. Okay. You'll notice
I varied the size of the heads here just to
keep things interesting. So she's gonna tell
him something. We're not going to
know what it is, but we'll be able to discern based upon the
facial expression, how the situation has changed. You know, there's some
kind of exposition that's going to happen
here that's gonna turn the tables and everything. Okay, great. And then what that is going to
cause to have happen is he is going to look
back over his shoulder. I'm going to do a super
zoomed in close up shot here. Why? To increase the
amount of drama. Now, you can see
I don't start out very fancy when it comes
to my heads, do I? Very rough looking oval. It's getting something
down on the page, and we're going to draw
a shoulder in here. Well, actually, you know what? That's probably a
little bit too big. I think what I'll do is I'll shrink this head down
to about the size that I first established for
the head in the first panel. And I'm just going
to I'll go back to the first panel and shrink that down even further
so that once again, we've got that nice
variation there between each of the head shots
that we've got going on. And so what we're going to do
here just to once again mix things up is we're
also going to well, we're going to go
ahead, actually, and tilt his head in
a downward direction. All right, so he's looking
back over his shoulder. That's why his
head's now turned. All right. There we go. Beautiful. So this is kind of like an establishing
shot, right? Like, we can see where
the characters are in comparison to one another,
which is really great. And if we can shrink them down, then that's going to allow us to actually make a little
bit more room between them. Alright. So we'll put this one. You know, I'm not sure
that I'm liking her pose, so I'm just going to
rejig it once again. I think I'll give her pose a
little bit more confidence. You know, this will
be a little bit of an extra bonus where we see how body language
comes into play. So they're both being kind
of cocky toward one another. She says something
he doesn't expect, and then the tables turn, right? And we can see that through
their facial expressions. What I might do here is
just give her some hair that's not too crazy,
something like this. All right, so it's going to
be hair that just runs down. Her body, like, so
some nice long hair. And maybe we'll give her
some kind of pigtails too. We're getting into some
character design territory now. But that's, you know, this is the beginning of our
sequence. That's how it starts. Starts out with a scribble, ends with a
beautifully polished, hopefully, nice
looking presentation.
7. Penciling Panel 1: Alright. So let's actually create some head structure here. We'll get into the
facial features and how they're being expressed, and we'll go ahead and
complete this sequence. Alright, so what you're
going to notice is that this base that I
place down on the page, it's just a it's just something there that really is standing
in as a placeholder. What I'm going to do is go way outside the
boundaries in a lot of cases of that initial oval
that I placed down here. Okay, now, go ahead and actually draw in the
cranium right over the top. Um, it's going to look a little bit messy until I start
cleaning things up here. So if this is coming across as confusing to you, I apologize. Just keep in mind
that really I'm going through the same process that
we went through earlier. It's just that I'm
drawing right in over the top of that oval on
constructing the cranium, right? And I'm going to
reposition a few things. So this might be like
the eyebrow line here. We got the length of the face
pretty much established. We just kind of did that
instinctually with the oval. And the reason I like
to get the cranium in there is it just helps you to figure out where the side of the head is
going to be. Okay? So that's the most
important part. Now, once that's done, I'm just going to
start to draw in the actual facial features. Why do I do that? Okay? Why do I do that before
planning everything out? Well, the reason for it is because I know where the
front of the face is. I know where the
top of the head is. I know what tight and
tilt it's on already. I've got a general idea where the proportions are
going to reside. And now I just need to get the facial features in
there so I can kind of rebuild the rest of
the face around them. And now I got to think about the facial expression
that I want to go with. So he's going to be kind
of confident, you know? Like, I'm thinking,
we're actually going to close his eyes here, right? And we're going to maybe
raise one of his eyebrows. And he might have this eye open, just a tiny bit to sort
of glance over at her. Maybe, in fact, both
of his eyes sort of open a tiny bit,
but not too much. All right. So
something like this. Now, when it comes to how far apart the eye
should be, really, there should be one eye
width between them when you're looking at the head
directly from the front. Now we've got a
little bit more of a three quarter turn here, so there would be
some foreshortening applied to the eye on the
far side of the head, but not too much. It's not going to
be that obvious. All right, so got the
eyes drawn in there, and now we're going to draw
in the nose. All right? The nose is going to
run down to about here. You notice that it passes the initial little anchor point that I added there
for how long it was supposed to come down because we are looking at the head
on a downward tilt, which means that the
nose is going to protrude further down because
it comes out of the face, and from this angle, we're going to notice a drop. He's going to have a smirk. I mean, to be honest with you, I'm not loving that eye
shape that I've given him, so I'm probably going
to adjust that. Like, I know where the
eyebrows are, so that'll do. That'll do for now
as a placeholder. And I'm going to have one side of his mouth kind of lifted up while the
other side's down. Gonna create a
little bit more of a strain here in the
middle of his eyebrows. He doesn't think he
can be beaten, right? That's probably one of
his greatest weaknesses, in fact, you know, because when you think
he can't be beaten, you underestimate your opponent. Now, he's closing his eyes, his eyes are little slits. So what we need to do
is avoid falling for the trap of making the width
of his eyes too minimal. Because it's only the height of the eyes that are actually being shrunken as he squints. Maybe this one can be a little
wider over here actually. I you should be able to tell even
without dialogue, what the dynamic is
between these characters. Now, at this point,
they could be friends, but once we get to
that last panel, we're going to see
that actually, no, they're not friends. Now this guy here that we're drawing is actually
freaking out a little bit. Let me redraw out his
eye altogether there. Look, I'm still
not loose enough, and in order to draw
good facial expressions, you do have to loosen up. All right. So go ahead here and mess around with his mouth
a little bit more. And now I get to
design the rest of his face around these
facial features. Gosh, that eye is just
bugging me big time. So you can see I jump around
a little bit as I work. Yep. We'll get the
ears drawn in there. Of course, and now it's
time, like I said, to restructure the rest of the face around those
facial features. And for me, I don't know. Like, once you get
the proportions of the facial features
down themselves, it's not hard to build out the rest of the
face around them. In fact, I often find that
I have to do that anyway, no matter how careful I am that initial constructive
phase of the head. In fact, sometimes
you can just erase whole sections and redraw
them, like I'm about to do. He might seem a little bit too kind of bony
and skeletal there, but I'm gonna somewhat fix that cause I want
him to look strong. I don't want him to look weak. Alright, so we're going to
give him a nice big chin in order to ensure
that that is the case. But we don't want him to look
like a buff head, right? Like, he's supposed to be
a super powerful being. So at least that's the
way I want him to be. Which means he might be a
little prettier, you know, kind of like cell or
freezer from dragon ball Z. Alright. And then we got the other
side of the jaw there. So we're gonna lay that in. Now remember that I don't expect you to be able to draw heads in using the same technique here that I'm showing
you as a beginner. What you really want to do is, of course, focus on that
underlying structure. When you're first starting out, definitely do that, because you need that to be able to
actually get to this point. See that I've just changed up his face shape a little bit. I've given him a really
pointy looking chin. Sometimes I'll go back and
forth as well and maybe adjust the shape of the eyes and their length
in certain ways. Getting rid of some of those underlying
construction lines now. I'm gonna give him a
much thicker neck. Just look at how this changes
his vibe, by the way. Just look at that. So maybe she's just showed
up to join the fight, right? And he's like, Oh,
hello, who's this? Who's this that thinks
they can oppose me? So you really got to get into the mood of whatever it
is you're drawing, right? He might even be cocking
his head back a little bit, so I'm going to actually make it that his head is leaning
back on his neck there. A, All right. Now, I've given him very little
trapezius muscles there, so I'm going to just correct
that, get my eraser out. Rejig things a little bit. You can see that nothing's
ever set in stone. You can always go
back, redo things. If you make a mess of
it, it's no big deal. It's really no big deal. The art form is very forgiving. It's not like you can't
correct your ways later on. And I highly suggest
that, you know, if you do see opportunities
to improve your work, definitely take them, 100%
take them. All right. Now, I'm going to I don't know, what could I add to this guy to make him even more unique? Let's give him some
kind of horn, maybe. Did we give him a horn
on his chin there? No, maybe not. I really want
that to be a bone structure. But maybe let's see now. Oh, I like this.
I'm going to make his head a little bit more
of a point at the top. Yeah, something like
that. That looks good to me. I like that shape. So we are doing a little
bit of character design, as I mentioned before, just to keep things interesting,
I think that's a good thing. You know, in a certain sense, the design of you are designing the expression
of your characters, of course, they're going to have a bit of a design to them. I'm going to bring out
the sides of his jaw. Okay, so we're going
to expand those. All you can see that I'm
just being a rebel here. I'm erasing bits and pieces,
reconstructing them. So don't stick too rigidly to what you first
laid down on the page. If you see area that could
be adjusted and maybe you feel like there's something more that
could be done with it or you've got a new idea
that you want to try out, by all means, try
it out, you know? Absolutely. I'm now going to go ahead and add in
a facial wrinkle there. Okay. And also draw in some rendering
underneath his mouth. I'm going to create, like, a chin here that's sort of a little bit weird and wrinkly and strange looking. Maybe something like
that. There we go. Very creepy. I want to
give him the same sort of shape here on the
sides of his jaws. So it's clearly like some
kind of alien or mutant. And I want to give him, like, some thickness around his eyes. So I'm actually going to
make them smaller here. I can see that I've
drawn in a bit of a pupil and an iris there. Okay, so we're having
some fun here. Got a pretty good strong
expression going on for him. Remember, if you're looking
for ideas for expressions, definitely go out down to the real world and just
see what you can see. You know, take your sketchbook
with you, obviously. And if you see an expression that
really catches your eye, Make sure you sketch it down. Alright, now, for his ears, I'm going to make them
really long like this. But I'm gonna make his ear
lobes super long, too. Okay, so we got a cool
little alien design going on for this dude. I'm just gonna stretch
out the anatomy of a real ear for a moment and mess around with that. Make it look
realistic. Believable. Run a darker outline around
the face for a moment there. Now, as for the details that
we add in around the head, I'm just going to kind
of create a division that runs up center
of his head there, maybe, like, splits off at
the top, something like this. That looks great. Okay. And now, draw in his other ear. It's going to come
up over there. I have that ear lobe
dropping down at the side. Okay. Feeling like I need to expand that
chin out some more, so I'll go ahead and do that. Yeah, I'm going to get rid
of this line here because I don't think it's
really serving the role that I want it to. All right, then we'll put in
a few more wrinkles around the nose there. Beautiful. And so it doesn't
really have any, like, eyebrows, just more skin
folds around the eye there. And I'm going to add a
thicker outline around the eye to add some
emphasis to it. So on the facial features, it's good to add some
emphasis to them. All right. A few lighter
details around the face. We definitely spent probably
way too long on this guy. But hey, let's create something fun here
while we're here. You know, because that's
what drawing is all about. Okay, now this lovely
lady in the background, what I'm going to do is
actually attend to her face in the next panel before I
tackle her design there, just because we'll
get a bit more of a close up look in
this next panel.
8. Pencilling Panel 2: All right, so for her, a bit of a different
story, right? For her, we're going to be well, she's actually gonna have
a cocky look of her own. So let's see here. Um, we do want to get in the spherical form
for the cranium. But at the same
time, because we're looking at the head on this
sort of upward tilted view, sometimes it's better to keep it a little bit abstract
and like I said, just get in there with the facial features and start to build out everything
else around them. You know, I'm going to
inevitably make mistakes. That's what I've
found with my art. And so I just accept that. And I try to do the best that
I can with what I've got. Now, what I will do is I'll
first go ahead here and just place in a little bit of a skull form for the
shape of the face. This might not work out
for me, by the way. This could come back
and bite me if I don't properly just get a general idea for the proportions
of the head first. I'm feeling it out here. Alright. You know what? I am going
to use that cranium. I want to use that lumus
method because I just feel like things could go
real haywire here, otherwise. If in doubt, if you're
not feeling confident, then make sure you get that
lumus method working for you. Okay? Lumus method is what I was showing you before in
those initial examples, getting the cranium down, a simple sphere to begin
sketching it in there, keeping it nice and loose. We've already got a
general orientation that we want to go
with for the head, so I will get it drawn in there, and you'll notice
that I'm changing up the axes of the head, so the tilt of the
head rotation. I'm drawing in that
horizontal guideline. Then what we're going to do is lay in the front of the face. Well, actually, yeah,
front of the face here. It's going to run down to and
remember that we want to be following the tilt of
the head as we do that. So that means the
chin's probably going to come down
to about there. I'm just estimating that, but I feel like
that'll be the case. Which'll mean the jaw line. Well remember that we
got a few corners here. We've got this corner, Okay, the back corner of the jaw, and then that's going to
run down to the chin. Boom. All right, so we
just link those together. And that's got our general
setup for the head sorted. And now I'm going to
draw in the face plane. It's going to look a little
bit like that. All right. Once that's done,
we're ready to start drawing out the
facial features with a little bit more structure
there to help us out. Now, it might be worth
even before we do that to just place in the neck, figure out what we're
going to do for it. We're going to make her chest pretty small because
she's a female character, so we want to be careful
not to make that too broad. However, her chest is going
to be sticking out here, let's just keep that in mind. I'm going to erase redraw out the arch that we see at the
bottom of the rib cage. And have it just
pointed out there, and that's going
to be good, right? We could also kind of very loosely just lay in
the breasts there too. Alright so that's all done. Let's go ahead and see how we do with the facial features now. The head very likely is
going to be completely reconstructed around her facial features once
we draw them in there. Alright, I'm going to undo
that redrawing the art. You'll notice that
it's gonna take me a few attempts to
get this, right. And as I'm drawing a character
with a certain emotion, I really do try to make sure that I'm feeling what
they're feeling. You know, I really try to
put myself into the role. It's like you're you're
an actor, you know? And you want to become that
character for just a moment. Okay, so we've got a bit of
an eye drawn in over there. I'm almost squinting
my eyes at the moment just to get the general
composition of the face down. We're going to say that the
nose will land about there. And because we're looking
up at the character, that means we're going
to start out with the nose plane,
underside nose plane. Get it drawn down. I'm going to get rid of
this line that we placed in earlier just because now it's starting to get
in away a little bit. In fact, I'm going to get
rid of a whole bunch of that constructive line art that we were working on before. I go to feel out where
I want that eye, loosely kind of
establish it there. And then we draw in the nose. Getting these nostrils
right is not easy. So it might take you a few goes to produce
what you want there. Now, the question is, how
do we get from this angle a cocky looking
expression on her face? A right? Maybe something like this.
Now, the funny thing is, I'm not hugely good at actually reading facial expressions,
believe it or not. I did this test once where
it showed a range of different facial features on
the faces of people who were conveying certain emotions and I couldn't read them very well. I didn't get very
many of them right. So I'm not sure how good
I actually am at this, but usually it turns out okay. You know, I feel
like you're going to be squinting a little bit. When you're in a really, like, confident pose where you're
sort of mocking someone. Okay, we're going
to get a little bit of eyeliner happening in here. Of course, one of my favorite parts about
drawing women is the eyeliner. Beautiful. A there we go. And then I'm going to
do some more erasing here will soften things up. It's important to soften
things up for the ladies. I'm going to redraw
these nostrils for just a minute
because like I said, getting them right is just sometimes a matter
of trial and error, but if I can picture
that underside plane, sometimes it's better to just imagine where it
should be as opposed to actually laying it down there and there we have Still, I'm feeling like that nostril
is a little bit too big, so I'm going to take
it in some more and I feel like it needs to be taken down as well at the top. There we have. So yeah, that's the thing is that drawing is not a
straightforward process. You do want to really get
to know the fundamentals, but this stage that you get to where you're still running into some problems
from time to time, like you see for me, guess what? That isn't as bad as it looks. It's actually, uh, It's fun. It's fine. It's like working
out a puzzle of some kind. So what I'm gonna do here
is I'm gonna take her mouth around and then lift
it up at the sides. And I'm going to have her sort of maybe bearing her
teeth a little bit. You can see that
it's just a subtle smirk that I'm giving her. And sometimes it is
about subtleties. What I'll do in the
last panel is I'll give the guy a more
extreme expression. How does that sound, just to show you how that would look. Okay, so this is going to
be her upper lip there. And then her bottom lip I What I'm going to do at the sides is just get rid of some
of those lines there, like so, and there we have it. As gonna go ahead
and do some erasing. Cause I definitely
don't like the way that chin is shaped as it is. We'll draw in the ears. Alright, so let's
get dose laid in. And you'll notice that the bottom of the ears
and the top of the ears, they're going to
drop down a little lower than what they
would be if we were looking straight at the front of the face at an eye
level view because why? Well, the proportions shift as the head is foreshortened
in perspective, just as with anything else. Then we'll take side of a jaw there and
we'll move it down, let's say about here. There we go. That's
looking pretty good to me. And then you can see that we've got the far side of the face. So we'll have her
cheek bone there, and we'll just sort of
merge everything together, okay, into one form. All right. And we'll sort of
try to present, like, the muzzle of the face
and whatnot there as well. This cheek might be coming out a little bit too far.
That's what I suspect. But we want to spend a little bit
of time around here just to make
sure we get right. You, getting the face
of a female character, right? Oh, my goodness. I mean, you saw
the previous guy, we messed around
with his proportions and did all sorts of
things to his face. He still looks cool. It's not gonna be the same
case for this lady. Like, we can have ugly
looking male characters, but I guess we can have ugly looking
female characters, if that's what we want. It's just not commonly what
we're after, you know? So and even when you kind of ugly up the
face of a female character, somehow there's more of
a masculine appearance. I think that it might be just I think it's a biological
thing, honestly. You know, as you have more growth hormone
injected into something, it's gonna start to I think that's what causes
mutation to happen. You know, things have to grow. Like, tumors have to
grow, for example. And they need growth hormone in order to be able to do that. Now, it's known that women don't typically have as
much growth hormone, at least as male do. And that's why men and women actually look quite
different a lot of the time. We've got her face pretty
much drawn up in the view that we wanted with a cocky
looking facial expression. Now, what I'm going to do
here is I'm actually going to add in a little bit of rendering to indicate
lipstick here. It bit of rendering there. Then down here as well around
this side of the mouth. Then also add in a
little bit of a glint. Over here, there we have it. The other thing is
that I feel like potentially the eye that's closest to us might be a
little bit too far over, so I'm just going to get rid of some of these construction lines
to get a better look at that. Actually, that's pretty good. That's almost exactly
where we want it in fact. We'll have her eyes
slightly relax there. If we wanted to, we could
give her some eye shadow. Okay, so her eye, by the way, is going to be, having the iris kind of come up at the top of the eyelid there or the edge of the top
eyelid, rather. Okay, so something like that. All right. And then
what we're gonna do is actually start to design
the rest of her body here. So we've got the facial
expression down. We've got that looking good. We've got the angle of her
head kind of sorted, as well. I'm just going
around the lips here and defining them some more where I feel
like they need it. Now, for her hairstyle, you can see that it
actually kind of comes down around her face, her body. It's going to come down and
around there, probably. And we're going to run it around the side of
her head there, too. So we could probably
actually get rid of a lot of this entirely. I always feel like
this part here around the front of her head
is kind of like a fringe. So I'm going to undo that, actually. Let me undo that. Let's reconstruct this
out because I really like what I had going
on there initially. So I'm going to kind
of tie this back almost at least having running
around her face there. Like so. That's
cool. Looking good. And then we'll jump back over here and you can see that she's got this
extra kind of part, which, you know, let's
see if we can get the top of it
looking right first. So we're just going
to cut that back. Like so. And then
this part's going to run down the side
of her body there. Okay, so draw in a few strands of hair running
down the side of her face. And same with this
side. You know what? Probably we will
still see those ears. Maybe just a glimpse of Maybe not. I don't know. Let's see.
Maybe something like that. And then, of course, she's
got her little pony tails. I guess it's not
really a pony tail. What are they when they're doubled up like
that. I don't know. Her hair's tied up
on either side. That's the main
thing to remember. So we're gonna get that
drawn in there, like so. Beautiful. That's looking good. And now, as for her costuming,
well, you know what? I'm feeling like
we're gonna give her some kind of I
don't know, jacket. Let's do that. Something like
this will work, I think. I mean, we could
have kept it simple and just given her
tights or something. That's what they typically do in comic books to just make it
easier to draw them out, the characters,
but you know what? I like to think keep
things complicated. So here we are All right. There we go. Just a very
quick jacket design here. Just for the sake of
the demonstration, to give you something
fun to look at, as well, maybe
inspire you a bit. You know, it's not fun when you just half the time
you're learning, you're drawing something
that looks like a study. Like, let's actually
make something that potentially an ink could go over the top of and turn into a finished
illustration. Like, why not? Okay. There we go. We'll put some love into this. We'll spend a bit of time on it. You can see how the
whole process unfolds. Look, at a certain point, you'll probably get bored
and you'll be like, All right, Clay,
I get the point. That's really good
because it means that you can pay less
attention to what I'm doing and actually work on your own sequence with the characters that
you've created and give them some life. Because that's what
this is about. Whenever you're drawing a comic book sequence and you're including
characters within it, really make an effort to ensure that those characters have some level of expression
coming through. If you're looking at
them and they all have the same default face, there's nothing happening, no personality coming
through with any of them, then change it up, change it. Okay, because that's
what makes a comic book compelling is when you've got characters in it that
obviously look alive. I look like they're
there for a purpose. I look like they're reacting to what's happening
within the story. It just makes it more impactful in so many different ways. Alright, I'm going to just
run my pencil over the top of this hair do here around
the outside shape of it. Okay, just to bring some clarity to what
we've got going on here. It Okay, there we go. So you can see how her hair is actually sort of
folding over the top, going in and around
the back of her neck. All right. That's looking good. Adding a bit of rendering around the side of the breast there. Maybe a bit of
rendering up here, too. Let's see. Wonderful. Now, of course, we got the
side of her body as well. And well, you might
notice that there's a fair bit of hair
actually coming down and around her body in
the far off shot, which I really like, so I'm going to
get that in there. And that'll pretty much, for the most part,
wrap up this panel. So she's just told
him something kind of crazy, as I said, and that's why
we're going to have such a dramatic change in
emotion in that final panel. Alright. So over here, what we're
going to do is just give her, like, you know, a skirt maybe. We know that she's
got a jacket on, so we'll lay that in
there in a bit of a face. You can see that the
face that I've just laid in from a distance looks creepy. So I'm going to undo that and just be really careful
here about how I lay it in. A Okay. I'm just drawing
something in real lightly there. Alright, beautiful. And yeah, she's got her, like, arms and stuff on her hips. It's just a very basic gesture. You're not really
supposed to be paying too much attention to her facial features there when you're looking at such a
distanced view of the character, but at the same time, you may notice that
there's a bit of a smirk. Okay. And then on top of that, let's add in, I don't know, maybe some background elements. Maybe some broken
down buildings or something in the
far backdrop. Okay? So buildings that have
somewhat collapsed. It's like post
apocalyptic, right? Cool thing is with a
background like this, you can just fog everything
out at the bottom. That's what Mark Sylvester
was talking about in one of the latest
interviews I've seen with him, he's like, you just fog
it out toward the bottom, and it looks really good. Now, probably I'm creating a little bit of a tangent there between the background
and this dude's ears. So I'm going to be careful not to take
those too close to him. Alright. There we go. Adding in some buildings,
nothing too fancy. There we have it. All right. So now we are indeed ready to move on to
the next panel, right? And then that will wrap up our little emotive sequence
that we've got going on here. So far, they're trading subtle
smirks with one another. Alright, and that's
all good and well. That's a little good and
well until, you know, she says something
that rings his cage, rattles his cage a
little bit too much, a little bit more than maybe
he wasn't anticipating. All it takes is little
little upward turn of the mouth over here. For him to get his
heart racing. Alright? Cool. So we'll jump
over here now. I'm gonna go back
and just add in a little bit more definition
to his eye there. So you can see me
jumping back and forth. I do that from time to time.
9. Penciling Panel 3: So now we're back over here and we're going to draw
out this cranium. Once again, we just want
to for the most part, see how far back his
head is going to come. This is just to ensure that the construction is
nice and solid too. All right. And of course this will be where the side planes of
his head resides. We're going to drop down
the length of his face. Now remember that we
extended the length of his face quite a
lot in his design. But once we've got
all of that in there, I think we're actually
quite ready to kind of go in and start laying
those facial features down. So let's go ahead and do
that extreme expression. That's what we're
going for here, right? So his eyes are going to be basically popping out of
his head in this one. It's like, No, it can't be. I can't be beaten. You're
lying. It's not possible. Okay, so it's very clear that something has
just gone down. You know, on this
side of his eye, we might actually have it sort of starting to
squint up a little bit. And we might change the way
in which his eyes look there. We don't want them to be
too cartoonified, right? Now, the trick is
actually keeping his proportions intact. So I have to be very
observant of those. Um, his nose is
actually quite long, so we're going to pop the
bottom of it down here. Flare his nostrils up somewhat. And now his mouth. It's gonna look
something like this. Okay, so it's hanging open. Here's gob smacked. All right, so we just draw in the outline for the mouth open. We might have him
gritting his teeth, too. You know, just mess
around with the shape of some of these areas, some of these facial features. You know, you never know
what you come up with. Like, I've got this weird, wacky looking shape
for the far side eye, like, you know, what? What else could you
come up with here? I'm gonna go for something
like this. All right. And, you know, he's I
got a pretty big brow, so I'll describe that. Once the facial features
are in, like I said, we can pretty much go and start drawing the rest of the
face out around him. One of the best ways to make a character
look surprised is when you have the pupil in the iris sitting directly
in the middle of the eye, and you make the pupil
very small, so pinpoint All right. And now, as for his teeth here, um, I'm going to do something like this. Okay, I'm going to have
those coming up and around. There we go, beautiful. Have the top teeth running
in the opposite angle. All right. And like I said, we
can always go back and adjust the shape of these facial features if we want to mess around
with them some more. Okay. Now, obviously, we're
going to have to adjust the point at which his
chin ends once again. I'm gonna go in here and just run that down
to about there. His cheekbone is
quite prominent, so I'm going to draw that out. Do a whole bunch of
erasing here now. It's important to erase
because otherwise, you think that you
need to stick to the confines of those foundations,
and you really don't? You really don't want to actually adjust
everything according to the changes that you're making and just looking
at the facial features, having the face wrap around it with the correct
proportions accordingly. So this cheek bone is going
to raise up somewhat there. We could have the jaw
popping around from that side a tiny bit, maybe, but what I'm going to do here is I'm going
to get rid of that eye completely and adjust its shape because I'm not
happy with the shape that I had going on for it. Okay. All right. That's looking
a little bit better. Now, in order to get the
proportions of his head correct, not only from the front
but also the side, we're going to need to draw this head back quite
a decent amount. Okay, so time to get back
out the eraser once more. All right. I'm going to guesstimate
that his ear is actually going to sit
around about there. Oh Don't forget, we're going to be looking
at a decent amount of that ear from the side. I feel like his head's
a little bit more turned in this
particular example. Okay. So there we have it. And then we got the top
portion of the ear. It's running up and
then down and around Like so a Alright, there we go. Now don't want his ear to
be larger in appearance. Like, we don't want to look too big in comparison to what we had initially with the first panel. Now we are looking at it
on a different angle, which means it may stretch
out along the profile view. Okay, so there we
go. We're pulling head back further, too. He's got a very big thick neck, so I'm just going
to draw that out. And Now, as for this shoulder here
that we laid in initially, we're going to have to
adjust it too, probably. Let's just draw his
jaw line in first. All right. I've gone ahead and actually protruded
his chin even further down. You can see lots
of adjusting here. Make use of the razor. It's
a beautiful tool to use. It's going to help
you out in a big way. And all we need to remember
here is that he's actually turning his head around, okay? So he's turning his head. That means his trapezius
muscle is going to be there. The back of his
head, the back of his neck is going to
sit around about there. Okay. We might have a
shoulder over here, depending on well, actually, probably won't see that,
to be honest with you. Now, his trapezius
muscle is quite large, so I would say
it's going to come up further and probably obscure some of the
bottom of his chin. All right, we got his ear
lobe kind of dangling down. Or maybe actually,
it will kind of sit tucked in against
the neck there. So it's not just about
the facial features, it's also about the physical
state of the face, too. Like we want to apply physics to the head as
certain situations occur. And I'm feeling
like his ear lobe is definitely going to tuck in against the neck,
so. All right. Just getting the positioning
of the head right, the proportions of the head. And then once that's done, we
can feel free to go in and actually start laying in the details around
the facial features. All right. And, look, I think
that ear is actually coming over way too far
toward the front of the face, so I'm going to erase that. And then draw out some of
the structure of the head. So we've got cheek bones, which once again, quite a prominent feature
on this guy's face. That's going to run
back to about there. Okay? So I think based on that, the ears will sit here in fact. Now, what did I just do there? Well, I figured out where
the ears needed to go in relation to the placement of the cheek bone and how
far that was coming back. All right. So I could see how far
the cheekbone was coming, I could determine where
I wanted the ear to sit. And I am going to still apply what I was talking
about last time, which is actually having that
ear lobe run down and tuck in against the neck because
I just think that's an important little
detail to incorporate. You know, ears should come
across floppy at the base. All right. There
we go. Wonderful. And this will be the
side of the jaw up here. Okay. Now I'm erasing some
of the details that we added in around the face
there for the cheek bone, just because some
of them we might not necessarily want
positioned where they are. His mouth is very
exaggerated here. Adjusting the shape of
the chin now coming down and around to form
the base of the face. All right. Now, here's
where things get really fun because this is a bit more
of an extreme expression. We're going to see
more details, okay? Because the face starts
to really scrunch up. It's using more muscles
in order to compose itself into these expressions
with more intensity. And so in order to show that, to show that it's a
more intense emotion, that's exactly what
we're gonna do. Gonna add more lines in there. And you'll see just the effect that it has. It's
pretty powerful. Now, in order to pull
this off effectively, it's important to
understand what's going on underneath the
surface of the skin. So what that means is having an understanding of those
underlying facial muscles. Okay? So you're
going to have the we'll go over those
in just a moment. Actually, let's do it now
while we think of it. So you're going to have
the mouth muscle here. Okay, so this is the muscle
that surrounds the mouth. You're going to have the
muscles around the eyes. All right. And then you've
got a muscle that runs down here around here as well. Okay, you've got
the chin muscle. And you've also got the
jaw muscle up around the back of the face around
this section with the cheeks, normally they weren't so bony, you'd have, you know, a bit
of a cheek muscle there. And once you get to the top, you've got the brow muscle. And then you got this big band
of muscle that sits around the forehead and some
more muscles that sit around the temporal
area of the skull. Okay? So that's what I'm
thinking about as I add in these lines is just what
muscles are there that are scrunching up and
getting all wrinklfied. So as I said, we got this
muscle that's going to run down and around the mouth. You can see, right? Like, how much did that
intensify the emotion just then? Like, it really pushed it. Okay, there we go. And then we have the underside of the mouth
muscle, as I like to call it. You could even go ahead and place in some wrinkles
going up around the chin. You might notice
this, like if you're crying or if you're
really upset, you'll see the chin muscles actually wrinkle up quite a lot. Alright, now we won't put
too many details in there, just enough to indicate that
the chin muscle is tensed. All right. And then on this
side, same kind of deal. Kind of go in there,
represent the muscle around the mouth and around the
face in that section. This kind of muscle actually separates the cheek bone
from the rest of the face. In fact, you got
a whole bunch of different forms
layered on top of one another in this far side
representation of the head. At least on this guy,
due to his design. I feel like, you know, this bottom part of his chin, that could come out some more. You know, I don't want
him to appear skinny. So let's give that
some thickness there. All right. Looking
good, looking good. And now we'll run a darker, more define outline
around the eyes. You could even add some veins into the eyes if you wanted to. Okay, so here's some details for the bottom eyelids
that we're defining. We'll do the same thing
around the mouth. We'll define that some more. We actually want to see it. You'll notice that as you darken up the outline for these different
areas of the face, it starts to look more complete, even though you're
not really going over any of the other details. Okay. But speaking of the
rest of the face, let's draw a more defined line
around the outside of it. We've got this center line
that we need to place down the middle of his head just to keep the design consistent. We'll run this back around. Once again, I'm
feeling the emotion. I'm really trying to make sure that I'm pushing that through into the character. All right. Get my eraser out, get rid of some of those
additional details that maybe we don't
need so much. We only want this to be a subtle detail here in the
middle of the head. Pulling up some more wrinklege
around that brow muscle. Look how much more extreme
this emotion is now. That is great. Now, because we're looking at the nose on much more of a
three quarter view, we do have the opportunity here of actually defining
the nose bridge some more. So I think we should
definitely do that. A. Right? And as you can imagine,
you can easily go in and start rendering bits
and pieces of this out, which I am resisting doing simply because
that takes time. And you have probably
been sitting here watching me whip up
these heads long enough. Allright? So I don't
want to if you're still here watching completely
bore you to death because, look, watching
someone else draw, it can be monotonous, especially with an
artist like me, which I'm always kind of
rejigging my drawings. So it's an ever changing animal, a lot of the pieces that I do. It's constantly transforming. There's no knowing where
it's going to end. And, I mean, look, that can actually
make it kind of more exciting to probably watch, honestly, just because you're as surprised as I am by
the time we're done. But still, now, I
am going to add in some more neck
action going on here just because the
neck muscles tend to tense up a little bit as well as you start to pull the face and contort it into a more
stronger force of emotion, null expression, as I said, the same thing
happens to the body. But we'll generally add
a few details in there. We don't need to add too much. The last thing that I'm going to incorporate is just
some of these lines. You'll see this in comic
books a lot of the time, these speed lines that
sometimes are there to just emphasize the extremity
of an emotion. A so I'm pulling those in now. And that'll just,
you know, really, you shouldn't have
to rely on those, but it does add to the
effect here, doesn't it? Alright, I'm going to get rid of some of those overshots that run outside the
confines of the frame. And I would say that
that's about it. That completes this
demonstration. So let's do a really quick recap on what we've seen so far. All right? We've got our
first set of heads here. You'll notice that there is definitely a
structured approach that we can take in order
to get a well proportioned, solid look in the head
down onto the page. And then we can take that
same structure and we can tilt it downward and upward, orientate it in any
way we want in order to create the kind
of expression that we're looking for and the emotional force of it that we'd like to
present to the reader. Now, once we apply the principles that
we learned up here, we can go ahead and actually create a
full blown sequence. And as you can see, we
don't need a whole lot of dialogue in order to bring
these characters to life. And for us as the
reader, the viewer, to understand exactly what
it is that's going on. Now, we didn't talk
too much about how lighting actually affected the way in which storytelling comes through a
character's face, but it does have some
impact sometimes, especially if you've got a very dramatic
lighting condition such as you've got
a character in the dark slowly emerging. That's going to be a huge and
prominent storytelling tool that you can employ. However, that's probably more so related to storytelling
with lighting. So we'll save that
for another lesson. But for now, you've got plenty to work with when it comes to expressing through the facial features
of your characters, thus giving them
more personality, more emotional capacity
and more impact just on the audience and how they're feeling
about the situation unfolding within the book, which is, like I said,
it's visual storytelling. You know, that's more
often than not where you're going to be pushing that narrative through
the characters. You know, it's the
characters that tell the story most of the time. So there you have it.
10. Conclusion: And that wraps up our lesson on storytelling through faces,
facial storytelling. I hope that you got
a heck of a lot of value out of it and
that it's given you some ideas as to how
you might be able to start pushing the personality
of your own characters, making them actually
feel alive like they're there, giving them
some unique diversity as far as their
personality is concerned, because that's what's going
to help them to stand out, not just in the way
that they look, not just in their design, but actually how they act
throughout the story. Remember, to put what
you've learned here into practice as fast as you possibly can while it's still
fresh in your mind, because looking at it, without applying it,
listening to it, without putting it into action, it's not going to
have the same amount of impact on your skill set. So you've really got to make sure that you pick
up your pencil now, draw up a sequence if
you haven't already, and get those characters
expressing as potently as you possibly can and tell
a story through that. All right. Until next time, keep on drawing,
keep on creating. I'll see you again real
soon. Bye bye for now.
 Clayton Barton, Harness the Power of Dynamic Drawing