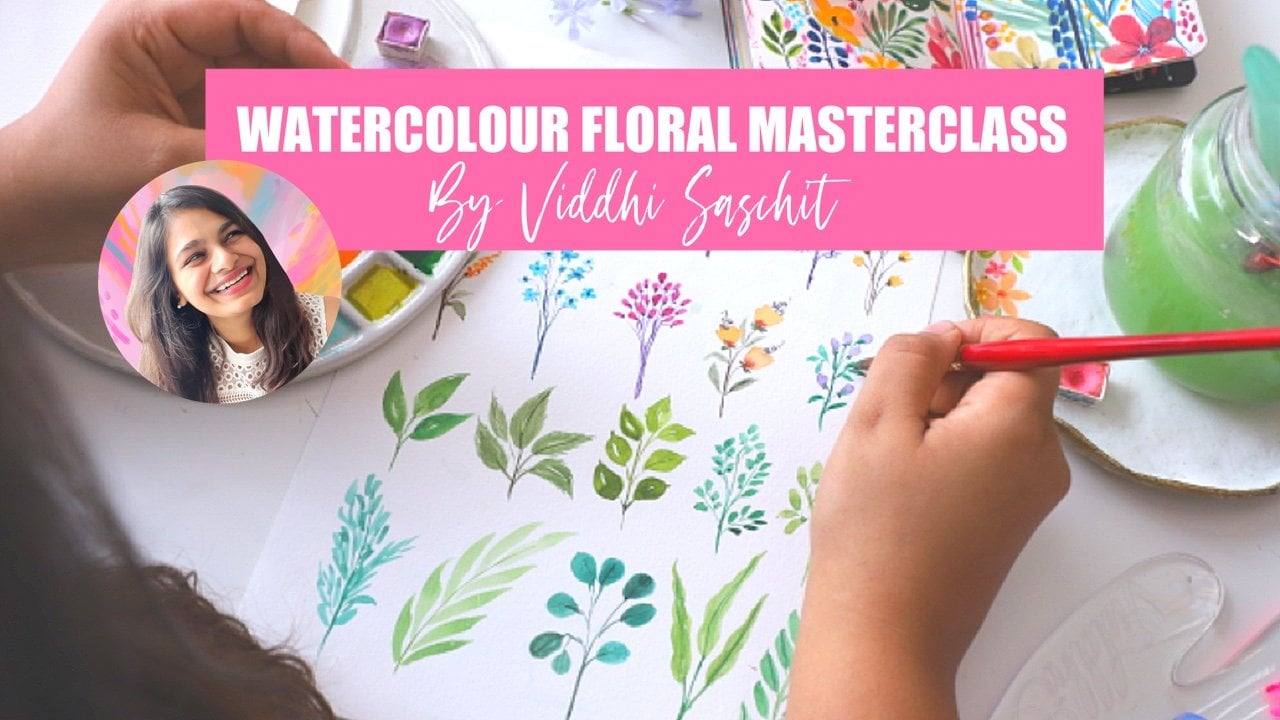
Transcripts
1. Class Introduction: Ever fell forward with
painting in one style. Or you're unable to find
a unique style of yours because you feel stuck on
how to explore new styles. And think out of the box. If you resonate with this, then this class is for you. Hi everyone. I'm with the
such as an artist author, surface pattern designer,
and creative lopuler. I'm so thrilled to be
teaching this class, which is going to be fun
and also very impactful. This class is going to enhance your creative choices and so many new ideas
will start flowing. Ideally, this class is directed towards surface
pattern designer because we need to have a lot of different styles to show a lot of variety
in our portfolio. But this is also
suitable for any artist, any medium, so that you can explore different
styles in creative. So here's a quick
overview of this class. We'll be choosing one flower
shape and we will paint in ten different styles which will help you explore
your creative. This class is also
suited for fitness and also all levels
of creative artists. Let's get started. It's
going to be so much fun in this class and I
cannot wait for you to explore so many
different styles with me.
2. Materials used in the class : To get started, we'll have some basic materials like I have my watercolor
sketch book over here, and I'm just choosing to
do it in a sketch book so that I can have it for
future references, but you can also do it in a
piece of paper or anything. We'll be needing watercolors. I'm personally choosing to just stick with one medium to
explore different styles, because that will
allow me to see how much I can create
with one medium. And then later on
as an assignment, you can also try
the same florals and different styles with
different other mediums. Imagine the amount of creativity and styles
that you'll be exploring. I would recommend to stick
with just one medium. You can either pick
wash, or watercolor, or mix anything,
whatever you want. But I would prefer watercolors
and I would recommend you watercolor so you can grab your favorite color palette
from the watercolor. Mine is a mix of colors from art philosophy and
different other brands. This is my watercolor
palette that I'll be using. This is the mixing palette. It's a ceramic palette. You can have any
regular mixing palette that would totally be fine. And you would need some water, of course, to paint
because it's watercolor. And then you can
have some brushes. Any watercolor brush
should be fine. The materials are very
simple and that's it. But feel free to add more materials you may
require as we paint along. Are you excited? Let's get
started with the first style.
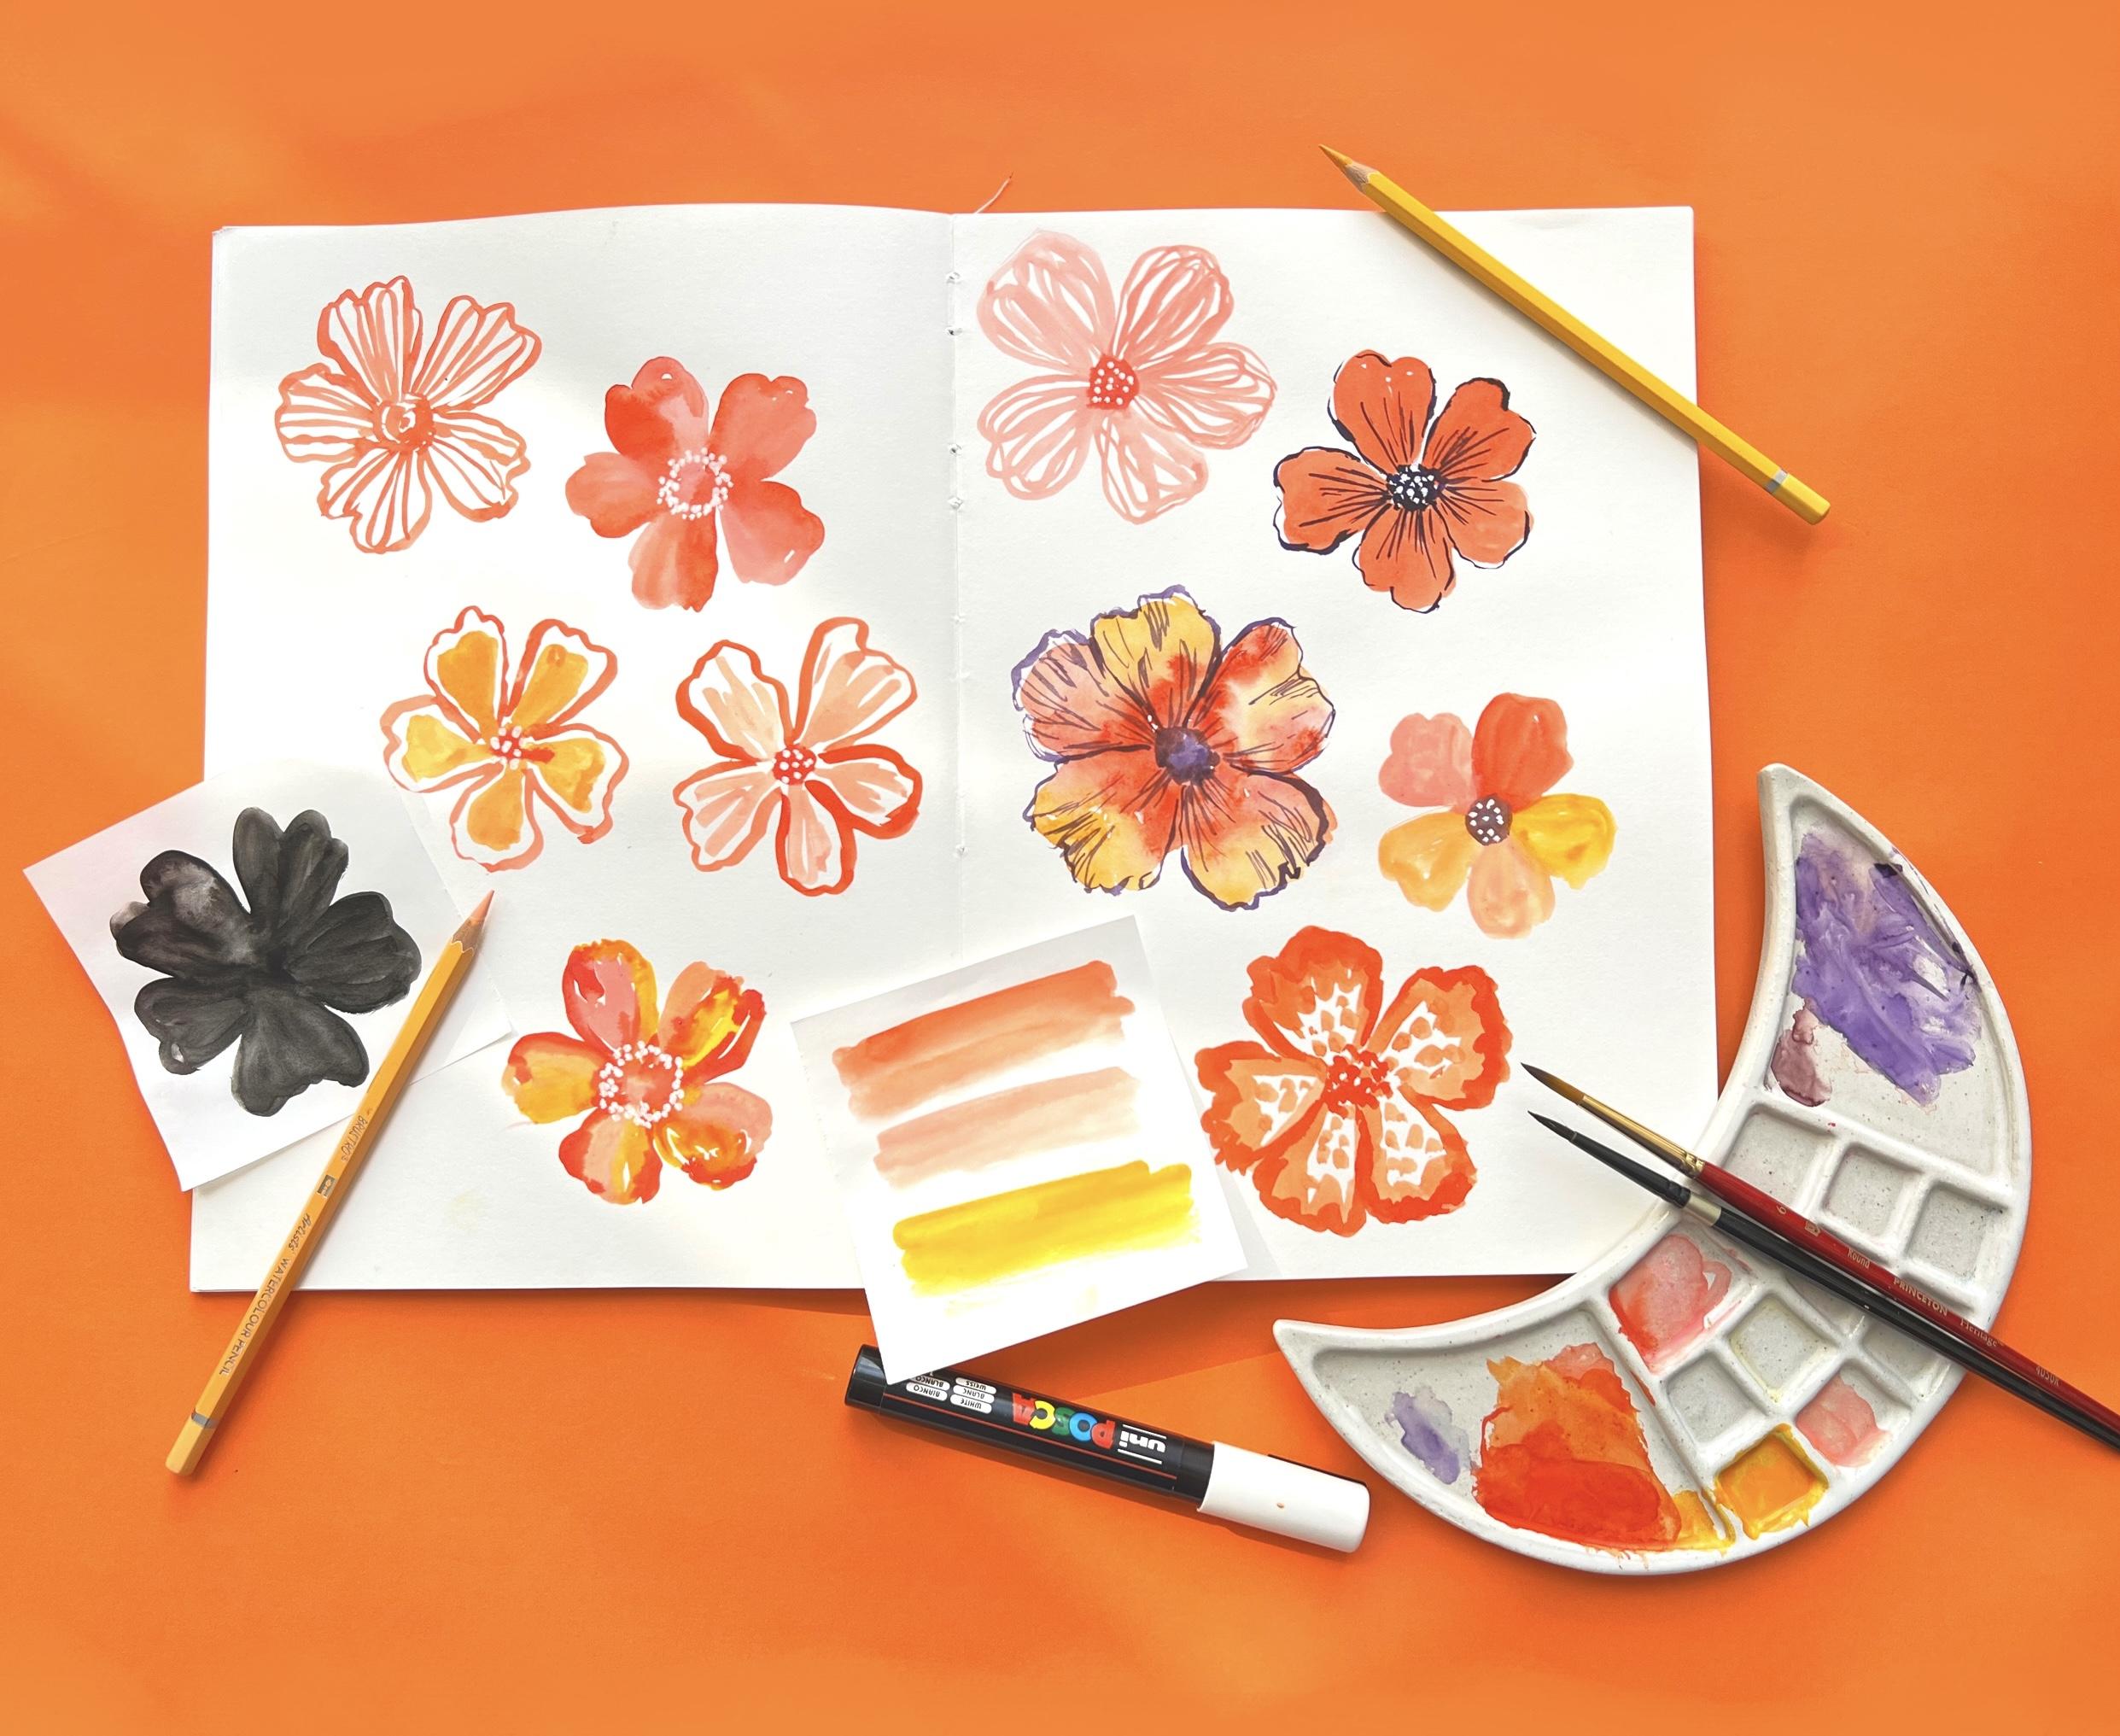
3. Style 1 : SImple Lines : Let's get started
with the first style. And I've just kept a reference over here for the flower so that we can just see how many different styles we
can do of the same flower. First one is going to
be abstract lines. You can pick your
favorite color. I'm going to pick some
nice bright orange. I'm going to mix it over here. And then I'm just going to just draw ready
abstract lines like this. While I'm just drawing the abstract outline
of the flower, I'm just moving my brush to create different
variation in the brush. And I'm just going
to draw lines like this which will
connect the petal. And we'll come back
to the center. Then in the center, I'm just going to fill
in some color like this. This is going to be the
first tile if you want, you can also add
leaves over here. But I'm just going to
paint flowers probably. In another lesson, altogether, we'll just explore
different types of leaves going on
to the next tile.
4. Style 2 : Loose Brush Stokes: The next style would be a
mix of colors for which it would just be like
different brush strokes come together to make a flower. I'm just going to make
a brush mark like this. Then with another color, I'm picking some
light pink color. Then I'm just going
to paint like this. I'll repeat the same
for all the petals. It's half pink and orange, dark orange like this. Basically, it's just painting the half petal like this and just leaving it while
it is still wet. You can add in the next color. I'm just sticking with
this bright red color at the moment because I
want to see how it is. I'll be like, this will be the primary color that I'll
be using for all petals. But you can choose to have different colors as we
explore different styles. But I think just
the similar colors. It would be like so amazing
to see the amount of variation that you can create through just
using limited colors. This is it. I'm just going to finish it
by adding some pink, and I really love how this
flower looks in the center. I think I'm just going to add
a mix of both red and pink. Okay, so this is
the second style. I know it's going a
little bit quick, but this is how we are going to explore like
different styles. I think I'll try my best to help you explore like at least
seven to eight styles. So let's see how much
we can do, right? I'm also going in the flow, so let's see how we
can explore together. Moving on to the third style.
5. Style 3 : Paint outline and fill in: For the third style, what I'm
going to do is I'm going to draw an outline of the flower, just like how we did
in the first one, just creating these wavy petals. Now what I'm going to
do is inside I'm going to fill in with
some yellow color. Going with a slightly
different color than this might just add a
little bit of pink. To make it similar shade, just fill in the petals inside without
touching the edges. It's like you have outlined the flower and then now
you're filling the inside. While you're just exploring, make sure that you're
having fun and not worrying about how
it is turning out. Because this exercise
is all about having fun and exploring
different styles. Make sure that through
every style that we explore that
you're having fun. In the center, I'm
just going to add a little bit of
the orange color. Okay, there we go. This is the third style
of the same flower. Let's move on to
the fourth style.
6. Style 4 : Paint outline + lines : For the fourth style, I'm
going to draw an outline. Again, just like how
I did over here. I love wading with different brush strokes while I'm painting the
outline of the flower. Next what I'm going to
do is I'm going to take this pink color and dilute
it a little bit more. This will be something
similar to this, but I'm just going
to combine this, the first style and the
third style that we painted. It's basically
bigger brush strokes like this in the center, but also as big enough to
fill the petals like this. This is the fourth
style in the center. I'm just going to put red color. I know this was very quick. You can see how different
this style looks like. It is similar to this one, but also it has a little
bit of different style. This is the fourth style. Let's move on to the next one.
7. Style 5 : Painting with two colours: Let's move on to
the fifth style. The next style is going to be similar to the second
one that we painted, but it's slightly
going to be different because instead of
using two colors, we're going to use
different colors and also leave some
gap in between. You'll just see how I'm exploding
this style differently. Start with the red color first, or any color that is your
primary color over here. Just draw an outline like this. Just one stroke. And then use different colors. I'm going to use pink. I'm just slightly going to bring it in like
this without touching, without blending with
the first color. I will add a little
bit of yellow. You can see how this is
different from this. It's very similar in style, but just using different
colors and leaving some gaps intentionally in
between is still looking very different
than this one over here. You can continue the same
with all the petals. You can also interchange. You can start with
pink and bring red color in the center
and yellow in the side, or however you want, you can put yellow
in the center. It can be a mix of
different colors. And you can also
add another Colo. Just added a little
bit of orange here. Just go with the
flow and just enjoy. I hope you're having fun
exploring different styles. And as a surface pattern design, I think being able
to explore a lot of different styles is
very essential so that you can create a lot of
different things for different clients and
a lot of collections, and a lot of variations
in your portfolio. That's it. And in the center, I'm just going to
add a little bit of pink color and a
little bit of red too. Can you imagine? This is just one flower and
we have already explored five different styles and it's amazing to see, right? Let's move on to the next one, which is a six style. Let's see, how differently
can we do at this time?
8. Style 6 : Wavy Lines : For the sixth style. Now I'm going to vary with
a different brush size. I'm going to use my
silver brush number four, which is comparatively thinner
than what I was using. This time we'll explore the first style that
we painted over here, but it'll be slightly different. Let's see how much. Just by varying
few brush strokes, it still makes a
huge difference. I've just mixed a
Gordos peach color. What I'm going to do is first what we did in
the first style that we explode was we did
an outline and then we filled in with
different brush strokes. So what I'm going to do is
I'm just going to start with the center and I'll just start
with the center over here. And then with thin
brush strokes, I'm just going to create and
give shape to the petal. And it's like, you know,
without lifting a brush, you'll just create a couple of lines and we'll repeat the same. And one last pet lo here. If I bring these two together, you can see that it is
very similar style, but still there is some
difference between these two. This is a little bit defined
and this is more flowing. And you can see these curves in between the
petals and all that. It makes it different
from the first style. I know we have just been
matching different styles, but the next one
that we are going to do is going to be
very different.
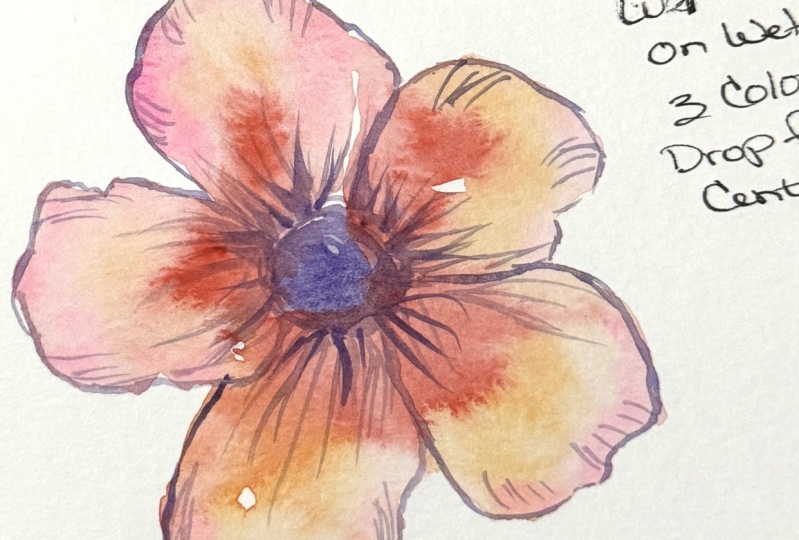
9. Style 7 : Painting + dark outline border: So for this style, I'm just going to paint the
flowered in just one color. I will just fill in completely
using the same brush, because the brush that we
used for the previous style. But if you want a bigger brush to fill in colors,
you can use that. It's basically filling the
flower with the same color. Next what you're going to
do is pick a darker color. If you notice, like I generally don't use a lot of
black in my work. I prefer to use
some darker colors like dark purple or anything. But you can also feel free to
use black color to outline. Next, what you're going
to do is it's not like a cartoon style but
something more like an abstract outlining
of the flower. You'll just see
what I mean to say. I'm just going to take
some dark purple. I'm not going to have
this paint very watery. It'll be a little bit of
thick because if it's too watery and if you know the
basics of water color, it will start bleeding
into the petals, which is something
that I don't want. I'm going to take a lot of concentrated paint if you want. You can also allow this to completely and then
give an outline. But I'm just going
to go ahead and give an outline now so that little
color might just bleed in. And that would be okay with me. It's just like outlining the
flower but not continuously, just in few places. You can also with the bushes, you can see how I'm
giving pressure to dy with the brush
strokes in the center, you can just paint
these tiny little dots. This is a very bold style from what we have
exploded so far. But I really like
how beautiful it is. If you want to go
another step further, this could be another style. But we are just going to
explore in the same style. You can just draw these
thin lines like this. You can also do it with
a pen if you want, but I'm just doing it
with the same brush. It can even be a
little bit thinner, but it's okay right now. You can see this is like a
very bold style over here, just ready with lines over here. And I love this. I love how this is very different than everything
that we have painted so far. I love to hear what you
think of this class so far. Please do let me
know while we are still in process of
exploring more styles. You can share it with me on
my Instagram or you can just post Project of Yours in the group or in
the discussion area. And I would absolutely
love to see track and hear your thoughts on how you are
enjoying it so far. Moving on to the next style. I think it's style number. I'm just counting it's
style number eight. While we've already explored seven different styles
of the same flower, and I think that itself
is very amazing. Right. Okay, Let's move
on to the next one.
10. Style 8 : Wet in Wet Technique: The eighth style is going to be more like a wet
in wet technique, which is a basic
watercolor technique. What I'm going to do is just wet the surface with
just some water. I have purple color in my brush. I haven't washed it properly, but I think it's still okay. You can just have
clear water and just draw the outline
of the petal. I think having a
little bit of purple, I think it's good because
you'll be able to see how I'm just making the
outline of the flower. Otherwise, it would be hard to capture the brush strokes that I'm doing, the
water on camera. I think it's good in a way. Now, I'm just going to drop
colors and see how it turns. I'm just dropping
red from the center. I think I put the petals
a little bit closer. You cannot see how each
petals are different, but I think once it dries, you may be able to see, even if you are not
able to see the petals, like how you can see it
in the other flowers. I think you can pick this
style from this flower of just abstract outlining and then put it away here and
it'll look beautiful. I think I might try that because this doesn't
look like a flower, but it could be an
abstract flower. If you're looking for an
abstract motif for your pattern, I think this would be great. I'm just going to bring
in a little bit of pink. Okay, this looks very abstract. But as I said, once it's tried, I'm going to be adding this one over here
while this dries, let's move on to
the next style and see how different can
we paint this flower. So this is going
to be challenging because I don't know what
I'm going to paint next. Let's, let's have a look.
11. Style 9 : Multi colour petals: For the ninth style, how about different colors?
Explore with colors. This time, all of this we is
exploded with brush strokes. Let's explore with
colors this time, like every petal could
be a different color. Let's see how that will look. I'm going to use the basic
colors that I've used so far to mix a bright orange color. While you can explore with different brush strokes
and all lighting, you can explore a lot
of things with colors. Also, because colors can
also redefine a style, you can see how this is
looking different from everything in the center. I'm just going to
add some blue color, a mix of the purple that we use. Just going to be very light. I think I like how this one
has also turned out to be. Let's explore the last style, which is the tenth style. And this is going to
be really challenging, but let's explore
something different.
12. Style 10 : Painting + mark making : Okay, now for the last style
that we'll be exploring, I'm going to do a mix of a couple of styles
to start with. So I'm just going to give
zigzag lines like this. Just bold zigzag
lines for the petal. This wasn't supposed to be clips but accidentally
closed it. It's okay, just I'm
just in the flow, so I'm just going to fill it
with some dots like this. This is an even
more abstract type. What I'm going to do is to
define the edges a little bit. I'm just going to take
more darker color of this. I'm just going to
soften the edges first. I just gave a very
abstract rough edges and then I'm just softening the edges to have a darker color of
the same color. You just need to have more
of paint and less water. Oh, at the center, you can just drop in some
darker colored dots like this. That's it. Isn't it interesting that we
were able to explore ten different styles of just
one single flower, right? In the next lesson, I'm just
going to show how you can detail some of the flowers and make it look even
more interesting.
13. Detailing the flowers: For the detailing, I'm going
to use my postcard marker. You can use any regular
Uniball white color pen. You can even use H if you want. So I'm just going to be using this postcard marker and I'm just going to be adding
some details like this. I'll just keep it very
minimal though for this. Just added some dots. I think I leave the
center as it is because I like it how it is over here. Also, I'm just going to add
some bigger dots like this. For this one, just
a couple of dots. I think I will use the
same detailing technique which I did over
here for this one. For this one, I'll
just add a couple of dots in the center. Same for this one. This one already has
some white spaces, but I'm just going to
define it a little bit more by adding some
dots for this one. We missed it because it
wasn't fully dried yet. Now that it's fully dried, I'm just going to go add some
outlines just like this one over here for
painting one flower. You can mix, match.
A lot of styles like this one is a
completely different stack, but I'm still using the
style over here of adding a abstract outline to make it another style like
which is very unique. I'm just going to
start from the center. And for the center, I'm going to add some purple color paint. You can additionally also
just add some thin lines. Like if you'd have seen a
botanical line drawing, it would have these
very thin lines. You can do it with a pen, but I'm just going to do
it with the same brush. I'm just going to add very
thin lines like this. You can also have another style by just taking a micron pen or any water resistant pen and sketch a flower
outline like this. And then you can just fill in some paint that could
also be another style. I think by doing this exercise, we'll expand your creativity
and your perceptions about how differently
you can paint different things and not
just paint in one style. I think that's it for this one. I'm going to leave it as it is.
14. Final Thoughts : Let's take a look at all the different styles of flowers that we have
created so far. Isn't that interesting
to just take a look at different styles that we
have been able to explore? I really hope this has given you a new fresh perspective
and this has boosted your creativity in
exploring different styles. I would absolutely love to know which one was your
favorite style. I know I said that we'll
be painting leaves also, but I think it would be better for me to give
it as an assignment. And you can paint a
bunch of leaves with the same styles that we
explore in the class, or you can explore
something different. Surprise me. I would absolutely love to
see what you create. And along with the
finished floral style, ten different floral styles, and also the leaves, and maybe something
like this which is more like finished
pattern kind of thing. So this exercise is
going to open those to creativity for creating so many different
styles of pattern. And to make your
portfolio really, really interesting and very exciting for your clients to look at or your
agents to look at. This is something similar to the sketching
style that I did, but I've used different
colors over here. And you can see
how lovely this is as fun pattern which could
go on a lot of things. That's it for this class. Thank you so much for joining. I'm so thrilled that you watch this class today and
learn something from me. Do tag your final project
with me on my Instagram. I'm under the name
called The Subs. I'd love to see. Thank you. Bye.
 Viddhi Saschit, Author|Artist|Surface Pattern Designer