Transcripts
1. Class Intro: Hi. Welcome to the
Skillshare class on how to design an event poster
for a music festival. My name is Marlene. I've been working as
a graphic designer and print designer for
about seven years now. In this class, I'm
going to teach you everything about how to
create an event poster. From getting the brief
from your client, to working with typography, illustration, and hierarchy. Then finally, how to prepare
your artwork for print. The class project for
this course is to create your very
own event poster. It could either
be a project that you're working on for a client, or you could share
something that's just a personal project for a music genre you really enjoy. After taking this course, I hope you feel excited and inspired to create
your very own posters, and that you feel
a little bit more confident with the different
printing settings, and how the creative process of creating a poster for a
client actually works. I can't wait to see what
you're going to create. Let's get started. [MUSIC]
2. What to Include & Tips: [MUSIC] When you're
designing an event poster, in my experience, there are different sections that
tend to come back. It's always good to be
familiar with the type of information that you typically want to fit in your poster. This is also good to know so that you can
make sure you get all this information
from your client before you actually get
started with your design. Your client might send all
this information right away or you might have
to ask them for it. I thought I would share
a little bit what a typical poster design
typically needs to include. Typically, most posters
have the event name. It might be like the
name of the festival or the name of the organizer,
something like that. Usually, you have the dates that the festival
is happening on so that people can know when
to attend, the location. Normally, a lot of events also want to list the artists that
are going to be present. This is a good way to
draw in people who might be super interested in the different artists
that are listed. Something that a lot
of people also want to include is organizers
or partners. This is usually where
you have to fit a ton of different logos that
might not be in the style that the rest
of your poster is. It's always really good
to know beforehand what those organizers and
partner logos look like so that you can make
a space dedicated in your cluster to be
able to fit them. In some cases, you have
logos that can easily be put in black
and white and that makes things a lot easier. But in my experience, when
you're working with events that have a lot of different partners
with different logos, it might be that they have to replace on the white background. Sometimes you can make a
border around your poster or create another space in white where those logos will go. Some events also want
to include things like their website or
where to get tickets. This is usually a really
good way to not have to just Google the name of the festival as someone who wants to attend, but you're giving
them an easy way, a call to action to how
to get the tickets. The last common piece of
information that a lot of posters want to include is social media
handles or hashtags. This can be as simple as putting the different social media icons and putting the handle or putting a hashtag
somewhat on the poster. This is going to
help them drum up interest about the
event beforehand. Lastly, sometimes events
also want to have information about the event itself like if it's accessible, if it's going to include food, things like that, where you have a little bit additional
information. If you're noticing that your
client is trying to fit a lot of information into
the one poster design, you can try to encourage
them to just see the poster as the
first interest point, the first thing that your potential visitor
is going to meet. Then you're going
to guide them to the website where they
can read a lot more. If you're noticing that
your client wants to put paragraph after
paragraph on the poster, it typically makes for a less effective
design and so take your role as a designer to be a guide for how much information you think is appropriate. You can always show examples
of other really nice posters and make sure that you have that conversation
with your client. There are a couple of different questions that you need to make sure you ask your client
before you get started. Besides knowing exactly what
information to include, you also want to know when the poster needs to
be ready for print. Because typically if an
event is a certain date, you want to have a
couple of weeks before that just to be able to print. Different printers have
different lead times, but just make sure that
you have time both for revisions and back-and-forth
and also for them to print. You also want to ask a little bit about
the printing press. You want to ask about
the size of the poster. Is it like an A1 poster, an A3 poster or
more like a flyer. So make sure you ask about
the dimensions and also check with the printer or with your client about things
like the bleed settings. This is going to be super
helpful when you're creating your design because you'll
know what a safe zone is. If you're working in design, which is the tool that
we're going to use, it will also give you a
little bit of a guide for the area that you
want to keep safe. But it's always
good to know right from the beginning
so you can prepare your document correctly what bleed settings that you want. Some clients might
also have an idea already of images that they
would like to include. Maybe it's a photo
from a previous event or photos of the artists
that are going to attend, so make sure you ask for logos and images and anything else
that they need to include. That can also be things
like brand colors. If there are specific
requirements for the style that the
poster needs to have, maybe they've had previous
years when we've had a design and you want to
stick to a familiar feel, that's really important to
know before we get started. Now that we have all of the basic information
to create the poster, we're going to start
looking at inspiration.
3. Research & Mood Board: Now that we're ready to start
looking for inspiration, I think it's important to
do this in two stages. The first one is to do research and create
inspiration boards for yourself and then you
can work together with your client to double-check that this is on the right track. Sometimes for smaller
projects like poster designs, there might be a
quick turnaround, you might not have
a huge budget. In this case, I suggest
using something like Milanote to create a mood
board that's quick and easy, is not going to take
you too much time, but is still an easy way for you to double-check
with your client before you start designing to make sure that you're
both on the same page. In this course, I'm
going to be designing a poster for an event
called Tiveden Americana. This is a music festival for Americana music
and it's going to be held in a national
park, which is super cool. First we're going to look
at some inspiration and do a little bit of research
on the music genre itself. Then we're going to
go and add this to our mood board that we can
share with our client. The first thing I'm going
to do is just to look into a little bit about Americana
music because that's something that I'm
personally not that familiar with and I want to make sure that I'm
hitting the right feeling. I'm just going to
head over to Google. [NOISE] I'm just going to start by looking
at some images. This will just give me like
a super clear first feeling, what that means and I can
see a lot of country style, a lot of guitar music. A lot of it seems to be very
live small-scale feeling. I quite like this where
it's like outside, kids kind of related to
indie, maybe folk music. I think this is really good so we can use this
as references. I like the black and
white type of images. I think one trend that's
coming up is a lot of these very golden warm tones. I'm going to head over
to Pinterest as well. I'm just going to
have a look there. [NOISE] Do the same thing, just google out there. Right now also we're getting
a lot of the same thing, we're getting guitars, I like this one where
it's like a little bit of a hand lettering feeling
in an illustrated aspects. I just do this for a bit
where I'm looking at different examples and
what's already out there. Especially I'm noticing a
natural muted color scheme, which is actually going
to work really well since we have this
national park theme. Awesome. Now that we know this, I'm going
to do one more thing, which is, I'm going to look
at national park posters. [NOISE] Because I think that's something
that we can also get some cool inspiration from. This one is awesome. I
really like how the text is spread out in different
places so you have the different
directions of the text. That's really cool.
I've collected a couple of different
inspiration images and I was looking at Pinterest, Unsplash for photos
and just Google. What I'm going to do now
is I'm going to put them into this new Milanote board. This is going to serve
as an inspiration. The first thing I
want to do is just to get everything on the board. I'm just going to
start by dragging all of these images here. We can start to see that
there is a couple of trends, we have all these
yellow and warm colors. It's quite natural
for photography. It feels like there's a
lot of things outdoors. I think I missed one image. We can start to see that
there's some photography here. We have some graphics, some more type of
graphical ones. What I'm going to do is
I'm just going to start to order these a little
bit so that I feel like there's a little bit more of a structure to
what we have here. This is just so that
it's going to be easier for my client to have a look at everything and see what it is that we are putting and why. I'm going to start to put these different poster
designs over here. I think we're going to
lose this one actually. Be a little bit neater and
it's not my favorite anyway. Some mnemonic that,
we have that, and then we have
this more type of graphical stuff over here. Then we have some more
photography based things. I really like Milanote
because it's so flexible and you can organize things into
categories and you can put notes so that's what
we're going to do next. Once we have all of the
photos that we feel are representative of the
style, let's have a look. I think as nice as this one is, I think that the color tone
just isn't working so just for the sake of keeping our
design a little bit cohesive, we're also going to go
into this one and we're going to edit it a
little bit so we're just going to click "Edit Image"
and then we can just go straight in here and
start editing the picture. Great. That's looking
a lot better. We have a little
bit of stuff here. This one, I think as much as it does apply with the color, I think it's a little confusing because the style
is so different. What I'm going to do now is
I'm going to create this as three different
zones just so it's easy for my client to understand
what it is that we're showing and also
for me to remember why I picked different things. I'm just going to
move all of this down and I'm going to start putting a little bit
of notes and titles. You can just go on
this little extra dot here and you can just click on the heading and
drag that over here. This is going to be
poster inspiration then I'm going to put
photography style. Then finally, we're
just going to show a little bit of what the
topography could look like. I like to always
give a little bit of an instruction to my client
as they're getting in here and so sometimes
I like to add a little card at the top where I'm explaining a little
bit about what's going on. The last thing we're
going to do is just clean this up a little bit, just so it looks a
little bit neater so we align this and same with here. Then we're going to share
this with our client and all you have to do
is click "Share" and you can create different
settings so you can either enable
read only and that will just let them see it
but not engage with it unless they're
creating an account or you can add them as editors, which means that they can do the exact same thing that you can so they can add notes, for example, and let you
know their thinking process.
4. Hierarchy - Effective Design: [MUSIC] When you're creating
any piece of design, the right hierarchy and
thinking about what information is most important is one of the best ways to make
sure that your designs are not only good-looking
but actually effective. I thought we would
have a look at how a couple of different
posters have worked with hierarchy to make sure that their design
is very effective. The first poster we're
going to have a look at is for the span called Sync, and there's quite a lot of information here
so we're going to start unpacking it and look
at how they use hierarchy. The first thing we're
going to look at is what stands out to us, and this is something that
comes with practice a lot. I think it's a really
good idea for you to go to Pinterest or other places and start looking at different event posters and
what stands out to you. In this case, the most
important information and the information that you can
see first is the band name, and that's because
that is what is going to draw people
to this event. Then if we look at hierarchy, most of the time hierarchy
is done either through size, color contrast, or bolder type. The next thing I'm seeing is
the date that the image is happening on and the
logo of the organizers. That seems pretty correct to me. Usually, you want
to make sure that the people who are going
to be hosting the event or the bands are really
at the forefront and then you can have a look at the rest of the
practical information. In this case, we also then have a quote about what their music is like so that people who
haven't been to any of their concerts before
are excited to come. We also have a little
bit information about what will happen
and where it will be, and a very practical information laid out in these little blocks, the venue, the time, how to book tickets. Then we have another
logo of the organizers. In this case, this is the
organizers of the event, and this is the organizers
of the location. It's not really
that important for the person who's
attending the event to know which one is which or to
know who these people are, the most important thing is
to know what is happening, why should I go and how
can I then go there? The least important information
for the person to know, but it's important
to have on there is things like the
sponsor logos and a little bit about the company number or the organizing number
of the company, just to give a little bit of legal information
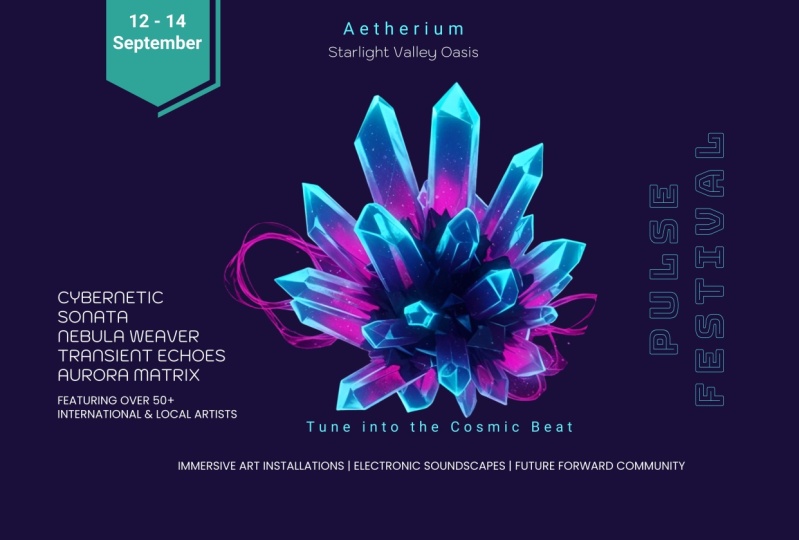
for this poster. The next one we're going
to have a look at is taking a very different
graphical approach, here we have illustration and the hierarchy here
is also very clear. We actually have a really
similar hierarchical order of information to
the last poster, which means the first thing we see is the name of the festival. The next thing we can see besides this beautiful
illustration which really sets the tone for the
type of music is the date, and then the third piece of information that
we can notice is the logo of the organizers and finally the website
where you can learn more. The last piece of information is just the logos of the people
who are sponsoring it, and I think this is
a perfect example of a super simple poster
where it will draw you in. It will be very visible and all the information
you need is actually just the
website so you can go and check out more
about the event. It's not always important to put all the information
straight on the poster, especially if it's a
little bit more time before the event is
going to happen, it's really good just for
people to go check out the website and learn a lot
more about what's happening. Let's have a look at how in the poster that we're
going to design, it is actually going to
work with a hierarchy. We know that we have this
different information, and the first thing I want
to do is just to think about the priority in the hierarchy
of this information. I think their location is going to be a
little bit bigger. I think also the date is something that's quite
nice to make really big because numbers tend to
be quite visually appealing, it's not that long so
it's really nice to make it quite large
and then also, it's a good thing for people to know when it is and that's a key hierarchy
information as well. I'm going to make this bigger, I might think about
maybe making the numbers bigger and the text a
little bit smaller. Maybe something like making sure it just fits underneath or something we'll have us think. Then we have all these
different artists which we could maybe keep like this or maybe do a
slightly different layout, and then we have the website. Okay, that's interesting, so hierarchy here would be
logo is the most important, location and date is the next important and then
maybe we will make this bold or something so maybe it gets a
little bigger as well. Then we have the artists and
the contact information. Cool, so that's where
we want to fit. Now I want to think
about how to create this feeling of the nature, the feeling of the music and information and inspiration that we looked at before [MUSIC]
5. Layout & Design: [MUSIC] Now that we know
the basic structure, all the information
we need to put, the hierarchy and
the inspiration that we're going to be using
to base our design on. It's time to start creating
the design for our poster. I'm going to take you
along as I'm designing this poster for the
Tiveden Americana event, and you can see my working
process in Adobe Illustrator. Because I work a lot with illustration and I
personally just feel a little bit more comfortable creating designs in
Adobe Illustrator, I usually start out creating
my designs and layouts in there and then I move
everything over to InDesign. InDesign is specifically
created to design print, but you can also export a poster as a PDF from
Adobe Illustrator. If you're completely new to Adobe InDesign but you're really familiar with
Adobe Illustrator, you can stick with the program. I just want you to know that. We're going to look at
how to use InDesign as well so you'll learn
that process as well, but it sometimes can be just good to know what
your options are. I might use illustration
for this project, but I also want to explore
maybe using some photography. I'm just going to
go on Unsplash. In this case, actually there is no photos that the client actually wants me
to incorporate, there are no specific ones. I think what I'm going
to do is going to start by finding some
pictures of guitars. Something that is going
to give lots of space, but layout like this is pretty good in the
sense that there's a lot of whitespace, but it's a really
different type of vibe. This one would fit better, maybe something like
this would be cool, where it's like the right vibe, but this feels really blurry. I'm not quite sure. I like the outdoor
scene as of this, but then there's too much
going on. This is a good one. I like this one. I'm going
to download this one. I want to find someone
who's maybe playing music as if it would
be like an artist. This is pretty cool.
This is like the vibes that we saw in a lot
of the inspiration. I think it's cute, maybe I'll save it for later. This is also pretty nice. I think this has a lot of
potential with that feeling, but does feel quite murky. Maybe I will have to go into Photoshop and
edit it a little bit. I found another one that I
think might be pretty cool. This is actually one that I found as an image on Unsplash, but then I was just playing around with
different effects because I wanted to create
something that looked like a burnt polaroid. As I was playing around with
techniques a couple weeks back and I made this as
just like a fun experiment. But now looking back at it, I think that the polaroid burnt feeling might
be pretty cool. All I did was basically to do a color burn
with the effects. Instead of choosing multiply, I just chose color burn and then I added a couple different
color layers to it. I also made this a
little bit sepia with the colors that sepia
is pretty cool. But I also want to incorporate
some illustrated elements. I was looking at the way
that a guitar looks, and I'm sure [LAUGHTER] there's a much
better name for it, but the neck of the guitar and where you have
all the strings. It does remind you a little
bit of a tree trunk. I had an idea of connecting
the guitar which is kind of essential element to this music genre with the tree, which is this connection to
the national park aspect. I'm going to have a look for
some different pictures of trees and some pictures of guitarist so I can use
them as a reference. I was able to find this picture, which is a vector that I was able to grab from
a stock site that I have a subscription
to of a pine tree, which is the most common type of tree in this type of national
forest that we have here. Now I'm looking for
something that can be the guitar part of it. I was looking at pictures of guitars and I came
across this one. Now, I think this one has a lot of great things going for it because it's a
really simple image. There's a couple of
ways you can do this. Sometimes I just use the pen
tool and I will literally trace along the edges and just choose the parts that I
think are interesting. If it has to be something
super symmetrical, I might choose to use the Ellipse tool to create the perfect circle
and things like that. In this case, I want
to try to image trace this and I'm sure I'm going
to have to fix it up a lot, but I just want to see
if we can use that to create a little bit more
of a grungy feeling. I'm going to start by making
this black and white. I'm just going to go
and edit the colors. I'm going to click "Edit",
"Edit Colors" sorry, it's in Swedish, but I'll try to translate and then
convert to grayscale. That's going to make it
easier for it to image trace. Then I'm going to just
click "Image Trace" and it's going to give me
something pretty crazy. But what I'm interested
in here is actually this. I think this looks
pretty cool that it has image traced it
but not perfectly. I think the shape
of it is correct. I like this little bit. I'm not sure if it's too messy. You can also play
around a little bit with the settings for this. Right now it just is standard, but you could also have multiple colors or
just grayscales. The black and white
logo type tends to give a very basic main shapes
result just fine. I'm just going to go with the standard and
I'm just going to expand this and that's going
to allow me to edit it. I'm just going to ungroup this. Usually, in my experience, you have to do it
a couple of times. Now I can remove the white
background and I'm going to make this black and then we're going to merge all
these things later. I'm just going to go
and grab everything that I don't want to see and try to make
it the black color. Cool. All I did was I kept
the bits that I like, which are the shape of
it and these lines here. I also went in and changed a couple of
these so that it's not perfectly symmetrical
because I do want it to feel like it's a unique
design on either side. Cool. I have these two parts. I have the tree and I have this. Placing it like this
already looks pretty cool. I definitely think
that we need to get rid of this part here
or at least hide it. I'm going to see in
terms of sizing, what might look good. I was thinking
something like this. It's going to be pretty good. I think it's pretty cool. I know color-wise this
looks a little crazy because we have black
on a gray background, so you don't see this so much, but I think it's
going to be up to the color choices
to make it visible. If not, we're going
to have to go in and just make these a little wider. This is all of the
information that I want to fit. Let's get rid of that. The first thing I
like to think about, because it's the main
hierarchy is the logo. I think in this case, if it's going to
place on top here, it's going to have to be white. I'll just go change that. We'll see if maybe we
want to put it really large or basically the
first step that I'm doing now is just playing around with the layout in Adobe Illustrator. I could definitely do this
straight in InDesign, which is the program
I'm going to use to export this for print. But I'm just so much more used
to working in Illustrator and I feel like it's
easier to test things out. Especially when it
comes to illustration, I'm way more comfortable just creating it in
Illustrator first. I'm just playing around
with ideas now and then whichever design you
feel strongest about, I'm actually going to
create that one in Adobe InDesign. Let's see. We might have to put some filter on this to make
sure it's visible. I don't want it to be
right on the edge, I don't want this edge to be right on the
top of the guitar. It's looking a little
awkward to me. I'm going to have to choose a typeface that I feel is
a little more inspiring. It's just a basic one. Let me have a look
at some options. [MUSIC] It's quite nice. I think I'm
going to go for this one. It has a lot of character, but it's still a
really simple one. It feels quite in line
with the other styles. I'm going to try something. I see this area here that's black and there's quite
a lot of space there. What I'm going to try to do is I'll place this on top here. We're going to place
this in white, we're going to see if that's
going to work or not. Then we're going to see if
we can maybe place all of these artists names
in a different way. I've just prepared this as
slightly different format, so they're all laid
out like this. I think this could
be pretty cool. I'm thinking of maybe mirroring the color of the guitar itself, this is totally not
working though. I'm thinking maybe I'll
switch this around, put this here a little
bit more like what we saw for the inspiration images. I can already tell that some of these or the photos are going to be trickier to work with, and so I actually think that the most successful
design is going to be the illustration version. I'm actually going to
complete these other two, the photos in my own
time and I'll show them to you as well at the
end of this video, so you'll see three
different concepts. But on-screen now I'm going to be sharing
with you how I do the illustrated
one because that's the one I think it's
going to be the winner. We have everything we want
for the illustration. I'm thinking that the guitar should probably be
front and center, and thinking of placement, I'm not sure we need the
whole tree to be part of it, if it needs to be this tall, if it can get cut
off, it shouldn't. I'll test a couple
of different ones, but I also don't
think we need to have the whole guitar shown. I'm just thinking
something maybe like this. Perhaps a little smaller,
something like this. I think that could
be pretty cool. I think you still get the idea, but it's not too overwhelming. Then we're going to try
to place out the logo. I think that we could either make it like this where we have it on top of it and we'll just do a bit of an
overprint effect, and then we're going to
make all of these the choice for the right typeface, and I'm just going to
make some of these, maybe slightly different. There you go. I want to be able to incorporate
the date somehow. That's something that's
going to be a big thing. I could put it here, which could be pretty cool, that could be an
opportunity to do that. What I saw in some of
these designs that we looked at before was a
little banner thing, so I'm going to try
that just over here. You might wonder, why does I think in black and
white at the moment, is just because I like to
focus on the layout first, and then once I have
been able to figure out the overall
layout of things, then I like to just go in
and pick the colors just so that I know that the overall
layout is going to work. Let's sprinkle in
and adjust a little. Put this top. Something like this, maybe. Then the question is, are we happy with it being
just like this, or do we want it maybe to be
a little more interesting? Maybe we just add another paint. Just create a little bit
more of that filling. Maybe we can add
a slight detail. You'd be a little line. Getting a bit more character. We'll do the same one here. That's a start. I think that's cool because
you're getting those division of the
date and the logo itself. This is a little bit empty now, but we can how think about
what to actually do. Now, I'm thinking that this
needs to be the next one. I put this on top here. We could put this
all the way here. But I think it might look
a little bit too awkward. I think maybe making sure
that it's in-between where this is stopping and
this is stopping here. Now we've got a couple of
different things to place because this is already
underneath and smaller, I'm thinking that
if I just place this here and then
place this under here, it's going to be just a list of more smaller
and smaller stuff. What I'm thinking is, what if we would do this and place the location
a little bit smaller on top, and then we have a ticket prompt a little bit
bigger underneath. That way, we're making it a little bit easier for
people to get in touch, but the location is still
there. What do you guys think? Let me know in the comments
what you would've done. I'm just going to go ahead
and move this up a little. I can like that layout. The one thing I'm feeling
right now is that it's pretty awkward with
the space here, and also all of these ones, if we're going to
place them here, which is my feeling
that we should, I feel this is very cramped. I'm thinking we might just
try to move this over here. See how that looks. I like it. I think
that's going to work. We make this a
little bit smaller. Then the last thing we have is just the contact information. I'm just going to make
that a little bit bigger, I think we'll make it
a different color. I like this layout.
It's pretty cool. Great. Now we need to
think of what colors. When we have a look
at the inspiration, we saw a lot of these
muted, natural tones, there was a lot of brown beef, these burnt colors, and a lot of colors
that feel natural. Because this is going to be in a national forest, I
think it's perfect. I want to test that a
couple of green colors. I'm going to start by
just adjusting this, putting it in the back. I'm going to try to look
for a green that's in its natural color spectrum, maybe something like that, and then actually
I can merge these. What if we try to go for a shade of this which
is just darker? We'll have to see
how much darker. This is cool, but the guitar is disappearing
a little bit. We'll have to make
it a little darker. I'm going to make these
lines a little bit wider because I can tell
this is going to be a little bit of an issue. That looks a lot clearer now, I might go in and
fix a couple more, but I think familiar
perspective, just explain. Now, there's lot of
white on this here. I want to try to grab a color that feels a little
bit more like those, be she warm tones that we saw. Maybe something like this. Let's go and grab
that next color that. Nice. Let's see now, if we want to do something
about this color tone, I'm thinking this is a bit
too harsh with this black, so I'm going to try to
make it a green color. That looks better. It
looks a lot more natural. I could go two ways now. I could either make some
of this really dark green, which would look pretty cool, but I have another idea. I think I found one that I like. This is basically
a darker version of the color we have here. This, to be honest, could
be the poster design. I am going to run
it by my client, but actually I
wanted to show you another color option
that I was testing out. This is another color
option that I like. What I like about it is, it's really going with the inspiration
pictures that we saw, however, I do feel like
the legibility of the logo against the tree illustration
is a little bit weaker. But I'm going to show my client books and we'll
see what they pick. Before I send it
off, I'm going to put it on a mock-up
and I'm going to show you guys the different ones that I actually ended
up showing the client.
6. Mockups - Presenting Your Work: [MUSIC] Now that we have our different
design options and we want to present the
work to our clients, we want to make
sure that it feels representative of what
it's going to look like. Because a lot of clients, they are not used to envisioning what's something
that looks flat on, just a computer is going
to look like in print. I really like to use mockups to make sure
that you're giving your client that imagination of what the design to look like. There are so many different
sites where you can download pre-made mockups
for a poster design. Posters are quite
common thing to design so there tends
to be a lot of options. I tend to use Envato
elements because I have a yearly license where
you can find lots of great mockup examples. They're usually Photoshop files that are super easy to edit. There's also a lot
of free sites and so you just have to look into
what the licensing is. For mockupsdesign.com it does say that you don't have
to credit the person, but it's always a good idea
just to have a look anyway. In this case, I'm going to go with the poster
and concrete wall mockup because I think it really fits the type of vibe
that I'm creating. Great, so now we have
the design open. Typically you'll see
something like this where you have the
mockup which has, if you expand it, lots
of things like contrast, you might have different layers. Like if you look
really carefully, it's this little bit here, so the overlapping,
you could remove that. Just lots of little things
where you can go and edit. You also have things
like the highlights of it so you can see
what the effect is. In some cases, like right now, I think this highlight
is super-strong. You can either just choose to
remove it or you can also, if we turn it back on, go and change the
opacity of this. This is something where I like to start putting in my design first and then see how I can
represent my design best. I'm going to click
on this poster 1, and this is what's
called a smart object or a smart layer. That means that what you
put in here is going to be updated in this
other layer here. What I'm going to
do is I'm literally just going to go into my Illustrator file and I'm just going to grab the
design I have here, copy it, and then I'm going
to paste that in here. I'm going to keep it
as a smart object. Then I'll just have to resize it a little bit to fit the
actual poster design. This is something
where you might have to play around a little
bit with the dimensions. Some poster mockups might not be the exact dimensions that
you're working with. Maybe you have to look
for another one or see how it's going to work
best with your design. In this case, I think it
works totally fine because we have a little bit of
whitespace on either side. I'm just going to hit
"Enter" to place that and I'm going to
go "Command Save", and that's going to save it and put it onto this other design. Now if we go to the other tab, you'll see that
the posters there, but like we saw with
the filter before, this is super faint. I'm going to go and
have a look at these. I think that the
highlight is probably the biggest problem here, so I'm just going to
start to remove it. We could either just
straight remove it or we can maybe see if we want to
keep just a tiny bit of it. Perhaps if we have nothing, it looks a little bit too fake. If we start moving
it a little up, I think that's pretty cool. We also see a little bit
more of a texture through. You can go through the
different settings and because these mockups are
created by different people, they will be a little bit
differently laid out, but this is quite a typical
layout of a mockup file. I'm going to save this and then we're just going
to export it as an image to show to our client. These are the three ones that I ended up showing my client, and I'll talk you through
a little bit what I did. The first one is the
one that we looked at with the guitar and I ended up working with this whitespace to try
to put in the date, which worked pretty nicely, and then I replicated that
effect with the tickets. I then was able to
use the space around the frame to put in the different information like
the artist and the place, which is something that I
think work pretty nicely, and I also added a color filter to make the whole image
a little bit darker. The next option was the one with the color dodge or
the burnt feeling. I ended up adding a
white frame to this one just to create a
polaroid feeling. Here the layout
is pretty simple, I just wanted to image itself
to be the focal point. Then finally we have the
design with the illustration. Here, I actually ended up adding a little bit of a detail
that we had initially, and I made the shapes inside of the guitar a
little bit more prominent. I also worked a little
bit with the hierarchy, so I made the dates. How do you see vertically,
not horizontally? I also made the sizing of certain things a
little bit different, so these were the
three fun designs that I ended up
showing my clients, and they were showed
on the mockups. You'll be able to see it how it was gonna
be in a setting. The client shows the
illustration 1 and not being rolled out in
their different events.
7. Printing from InDesign: [MUSIC] Now your client has approved your design
and you're ready to move it into Adobe
InDesign for print. What I'm going to do now is take you through how I go from Adobe Illustrator to creating
this design in InDesign. But the same thing
works if you're designing straight
from InDesign. I'll show you how
to probably take an illustration that's
created in Adobe Illustrator, and moving it into InDesign. The first thing we're going
to do is we're going to be setting up the document
in Adobe InDesign, and here, it's working
in millimeters, which I'm quite comfortable
when it comes to print, and I'm going to put this as one page because it's going
to be a one-sided poster. This is the dimension
for an A4 poster, which is what we're
going to create now, and here is the margin. This is going to show
a little bit about that safe zone that we've
been talking about before. If you keep going down, you'll also be able to put the bleed. In this case, I'm going to put five millimeters because that's the standard that my
client has asked for. I'm going to click ''Creates'', and here we have the
documents setup. If you're new to InDesign, what you'll see here is, this zone here between the edge and the inside
with some purple line, that is basically the safe zone. When you're printing
and it's getting cut, it could be that a
little bit of this edge could be cut a little further
out or a little further in. You just want to make
sure that any texts or important information is
placed inside of this line. The red line shows bleed. This will be an area that it can also be affected
by how it's cut. You'll make sure that
nothing is going to be actually be
placed here except for, let's say the background color, or if you're doing
an illustration that's spanning the whole width, you might be able to
put that all the way. In this case, what
we're going to do first is just put the background. I'm just going to place a box that's going to span at least as wide as the outside
here where the bleed is, and I'm just going to
go and grab the color from my illustrator documents. In this case, you can grab
the hex code and it will translate pretty
well into a CMYK. [MUSIC] I'm going to be
placing all the texts in here, and I'm going to put in
things like the logo, the sponsors, and
anything else as images. That takes us to the first thing I want
to show you which is, how to take this illustration and create it as an image that
we can add into InDesign. What I'm going to do
is I'm just going to go and copy this, and then we're going to
go to our file here, paste it in, and we're
going to export it. What we're going to do is
we're going to save it as the format that we're
going to be using, which is Adobe PDF. We're going to call
this tree illustration , and then we'll Save it. What we're going to do
here, we're going to put it as high-quality print that will make sure that this is optimized for InDesign later on. You can just straight copy it
and paste it into InDesign. I could do this, where
I'm copying this and I'm just straight
pasting it into InDesign. It does work and sometimes
there's no issue, but in my experience, it can cause issues
when you're printing, and it can also be that it
becomes difficult to edit when you're coming back to
document after some time. I think it's always
a better idea to just export it as an image, and then you can
always embed it. We're just going to go and grab this image and
drag it into here. [MUSIC] Now we're going to place it roughly where
we think that we want it, and we can always adjust
it a little bit later. I'm thinking maybe
something this, making sure that we think about how the
bleed is affected. In this case, I'm not
too worried about the outer edges because if a little bit of it gets cut off it's not too big of a deal. I'm okay placing it a
little bit outside. Then we're going to
grab the logo and the text and just start
adding everything in. As we can see, I'm
always looking at this area and I'm
using it as a guide. I think it's always a
nice thing to be able to have an alignment
in your design. That's going to help
me when I'm creating all of the different
areas of the design. [MUSIC] Now our design is ready in Adobe InDesign and it's time
to export it for print. There are a couple
of different things that are good to think about. I'll just show you that
on my screen right now. The first thing we want to do is to export this document, and you're going to do
this under ''Export'', and we want to make sure
it's not set as interactive, but rather as print. Then we want to make sure
we have a clear name for our design and then we
just click ''Save''. We're going to get this box, and here's what we want
to have a look at. This already say
high-quality print, which is exactly what we want. But we want to go through
these different ones and have a little bit of a look. The first one we're
going to have a look at is the bleed settings. I'm sorry, this is in Swedish, but I hope me translating
can be helpful. You can just choose to use
the document bleed settings. In this case it's
five millimeters, which is exactly what I want because that's how
I've been designing. You can also hear if
your printer has asked for different things like
showing the color profiles, you can embed that here as well. The next one we
want to have a look at is the one called advanced. Because here we are going to be dealing with the typography. Because the type
that you have in the poster is actually
written texts, you want to make sure that basically it's the
same as when you go into Adobe Illustrator and
you're expanding the text. What you're going to do here, is you're going
to put this at 0, and I know that mine
seem a little abstract, but that basically means
that it's embedding all of the typefaces that
are in this document. The next thing I'd like to
do is just have a look at the summary because this has
a little warning section, and if there's anything like really low resolution images, or anything else that could
be a problem for the print, it will come up here
as a little warning. The only thing you
have to do after that is just click ''Export''
and you're done.
8. Class Project & Thank You: [MUSIC] Now it's your turn. Take everything you learned in this class and anything
that inspires you in the music industry and create your very own music
event poster. I'm really excited
to see what you're creating and keep in mind
the different information, the hierarchy that we want
to create with our design. You can share sketches,
full designs, or even something
placed on a mock-up and you just make sure
to place it in the projects tab underneath. I'm also here, if you
have any questions, you can go into discussion
and ask me anything about the process or anything that you feeling a
little bit unsure about. Thank you so much for
taking this class. I look forward to
seeing your projects.
 Malin Lernhammar, Designer and teacher