Transcripts
1. Class intro: [MUSIC] Hi and welcome to this Skillshare
class on how to design your very own packaging. All the way from working
with a client on the brief, to working with a printer and getting the finished
product done. My name is Maulin and
I worked as a brand and print designer for
about seven years now. I really love packaging because it's such a great
opportunity to be able to be really creative and come
up not only with one product, but different lines of products
and seasonal products, and you can use illustration, you can use layout, and there's so much
great collaboration with both clients
and the printer. Because there's a
lot of moving parts, things like certifications
and requirements, and also just a lot of things
that you usually want to be able to fit in a beautiful
way on the packaging. I want to take you
through a couple of different stages in this course. The very first stage is
looking at their requirements. We're going to be talking
to our clients to find out exactly their
dimensions of the product. Maybe get dye lines
from the printer. We're going to talk about the goals of the
product, the audience, and everything that
we need to know to design this beautiful
and effective packaging. Next up, we're going to go into sketching and
we're going to work first in Procreate to
sketch out different ideas, and then we're
going to move on to finalize the design
in Adobe Illustrator. Once we have the final design, we're going to put the
ideas and concepts onto different beautiful mock-ups
to show it to our client. Finally, we're going to use the finalized design
to collaborate with a printer and create the design that is going to be
the finished products. Along the way, I'm
going to be sharing tips and tricks that
I've learned to make sure that the packaging
stands out on the shelf and stands
out from competitors. The chest project for
this class will be to create your very own label, so you can share a
sketch or maybe even a finalized mock-up of the
packaging that you're designing. I'm super excited to see everything that you're
going to come up with, and I really look forward
to seeing you in class. [MUSIC]
2. Requirements: [MUSIC] The absolute first thing
that I really like to do when I design any type of
packaging is just to really get to know the product that's going to be
inside of the packaging. If it's a tea, I might like to try the tea
to see how it tastes and get an idea of the
experience of the tea. If it's a kid's product, maybe you'd like to see
the product itself, look at the shapes of it, and how that's creating a mood or the type of branding that
you want to tie into it. Getting to know the product
and getting a bit more familiar both with the target
audience of the product, and also it's important
to think about how it fits in with
the existing brand. You'll want to ask
your client if this will be part of an
existing line of products or if this is something that is
going to be part of a completely new line. If it's part of something
that's existing, usually you have a
lot more parameters for the way it needs to look, the way it needs to function, the size of the packaging,
and that type of stuff. If it's a completely new
line, you, of course, have a lot more freedom and can create something that
feels a lot more unique. You'll also want to find
out if this is going to be a standalone product or if it's going to be
what's called a skew, which is one product
in a line of products. Sometimes, for example, you might be creating different flavors for
the same products. Let's say you're doing
a flavored water. Maybe you're doing lemon, strawberry, and
pear, for example. Maybe those are different
flavors that you need to consider how that's going
to work on the packaging. You might have the same layout, but then you might have different ingredients to
display on the packaging. Next up, we need to get
all the information that needs to fit on the
packaging from the clients. If you're collaborating with a copywriter or
something like that, then your clients
still needs to provide that information to
the copywriter so they can write the actual copy or maybe your client
is providing it. This is including
things like the text. It might include logos,
certifications, barcodes, QR codes, ingredient lists, and anything else that
you need to have. For a lot of
industries, especially when it comes to food products, there's a lot of information
that will want to include that have to do
with health and safety, so like allergens and
ingredient lists. There's a lot of specific formatting that comes
along with this. What's really important to
do is you'll have to look at the different countries where the product is going to be sold, and you'll have to look at what those requirements are
for that specific area. For example, in some
countries like the UK, they have specific requirements around what's called
a line of sight. Meaning that, for example, if you're looking at
the ingredient list, you'll also need to
at the same time be able to know how
much of the product is in the packaging in the same eyesight
or line of sight. That means that
when you're looking at it and seeing that it's let's say 100 calories
per 100 grams, you need to know, is it 500 grams or 200
grams in the package? That type of stuff
is really important to get familiar with. There's a lot of information of that on basically like.gov, basic websites, or packaging labeling requirement
websites for each country. Sometimes your client might already be super familiar with this and so you just need to ask what the requirements are, both in terms of
what information needs to go there
and what information needs to be put together
or in different layouts. Next up, I think it's really
important to also think about the competitors
of this product. Because what we want to do
is we want to be able to stand out on the shelf and be something
that's really visible. Basically, stand out from
the other products so that it's easy for someone to pick it for all the right reasons. This is also great because
you'll be able to see what type of certifications
that they're using, what type of information that they are choosing to highlight, and that can be a
good indication of what the consumers
are looking for. I like to start by looking
at the competitors and their labeled designs
and then also go to different stores where
the product will be sold. You can ask your client where
the product will be sold. This also work just as well if they are
selling the product digitally because if they are selling the products
in a digital store, there's technically
still storefronts. You can just go to
that website and go on the page where
those products would be featured and you can look at what the designs
look like there. This is something
that is sometimes referred to as a
shelf space analysis, so basically just looking at other products that are sharing the shelf space and trying to figure out how can
we stand apart, how can we feature the most
important information, and it will also give
you a little bit of an idea of how much of the packaging face basically is actually visible when
you see it on the shelf. Because you can put beautiful things all
around the packaging, but there will be that face of the label that someone
will see immediately. That's really important to get all the key
information there. The last thing we want to do in this research stage
is to ask the client for what's called dielines or basically just the requirements
with specifications for, for example, the dimensions
of the packaging, if there's different
sides to it, how they are overlapping, there might be zones where
you're not allowed to put designs because they will glue them together, for example. This is something that
the printer will have. Either the client might
have already gotten it from the printer and they
can pass it on to you or they might just have, if it's a very simple label like a wraparound label on a bottle, they might just have
the dimensions and maybe that it should be this
much bleed, for example. Make sure that you have the exact dimensions
and requirements and preferably a dieline document
from the printer itself. Because this will
help you figure out exactly what space you have to work with before you
start sketching. Sometimes these documents can
be a little bit complex and every printer is
really different in my experience with how
they choose to do it. Some have a PDF that you can literally just place
the design in. Some of them want you to create a document with the
right specifications. I think it's always a
really good idea to get a direct contact person or at least the contact information from your client to the printer. Instead of it being a game of telephone between you and
the client and the printer, if you have any questions, you can call up the printer, you can ask them questions, and you can look at the document
together to figure out, this will be upside down and this will be folded
over or whatever the requirements are just so that it's super clear
before you start designing.
3. Sketching your ideas: [MUSIC] Great. Now that we know all the
requirements for the project, what we're going to
do is we're going to start just looking
at the space that we have to work with and
we're going to start blocking out the information
that we want to include. The one that I'm going
to be sketching on today is a drink packaging. It's going to be basically
a wraparound label with a little bit of space all around the edges as a safe zone where we don't
want to be printing. There's going to be a zone
on the left-hand side, which is basically where
it's going to be glued over. We want to keep
that empty as well. The first thing
I'd like to do is just to open Procreate
where I'm sketching. But you could do
this on paper or in any other program that you
feel comfortable with. I like to not work straight
in Adobe Illustrator just because I feel like I'm trying to make it
too perfect right away. I'm basically trying to
just get a rough sketch of all the layouts and
what's going to look good. I think it's good to
work at scale because if you start working in a
document that's way bigger, then you might try to
fit in a lot more stuff than can actually work on the scale that
you're working out. Try to keep it roughly
at the dimensions that you'll want to actually
have the final design in. I just tried to roughly
put out things like, where is the logo going to go, what is the field of view, and what information can fit
when you see on the shelf. Then I like to put in any
information of things like the product name or it could be the flavor
of the products. I like to add in any
information that the client has asked to
have on the front first. Once I've done the
front of the label, then I can start to block out information for things
like ingredients or instructions or any
other information that you want to put more
on the back of the label. We also want to make sure that we're putting space
for things like barcodes and QR codes
and social media. Most products also
require you to put the address of the company, so that if they have
questions about the product, they can contact the company. That's also something
that we'll want to make sure we leave space for. In some cases, your
client might also have information that's
a little bit more about their business or
their mission or something a bit quirky
to build personality. In that case, you also need
to block out space for this. I always like to try a couple of different formats
and a couple of different concepts just to see how we can resolve
different things. One of my favorite
things to do is once you know where all
the information can fit, we can start to think
about ways to bring in the brand personality
and the feeling of the flavors or the
product itself. That's a way that we
can bring, for example, instead of just having a
straight up bad we and could make like a leaf into a badge, or we could create these
little interactions that just feel a bit more
unique and that bring a lot of personality
to the packaging. This is also a
great stage to put things like if you have
a limited edition and people will be either
stamping or signing the packaging for
which product it is, like one out of 100 or
something like that. It's also a good idea to really start thinking about if there's anything that you'll
want to bring out as a feature of the product. Maybe it's really healthy. Maybe it is waterproof. Maybe you have something
else that you'll want to highlight on the front
of the packaging. As we're doing this, we'll
want to really keep in mind the parameters of
the research that we did. Basically, the shelf
space analysis and talking to the client about what's important for them. For this design, I'm creating
two different layouts. For one of them, the
illustration is a lot more complex and we have a
lot more detail in it. That means that the graphics and the information needs to be spaced a little bit differently. One of them, we're going
to be having a very clean, simple, big graphic shapes
of the fruit and the leaves. This is just to start bringing in some slightly
different layouts in the packaging and play around with the design and the options. Great. Now that we have
the different sketches, my next step is
always to check with a client and see which of the
sketches that they prefer. Sometimes it can be
difficult for clients to visualize what the finished product
is going to look like. But sometimes it can just
be a good idea to get their gut reaction
or a little bit of feedback before you move
forward and put all that work into creating this
custom illustration or custom packaging. I think it can be a
good idea to check with your clients on the
sketching stage.
4. Creating your design: Great. Now that we
have our sketches from procreate or if you
have it on paper, we're going to bring it
into Illustrator and start building out the
finalized design. Depending on the deadlines and the parameters that you've
got from the printer, you might be either opening a PDF document in
Adobe Illustrator or you might be just
setting up your document in Illustrator with the
correct print settings, and of course we want
to make sure that we keep it CMYK color profile. RGB, is used for digital
and CMYK is used for print. That's really important
because the colors will appear a little bit
different in CMYK. They will always be
a little bit less saturated compared to RGB. This is something
that, of course, it's really sad if you're
creating a design, and you're showing
it to the client and it's designed in RGB and then you have to
show them a design that's altered afterwards, after they approved it. Make sure you're working in the right color
settings to begin with. When I have this, I start to do all of the text
boxes to start with, because for me it's
nice to make sure that I'm able to put the texts
in the correct size, and fit everything as
it was intending it to. Sometimes clients have an
idea of a lot of texts, and we might have to
get back to them and say that it's too much and
it won't fit the design. This is because
most countries have packaging requirements for
inclusivity, which is great. A lot of the times
the texts has to be at least four
millimeters tall, and of course it's always
better if it's a little bit bigger just to make sure
that nothing is too small. This is typically only applying
to crucial information. If you're adding
anything that is, let's say company information about their mission or something that isn't required
information on packaging, you might be able to get
away with a smaller texts. But it's always a
good idea, I think, to start adding in the text and making sure that
it's not too small. You'll also want to make
sure you have plenty of space for things like
QR codes and barcodes. With barcodes, you can
actually have a lot of fun, but it's important to
follow some good standards. Basically with barcodes,
what you'll want to think about is you'll need to have that white
background all the time or you're
able to remove that as long as it's a high
contrast between the black usually barcode
and the background. The important thing
for a barcode is that spacing between
the different lines. Sometimes you might
see examples of how the barcode
shape is changed. Maybe it looks like a mountain
or something at the top. Usually the shape
itself can be altered a little bit as
long as the spacing between those lines
is consistent because that's what the reader is checking in the barcode. You'll also want
to make sure that the numbers that you have
are clear to read and that they are not being
obstructed by any part of your design or being placed on something where it becomes
really low contrast. The same thing goes
for a QR code. With a QR code, you really want to keep that
white boundary around it, and you'll really
want to make sure that the different corners. If you look at a QR code, you have those bigger corners, those blocks needs to be intact. QR codes are a little
bit more robust in my experience than a barcode. But you still want to make sure both that you're testing it, that your client is
testing that it's working, and that you're not messing
with the contrast or the minimum sizing too much. Great. Once we have all of
this information put in, then we can start
putting in our designs, and playing around
with color and making sure that everything is working. We really want to keep
in mind here again, I like to put a little bit of some different guides
up so that I can see which part of the design will be visible on the shelf. Most of the time, let's say
you have a square packaging, you have the front of the label, and then you have the sides. You want to keep in mind what is going to be
visible on the front. If it's a wraparound label, you need to really
think about how much of it is going to be visible
as it's wrapping around. You might have to test that on a bottle and
you might have to measure it if your client
has finished bottle. On some guidelines, you'll also have those different
specifications, and they've already put in grids and guides, which
is super helpful. Sometimes if you have different products
in the same line, like maybe you're designing. In this case, we
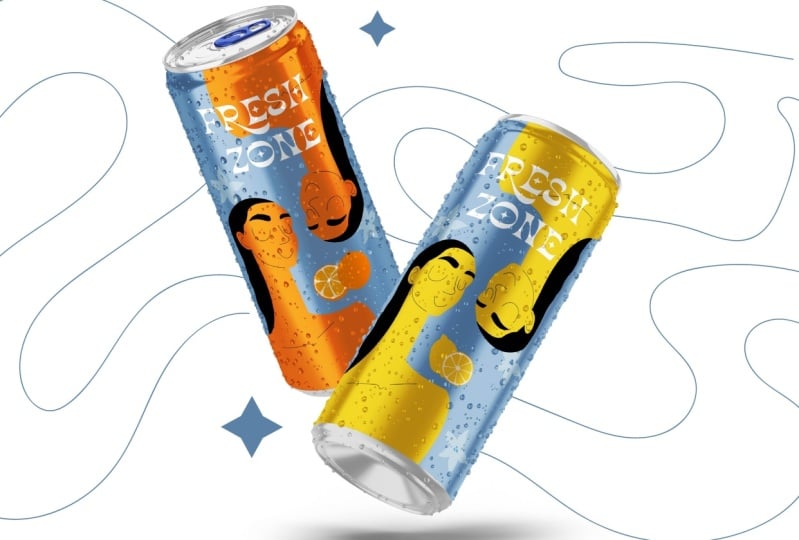
have two flavors, strawberry and lemon and lime. Then I like to also design
them basically in parallel. Maybe I do the
complete layout first, and then I transfer that and just design the elements
that are changing, changing the colors and
the ingredients that are going to be on
the other packaging. That way you're making
sure that you're getting a really
consistent look, and I'd like to put them next to each other
when I'm testing out different colors
just to make sure that not only do they
look really nice, stand alone, but they also look really nice
side-by-side on shelf. Something that is usually
really important is to adhere to the brand guide regarding the logo
of the company. For example, you
might want to do a really dark package design and then how the logo in white. If that's not something
that is clear that the client is allowing
in their brand guide, you want just want to check with them to make sure that they don't have anything
against the logo being used in
white, for example. The next step, once you have
your finished design and you're happy with the color,
the layout illustration, everything you're
including is to put on a mockup and to show it to
the client for sign-off. I always like to show a basically the complete
flat version where you have all of the
delights written out, and everything, but that's really good for the
client to prove it. But I think it's really important to have it
on a mockup where they can really feel how the product is going
to look at the end. I don't think it's
a good idea to only show the mockup
because then there might be some confusion around
what the back looks like or just the complete
overall layout. I really like to include both. When it comes to mockups, there are so many
great places that do really common product mockups as you can go to places
like yellow images, Creative Market, Envato
Elements for example, they all have really
great mockups. But if you can't find one, you can either create
your own by, for example, taking a picture of the products bottle or products packaging that
you're going to be using, and then using Photoshop to
put that design onto it. If that feels too complicated, what you can do is also through
sites like yellow images, if you have a subscription, you can actually ask them to create a mockup
specifically for you. Then what you'll
do is you'll send a picture of the container that the packaging will be on and you'll show them
where the labor will go. If it's on the whole
packaging, then that's easy. If it's just part of it
like a wraparound label, you'll need to give them
those specifications. Then they can create a
mockup for you that you can just put on your design too. This is great, especially if you want to have effects like water drops or anything
else like that, that you want to make part
of your mockup to make it feel more realistic
or more on rent.
5. Exporting for print: [MUSIC] Now your client has
approved your design, and you're finished, and
you're ready to export it. What I'd like to do is
just to start by checking with the printer how they
want the document prepared. Some people want to have the
color profiles included, some people just care about
the bleed being correct, some people have very
specific requirements, but overall it's
usually that you'll prepare something
like a PDF that's high-quality print settings exported from Adobe Illustrator. You'll basically go
''File'' and then you'll go ''Save As,'' and then you'll choose the option ''Adobe
PDF,'' and then you'll save it. Then you will put here
''High-quality print.'' There's a lot of
different options and settings that you can do, but I like to do the Keep illustrator
editing capabilities. You'll also want to
make sure that if you have any images
in the document, they are properly embedded. If you do any typefaces
which [LAUGHTER] of course you're going to be doing texts and things like that, you'll want to make sure
that the text is expanded, which means that if
the printer opens the document they will not have to have those
different typefaces, because otherwise
it will start being default typefaces or start messing with your
design in general. For all the typefaces, and all the line work, and things like that you, if have underscores, or things, or line icons, make sure you are expanding everything like that, and then make sure you're embedding all the
different photos. As you're exporting
the document, I think it's also really
important to check the little summary because that area will show you if
there are any warnings. In the Warnings it could for example tell you
that the document is being exported with
low resolution images, which then is something
that you'll need to go and check up
on your settings. It's just a good place to catch little things in this
little Boarding section. Once you prepared this document according to the
printers requirements, I think it's always
a good idea to first send it to the printer and the client together in
an email and make sure that warn your client
assigning off on the design. They have proofread
it and they have checked that everything
is just as they like it. You also want to make
sure that the printer is either providing
some press proof. Basically making sure that
they are showing that this is what the product will or the packaging would look
like once it's printed, and that you have a full
understanding from everyone involved that this is correct and this is how you're
intending it to be. There can sometimes be
a little confusions or maybe something that you
thought was going to be turned horizontally, should be turned vertically, or upside down, or
something, and so. It can also be a good idea
to just check those things together and make sure
everyone's on the same pitch. I highly recommend doing something about your
contract for this, and this is something
that has made me feel a lot calmer even though
we never had to use it. That's just saying that
when there's printing involved if the client has
signed off on the design, once that is all
done then you're not responsible for what's going
on in the printing process. If the printer makes a mistake, if there's some miscommunication once your client has
signed off on the design, maybe they made a spelling
mistake that you didn't catch and they didn't catch
but they signed off on it, it's not on you to let us say compensate them for
that mistake and printing. I think it's a good class
to have in your contract that once your client has
signed off on the design; that's it, your work is done, and that's someone
else's responsibility.
6. Class project: [MUSIC] Amazing. That was quite a
lot of information, but I hope that you're really
excited to be designing packaging and that you're excited to get started
on the class project. The class project is for you
to either provide a sketch or maybe even a full mock-up of your own packaging design. You can either do something that you're doing for
a client project or just something
that you're doing as a personal project. It can be any product, any type of packaging, whatever you're
excited to work on. If you have any
questions at all, I always answer the
comments and the questions, so you can join in the
discussion tab below. I'm really excited to see your projects and
your package designs. Thank you so much
for taking part in this class and good luck
with your projects.
 Malin Lernhammar, Designer and teacher