Transcripts
1. Introduction: Hello, and welcome to my studio. My name is Ido Agassi, and today I want to
show you how to make what seems to be a
regular envelope, but with a twist. This is quite simple to make. It would take us
around 5 minutes, and I want to teach you
how to combine with different leftover
materials that you have saved exactly for
these occasions.
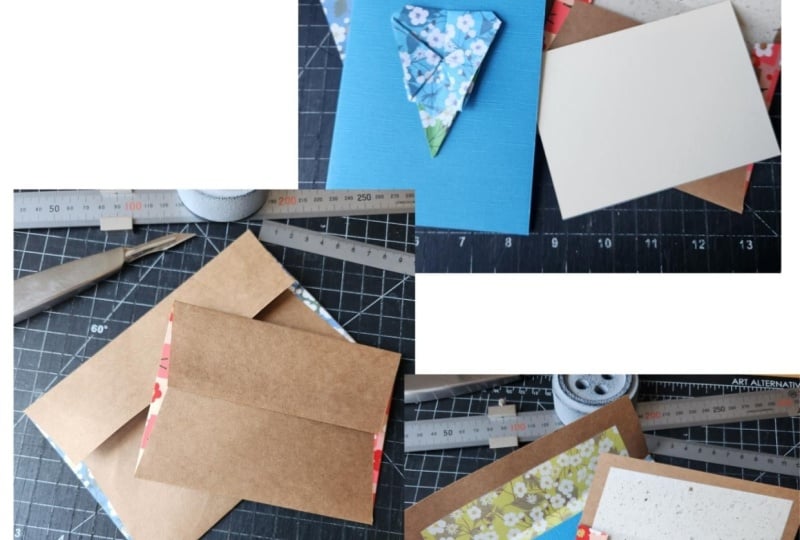
2. Tools & Materials: So for this tutorial, what we would need is paper around A four size
or letter size. This is 160 gram, but you can go
thinner or thicker. I would really suggest
that you have your card that goes inside or
the size of the card. You would need a
ruler a bone folder, but you can also use the back of a spoon, or your fingernails. You would need a craft knife or if you prefer to
work with scissors. And to mark, you can use a pencil or just a
push pin or a needle. For gluing, we would
use double sided tape, which is much easier to
work with or glue stick, and you can work with PVA, white glue, what I use the most. So with an idea in
mind, let's bind, I'll clear everything and
we will start working.
3. Main Class Envelope with a Twist: I'll bring my paper and locate it on the table.
I'll bring my card. It is always best to use
the card that you want to put inside so you can
calculate properly. And because the side
of the card can vary, I want to show you the formula. The top side is going to
be 5 centimeters or 2 ". Then I have an allowance of
around half a centimeter, so the fold won't go
up until the card. The bottom side is 8
centimeters or 3 ". And the side flaps
are going to be 2 centimeters or three
quarters of an inch. So I'll move the card
aside and I'll bring my ruler and my bone folder. And what I want to do is fold 2 centimeters
from the edge. I can line it up on my table. I can take something
like this ruler, which is 2 centimeters. Of course, you can just mark
2 centimeters with a pencil, and I'm going to use my weight, which is two centimeter thick, and I'm going to make a crease. If you don't know
what creasing is, I would link a video about
how to make creases, and I'm going to
fold it to itself and then fold
completely first with my hand and then with
the bone folder. Let's do the other side. Now I'm going to line
it up on my table, show another technique,
and just make a crease. Lift it and bring
it to the ruler. I'm not letting go of
the ruler until I'm finished and then
fold it to itself. Now, let's do the bottom flap. I want 8 centimeters or 3 ". Folding it to the ruler
and folding it completely. And my last fold is 5
centimeters or 2 ". I would line it up here. But again, you can also just take a ruler and
mark 5 centimeters, and that would give you the mark and fold it completely. Now what I'm going to do
is cut these four parts. So I'm going to take my ruler. Look that I'm lifting to
see where the fold is. And from this fold, I'm going to cut one and on top, two, and I'm going to cut
this side, one and two. Let's cut the rest I have here. One, two, Great. Now I'm going to mark 3
millimeters from the edge here and just cut with an angle from the
beginning to that point, you can also just use scissors to cut it with
a bit of an angle. Now what we have to do
is fold this inside, fold this one, and this on top. And I want to show
you a trick how to have the angles the
same place each time. What I'm going to do is bring a piece of card
or board that you won't damage the front
side of the envelope. I'm going to close it, close the bottom side
and the top side. Now I'll take my ruler, and I'm going to measure 7 millimeters from the top
side and from the bottom side. I'll take my push pin, and I'm going to mark
the location here. Now I'm going to open it. Put my ruler from the
beginning line here, up until my mark, and I'm going to cut. Now I'm going to do
it on the upper side, from my mark until
where it's zero here and I'm going to cut. Let's do that to the other side. Cut. And on the upper side from the mark we have
up until here, and cut. Great. Now, when I'm
going to close it, I'll have the location
exactly in place each time. So this is a very nice trick. All we have left
to do is glue it. So I'll just take
my glue and run it one line here
and one line here. Not a lot of glue. You can use also double sided tape or
a glue stick and connect. Let me work with the bone folder and the
envelope is finished, but I want to go back
a couple of seconds before I connected it together and show you how you
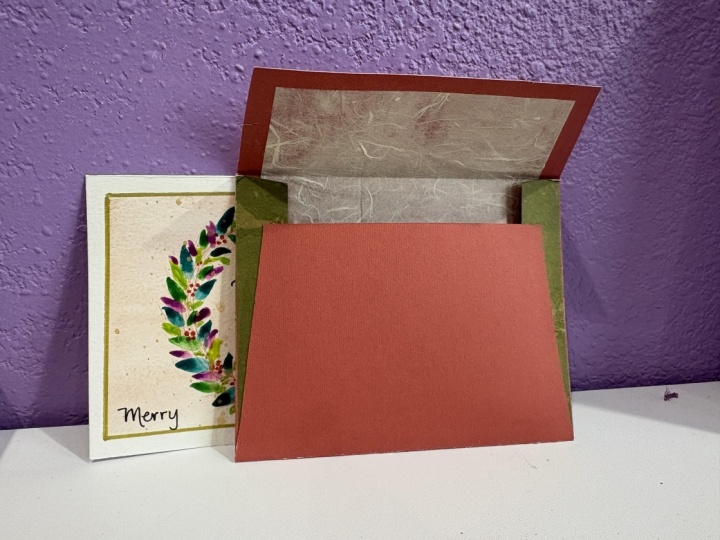
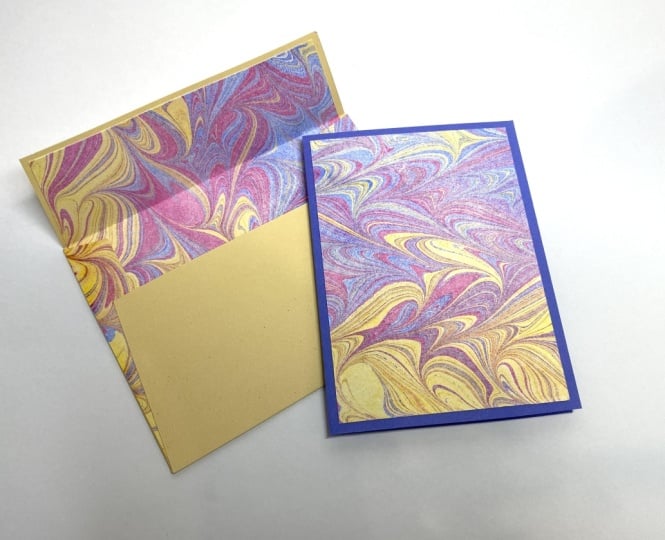
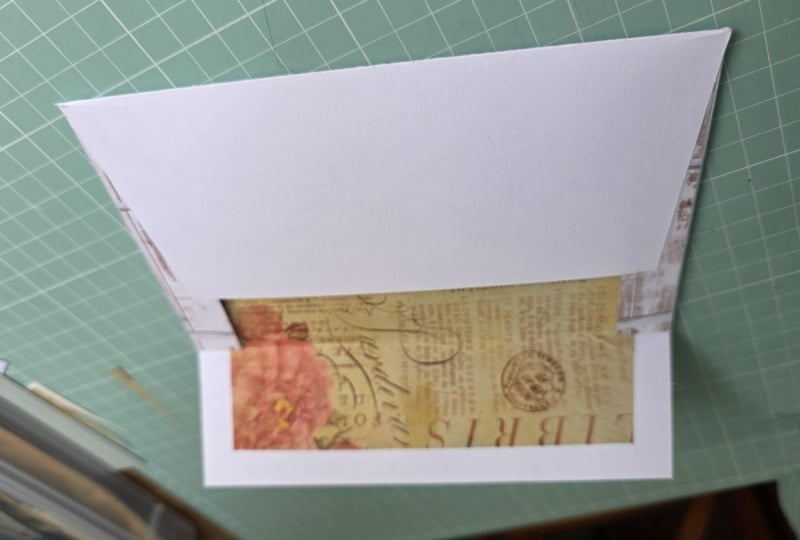
can upgrade your envelope. Now, let's upgrade it. What I would do I have leftover
material from a project. I save it for years, and now I have a
reason to use it. What I'm going to
do is I'm going to glue just the flap here. Just up until the end. Now what I'm going to do is
take the piece of paper, and I'm going to bring it
up until the fold here. See that it's glued properly. I'll flip it over, see that it looks good here
when I fold it. I'll use my bone folder a bit. Of course, you can also
use double sided tape. It would work nicely also. I'll take the waste paper out. Take another piece of paper, bring it exactly to the fold. S it's nice and located good. Let me fold it and see that it comes exactly to the point. I'll work with a bone folder. And now very easily, I'm just taking my knife and going like the
white flap inside. I can use my ruler and cut
it according to my flaps. And the short one here. Now, what I want to
do is line inside. I cut a paper to the
width of the top pocket. So this is around
15 centimeters. I have more or less the
same gap on top and bottom. This part, you don't
need it up until the lower side because
this is hiding inside, so you need just
a little bit more than the eight centimeter
or three inch fold. Now I want to show you a trick. How can you make the angle
of what we cut already? So what I'm going to do
is put this on the table. Align it with the envelope until this is exactly in place, and this is exactly in place. I'll take my ruler and a knife, and I'm going to cut according
to the envelope angle. Now I'm saving this. Look, I'm taking this piece, flipping it over
to the other side. I'll flip it like this
so it won't move. I want it exactly
the same place, and I'm going to cut. Now I have the exact
angle on both sides. Let me put it inside
the envelope. I'm going to align
it so it would look straight on three sides. I'll put a piece of
weight and I'm going to fold this piece inside so
it would have a nice fold. Now I'll take a piece
of waste paper. I'll bring my glue and just
glue only the top side. We don't need the lower side. I'm going to lift it, take the waste paper out and just connect it see
everything is aligned. Okay, let's leave this loose. It would help the things go inside the
envelope or outside. And now, all we
have left to do is fold this and close it here. I'll take my glue in just a small amount
on the line here. Let's put it on the line here. Close the flaps and then
close the envelope, work a bit with the bone folder. And we have ourselves
a beautiful envelope. Look, how amazing. Let's try and put a card inside according to
our measurements. Fits perfectly, and I love that it connects exactly in place. I would love to see
what you have made with your scrap materials and how
you upgraded your envelope. So please share it with
us in the class projects. Also, if you can take the
time to write a review, that would help tremendously. So thank you for watching
and for being here, and I will see you
in my next class.
 Ido Agassi, Book Artist