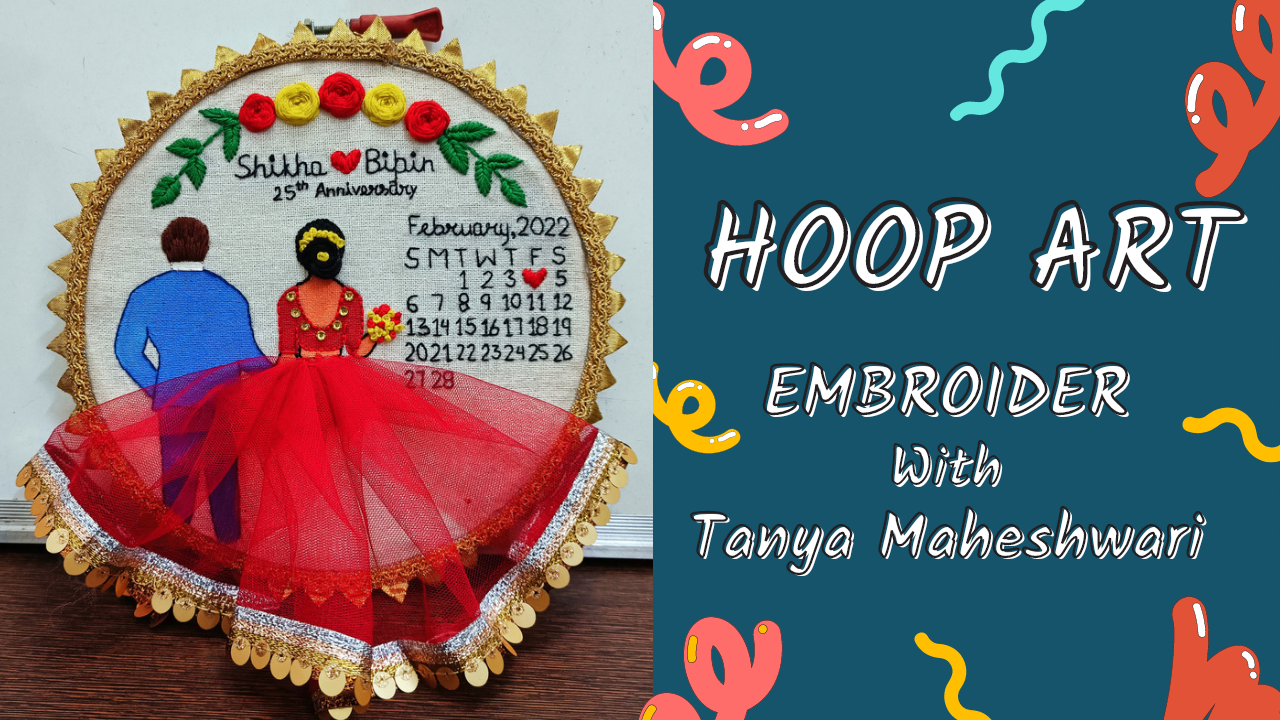
Transcripts
1. Introduction: Hi everyone. A Bombay them do my this. Who bought in grocery class? I'm done. And now it does graph. And then educate them. This class. I'm gonna beat you how to make the SciPy date
and drag regard. But this, I find shale, how to fix clues and
the embroidery hoop. Then how do we template for
those saved the big guy. The most important part of this, that is how to embroider this class and
share lots of pets and techniques that you
can use to make Yochai. The next video, I
let you know what materials you are going
to need for this class. In the end of this class, there will be a fun class
project work for you. Come join, and
let's get started.
2. Material Needed: For this class, you
are going to need an embroidery hoop of
about ten or 12 inches. Byte, byte gotten glued noodles, different color of losses, read or any other different color blue piece for this God of the bright acrylic
Carlos, paintbrush, CSO, decorative leaves or any
other decorative item, glue gun on that said, these are the materials that you are going to need to
make the scarred. Now, let's us start making this safety date
card. Stay tuned.
3. Fitting Cloth in Hoop: So to begin, first of all, we will fix the glute
in the embroidery hoop that simply just open
this as grew from. For that, hold the
note like this. Start loosening.
These grew slowly. That's it. Now you have two loops. One with not any screw, we're just bigger one
another without them, which is smaller
than the first one. Now what do you have to do is stretch your glutes
like this and put these smaller loop
which has no nodes then screw below the
clue, like I did. Make sure you leave at least three to
four centimeters load as the margin folded, extract load our deep back to security glute
permanently with D who? After this, take another loop
which is the bigger one, which has not any screw, and place it over the
first one like this. Make sure you have
loosen it up earlier so that it gets a bit over
the first one nicely. Once the bigger loop getWidth
over the smaller one, it will look like this. Now, what do you have to do
is type this group for that. Again, hold it from the bolt video one hand and
tidy skew video another hand, just like I am doing. If you don't I this Q, you'll not be able to get
the nice stretched glue two, which is important
in embroidery. You can see blue tasks where
did in the loop nicely. Years after that stretch your glutes slightly
from all the sides. And that's it. Now, what do you have to do is cut the extract load right now, or you can cut it later. It's totally up to you. As leaders will fix the
glute that we lift as the margin to
permanently security glued with the embroidery hoop. This glute fixing part is done. Now in the next video, we will draw our safety
date template on it. See you in the next video.
4. Template Designing: In the previous video, you have learned how to predict glued in the
embroidery hoop. Now, in this video, we will learn to draw
the template on it. And for that, you can download the reference picture from
the resource section. Did your pencil. And first of all, we are going to
draw this part of our template here since we are
going to drive your flaws. So if a dot simply draw circles, notice I'm not using
sharp pointed tip pens. Instead, I'm using slightly
blending pencil and make sure you directly draw where
exactly you want to embroider your flow
through drawings. So good. Divide that circle
into five parts with the help of slightly curved
to represent petals. You can also use water-soluble pen in place
of pencil if you want to. Okay, after dividing the circle, draw two more sets. Circles here at the load
side of the first one. However, bit smaller
than the former one. Once done with this side, move on to the right side and
similarly draw two circles here and try to draw them equal
in size as the left side. So goods videos, it
is not necessary that the circle should have to read SEC copy of the left ones. That's okay if they
are slightly change. Okay, then let's draw
some leaves here. By the end of the last
good id lived side. I'm going to draw five years. It's totally up to you. You can draw four
leaves into pairs, then one at the top. Or you can draw two
leaves in one pair and then release alternately. One's done with this side, move on to the right side and similarly draw equal
number of leaves. And do not forget to follow the same pattern as you
did on the left side. Yes. While drawing do not apply so much pressure
on the glute. That's the leaf spot is done. No divide the other four
circles and five bars as well, like we divided D plus1. You can draw more circles
for the flowers and even you can draw more lives near deep loss if you want to. It's totally up to you. You can modify the upper
part as by your likings. With that, this part
of template is done. Now let's move on
to the another part and which we'll
write name for whom. So I will, we are making it. For example. I'm writing Chicago name of
the first part now, Albright. And then I'm gonna
write weapon name of the second partner or groom
are in-between their name. I'm going to draw us to symbolize bond and
love between them. You can also write words
in place of drawing hurt. When it comes to writing. You can write names and block letters are
in cursive writing. It's totally up to you. It is just a demo. You can modify it as
per your lighting. With those part of
template is also ready. Now let us move on
to the another part in which we will draw
groom and the bride. So let us start with the groom. As I'm going to draw
room at the left side. Dot draw a line like this. Then draw two
slightly curved lines from both the ends
of default my line. And once you are done
with that joined board, these lines with the help of
horizontal line like this. This is the height of the group. Then draw two small lines. Again, join them with
horizontal line. Just like this. This is the color of the
shirt that room has worn. Then draw two slightly
Eastland lines when I both left and right
side from the color. After this body, draw a
vertical slant line from here, just like I am drawing. Then draw another landline
for below the elbow part. Yes. Just like this. Draw two more lines, just like me to give
the proper shape. Now, draw one small slant
line from here, like this. I'm from its ending point, drove by most land
line like this to make the torso know
the right side. First of all, draw
a vertical line, then from its ending point, draw us landline for the arm. You can notice that this side, I'm not drawing all these
lines, lines as haha, I'm trying to illustrate
that left pane is in the pocket with the right room is holding the hand of a spark. No. Once you are done with the join it from the
bottom to complete the code and then draw a W like structure for
the trouser of the group. Now, it is time to draw the
good or the right bar dot. Simply copy the way I
am drawing FASTA file. I'm drawing the above
part of the body. And then we'll move
on to the lower part. You can draw it in
your way as good. I'm just copying the
picture that you can see at the top left
side of this screen. I hope you have
already downloaded this picture from the
resource section, as I have asked you in the
starting of this video. No draws landlines for the
left-hand of the good to illustrate that she's holding the right hand of the
boy or the group. When it comes to the right-hand
of the girl or the bride, draw it in such a way that
she's holding the flaws. After DOD, draw a so good above the neck for
the head of the good. As hail, ye are gonna
Android a bunch of the good. Then Draw to slant
slightly curved line one at each site to make
the Goan part of the good. With this only last part of
template is left to draw. That is calendar. You can draw any months
calendar as your requirements. For example, here, I'm drawing
February month calendar. So plus default, the
name of the month, that is five dirty. You can write it either in
cursive or block letters, or you can even write
half month name, like Jan and so on. Once you are done
writing the month name, right ear, I just didn't do it. For example, I'm writing 2022. I just sent to the Fab
ready after dive right. In issues of the days and block letters like S for Sunday, Monday, Tuesday, and so on. I make sure you leave
sufficient space. Each initio, as we are gonna write dates
below these in issues. Often open your window of that particular month
you want to embroider, start writing the dates hail asked for that
month calendar. Right. All the dates except that particular date for
which you are making it. As to highlight that
particular date, I'm gonna draw heart. Once you are done with that, it will look like this. Our template is ready. Now in the next video we
will start doing embroidery. So see you there.
5. Spider Web Rose: In the previous video, we have learned to
make this template. Now it is time to start
doing embroidery. First of all, we will
start with the spot. And for that, I'm going to
use this red color flows. You can use any
other color of laws. Also. Take out at least one to 1.5 meter long trade. Got it. Once you got it, take the thread with all these extra strings and
put one end of the thread, the needle, just
like I am doing. Then stretch this third up to 30 centimeter length just to make sure that this thread do not come out of the
needle hole easily. Be another end of the
trade tie unknown. So what do you have
to do is simply wrap the thread around
your fingertip and then bring this small
in-between the loop from the backside and
take it out nicely. And with that, our notice ready. If you want, you can tie one more note over that
to make it more tape. Now how will they need a
video main work in hand, whether it is left
one, right one. I'm with another hand. Hold the embroidery
hoop carefully. No, take out the needle from the center of the
middle Florida like this and stretch the thread telling not rich the
surface end of the class. After that, put back the
needle inside the clothes. At this point. Do it very carefully so that the tag do not get entangled. If you are a beginner, you can even start with a
small lengthened carefully, the threat completely
inside the clothes. And you will get this
stitch like this. Now again, take out the needle from the center like
we did earlier. But make sure you do not take it out from
the earlier point. Otherwise, it will
undo your state. So just check out
the needle from it. It just in point
would be needed again inside the clothes from
here to make this stage. Repeat the same procedure to
make another three stages. Make sure you stretch the
trade nicely every time. But also remember that you do not take that tightly that
it affects deep glute. Do it very carefully. In the end, it will
look like this. No. What do you have
to do is take out the needle again
from the center. You can take out there
from any central point. Now, leave this stage and take out the needle
from below this stage. Just like I'm taking. Then lead this one. I'm taking out the needle
from volute this stage. Then again, leave the next stage and pick out the needle
from below this stage. Doing so, make sure that
trade do not get entangled. Otherwise you will
have to code editor. You can notice that
with the second drone, we have started taking out the needle from
below those stages, which we have left
in the first shown. Here, you can notice that in every round we are taking our
needle from those stages, from below, those stages which we have left in the
previous round. I have fast-forward the video, but you can do it at the
RPA slowly and nicely. If you are a big no, what else you can do is you can stop the video and
then follow it. Or you can also decrease the playback speed
of this video. Just keep doing the same till we completely fill this circle. Also, notice that you do not switch the trade every
time very tightly. Us, we want a slightly
loose flood design. Give adjusting the trade
IDO video fingertip on needle itself. To give it proper round shape. By now, you might have started recognizing which we
are embroidering. So yes, it is ruse. This type of embroidered ruse
is known as woven rules. On weekend see a spider
revenues as we are kind of embroidering web
of traits. If you want. What else you can do to make
such rules is just WAR trade after embroidering
those five stages and tie a knot at the endpoint. And this way, you'll
get to illustrate in a goo and then
start making web. You will be able to
complete your flower fast, and that will also
look beautiful. It's totally up to you. You can do it either
way you like. Once you reach the end or
completely build the circuit, what do you have to do is insert the needle and the
clue like this. No, decode the needle
from here like this. And then again inserted
inside the cloth like this. We are doing so to make sure, or we can say to secure these stages and web
design of the flower. Now flip this embroidery
hoop as it is time to secure this plot
embroidery completely. Take out the needle
from below of any of these stages like this, but do not stretch it
completely leave a small loop. So the electron that loop, you can take out the
needle again in order to make them not us like this. Do this process again. Repeat these steps again to
make two to four nodes mode, to make sure that you have security of embroidery
completely. I stretch the trade
nicely and cut the extra thread with the
help of the thread cutter. Even you can cut it
with the help of bleed. So with that, our rows
embroidery is ready. You can see how
beautiful it is looking. Now we are going to
embroider other plus dot. I'm going to use this
yellow color flows, but it is totally up to you. You can use any other color
flows to, for example, you can use baby
pink color flaws with this red glow flaw. But yes, made sure
that to whatever color you choose that goes well
with this red color plot. For that, again, take out at least went to 1.5
meter long tray. And then Goddard and then
put it in the needle rule or just repeat the same procedure
as we followed earlier. Take out the leader
from the center of this flower like this, and start making those
five primary stages that we made earlier
in the red flood. If you're not able to recall
what instructions are, what peptide gave you that
time or during that Florida. So what you can do
is you just go back, get that part in the video and watch it while
embroidering display. After this, start making web
around these five stages. And then you will get a yellow
color, Florida like this. Similarly and brighter. This Florida also
fought this hand. I'm again using
yellow color flows in order to represent that
I'm following some pattern, but it's totally up to you. You can choose. What you can do is
you can embroider all these five plus with
different color flows. It's totally up to you. You can always modify
the design as well. Just follow the
procedure as we did in the first one and
then the second one. There is no need to hurry up, just do it at ERPs. And with that, our embroidery
or Florida is ready. Now follow the same procedure
to embroidery floss. Also, for that, you can use red color or any
different color flows. It's totally up to you. Now, I may do in the next video with complete five
embroidered flowers. See you in the next video.
6. Leaves Embroidery: So here's my five
embroidery floss. You can see how beautiful
are these looking. Now let's move on to the next
data's leaves Android tree. Father leaves a
green color floors. You can take dark
or light green one, It's totally up to you. God died least one
meter long thread and put one end of that
thread and a needle, just like we did in
the previous video. It might be possible that you'll find this task a
little bit difficult. But if you have patient, you will be able to do it. After that ID another
end of the string, tie our NADH and FADH that simply follow the
procedure that we did in the previous video for
denote the notice ready. Know, if you want, you can tie one
more note over it to make a thick like I am doing. Now. It is ready with the needle and embroidery
hoop is also ready. Let's start embroidering leaf. So this fast, it'll pick out the needle from the melodic
load at the tip of the leaf. Yes, like this. Then leaving small sense, put the needle back into the
load in-between the leaf. Just like I am doing. This is small stitches kind of working as a midriff
of the leaf. Know, what do you have to do? A stakeholder needle, again
from the melodic load, just the left side adjacent
to the first stitch, but slightly below
from the first. Stretch, iterate nicely
and then insert the needle back into the glute just below the first stitch ending point, just like I am doing. With that. Another
stages also ready. Now decode the needle
from the right side of the first stage as we
did in the left side. And then again put it
back into the cloth just below the first
and the second stitch. Like this. This take out the needle from the left side of
the second stage, but slightly lower than the
starting point of dark stage, then put it back inside, did load a little bit lower
than the second third stage. Just like this? No. Take out the needle from the right side of
the third estate? Yes. Like this and put it
back inside big load. This point? Yes. Deep I distinctly thread
while you are embroidering it so that you give the
proper shape to the leaf. So now, what do you have
to do is simply repeat these steps to completely
Android or your leaf. But with that, you also make sure that every time
you make US stage, that is stage ends in between
the leaf so that there is a design or we can say there is a bag that represent that. These stitches are wings that are arising
from the imagery. Every time you taking out
the needle from below deck load or inserting
it back into the cloud. It just make sure that
trade is not entangling. Otherwise, you will have
to do all these stages. Again. Make sure that
thread is not entangling. Our first leaf is ready. You can see it is kind of a marginal leaf and it is looking really
beautiful, isn't it? Now repeat the same
procedure and embroidery all these leaves just like
we did the first one. Let's us start with
the second one. This time, I'm going to
draw our first midrib. But our convenience
like this, right? Does just for our convenience. So if you don't want to draw it, then that is totally okay. Now take out the needle again from the tip
of the second leaf, just like we did
in the first one, and make us stitch bleeding a small distance
in the center of the last time we do not have a guiding line that
should be our stitch end. But this time we have
already drawn a midrib. So we know that our all these stages should
end on this line only. And this way you will
be able to, you know, embroidery our lives much
easier than the previous one. But it is totally up to you. If you want to do it
like the first one, you can do it that way too. It's totally your choice. Follow these steps and
completely I'm rather your leaf. It does not like that. This is the only way
to embroidery leaf. There are lots of
different styles or different patterns are
available to embroidered. I'll leave. You can modify it
according to yourself. And since it is the old guard, modifications are
always welcome. And yes, if you want to learn different
embroidery styles, different leaves embroidery do come into in the discussion box. I'll definitely make
a class for that to. Our second leap is also ready. Now it is time to
embroidered these stem. But that first of all, highlighted a little
bit more with the help of the
pencil like this. And then take out
the needle from between these two leaves
like I am taking note? Yes, like this. Then leaving a small gap, Mecca small stitch by
inserting the needle back into the glute
like I am doing? No. Again, take out the needle
from below the clue, but it has small distance
from the first stage. Then insert the needle
back into the clued from the point where the
first stage is ending. Now again, take out the
needle from validity load, leaving us smile distance
from the second stitch. But this time, insert the needle back into
the glutes from wheel. The second stage has started. This type of embroidery is known as back stitch embroidery. Repeat the same steps till you completely embroidered
these demo of this design. Now you might be
thinking why to make so many smallest stages just
to embroidered a small stem, men, it could be done in
two or three stitches. Then liquid tell you
that this is important because with the help
of this modal stages, hail VR giving it a
slight Good night, which is not possible
with the help of two or three stage stitches. Stem is ready. Now as the third is
about to end an indel. So what do you have to do? A spastic all secure
these stitches, and that can be done by
tying three to four notes, as I have taught you
in the previous video. Then again, take threading the needle and start
embroidering other leaves. Complete this design by
following the same instructions. And I need you in the next video with
calendar embroidery. So see you there.
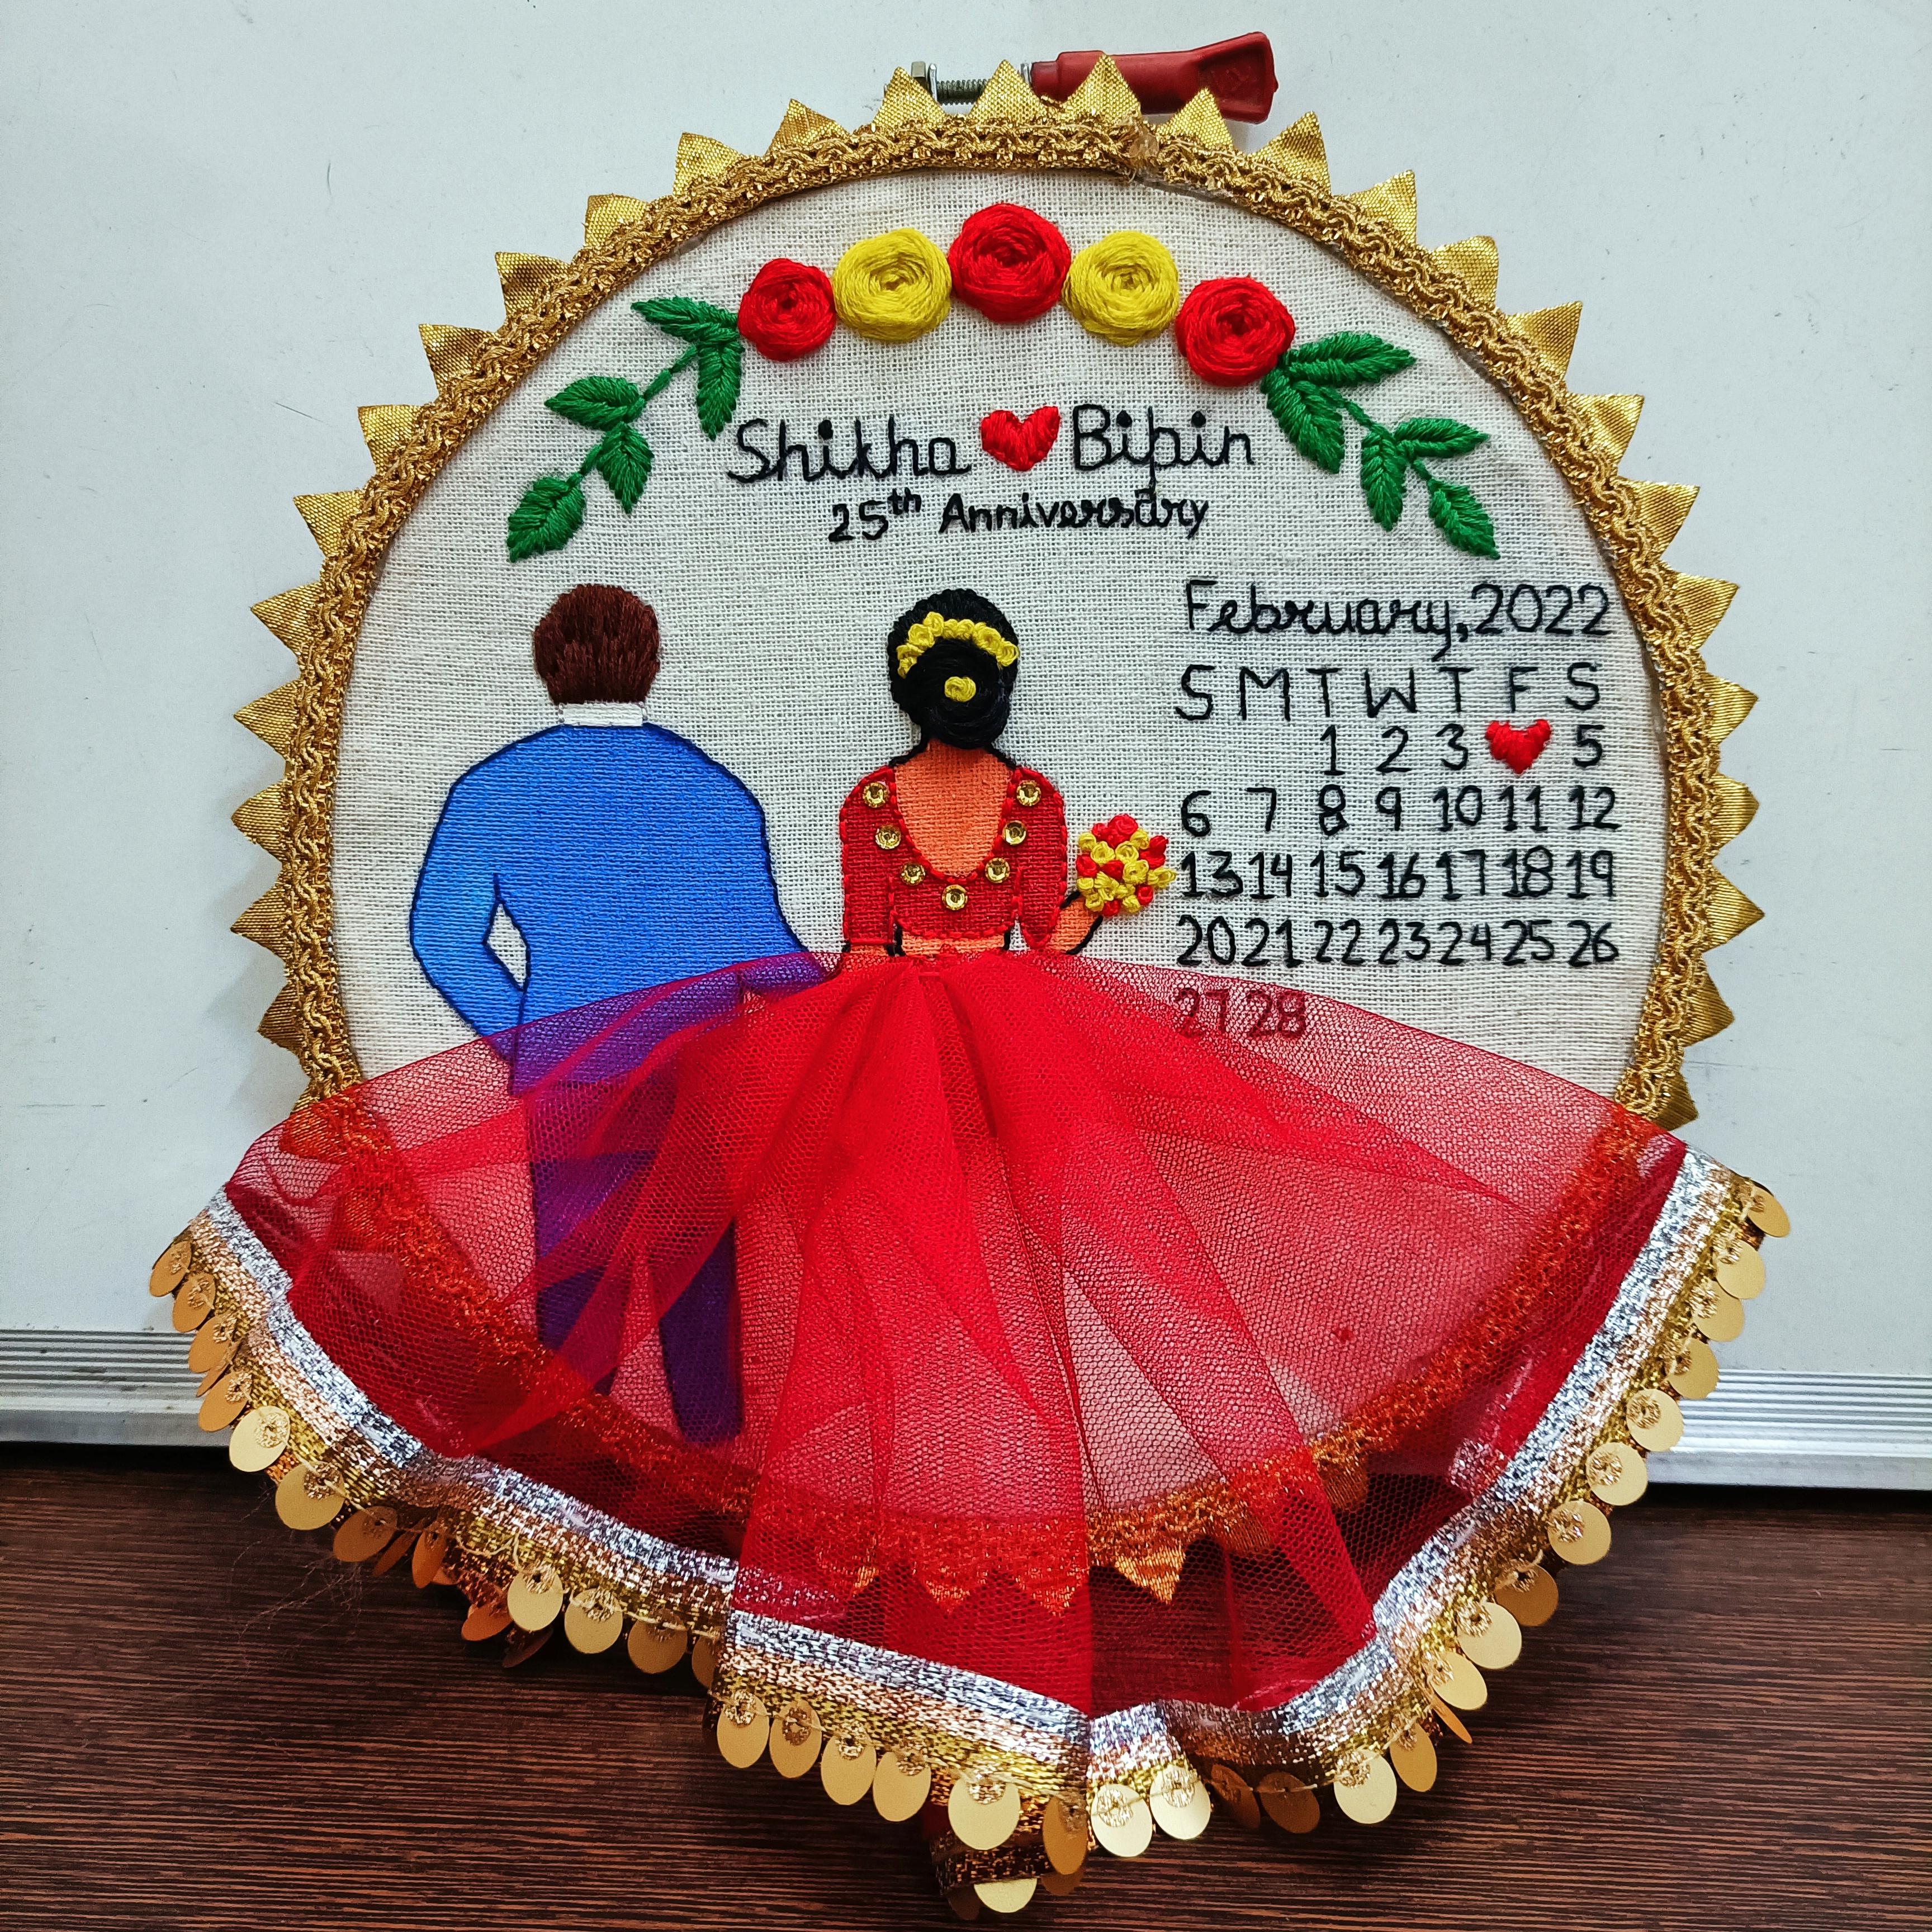
7. Calendar Embroidery: The spot is done and you can see how beautiful
is this design now looking over the colors are even complementing
each other so much. Now it is time to start
embroidering calendar, so forth that will go on
to dry the numbers from one to 30 or 31 according
to the month you selected, except that particular date for which we are
making this card. Now, I'm going to use this thin needle for
them writing numbers. And you can clearly notice
the difference between this ten meter and the needle victory have
been using so far. There is a blunt end
and it is a take one. While we move on to this needle. This is very thin and its end
is very pointed and thin. So we are going to use
the Snowden as this time, we are going to use to
strength read-only. So now let's move on
to the thread part. So for those, I'm going to
use this black color flaws. You can use any other
color of laws to, but make sure that you
select any dark color floss. Got around one to 1.5
meter long trend. If you are a big enough, then you can take any
small length of thread T2, it's up to you and what length
you are comfortable right? Now if you pay attention, you will notice that clauses made up of six strings together, since we are gonna need
only two strands together. So what do you have to do
is you have to separate out two strands together from the rest of
the four strings. But make sure that you separate them from the mid
length of the trade. As in this way, your thread will not
get an angle and you will be able to
separate it out easily. Here is the toString method. You can see it is really very thin as compared to this one. Now what do you have to do
is put this to strength. And they needed since this time, we are using very thin. Needle hole is also very thin. So you have to be very focused while inserting
tread into the needle hole. What else you can do is
you can use Thread tool. Would you get in finding
your market very easily and di2 at
very minimum rate. So you can do it as convenient. Once you're inside the
trading the needle hold, stretch it out up to
30 centimeter length so they do not come out of
the needle hole easily. Be another end of the trend. Tie or not as I have taught you in the
previous two classes. But this time you tie at
least three to four notes, one over the another to make it take as treatise very thin. So if you die only one node, then there are
chances that it will cross the cloth with a
slight pose stretch. So make sure that you tie at
least three to four notes. Once you've done that, you have your needle with the
thread, an embroidery hoop. Now you are completely ready
to start writing numbers. Let's start with the number one. Take out the needle
from the backside of the clued like I'm taking note? Yes. Like this. Now inserted back
into the glute making a slant stage for the
part of the number 1. First stages done? No, I'm going to use Becky stitch technique to
Android or further for those leaves small distance from the first stage
in vertical direction. And then take out
the needle from back of the clued like this. You can notice I have left
very small distance as now, we are going to make small
stitches after this. But the needle back
into the clues from the point where the
first stage has ended. Every time you enter a stage, stretch degraded very nicely, not to already tightly
and not too loosely. It repeat this same
backstitch technique to completely embroidered
this vertical line of the number one. The vertical part of
the number one is done, not embroidered us
most pitch that in horizontal direction
below this vertical line to complete the number one. Does it one is ready. Now you can understand why we have taken to strength read-only as making small cities would sixes change was a
very difficult task. So now let us start embroidering are another desert
data's number two. Fadh, this again take out the needle from the back
of the glutes like this, and then inserted
back into the cloth, leaving us more distance. You get a small stitch. Now take out the needle
back from the glute, but this time leaving
a small distance from the first stage as we
did in the first visit. Yes, this is what the backstitch do,
embroidery does desert. What we are gonna
do is we're gonna draw a very small stitches in order to give that
desert or give that to desert a proper co shape. You need not to worry that I'm, I'm writing it so fast, I'm not doing so. I have just a sped
up the process in order to show you
that really quickly. But you do it at your pace. You can even rotate the embroidery hoop according
to your convenience. Once you completely
embroidered it, you'll notice that those smallest stages
has really worked. I'm it has gave you a desert, a proper and nice Go is ended. Okay, so I have showing you how to Android or a
single digit number, whether it is the simple one, R one that includes code. Now let's move onto
Desert number. So we are going to embroider 28. So for this first of
all, embroidered, does it do, as I have
told you earlier, make small, small stages to
give the proper gov and yes, you'll be able to get
the proper dessert. Number two, does it do is ready now it
is time to Android. Next desert data's
eight of the number 28. So far, this big old they needed from the center of the yes, just like I'm taking them. Now. I've been noodle back
into the include are the top left side as unforced and writing the top part
of this visit eight, and then I'll draw
the lower part. But it's totally up
to you if you want, you can first generate the lower part and then
move on to the top bar. Make sure that you embroidery, very small stitches as the US eight is all made up of goes. So it is very important to
make small, small stitches. If you are finding, embroidering this
Glenbow difficult, odd any particular dessert, then what you can do
is you can practice that particular dessert
or all the numbers on any row sheet on any rough fluid will be very difficult if it goes wrong on this main fluid. If you are finding, embroidering this calendar or any
particular desert difficult, then what you can do is you can practice that
particular dessert or complete calendar
on a rough sheet of paper on any rough blue. Because if it goes
wrong on this glute, then you will have to
undo your complete as each visit disconnected
with the another one. So it will be difficult for you as well as it might
ruin your glute. I suggest you that if you are a beginner of finding
it difficult and just pick this one time or two times on any
row or any drove glute this way and
draw all the desserts. And then I need you in the next video and
embroidered the weekend. See you.
8. Week Initials: In the end your calendar
Wilson would look like this. You can notice I have left this space while dot
particular date. Now it is time to embroider
the weekend insurance. But you can notice that those vague initial
template has got some feed. For that. I'm gonna
rewrite those initials so data it will be easier for me to embroidered those initial. So if it is much
visible than the night, Let's take a pencil
or you can even use your water-soluble ink pen
and whatever you have, but it should be, you know, water-soluble or that can be removed easily after embroidery. For that, first of all, draw a straight horizontal line using a ruler or saved squared. Just jump off the calendar
or Depot addition till where you want to
embroider your initials. Know it is time to rewrite
these initials and make sure that you rewrite them just above
the previous one. And in exactly the same
manner the way you have wrote them a allele
as you have already. I'm rather your calendar
according to that initials. Just rewrite them according
to the previous one. Now it's time to
embroidered these initials. So for that, again, take a toString trade. Then put the one end of
the thread, the needle. And you have to use that
exactly same needle which we have used earlier
to embroidered the calendar. Ideas that tend when. Once you install the
threading the needle hold, stretch it up to
the enough length. It can be 20 centimeter or
it can be 30 centimeter. It does basically dependent
on the length of your thread. Now I'd be another end
of Detroit, tie a knot. And I hope by now
you are like so, use two of tying or not so
that you quickly die or not. Don't forget to tie at
least three to four notes. As again, we have taken
to strength train, it is very thin. In order to make that not take, you have to tie at least
three to four notes, one over D, another. I understood Lee. Okay. If you are not remembering
how to tie a knot, you can just re-watch
the PVS classes. Now let's start embroidering so far that take out the needle from the back of the glute
and then make a small state? Yes, just like this. Now, leaving small descends
from the first stage, start embroidering using
backstitch technique. I do embroidery of very small stitches because there are lots of
goals in the S-shape. To give dark drop
book of two delay TO make sure you
embroidery small stitches. I've ever done these
initials and the most basic and in the
simplest way I can, so that even a big note again embroidered
these initiations. But if you add an intermediate
audit once learner or you think you can embroidering
much more creative way, then what you can do is you can write these initials and
cursive handwriting. There will be a lot more
costs than these basic ones. But if you want, you can try that too. Once you completely embroidery
of first redefinition, just secure these
stitches and what died simply tied to do three nodes or the
backside of the clues. And that's very simple
years for dy dt, what you can do is you can
take out the needle from below the any stitch and then take out the needle from dad thread
loop and stretch it. This way you can tie to do
three non-zero under IAS, it will be very secured. Now you might be thinking
you have just embroidered the first initial
of the week and I asked you to secure
these stitches white. There's a reason for
that and that is. By Johns At some point
embroidering goes wrong, then you'll have to just undo that initial embroidery and not, yes, it is important
that you secure stages every time you completely
embroidery and initial. Once you secure that
first initial start, embroidering the next initial using the same
backstitch technique. I guess hill, I'm writing
this m is much more easier than embroidering is because M is all about, you know, lines. I don't think there
is any difficulty to embroidery modal here you can even embroidered
the vague stages instead of this small ones, as there is no co-present
IDs in the system. Once you completely and brighter this initial against stages, I'm for diet, tie a knot at
the bedside of the clued. Know it's time to
start embroidering literati non stages while
the horizontal line. But make sure that both
false and the second stage, and at the point from where the vertical
line is starting. Then embroidered
the vertical line using the backstitch technique. Now that is one more way
to embroidered this P and data is simply embroidered the horizontal line
with single-stage. Then I'm drawing a vertical
line also with single stitch. Now, you know two different
ways to embroider t. It's up to you what way
you want to embroider. Now, it's time to
embroider initial w. Do it using the backstitch technique
and a small stitches. But if you don't want to use the smallest stages or I'm
using smallest searches. What else you can do
is you can embroidered the vertical lines of the w
using symbols long one stage, that is no gulp resident
in this initial. It is not necessary
that you have to embroidered it using
small statistic only. Similarly embroidered
the last three initials of the week using
backstitch technique, small and big stages. And in whatever way
you are comfortable. At the end of these initials, do not forget to
secure these stages by tying to do three notes I
did backside of dq load. Once you completely embroidered, it will look like
this isn't looking so gate know in the next video we will embroider
the month name. So see you there.
9. Month Name: Now it's time to
embroider the monthly. Hale I have made detail
end of February month. February. But if you have made
good for any other month, you can embroidered its name. It does not like that. You
have to exactly copy this. It is just an illustration
how you can do this. Simply embroidered the first horizontal line
with a single-stage. Then when it comes to the vertical line and draw
it at a stage drawn where the second horizontal line
is starting. Then Android. Most stage to complete the
vertical line of df of this Android or the
second horizontal line of this letter F. With that, our first letter of the
month name is done. Now it is time to embroider the next letter of
the month name. And that is E. For this, you have to Android or release more stages in order to give
that proper to the letter. Plus, it is very small as
compared to the deserts. So yes, you have to embroider very small stitches as
compared to the numerals. At some point, if you find
that there it is very difficult to embroidery such
a small letters would go. Then what you can do is you
can practice that later or those letters on some rough
clue on some rough heat. And if you want, you can
even break this two to three times and re-watch this
video again and again, and drag this on
some rough load. In this way you will get, you know, perfect in that. Plus you don't want to ruin your main glued on which you
are embroidering your car. You have already and
broader so many things. So it's better that you practice on some
rough glowed around some route sheet
if you are feeling that you won't be able
to embroidered it. If you want to learn how to embroidered different
letters in different ways, they just comment in the discussion box and I'll
think about it and make a clause in which I
teach you how you can embroidered different
letters in multiple ways. If you are writing
the same month name, then after embroidering E, star them writing the letter V. You can notice that I'm
really, I'm drawings very, very small stages because it is very important to give the
proper code to that later. If you don't give
that proper color, it will not look like
similar to that later. So it is important that you
embroider very small stages that you can notice that I'm always using
backstitch technique. Just use backstage technique and smallest stages and embroidered
the complete monotony. If you want, you can
even embroidered the month name in
capital letter. For example, let's say
you want embroidering a month name that is August,
then you get him right. Aug and so on. All kids. Are you getting broader
like the way I'm drawing the first letter is capitalized one and the rest to
answer a small one. What you can do, you get embroidered the
abbreviation of that month name, example for February, you
can embroidery just fab, for January, you can simply
embroidered Jen, and so on. It's totally up to you. You're getting them right
there in whatever way you are comfortable and in
whatever way you want. Just embroidered
incomplete month name Guelph really
nicely with small, small stages and
at your own pace. Us by now, I've already
spread of this video. Then once you completely embroider your month
name and then you go, do you have to do is you have to embroidered coma just
next to the month name. For this was to fall and
draw a vertical line. Then our horizontal line connected to the first two
vertical lines stitch. After that one
more vertical line connected to the second stitch. In this way, half part of
the coma is embroidered. After that, what do you have to do as embroidered
the lower part of the coma by using that same small stitch and
backstitch technique. In this way, month name
with the coma is ready. Now it is time to
embroider D0 E0, for which we have
embroidery, the calendar. It could be two, indeed, 20 to 2023 or whatever we are
you have embroidered here, I'm Android in 2022. I have made this
calendar or making this guard for February
month of 2022. But you can embroider any ear. For example, you can
embroider 20232024. I'll go whatever you
are making your card. If you didn't even notice
that I have also modified the template as I have earlier
written to indeed to only, but now I'm embroidering 2022. So it's up to you. You
can directly embroidered 2223 or whatever year that is, or you can completely
embroider 2020 to 2023. It's totally up to you. And according to
this space that has left after I'm dragging
the month name. Once you completely
Android at it, it will look like this. This is looking so
great as intake. Now, in the next video
we will embroidered this particular date that
we have left earlier. And then we will paint the clothes of groom
and the bride. So stay tuned and I lead
you in the next video. Until then, bye bye.
10. Heart : Now it is time to android dot dot particular date for which we are
making this card. So for that, I'm going
to use this technique. This time we are going
to use this six is ten plus instead of the
toString or three strings. So again, what do you have to do is prepare your needle
with the particular length of this red glow flows and then take out the needle from this
pointed end of the hood, just like I'm taking notes. And then embroidered a
straight vertical state just in the center of the hood. Like me. With this stitch, we have divided our heart
into two parts. Now, let's first go
to the right side of the hood and again, embroidery. Stitches just like
the first one. I just didn't do it like this. No Android or the Third Estate just edges into the second one. But notice how I'm
not saying that you have to take out your
needle for the next stage, just adjacent to the point from where the previous
stage has started. As if you do that, then you'll never
get the hood design. So just follow the
template and take out your needle or
lithium dose point where the heart
designers present. In this way when you will completely embroidered
that template, you'll get the
eyedropper heard design. You can also use to stray node tree strength
trained for this, but it will be a little
bit time-consuming as then it will require more time to completely fill
this hard design. While if you are
using six is stunted, since it is a real date, less demand, it will retire inefficient to completely
fill this hard design. What it is totally up to you. If you want that thing
design on your hood, then you can use to centered. Once you are done
with the right side, start embroidering at the
left side and put those, repeat the same procedure that we followed for the right side. You can even do some
different dark color flows. For example, you could
have used dark pink color to embroider this hood
instead of this red one. But make sure that
whatever color you choose that gets
proper highlighted. Right now, we are
writing this herd for that particular date for which
we are making the scarred. So that should, you know, get dropper
highlighted. With this. I heard embroidery is done
on a particular date that is 4th of February of 2022 is
getting highlighted very well. Now it is time to secured
these stages so far does flip your embroidery hoop and tie a knot at the bedside. For those, take out
your needle from below of any two
stages are one stages. And then take out your
needle from this loop. Just like I'm taking. Stretch. This way you'll get
a proper node ID bedside. Just repeat the same
processor and tie at least two to three naughts at the bedside to completely
secure your stages. Once you secure it nicely, just got the extra
trade with the help of this thread girder or even you can cut it
with the help of bleed. The heart embroidery
is secured very well. Now it is time to paint the address of the
groom and the bride. So for this, I'm going to
use paint brush on 0 number. You can even use paint
brush of one or two number. It's up to you and
according to the size of your embroidery hoop and template, these
tools accordingly. And then take out the
red acrylic color. I'm going to paint
my bride dressed post and died too
with red color. But if you want, you can change the color. For example, you can do
some white color, orange, pink, sky blue, any color that you like
to paint your dress. So take small amount of
color in your paint brush, then start painting the blows
or the top of the slide. So for this, first of all, outlined the design and
then start painting in it. So here I'm starting with this sleeve of the
top or the blows. And you can even notice that on first painting it in
vertical direction, since the Blau sleeve is
in vertical direction, you have to just
repeat the same. Once you are done
with this leaf, move on to the backboard
and there you can paint in horizontal direction
instead of the vertical one. If you find that
at some point that your color is very
taken consistency. Then what you can do is you can add small amount of medium that is two to three drops on according to the
consistency up your color, but never add water. Now the question is why you cannot add water in your color. The reason behind this is that whenever you wanted to
watch this embroidery hoop, you will not be
able to clean it. Because if you use watering your color and you
wash it with DI water, then your color will
also washed out. So I suggest you to use only medium if your color
inconsistencies take. With this the blows
of the breeders JD. And the lower part we will state some red color glued to make
this God of the bright, but we'll do it later. Before. Let's paint the
dress of the group. Similarly paint the
groom's coat and deep paint as we have
painted the brights blows. And you can notice that I'm painting the groom's dress
with this blue color. But if you want, you can change the color. For example, you
can paint it with some white color already
live in Delgado. It's totally up to you, but make sure that
whatever you choose, that goes valuate deep
bright red color. Another way to make the dress
of the bride and the groom, or the Kappa is to embroidered. What example? Instead of painting,
you can even embroidery too. So
it's up to you. You can embroidery thread, you can paint it. It is totally your choice. To me, this painting looks very good instead of
the embroidering. But if you want, you can even embroidered it. Once I'm done with
the groom's code, similarly paint the groom spent, but make sure that
you paint it in horizontal direction instead
of the vertical one. You can notice that
I have painted both grooms coating
paint with same color. But if you want to
modify it or change it, then what you can do is you can change the color
of the parent. For example, you
can paint it with some black color,
so it's up to you. You can modify it
according to yourself. Also notice that you
do not painted with so many coats as nato we are gonna
embroidered the boundary, if you will, painted
with so many goods, it will be difficult
to take out the needle from the Cloud and inserted
back into the glute. Make sure you do not
painted with so many codes. Those prepared our
skin color by mixing Prussian blue and
red and Kennedy and low in equal amount. And then paint the back of
the bride with that color. Just like I am painting. Just paint the back waste and hands-off the bright
with the scholar. Once you are done
with this pain, the groom's color
with white color. To illustrate that he has won some white color shirt
inside this blue suit. The clothing part of the
bride and groom is done. You can see how
amazing it is looking. Now in the next video, we will embroidered
the hair of the bride. See you in the next video.
11. Hairdo: By now, the paint has
dried up very well. Now it is time to
embroider the hairs. First of all, m rather
deep bright sail. For embroidery, I'm gonna
use this technique. I'm going to use this
black color flows. But you can use any different color of
brown or gray as well. It's totally up to you
and for whom you are making this guard
choose accordingly. The diet taken appropriate
length of debt flows, and insert one end
of doctored into the neighborhood and prepare
the noodle with deterred, as I've told you in
previous classes. Later died, draw a small circle just like I am drawing inside this big circle just above
the neck. This is small. So regardless for the button which will embroidery
and the next video. However, I'm driving a button for the brightest,
totally optional. If you don't want to
embroidered up button, you can leave your
bright sail Open, Honestly, I'm gonna
Android It Up button. So if you want to
embroidered Up button, you can just copy me or you can also modify it
according to yourself. For the bright
tail falls to fall embroidered the outline
of this bigger circle. What do you have to do is simply embroidered with small stitches. Third, embroidering
this first stitch, follow the backstitch
technique to completely embroidered this
outline of the bigger circle. I'm gonna painting
again embroidery with very small stages as it is a circle and there
is no straight line. I'm Dr. rate with very
small stages to give that dropper gov to
this head Audit button. Repeat the same
dilute completely embroidered this first
Andy bigger circle. And in the end it
will look like this. Once you completed, move on
to the next smaller one. You have to outline the circle also just
like the first one. Using again that small stage
and backstage technique. I'm drawing this as well. Now in this spot, Let's him rather him so far. First of all, take
out the needle from the center point from
default circle, like this. Judge it up to the
complete length and then insert the needle
into the glute. Just do on the center
of the second circle. Just like this. Similarly embroidery
such a stage at the left side
of the first one, but does take out
the needle from the first outline and then slightly insert the needle back into the cloth from
the second node, Ln. Yes, Just like that. This way you will
get a slant state. In this similar way embroidered most stage that
is the third one, just leaving us smaller distance
from this second stitch. Repeat the same ID right
side and embroidery as such, two stages there as well. Now the partition is done. You will have to fill all the empty space
and those areas. Similarly, we embroidered
these partitions stages, that is devices stitch. Nowadays question
is, when we have two embroidered it completely then
why we did this partition? The onset is I wanted to do make sure that whenever we
embroidered the hill, that should look like
natural hairstyle. Hail venule embroidery, some
straight vertical stages. It will illustrate the top here, while the left and the right
sides long stitches will represent that the
left and right side here oncoming at the backside. Once you completely embroidered, it will look like this. Now you can notice that yes, it is really looking like the real natural
hairstyle is undid. Now in the next video we will embroidered the BUN of debrided. So stay tuned and I'll meet
you in the next video. Till then, bye bye.
12. Bun Embroidery: In the previous video, we have learned to embroider
the bride's here this much. Now in this video we will
learn to embroider deep been. So far those take out the leader from the back of the
cloth like this. I stretched the threat of 27 to ten centimeter length and hold it there just
like I am holding. Then insert the needle back into the glute and distinct
to the first from where you have taken it out and then stretch
it inside the cloud, leaving that seven to
ten centimeter length. Yes, just like this. Now, I'm drawing a small stage, just add this into the previous way in order
to secure this loop. Whenever you embroider
your next stitch, this loop will not get straight. After this. Again, take out
the needle from back of deep blue to just do
this first loop stitch? Yes. Like this. Then again, stretch this straight up to that seven to ten
centimeter like this. Who deal with the help
of your thumb or finger. And then insert the needle back into the cloth
adjacent to the state. Then again embroidered
a small stitch, a descent to this loop stitch in order to fix this
loop permanently. Now we have two such loops just to repeat the
same procedure. And I'm drawing two or
three more such loops in order to get that dropper
volume of the hills. While I'm writing these loops, make sure that all of these
loops are of equivalent. Otherwise in the end, you will have to trim them to get that equivalent strings. Once you embroider the
desired number of loops, flip your embroidery hoop, unsecured these
stitches, but this, take out the needle from below. Any of these strategies, then stretch it till the point
you get this small loop. After this, take out your leader from this loop and
stretch it again. This way you get
up, drop a note, repeat the same procedure to tie at least two
to three nodes at this side so that you secure all these stages
completely a nicely. Once you tie two to three nodes, got the extra thread with
the help of the season. After this flip your
embroidery hoop, who will all the loops
in your hand and got these loops from the
center with the help of this is arranged these
thread strengths to get over the help
of your finger, the needle, and then to stick together just like
where to start here to make up of the
diet rounded up in this empty space just like
we make are like this. Who will detail with
the help of the finger interested nicely so that
it do not go anywhere. Then take two strands, one strand of the
flaws in your needle, just like we took for
linear rail embroidery. Now with the help of
this needle and thread, we are gonna secure deep
been hairstyle, FADH, those take out the leader
from the center like this and inserted back into the
glutes from the left side of the ribbon in order
to secure that part. Just like the left side
of the Berlin, secure. Now again, take out the needle from the
center of the burn. This time we're gonna
secure the right side. So just insert the
needle back into the clue to just from below
the right side of the barn. Dot said, this
middle part is gone. Now again, two is the
remaining part of the string, and round it up around the
middle part of the ribbon. Once you completely round
up this to a steady-state, secure this with the
help of small stitches, just like we did earlier. Once you completely
secure the burn, but even then you find some
small strains near the neck, then what do you have to do is take out the needle from near the neck point and then insert the needle by
making small stages. But that time insert the needle back into
the glutes on what silently so that all of these small strange goes back
behind the button. In this way, you will be able to get a nice and clean been embroidery with this
button as ready. Okay, so let me show you
this one from the top view as you can see how beautiful
and amazing it is looking, looking like a real world. Now in the next video, we will decorate this one. So stay tuned. And I may do in the next video.
13. Decoration of Bun: In this video, we
are gonna decorate the burn of the
blight for those, what we're gonna do
is we're going to embroider a chain of flaws hill. Then we are going
to embroider of one flower here at the
center of the bone. Just like there is a
tiara of flowers around the button and apply paint
in the same thereof. Deep burn. Here I'm
using technique. And this year local overflows. You can use any other color
flows to, for example, you can use baby
pink color flaws on maybe a white color flows to
embroidered a tiara of loss. It's totally up to you. This time, I'm going to use
French knot technique to embroidery floss for
the simply take out the needle from back of
the glute and then pull the needle away from your hand or the work just like this. Then wrap this thread around the needle for three times 13, then hold the trend
nicely and shift these rats at the
backside of the needle. After this, insert the needle back into the cloth
near the first. Just like this. Now at this time, stretch the trade nicely. So do not get loose. And then stretch the needle
back into the cloth. Just like this. This way you'll get a proper
french North Florida. Isn't it looking so great? Now, again, take
out the needle from the left side of this
strange node like this. Then hold the needle
away from your hand. Wrap the thread for three
times around the needle, just like this of the dust. And so the needle back into the glute near the
first Range Node. Stretch the trade nicely, but not very tightly. And then stretch the needle
inside the closed till the complete length of the
thread goes inside there. And this way you'll get a
one mode French node plot. So you can see how beautiful
it is looking as indeed. No, what do you have to
do is you have to repeat the same procedure
till you completely embroidered the tiara of the
floss around this button. If you want. What else
you can do is you can embroidered different
color, for example, yellow, orange, baby pink, white, and so on by using the same French
knot technique to make your tiara more colorful. Once you are done with the
tiara and draw it as such, one more flower in the
center of the button also. To show that that is a flower paint that has
stuck inside this one. Does follow the same procedure. Take out the needle from
the center of the button, hold your needle
away from your hand, and wrap the thread around
it for three times, just like this. After that. And so the needle back into
the barn and deep glute, just like this, stretch
it inside the clue. But a dead time also
do not forget to stretch the thread that you have wrapped around your needle. Otherwise you will
not be able to get a proper french not fly. Once you completely
embroidered it, do not forget to secure
all these stitches and all these Range Node flaws by tying a knot at the back side. The degradation part of
the brights button is done with the steep glide
hairstylists also ready? Now we will embroider groom
SEO in the next video. So stay tuned and I'll meet
you in the next video.
14. Hair Embroidery: In the previous video, we have Android or
deep rights here. Now it is time to Android. The groom's here. For the hair. I'm going to use this
volume gonna flows. There are lots of
different shades of brown are available
in the market. You can choose accordingly. I'm, even if you want, you can even use black color
flows for grooms embroidery. After dark, prepare your
needle with the thread and take out the needle from
back of the glute like this. Now this time we are gonna use that long and short
stitch technique to embroidered rooms here, which means that we are going to draw the groom
sale in two parts. First two million riders, some long stitch and then
in the left part will embroider the short stitch
or you can do vice versa, like in the top part, UM, writers some short stitches and then in the lower
part you embroidered some lungs stages it just to completely fill this headboard. I'm going to write a
written both ways. For example, in the upper half, at some point I brought
in some long stages. Then at some point LM
Radha, some short stitches. Then according to those
long and short stitches, ILM rather the lower half. What else you can do is you first embroidered
the upper half, either with the long
stitches or shortest stages, and then embroidered
the lower half according to those stages. Another way is you can embroidered a small
part of the upper half, either with small stage or
long stage or with the boat. Then according to those stages, embroidered blue apart also, just like I'm doing. Then you just repeat
the same Andromeda, some upper half, then some
lower half, then upper, lower. And in this way you can completely Android
or the groom's hill. What if you do not want to follow this long and short says technique to not the only way to embroider the groom's here. There is another way to. So for that what you can
do is you have to encode a single long stitches across the complete headland and embroidered the
heroes in that way. Even there is one more way that you can first Android
or the outline of grooms hill and then fill that empty space with
multiple lungs stages. It's up to you. You get
enrolled or the groom sale in whatever way you want and in whatever way you
are comfortable, you can always modify it
according to your safe and according to the person
for whom you are making it. So do modify it and do it
according to your way. Now the top of the groom
sale are embroidered. Let me tell you why I selected this long and short
the stage technique. And the reason is in
the embroidery itself, if you get really
notice the embroidery, it will look like that
short stitches are representing those frontiers of groom that are
coming at the back. While long stitches
are representing, Here's a deep backside. So I hope now you get by. I have selected this technique. Once you completely
embroidered the groom sale, it will look like this. Isn't looking so realistic. Now in the next video, we will embroidered the
outline of bride and groom. So stay tuned and I'll meet
you in the next video. Bye bye.
15. Outline Embroidery: Now we will embroidered the outline of the
bride and the groom. Let's start with the
body part of the bright. For this, take
your needle and in that three to four strained
black colored thread, start embroidering
the outline of the brights body from where
the neck is starting. I'm fat diet. What do you have to do
is embroidered of very, very small stitches in order to give that dropper cough
to the body shape. For this, just follow the
backstitch technique. Once you are done
with the left side, similarly embroidery
on the right side of this neck and
the shoulder part. Also. If you want, you can also embroidered
the outline of brights body part with the help of some
skin color flows also. It is totally up to the
availability of the color, What color is easily available
to you and around you. Use it accordingly. Once you are done
with the above part, similarly embroidered the
hands and waste of the bright using same backstage and
small stitch technique. In the end, it will
look like this. Now we will embroider
the outline of the rights blows sofa. I'm gonna use this
regular flaws of three or four strings for this. Again, what do you
have to do is repeat the same backstage and
smallest stage technique. I'm here. I have selected this red
color flows because I have painted the blows of the
brain the word red color. If you have painted it with some white color or
with some live window, then embroidered the outline
with that color flows only. But if you want to
embroidered the outline of the bride's blows with
some different color. I'll let suppose you are facing difficulty to find
that particular color. Now if you have using
your brights flows. So in that case, what you can do is you can embroider the outline
with golden color flows. There's two reasons. First, you will be able
to find that color flows around you are
in the market easily. Second, it will
look like design. No one will think
that you weren't able to find that
particular color. That's why you have embroidered with some
different color. You got my point. Why I've told you to select
that golden color flows. So completely
embroidered the outline of the brights blows using direct same
backstitch technique and small stitches. Once you are done with
the brights blows, it will look like this. Now, move on to
the groom's side. For the groom, I'm starting with divide color of the shirt. For this, take
white-collar flaws of two or three strains and start embroidering
the outline of this color using died
backstitch technique. But it is not necessary that
you have to embroidered it with small stitches only as there is no Go and the
color of the shirt. So you can even embroidered
with smallest stages. Or you can also enjoyed already
using that big stitches. Also, if you are
not able to find that wide Kirchhoff
laws around you easily, then what else you can do? You can simply use the simple trick that we use for stating something bought, embroidering the
outline of this color. Once you completely
embroidered the outline, flip your embroidery hoop, unsecured those stages from the bedside by tying
to do three notes. Take two or three strings of dark blue collar
flaws in the needle. Start embroidering the
outline of the groom's coat. Embroidered the outline using that same backstitch technique. If there is no gov, you can use both short stitch along stage according
to yourself. But if there is any govern the body structure
and body condition, then you have to use
short suggests that you can provide that
dropper gov to the design. Once you completely embroidered the outline of the upper half of the groom that is called similarly embroidered the
outline of the lower part, that is the time to degree. And the next video, I will show you the complete
embroidered outline of groom and the bride. Stay tune, and I may do in
the next video, Bye-bye.
16. Let's Embroider Name: Now it is time to Android
are decoupled name, hail, I'm first of all gonna
embroidered the brides name, and then we'll move on
to the groom's name. But you can do it wisely
closer to like for example, you first the groom's name and then you get him
rather deep rights name. It's totally up to you
how you want to do it. It is not fixed that
you have to embroider first name only and then you
can employ the groom's name. No. It's up to you. According to those person
for whom you are making. It. Does, again, prepare your needle where to strength of any
darker color up laws. Or you can simply choose
black color clause. And then using that same
backstitch technique, start embroidering all
these letters of the name. For this, what do
you have to do? Simply embroidered our
first smallest stitch and then leaving
us small distance, take out your needle
back from the glute. And then those time in
Saudi on needle back into the point from where the
first stitch has ended. This way you will then
write out a back stitch. Similarly by following
the same instruction, you can further Android or your ladle and even all
the letters of the name. Here, you can notice that I'm
embroidering it with very, very small stages
they didn't need. And I'll be able to
get that dropper go in the later motor over here, I have written the
name of the bride and the groom in
cursive writing. Well, first letter is
the Capital One, vile. Rest of the letters of
the name are small ones. But if you are facing
difficulty in embroidering these small letters are
in cursive handwriting, then what else you can do
is you can simply write the complete name or all the letters of the
name in block later. That way you will be
able to embroider it much easier way then
these small letters, It's up to you if you are facing difficulty in I'm driving
such a small legos, then simply write the
name in block letters. It's totally your design and there is nothing
wrong and right. If you want, you can also use some different color flaws to embroidered the
names of the couple. But example, you can use
some dark pink color flaws or maybe some dark
blue color flaws to embroider the needs. It's not fixed that you have to embroidered it with
black color only. It just choose the color
of the flaws according to the color combination
of your embroidery hoop. If it comes to me that via selected this particularly
black color flows to embroidered the names. Then it is because later
I'm going to embroider this small hoodwinked
red color floss in-between the names. So do properly highlight
that hurt with the names I have selected this black
and red combination videos. You can go with any
color combination and instead of this hood, you can also write weights with whatever you find suitable. If you want. You can also Android us some
hashtag just below the name of decoupling or above their name if there
is some space. What example are you going to embroider high-tech together wherever hashtag love or
whatever you want to, Android or the person for
whom you are making it. If you want to embroidering
it in cursive writing and there is I and the name of
the bride or the groom. Then in that case, I'll suggest you to
simply not embroidered a small stage for that
dot over the eye. There. What do you do
is you can embroidered a small circle with the
help of small stages on what you can do is
you can embroider of French knot and that way it will look more attractive
and mood creative. Blind name is done similarly, Android or the
groom's name using that same backstitch technique
and smallest stages. Then embroidered those hard
similarly, the previous one. Now I need you in
the next video where I showed you the complete
embroidered names. So stay tuned and bye-bye.
17. Bride's Outfit: The name of Decapolis. Ready? Now we will make scared
of the bright and does what do you have to do is you have to take
a piece of blue. So here I'm taking a piece
of Nate of red color. Here you can notice
that there is already a laser
attached to this clue. You can also take or use some different kind of Pluto
instead of this net one. For example, you can
use some blue to, or cloth which is
already embroidered. Or you can also use dark clothes which has
some sequence work. So it's up to you
and around you. What type of material
is available? Choose accordingly according to your preferences or the person for whom you are making the sky. Once you select your
clue to then prepare your pen needle with
the yarn or the thread. For this, what do you
have to do is you have to take a sample
red color yarn. Or you can also separate single one string from this exit streams or
direct Galapagos. Then for the upper end of the clued up to two or
three centimeter, then start swinging it with the help of that needle and D3, we are doing so
also going to make plates in the clothes so
that it looks like this. Do not forget to tie a knot at the end of the trail before
you see you the clue, as later we are going to stretch this thread to make
Blake's in the glute. So it is very important
that there is some take note at the
end of the thread. Also, notice that you do not
have to sue this glute using very small stages as if you're still with
this small stitches. Then later when you
stretch the thread, you will get very ten
plates in this glute, which will not look good
to make this part of the brain in order to get the
dropper bleeds in the clue, this card of deep, right? What do you have to do
is you have to see you using not so long and not
so very small stages. What I mean that you
have to stitch it up using moderate stages. Off to those who will
the thread around the needle side start
stretching the trade. Now you can notice that when you are
stretching the trade, there are some
plates in the glute. So what do you have to do? A half to keep stretching
that trip till you completely get those plates
in the complete glued. So for those, what do
you have to do is you have to keep shifting
those plates at B, that side, rare
there is the node. So in this way you'll get the proper plates in the
complete length of the glue. And remember, I have
sown this glute with red color thread only because the color of the
clusters read-only. So if you have selected
some different color glued, then seal it with
that color trade-off. For example, let's say you have selected
some yellow color, blue to make this
code of the brain, then in that case, you have to still using that
yellow color out read-only. Otherwise some
different color thread will not look that good on it, and it will look
so different order then once you completely stretch the thread and you got plates and the complete
length of the clued. The next says you
have to arrange those plates nicely with
the help of your hand. Then if you are satisfied
with deep plates, then what do you have
to do is you have to secure that open
end of Detroit for those simply CO2 to
three stages and then tie a knot at the
back side of that blue. And with that discard of
the brightest, ready. Now the last part is live
datas to stitch this skirt on to this embroidery
hoop, please, this skirt on the
Android regroup, we just below the blows
of the bridle and arrange the position of this skirt
that where it is gonna be. Finally, I'm where
you have two stages. If you want, you can also mark some places that you are
going to stretch it. At this point, I'm gonna fold
it like whatever you want. Just arrange the position of this skirt in your
mind and then we are gonna fix it or completely staggered on
our embroidery hoop. Let's save violent ending this Scott on your embroidery hoop. At some point you'll find out that it is looking quite big, then you do not have to worry. You just simply
undo those stages, entering the length or
the width of deep blue, whatever looking extra to you. Simply again, make the
blatant that good. Without way I have
taught you earlier. However, that was evenly. I know the way it is. First you make the plates and then directly
sue those splits. So that was the
another way you can make the plates in
whatever way you like, either with the first one or the second one, it's up to you. Then once you are satisfied with the plate length of
this code, then seal, stage it on your embroidery
hoop using data again, ten years at that time too, you have to select the same
color, thread or yarn, which is exactly looking similar to the color
of your scope. They just see you this card on the embroidery hoop nicely
and make sure that those time you see with the help of very small stages that do
not look over this code. So you'll see you it nicely. Once you completely stitch this card on the
embroidery hoop, flip this embroidery
group, I'm tired, at least two to three nodes
or the back side of the glute Just to make sure that these
stages do not get undo. So for the simply tied
two to three nodes, as I have told you
in previous videos. That skirt of the
brightest ready, it is looking so
beautiful, isn't it? If you want, then
you can also secured both ends of this code with
the help of small stitches. That is totally optional. Now, I'll meet you in
the next video in which we will embroidered the bouquet
in the handout debrided. So stay tuned. Bye bye.
18. Bouquet: Do embroidery, the
bouquet in deep dives. Having prepared to take notes
whether I Niccolo flows, I'm using this red
color of loss first and then I'll go to use
your local overflows. But you can use a Niccolo flaws. It's totally up to you. You can use two or three
different color of laws, or you can only use one color of laws to
embroidery floss. For those, again, take out your needle from dQ
backup the glute. And as we have previously
Android at a French knot fly. This time again, we are gonna enjoy that are
French knot flight. So first, stretch the
thread like this, then hold your needle
away from your hand. Wrap this thread around the needle for three
to four times. After that shift. Tab at the backside of the
needle and insert the needle back into the cloth
just near the first. Just like this, however, while doing so, do not forget
to stretch this thread. Otherwise you'll not be able to get that proper
french North Florida. That sake, it is looking
so great, isn't it? No. Leave the needle and the red color flaws
at the backside of this glute and repair another noodle with the
yellow color flows as no, we're gonna embroider
yellow color floss around this central
red color flower. Once the needle and
thread is ready, take out the needle from backup deep glute just near
default SLA like this. After dark, again, hold the needle away
from your hand and wrap the thread around
linear there for three to four times,
just like this. Then shift these rep at the
backside of the needle. And so denuded it
back into the glute just near the first of
this yellow color trait? Yes, like this. So with this, the second floor of the
bouquet is also ready. Now what do you have to
do is you have to repeat the same procedure of this strange not technique to completely I'm
drawing the bouquet. These sets are take out, denuded from backup big glute. Hold the needle away
from your hand, grab the thread around the needle for three
to four times, then shift these reds at
the bedside all the needed, and then insert the needle
back into the glute near the point from where you have taken
note beneath them. But by doing so, do not forget to stretch the
trade that you have wrapped around your needed in order to get that drop-off French node. Once you completely embroidered the yellow-colored floss laws
around this red one, again, take your red color
flows and start embroidering flowers around
these local airflow. Selected only red and
yellow color flaws to completely embroidered
the flaws in this bouquet. But if you want, then you can use
multiple colors. For example, it pink,
orange, yellow, white, and so on to
completely embroidered the plus and thus
booking it is up to you. You can embroider
all the plots of same color or written
multiple color flows. Since it is your God, you are making it. So modify the
designs if you want. So the person for whom you
are making it for him. So once you completely
embroidery, all the flowers of the
bouquet will look like this. Isn't it? Looking so, so
beautiful integrity. We will decorate this
embroidery hoop frame in the next video. So stay tuned and I'll meet you in the next
video. Bye-bye.
19. Frame Decoration: We are going to decorate those embroidery hoop
frame in this video. So far those preheat your
glue gun with the glue stick as now we're gonna pays the decorative liaise with
the help of this glue stick. So apply the hot
glue on the frame, but on a very small part, otherwise it will get
cooled down very quickly. Then paste the
decorative leaves on debt part of the
hoop. After dark. Again, apply the hot
glue on the frame and make sure that you apply
the hot glue very carefully, that the hot glue do
not come over here. Embroidery clue. Then basically decorative
leaves on that heart deal. In this way you just have to
repeat the same procedure. Apply hot glue on
this small part of the embroidery hoop dream and then the decorative
list on that bond. This way you will be able to completely decorate your
embroidery hoop frame. It is not necessarily
that you have to pace the exactly same decorative lays on your embroidery hoop frame. You can paste any
decorative list that is easily available to you and
around you are in the market. Just paste that decorative list that is easily available to you. You can always
modify the design. If you do not want to paste this decorative layers or any other kind of
degradative list. Then in that case, what you can do is you
can pay some beads, stones, or half poles on
this embroidery hoop frame. Let's suppose that you
are pasting or decorating your embroidery hoop
frame with the help of half buzz beads are students. Then there are again two cases. That first one is that you can paste all the beats are at
least two Ansoff, same color. On another way, you can be as multicolor beads are
multicolored stones on your Android roof. To decorate it, you
can simply paste white color half volts on
this embroidery hoop frame. It is totally up to you. You can decorate the
embroidery hoop according to yourself and as per
your lightings. So it is basically your choice. If you had a big nose
and tune know how to use glue gun or you
don't have any glue gun. Then in that case, what you can do for pasting your decorative leaves or beat, you can simply use
acrylic glue that will also paste your
decorative material with the embroidery hoop frame. The only reason why I
didn't use is that it will take a little bit more time
as compared to this glue gun, a blue state to get dry. So that was the only reason
for me to use this Google. If you do not want
to use glue gun, you can simply use
that acrylic glue. It's totally up to you. But if you are
using hot glue gun, then please make sure that
you use it very carefully. Otherwise, you might get
burned with dot-product. Would you use it very carefully? Also make sure while placing your decorative material that the heart view do not come
away your Android drink load. By now the pasting
of this decorator lays on this embroidery
hoop is almost done. The decorative list, once you completely reached
the starting or the beginning point
from where you have started pasting
your decorative leaves. You can cut the
decorative liaise with the help of this scissor, but make sure that it
is a sharp scissors to get up dropper end
of the decorative list. Now to secure the end of
the degradative list, simply apply hot glue
on it and press it. In this way, you will be able to secure the end of the
degradative list. With this declaration part of this Android regroup
frame is done. If you want. You can also pay some ribbon go on this note, but that is totally optional. What did you say?
How's it looking too? You know, let me know
that and discussion box. Now in the next video, we will completely secured
the embroidery glute. So stay tuned and I'll meet
you in the next video.
20. Final Task: Our God is almost ready. You can notice that
I have embroidered 25th anniversary just below
the name of the copy. As I'm making this card for
the couple who has celebrated their 25th anniversary on
fourth February of 2022. The only work that is
left in the scar as you completely siloed
secured the cloth with the embroidery hoop frame. What does what do
you have to do? A 0.5 to trim your clothes
in a circular shape, leaving at least three to four centimeter extra from the frame so that you will be able to paste it does take it
with the frame easily. We are pasting the cloth with the embroidery hoop
instead of swing it. Because if you see you
too small embroidery, our stitch marks will come at
the main side of the card, which will not look good. So that's why we are
pasting it with different. For pasting, what do you have
to do is again hot glue gun and then apply a small amount of hot view on the
frame like this, and then start
pasting your clue. But every time applying
HOD view on small, small parts of the frame
as a gig dry very quickly. So just apply hot glue on this small part of the frame
and then base your glute. You have to repeat the
same procedure till you completely paste your clothes
with the embroidery hoop, invite basing your glute. There is need of making plates. Then make plates in
your glute. Base two. Once you completely
pays you upload with the embroidery hoop at
will look like this. Now we have to seal this. So far the ceiling here, I'm going to use
this foam sheet. You can easily find it
and you're nearby market. Now, please the sheet on your working table,
just like this. Then over it, please your saved the date card,
just like this. As now, we are going to
trace the skull to get the exact shape and the size of the sheet to seal this guide. The tracing arranged the
cart position on the sheet and then please the shape
with the help of the pensive. You can trace the shape
with the help of Venezuela. It is up to you. It doesn't matter
whether you are tracing it with the
help of pencil or pen. Once you are done with
the tracing part a, this is a start cutting
this shape from this sheet. You can cut the shape with the help of the
paper gutter also. So it's totally up to you. You can cut it with
the help of anything, whether it is a season
or a paper Gato. But make sure you handle says, a paper cutter very
carefully and not harmless and the circular
form sheet is ready. Now we are going to paste the sheet on our
embroidery hoop frame. Preheat your glue gun, and then start applying hot glue on the
embroidery hoop frame, just like I am applying. Just make sure that you
do not apply hot glue on very small part of the frame are on very large
part of the frame. Just apply it on medium
or moderate part of the frame and then pays your circular sheet
over dark part. Just like this. Right? After this, again,
apply hot glue on some part of the frame and
paste the sheet on that pipe. Now you have to repeat
the same procedure, applying hot glue on
small part or some part of the frame and paste
your sheet on that part. Tell you completely
paste this foam sheet on the embroidery hoop frame
are completely sealed. This embroidery card. Make sure you paste the sheet
from each and every point. Spot pasting this one sheet, you use only an early hot
glue or glue gun stake. As acrylic glue will not. That good luck. They stink this sheet with this ceiling part
of the card is done. Now, what do you have to
do as you have to arrange the plates of the bride's is good with the help
of your hands, just like I am arranging. And then press it nicely
with the help of your hands. Just like this, I'm saved. The date guard is completely
ready as indeed looking so, so beautiful and the
color combinations are looking so great. Now, in the next video, there is a fun class
project work for you. Stake you in and I read
you in the next video. Bye.
21. Project Work: Guys, now it is time
for your project work. Make such, save the date
embroidery hoop on your own, public goods and roses
and final pictures and upload those pictures in this class project and
resources section. I'm super excited
to see big Joseph, the art embroidery hoop, and to see which color blouses and paints you have
used in your hoop. After completing the class, do not forget to review it as I'm waiting
for your feedback. Also, if you do not want to miss any notifications regarding my newest classes on Skillshare, then do not forget to
place the Follow button. Thank you so much
guys for joining me. Bye bye. Take care.
 Tanya Maheshwari, Artist and Crafter