Transcripts
1. Introduction: There's nothing
more festive than a gingerbread house,
the candy accents, the festive colors, the
sweet little details that feel like stepping right
into the holiday season. Hi there creative. I'm
Shannon and I love turning simple ideas into
creative projects that anyone can enjoy. In this short class, I'll
show you how to paint a delightful
gingerbread house using a few easy watercolor
techniques. You start from choosing one of the gingerbread
house sketches in the project and resources
section of this class. Once your sketch is ready, we'll explore negative
space painting and soft shadowing techniques to make our gingerbread
house stand out. I'll also walk you
through adding simple finishing touches that bring the whole
illustration to life. This class is perfect
for anyone who loves watercolor
and wants to create a sweet holiday
illustration that can be incorporated into
gift tags and holiday cards. And all you need
to get started are basic watercolor
painting supplies. So let's dive in and paint a deliciously festive
gingerbread house together.
2. Warm up Exercises: Before we dive right into
painting our gingerbread house, I want to share the
main techniques that we will be using
in this painting. So the first one is going to be a negative space painting where we paint outside of the shape rather than
filling the color inside. Now, you can draw a simple
shape on a piece of paper. This can be a circle, a heart, and then you're going to
use your paint brush and the color of your choice
to outline that shape. Try not to let your paint go on the inside and
really take your time. The second technique is going to be how we paint our shadows. So I have this circle, and I'm using blue to add a
shadow to one side of this. Then I'm going to
clean my brush, and with a little bit of clean
water still in the brush, I'm going to drag it along
the outer edge of that light. What we're going for is for
a smooth transition from your blue that fades into the background rather
than having a harsh line. So sometimes you
will have to clean your brush and keep lifting color from the paper until the transition
is smoothened out.
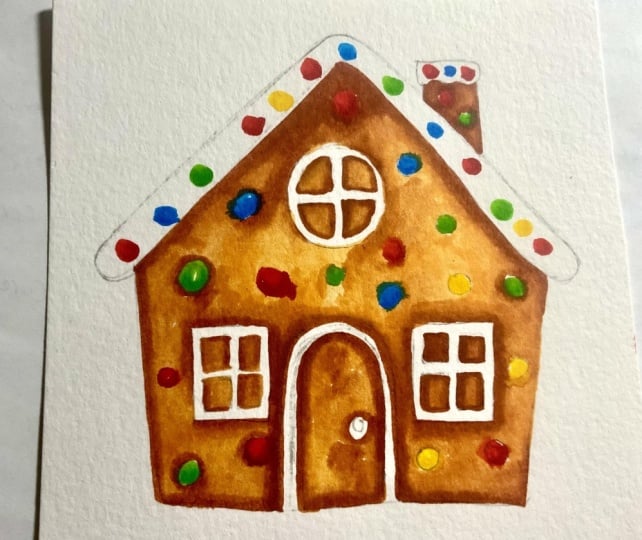
3. Painting the Gingerbread House: In this lesson, we are going to be adding in the brown part of our gingerbread house and then focus on the details in
the rest of the class. So we're using the negative painting technique
that we did in the previous warm
up lesson where we are painting in the
gingerbread house, but leaving the
icing section white. Now, of course, you
could use masking fluid and mask out the areas
you want to remain white. But I also think that it is
a lot more fun and organic to just do this using a
negative painting technique. So you're basically going
to be outlining each of these sections like the
candy on the house, the windows and the doors, and filling in the space on the outside of
these elements. And as you are
adding this paint, you can paint the entire thing
in this solid brown color, or you can add some
water to just create a little bit of
variation and texture. H Once we're finished, I will see you next
lesson where we start adding some
details to our windows.
4. Painting the Windows: In this lesson, we're using that same negative space
painting technique to fill in the
windows with blue. Now, you can use any
color that you want. I just like how the blue will contrast with the warmer brown. And as you're painting, take
your time so that you don't paint in too much of the white Once your mendous are complete, I'll see you in the
next lesson where we can start adding our candy.
5. Painting the Candy: Now we're going to
paint our candy, and for this lesson, you can use whatever colors you want. I am starting with red
for my gum balls and then adding that color to the candy canes at the side of the house and the
pinwheel candy. So feel free to alternate
whatever colors you want and to experiment with how you
add in these colors. When you're finished
painting in the candy, I'll see you in the
next lesson where we look at how to add some shadows to these candies to make them look
three dimensional.
6. Adding Shadows: In this lesson, we're now
going to add some shadows to our gingerbread house to
just build up the dimension. And I'm starting with a darker
brown and a smaller brush, and I'm going to paint a line of color on the
bottom and the right of each of these elements that are on the brown part of
my gingerbread house. Then you're going to clean
your brush and use clean water to lightly blend that harsh
edge into the background. Before we add shadows
to the candy, I want to add a little bit of shadowing to the white areas, and I'm using a very
light diluted gray. We don't want it to
overpower anything, but we do want it to be a little bit more of
a contrast versus just being a solid white
space for the icing. You're going to be adding this gray on the same
shadow side that you've been using for the
other shadows so far. So for me, that is the
right and the bottom, it is very much random. You don't have to try to
hit all of the spots. You just want enough to insinuate that the
light is hitting this in and causing some
shadows to form. Starting with the candy cane, I am using a dark red, and I'm adding a line on the right and the bottom of
each of these red sections. I'm also going to
add the shadow to the gumbo candy on
the roof and by the door and the
windows and also to the pinwheel candy on the
gingerbread house as well. And for the other candy, use darker shades
of those colors to add a similar line to the
bottom of those as well. When it comes to adding
shadows on the window, this is going to be a little bit different because the icon is on top of the window pane and will be casting the shadow
on the window. So rather than it being
on the bottom, right, these shadows will be on the upper left of
each window pane to create the illusion that the sin is on top and
cast in that shadow. Your shadows are complete. I'll see you in the
next lesson where we add some highlights to
tie everything together.
7. Adding Highlights: The final step to pull
everything together and really make this pop is
to add white highlights. So use a white gel pen or paint pen or some
acrylic paint or guash, any opaque white medium to
just add a thin line in the upper left corner to each
of these pieces of candy. You can also use
this opaque white to add any other details and any other areas where
you want to add more icin to just bring
everything together. For me, that is adding a pattern on the door
and to the chimney, using some diagonal lines, and also to add some
dots all across the gingerbread house to fill in some of that negative
space that we have. You can also add some of that gray to the
bottom of this to add shadowing to the snowy part at the bottom of the painting. And that is pretty much it
for my gingerbread host. So once you're finished
adding your white details, I'll see you in the
next lesson. Oh
8. Wrap up: And that is it for your
gingerbread house painting. I can't wait to see
how yours turned out, so head to the projects and resources section of
this class to share it. I'd also appreciate it if you could leave a review
sharing your thoughts on the class so
that others who may be interested in a quick, beginner friendly
watercolor class would know what to expect. Thank you so much for
joining me today, and I'll see you
in the next class.
 Shannon Layne, Lettering, Procreate & Art