Transcripts
1. Welcome & Supplies: Hi, there creative.
In this class, we're going to paint an expressive watercolor
river landscape. The supplies you will need are watercolor paper,
watercolor paints, masking or washy tape, a paint brush, white wash or acrylic paint or a paint pen. And the sketch for this landscape can be
found below this video. So you can sketch that onto your paper before
we get started.
2. Warm Up Watercolor Techniques: Before we start
our main painting, we're going to warm up with a few essential
watercolor techniques. First, we'll have a look at a graded wash where the color shifts smoothly
from dark to light. This is going to help us with our control of
water and pigment. So you're going to paint some color and then
clean your brush and grab some water and paint it along the bottom
edge of the color. The watercolor should
naturally flow into that water and start to
create a soft transition. But you can clean
your brush and go over to help smooth
it a little bit more. And then clean your brush and use more water to fade out
the bottom edge of the light. And you can practice creating these washes from
different angles because not all will need to
be going from top to bottom. Sometimes you will have
an element that needs a gradient of light to dart that transitions
horizontally. So you can play around with different angles of
creating these washes. The next technique
we're going to explore is creating
blooms or back runs, which happens when
we add extra water. So first, you're going
to paint some color, and then you're going to add
some extra water on top. And this water will push away the pigment and create
beautiful organic shapes. So you can try this with
an even amount of color, or you can even
create a graded wash and add the water in. And you will see
that it also adds some really nice back
runs and blooms. The next thing we
want to look at is how we're going to be
layering our colors. So let's we're working on
our grass in the fields. You might think that
you're going to start with your lightest green. And while, this is
a good approach, it may be better to start
with something even lighter, which in the case of
green is a yellow. So I've put down
some yellow first, and then I'm going
to add some of the same green and lightly
blend them together. Then I'm going to
select a darker green and to help create
a little bit more depth. And you'll see that this
creates a better transition of light to dark than just using a light green
and a dark green. Then for texture, we're
gonna try scraping into damp paint to create marks that suggest movement
or rough edges. And you can use the back of your paint brush or
you can even use a palette knife if
you have one or an old credit card works
for this technique as well.
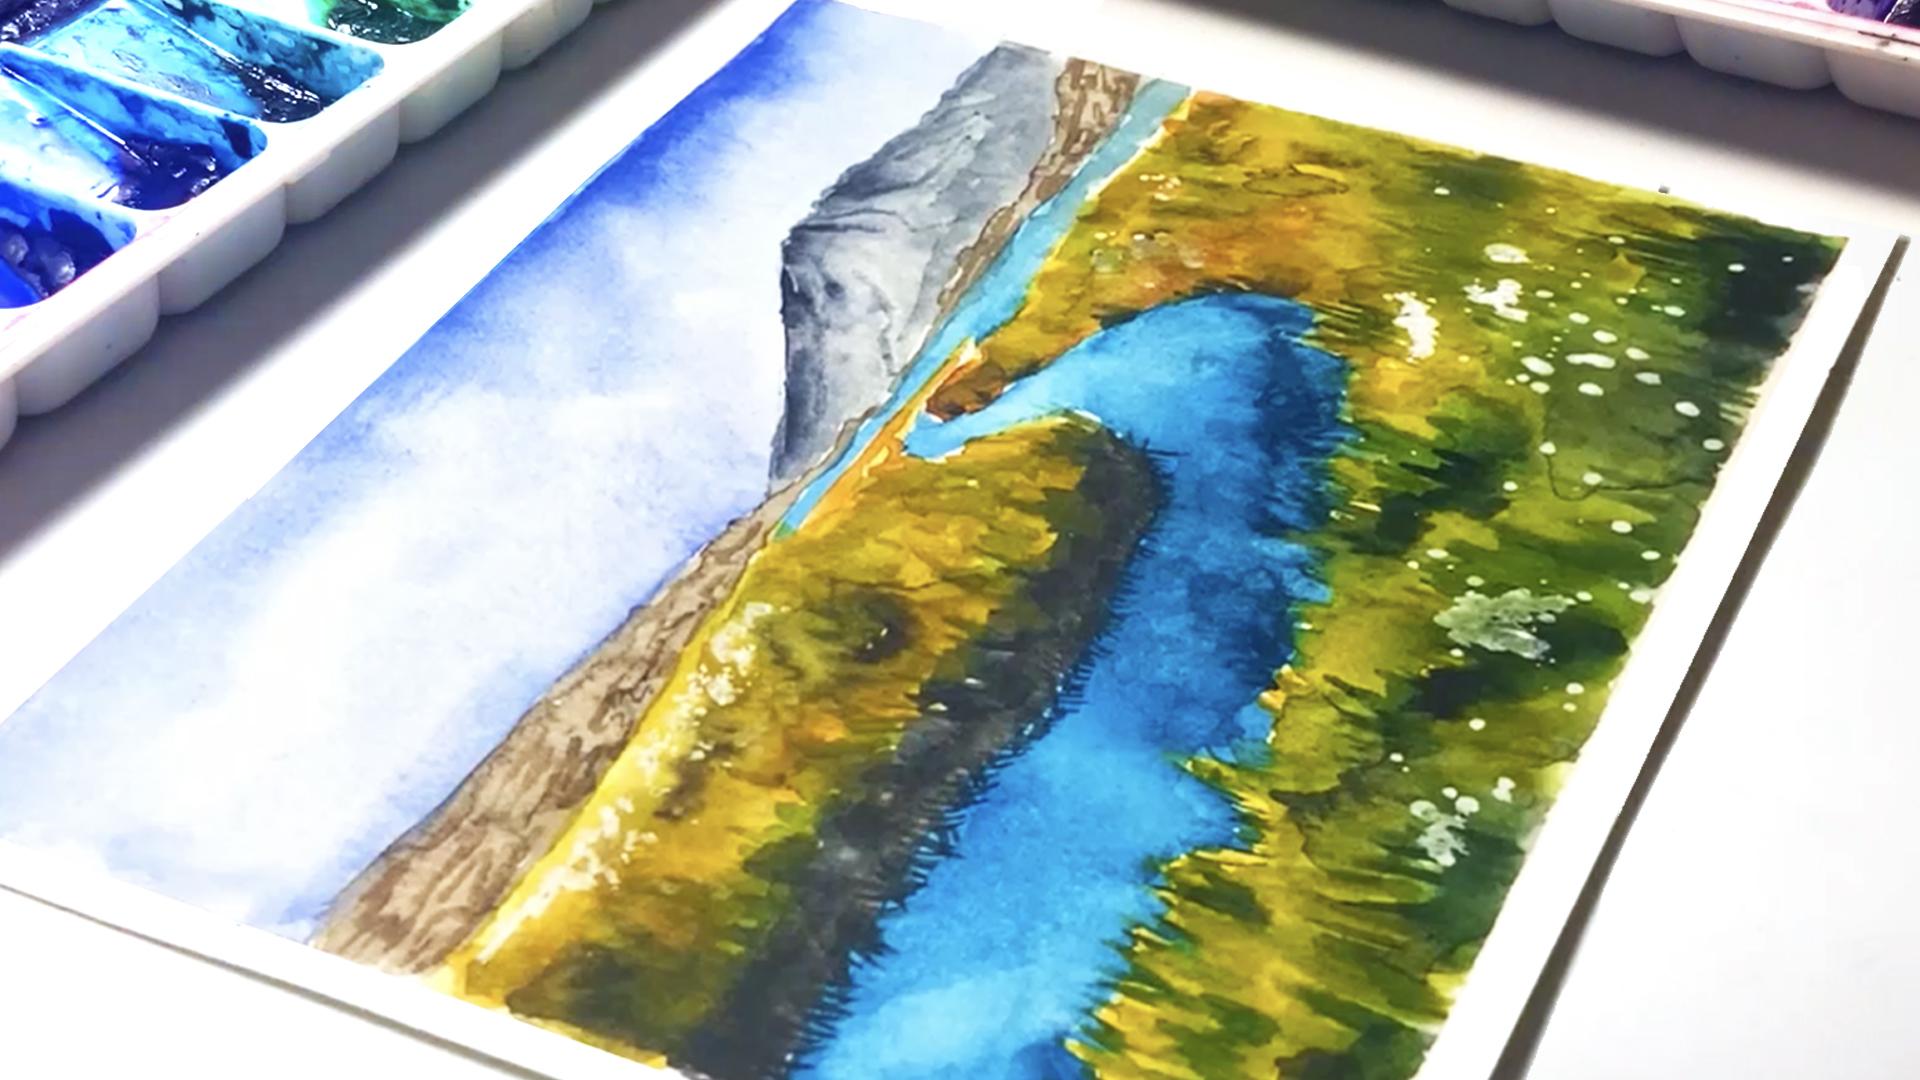
3. Let's Start Painting: So I'm going to start by
painting the background first, and I'm using blue, and I'm going to
mix a lot of water to it to just create
a diluted mix. Then I'm going to
start by painting that along the top
part of the sky. And we're going to create
somewhat of a graded wash, but I'm not trying to
be too precise because the water will help to
move the color around. And I'm also going
to intentionally add some blooms to create some natural organic
looking clothes rather than trying to paint
the clothes precisely. As you paint, you can add a little bit of
blue to some areas. Again, keep in mind that the white part
that we're going to be leaving in this sky is going
to represent our clothes. So you want them to look a bit, like closed and not
necessarily have any sharp edges or lanes so pay attention and use
clean water to blend out any harsh lines
that you have forming. And while that is drying, I'm not going to work
on the mountain that is in front of it because I don't
want the colors to bleed. I'm actually going
to allow that to dry naturally and then work on adding in some color
to the grassy fields. So I'm using yellow, and this is yellow ochre that
is mixed with a little bit of a warmer yellow to create
a bright warm yellow color, and I'm going to use some very abstract rough
brush strokes to paint in the grassy
fw in the middle ground. Then I'm also going
to add some of that color to the grassy
fields in the foreground. And because this is close to us, we're going to need to create
the illusion of texture. So I'm using some
short, choppy lines, and I'm also going to have some skinnier lines all to
simulate the grassy texture. This is only the first layer, so I'm not trying to be too
precise with what I'm doing. I'm just trying to
block in the colors, especially in the areas where I want the lighter
parts of the grass. So once I'm done adding that, I'm going to mix a little
bit of a lighter green and then also block in some colors in the
foreground and again, using similar strokes and alternating between
these larger, chunkier bistrobs and then
adding some more skinnier, thinner ones to create
that glassy texture. And then I'm going to get
a darker green and repeat that same process of adding these abstract lines
to the foreground. So while that is drying, I'm going to head back to the mountains
in the background, and I'm using a
bluish gray mixture to paint a line at the
top of the mountain, and then I'm using some water to create a little bit of contrast. You can even drop in a
darker shade of this gray to a few areas to create a little bit more
of an organic texture. And then you're going
to use the back of your paint brush
or a credit card or something to just scrape in some lines to add texture
to the mountains. And then I'm going back in
with some of that darker gray just to add a
little bit more contrast and color variation
over the texture that was scratched in. And
4. Add Finishing Touches: So now I'm going back
to the middle ground, and I am mixing a blue
to paint in the river. And as I paint behind the grass, I'm adding the color in some similar strokes to
how I added the grass, especially along the edge, just to further create
that sense of depth with the grassy field being
in front of the river. And I painted this using
a lot of water along with my color so I can get some organic blooms and
textures as I paint. So next I'm going back
to the rocky hills and I'm using some brown to
just paint in the color. And then I'm using a
little bit of a darker brown to add some abstract lines to create the texture of rocks. And I'm not trying to
be too accurate and too defined because this
is in the background. So I'm mainly trying to
gesture to the texture, and I'm also going to drop in some water to create some blooms and help give this a
more textured effect. And then I'm going to go
back to the grassy fields. And I have mixed a
reddish brown color, and I'm just going
to use that to go over some of the
areas on this field. And paying attention
to the reference image and seeing which areas are dark and which
areas are light. And I'm also being creative
and making adjustments based on how I think certain colors may look
next to each other. As you paint, you can also use some water just to help fade
out some of that color, especially in the background
because like I mentioned, the closer we are
to the foreground is when we will start to
see all of the definition. So the color that you're adding to the grass that is
in the middle ground, that doesn't need to be as well defined as the one in the front. So I'm going to
just be alternating between my reddish brown and then some greens just to help build up the
layers for the grass. And I'm also working on the grassy field on
the left side as well just so that I am using the same colors on both
sides to keep them cohesive. In the reference image, we can see that
there is a shadow cast by the grassy
field on the left. So I've just mounted
with a very dark brown, and I'm adding some short, choppy strokes to
create the illusion of the shadow over the river. This part is going
to be a little bit tedious and time consuming, and you just want to make
sure that you take your time as you go and mimic the
effect of the grass. So, again, I'm just going to
be alternating between using different shades of
green to help build up the texture of the grass, mainly in the foreground, and I'm also paying attention to the shadowing on
my reference image. And to complete this, I'm going to add some splatters. But first, I'm using a
white paint pen to add some tiny dots all across the grass to create
some tiny flowers. And then I'm going to
use a paintbrush and some acrylic paint to add a few splatters
in the foreground.
5. Wrap Up: And once your painting is dry, you can remove
your masking tape, and your expressive river
mountain scene is complete. I hope you enjoyed
painting along with me. Thank you so much
for joining me in this class, and
I'll see you soon.
 Shannon Layne, Lettering, Procreate & Art