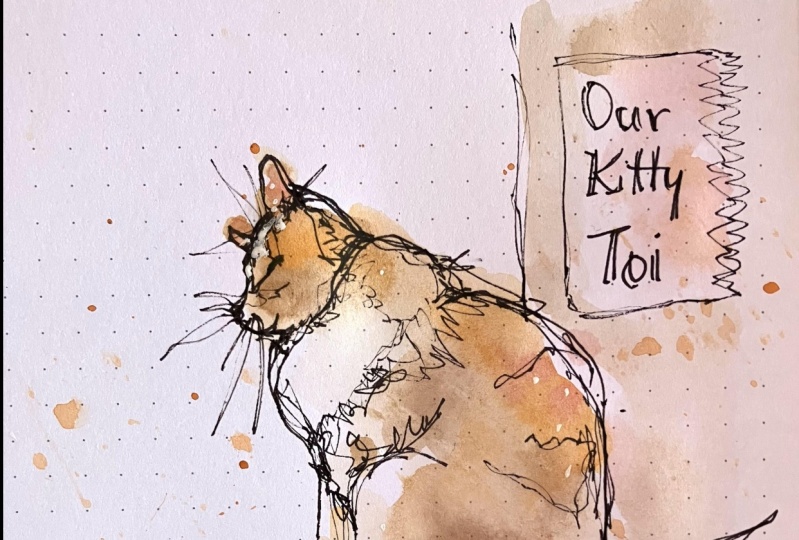
Transcripts
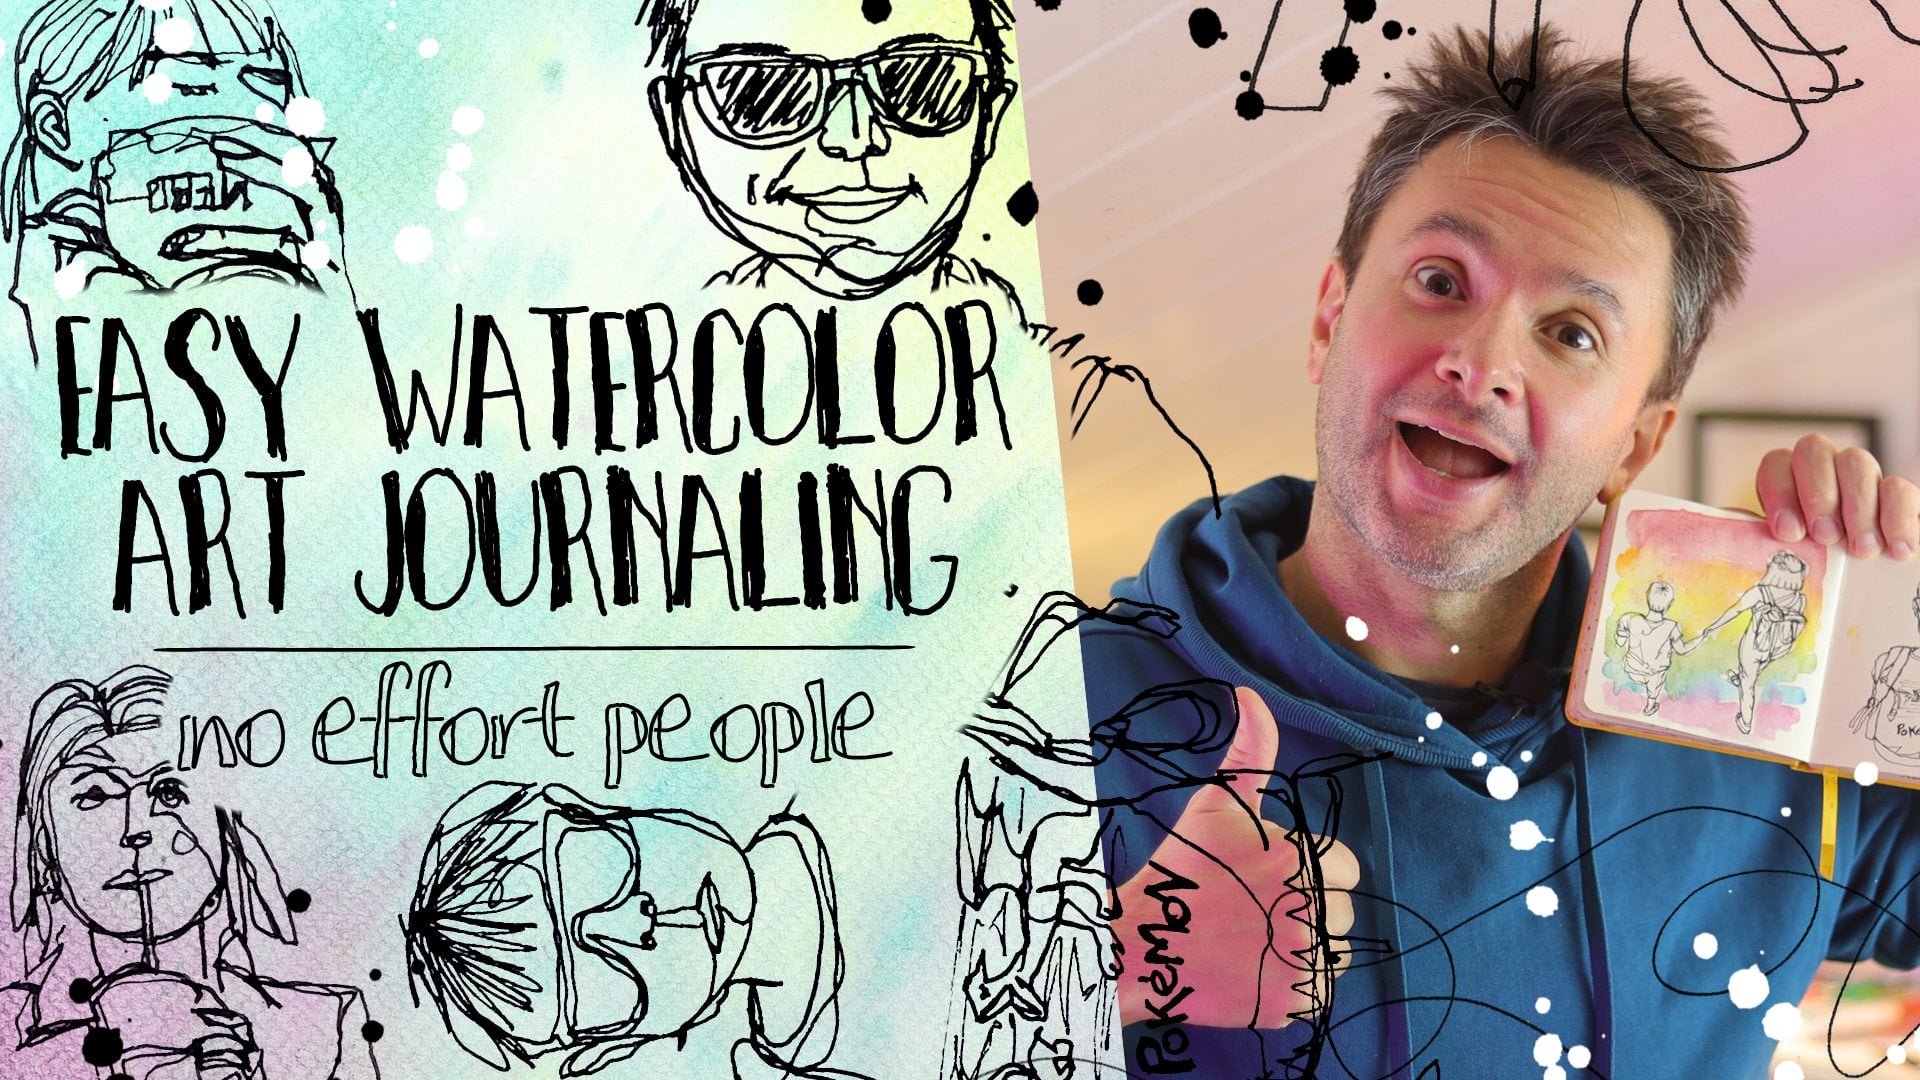
1. Introduction to No Effort Sketch Journaling: You can draw. I know you can, because if you try
continuous contro drawings, I'm sure you'll be
surprised with the results. Maybe it wouldn't be
what you'd expect, but we don't always
know the things we need until we see them. Jack, this got cold like
your sense of humor. Hi. My name is Fati, and I identify as a drawer. If you know me, if
you watch my classes, you know my love for No
for ticket journaling and my mission to get everyone to
start drawing immediately. And I think perfect way to do this is continuous Co drawing. This all started with my
class. Everyone can draw. One of the exercises in that class was
continuous Co drawing, and I kind of fell in love
with students drawings. People who claimed that they couldn't draw
were turning in these crazy looking,
interesting, captivating lines. And one day at a coffee shop, instead of drawing
like I always do, I did a continuous contra
drawing, and it all clicked. It was done in moments, and it had everything I wanted. No planning, no
pencil sketching. It was a representation of my
subject, but not entirely. It was also something different,
something expressive. And it looked very stylish when combined with a
bit of watercolors. So in this class, we will dive into
continuous contro drawing. We will talk about stress
free art practice, making expressive art, and getting better at
drawing altogether. In the process, you will learn the difference between
looking and seeing, strengthen your hand
eye coordination, and of course, I will
demonstrate lots of examples. This class is for anyone
looking to start art journaling and who wants to get more confident
at drawing. All you need to take this
class is pen and paper. It doesn't even have to
be watercolor paper, but no pencils or erasers. We won't make any mistakes,
so we don't need them. Looking forward to doing
this with you. Let's go.
2. Your Class Project: Your class project is drawing. Just pick up the pen
and put it on paper. Specifically, continuous
control drawing. Jack, your project is to get
me a fresh cup of coffee, and by fresh, I also mean hot. Throughout the class,
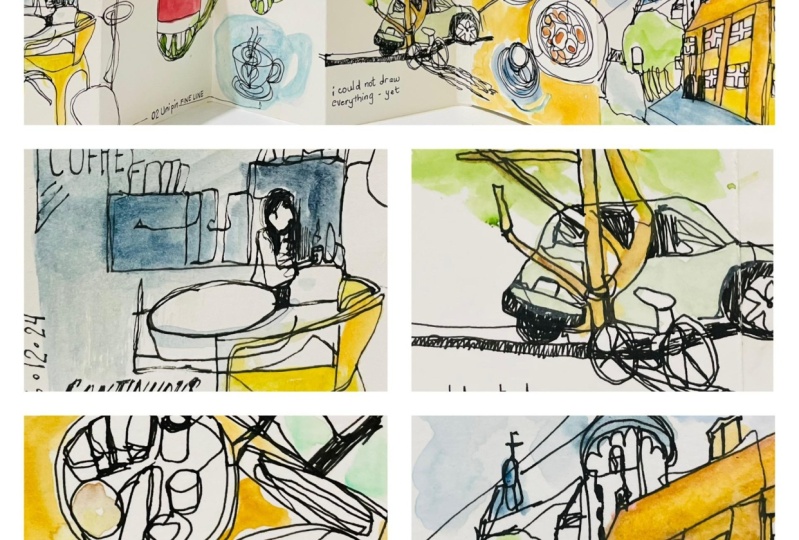
I will draw lots of things interior of a cafe, a portrait, among a tree, stuff on the table,
and a building. I try to pick things
that will be likely your subjects when you start your own noi for Sket journals. You can draw them with
me during the class. You can also find each photo in the class resource section. Feel free to download them, zoom in, look closely
to see the details. And then this is the key draw them in continuous contour style without lifting your pen. Later on, take a photo and share it with us so we
can appreciate your art. By completing your
class project, you will strengthen your
hand eye coordination and learn the difference
between looking and seeing. Thanks to these two skills, you will be a better drawer, the person who
draws, but you will also illustrate your
subject expressively, which can be super satisfy. Now if you don't mind, I
will get to the class. Oh, here's my coffee.
Thanks, Jack. Thanks.
3. Why Do I Use Continuous Contour Drawing p1: Sorry, I'm looking at my notes. Everyone is recording. You are recording. You are recording. Jack, are you recording?
Okay. Jack, where was I? Oh, yes. The students drawings who took my class made me fall in love with what
I was teaching to them. Continuous control drawing. I guess before I was looking at continuous Control drawing
only as a practice tool, but using the restrictions that come with continuous contro drawing to create helped me come up with
noorsket journaling. So this is why I use continuous Cro drawing for
no for sketch journaling, for the speed and
for the chance of ending up with something
new, something unexpected. But this is not all the benefit. Continuous control drawing
is a great exercise to teach yourself that
hand eye coordination, which is crucial for
getting better at drawing. Seeing versus looking.
To be able to draw, you have to see your subject, see the details, see the lines, see the differences,
see the textures. Just looking is not enough. When you do continuous contour, you are combining the scene with the movement of your hand. You move your hand at the same speed and
direction as your eyes. Your eyes are
tracking the lines of your subject and your hands
move the pen on the paper, the same way to trace out
your subject on the paper. Now let's try to do
that with this example. Okay. Now, what I'm going
to do I have this image. Let's imagine I'm out
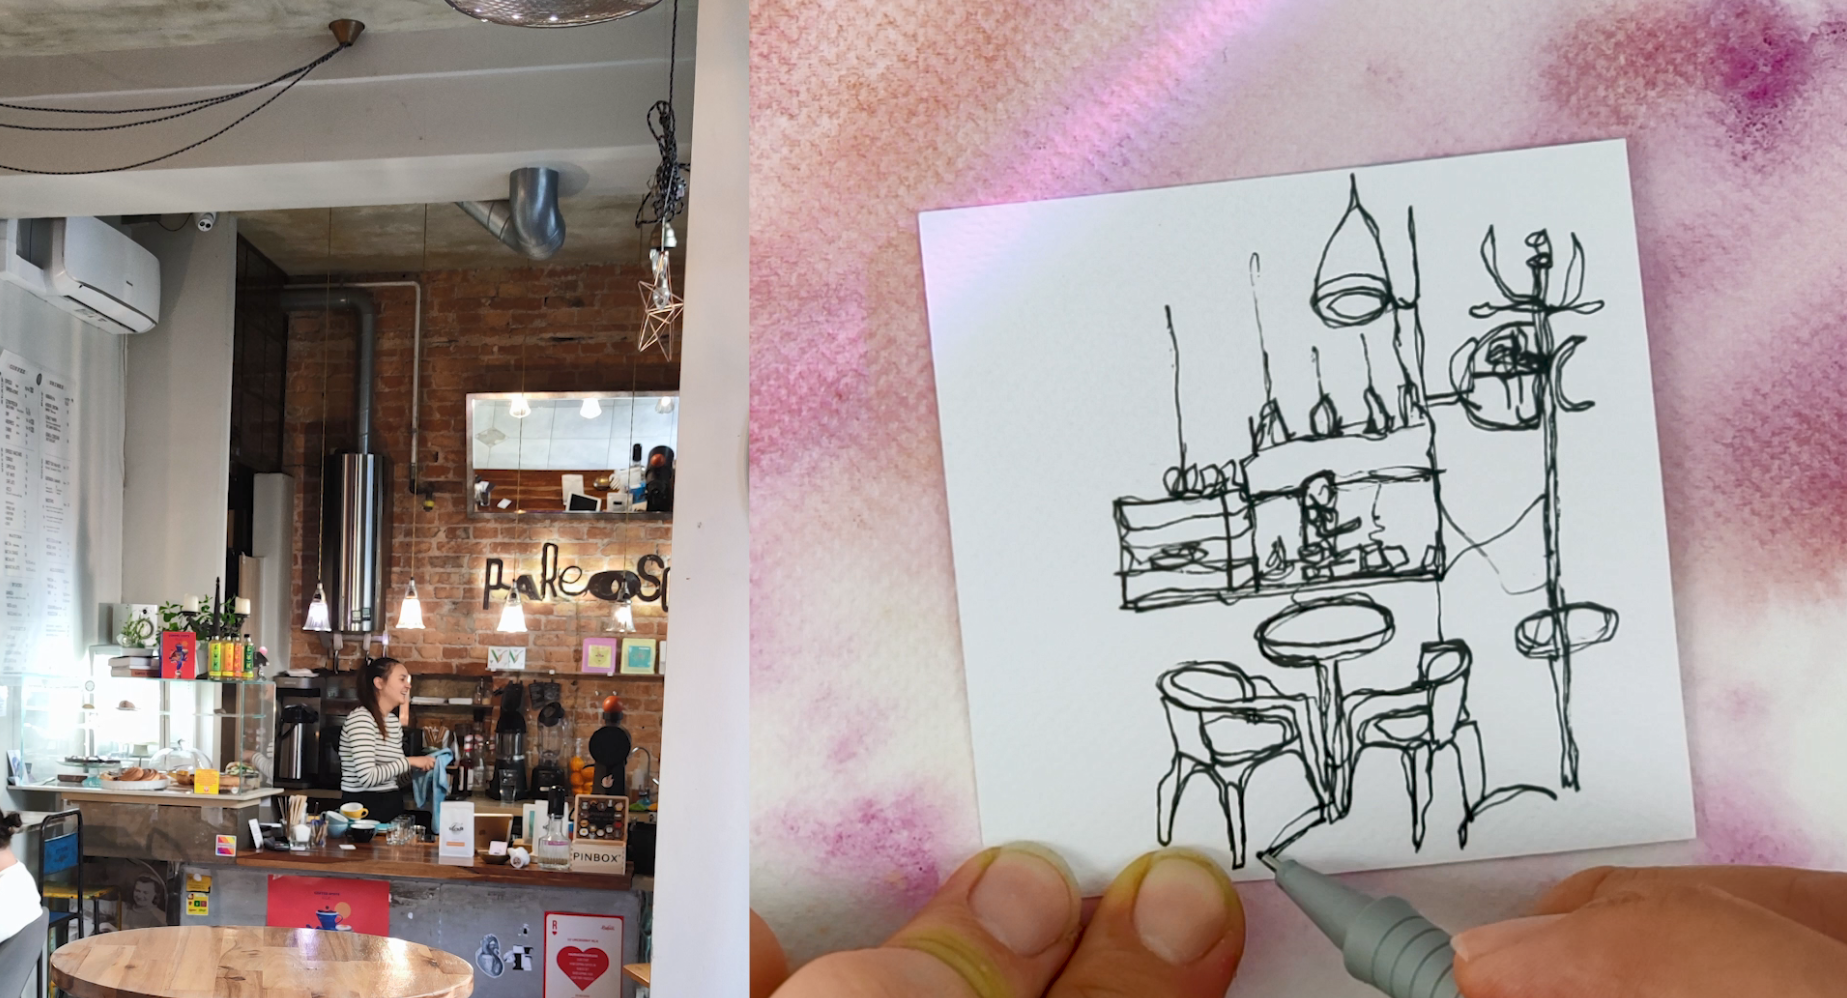
in a coffee shop. This one of my
favorite coffee shops. It's called Payosup and
I will as I was there, and I actually did this drawing. So I want to repeat the real
life situation with you. This was the photo I took. I'm doing a series from the coffee shops I visit
called Cafe Portraits. So I'm trying to capture that kind of portrait photo of a cafe, whatever
that might be. Sometimes it's a
corner, sometimes it's where they make coffee. Sometimes it's from outside. Sometimes they have
very nice shop fronts. So in that series, when I go to coffee shops, I did this I think last
Friday or the Friday before, and I will be doing continuous
country drawing of this m. Okay, let's start. I'm
choosing this table. It's quite in the center
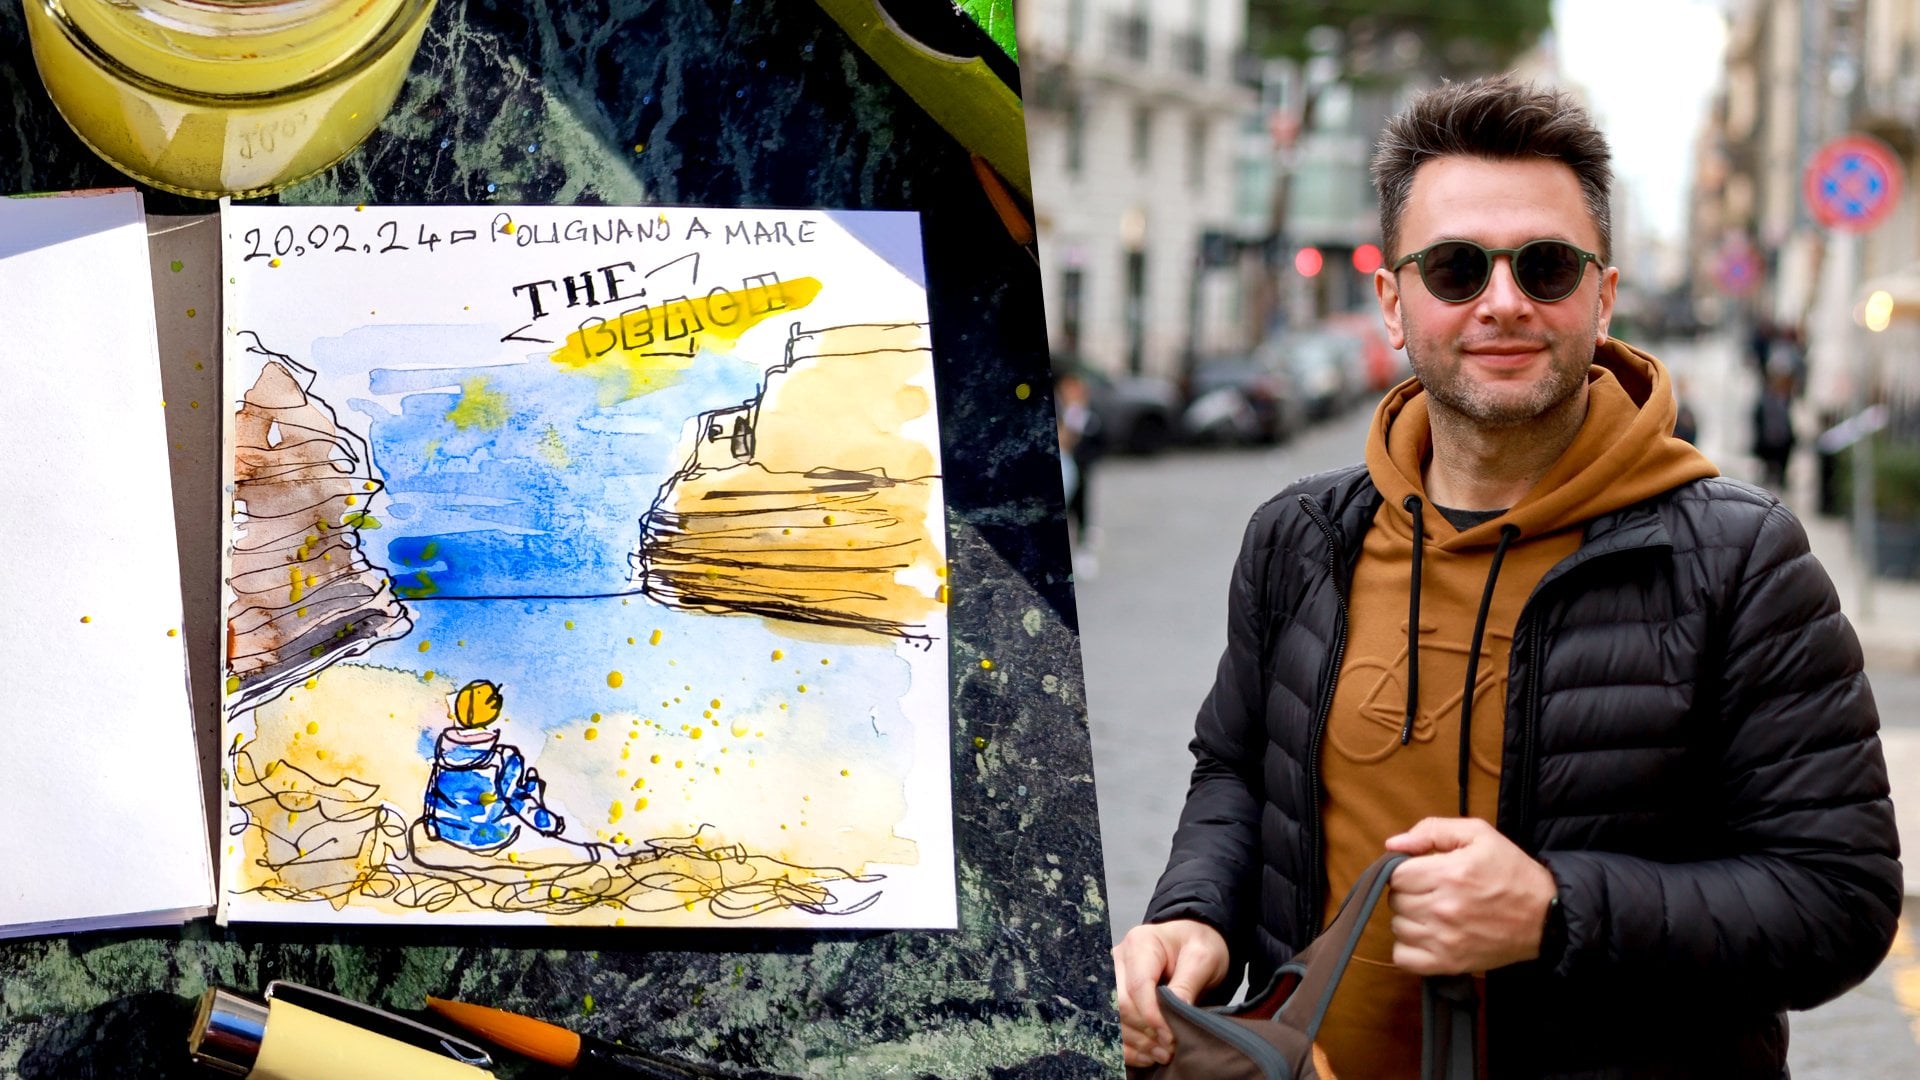
as my starting point. And I don't worry too much about where I'm going to end up. I will write date and place
on the top left and I will leave space here for some
writing for the title. So I'm starting from here. I put my pen down, and now I'm tracing the
table with my eyes. I'm not lifting my pen. I see the leg is
going down like that. And in the meantime, it's touching here too to the chair hair is going further down because
it's closer to me. And this leg is
also closer to me. There's this kind of shape here. Or there's something, but
I'm not bothered with that. I can see the cushion on
another chair, I think. And by the way, I'm doing a little bit slower
than usual because I'm trying to narrate what
I'm doing for you. But normally this
should be done quickly. Like I said, don't
think too much. This is not supposed to look like anything. This scene gives us a starting point and with that, we end up with something else. Okay, and this part is done. And from here, as you can see, I haven't lift up my pen yet. Over here, there is a wall. And next to the wall over here, I see nice looking lamp. Sorry, I had to lift
my pen up because my watch was buzzing. My jump was over. If you
don't know what jump is, check out my jump class. And I will focus on this
right hand side now. This goes all the way
to the same level. I will just focus on
this code hanger here. I'll bring it all the way. Don't worry about
making all the details. Try to do them quickly.
4. Why Do I Use Continuous Contour Drawing p2: There's a kind. In
this photograph, and I'm going back to
the wall and from here, just above the round table, I can see in the
distance the coffee bar. I will now focus on that. There's a cake display here inside there are
some cakes and just a little bit above
there are these lamps. That look, I'm
doing this quickly. The proportions might not be the same, don't
worry about that. I mean, I can see that
there are some stuff here. There's a little cup. There's a kind of
a piece of paper, maybe it's a WiFi code, and there's a tablet behind it. And so I represented
those, and beyond them, there is this probably
Barista Okay. And then behind her,
there's a shelf. You see, I don't worry about going over the same lines,
but in the meantime, if it's her face where
it's supposed to be, I try to go around it, and then this line
becomes more pronounced. And these are the decisions
you will have to make when you do this that sometimes
it's okay to go across. For example, there's
another wall here that there's a shelf
in this thing, and that sometimes to from the edge of the
wall to the coat hanger, it's okay to go like this. There's nothing here
on the wall to draw, but this gives more texture and character to drawing,
and that's okay. But in the meantime, when I'm drawing her or when
I'm drawing the table, I like to go around it if I can. Now, there's also the lack
of the table as well. And I think this is pretty much it for me that I don't have
to do everything. Normally, what I
would do after this, I would add colors, and over here, I
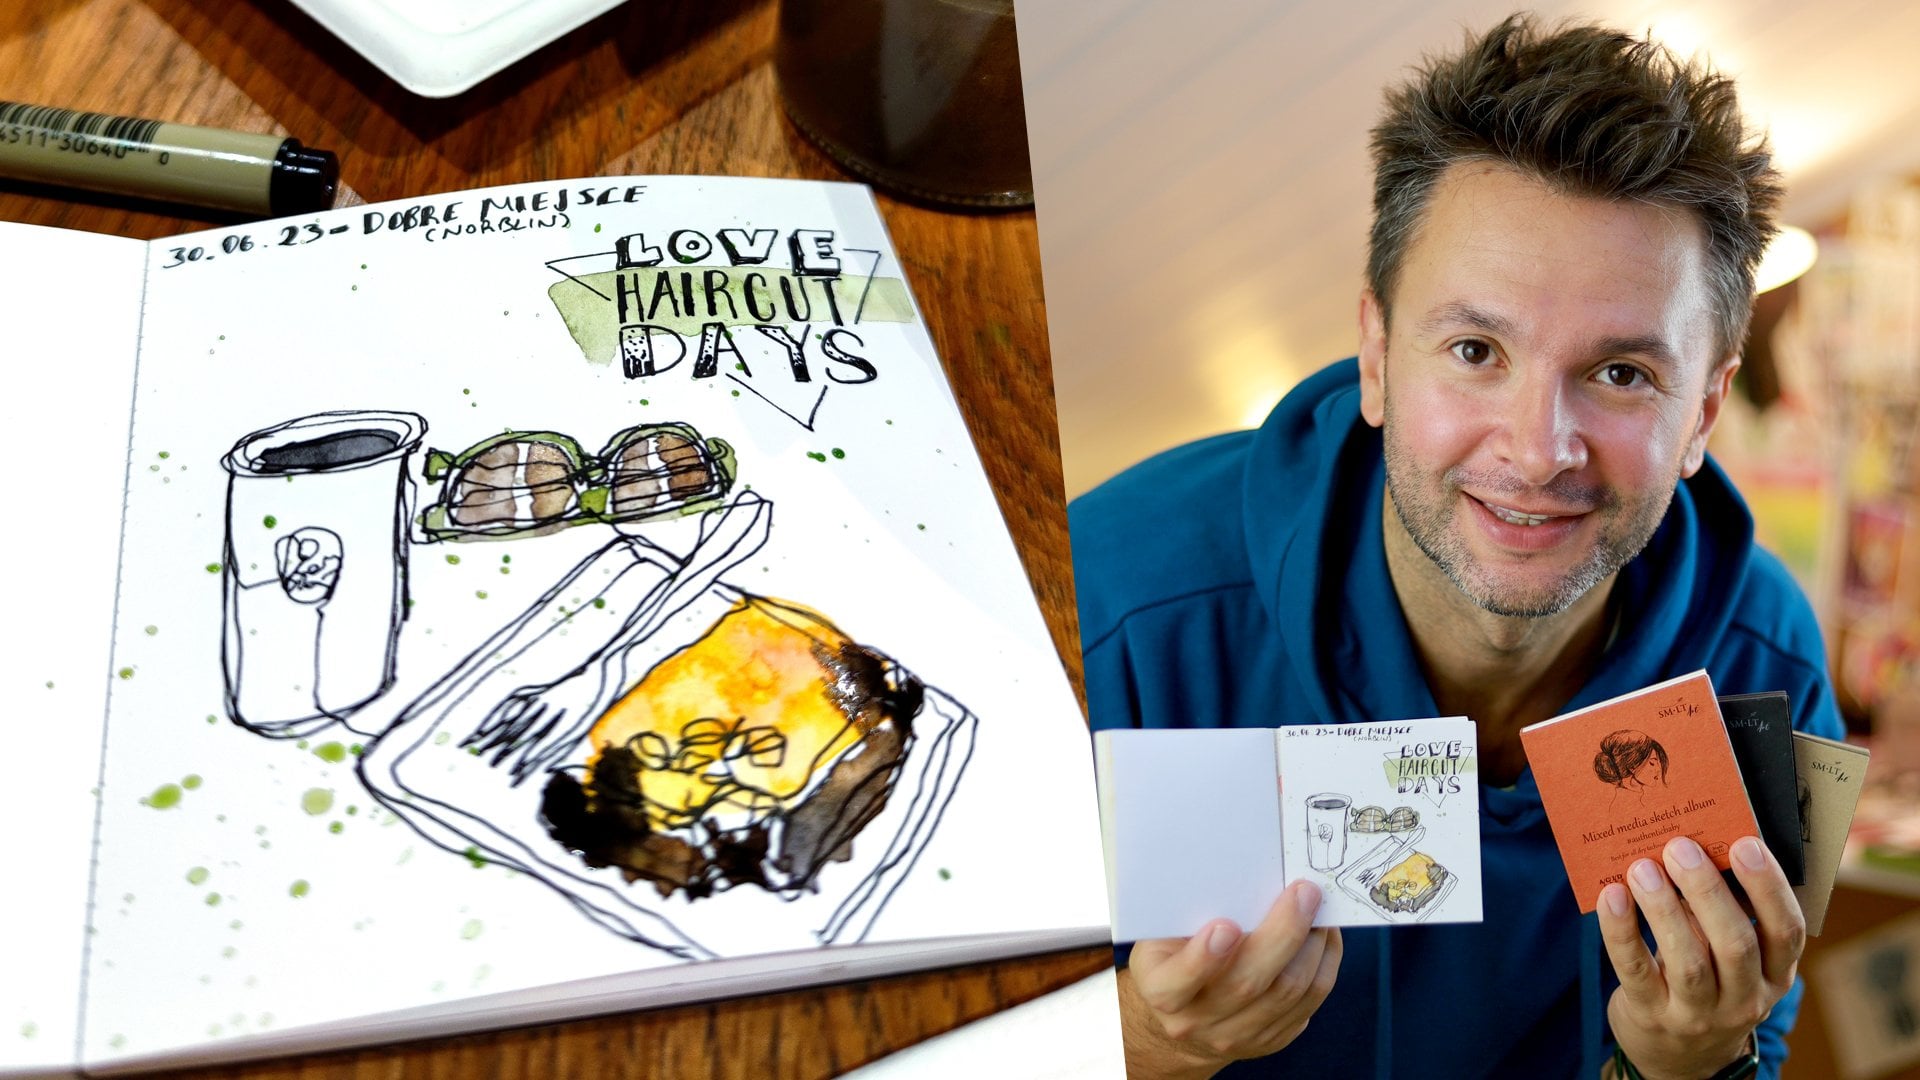
would add the title. That's what I do at the date and the place I was in name
of the coffee shop, and then I write what I eat and drink at
that coffee shop. And I think I can show you here This is how I drew it on that day that I
put the data in place here, brownie and filter coffee.
That's what I had. And this is how I drew it today. As you can see, I was
much more focused on the table and chairs. That's maybe I zoomed in more to the
picture to draw from. And now I took a wider
approach on this one. And they are both
the same place. They are both from
the same picture, but different. This
is the beauty of it. Every time it comes out
a little bit different. And this is the
surprise element. But I was telling you about this this is another
one I started. This one I started actually
on holiday in Turkey. And you can find these drawings
on my YouTube channel, skipping that part quickly. And then when I came
back to Warsaw, that I went back to my
coffe shop drawings. This one is not painted yet. From moose. From Cap and Nero. This was Cavalerka and this one. And then when I had some time, I took an abstract in between, and this was last time. And you can see how I
colored it as well. This chair was blue.
This chair was green. It's not really
painting the thing, but taking whatever color
they are as a starting point. And I also let them bleed into each other and
make these watercolor washes. And I like how they turn
out loose way of sketching. So this goes right. So if you were able
to do this perfectly, that you saw I was
tracing a with my eye, the picture and drawing
at the same time. If I was able to
do this perfectly, I would end up with
the exact copy of my subject like a printer. But the unexpected beauty, this surprising part
I was telling you, comes out of a result
of the difference between your eyes
moments or in this case, my eyes moments and my hands. Because I'm not able to do
exactly what my eyes say, I end up with these
fun looking lines which is really
good for creating. Nevertheless, by doing this, you train both your eyes and your hands and now you
are better at drawing. In time, you will be quicker
and more confident with your continuous control
drawings and more accurate too. At that moment, if you still want to keep
the abstract feeling, you will speed up your process to throw yourself off a little. And that's what I
do with myself. I try to really under 1 minute, under 2 minutes, try to complete
it as quickly as I can. Having said that, when I
have a scene like this, it usually takes longer
because it's a coffee shop, there is a foreground
background, lots of objects to draw, and sometimes I spent longer. But still, I try
to do it quickly. So this is why I use continuous Co drawing for no
effort sketch journaling, and I highly recommend
you do the same. In the next lesson,
we will talk about no stress art practice side of no effort sketch journaling and continuous cotter drawing. So see you next lesson. Check. Next. Oh
5. No Stress Art Practice: There Are No Wrong Drawings: One of the reasons
why I recommend continuous contour drawing and no effort sketch journaling is because it provides
no stress environment for practicing art.
What do I mean by that? Check. What do I
mean? First of all, there is no bed drawing.
I say that a lot. There is drawing, then there is no drawing. That's all there is. But let's forget
that for a moment and imagine that you
made a bad drawing. I mean, it is so bad, you can't stand the side of it. The worst case scenario. Oh, my God. What will we do? In no effort sketch journaling, you are working on
a nine by 910 by ten centimeter square.
Just throw it away. That's it. Problem solved. This is the worst case scenario. That's what I mean by
no stress environment. Burn it if you want to
be dramatical about it. Jack I told you
this wasn't safe. Because if you are working
on a big page like A four or a three watercolor paper,
this gives you stress. I do feel it every time. This sugar isn't for free. That's a cause for stress. Or if you are working
on a binds sketchbook, you can't just rip the page off. Even if you cut the page
careful with a knife, you will still see it
was taken from there. Or even worse, you've been
using this sketchbook for a while and you already have beautiful drawings and
paintings on them. So the page you
are going to draw is already attached to
something very valuable to you. This is a cause for stress. But if you are working on a tiny individual
square, fudge it. I can afford to throw
away one tiny square. Having said that, I didn't
throw away even one square. I love them all for
different reasons. And this brings me to
embracing your mistakes. And what does that mean? We
do continuous contra drawing. We put our pen down and don't lift it up until the
drawing is done. You go over the lines
you drew before or you go across your subject
where no line supposed to be. So this is already
pretty abstract. And do you know the best thing
about abstract drawings? They are made up. There
is no wrong answer here. How can you fail when
there is no wrong answer? That's right. You can't. So what should you do? Put your pen down and
hope for the best. Remember that every
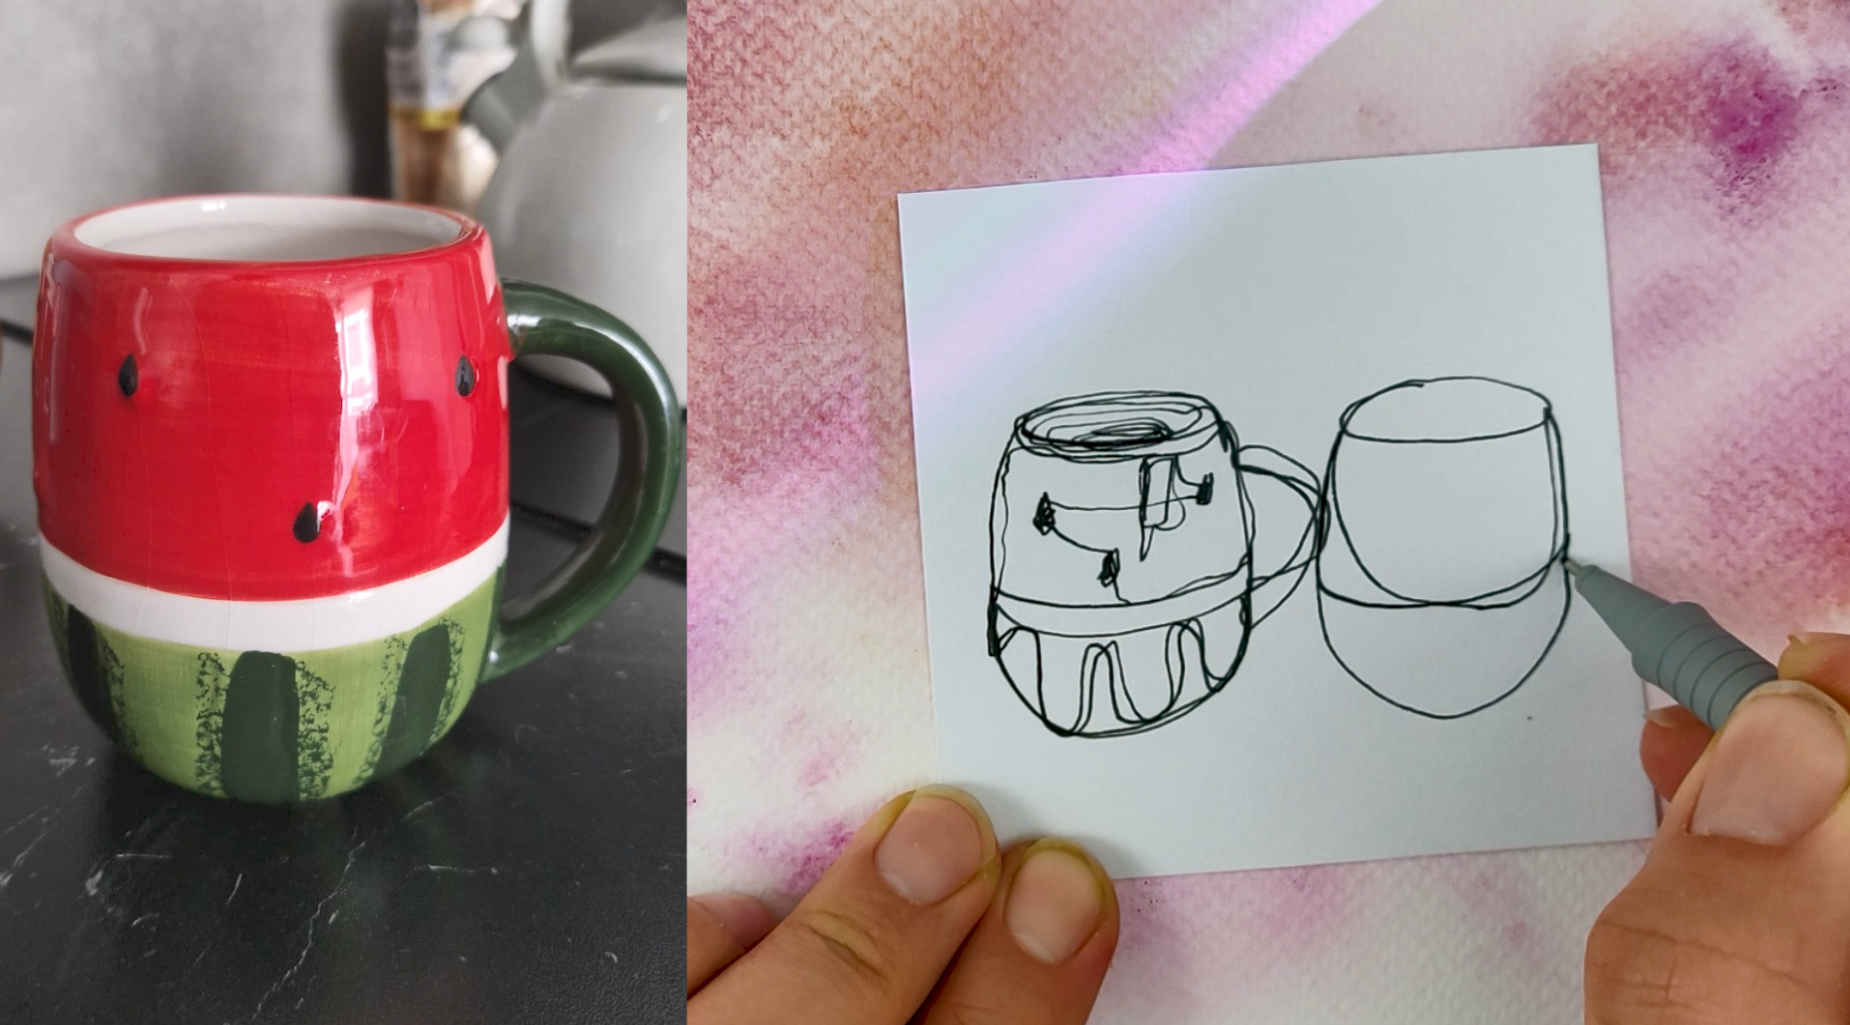
drawing is a practice. Every time you do this, you are getting better at drawing. What if you really
made a mistake? Like you were drawing a
mug, but it's too short. Oh, my God, too short. You go over your mug and make it taller and leave the
first line there. That's now part of your drawing. This is that unexpected beauty. Oh So this is what I mean by no stress
environment for art practice. In the worst case,
you know what to do. In the next video,
we will talk about what is the difference between looking and seeing. See
you in the next video. Oh, let me take a
zip from my coffee. Thank. Jesus. Thank you, Jack. Bless you too. Oh, perfect cold.
6. Don’t Draw From Your Head: Hand-Eye Coordination p1: Welcome back. Check,
are we rolling? The usual problem people
have with droving is that they find their
drawings childish. That's usually because
they draw from their head instead of
seeing their subject. We all have this. This is actually not a problem
but a blessing. Our brains have to handle so much information in
such a short time all day, every day, so it
makes shortcuts. Waiting for the plane to pass. Let's say you are out on
a walk on the street, you literally
receive thousands of pieces of information
just by looking around. Cars, cars, more
cars, street, people, sky, trees, leaves,
bike, pigeons. Your brain can't hold onto all this data, so
it labels things. And this makes our life easy. But unless you have
photographic memory, as long as you
don't pay attention to the subject in front of you, you won't be able to
draw it as it is. Because what color
were those cars? What was the shape
of the logo like? What color were the leaves? How about the pigeon? Can you draw the helmet at the back of the bike just from
that first look? What was the writing
on the bike? How about the
texture on the tree? Or the shapes of the leaves. If you don't see these details, what you end up
drawing is probably a brown trunk with a green
ball on the top of it. Jesus, how many planes? Come on, pass. I'm going to show you how I would draw this scene
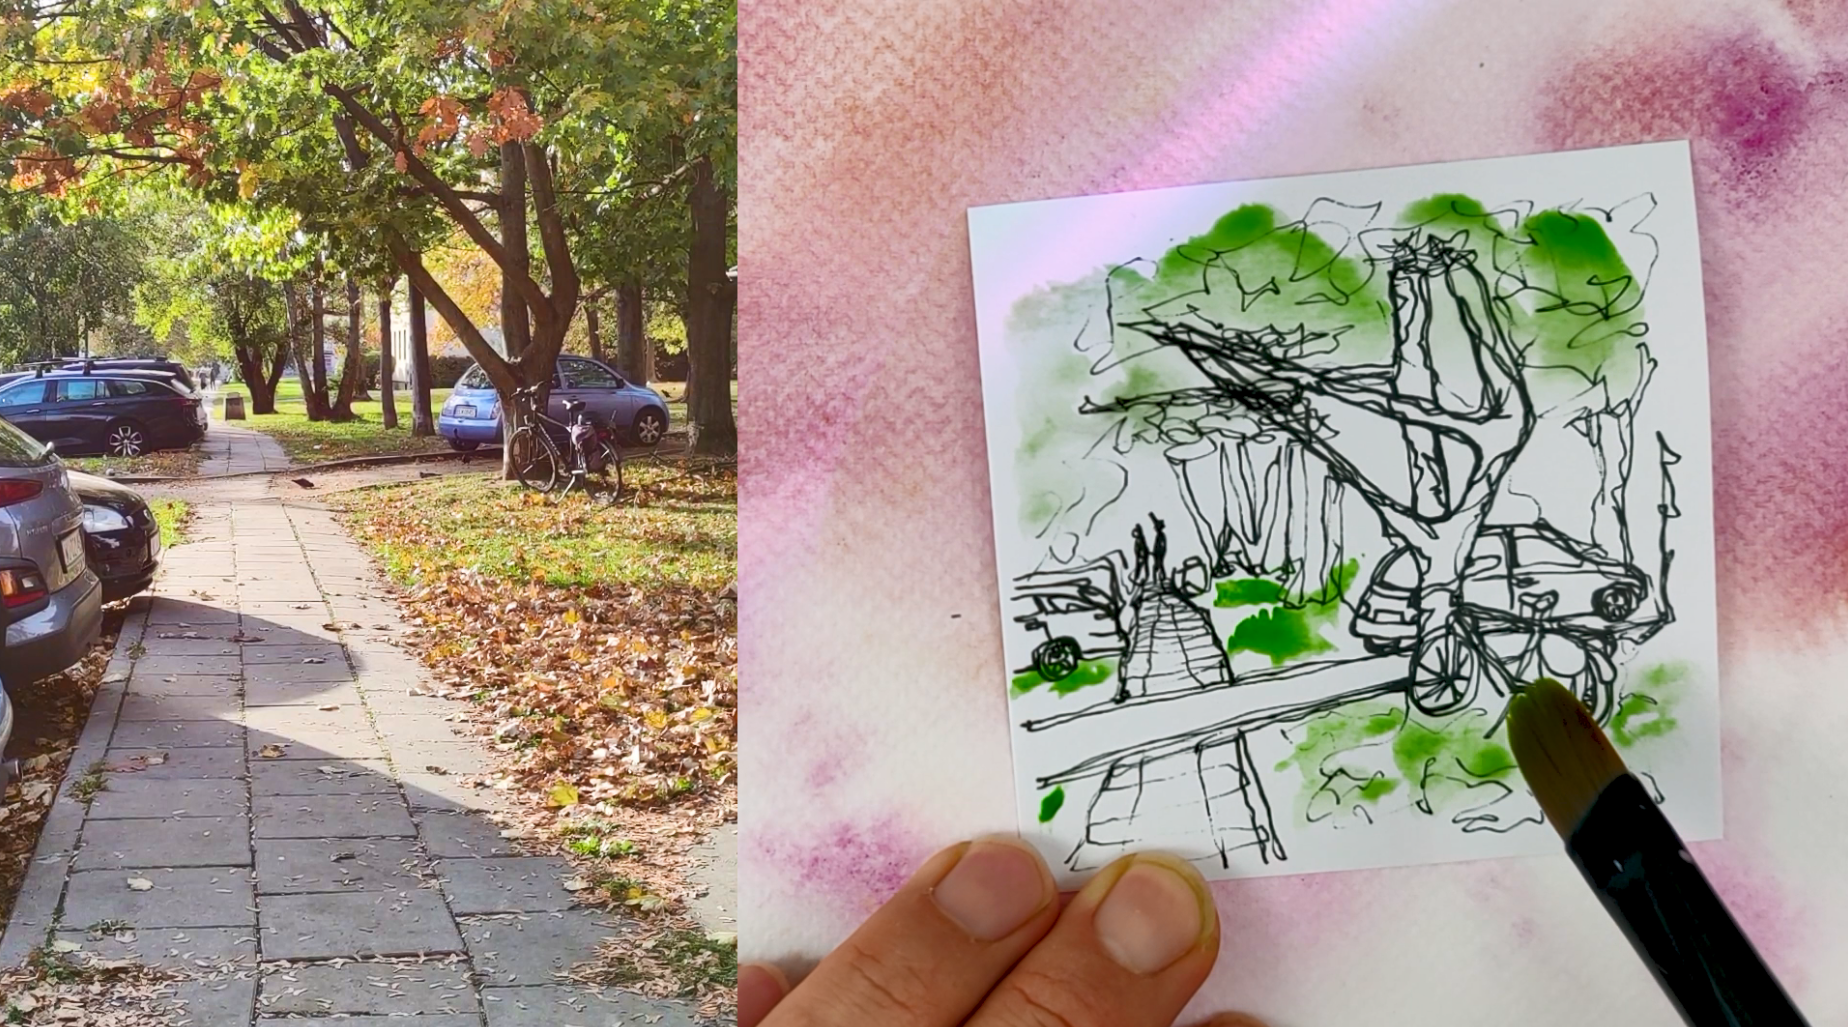
I took a video of I took a photo of on that beautiful autumn afternoon while the sun was setting. Not like the one I just
threw and threw it away. Like I feel way. Instead, I would just
look at the details. I was telling you that this is a good exercise for your hand eye coordination
and you learn how to see. But in the meantime, you are paying attention
to all the details, but you are not taking
all the details. On your page. This is where the time management comes from because it doesn't
take that long. I look at the I showed you
close up of this scene, and you saw the
shape of the leaves, the texture on the tree. They were all visible. And we know that they are there. But from this kind
of a distance, I want to draw the general
shape and the feeling. I want to capture the general
feeling of the place, but I'm not going to
go into every details, but knowing some
of those details will help and you'll
see in a second how. So I'm looking at my tree. This is not a very regular tree. I could have picked an
easier tree for myself. Let's start from here. It branches like three, four different
directions. This tree. There is one going
across like that, and then I will
bring it back here. And because I know that
this tree has textures, while I'm drawing, that
there are these leaves here. I will just make some
squiggly lines here, these leaves for the leaves, and I'm now following this branch climbing
down like this. And then here I see
there is a bike. It's something like that, I think that I'm trying not to think too much how
a bike looks like, but I'm trying to
just let my hand led by my eyes,
that I'm trying to deliver just what I see. That's why continuous
contra drawing is a good practice to train
your hand eye coordination. Your eyes trace the details of your subject and your
hand follows the lead. And like we talked earlier, because you can't
do this perfectly, we end up with your
interpretation of that tree, which is much more valuable than a perfect representation of it because now it's something
else, something new. It has a layer of your
experience on it. You bended reality and made your expressive
art out of it. The weirder it looks, the
more interesting it gets. This is the part, for example, I don't pay too much attention
to all the details I see. That's a conscious decision. I drew the metal parts of
this tire and I just did quickly to give
the feeling of how it's supposed to
look as a shortcut. So in there, I'm not doing
exactly like how I saw, but make an approximation
of what it is. That, for example, we looked at it in here, there was a writing, but I won't be able
to add this detail with this tick of a pen
and from this distance. So I'm letting go of those details that I'm making this decision
to let that go. Okay, I'm putting my
pen back normally. Since I do this quietly, that I don't I can focus
and do the drawing. And behind the
tree, there's a car and the car here's
the handle I see. And the car actually is
visible on the other hand of the tree as well,
and I will get there. I don't want to go
across like that. Now I was telling you that we know that this
tree has a texture, but we are not really
able to pick up on that. So for these kind of things, I try to use these lines to give the feeling
of this texture. Actually here there
is another branch coming from behind it. And did you see, to be able to get
from here to there, I kind of went around it because I didn't want to lose this feeling that
this branch is behind. To me, this is an
important detail. Now, you can't see this branch any further because
of the leaves over there. Here's another small branches going away from the main branch. And I will add some
texture here as well.
7. Don’t Draw From Your Head: Hand-Eye Coordination p2: Again, because the bike is in front of the tree and
this is important, I don't go over the handlebar, but in other parts, when it's not so important, I can go across now, I will try to complete
the car here. That is the bumpers. I see stoplights and there's another line
going through here. I'm able to see one
of the back wheels, and under the back wheel, I see kind of a payment going like that or payment
stone should I say? So I'm going to
draw that and that actually is coming
from here as well. I usually do these few lines
because it's never one line. That's when you have stones, pavement stones
next to the road, you can actually always
see with t angles. The one is touching
to the street, the one above and the one
going further away from you. So that few lines, it represents
how it's supposed to be. And a bit further from
the bike here actually, this is the footpath
it's visible. So I'm going to this footpath, and I'm going to go to the
other side and continue this footpath to the here I see, I think, Ben and it's
something like that. It's getting kind of
narrower into the distance. And over here, there
is one more car. I want to add this as well. That's the bumper of
the car and then to the stoplight you can see the back window like this and the line
is going like that. Small window on the side. Here's the handle and And then there's
even a bigger car behind it. And I
will leave it there. And from there, I
want to there are some more lines visible. As it goes towards the distance, these lines get
closer and closer. Here, I'm making them with
more distance and dip as well. This is also I'm paying attention that there
is a paved road here, but I'm not trying to
take all the details. That's what I'm trying to say. And in here, there
are some leaves, so I will just make some texture here because this is not a flat surface,
and I want to give that. And in here, this payment
continues and from the car, maybe I can offset this
tree here only that much. I don't have to draw
the whole thing. And I came back to the
tree because over here, there are some leaves. I want to include Again, I'm paying attention
where the leaves are, but I'm not trying to draw
every single individual leaf. This branch actually
continues like this, and about this branch, there are also this
orange yellow looking autumn leaves I want to
definitely add and for the rest, I will because this array
is all covered with leaves, I want to leave some
texture here as well. And And going into the
distance that there is another another tree. I brought that one
to close, I think. But it doesn't
matter. This one kind of separates into three. And then starting next to the
pin, there is another one. And in the distance, I see a person and there's another
person next to it, they're walking away and
there are more trees here. And there is one more tree
coming out from there. So as you can see, I paid more attention to the
front and at the back, I just did some squig lines
based on the details. Still, I am looking and
seeing what's there, but I'm choosing
which details to include. I just see something. I left a bit too empty
here in this triangle. I will add the car. I think I'm done. So I think this
is a good example of not just looking but
seeing the details of your subject and then deciding
what to take from there and knowing this texture is there is actually helping
you guide your pen. And this way, you can bring more of a
feeling of the place. And this could make a very nice addition
to your art journal. That's a bit of a title here. I know I didn't leave much space here because I didn't
think about it. But you could just
write here beautiful autumn day or nice autumn walk, something like that,
and then date and the place, and we would be done. And if you were to add a bit of a color because this
whole thing is very green. It's a beautiful
street we have covered with trees on both sides. It's green here, green
here, green here. And then there are
those autumn leaves. You don't want to leave
them that they are here. They are here and some
other places as well. This is a good moment
to splash as well, and the autumn leaves are definitely on the
ground as well. And knowing that we have
lots of tree trunks visible. Very roughly to signify
what we are looking at. You don't even have to
do the whole thing that these whites also help to the
texture you are working on, and that's it for me. I think that painting is I'm not going into
the painting much here. I just how it as an example. There will be another
class about how I just focus on
the painting part. But you could definitely have a journal entry,
something like this. And when you compare
to this to this, you can see the difference between looking and drawing
from your head and seeing. So that's what I mean when I say don't draw from your head. To be able to draw your subjects accurately, you have
to see them first. In the next lesson,
we will talk about how to have bold crisp, confident lines for your
drawings. See you in excess. Jack, when I say crisp, I'm talking about the lines
being very high contrast. I'm not talking about crisps. It's not time for snacks.
8. Keep It Moving: Bold Crisp Confident Lines p1: Waiting for the plane
to pass. Welcome back. When you are doing
continuous control drawing, make sure that your
lines are confident. Now, what do I mean by that? When you stop to think,
it shows on paper. That hesitation makes
your lines uncertain. It almost feels like you
didn't know where you were going with that pen, and
you probably didn't. But I'm asking you to
pretend that you do. We want bold, crisp, confident lines.
Use a ticker pen. When I do traditional
sketch journaling, I always use 0.1 or 0.2. This gives me space and
agility to draw fine details. But when I do
continuous control, I use 0.5 minimum, sometimes 0.7 or 0.8. Why? Because it has much
more weight on the page. This also helps with finishing the drawing faster
because with less lines, you have a bigger
impact on the page. You are simply deploying more
ink on the page per second. Once you start,
don't stop to think. Don't think about
the end result or the total image you are
drawing. Keep it moving. Don't worry about the
line you just drew or the next line you are going to draw. Just be in that moment. Let's now try to draw this
image that this was a cafe. We visited in Copenhagen. I think it was called sex Cafe, and Yeah, I was thinking
something funny to say. No sex was involved.
Basically, it was just name of the cafe. And they did some funny
naming in the menus, I think. It was a nice place, and we had this breakfast over there, and I have this photo from it, it's a lovely memory to
add to a sketch journal, easy watercolor art journal. And so that's what we can do and try to I will try
to make this point, I was telling you not to stop
to think, keep it going. Don't worry too much.
Stay in the moment. I, I think, start from the I
will start from the coffee. I'm using my 0.5 pen. I always go twice around
the rim of the coffee mug because it's never a single
lines because it is thicker. It's not like a paper thin, that it always has this feeling. Okay, I'm stopping
because I'm talking now. Normally, I'm telling
you not to stop. And here I see the handle. This is a very steep angle and I see a bit of a shine here. So I went over this
and here I'm jumping. Look, I didn't lift my pant, just jumping to the plate here. There's a plate. And again, I go a second time because
it's never a single line. And this actually has something going around the
rim of the plate. So for this, I will
go one extra time. And then jumping into the
inner section of the plate. And then in here, I have some potatoes, cheese, another potato,
another potato, other bigger potato,
smaller potato. I think there are
also eggs in there. That these kind of
things gets much better. There are some cheese here. Cheese has more texture, so I'm going over
a few more times. And I can see that I want to give this depth of it because we are seeing
it from an angle. And then I will just jump over here and there's
another plate, and I will just hop jump
over there as well. You see the first line wasn't perfect, but I didn't
worry about it. I don't worry about
going across the places. I'm stopping now only to talk to you.
Normally don't stop. I go across, and I don't
have a problem with that. I try not to go across if I
want to make sure that if a subject in is in front of another one and I don't want to break this feeling,
I don't do it. But even if you do,
it's not a big deal. Like, for example, let's do there's a butter and
butter knife there. And let's say I drew
this tiny plate for butter and butters
is kind of a shape. And then let's say, I forgot the knife,
doesn't matter. You just draw the knife and
this will be also fine. I guess it also depends
a lot how you prefer. In here, there was a
jam and from here, I will jump to the egg. For example, this egg holder is sticking almost
outside the plate. Not almost, it does. And then the egg on it, and look, I went across this egg holder
because it's dark. I want to give more
texture to it. In here, I see a spoon and here there is
a loaf not loaf, but a roll of bread. Again, to give the texture, I'm going over it a bit. There are slice of cheese. I just noticed there is, I think, a napkin
under the bread. So I'm also adding that after the fact that
I already drew. I want to go around the
plate one more time. Look, this time, I
don't want to go over the deck because we already did that and now I'm emphasizing the plate but
not going over the deck. So the extends out even though
in the first place here, there's nothing on the table. I don't have a
problem to jump to the little dish
with the cutlery. I will just do that and
it's standing diagonally. And I love drawing forks. They always look so weird. And next to it, there's a knife sticking out. I will go around this
ceramic dish one more time, and I will show the depth of it. And here also should
be shown like that. And if you want to include
the table as well, it's always a good idea. And here's the
second table going. Look here, I'm going
around because this is underneath and I
want this to stay. And I'm going around the This is the second table like this. And that's pretty much it.
9. Keep It Moving: Bold Crisp Confident Lines p2: To draw this scene. And this satisfies my needs,
and I'm happy with it. As you can see, don't
lift your pen up. You can go across things. It doesn't matter that these lines I actually
like how they look in a painting and drew the plate
first and the knife later. This is also okay. But later, as I'm kind of laying the
feeling of the place, there was a table there.
This is a table set up. I didn't make this line
go across the plate. I went I used the
existing lines to go around it and continue
where the table was. So you need to use this restriction of not lifting your pen to your
advantage and also, you can make it your style. You can make everything go on top of each other and
that will be also fine. Yeah. This was my advice
for you. Keep it going. Don't stop and all that. I don't know if I
will keep this part, but if I were to paint this, I'm trying to just get a nice green color
over here because this coffee mic and a dark green and then inside it, there is my black coffee. Just like that. This yellow is a good idea. There
is cheese there. And here, there was the
there were the eggs. These potatoes. There's also the
butter over here and also we shouldn't
forget the bread. For these kind of situations, it's kind of good to do the background and leave the plates nice and
white. You can do the same. That's how I would I
think I have the sage. But it's not a painting class, so I'm not going into that. And let's go. One more time. I splash paint on my background. No. At least it's
very similar color, so it's not very visible. I fixed it. So that's what
I mean when I say what? Jack, what was I talking about? So that's what I mean when I say bold crisp, confident lines. I hope it's more clear now. Just stop eating those crisps. I can hear all the
way from here. In the next ss and we will talk about not hesitating before starting your drawing and
what you can do to help them. See you in excess. Jack,
bring my chronometer.
10. Do Not Hesitate: Use a Timer to Speed Up p1: I know the plane is
coming. Come on. Can we give you the rest? Or so. Why so easy? Well,
come back. We was. Don't wait before starting
to draw. You know me. I'm obsessed with making people start drawing as
soon as possible. And that doesn't happen
if you dub yourself. You just need practice,
and the more you do it, the easier it gets.
So just start. I recommend you use a timer. Tir has two purposes. You have to start before
it hits 5 seconds, and you have to finish
before it hits 5 minutes. Pick a spot, put your pen down and start figuring your
subject out on the go. I give myself 5 minutes because everything has to
be done in 10 minutes in noIFsket journaling and we still have the title
and painting to do. Also, don't overdo it. It's difficult to give a
concrete example for this one, but not every line has to be
drawn across multiple times. Leave something to
the imagination. You don't have to draw
everything either. You don't have to
draw a building completely from
ground to the roof. Take what's interesting. If a tree is creeping
into the canvas, it could be just
some squiggly lines with some green
paint on it later. If you are drawing multiple
subjects and you need to move from one subject to the other,
don't lift your pen up. Just go across that empty space. In fact, I encourage it. This gives your subject so much more character
and sometimes it feels like texture
or even glow or shadow. The same way, you can go
over existing lines too. Let's say you need to go across the page or
across the subject. You can trace back the lines you already drew to
avoid going across. This way, those lines become
heavier and more emphasized. Like I said, there
are no wrong answers. Go nuts. So this image
is also from Copenhagen. I'm going to make a class with the actually blogs and
recordings I have from there. And now, I'm not able to
tell you where this was exactly this building, but it was impressive when I make the class
that I will make sure that You have all the data because it will be
a different class. I will just traditional
sketch journaling from there and it will be sketch
journaling in retrospect. 3.5 minutes. Here I see a sign. I want to include. This building comes a
little bit further. I see there are
some more windows on the side of the building. And here actually, we
can see a bit of a dome. And and in this last minute, I actually want to
include these lines which has a light and also they go this way and
one of them goes this way. And I think with all these, that I can maybe put some
more details to the roof. And this gives me space
to write time and place. I'm done. So let's stop the timer. I tried to capture
this round addition to the building, provide
that for the church, and in retrospect, it
could have been taller, but it doesn't matter because this is my first sketch journey. And as you can see, the building is there, but I
didn't do all the windows. I didn't do the payment. Instead, I chose this lamp that it looked
interesting in there, hanging in the midair. I liked it and so this is
totally doable in 5 minutes. Later, when I'm I still have nice space for title
and date and place. Date and place totally could
be here as well or here and, like, leave the space completely for the
title that's possible, or just for blue sky. And later when I add
a bit of green here, it will pop nicely as a tree. Again, I paid attention to and saw what was
on this picture. There is a tree here,
but I didn't try to draw every single thing that
this is a quick study. This is you working with these restrictions of
not lifting your pen and under 5 minutes
trying to do. And later you have time to
do the title and the colors, and then under 10 minutes. This is what knife or skit
joining is all about. That's why I came up
with it for people who are short of time or they need a sometimes quick fix of creativity and
accomplishment. Yeah.
11. Do Not Hesitate: Use a Timer to Speed Up p2: So I think I want to
as I came this far, I just want to splash a
bit of paint here. Sorry. A bit of green. We went there in June, so there is no sign
of autumn at all. And a bit of this orange Looking, how can I say Roof. I forgot the word roof. And this building, is it brown, would you say?
That's too strong. I think I want to Sorry, I need to get blue here. Which one is this? Ultramarine.
Okay, that should do. A bit of. I'm picking blue for this beautiful sky. And I think I'm done with it. Let me hold down like this, suckling the paper and maybe let this color
come in a bit here. You can always use behind your
back of your brush to give a bit more texture
to your paint. And so this was it. This is another memory
captured from Copenhagen. And you saw even
with the painting, this wasn't 10 minutes. So I'm happy with this. And this is how you can use
a timer to help yourself. Go over this first
difficult step, press the timer and
then in 5 seconds, make sure to put your pen
down and just keep it going. And when it says 5 minutes, you have to stop and so that you won't be
fiddling too much. What do I mean by too much? We don't want to end up
with here's a scrap paper. Let's put this over here. We don't want to end up
with something like this. Let's say you are drawing a C
and we don't want to end up with a drawing like this, not every line over
emphasize like this and this is not the goal here, sometimes we go over
the same lines and they are becoming more
pronounced for sure. But this is not what we
are trying to do here. When you do this kind
of drawing, yes, the average of all these lines create one unified
look and it evens out that it is definitely more
even than just doing this. But this is not what I'm
trying to teach you here, this way that you end up
with more interesting lines and this when you add a bit of color to it, it's much more interesting. That in my opinion, this is now, actually, when I pick
up some of the paint, I like how it looks. This looks to me
much more artsy. That's something you could see at the edge of a magazine to illustrate a topic or at
the edge of a cafe menu, these kind of drawings could be. This looks like I'm
trying to draw I'm new. What do you think? This one
feels much more confident. It looks like you know
what you're doing. It feels expressive. This not so much. So that's what I meant by
not overdoing the lines. It's just do as much as you
need and leave the rest. And keeping a timer will definitely help with trying to do your subject
under 5 minutes. So that's how we
can use a timer to start faster and
finish faster, too. Stop doubting yourself
and just start drawing. Remember, what were we going to do in the worst case scenario? Just throw it away or
burn it if you have to. This was it for this class. This was the last
lesson after this one. There will be the
conclusion video, and I will see you
on the next one, but first on the
conclusion video. And another plane is passing. Jack, I feel like you
had a finger in this. So many planes passing
today, just over my head.
12. Conclusion: Welcome back. Thank you very much for joining
me in this class. This was the part two of Easy watercolor art
journaling series. If you haven't checked
out the first part, make sure to do so. We went through
lots of benefits of continuous control drawing and no effort sketch journaling. I hope that you are already on your way out to buy
a tiny sketchbook. Jack, do you have
a tiny sketchbook? If there is one thing, I want
you to remember when you start drawing in your
tiny sketchbook, it would be this thought. If there is no wrong
answer, how can I fail? And then start your clock, put your pen down,
and off you go. Never look back. And the
usual follow me here, here, here, and here. Leave a review
because, blah, blah, blah, it helps me, blah, blah, blah, better teacher. Share your class project because you know
what? Just because. Do it just because you shouldn't need a reason
to share your art. Right, Jack. This was
it for this class. I will see you on the next one, go get your tiny sketchbooks
and start the clock and start drawing right
now. See you on next one. Stay creative. Bye, Jack. Give me some of those crisps. Hi, my name is Fati. And identify again,
my name is Fati. And I identify I identify. Another plane is passing
Jack. You kidding me. Come down. Jesus another plane. Go. Could you stop? There's a bird on the roof. I'm probably trying
to crack a nut. A portrait, a mug, a tree. What else? Jack, what else will I throw? Waiting for the plane to pass. Almost there. Look closely to see the
dit dit dit ti details. Thanks, Jack. Oh. I don't know if
this is believable. Let's start from lesson one. I can't do intro straightaway. Intro is always last. I need to warm up first.
The students drawings, drawings, not drawings. Drawings is past
continuous dance because Trow drew drawings. The students See you
in the next lesson. I think next lesson
is this side. I I need a lighter. I need a lighter. Because I
will do something dramatical. One of the reasons why
I recommend no for sketch journaling and
continues control o Even if you cut it
carefully with it again. So that's why I am I saying? You have to start seeing. Okay, let's not go in there.
What am I talking about? High contrast, high contrast. I'll come back.
Say, welcome back, but I don't know what
I'm welcoming you into. So that's how you use a
chronometers for your advantage. I mean, how could you use a chronometer for your
disadvantage? I don't know. No for sketch turning
and continues con travel and a plane is
passing, and I'm waiting again. I'm gonna go crazy. I want a coffee, but I want
to finish my work first, but then it will be too late. It will be dinnertime,
but I will still want coffee and something sweet. I don't know what to do.
Let's finish the work first. Jack, let's finish it, and then we will go
for coffee, okay? You have a tiny something.
 Fatih (fab) Mistacoglu, watercolor storyteller