Transcripts
1. Intro: Why should we draw people?: You can't draw people. I know. You suck at it, right? Wrong. You don't suck at it. You just never gave yourself
the permission to practice. Hi. My name is Fatih,
but you can call me Fab. I'm an artist, online teacher, productivity enthusiast, and
a recovering procrastinator. I draw, paint, and show people
how they can do the same. That's why I have
over 20 classes showing me doing just that. This is my fifth class on
NIF Sketch Journaling. The other is being NIF
Sketch journaling, NI for compositions, NI for
drawing, noi for painting. And now, known for people. This class was highly
required by all of you, as this was the result of the little marketing
research I did. And I can understand why
drawing people is tricky. A wonky building is just fine, but a wonky son or partner is harder to share with people
because people have feelings, and they say things like,
Is this how you see? I get that. On the other hand, a building doesn't give up
yet, people are everywhere. We keep sketch journals to stay creative and look for
something inspiring to draw. A beautiful street.
There are people there, a coffee shop. There
are people there. My birthday. There are
people there, too. It is as if you can't even avoid people anymore these days. So being able to
draw people opens many possibilities for
your sketch journals and your creative journey. That's why I want to make this class because
I am just like you. I can't draw people. At least that's what I told
myself for years. The only difference
between you and me I do it anyway,
and it's fine. Some of them are better
than the others, but none of them are bad. Because remember, there
are no bed drawings. Some of them turned out to be the best thing I
have ever drawn. Some of them, not so much, but you can't just hop to
the top of the stairs. You have to take
every single step, at least every other step if you want to reach
the upper floor. And guess what? In this
incredible analogy I created, there are no lifts. No lifts. Everyone has
to take the stairs. By showing you that it's okay to draw people in
any way you can, I want to remove the
stress and allow you to practice so you can
actually get better at. This class, like all my other
classes, is for everyone. Don't need any
experience or skills. If you enjoy keeping a
sketch journal and want to draw people the way I do,
this class is for you. The more advanced
students who wants to pick up my style
are welcome too. During the class,
we will look at many situations where you might want to draw people on your sketch journal like
people in the background, people in the foreground as a main or secondary
subject, self-portraits, full and partial body
compositions, clothing, and faces. What? I should mention
eyes, lips, and hair. I think they know what a
face consists of check. We know what a face consists of. Your class project
is somewhat special. So basically, I want
you to draw people, but for more details, make
sure to check the next video. This is gonna be
great. Let's go.
2. Class Project: Draw People!: Welcome to my new class
No effort People. If you are from the
future, this class might not be new for you, but it was at the
time of recording, and if you haven't
watched it already, it might be still new for you. So I think we proved that the concept of new is
not so straightforward. Before we get on with
your class project, I think I invented
a little game. Throughout the class, there will be motivational
moments like this one. Your paper is your playground, and you make up the roof. So if you find out how many
motivational moments there are and reach out to me on Instagram DMs with that number, I will do no effort
droving off you. No effort you are sure
this is a good idea, Jack. So your message should
be like NI for people. X, X should be the number of the motivational codes
hidden in this class. Let's see if I will
regret this decision. Now, class project,
your class project is, I don't know what it could be your favorite building,
Jack, their pet. The class is called NIF
People not No for animals. No, I didn't say there
are no bad ideas. I would never say
that around you. That would be a bad idea. Okay, obviously, you're
going to draw people, and all people are accepted. But let's put a
little twist on it. Because the class is
called no effort People, I want you to try and find the most no effort
person around you. Meaning the most easygoing, relaxed, laid back
person you can find. It might be your husband,
your wife, or your bestie. Let's see what will
come out of this. So this is it. You
have a little game to play with me and your
assignment. We are ready to go. Count backwards with me.
Five, four, three, two, one. Jack, why are we still on? We count it backwards.
No, you were supposed to cut at one,
and we go to the next w. What did you think
we were doing? Just a counting exercise. I will stay home.
I will stay home. Okay, look, this is how it is. We count backwards
and you cut at one. Four, three, two,
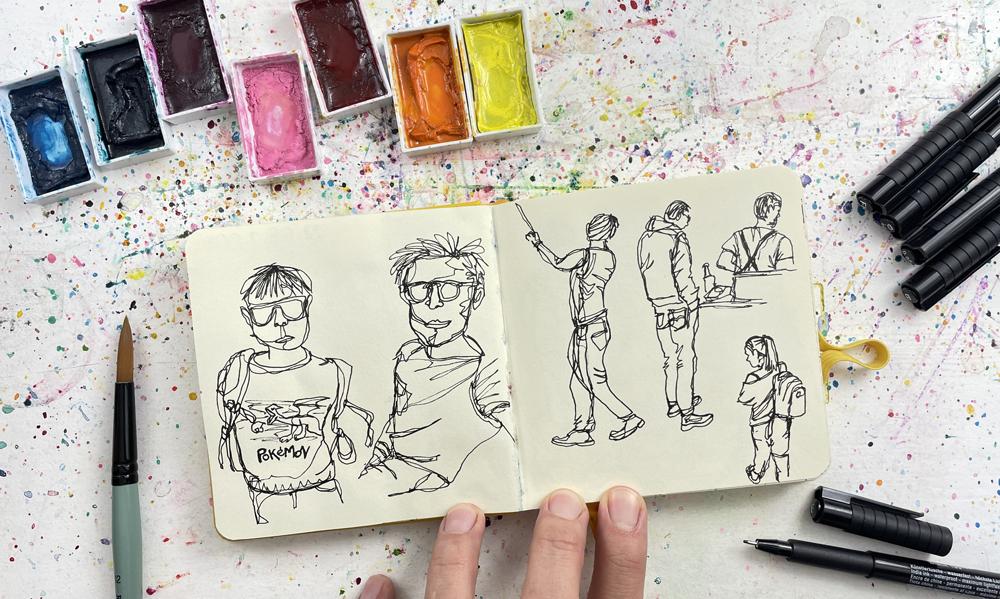
3. Drawing People in the Background: Hello, everyone. Welcome to my Noy for People class.
This is less than one. You can see there are
some Noy for people here. I didn't do a materials section for this class because we're going to use
very basic things. I want this class to be mainly about actually the drawing part. The painting, I
think we covered it and this painting the
people doesn't change much. But every now and then,
if I feel like it, I might at the end put some color over it
and that will be it. But other than that,
we're going to use I'm going to use my sketchbook, this is 11.5 by
11.5. Let's say 12. 12 centimeters
square sketchbook. This is not even
watercolor paper. This is probably 180 gram. But it is very smooth.
It is hot press paper. I tried to find it, but
it doesn't say anywhere. They could have just write here. And it's talents
brand, art creation. I think when I was ordering
a bunch of art supplies, I like the color
of it and how it looks like this. So
I just ordered it. I really like this
it became a bit my experimental sketchbook that I was using this
one when I went to the urban sketches symposium
in Poznan this year. These are the stickers from
other artists I collected. And this is coming
in the future, combining no Effort
Sketch Journaling with traditional
sketch journaling, doing this kind of spreads at. I like doing that. My son was also experimenting
on this and I also do my abstract painting sometimes when I'm outside
and I just feel like it. This is an unfinished page from the mountain strip we took more abstract and
these are the Poznan. For this one, I'm not going
to show all of this now, this is not about this
class is not about this, but these are my pages
from Poznan trip. There's a whole YouTube video about that you can go and watch. I was maybe I can show you this one.
This page I really like. But there will be some writings here I still haven't finished. Anyway, this is the page we were creating on schedule
party with Peggy Dee, this was my example
and this is what we did during the workshop. Anyway, this also you
can go and find it. Somewhere in my
link in Video page, you can find it
through Instagram. But today, we're going
to focus on the people and drawing part of it. I try to of course, my approach to this is
everything is made up of lines. Dive in, don't be scared and see what comes
out at the end of it. This is my first advice. However, in order to demystify this people
subjects for you guys, I divide it into
different sections and those will be People
in the background, people in the foreground,
self-portrait. What else was there? Full body compositions
and partial body parts that might go into your whatever
you are trying to draw. Then we're going to
focus on the clothing and also the face. We're going to start with the
people in the background. Yes, Jack. Yes, there's less
people in the background, someone like him
behind the counter. This is one of the
I pick some images. I'm going to share
those with you as well, so you can also use or you
can use your own images. That's I think even better. Now let's go over
here and there's an unfinish drawing here from yesterday and going
to start from here. And I was saying I didn't make a materials section for this class because I'm going
to use this very basic, not even watercolor
sketchbook and I bought myself a bunch of
Faber Castel pit artists pens. They are over here.
And for this size, my favorite is 0.5 here. Yeah. That's what
I'm going to use. Drawing people doesn't
have to be scary. Let's start with the
first image. Shall we? Let's push this out
of the way a bit. Come to this side
because this side the picture should be
crumped should come in. I'm going to even
get my phone here. Okay. Now, in this one, let's say you are at the
coffee shop and you want to draw the interior
of the coffee shop, the bar maybe in the background, there's usually a barista or server or the owner
of the place, and that's what we
are going to do. I'm just going to dive in. That in here, I know that this is non forget
journaling and I set the rules from the beginning
how we at the date and simple title combines 23 words and then simple drawing
and some splash of colors. In here, like I said, I'm going to focus on
drawing the people. I'm not going to do
the whole composition and the date and I'm not
going to create pages, but we're going to
focus on the people. Then you're going to take this with what I was teaching you in the other classes
on this topic there are at the moment four
the main MFG journaling. A class and after that, there's a mini 10 minutes
long NI for compositions. After that NOI
drawing and painting. This is a continuation
of those classes, and we're going to
focus on the people. But of course in here,
we need to set up the place a bit because we have the person is in the background
and we need to show that there's a foreground
because of that. I'm just going to put my
pen down somewhere and put my eye somewhere on the picture and then I'm
just going to continue. I'm running out of breath. Okay. Let's go. I'm starting
from those pastries. There's a plate of
pastries there. This is the counter over there. This is enough of the counter, and this is the front
of the counter. In here, there is something
else on the plate. This comes like this and there are a bunch
of other stuff. It's a busy counter top. I think in here, there's
a bottle of water for people here there is a pin box. They sell pins. Pin box to the star countries and there's more stuff here
and back off the counter. Then write about here next to the pastries. There's a lady. I'm just going to because
she's in the background, she's not my main subject here, but she's also part of it, that when you at people, it's more feeling to the
situation and more action. I want to show that
she was there and she was making coffee. Again, I'm focusing on the lines that you can see her arms
come down like this. It disappears in front of her. And here I can see her
hand holding something. And her hair comes
in a ponytail. These are the
stitches of her top. She is a waistline, let's not forget that. And again, her arm comes. Now for example, I see that her arm should have
come further down. I go there and fix it.
Don't worry about it. Don't worry about the
extra lines you are doing here continuous control
drawing and this is okay. Again, it's too hasty that I'm fixing the
shape of her hair. Don't worry about this too much. Again, we will add
more lines here. And here's her neck here this. Now, do I want to do her top? Yes, I do. I'm trying
to do these lines. Because it's black
what she's wearing, I can't see much details of the of her trousers or
if they were skirts. And here is the lines are a
bit off because it's her arm. And doing the lines like this, it will actually show
that in here it's stretching and let's go to the other side you can see that if I don't want to
go over what I draw, I just follow the
existing lines. And a bit like this. So it's too much, but it's okay. Then I'm going to go to her
head and in front of her, there is a shelf on
that shelf there are some I think bags of coffee. Again, I'm doing
them very simply. This is the goal of this
that make it quickly and I'm going to the other side. There's one more package like that and then the
shelf finishes here. Do I want to add
something else here? Yes, these details I actually
really like that there are these lights and hang them from the top and
go to the next one. These details, I
really like adding. As you can see, I'm not lifting my pen up for any of these. And I can go over here
from her shoulder, I see myself is starting This is just I'm picking some details from the environment actually
to fill the space. Then here there's, I think, something like a microwave and here's the back counter. Let's put the other side as well to give the feeling that
this is the background. Let's add like that. There are a bunch of orange. Front counter.
Here, for example, there's a poster,
but this poster is there's a handle of a chair. And as I'm doing this, there's also a desk,
a desk, table. And I'm going to leave it here. I said, I'm not going
to do the whole thing, but I couldn't stop myself. I'm going to try to focus
on the people more. But anyway, as you can see, if this person wasn't here, even though she's
in the background, this composition would
feel somewhat empty. If there is a person in your whatever you are
trying to going to draw, it's a good idea to go
ahead and add them. There's nothing to be scared
of What did I do here? I just picked a point and started and from there
went back to her. I need to catch my breath. Jack? Nothing. Then I just started
following the lines. I'm just like let's imagine that my eye is
50% on the picture, 50% on my paper, and I'm trying to go
simultaneously at the same time, my eye is tracing the lines
of her and my pen follows. Like this, she definitely
is part of our drawing e and this wasn't too difficult. I want you to also be not afraid of drawing
people go at it. This is not exact
replica of her, but that wasn't the goal anyway. So what if it doesn't
look like the person? Um, so for this one, let's do one more. I'll try to do this one quickly. Let's say, let's do
it like this. Okay. Here, this is a photo I took from a coffee
shop and I took a photo of the pastries that they had really delicious pastries here and as it happens in the
background, there are people. So my main goal is
here is the pastries, but putting these people at the background will
make it will give more depth and it will add more action to your composition. It is a good idea to add them. What we do, we don't feel
afraid of drawing people. We just start from
a point, go edit. If it's slightly wrong
like it happened here in the arm situation, correct, course correct, and we continue and it's
going to be fine. Just trust the process. I'm going to start from here. I see this name tech thing. Behind it, there's a very
nice looking pastry. Pastries have always
squiggly lines. There are no straight pastries, lots of details, but we're not going to
put all of that here, and then continuing from here, there's another name tag and
then there is another one, but it's standing a bit weird. Here there's the tray. Here there are some writings. There are more pastries here. I'm going to add them
very roughly here. Quickly. Let's say this was the one in focus
in these ones, I'm not pressing down too much. Here there is another pastry. This vagueness, there
are more pastries here. I'm making them look very vague. There's I don't know what
this thing is called to hold the things without
touching your hand. I like how it's fading, so I'd say to put more
lines on these ones. This is like that, and it continues like
this that there's more pastries this way, this is in focus, can you see
here the counter finishes. I'm going to say
somewhere around here, it starts with her arm. H. And somewhere around here, this is the waistline
and she's wearing jeans. This is the pocket label. We can't see the
second arm from here, but we can see her hair
coming into the picture. Okay the face we can't also see. Again, this is in
the background, so I'm not going to
fiddle too much with it, but I want to add some creases on the clothing
that they are usually there. This will feel more realistic. In front of her, there
is another person. S is I think making coffee
that I'm going to start from the shoulder and
I can barely see, but her hair is visible. Like this and a bit of neck. Around here and this
goes like this here, you can see her arm in front of her and this
goes down like this. There are sechs of
her jeans. On pocket. Putting the details
like pockets, everyone knows how Jen's
pocket looks like. If you make the
effort to put one, this will clearly
show what it is. In this picture, I
can't see anymore that where her arms go
to that I think in here, as you can see the
elbow is here, the elbow must collect this
and her hand is sticking out from here, holding something. I don't know, let's give her
a milk bottle or something. And I think in here, there's another counter
where they make coffee and behind her, there's another counter that
actually finishes here. And I would do just like that. In here, I put more
details on her and the lines are more
strict because everything I was looking
at it from a distance. So even though she's
in the background, everything is far away together. Then here that was really
zoomed into this pastry. And then they are all
blurred in the background. I just did them more quickly. We can try to put more details on the hair
and a few individual ones. This is how I would
do. Again, these are just lines when
you look at it, you can see that there are two people there. Is it perfect? It's not, but it's
not supposed to be. So yeah. This is how I tackle when there are people
in the background, I rather include them
than not include them. This is also totally
an option, by the way. You can just completely ignore her or ignore them,
focus on the paces. This is totally fine. But if you want to
challenge yourself, if you want to add
people in your drawings, if you draw at
coffee shops like me a lot, this is how we can do. The main thing is
to just give it a go and it will
be probably fine. The more you do the
easier it will get. If you get something
wrong in the first go, you will fix it later by adding
more lines. Don't worry. Don't go back to
pencil sketching. This is just fine. That's
what I wanted to say. This is it for the first lesson and I will see you
on the second one. Jack, what is the
next one? Yes, this time people in the foreground, but as secondary objects, and I will tell you
what that means. I will see you on
the next one. Bye.
4. Drawing People in the Foreground (Secondary Object): So, welcome back. Now we're
going to do people again. Surprise. But in the foreground. But as a secondary object,
what do I mean by this? Like, there are some
situations that you want to when
you're traveling, sightseeing, someplace
you take a photo, and there are people
passing in front of you. That's for a photo as well, this brings a really good kind of feeling of moment
to your composition, and it's good, but
they are not actually the main subject This person
is not your main subject. You don't actually want to photograph them or
draw them even, but they are there, they
are part of the scene. So sometimes you draw them. For example, in
another coffee shop, maybe actually, I
can draw these lady. I think she's a nun. This is the photo I too,
I'm going to draw this one. This is a photo I
took in we were in I think Italy around Lake Como
Pelagio I think we were at. I took this photo of this
beautiful narrow street, and there was a lady passing and I like it because it shows that this was a crowded place and people were
coming and going. So she was part of the scene. And I think with her, it looks more interesting. I'm going to this time start directly from her as she
is in the foreground. She had this thing on her head, that's why I think she was a nu, but I don't know how
this thing is called. I'm sorry. And she had her glasses, nose. H. Chin and she had this
waistcoat thing. I think in here there's a strap and here her arm was coming out. This kind of clothing, let's do her arm first. Because she's moving walking that her arm is in front of her. She's wearing a Okay. Shirt and you can
see the creases on that shirt and this
puffy waistcoat. And there's a strap coming out. I think in here,
there's her back. As you can see, I'm
trying not to think too much and keep moving my pen. These extra movements
of your pen. Is lots of detail and
texture to your drawings. Yeah, you can see, let's finish it around here. Um that I went a bit further down than
the picture allowed me. She's holding
something in her hand. Maybe it's an umbrella.
It was a rainy day. I at the other part
of it and Okay. There's her back here. Maybe this thing can come
a bit further front. Now I'm done throwing her. Can you see this extra line that it adds more
texture to that area. Let's say her right
arm in the front, then her right leg
would be to the back. So I'm going to
leave it like that. I'm going to ignore
the other two people because I don't want
this to take ages and from somewhere
around here behind her, that this building starts
goes all the way back and there's a street sign here. There are cables going a pipe and beyond that pipe, I see a window that from this
angle it looks very narrow. But basically, this is
how it keeps going down. I start seeing the roofs. Yes. Yeah, let's hear and all the way
here enters street. He. And the street goes like this. In here, there are steps. Just to get the
feeling, I will try to quickly here there's the
roof of the building. You can see other
houses here and Here, there are
some green plants. And it's fine. The windows, more windows. Windows. So there was a
street like this and this lady actually gives more movement to the picture. So I would I would rather
include her in my composition. Then on the wall, there is a very nice
place for you to write a few things and here
you can add your date and add a bit of
color, there you go. This is your person
in the foreground. But as a secondary object, she wasn't the goal
of this drawing, this tree actually is, but happens in the foreground and there's a reason for that. I guess if I was to draw this, I will very quickly
pick some yellow for the side a bit of orange and pink because
it's not quite orange. Maybe give her some colors too. And some splashes and I think it would be
done just like that. Remember, this is no
effort to get turning. We try to give as little effort as possible
with maximum impact. That's the goal. That's where this practice came
out, basically. That's how I invented for
myself because I want to not spend hours and days
and weeks on one spread, but get things done quickly
and still give the feeling. I allow how expressive and
artistic these pages look, and this is how I do it. And I believe you
can do the same. Just pay attention to
the lines and don't be afraid of what's going to
come out at the end of it. It doesn't have
to look like her, she doesn't know that you
are doing this painting. She does know that I'm
doing this painting. But I did it and it represents what I
wanted it to represent. I illustrated the situation and it looks beautiful.
That's what matters. It's no different than
driving a chair or table. I will try to do one more
example on this side. Now this is my son
and his best friend. I'm going to in here, they could be actually
the main subject. But I took this as an example to think that you
could actually have something in the background
that is more noteworthy. But adding two kids
looking at it actually gives lots of feeling to it. Maybe it's ice cream truck or something like that,
if you know what I mean. Ice cream truck would
be the main subject. However, adding the kids
secondary subject as kids, looking at the ice cream truck. In the foreground, it adds more feeling to your
painting and drawing. That's why you might want to
have a painting like this. Let's imagine No imagine, we are looking at the
photo and I'm going to start they are going to
be a somewhat smaller. The codes have always
creases on them. Always try at them. We will talk about this later. That they are never
just straight lines. There's an robot. I'm going
to throw a little neck here big head for the body. The ears are visible. Here this time the hand
is going down like that. I have to say, I
usually keep the five, but when it comes to details
of the face and hence, it's too thick and I'm not able to unless I really
zoom into a picture, it's difficult to put
the details of a finger. So I don't worry
too much about it because that's not
the main point that you are just trying to
draw these kits, yes. Again, clothes are
never straight. Always at some creases and
if it's not exact size, as you saw, I made
the leg too thin, I just came out of
it and this becomes a part of the texture
of the clothing. We can make this arm a bit
bigger and his friend is touching they're
touching their arms. We can see lots of crest here. I went too far down,
but it's okay. I came up a bit. In here actually, they
were watching in Poland, we have a shop called Japka and they have a
automated shop completely. When you go in there
is the machine that makes you hot
dog and they are watching a robot arm
making hot dogs. Here lots of greases you can see a bit of
his elbow as well. I'm adding a bit more
texture to his friends. Y clothes about the same size, you can see the hair like this. Our boys there and his friend
is actually wearing shorts. You can see how many
faults actually it has. Back of the knee. And shoes. Then I'm going to go to the background. Let's say, I'm just
going to represent it by this huge window, whatever that might
be in your case, in your story, and
they're watching. As you can see that it's already gives what are they
looking at so intently to kids that's what makes it interesting and that's
why you might want to have a person in your
drawing in the foreground, but as a secondary
object subject. This is how I'm going to represent how I'm going
to finish this lesson. Another example actually want
to show but he didn't draw, but I already drew
here, for example. In this photo, I took
at a coffee shop that he was standing in front of the bar and looking at the food. Again, he's not the
goal of my drawing and there was a barista behind
the counter making coffee. But adding to this picture, it just gives the
feeling of the place. It's a busy place there
are people coming going and you can also you might want to actually draw people like
this and it's really fun. This is another
example of people being in the foreground but
not being the main subject. This is it for Lesson two. I'm going to see
on Lesson three. What would that be? Jack. Oh, people in
the foreground again, but as the main subject. So I'm gonna see you
on the next lesson. Bye. Thank
5. Drawing People in the Foreground (Main Subject): Hello again, and welcome back
to Lesson three, People. In the foreground, but this
time as a main subject. This is our intention. We
want to draw the person. I guess this will be the most
common use for you guys. That's how you will be doing. I don't know, you will draw
your child, your spouse, wife, husband, your uncle, your aunt, wherever
you want to draw, that you had to spend a
day with your aunt and you want to draw her in
your sketch journal, and this is it the subject is in the foreground and
that's the main subject. Um, so again, this actually, I'm gonna pick my 0.5. It actually doesn't create any big difference in
terms of what you do. My advice is again the same. Everything is made out of
lines and focus on the lines. I guess how it differs is that you might want to just put the person
and nothing else. Maybe that will be
your composition. You just draw the person and say a few words at the title at the date, and
maybe that will be it. This will be only the person. That, for example, when I was throwing some
examples here, this is my favorite
one, I think. My son, I think second
or third day of school, he was giving such cool wipes in the changing
room downstairs in his school and with his pokemon
hoodie and his backpack. So this can be a page by itself. I might even take this
out and just put it somewhere on the wall.
I love it that much. Or my friend Olivia, here, that could be an example like a
meeting with a friend. Just add this on the side of the page, add a few writings, add a title, and say, there's nothing better
than having a friend. And that will be your drawing or yourself.
But you get to this. This is I think more subject of next lesson which
is self-portrait. I'm going to go with this one. Now probably I'm putting
the image up somewhere. I'm going to push this
aside and I'm going to as I always do,
look from my phone. This is how is it
called? From a parade. This was the word I was
looking for, not just a walk. It was a parade and I
think from two years ago. It's a lovely picture that my son is holding
hands with his mom. I will try to capture this. I think if I find it I
will put it somewhere, I actually did a
drawing from this day, but usually I avoid people. I end up drawing a scene
from the coffee shop. We ended up and a this was
the way I remember this day, which again, a lovely page. But this drawing can also be good way to
remember this parade. I'm going to because I want to keep them folds so this requires a little
bit of thinking. But if I just start and run out of space, that's also fine. If the page cuts them on the knees or something,
that's also fine. But I will attempt to
keep them together. I will start, let's say the
hands are in the middle of this page and I'm starting
up from her hand. That's her elbow. I'll come back to
this later this part, but I want to tackle her first. She has a backpack on Again, I actually
see this detail now. I see my son's Tex is sticking its head out. I will try to capture
this as well. And here are the zippers
open because of that, and over here, it's closed. And it says there are lots of folded qualities
of the fabric and a longish strap is coming down like that and here it's flipping
over to one side. Look, even just doing these
lines like this gives the feeling of the
subject you are drawing. Again, I'm just
focusing on the lines. There's another handle coming
from here and the backpack, I will bring it down a bit. I'm adding some
creases from here, I can go back to drawing
her I will go back to there's a strap
going like this to the front and here is also the backpack
strap overlapping that. It's actually quite complex
and there's her dress. Now I can see that in reality, her arm is more closed, but I'm not worried about that. That I'm adding some creases to her clothing and then
it goes up like this. Then it goes the placement of this strap of the backpack
is not in the right place. But again, I'm not
worried about that. I'm just focusing on my subject. Adding some more rises
here to make it more realistic and her shoes from here, I'm following the
lines I have already drawn and going back to from here to the shoulder, there's another
strap stepping over the other strap and there is this black strap that
should connect with the other one that
black strap is here. And from here, her actually neck is covered with her hair. It comes all the
way to I will go like this that she has
flowers in her hair. Another one is
visible from there and her hair comes
something like this and I will
add a few strands of hair to give the feeling of the hair and a bit
from the top as well. This usually helps.
I noticed that when someone is blonde
or have light hair, if you try to draw everything, suddenly you have a
person with black hair. That's why it's good
to leave white space, try to draw the shape
of the hair and then add some a few strengths to give the feeling and leave it there. There's the thing that attached those and here I think I can see the
edge of her sunglasses. With that, I'm done
with her and I will go back to the
hand, the tricky part. I can see her pinky wrapped
around my son's hand. Like I said, when it's
such small drawing, it's difficult to capture the details of hand and face. But again, don't worry
about it too much. This is my son's top, the arm and from here to
elbow and going up like that. Now let's focus on the drawing there are these
creases and under the arm, the t shirt goes to the front. Lots of creases to add. And here more rises
on the shoulder and the his arm sticking out like this and
tiny bit of the hand, you can see that. And from here, Same applies to my
son's hair as well. The ear is visible. In this case, I can try to show how his hair
separates here. You can see the
ear here as well. I'm adding some extra lines, his t shirts really crinkly. Because this photo is
a bit from the top, it's actually and his legs
appear quite actually small. His leg is also left leg is to the front and like this, Maybe because her leg
is a little bit front, I can make it look like you can see
the front leg here. But I think this
looks more realistic. I just helped a little bit
reality and I think that's it. The way I would
remember this day, I think I said that I'm
not doing paintings, but also Sorry I'm
reaching for some paints. That I said that, if I feel like it every now
and then, I might. It's one of those moments. But I'm just going to
start with that color. First of all, let's
add some water with this eye dropper thing. I guess if I was doing this
page for my sketch journal, I would very quickly
paint like this, pick up this water that
I dropped because this was the parade from Warsaw. Okay. Pick up some orange. There's a bit too
much red there, I will let it go on the other side. You
can always do that. I'm going to pick some yellow. And before I mix some up, I think I want to pick
up some of this paint. I think it's just too much. And the way I do that
is by drying my brush and picking up some of
the paint just like that. Yeah, because I don't want
to run all over the place. That I want the colors to mix. I don't want to feel too much, but I also want them to stay
a bit in their own sections. So I will try to bring
the orange back a bit. Let's add some green. This screen I see
now is very close. I want it to be more
visible than that. So I'm going to use this green. This is Adm green. Okay. So and some torquois blue. I'm going to drop
some of it here. But here, there's
too much paint. I'm going to pick some up. You don't go all the way. Let's control as well. You can always do this by the. You can control your amount of paint you apply if
you are quick about it. And finally, I will let
some of this purple. And to finish it off, I'm going to add a
bit more pigment to the top to the red. And I think this is how I would remember this day. I think that would work.
What do you think? And once this is dry, it will create beautiful watercolor wash. Then over this, if you do some writing,
this will look beautiful. I think this will totally work. Just focus on the lines, not the end result. Okay, let's quickly do one more. Then the next one I'm
not gonna paint because then I'm taking too
much of your time. Is the main subject. I
like these drawings. I like this top
photograph so much. So maybe I will
just use it again. Because the other one I
picked for this, again, my son from the back
inside an airplane. This one is at
least front facing. So I will try to do it quickly. When there's a person, especially with sunglass, I
always start with sunglasses. If you get the sunglasses right, the rest will be fine. And sunglass almost
always have frames. So do that and you
can see the ear. And that's cute tiny nose. And it not even smile, but I think probably I was telling him to smile and this
is the face I was getting. And here I can just to his hair. Make them go a bit
longer some of them. He has light hair, so I'm not going to do too much. Maybe give him a bit
more cheek here. And the ear is visible here too. Here's the neck and the top. Here you can see the straps of his backpack. I'm sometimes
forgetting my words. I'll go back here, here shoulders with the bow and go back in the back of
the backpack a little bit. And here is top. And here's the other strap going like this to the back and Let's complete this snack here. And of course I shouldn't
forget about the chaisart. I think this is chars art. I will do my best. These are the rings. And here it says Pokemon. I don't know if you have a
child who is also a big fan of Pokemon or if you
are a fan yourself. I have a friend who still
collects Pokemon cards, for example, and he loves it. Yeah. Then you could do the
same trick with this do the background with some colors that represents the
day, whatever that is, or a you can even just put
one color on one side, give him a shade, and then the other side, it are lots of things you can do. I always say that the main idea with No or Sketch journaling
is that you are not trying to spend so much time making everything so realistic, it's just that very quickly you are
capturing your feeling, your memory, whatever you want to do in artistic way and
this is one way to do it. That's. What I also love that every second
time it's different. That's how we look at this one. In here, I drew him
much more serious. I think it's closer to the
real thing, the real photo. Here, I think I gave
him a bit more smile. Both works. Yeah. So this is it
for the main subject, the people as the main
subject in the foreground. That as you can see it
focuses on these people. You can also try
to draw like this. Just focus on the lines,
trust the process. Don't pick up your pen,
just keep drawing. And this continuous contract
also gives so much character and feeling this
expressive feeling to your art, your drawings. And these are people in the foreground, but
as secondary objects. As you can see that it it's
quite different than in here, how they are and how
they appear here, that they are much
more important in my composition. Yeah. This is it for the Which
lesson is this, Jack? Third? Yeah. People in the foreground as
the main subject. In the next one, not
last one, there is more. Next one will be self-portrait. We will focus on this area and I will see on
the next one. Bye.
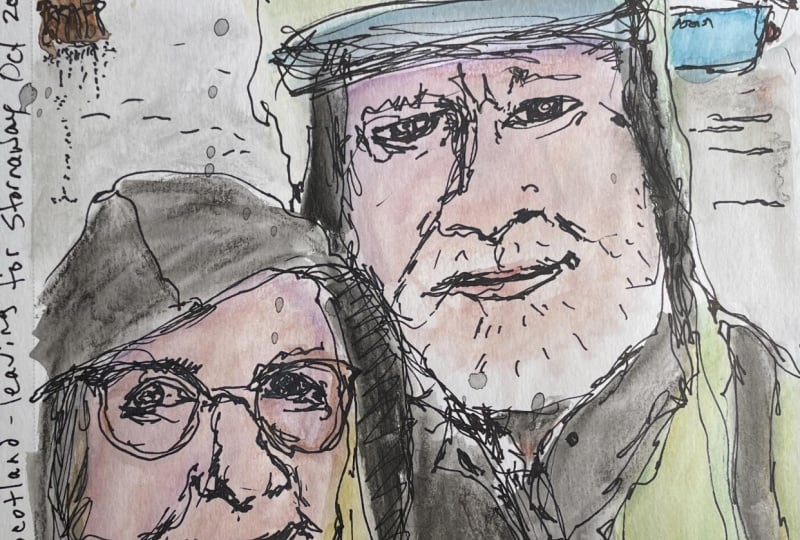
6. Self Portrait and Drawing People Close Up: Hello, and welcome
back to self-portrait. In the previous one
with these people, my people as the main
subject for drawing. I realize I forgot something
that when I do sunglasses, this is a very simple
trick to actually make the sunglasses shine that you just make them a bit darker and it immediately
looks much color. So don't forget that. So we are moving on to self-portrait. In this lesson, we'll
tackle the self-portrait, how do I do self-portraits. I will try to do two
here that you might want to do a self-portrait
of yourself when you did something and you are capturing in your sketch and if
the focus is you, self-portrait could be
a good way to do that. Let's take it to
the right a bit. For this, I will really
zoom in to my face and we will focus wheels
just to the face. This way, we have now we can go into more
details this way than when we are doing
a smaller drawing, not smaller drawing, but
when you draw a full body, the face is a small part of it. But when you zoom in, you have more space and you can go into more details this way, still with a thick pen 0.5. Let's do that quickly. Like I said, if I
have sunglasses, I always start with
the sunglasses. For example, I noticed
that it should have been much rounder
sunglasses. I fix that. Put the frame in for this, I will lift my panda
there are these two dots. It's an important detail of the sunglass and I want
to keep it that way. This way, it's the
id of my face. This is a bit of my
face is going to be. I have to come. As I might run out of space when I'm doing
this that's also fine. You can even zoom in. You can make the sunglass even bigger. From here, you can
see a bit of this and my ear and then
there's their headphones. My chin and my big cheeks. They try not to worry
too much about it that sometimes they think of it like a carcature my headphones that some parts
might get bigger, some parts might get smaller and it might not look
exactly like you also, and that's also fine. I'm doing my hair lines, but I don't want to
do a straight line. Now I will try to
do the outside. It's much more spiky that
goes out and like this. Then I will try to a
more details like this. So where was I was
doing the hair. Oh, my. I had to take a little
break and I left my pan cap oponent dried. Because I have darker hair, I don't have a problem
making my hair. With more lines that
it appears more black. But around here, I
will leave a bit of white space because I have
some white hairs coming in. And let's say I will
continue from here. Yes, just like that. Then I will follow
these lines back down that you can see some of my lines on my forehead. My eyebrows are also
visible over the glasses. And from here, I can
focus on my nose. And here I will go to my lips. There's a big smile on my face. I guess this is what they
talk about when they say Runners high and here's My thick bottom lip. Going to teeth, I have to say, you have to be very
careful because it always looks silly. So I'm doing tiny bit on here. Okay. And don't tell
me that I didn't warn. And sometimes I
add this kind of, I need to go across from
one line to another, and I add some
swears it just adds more texture to the painting. I have more bears here, so it can be more
shade in this area. And here is my chin. And from here there is
this neck warmer I have. It has, like, lots of faults. I can represent them with lots of lines because
that's what they are. It has made lines
one after another. And then I have my top with, again, all scrunched up. And from here also. The t shirts coming this way. And like I mentioned before, when you have sunglasses, just like that, you can
have a self-portrait. I know next to it
here at your date, here you can add
face of a winner, whatever you want
to say for the day maybe you were after a race. What you can do more with
this is that I think in here, I can also add this and at this point, you
are lifting your pen, but you can add some if the person you are
drawing has beard, you can also play
with this a bit. I won't hurt. Just like that, you can do
self-portrait of yourself. Again, because we were
zoomed in so much, I was able to focus on some
of the details and make them nicer and don't get all mixed up even
though I'm using 0.5. Trust the process. But what's missing
here is the eyes. I always recommend sunglasses
is a very good trick. You can draw anyone
with sunglasses. It makes it much easier. Eyes are way more tricky, but I will do one with
the eyes for you as well. Let's say I was drawing
this one and this time, there are no sunglasses, so I'm going to
start from the hair. I will try to get the
general shape of the hair. I give myself a nice big hair. Some continuous lines. I'm strengthening
this feeling of hair. Some of them can
come in like that. That I'm basically
following a general line, my hairs are going, but I'm not trying to draw
every individual hair. I'm trying to hide this
initial line. Amen. Okay. And from here, I'm going to go to here
my irrespisible obit. I might have exaggerated my in there, but don't worry
too much about it. Because my face is
at a bit of angle. It's looking this way. I can see more of
the right side. From here, let's say my neck
goes down like this and my t shirt comes like this and it disappears behind my neck and my neck goes like that. And here is the
rest of my t shirt. You can see, again, we will talk about
clothing later, but just by adding the rises, it gives so much more of
the feeling of clothing. I'm not trying to do
exactly the same, but I'm looking at it, taking this as a base in
which way Chris are going, and then I just add
some extra lines. This way, the face is done. Usually, again,
follow the lines. Look at where the ear ends
and where the eye starts and try to do your
eyes from there. When we come to the
eyes, the tricky part. Try to get to top part and as you can see
that with the eye, it's two lines, and then
the eye is never perfect. You can't see the
perfect circle of your what is this thing called
the middle of your eye, the dark part that you
can see it partially. Unless you like it's shock moment and you have
your eyes fully open. And from here, I
will switch to nose. And on the same level, I do this first line and there's another line underneath
and the bottom one. And inside, you
can see so again, I'm just trying to
follow the lines, not do what my brain tells me that there are
lines, so I'm adding lines. The trick here is that the
eye has to have a shine. If it doesn't have a shine, it looks simple and
childish drawing. But just decide where the
shine is for this one, you don't have to lift your pen, draw a circle and then the rest just feeling black
because in here, I'm not using any color, so I'm not going to differentiate the
middle and the outside. Because the shine is
on the left hand side, the eye is like a sphere that the shine has to be on
this side here as well. Draw a circle and inside the
rest of it is fill black and suddenly you have
much more realistic eyes looking at you and that's it. Again, this is just for looking at the lines
and following them. I look very weird without the eyelashes. I'm
going to add that. I have my creases on my
forehead and I'm going to go here and the other
eyebrow goes like this, I think, a thicker maybe. From here, I go. This time I have
closed eyes, lips, again, draw a simple
line like this as smile, and then the usual
lip goes like this, that there's always a dip here. I gave myself very juicy lips, but again, it's okay. Let's add this
detail of my throat and I indicated the chin there. Okay, I think I'm
happy with this. So like that, again, I was on the side. Okay. You can like
with the other one, if you are drawing a man, You can just add some
beard with simple dots. You can use this for
shading as well. That if you do it more intense, it will appear as a shade. It's a very good
way to do shading. I use these dots technique in my abstract paintings as well. If you watch Abstract
watercolor series, you would know if you haven't, I would recommend going
there after this. Just like that,
another self-portrait. Zooming in helps because you
see more of your subject and you can focus on the lines easier and
you have more space to focus on the lines
and just like that, there's a self-portrait
next to this I don't know, face of a loser,
maybe had a bad day and you want to emphasize that. Two ways to do. If you are
afraid of drowing the ice, go with sunglasses.
This always works. And it makes actually
all the drawings much cooler or if you want to do the eyes,
this is a way to do it, that you never see
the full circle, that it is under the eyelid
and the bottom of the eye, I don't know, and you put a
shine and just pick one side. They have to be
on the same side, one shine here, one shine on the right, one
shine on the left, can't be and fill the
rest with black and this will appear like
really realistic eyes looking at you all of a sudden. You saw I didn't do
anything special here. I drew this without lifting my hand and you can do the same. Yeah, just like that, we are done with self-portrait. I hope you enjoyed this lesson. I would like to see
your self-portraits. That would be nice
class project. If there were any other
examples, I guess, again, this is the same person, me
zooming into the picture, how much more details I'm
able to put than this one. And another self-portrait of myself here looking
cool with sunglasses. And my brother in
law, my cousin. This is my sister. This
is what I was saying. Be careful with the teeth. When you draw the teeth
with such dark black lines, they appear very weird
because normally teeth, they don't have such black
lines in between them and separating them makes it look like the person has
separated teeth. Try to avoid that. Yeah, this other self-portrait of mine, but a bit more Zoomed out. Again, with glass actually. Why not since we are here. You can just add this.
Make it even cooler. Good luck with your
self-portraits and this is becoming a
very cool collection, actually. I really like it. Look at this handsome guy. I will see on the next one. What is the next one,
Jack? Lesson five. Zoom out. We're
going to zoom out a bit because we
really zoomed in here. We're going to zoom out and look at some full body compositions. I will see you on the next one. Bye.
7. Zoom Out: Drawing Full Body Compositions: Here we go. Welcome back. We are here with Lesson five. We're going to now
from these portraits, Zoom self-portraits, zoom out and look at some full
body compositions. I'm going to put my I
sketchbook a little bit to the side and bring in my
phone to look at the image. I picked a few images for this. One example could be this. This I already actually
already drawn. I'm going to show you how
it end up that it's here, that this was actually a fun and also a little bit
scary because it's a fun, different posture that the body and how the leg is standing
and the arms are up. This gentleman was um, doing these soap
bubbles for kids in a park in the city
center of Warsaw, and he was collecting money to climb the mountain
very exciting. And yeah, there was this
photo and I thought I'm going to try to do this and
you can see, again, these creases on the
clothing that it really shows in what way he bending. This was one example, this one is another example
of full body compositions. I picked a few photos. Maybe we can start with
this one as the first one. After that, we will see. Depending on how much time
I will spend on this one, I will pick the next one. Now let's open a fresh page. And I have my favorite 05. But next five, that this FH, which is it is also
thick but more bandy, not as much as a brush pen, but not as stiff
as the normal one. I think this is
felt, I'm not sure. This also fun to use. But I'm going to
continue with my 05.5. Let's put this a little bit to the side like that so the photo can just come in here.
And fill the space. This is a photo I took
from a comedy show. This is a Turkish
comedian, Tuna Censas. He was doing a stand
up show in Warsaw. I thought he actually
saw me taking the photo. He said he's going to stand
and give me good pose. Otherwise, it always looks
bad when he's talking and it's actually
very good pose. Let's see if I will be
able to capture it. Okay. I think I always
pick a place to start, and I think I will
pick the microphone. Okay, and the microphone is
chest level and from there, we go to the head. He has a bit of
hair, not too much. And his most
characteristic thing, I think his mustache. Okay, I'm doing the shoulder. I will go back to the face and here his
ear is visible again, more hair on the side and on the side. His eyebrows. Okay, I will try
not to do so much. This is again because we zoomed out and I'm using a tick pen. The amount of details I can put into this is very limited. I don't want to a whole
bunch of black lines. What I was being careful about was you could
see his eyes. They are not very big
like they are it's narrow and you see the pupils
inside, but not as full. So I try to make them as one line for the
top of the eyelid, from the eye inside, and
definitely leave a tiny bit of a dot as a shine that gives
the real feeling of an eye. And then the mustache and the smile he has and
the eyebrows and eye out. It's better not to fiddle
too much sometimes. Okay, from here, his
shoulders also visible. And then it's behind
the microphone, then his arm goes
down like this. Let's do the stand of the microphone because
it's in the front. This way it will be easier. I will room out it to
see the full picture. I think I will go like this. But in here, I have to stop because on the
way, there is a book. He was reading some
section from a book in his special to now. And here I can see his
thumb holding the book. This is the we can see his arm, and go back to the
book and it has, like many pages like this. And ok, this is about half
of the point of his body. And from here, I
will go under Okay, now I notice that microphone
is a more slanted than it goes for sight and it's okay. I will do it like this. This is the microphone stand. Going back to the book to be
able to go back to the leg. But before the leg around here, there is his green top
and here you can see rises here he has his hand on his hip in the
superhero pose he gave. Okay, here, Chris top is
visible behind his hand, and I will go back there. And Because how his arm is standing there
are lots of Chris on his top and like this his
arm it goes like this. Now I can exit from here by going around the hand
back to the trousers. Now for this he's wearing jeans, so there are always
some creases around the knee where it
meets with the shoe. Now I'm at the shoe level, and I don't have lots of space for the
shoe, but that's okay. That you can run out of
space when you are drawing. We're not gonna freak
out about that. Okay. And from here is second leg a little
bit separates here. And the stitches are here and his second foot is standing a little bit to
the side, not facing me. Okay. I think I'm ready
to exit from this one. One last thing, it's
already been 12 minutes. Behind him around here, there is a chair. And beyond the chair, there is a carpet going like that that if I was
drawing this probably, I would use these details
to set up the place. Then the second part
goes like this. I think if I was doing my no effort to get
journaling and I want to capture this great
night I laugh a lot. I guess I would be
able to capture that night like this and it wouldn't be too far
off from reality. What do you think? I'm very
pleased with this one. I think I captured his essence. That's what it is all about. Now, what I would do, I guess I would add a bit of I would add the
date and the place, and maybe I would quote
him from one of his jokes, and that would be
a perfect page. Keep in mind, if
you go to event. This person is just giving you inspiration for the lines
that will come next. It doesn't have to look like anything else other
than the result. Let's move on to the second one. Which one should I do? I'm going to skip this one, this is a photo of my wife. But it will be
similar composition like one person
standing facing me. This is interesting,
my wife getting our son on her back or my son, maybe I will just try
to draw my son here. This is interesting body pose and it will definitely
challenge me with the hands. Let's see where that goes. You see, I'm going down straight ahead to what
I'm scared of the hands. That's what I'm also trying
to teach you here, go for it. Now, let's start with
the head maybe head, not the head, the head. He has light hair, so
I'm going to try to draw his hair like silhouette of it. Here is here. Then I will add some
strands to this. This way, what am I doing? I'm showing that
he has light hair. If I do everything black, it will look like he has black hair and that
a bit misrepresents and looks funny in situations people have
white hair or light hair. That's why. From here, I feel like his head
eye drop quite big. We might run out of
space, we'll see. He's looking down so
you can't actually see his eyes to represent
that you can put some eyelashes and we see much more his left
side on our right side, but left his face and
let's speak in my turn. On my right hand side, his face is more visible than on my left. From here, I will put my
pen down again continue. And from somewhere around
here, his jacket starts. It's a very puffy
jacket with lots of elements because
his hands are up, his shoulders are
at his ear level. And his hand is going
up like this above his head. That's about right. It rejoins the arm
joins the body here. And I will go back up there by following
my existing lines. And his hand, I'm going
to zoom here a little. What is his hand string? Ah. Here's his thumbnail and I guess my advice in
general with the hands is just to really
slow down here. I'm trying to put
those creases in his hands to give the feeling. And then palm of his hand. Here's his nail is visible here. From here, you can
see inside. Okay. I know it looks weird, but it is a very
funny hand position. Something like this from
my son and I did my best. I'm not going to worry
too much about it, and neither should you. You can always pick a photo that there is no hands visible. That's always an option. Now
I'm going to zoom out again. S the full picture,
I'm going down here. Dying here color of his jacket is sticking
up here a little bit. Again, it's going all
the way to his ears. Is going up again? To puffy details. And here's the side of his jacket joining with
the arm like that. And here there's a pocket. And here in the
middle is the zip. So now, there are these details of his jacket that it's like a Chevron pattern. So I'm going to
capture that quickly, and now on the side as well. Okay, now I'm going
back to the I can't avoid any longer the
hands. Let's do the hand. Okay. Now I'm just trying to focus on the lines. Because of the angle, it's pinky, looks tiny, but
it's not because of that. It's just the angle. Don't worry too much about it. Put the finger creases and here his hands have more
creases and here. Okay. Again, this is very zoomed out and I'm bit stick when I'm
able to put this much detail. I'm not going to go more
int to just only get worse. Now I'm going back
to where I was, which is it's funny Mud expression. Okay, this is enough
and we can go back down and see what his feet
think. The scary part is over. Straus starts. The other goes down. There's a patch on his knee. His shoe tiny bit visible. Okay, and this side his
feet is in the air. And somewhere around here that this look he was
walking on is visible. As you can see, this kind of simple textures also gives the feeling of a
vout very easily. Okay, so we have to again, let's if you have a fun day in the forest
with your family, with your children, you
could capture it like this. Again, this is not a
perfect replica of my son, but I'm going to say it
again, that wasn't the goal. The goal was to exercise, practice and come up with some lines and he was our
inspiration and we did it. So I think with this, I'm going to finish our full
body composition lesson. That's maybe if there are more full body
compositions with it. There is another example
of my brother in law, that he was carrying a packet of mushrooms that I think I
captured him very well, that clothing is very important. Crisis gives a really realistic
feeling to that he said his glasses and here
is my father in law, again, standing up with
his pockets in his hands. Again, when the
face gets smaller, you have very little chance to capture the details
of the person. But if you zoom in
and draw bigger, you can do more in here. This is actually the same that
I just drew the zoomed in. In here, you can see I was
able to put this much on me. My sister in law was
kneeling and trying to pick this mushroom and here's
the Zoomed inversion. Yeah. This is it for
full body compositions. Don't try to do too much on the pace since you
are zoomed out. Pick what you can use
the few lines for the eyebrows and if the person
has glasses or mustache, try to capture that
and leave it at that. The rest is about capturing
the way they are standing. Okay. But other than that, I pick a point and just
try to follow what's next. I try to look at the relation. Okay, the arm is
raised about the head and the shoulders come
all the way to the ears. That's why you are able to capture how the body
is standing, actually. So this is it for this lesson,
full body compositions. Next one. We will zoom in
again and we will look at some partial body
compositions because sometimes you don't have to put the full body to
tell your story. Maybe you need a
part of your body, and we will have a look at that. So I will see you in
the next lesson. Bye.
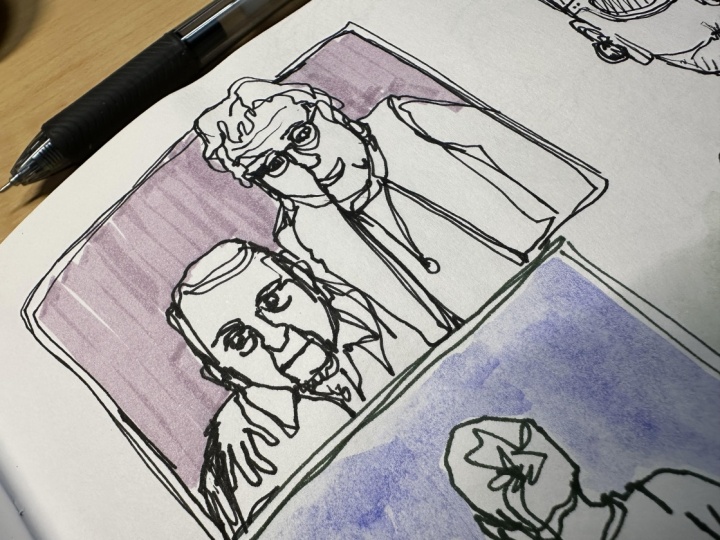
8. Zoom In: Drawing Partial Body Compositions: Hello again. Welcome
back to Lesson six. We will now zoom in
again and look at some partial body compositions where you don't have to
draw the whole thing. What kind of situations would
that be? Let's have a look. Let's turn a new page. I found some older
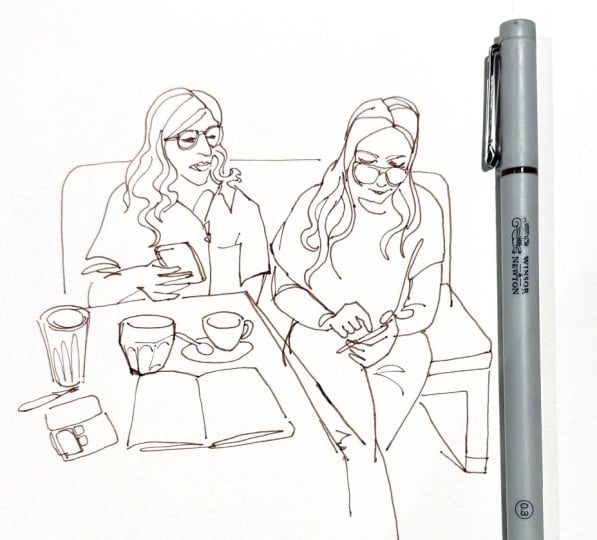
pages I did when I was doing my effort sched
joling both are from 2023, that I guess the biggest example in my mind for this was this that you are out with someone, you are droving your coffee and your coffee date with your
wife in my case, for example, it was, and this
person is sitting in front of you and she's actually or in front of the picture. No, in the picture
that she's visible. So in that case, that it's better
to include them. You remember this
moment kind of better you capture this memory better because this
person is there with you. Don't be afraid to draw them. You can totally just
go ahead and draw the table and your coffee and your cake and
be done with it. But if you want to, that you
could also just by adding a bit of the arm and
maybe up to shoulders. There's not even a face here. It's easy to do. This is a easy way to include
people in your drawing, but without the full
responsibility, let's say, and or in this one, for example, on another day, these are actually like a
month apart these dates. We were on another coffee date, and this picture is a bit more Zoomed out and
this you can see, it's still showing the table, but my wife's face
also visible that I focused on her
sunglasses and her hair, and she became part of it, and I really like this
page because of it. And then another kind of more recent drawing
edits on this was this. This was also good because you can actually
see at the back. This is the photo I have
from this paro soup. Coffee shop we draw first
in the first lesson. And I want to draw something
a bit more dynamic, bring the two together. I draw a section from
the coffee shop, but also I want to
include myself in it. I took a selfie that
wasn't showing foul me, but the photo is
here, you can see it. And I just drew this looking at the photo
and I love this page. This turned out so dynamic
and I'm melting into the background here and it
shows two things at once. It's like your camera recording
the front and the back at the same time showing
you to place and also you at the same
time. I like this. For these kind of compositions, you could use a
partial body and it is fun to do and the results
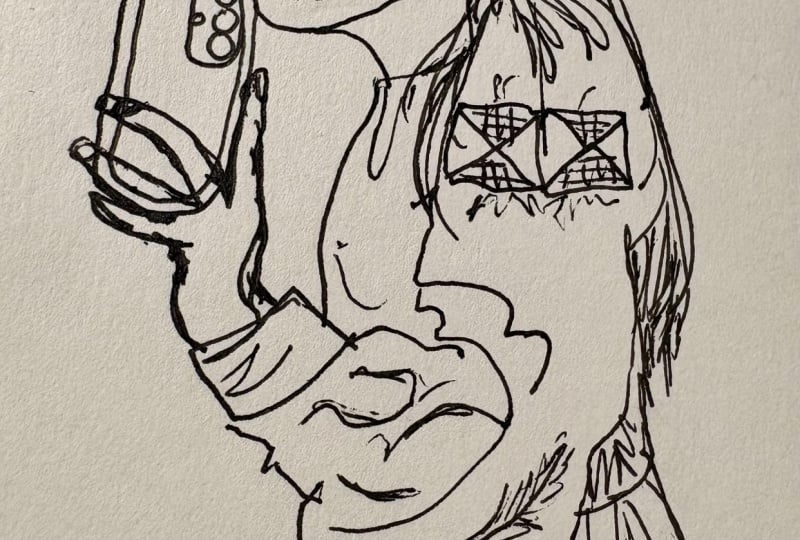
are usually worthwhile. For this, I picked a few photos, which one should we use. I have already shown
you an example of this. We could repeat this or
there's another of me. This could be also an
example that's in here, you can see I'm only
partially visible. Maybe in here, you're trying to show whatever is behind you. I guess I took this photo
because I was maybe going to share a story
on my Instagram that I'm working or painting and
drawing, whatever it is. But you are also
part of the story. This makes it more interesting. Um I think I'm going to draw this one to start
with and see how it goes. Let's position ourselves for
easy editing later. Okay. If I was going to
draw this picture, if I pick this composition for my sketch journal that day, now for sket journal, and I'm going to say busy at work or busy like a B
or something like that. I'm going to start from
the edge of the paper. Again, I'm going
to try to capture the silhouette of my hair. My ear tiny bit visible and
then my huge cheeks and then it goes in and then my
chin and it exits the frame. I'm going to go back here again. This is because I
have this dimple here but barely visible,
but I want to include it. Okay. A bit of my lips visible. And then my nose and
same level as my ear. It's my eye socket, let's say, eye area we're in. Now in this one, for example, my eye is very open. Because of that, my pupil is
almost completely visible. I'm going to leave a
shine on this side. And go back to giving myself my eyebrow because without
eyebrows, we look awful. Totally alien look. And my forehead creases. I'm going to add some more
strands of hair to my hair, but I'm not going to
do it completely. Okay. We can add some beard. I have a big chin,
but it's okay. This one goes like
that, my neck. This one, my neck
goes like that, and then I have my
tank top visible. And then my shoulder goes
like that, pretty smooth. And here I had
some more lines to show my neck and what bone is this interaxi
called bridge bone. I forgot. And now, then from my cheek, I can see that my
laptop is visible. That could be part of
the story that maybe I'm trying to say
something about work. Maybe I launched a new class. And that's the story I want
to tell people my desk continues behind and
there's a water container, and I'm not going to go all the way to the end
and in front of that, there are a bunch
of my paintings. I'm going to represent
them with these lines. And then you could
just add bunch of colors here and that could be our main subject that you are trying to draw
the attention here maybe. This way, you could just have the still include the person, still include yourself
in your story maybe, but without the pressure
to draw the entire thing, and then you could make
here maybe a p writing, Monday sacks, whatever
you want to say. I don't want to work.
I'm too pretty to work these kind of things and
have your page done. This took us about 10 minutes. That was always my
promise to you guys. 10 minutes under 10
minutes art pages. It will be different every
time, and that's good. I think for the second example I want to do with you
guys is this one I showed at the
beginning, like myself, but showing more
of the, let's say, there's a half of a
face and a torso. That you could totally try
to do this on your own. Take a photo of yourself,
similar to this. That's from an arm
length and try to draw. Now I'm going to
start with I think here the hand and the
arm makes sense to start with that's most
visible in the foreground. And here's my watch. From my watch, my
arm goes like this. Behind my arm. Like
behind my forearm, my upper arm so my shirt. Okay. Just like that, my shoulder and my
forearm is visible, but I'm going to go
back to this section and include my tattoo. And from here, just
from below where watch finishes that my
shirt goes like this. But in front of me, there is my Sketchbook. This ten sketchbook I
showed you actually. That's done and from here, I can go back to my shirt. Then just around from
the step of my watch, I can see my t shirts neck line. And here my shirt starts. I like drawing the clothing. It's fun to follow these lines. This goes up to my
neck like this. My face, my chin comes all
the way down to the bottom of my palm of my hand go up a bit. My ear is visible. I'm going back to my hand
to be able to draw my arm. I find it that drawing
the lips a little bit bigger always helps
the results look more fun. And let's say I
will leave it there that it's not visible
in the picture, but I put my nose and the rest, we are just leaving it like
this because we don't have to draw everything
every single time. We are going down like this and you can see my
shoulder scrunched up. I guess because of
how I'm sitting. There are more
creases in the shirt. And here's another side
of the shirt. It's open. Here's a button.
Here's a button. And here's a button. Okay. And from here, there's my shoulders that the clothing always
falls under the armpits. And here the arms separating. Again, I'm not going to draw
the outside of my shoulder. This is a good way if you are going to mix this
with something else, leave the line that
finishes your subject and have the saucer of
your coffee mug, for example, coming in
here, that's joining you. So because for this
kind of compositions, you might want to try
drawing the body partially. It's also less stress and maybe easier way to get into drawing people in your no
effort to get journal practice. And for this, again,
you could add a date and write down what
you are thinking of. Let's think. What shall
we say for this one? Jack. Jack, could you
pass me my coffee? Thank you very much. Perfectly cold. Thank you. What could we say?
Maybe something like I'm too pretty to work. Maybe you are at your
coffee break from work and you're contemplating
on your life choices. And this is something
you could draw definently and have fun
and feel accomplished. So this is it for lesson six
partial body compositions. And in the next one, we're going to focus
on the clothing. We've been doing that
already quite a bit, but we will have a look specifically on that and maybe look at some examples, and yeah, that will
be the next lesson. So I will see you
on the next one. Bye.
9. Clothing Because Drawing People Means Drawing Clothes: Welcome back to Lesson seven. Right, Jack. I couldn't speak. Right, Jack. Lesson seven. And this is what?
Ah, yes, thank you. Clothing. Yes, this
one is clothing. We've been doing some
clothing because I'm not driving myself and
other people naked. But I will try to show you some examples and
do a live example, so you will we will talk specifically
about clothing in this one. Let's have a look at the
examples that I've been doing in this one, for example, I don't remember
in which lesson we drew. People in the foreground,
lesson three, maybe, that my son had a Pokemon top and this was in that moment, it was very visible. Putting effort to draw
what's on it made sense. In this kind of it depends in your composition
what's important? What are you trying to focus? When I do this, this
stands out that's Pokemon. Other than that, my biggest
advice for clothing would be, I think, rise up. Unless you are wearing a latex bodysuit and you don't
have any creases on you, which in this case,
I'm going to say, wow, any of your clothes you're going to wear,
they have crises. Because the clothing it
falls on itself and from the way you are putting
your arms down and sitting, the fabric creases and this really gives that's actually
a way to capture them. Otherwise, a t shirt is
basically just a You just throw a T and this is a t shirt and the sit with the
hole in the middle. But when it's wrapped
around the person, it looks different and that wrapping around is what we
are trying to capture here. Again, this is nothing more
than focusing on the lines. I'm looking because my body is twisted towards left
to take this selfie, all the clothes is
pulled this way, all the criss are
going this way. But again, I'm not
saying this because I studied human anatomy. No, I'm just looking
at the lines. Just look at the lines
and you'll be fine. This gentleman same
way that his leg was bended backwards
when he was walking and you could see
these crises behind his leg or on his back. Also he was arching back. That in this case, if
people are wearing jeans, and I think majority of
people are wearing jeans, they always have these
crest at the back that it immediately gives the
feeling of the neck sorry, not neck, where the knees. Um yeah, under the arm is
very important to give, one, two, three, four Chris and it immediately tells
you that's the armpit. Armpits are important. I didn't know I'm gonna say these sequences of words
when I woke up today. Armpits are important. Puffy clothing that's
trying to give this feeling like putting
a bit of curve outside that tells us that it is
actually something puffy and bigger than the person that is wearing it. Also important. What else can I show
you here in Saxon? Another example of
clothing that you can see, this is not too many lines, but you can see that this
is my friend, Olivia. You can see that these are her legs just from a few
lines and her arm is going this way and she
has something on top that has open in the front, and her arms standing this way that it's not so much to do. Just focusing on which
lines you supposed to take. That's important here. Again, because my arms are
up to take the selfie, my shoulders are crisped up
all crunched up towards me. And when you have a
hoodie and you are not putting it on that
is falling behind you, then again, it's all
folded on top of itself. So lots of lines, concentric lines showing
lots of fabric here. When people are standing, usually these creases that
gravity also helps so they are kind of folding
onto itself downwards. Again, you can see behind the back creases
here is important. That you can focus on the patterns they have
in the first lesson. That's also a good way
to capture the clothing. Later on when you color them, that also gives you a
second chance to actually give some details
and differentiate what is clothing
and what is skin. If you're going to go in that more realistic painting like blue top painting it blue, not because sometimes I just
splash some color over it and based on the
feeling and mood. Or I don't paint at all. I just paint the background
and it just looks cooler, it's up to you in that sense. But my biggest advice would
be to follow the lines, see where the lines are and put lots of creases
on the clothing. Focus on where the creases are. Usually they are in the
armpits and between the legs. Just like in here. There's not much clothing going on here. I wasn't naked under this, but it was summer and
I just had a tank top. Now let's do some demonstration. Shall we? For this one, I will try to let's see
let's position ourselves. Okay. This is my friend and
Polish teacher, Olivia. And I will try to capture
the clothing from here. I will try start
from her shoulder. You can see that this is the first visible line
and it goes like this. And then there's a huge grease because she loves wearing
pig hoodies and sweaters. And here, even more so. Another big crease and
another crees here. Her arm I'm not going to go too much that
I will leave some space. And these are those I don't know how it's called the stretchy bits where like, it kind of end of your sleeves that kind of
falls onto your wrists. And she's actually
holding something. I think this is her dog
muffins water container. Yeah. Okay. And coming back to
the it goes like this. From here, it goes up. I'm going to go to the
other side because I want to continue from this shoulder. Here are the stitches
and here they meet. Here's the neckline. Her ear. So her I see. M M. Because she has light hair, I'm not going to do too much, but her hair is gears her neck going behind her and I'm going to
put a few strands. I and I love this
proportion because she does wear huge tops like this so that her hair looks small and
this huge top I like it. She's going to hate it
and I like that as well. That's basically what
I can see from this. Her posture we managed
to capture with this big clothing still,
it totally worked. We could I'm not going to go into doing
the whole thing. But you could go as
far as trying to capture what the clothing says as well and that in here, for example, A is
all crunched up. I wish I had time I
enjoy doing this. I see an edge here. Yeah. But this is
already enough that it represents what she has on her. Every attempt is a success. Okay, let's try to
draw me here as well. I'm also here in the
outside of my hair. My huge lips. My huge cheeks. Let's add some
beards for texture. Okay. I try to do this
as quick as possible, so I'm going to
focus on the Okay, let's add some texture to the hair, and then my t shirt, neckline, and I'm wearing the same actually shirt
I was wearing before. It's not a coincidence. I wear same clothes very often. My shirt goes down like this. As you can see,
nothing is straight. P button, another button. And you can see on my
shoulder, I have a backpack. So there's that, that also
and stitches of my shirt, and then lots of
creases on my arms. I And from here my arm because all the way, I have my bracelet, which was also
present from Olivia. I'm holding a phon that
actually took this picture. And from here, it's actually
now I noticed it goes much higher, but that's okay. I'm going to just add my shoulder here and my
shirt goes done this. And, in here, I notice my shirt and
also my hand is visible. And I think I'm holding my glasses. There are more crises here and that crease continues here. And just like that, you could we were focusing
on the clothing here, but I think now
and looking at it, I would definitely
add more creases to t shirt inside as well. Yeah. And that we were
focusing on the clothing, but you could draw a photo of you and your best friend like this and underneath right
best this after a coffee date you had and capture this
memory in this way as well. Yeah. So I think this sums
it up for the clothing. The most important
thing, as I was saying, nothing is straight
unless you are wearing a latex buddy suit. Otherwise, always
look at the lines and keep your pen moving. Not all these lines are
perfectly matching to the photo, but keeping it moving, you are creating lots of texture and that is a very good way to represent give the
feeling of the clouds. And so you saw how I did it, you can try to do
it by yourself. Take yourself with baggy clothes and with lots of if you're
going to draw people, this is a good way
to actually do that. If you pick a photo that they have lots of
lines going on, if you follow lines,
you'll be fine. If there are less
lines and you need to give the body
curves and so on, that's actually
much harder to do. Yeah. So this is it from me for clothing
with a nice pink buggy. Actually, let's do it quickly because I haven't painted in the previous ones and I have
a pink paint just here. Let's splash a bit of
color here as well. And also, when I
say splash color, this is really what I
mean, really splash it. And for my shirt, I have this blue. Again, I'm going to
quickly splash and I'm going to let them
also mix maybe. And then some pink on
the other side as well. I want them to mix a little. And for me, this is done. You don't need
anything else? This is the beauty of noforske journey. With this much work,
you can be done. Actually, I'm very
pleased with this one. I hope you enjoyed this one. Next one will be
the final lesson. We're going to talk about face, eyes, lips, hair, all
those kind of things. Again, we touched all of those, but we're going to focus on them and we're
going to finish it. I hope you enjoyed this one. I will see you on
the next one. Bye.
10. Drawing Faces: Lips, Eyes, Nose, Hair: And welcome back. This is the last lesson. We're going to
focus on the face, eyes, lips, hair, and
this kind of stuff. Let's have a look
at some examples. Like we already did some
of this, of course. That in here, there are
somewhat close up faces. In here, it's an example how
you can avoid drawing faces, but still include people in
your no effort to get jours. This is also totally an option. Here there are lots of pass that my main advice will be and we will make an
example of that in a second, is eyes are tricky and a so if you are feeling
the same way about the eyes, you can totally go the
sunglass direction. Sunglass are easy. Basically, you just do the frame and feel the inside and
it's very easy to draw, and it covers 20, 30% of the face,
and they look cool. You can make it your style. I was giving this
advice before as well. This is still a totally
valid way to go. Make it easier for yourself. No more difficult.
If you make it easier for yourself and you
get the habit of drawing, at some point you will realize it already became easy
for you and you didn't even notice when you try to do things because it's about
the practice with your hand. There's nothing wrong about
making it easy for yourself. Sunglass are valid way to go. But we're going to
focus on how to make the ice if you want
to do that as well. The I feel like this
my brother in law, I drew here that has quite
a stare looking at me. And when it gets smaller, that it's difficult to
put the details in. So if you are drawing a full body and the face gets really small part of that, don't fiddle too much, don't try to do too much with your lines because you are
doing continuous country drawing and For example, here, my cousin here
is at the edge. If I put a bit more, it was
going to get out of hand. But I managed to capture
his likeness here. The advice will be, I said this before as well. Teeth. This is an example of
how not to draw the teeth. If you draw every single teeth one by one with a thick pen, this gives the feeling of
gaps between the teeth. It appears that the person has teeth that
have gaps in them, which is never the case. Almost. I'm guessing it won't be something
you are drawing. Don't draw the teeth like this, either just draw
tiny part of it. I'm going to show you an
example. I did myself. That is okay. If they are just
partially visible, like in here, that's okay. Or how we do with the hair, just do the um,
silhouette of them. We will make an example
of that as well. And yeah. Let's do some examples maybe. Here, putting extra
lines on your face, it actually gives more
texture, and that's okay. Look in here, I didn't put anything on my forehead
and it feels empty. On the other hand,
look at these ones. There's more texture here because there's
always more texture. So I would prefer
this over this. So don't be afraid to go over the empty
spaces with your pen. That's the beauty of continuous
contour and it gives texture to your drawings. And faces, another example.
And we will do the hair. We talked about the hair before. For light hair, you
don't do the whole every single, strand of hair. But you do the silhouette and just do a few strands to give
the feeling of the hair, then it appears light
and that's a good trick. In here, for example, my
brother in law actually has a white beard and hair. When I did this, it appeared like someone else
like someone with dark beard and very
means and deep. So this was a
mistake on my part. I like the drawing
what came out of it. But if I want to represent him, that I would choose to leave
more white inside the beard. And like I did how I did
here for myself that I try to capture the silhouette
of the hair and then few strands in it so that the
hair appears lighter. Example here, here, there wasn't much hair to go
with to play with. My son here looks like he's in a rock concert or something. Another example we will
definitely do some eyes here. No worries. Again,
and some lips. Let's do some examples and
this was the last lesson. We also had some faces
this I guess medium size, that's not too
small, not too big. Yeah, that I picked
this one before. So let's start with
this. Good example, I was saying, use
the sunglasses. Let's use the
sunglasses, then we will do the ones with
the eye as well. When there are sunglasses, I start with sunglass. They are central. So it's easier to go
around after that. The frame is done and we
can't see much after that. Let's do my long face. I think this was something
like I went for a run, but I wasn't my headphones
are visible my ear. I was unhappy about the wed writing or
something like that. Again, I'm trying to capture
the suite of my hair. I will go back down
again and to the inside. Here, for example, there
is one falling like that, I can try to capture that So far this, I'm not
doing straight line, but more squiggly lines because it's always some hairs.
It's never a straight line. It looks weird when you
do a straight line. I did a few that could
be style as well. It's not too bad in here. That's also some people's
hair really I don't know, looks like a weak really
sitting tight to their head. But my hair is not like
that my hair is more spiky, so I try to capture that. And then I try to
add some strands to these and try to give the direction of the hair
as well, how it goes. And then I will go
here. In out of space. Okay. And the forehead and some of my
eyebrows are visible. Was good. The more
texture, the better. My headphones are
visible here again. Now I'm going to let's say
bottom part of the face. I'm going to start from here and I have a very
funny lip shape. A huge bottom lip
coming out like that. And from here, I
will reach out to I said to make my
chin a bit go lower. And yeah. So again, the hair, make it squiggly and don't try
to do every single strand. Sunglasses almost
always they are dark. You can do this with
black watercolor as well that also looks cool. But when it's dark, it
gives the feeling of sunglasses that I
would recommend. And just follow the lines. That's my advice everywhere. And in here, because I'm doing this thing
with my lip it appears much closer to
the bottom of my face, so that's why it
looks like this. You don't have to draw
faces if you don't want to. Now, this was my advice on
the hair and sunglasses. But let's say we're going to do the ice, let's do the ice. So in this case, I'm just going to try
to do the ice, maybe. Um, let's say, I go up like this from my cheek here
I just jump to the eye. As you can see with the eyelid
folding on top of itself, there are two lines
that represents, and then the bottom going
like this and meeting. And in here, I think my
head is a bit tilted up. Mostly the pupil is almost
touching to the bottom, but the rest is hidden at
the bottom of the eyelid. There's a shine somewhere
here because there was a window over there
in that direction. I do this from here, let's say, I do the nose and go back to the eye again. Again, there are two lines. My wrinkles. And then it's the same thing. It's almost touching to the top, but the bottom is
like half hidden. And here let's put the shine. And like that, you can try to capture the eyes
that when there is a shine and when you don't leave the entire when
you don't do this, I'm going to show you this and eye in the middle like that. This doesn't look realist. The eye you have to be
in total shock with huge eyes open. I
never looks like this. There's always a white shine
because eyes are always wet and if there's
a light source, there will always be
a white spot on them that is eye shining. Let's bring this a
bit lower like that and from there and the lips, I do like to exaggerate
them a little bit. If you look closely, it has this shape, the face, the lips. But it's very subtle. When you try to do
this so subtle, it doesn't appear so nice, but when you a bit
exaggerate where the lips there is this
shape under the nose, in my opinion, it looks better. Here is how was
it called dimple. My chin Yeah. So that's how I get
around doing dice. Again, it's not perfect. For a woman, I would
recommend afterwards putting some eyelashes, that definitely helps. Forman we did before, few tapping with your pen and making this shade if the
person has a stubble beard. This is also a good way to do. We talked about the
sunglasses, the eyes, hair. I hope Okay. If my friend Caro won't be happy with
this, I will ask her. I will take this part out. But if she's okay with
it, it will stay. If I was drawing her, she also has glasses, but not sunglass, so you
can see her eyes actually. I will start with let's see
how this will come out. She is interesting shape
of glasses, actually. That these top parties, I'm going to actually show that it's kind of dark
color, and here is not. And then it goes
like this way round. Because of this different
top and bottom, I'm going to leave it as it is. I'm not going to
put another line. And I can see her
eyebrows about this. That it appears a bit
darker than it should. But again, she's my inspiration. It doesn't have to
look exactly like her. That was one of the
lessons as well. There's her ear and her face. I'm not going to
complete that because my goal is here to go
back to the eyes here. So there are two
lines about the eye. And then the bottom
one and her eyes are partially the pupils
partially visible. And here's going
to be the shine. This is a good example. I was saying, let's try
to continue from here. She has a beautiful smile. Her mouth is open,
so we are able to actually see her lips. So I was saying just to do the silhouette of the
teeth she has, yes. And then if you really
want to pick up a very thin one and make them lid
upwards like that. And of course, I now
realize her face should have come more down like
this, not like that. She has a dimple here too. Okay, I'm not really doing
justice to her beauty here. She has very fuzzy hair here. I will try to capture
that again slide. I don't want to do
all the strengths, but I want to do some going in and out because she has curly hair
that even here Like I said, it
doesn't have to be perfect copy of who
you are drawing from. This was one of the
things we said. She is our inspiration here. And if you have a person that
has actually not sunglass, but glasses and you see the eyes you want to
draw, you can do it this way. We can also add some
eyelashes to her. So that's how I would do. What else is left we
set eyes, lips, hair. Let me see if there's
another example. Let's do this one
for hair as well. So here's my ear and
the sunglasses showing from much narrower angle. And then my forehead
goes up like this and can see lots of hair falling in front
of my face like that. So I will try to capture
the silhouette of my hair. And then at some point they change direction and they
start going this way as well. There's a falling in front of
my eyes, my forehead here. Iposab behind the ear as well. Then this is how I would do hair in this situation that I
try to really go with this. Then when I completed
it, I felt like general shape of my head
was going a bit more up, so I added some more lines so I could even add a few more. And hair comes and
then behind my ear, you can see my neck going
and the shirt comes. H m and I will give myself some beard. Darkened glasses. I have to admit this
from this angle, it was much more
difficult to draw myself. That's something I
can also practice and that's not
something I do often. But again, is this a guy from profile looking
down? Yes, there is. And does he have
frizzy hair like me? He does. Does he
wear sunglasses? He does. So I call
this a success. And how many different faces
are here on just one page. That's one. Yeah. That's how I tackle
the parts of the face, basically, the nose,
the lips, the eyes. I don't worry about
the nose at all that usually after the ices, I just come down like this, and then there is the usually visible
from the front as well, the hole of the nasal
entrance, I don't know. And then it dips a bit
and then the other side. That's how I do the
nose. They are usually croaked, not perfect
symmetrical. But again, this is a drawing. It's not supposed
to be perfectly representative of
what I'm drawing. What I'm drawing from is my inspiration and
it results in this. Yes. But my friend Caro
is prettier in real life, that I can also admit that. I think that's it for the face. Don't do your eyes like this. If you want to go
with the sunglasses. And yeah, this is
where I say goodbye. After this there
will be conclusion. I hope you enjoy this class. I'm looking forward to
seeing your Noa for people. And I'm going to see
you, or conclusion. And on your reviews
and class projects, but we'll talk about that
in the conclusion parts. See you in the next week. Bye.
11. Conclusion: There Is No Bad Drawing: And Thank you for taking plus and making
it until the end. Jack and I really appreciate it. So let's summarize
what we practice. We drew people in
the background. This is especially useful if you are drawing
at a coffee shop. We drew people in
the foreground. This is helpful in many ways, like if you are
traveling and journaling about the places you have
been and people you have met. We did self portrait,
and this can be useful for journal pages where
you are the main subject, and these skills
are transferable if you want to draw
other people close up. We zoomed out and drew
people as a whole, and we zoomed in again and
drew people partially. I believe this will help
you when you want to draw people on your
pages in situations like meeting a friend or seeing a performer or
an artist on a stage. We focused on the
clothing too because people are everywhere and
they tend to wear clothes. Finally, we drew faces and focused on the eyes,
lips, and hair. I hope this will improve all the other situations
mentioned earlier. If there is no bed
drawing, how can you fail? So, what is the lesson here? There are many of
them, but I think the most crucial one is that
there are no bed drawings. Every drawing brings
you closer to your goal of getting
better at your art. Every drawing is a
step on the stairs. The more steps you take,
the higher you will go. And the best example
of that is this. Jack, could you pass
me my sketchbook? Sketchbook. I said sketchbook. You are doing it on purpose now. This is a book. I
said sketchbook. My sketchbook, the yellow one? It's in front of you. Thank you. Finally, sketchbook. This is the class number 24. Sketchbook. I did this drawing of my beautiful friend
Caro in the last lesson, and it's not the best. I can admit that, but I
didn't want to cut it out because I want you guys
to see that it's okay. Not every drawing
will be our favorite, but it will guide
you for what's next. Like this drawing guided
me too. This one. In the editing stage
of this class, I talked to my friend Carole and asked her if it's okay that I'm using our picture and showed her the drawing
I did, this one. This made me look
at this drawing a little harder and made me
think what was missing? Why did I fail to capture
my friend's likeness? And I noticed that I emphasized the frames and
the eyebrows too much. And this made her
look like she has eyebrows like Cara de
Levine and she doesn't. So I drew her again
and it worked. I had to take this step in order to get to this step.
It's that simple. So I think this is the
key takeaway here. Embrace every drawing. They all take you higher
on your creative journey. How far can I keep doing this? And now the usual stuff, please remember to
leave a review. For every good review, I get one black hairbag
and with this rate, I'll be all white very
soon. Please help. Also, it allows me
to know what you like and you don't like,
and that's helpful. Remember to follow me
so I can tell my mum, Look, Mom, how many friends I have? She doesn't
know the difference. You can also follow me
wherever you can find the follow button. I'm
all over the place. Don't forget to share
your class projects. Looking forward to those. Especially I can wait to see who your no effort person is. And don't forget
about the little game I told you on the
class project video. Find how many
motivational moments there are throughout the class, and get the No effort
drawing done by me. This is all from
me. Can you fit it? You can feel it, right? You can draw people. It's just lines. Check. If you find how
many motivational moments are there, I might draw it, too. Until next time, stay
creative and draw people. See you on next one. Bye. Okay. Audio recording. Videos recording. To. Let's see how long the battery will last. Video is also recording.
Hello. Are you straight? If not, we will adjust somehow. Okay, can you hear me?
Let's open our script. This time, I have a script. This is conclusion. No, I will start from the intro. You can't draw people.
You can't draw people. You can't draw people. I know. You suck at it, right? Wrong. This is my fifth class. Loss this is my fifth
class on again, again, yet, people
are everywhere. We keep sketch
journals to sk again. But you can't just hop to
the top of the stairs. You want know, again, and I love you. Just practice. Okay, that works. This class, like all my classes, is for anyone, everyone, anyone. This class, like all
my other classes, is for anyone, not
anyone, everyone. Right, right? If
you enjoy keeping a sketch journal, another one. During the class,
we will look at many situations where you
might want to draw people, draw people. Again, what else? And reach out to me on
Instagram DMs with that number. I will do a noi for
drawing of you. Still recording. So this is it. You have a little
game to play with me. So this is it. You have a little game to play with
me and your assignment. Assignment. Take us up. Jack and I truly appreciate it. Are you still recording?
Yes. On the last lesson. In the last lesson.
That's correct. Okay. Not every drawing
won't be our favorite. No, this should be b.
Not double negation. No. This is the correct one? I will take a nice photo of
this and make it zoom in. In here, I will zoom
into this again. Are you still recording?
Please be recorded. Yes. And don't forget
about. Still recording? Yes. Did I just do it? I think I did it
with 5 minutes to spare. I think that's it.
 Fatih (fab) Mistacoglu, watercolor storyteller