Transcripts
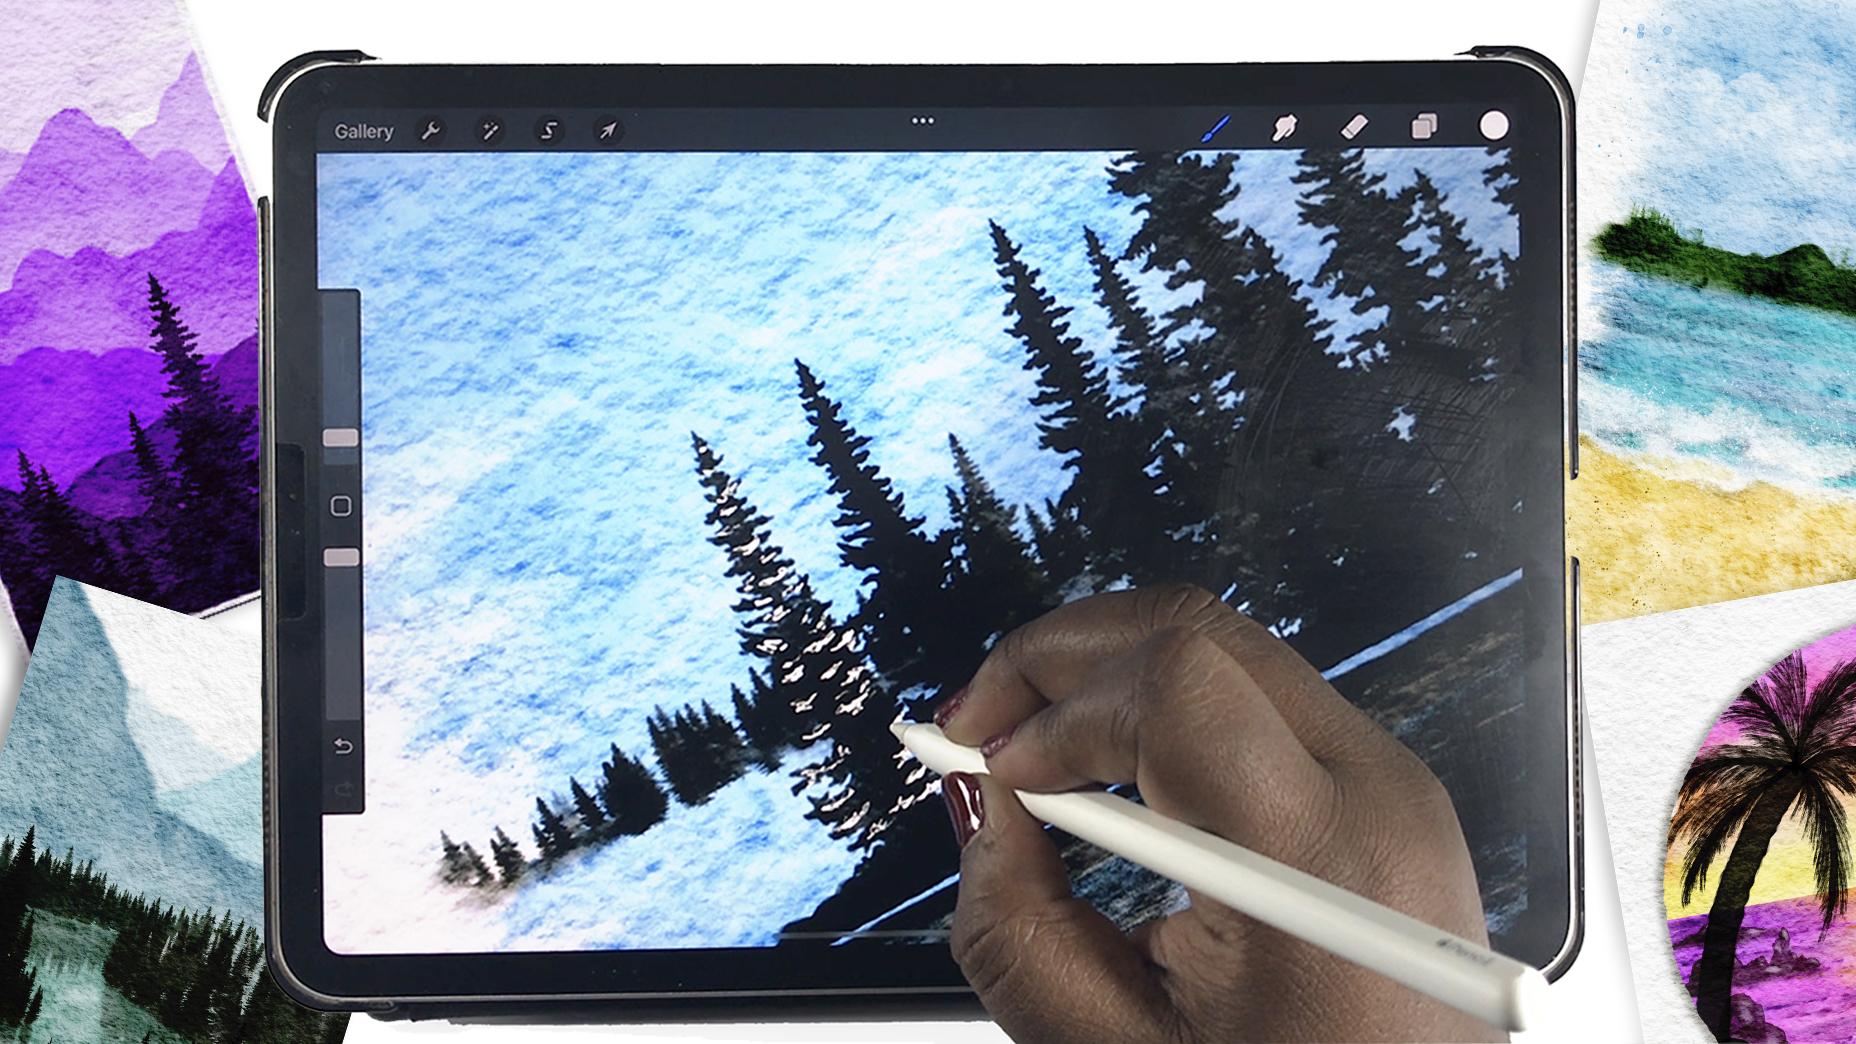
1. Introduction: Have you ever wanted to paint breathtaking
landscapes like a pro, but without all the mess that comes with traditional
watercolors? Hi there. Creative. My
name is Shannon Lane. I am a hand ladder
and an artist, and one of the things
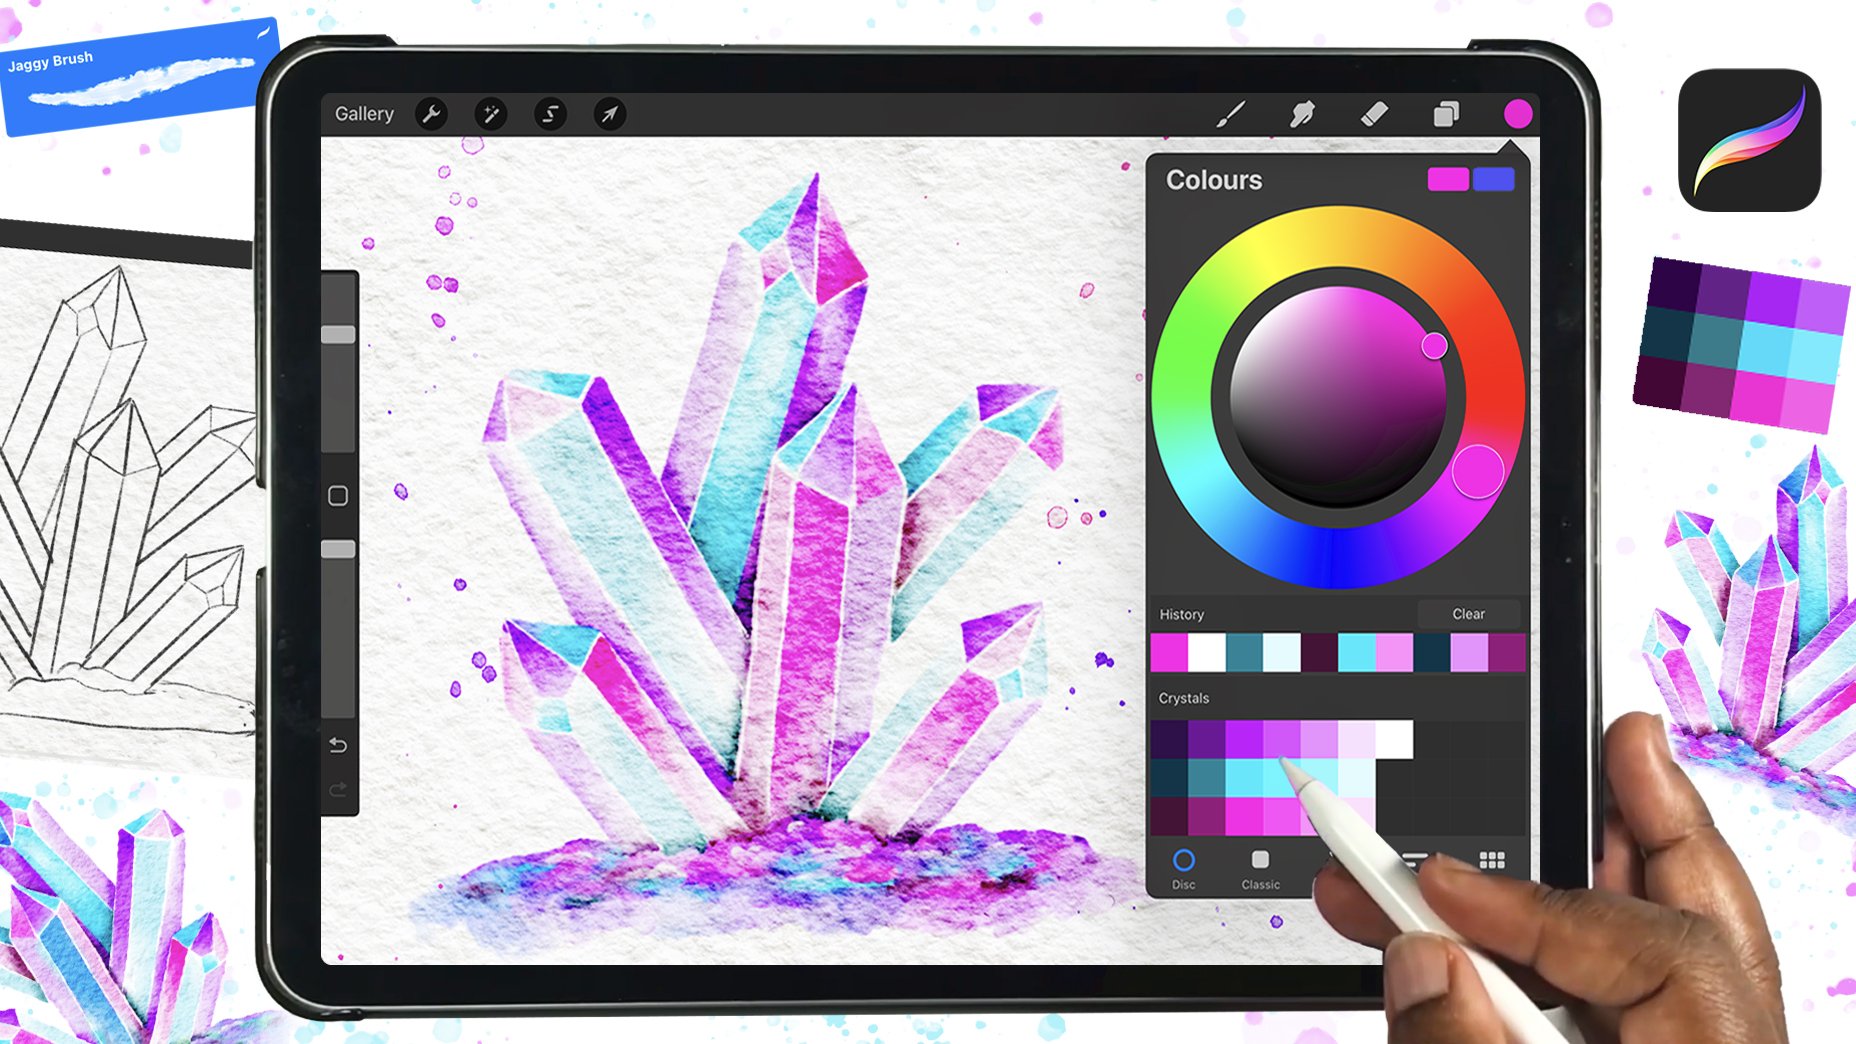
that I love most about procreate is creating
digital watercolor art. It's super convenient
because you'll have access to an unlimited
color palette, a wide range of brushes,
textures, papers. Plus there's no
mass in this class, you'll learn how to use essential tools and
techniques in procreate to effortlessly create five realistic digital
watercolor landscapes. We'll kick things off by
setting up our canvases, then we'll move on to
painting serene beaches, majestic mountains,
vibrant skies and more. All with the magic of procreate. And after we've
finished painting some abstracts, I'm
going to show you just how easy it is to
take any reference photo and capture that stunning
beauty in a few simple steps. Then we'll move on to
the class project, where you compile all your digital watercolor
landscape paintings into a portfolio and share
them in the project gallery. This class is perfect
for both beginners and seasoned artists
who are eager to explore the world of digital
watercolor painting. All you need is a
basic understanding of how to navigate
the procreate app. And step by step, I'll walk you through everything
else you need to know. If you're ready to bring stunning watercolor landscapes
to life in procreate. I'll see you in
the first lesson.
2. Supplies & Set Up: To get started, you'll
need an Apple pencil and an ipad with the
procreate app installed. The brushes that
I'll be using are the free brushes that I've provided in the
resources section. Each painting that
we're doing in this class will be done on
a completely new canvas. Before you start any of these, make sure you duplicate
and rename each of them to avoid any confusion. Once you have your
supplies imported, it is now time for us to start
painting our landscapes.
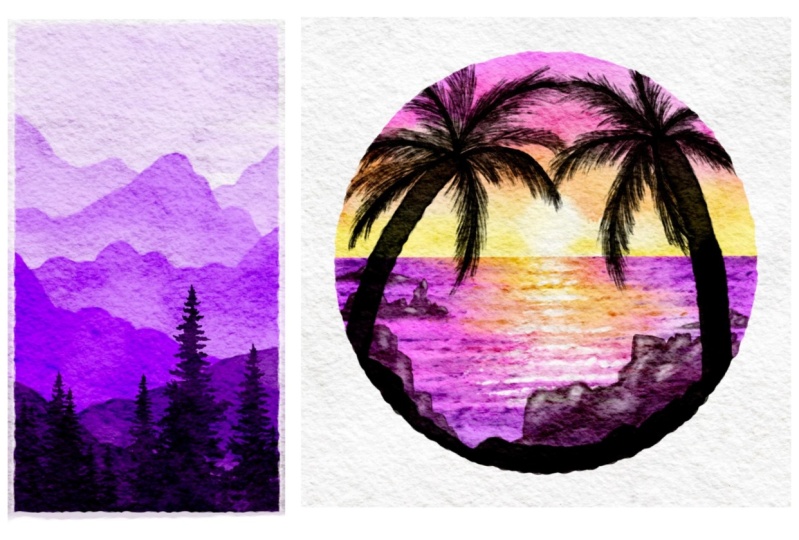
3. Monochromatic Mountains: Once you have your canvas
open head to the wrench icon, tap on canvas and then
tap on crop and resize. And then you're going to crop the canvas to a portrait size. Which just means that
it's going to be tall and skinny rather than the
square that it was before. As this is a
monochromatic painting, we're only going to be using different values of
one single color. Head to the color palette icon. Tap on classic and select
the color you want to use. By moving the hue slider, which is a slider at the
top, I'm using purple, but feel free to use whatever color you want
to paint the skye, we're going to select a
very light shade of color. You're going to make
sure that the brightness is all the way to
the white side. Then we're going to move
the saturation slider, this is the one in the middle, over to the left side. Then use the flat brush
to paint the Skype. Once you're finished
with the sky, you're going to move the saturation slider a
little bit over to the right, and this will give us a
darker value of our color. Then switch to the
sharp liner brush and then paint in your mountain. Then you're going to switch to the smudge icon and use the
feathered blender brush. And pull that color down to give the bottom that
feathered effect. I am going to be painting this
entire thing on one layer, but if you want to
be able to make adjustments or to move
mountains around, you should definitely create a new layer before you
paint each mountain. For the next mountain, you're going to go back to the saturation slater
and move it to the right a little
bit more to get a darker value to paint
that next mountain. Then you're going to
blend out the bottom. Another way to use this brush is to drag it across the area
that you want to have that feathered effect to paint. The rest of these melts, you're going to repeat
those same steps of choosing your color, painting it in, and then
blending out the bottom. Once you've taken your saturation all the
way to the right, you can then move the
brightness later to the left to get
even darker colors. After you've added
all your mountains, switch to the skinny pine brush and the darkest
shade of your color, then you're going to stamp that all across the bottom
of the canvas. You can play a rod with the
size of the brush to have a combination of small and
large trees to create. Normally, when you paint this type of painting
with real water colors, the paper is taped down, Your painting ends up
with a nice white border. I'm going to show you how
to create that same effect, create a new layer
above your painting, and then switch to white
and the sharp liner brush. Then you're going to paint a line along one
side of the canvas. Duplicate that line, slip it, and drag it to the
opposite side. Then merge those layers
together on a new layer above. You're going to repeat
those same steps and your border is complete.
4. Abstract Wet-on-Wet Beach: Starting with the flat brush
and a light blue color, you're going to paint
from left to right. This flat brush is
pressure sensitive. When you apply full pressure, it will apply full
color to the canvas. As you release pressure, the color will be lighter and also it will blend
into the background. As we are going for
an abstract look, I am not taking my color directly to
the edge of the paper. I am leaving it with that
rough textured edge. One of the great things about digital water color is that you can move things around
and things if needed. So don't be afraid to use the move tool to make
adjustments as to paint. Then you're going to use a
light yellow to paint the sun using that same left to right motion that
you used to paint. In the blue part of this. As you paint, make sure to leave a little bit
of white space in between the sea and the sand as this is where we'll
add our waves. Now we're going to add
some texture to the sun, switching to the bleeding
brush and the color white. And then we're going to
stamp it across the sand. You can experiment with different amounts of
pressure as you go. Then you're going to switch to a darker yellow or a
light brown color, and then stamp in some more
texture with that same brush, create a new layer above. And use the sharp blender
brush and green to paint a line across the area
where the sky meets the sea. Then switch to the smudge icon. And use the feathered
blender brush to blend the bottom of that
line into the background. You can also do this to
the sides of this line, just to feather it
out a little bit. With that same sharp
blender brush selected, you're going to paint the
top of the mountains. Then switch to the
skinny plain brush and add a few trees on the
top of the mountains. Now this next step is
completely optional, but if you want to add that wet on wet fuel to these trees, you can use the feathered
blender to tap on the trees, to blend them out very lightly and give them
that wet on wet effect now is tend to add in
the waves switch to the bleeding brush and white and paint in the area where the
white and the blue meet. Then you're going
to switch to blue. Reduce the size of
the brush and paint in some of that color
underneath that first wave. This will create a simple shadow and separate this section of white into two waves
to paint the shadow. For the second wave, you're going to switch
to a darker yellow and you're going to use your light yellow to
help blend that out. To complete this painting, we're going to add
some fine splatters to the waves to create the
effects of water sprays. Just reduce the size of the splatter brush as
a finishing touch.
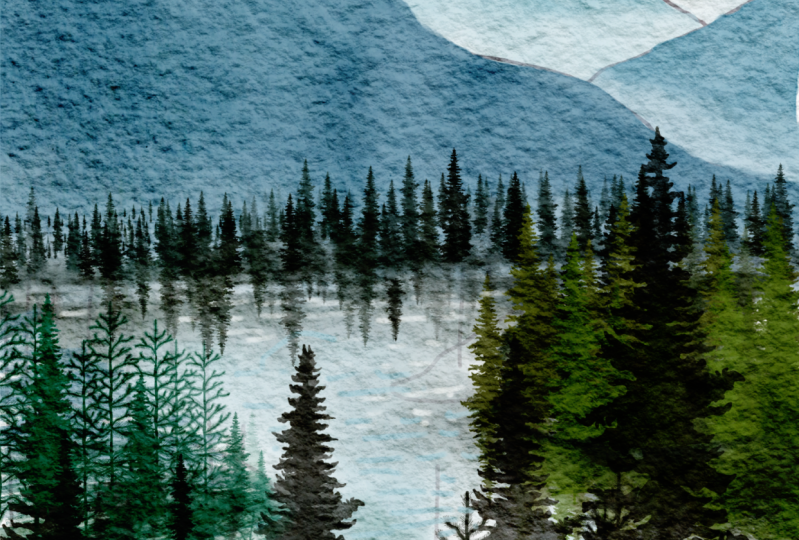
5. Reflective Winter Lake: Use the flat brush to paint
the background in blue, you can either create an
abstract border similar to the one that we did for
the wet on wet beat scene, which is what I'm doing. Or you can paint the entire
canvas and add a white border around the painting like we did for the monochromatic
mountain scene. It's totally up to you which
option you want to go with. Then on a new layer
used block and the skinny pine brush to add some small trees
in the background. Of course, you can use the move tool to make
adjustments if needed. Then you're going to use the
feathered blender brush to blend out the bottom of the
trees into the background. To paint the middle trees, you're going to create
a new layer and increase the size of
the skinny pine brush. Then stamp various sizes of trees in the
middle of the canvas. Use the sharp blinder brush to erase the bottom
of these trees. Once you're finished, then you're going to switch back
to the sharp blender brush and paint the land that these
trees are growing from. We're going to add the
reflection in the water. To do this, you're going to
duplicate the layer with the large trees and
flip it vertically. You want to leave a little
bit of space in between these and the other trees so that some of that
blue is showing. Then you're going to head to the adjustments icon
and tap on motion blur. And pull the pencil to
the right of the screen. On a new layer,
you're going to use the flat brush to add a bit
of detail into the water. To do this, you're going to be alternating between blue
and white and using a very light pressure to create that scratchy
texture on the water. Now we're going to add
some snow on a new layer. You're going to use the
sharp blinder brush and white to add some snow
on top of the trees. To create this snow, you're painting a mixture
of dots and lines. You're adding them at the top of the branches
and the leaves. And the placement
should be very random. They try to match the placement on either
side of the trees. Just alternate it a bit, since this is
digital water color. When you're happy with
the snow on one tree, you can duplicate it and
add it to the others. Depending on the
height of the tree, you may need to make
it smaller or larger. You can erase some of it. And then you can also
use the same brush to add a bit more snow
in other areas. To complete this painting, we're going to add a bit of texture with the bleeding brush, so select white and
then paint a few areas in the sky and in the
water on a new layer. You can also add a
little bit of blue and then blend them together
and into the background. To add that falling snow, you're going to create
a new layer and use the splatter brush to add
some white splatters, and this will create
the effect of snowfall.
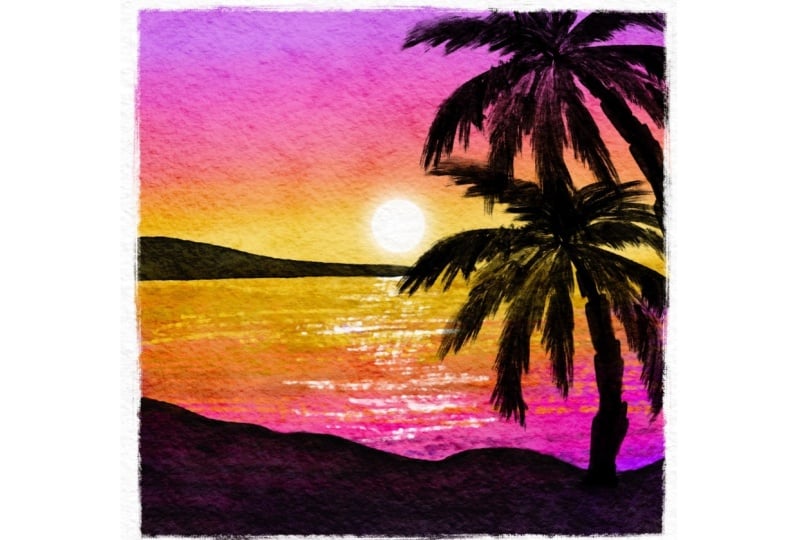
6. Tropical Sunset Scene: In this lesson, we are
going to be painting a tropical sunset
scene inside a circle. You're going to grab a new
canvas and you're going to draw a circle using
the sharp liner brush. Then head to the wrench icon. Tap on join guide and then
edit the drawing guide. And take the grid size to max. Then you're going to move that circle until it is in
the middle of the canvas. Head back to the color icon, and fill in the center of the circle by dropping
in some color. If you need to, you can duplicate
the circle a few times. And then mersre
layers together to ensure that the circle
is completely opaque. The next step is to
head to the adjustments on tap hue, saturation
and brightness. And then take the
brightness slider to max, create a new layer above the circle and then
clip it to the circle. Every layer that we create
will have to be clipped to this circle using the
sharp liner brush. Add light purple at
the top of the circle. Then add some pink, some orange, and some
yellow in the sky. Then you're going to switch to the feathered blender brush. And drag it along the areas where you want
your colors to blend together to add a little bit
of contrast and texture, You can use the bleeding
brush to add some weight to the sky and then the feathered blender
to just blend it in to paint the sun. Use the sharp blender
brush to draw a circle on a new
layer above in white. Then to give this sun
a bit of a duplicate that layer and apply a gaugan blur to the sun
layer at the bottom. If you need to make the
glue a little bit brighter, you can duplicate this
a few more times. Now we're on to painting
the Sea on a new layer. Use the sharp blender
brush and add those same four
colors that you use for the sky to paint the sea. Then blend them together using the feathered
blender brush. If you need to straighten
up your horizon line, you can use the sharp
blender brush as an eraser to draw a line
across the top of the sea. And remember to tap and hold on the screen to get a
completely straight line, just like we did for the sky. You can use white
and the bleeding brush to add some contrast
and texture to the sea. Just use a feathered blender
brush to blend it out on a new layer above, we're going to paint some waves. I added a few rocks
in the water, but don't worry, I'll talk
about how to add them in. Once we finish the waves, you're going to grab
the jaggy brush and a darker shade
of purple to add some texture on top of the areas of the sea that
has the light purple. You can play a
role with the size and of the brush and also use the angle of your apple pencil to get
different kind of textures. One thing that is very important that you remember as
you paint these waves is that you need to
try to keep the waves at the back smaller than
the ones in the front. You can use a smaller size brush towards the back and increase the size as you paint
the waves in the front. Once you're finished
with your purple, you can add darker
shades of pink, orange, and yellow accordingly. Now we're going to add some
highlights and reflections. So you're going to use
white to add some lines. The lines closer to the
horas need to be shorter. And the ones that are closer to the front are going
to be longer. To create the rocks, you're going to
use a dark purple. And the sharp liner brush
to paint your rock shapes. The ones I added
initially were too tiny, so I resize them and
changed the shape a bit. Then I added a much larger set of rocks at the
bottom of the circle. As these are in the foreground, they need to be bigger and more defined than the ones
that are in the sea. Once I'm happy with the shape
and the size of my rocks, I'm going to add
some highlights. I'm using white and the jaggy brush to add some color to the
top of the rocks. To complete this painting, I'm going to add some palm
trees in the front in black. Increase the size of the sharp liner brush to draw the trunks. And you can even
add some land or some black rocks at the
bottom of the circle as well. Then you're going
to reduce the size of the brush to add branches for the palm leaves and switch to the flat brush to add the
rest of the palm leaves.
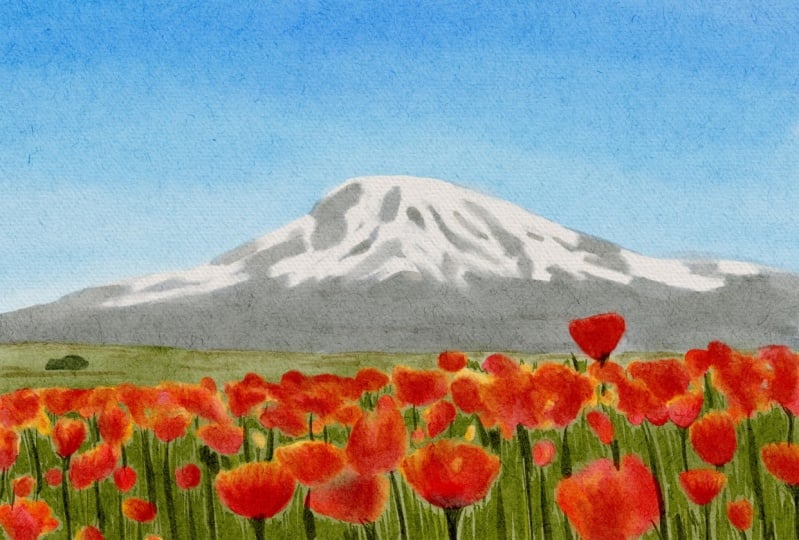
7. Painting From A Reference Image: So far, all the things that we've painted have
been abstract. But what happens if you want to paint something from a photo? In this lesson, we're going
to focus on doing just that. The first thing we
are going to do is import the reference image. You're just going to
click the wrench icon, select reference and navigate
to where you have it saved. Then I'm going to go and this canvas to a
similar dimension, you can input the
numbers if you have a specific number in mind
for the size of the canvas, but I'm just going to
it to a rectangle. Then the next step is to start
sketching out our scene. And I'm going to do this in about four different sections. I'm going to have the
mountains at the top, then I'm going to
do the trees in the background, then the water. And then I'm going to focus on the trees in the foreground. I did this on a layer
above the paper texture. Once I have the
sketch how I want it, I'm then going to work
on selecting the colors. I've provided a
free color palette that you can download
and use for this. The colors in the top row are all the colors I selected
to do the mountains, while the middle colors are
the colors that I'm going to use to do the
different sets of trees. Then the last row of colors are the colors that I'm
going to use for the sea. When I'm finished,
I'm just going to drag the palette and I'm going to put it on the left
side of the interface, just so that I have it
visible at all times. Now we're going to
start working on the painting itself and I'm going to lower the
opacity of our sketch. On the layer below, I am going to select the
lightest color. And I'm using the sharp blender
to paint in the sky area. Now, you can't see it in
this part of the video, but I'm just painting
it in that space. And I'm going to use
the feathered blender to blend out the bottom edge. Because I want the bottom
edge to be very soft. I don't want the layers visible on the other layers up front. To create my mountains, I've created a new layer. And I'm just going to use the
nest color on the palette to paint that layer with
the same sharp liner brush. Then I'm going to blend out the bottom edge with
the feathered liner. I'm just going to repeat this
for all the mountains by just using darker colors as I come closer to the
mountains at the front. And the feathered, the feathered blender brush
to blend out the bottom edge. This is what you're
going to do to paint the mountains
in this painting. When I finish painting
all my mountains, I'm then going to go to the layers panel and I'm going to group
them all together. Now I'm leaving them all
separate in case I need to go back and adjust
any of the colors. But if you are happy with the
colors of your mountains, you can merge them all together, then I'm going to create
a new layer and I'm going to start
painting in the water. For this, I'm just going to use the reference image to see where I'm going to
be put in my colors. I am going to leave the
areas where the trees will be very without paint. I'm just going to paint
the parts where I want the C to have color. I started with the
lightest color first, and then I'm going to add the darker colors where I noticed them on
the reference image. Again, I'm using the
sharp liner brush, but you can't use
any of the painting or the drawn watercolor
brushes in the kit. When I'm done, I'm
just going to use the feathered blender and add a relatively large size to blend all the
colors together. I am not trying to get
a Brit of any colors, I just want them to
blend into each other naturally as if they were
done with real watercolors. And that is what I'm trying
to achieve at all the steps. I'm not trying to make
this look too perfect, because with real watercolors, it is a little bit
unpredictable. Even though you know
where you put your paint, they do bleed and have
a mind of their own. I want to capture that with
these brushes as well. When you are done painting, we are then going to
move onto the trees. I am using one of
the pine brushes. You can use any of those pine brushes that
you would like. I'm just going to draw a
line of trees in the back. I'm also going to use
the move tool to help me adjust them so that they fit
where I want them to be. Then I'm going to use the
feathered blender to blend out the bottom of these
trees because again, I don't want that harsh
line to show up on any of the layers that I'm going to be working on in front. Then I've created
a new layer and I'm selecting a darker color and I'm going to add some
more trees in front of those. Then I just went in with a sharp layer and I
erased the bottom so that it becomes a
smooth straight line. I did this because if you
look at the reference image, you can see that these trees, you can clearly see the bottom and a distance straight line, the areas that are going to be behind the other trees
that I'm going to add. I will use the
feathered blender brush to get rid of the harsh edges. Now we're going to start
painting the trees that are more towards the foreground. I'm starting with the ones on the right side and I'm using a pine brush to stamp some trees of different
colors and different sizes. I'm using a mixture of some of the colors I use in the
other areas of the paintings. And then I'm going
to add some larger, darker trees towards the front. If needed, you can use
the eraser to get rid of some of the trees that may have gone out of the guidelines
that you've drawn. Then I'm using the jaggy brush to fill in the bottom
of these trees. This particular brush has
very rough texture and I feel like it would work really
well for this part. We can use any of the other drawing brushes
that you prefer. I'm also going to stamp in various different colors at
the bottom just to create some variation and
fill in some of that white space that
was left behind. And then I'm going to
repeat the same thing as paint the trees
on the left side. Now we're going to work
on the reflection. Simply group those layers
with the trees together. I haven't added that first
layer of trees that we did, because we're not
going to need to create a reflection
for that one. We're just doing the three
that are closer to us. I'm going to rename
this layer of the trees just so that
we know what they are. Then we're going to duplicate that layer to get
our reflections, and our reflections will go underneath the group
with the trees. I'm going to work on
these reflections one by one so you can hide the rest. And I'm going to start with the ones fritters in the back. I'm going to tap
on the move icon. I'm going to flip them vertically and drag
them down a little bit. Then I'm going to use the razor
to get rid of the part of the reflection that will
be behind the trees. I don't want the sharp lanes
that may be showing through. And I'm going to do
this on both sides. Once I am happy with that, I'm going to move on to
the trees on the left. Well, on the right side, if you look at the
reference image, of course I'm going to flip it again and I'm going
to pull it down. But if you look at
the reference image, you will notice that the
reflection is slanted. I want to make mine
as slanted as well. I'm going to select
the distort option, the container that
has this reflection. I'm going to make sure that
it is in the same direction as the one that I am looking
at in the reference image. Then I'm going to erase any parts of that reflection
that may be overlapping the trees for the reflection on
the other side. I'm going to do the same thing. Once you're happy
with the placement of these reflections, you can then merge them all
together and then lower the opacity or change
the blend mode to suit how you
want yours to look. To complete this, I am using
the abstract painter brush and a dark green to draw
some foliage at the front. This brush has a really
natural rough look that can be really great
for doing foliage. That is why it started
with that one. Then I'm going to stamp in some trees of varying sizes
and colors and keeping the colors very dark
because these are the ones that are closest to us
and they will be darker. I'm happy with the
placement of the trees. I'm going back in with the abstract painter
and I'm adding some more darker colors
all along the bottom. Now, once you're
finished with this step, you can take a look at your
painting and see if there's any areas that may need fixing. I wanted my water to have a little bit more contrast and a little more darker colors. Specifically at the areas
where there were shadows. I went back in with those
darker colors and added them. And then I also just added some white areas to
a few more places. That is pretty much
it for this painting.
8. Class project: So we've painted all
of our paintings, is now time for
our class project. You're going to compile all these landscapes
and share them to the project and
resources section of this class to create
a digital portfolio. Save and export the
images from procreate. Then head to the projects and resources tab of this class. And upload these images along with any other
relevant information that you want to share
about the project and share it to the
project gallery. While you're there, be sure
to check out all the other amazing watercolor
landscapes that are submitted by other
students of the class. You can leave a comment letting them know what you
think about their work.
9. Wrap Up: Congratulations, You've made it to the end of this
class together. We've painted
mountains, beaches, winter scenes, and even
a tropical sunset. I hope you leave this class feeling inspired
and confident about your new digital
watercolor techniques that you can apply to your
work in the future. Watts Net. Share
your paintings in the project gallery because I'm very excited to see
your landscapes. Leave a review because your feedback means
the world to me. And it will help others
who may be interested in learning about creating watercolor landscapes
in procreate. Don't forget to follow
me on skill share to be notified about any updates
on future classes. And thanks so much
for joining me. I look forward to seeing
you in the next class.
 Shannon Layne, Lettering, Procreate & Art