Transcripts
1. Introduction: Hi, I'm flow. You might know me from
my easy to follow. You can draw this video
tutorials at YouTube. But I also have classes
here at Skillshare. During this class, I will
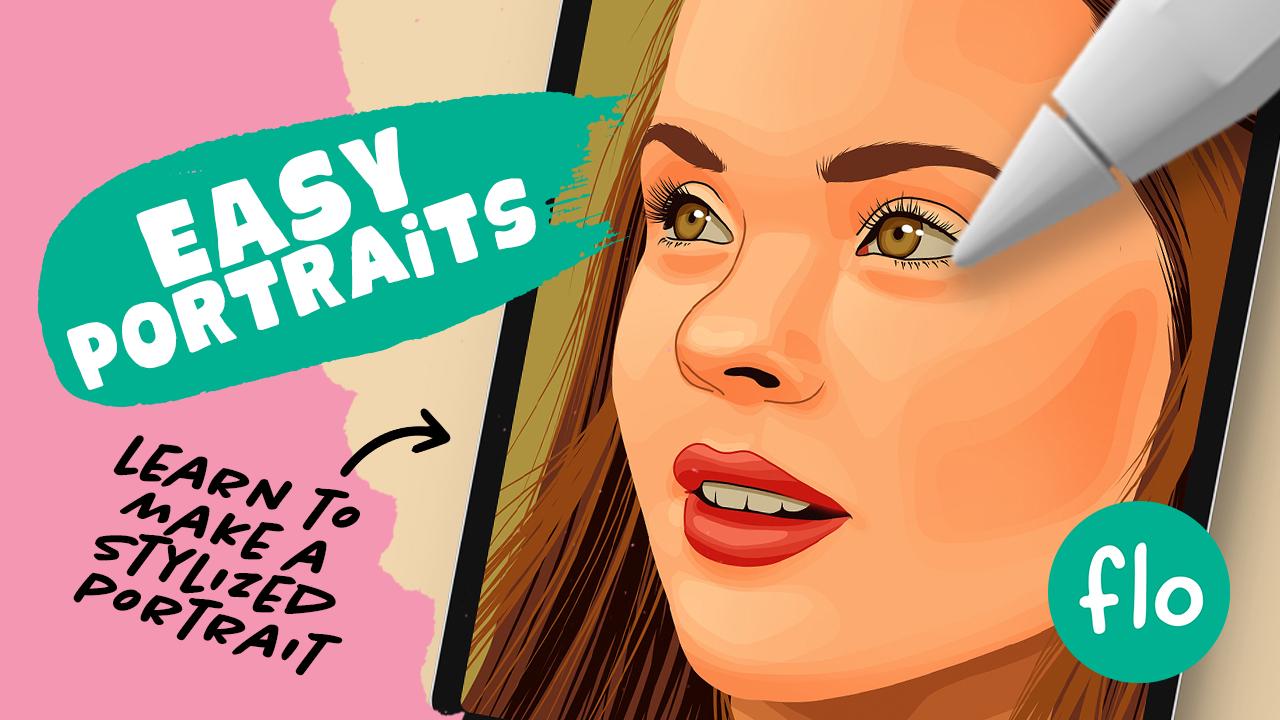
show you how you can easily create a vector style
portrait and procreate. The techniques are really easy and you don't need a
lot of experience with Procreate or drawing to
get this type of result. During this class,
you will learn how you can trace a reference image, how you can use different
layer blending modes, clipping mask, alpha lock, layer masks, and more. For the class project, you will be creating your
own vector style portrait. Or you can just follow along
grabbed the photo I'll be using and create
this portrait. The class resources include a brush fact color palette and the photo that I'm using
for the demonstration. So you can get
started right away. I'm looking forward to creating a vector style
portrait together. Go grab your iPad
and Apple Pencil, and let's get started.
2. Setting up Your Canvas: Before we can get started creating a vector
style portrait, of course, you need to
set up your Canvas. Perhaps you'll be using the
same photo as I'll be using, or maybe you have found a photo of your own
that you want to use. It's good to note that
during this tutorial, I'll be using a canvas that is 2300 pixels by 3
thousand pixels. So only if you are using
that same canvas size, the brush sizes will match. If you are working
on a smaller campus, you'll need to make the
brushes a little bit smaller. And if you're working
on a bigger Canvas, you will need to make
them brushes bigger. Once you have setup your Canvas, you can add a photo
to it by going to the wrench here in
the upper-left corner. Then go to Add. And then you can
use insert a photo and they can just navigate to the photo that you want to use, an insert it onto your Canvas. I have already inserted the photo that we'll be
using for this class. And before we get
started with drawing, we need to change the opacity
of this layer a little bit. You can do it by going to two
little squares here and tab the n and lower the opacity
by using the slider. You can set it at 35%, for instance, and then tap
the plus For a new layer. And on that new layer we're
going to start drawing.
3. Tracing Facial Features: Like I said in the
introduction of this class, I have created a
little brush pack with some brushes that we'll be using Fordist vector style portrait. You can download the brush pack and the resources section. And we're going to start
by using the liner brush. And I have also added
a color palette to the resources section in
case you wanted to use the same colors as I'm
using during this class. Just keep in mind that I have the color profile of my
canvas said to sRGB. And the first color
we'll be using is this first one
in the first row. It's near black,
and the opacity of the brush is at a 100% and size. We'll set that to 7%. Are first we're going to create the lines for the
facial features. So the eyes, the nose and
the mouth, and the eyebrows. Let's start with the eyes. You can easily just zoom in by spreading your
fingers on the screen. Let's start in the
corner of the eye. Follow that lower line to
the corner of the eye. Let's also followed
at the top line, adding a little bit of
thickness to this line. And then you can drag in a color like this to fill that line, my knee to fill
some of these gaps. Let's follow this lower line all the way to the
corner of the eye. Then we'll follow that crease. Start here and make
a swooping line. Rotate your canvas. Let's follow that
circle of the iris. Then we'll start
creating the eyelashes. Curved lines, short strokes. Follow the little lines
that you see on the photo. You don't have to
follow them exactly. This art will swap
to the other side. Wraps another one here. Let's also add the pupil that's
a little oval over here. For the lower eyelashes, we'll make these
short little strokes. Just a few. Don't let them touch
that black line or almost black line that we have created for the lower eyelid. Then let's zoom out and let's do the other eye
so we'll zoom back in. Now let's start in the
corner of the eye again, followed a lower line, then that outer line, giving it a little
bit of volume. Let's connect these two here. Dragging a color to fill it. Fix this a little bit. And then we'll create a
line for the lower eyelid. Start here. Make a curvy line and not
touch that corner of the eye. Leave that open. Now let's create the iris and the pupil, little oval here. Then a curve over here. Then again, we're going
to create the eyelashes. So look at the photo
that is showing through. Make the short swooping curves to the outside of the face. Over here we'll make some
short strokes again. Forties lower eyelashes. As you can see, you
can take some freedom. You don't have to follow
the photo Exactly. How do we have the eyes? Let's move on to the eyebrows. Let's first draw the lines
of two-channel sheep. Start here. Make a curved line like that, then go up here. Make another curved line. Fill that. Then we can add a
little bit more detail. We can add some loose hairs, some hairs that are
sticking out at the top, but follow that curve. That eyebrow can also rotate
your canvas a little bit. Follow that line,
follow that curve. It makes short strokes
that you stick out a little bit. Some here. Bottom. It looks a bit like this. And then you can move on to the other eyebrow first again, make the general
shape curve line. Then fill that shape. Then start adding those
loose hairs again. Again, follow that curve. The eyebrow. Make some hairs
sticking out over here. Perhaps a few over here. Let's move on to the nose. Let's start with
this hole over here. Follow this curve
and go back up. May go like this, almost
like a bean shape. Fill that shape and then add
a little line here around the nostril little
line over here. And then we'll make a curve
along the nose up here. Might need a couple of tries. It's hard to make a smooth sweeping motion
like this. Don't worry. There is always the undo button or you can tap two fingers on the screen to undo and take
as many times as you need. Let's move on to the mouth. Let's start here with a line and then follow
the underside of the lip. Followed a curve For
side of the upper lip. As you can see, I'm not touching that corner
of the mouth. You can leave some gaps. Do want to make it
touch over here TO then let's follow this curve. We can make the lines touch
for that inside of the mouth, but for the outside of the lips, you can leave some gaps. Let me rotate. Let's start here. Let me get swooping
line like this. Let's move on to the teeth. Just make a little
line going up here. Because we get that
nice taper of the line. Depth thin. And now we can fill these areas
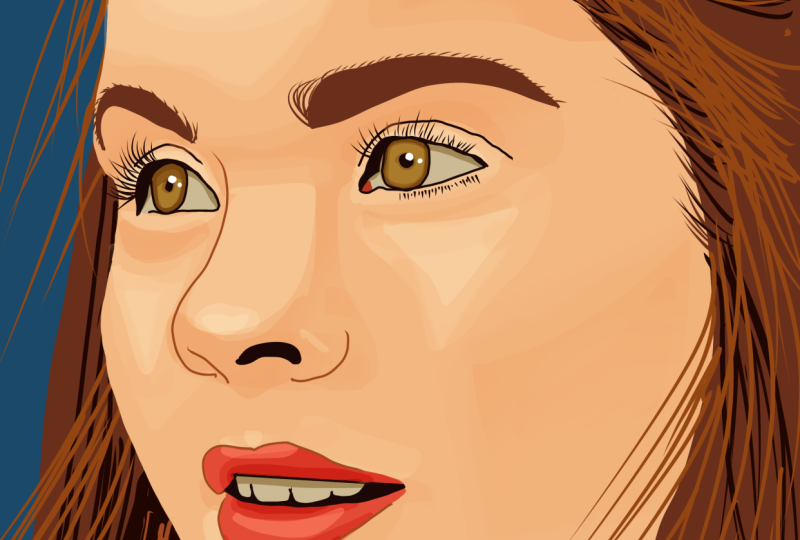
to make that dark. Zoom out. We can see that we have lines for all of the facial features. So it's time to move on.
4. Blocking in Colors: Now it's time to do
some color blocking. We're going to block
in the colors for the different parts of the face. The face as a whole,
the neck, the hair, but also the eyes and
the lips and teeth. We're going to do that
on separate layers. And those layers shoot be
underneath our lines layer. First tap the photo
layer and then tap the plus for a new
layer, afford a brush, we're going to grab
the monoline brush, which is part of the
calligraphy brushes. But I have also put it in
the special brush pack that is attached in
the resource section. Effort of color, I'll be using this third color
in the second row. The opacity of
this brush is at a 100% and the size is at 18%. I'll zoom in and
color in the iris. Just make an outline and then dragging the color
to fill that shape. Then do the same
thing on this side. Now let's also create
the white of the eye. Let's do that on a layer
underneath this one. So first tap the photo layered and tap the Plus
for a new layer and then grab this second
color and the second row. As you can see, it's
not entirely white. If you are using a
different photo in Egypt, pick a color for the
white of the eye. Make sure that you don't
pick a 100% white. It should be a
little bit grayish. Eater like yellowish
grayish or bluish, grayish. Just not white. Now let's color in those areas. You can either just do it by
hand like this, fill it in. You can make an outline. Then drag in the color. I'm sorry, go all
along the edges. This side. We're going to add
some white of the eye here. Then fill this area, dragging the color on the same layer and
with the same color. Let's also color the teeth because teeth aren't
pure white either. This is a nice color
for the teeth. Dragging the color
to fill the shape. We can actually
color the lips on the same layer as the irises. So let's go to layer three. Then grab this first
color and the second row. Now let's go and
color these lips. Going to follow the edges all the way to this
area, to the corner. Dragging the color. Then let's do to lower lip curve all the way to the corner. I'm sure you don't go over the teeth and then dragging
the color to fill it. Next, we're going to block
in the colors for the, for the entire face, for the hair and the neck. We're going to start
with the hair and we'll start with the hair
in front of the face. Let's make a new layer
on top of this one, tap to plus four color. We're going to
grab this color to first color and the third row. And now let's grab the
liner brush again. Let's make it nice and big. Let's grab. Let's make it 45%. Start here. Make a curved line down. Make something of a basic shape. Dragging the color to fill it. Let's add a little
bit more over here. Fill that as well. Now let's make the brush
a little bit smaller. Let's set it to 15%. Let's add a little bit of lines here to make it blend a
bit more with the face. As if the hair is coming
out of this area. These diagonal lines,
short strokes. Let's also blend it a
little bit over here. Let's make the brush big
again, Forty-five percent. Let's make very short strokes. That is not a crisp line, but it has these little
hairs sticking out. Suggestion of hair. In any case. You are about this point. Now let's move on
to color the face. We will do that on a new layer, underneath this hair layer and underneath the lips
and the eyes layer. So first, tap the photo
down, tap two plus. And for the color,
I have already selected a color, of course, but if you are having
trouble picking colors, what you can do is turn up the opacity of the photo to max. You can try picking
a middle color. For instance, here
on the forehead, grab a color like this
with your finger. You can just hold your
finger on the screen. You can go to the color wheel. And what I like to do is make the color a little
bit more saturated. You can drag the color a
little bit to the right, making it more vibrant, which you don't really have
to worry about the colors since we are working
on separate layers. So if in the end you don't
really like the color, you can always change it. You can always tweak
it a little bit. So don't worry about
committing to a chloride. Now, I'll be using this second
color in the first row. I'm going to turn
on the opacity, the reference image again, 235%. On this new layer here, I'm going to follow the
outline of the face. Let's start here. Follow this curve. We'll go down again over here. Chin. Now we need to make
sure that the shape is closed before we
start filling it. Otherwise, the paint
will spill all over. If we turn off the hair layer, you can see that this
shape, it's not closed. Let's make sure that it's attached to the
outside of our Canvas. Now it is closed, even though the
ends don't touch. Let's turn on the hair layer again and fill the face layer. Now the layer is for the other part of the
hair and the neck, they should be all layers
underneath this layer. Let's first tap the photo again and tap the
Plus for a new layer. And then for the color. Let's grab this third
color in the first row. Because we're going
to do the neck. Let's start here. Make a curved line that makes sure that it is
close behind here. Dragging a color to fill it. And now we can move
on to the hair. I want that to be on a layer between the neck layer
and the head layer. So let's tap the Plus
for a new layer. Let's grab the hair color again, that's the first color. And the third row. Let's follow this
line going down. Let's leave that area for now. Let's go over here
along the neck and make sure that the shape is closed before you
drag in the color. To fill it, all we need is
a little background color. So let's make a new layer
by tapping the Plus, drag that underneath the others. Let's go and grab this fourth
color and the first row, but you can use any
color you like. Of course. Let's
fill the canvas.
5. Adding Shadows to the Face: Next we are going
to add shadows and highlights to our
vector style portrait. And we're going to
do that by using layers that are set to multiply. Let's just get started
with the face layer that's later six that's tapped
a plus for a new layer. And to make sure that
whatever we paint on here, whatever we draw, that it'll
only show up on that layer. We're going to set this
layer to clipping mask. And now we're going to change the layer blending
mode by tapping the end and setting
it to multiply. For our brush, we
are going to use the monoline brush
for the color. We're going to use
the same color that we already used for face. You can actually
just tap and hold the screen to pick the color. But before we
continue, of course, we need to know where we should add those shadows as handy to have that reference
image that we picked to half that at hand. You can either have it
on a separate screen or you can open a second
window in Procreate. To do that, you can
go to the Wrench, then to Canvas and then
turn on reference. Now a little window will pop up. Now it'll automatically
be set to Canvas, which will show a
miniature of your work, a zoomed out version. But if you want to grab the
photo to reference photo, you need to go to
Image and then import the photo into the screen and you can just move it around. You can make it
bigger or smaller. Whatever you like. We're going to keep
it pretty small. The corner over here, but this way we can
identify the shadow areas. For instance, I can see a shadow area
underneath the eyebrow. Let's make a shadow area there. Make it pretty big, follow this curve, then
dragging the color. And for now it's
looking kind of weird, but it'll work out in the end. Let's also add a
shadow area here. We're going to make the
shadow areas pretty big. For our first pass of shadows, Let's make it a
little shadow here. Because we're going to make
multiple layers of shadow. This will be our
first shadow layer. Let's also add some shadow
on the side of the nose. You can see some shadow there. Let's make a shape like this, dragging the color to fill it. There's also shadow
on the underside of the nose dragging the color to fill in some
shadow over here. You can see I'm just making
these shadows bigger as I go. Add a little bit of
shadow to the nose here, and some shadow here in
the corner of the mouth. Some over here. Some shadow underneath
the lower lip. I can also see a dark area
on the side of her face. Let's make a shadow
area there as well. Dragging the color to fill it. Over here. I can also see
some shadow on our forehead. Add some shadow on the underside of her
chin for jaw line. I can also see a
very subtle shadow beneath those eyebrows. Let's just fill
that area as well. Once you have filled in
all those shadow areas, you can go to the Layer menu, tap the m, lower the opacity. Let's go for, for instance,
twenty-two percent. We're going to
make another layer on top by tabbing a plus again, setting this to
clipping mask as well and also setting it to multiply. And where are you going to
make another layer of shadows. But this time we
won't be going over the very subtle areas like that area in-between
the eyebrows. We won't be going over there again because that
shadow is very subtle. Focus on the areas where we
have the darkest shadows like underneath the eyebrow. Dragging the color to
fill it underneath the nose is also a
pretty dark area. We're going to add
another layer of shadow there as well. Here. Also pretty dark. And to identify areas of shadow, it can be handy to squint your eyes as you'll look
at your reference image. That way everything will
get a little bit blurry, but it'll be easier to identify dark areas and
light areas as well. Actually, let's go over
to jaw line again. Let's add a little bit
more shadow trick. What will make this shape
a little bit smaller? Perhaps a little bit
more shadow over here. Might be eight small
shadow part here. Underneath both lower eyelids. Maybe over here, a
little triangular shape. Dragging the color. Now let's lower
the opacity again. Tap the M. Go-to, well, let's say 30%. Let's make another layer again, set it to Clipping Mask, set the layer blending
mode to multiply. Let's make even more shadows. Let's go over the darkest areas. This really needs
to be quite dark. Over here as well. Underneath the nose here. Right now, I'm going to stick with three layers of shadows. You can actually make more
and slowly build up areas of shadow for your factual or portrait
vectors style portrait. Little bit more
underneath the lip here. More underneath the jaw. I'm a smaller shape. Over here. Drag into color. I will again go to
the Layer menu, tap the M, scroll to the left. Let's go for 30% again. What you can do to make the
shadows a little bit more subtle in some areas is
you can go to the layers. For instance, here, layer ten, you can tap that layer
and give it a mask. Now on this mask
you can paint with black and use the soft
brush, for instance. Set it to black by double
tapping here at the bottom. And I have the opacity of
this brush set to 60%. And let's set the size
to twenty-five percent. Going over the areas. You can channel, mask some parts and give it a little bit of
a gradient in some areas. You don't have to do
this for all the areas. Also make the brush a
little bit smaller. Let's go for 3%. For example. I make this area a
little bit more subtle. You can create some
soft transitions. You can do this for each shadow layer or
you can do it for some. Let's stop this one, give it a mask. Let's again go to 25% in size. I make this cheek area
a little bit more subtle. Here as well. Working like this with multiple layers of shadows
and with the layer masks, you get full control. If you feel like you
have masked too much, you can just switch to white
paint on the layer mask again and paint some
of the shadow back in. Now let's go to the top one. Let's give this one
a mask as well. Let's make this a
little bit more subtle. To want the shadows
around the eyes. I want those to
stay pretty crisp.
6. Adding Highlights to the Face: Next we are actually going
to repeat this step, but this time we're going
to focus on the highlights. So we're going to use
the same technique. Let's make a new layer on top. I tap into plus tapping that layer and using
clipping mask. But this time we'll set the layer blending
mode to screen. We'll still be using
the same skin color, and we'll be using the
monoline brush again. Now we're going to identify
the big areas of light. For instance, I can see a big area of light
on her forehead. So let's just make a shape. They're dragging the
color to fill it. I can also see a big
area of light on her nose dragging a
color to fill it. Over here we can see
some white her cheek. Definitely see a light
on her upper eyelid. Here in the corner. A little bit over here. This side, the upper eyelid
is also in the light. A little bit. On the
lower eyelid as well. On the cheek. Actually go along the news here. Light there. Little
bit of white. Over here. You can imagine the
light coming from above hitting these planes. This area over here, the chin area, we can
add some light there. Now again, we're going
to lower the opacity. So tap the S,
scroll to the left. Let's go to twenty-five percent and make a new layer again. Turning on Clipping Mask, setting the layer to screen. I'm adding more highlights. Let's make a smaller
shape over here, for instance, just like
we did with the cheek. Let's add more lie to the nose. What was it more to the TRC? Making all these shapes
a little bit smaller. And the eyelids, of course. Again, let's lower the
opacity by tapping the scrolling to the left. Let's go for 25%. Then a final screen
layer, tap the Plus, set this layer to clipping mask, tap the N and set it to Screen. Let's add some more light. To the top of these eyelids. To the nose. Perhaps a little bit over here, tiny bit of light, light edge. Some more white in this
corner of the mouth. I think this is nice. Let's lower the opacity again. Use the slider, set it to 25%. Now of course again, you can add layer masks to this, to these layers by
tapping the layers, adding a mask and using the
soft brush set to black. Make everything a
bit more subtle. In case you are running into issues with the amount
of layers you're using. You can just merge layers
that you are happy with. In any case, you can merge the multiply layers and the screen layers
with the face layer. But just be sure that you are happy with the layers
at that moment. Add a mask on this one as well. You're happy with the layers
before you do that because you won't be able to go back. If you are afraid
you might regret it, then I would suggest to duplicating your
entire project in the gallery and then
merging everything, or at least those layers, duplicate project because that way you can always go
back to your backup. I've made these layers a
little bit more subtle, added a little bit
of a gradient. Now I made these layers a
little bit more subtle by using those layer masks and adding
some sort of a gradient. I am pretty happy with
these layers right now. So let me just show
you hike emerged them. Let me just pinch them all
together from this layer, the base layer to the
top screen layer, merge them all together and now everything is on one layer.
7. Shading the Facial Features: Now we're going to apply the same technique that
we just did to the neck. Let's add a new layer on top. Cuz clipping mask to clip
it to the neck layer. And I'll set this
layer to multiply. I want the shadows in the neck
to be a little bit darker. So let me use this color instead is the third
layer and the third row. Let's not forget to grab
the monoline brush. Make a shadow over here. Dragging the color,
then lower the opacity. Set it too dark and I see
it needs to be a multiply. Where do you opacity to
twenty-five percent, then tap the plus
for a new layer, set it to clipping mask, then set it to Multiply. Make smaller shadow. Again lower the opacity
with this slider, set it to 25%, then another layer
by tapping the Plus, set the two clipping mask, the layer blending
mode to multiply. And another small shadow. Then lower the opacity again
with the slider again, 225%. And there we have the
shadow for the neck area. Now let's do the
same for the lips. Let's go to the ellipse layer, and it also has the iris on it. Let's tap a plus for
a new layer seven to Clipping Mask,
turn on, Multiply. Then grabbed and lip color. It's the first color
and a second row. We'll use the monoline brush to add a little bit of
shadow to the lips. Let's make a shape like this. Close it. Bragging a color. An edge to the bottom here. Dragging the color. A little bit of
shadow over here. Drag in a color. Let's also add little
edge around the eye. Let's grab this color, the third color in
the second row. Let's add a little dark
edge around the iris. On both sides. Let's also use the medium brush. Let's grab this
color over here to fourth color and the second row. Add a little bit of
darkness around the pupil. Then we'll lower the
opacity by tapping the m using a slider. Let's set it to 38%. Felt. Make another layer, tap the Plus sedative
clipping mask again, set it to multiply. Grab the monoline brush again
and the color for the lips. Let's add a smaller shadow shaped at a slightly smaller
than the one we just made. One over here. Then dragging the color, fill these areas and I want
to grab the eye color, third color, a second row. Just add a little bit
more of an edge here. Little bit of shadow. Coming from the top. Follow the curve of the
upper eyelid like this. Now let's lower the opacity just slightly. Let's go for 80%. They'll tap the Plus
for a new layer. This time we'll make
a screen layer first use clipping mask
and tap the end, scroll down to screen. And we're just going to
use that for the ellipse. Let's grab the ellipse color first color in the second row. Add a little bit of light here. Some over here, drag into color. And we can lower the
opacity. It just slightly. Let's go for 60%
8. Detailing the Hair: Alright, now the face is
pretty much finished. Let's move on to the hair. Let's zoom out a little bit. You need some space. Once you are happy
with these layers, you can actually merge them
again to save some space. Merge these neck layers. Now let's move on to the hair in the back first,
let's layer eight. Now we won't be using multiply and screen
layers here we'll be using a regular layers or you can just work
on this layer as well. Instead of a separate layer. What I'll be adding
a new one just to, just to be safe, we can
always remove it later. And we will be using just a
darker and a lighter color. First, let's add
the darker color. That's the second color
here in the third row, will be using the
liner brush. Again. We're going to set
the size to 15%. We're going to add these
lines for the hair. I'm looking at the dark
area on the photo. Adding more of that
dark hair over there. Making these swooping motions. You don't eat a lot
of individual hairs. It's not like a realism piece. It's a vector style piece. It's okay if it's a
little bit stylized, just make the brush
a little bit bigger. Forty-five percent. Let's add some more
dark strokes here. Goes to the hair, goes to Harris, pretty
dark over there. Let's move to the lighter color, that's the third color
and the third row. And let's pick 15%
in size again. Zoom in a little bit, canal. It's also add these
individual hairs that are sticking out. Make some move in
this direction. Cover some of these
darker hears. Also covered the
neck a little bit, have some stray
hairs over there. You can also make a
brush even smaller 7%. For some of these
hairs over here. These wispy hairs flyaway. Something like this is fine. Now let's move on to the hair that is in front of the face. So let's go to that
layer, layer five. Let's tap the Plus
for a new layer. First, go to the dark
hair color again, second color and the third row. Let's set the size to 15%. Let me rotate the canvas a bit. Let's add some dark
strokes over here. Go from the outside
to the inside because the end of the stroke
is nice and thin. Otherwise you'll have
that thick part of the stroke near the
base of the hair. This way around it
looks more natural. Also make some hairs
going like this. Perhaps some over here. Our reference image is a
little bit in the way. Curved lines towards
the forehead. Perhaps a few over here. Let's switch to
the lighter color, third color and the third row. Some of that lighter here. And let's also make it
a little bit bigger. Forty-five percent over here as well, some bigger strands. Moving from the outside
to the inside to get those nice parts. Let's switch to 15% in size. And do the same thing over here. Going from the outside
to the inside. More of that hair texture here. Over here. Go over those
darker hairs and add more texture with
short rounded strokes. Short strokes over here. If I would've used
the same technique for the hair as I
did with the skin. And I wouldn't have
been able to add these individual hairs
outside of the hair shape. That's why it's handy to use
this technique for the hair. Add some more lighter
hairs over here. Perhaps we can use a bit
more hairs over here. You can even add more darker
hair is more lighter. Harris add even more
color variation. Like I said, you can
use more shadow and more highlight a layers
to build it up even more. And with this technique
you have endless, endless possibilities
and a lot of freedom and a lot
of flexibility. I do realize that the teeth and the white of the eye could
use a little shadow. Let's go back to this
layer, layer four. Let's tap the Plus for
a new layer and add a multiply layer on top
set of two clipping mask. And like I said, we have
a lot of flexibility. We can just fix it
right now Let's go to the monoline brush, 40 eyes. Let's grab the second
color. Second row. Now let's first grab this color. It's a reddish color for
this corner of the eye. Then let's grab the eye color, second color and the second row. This a little bit of shadow. The top area of the white
of the eye here as well. Let's add a little shadow on
the top part of the teeth. Now all we need is a little
highlight on the eye. Let's make a new layer
on top of this one. Tap the Plus. Let's grab white over here to fifth color and the second
row, you know what? Let's move that layer
to the top of all, of all of the layers
so we can actually paint on top of the lines layer. Just add little bit of a
highlight here on top, two little dots here as well.
9. Coloring your Lines: And I for a file touch, you can also color
the lines layer. To do that, go to the
lines layer over here, then slide to the right
with two fingers, or just tap the layer
and turn on Alpha Lock. Now let's go to
the medium brush. For the eyebrows, for example, we can use the hair color
to make them more subtle. Let's grab that first color and the third row and go
over the eyebrows. We can also make other
parts more subtle. Let's make this brush
a little bit bigger. 7%. For instance, we can graph this shadow
color a little bit brown and go over some
of these nose areas. Making those lines stand
out a little bit less. You can do the same
for an ellipse. Let's grab this dark
red and go over the top area of the lips
and the lower area as well. Actually, let's do that. That way. You can push these lines
back a little bit, making them look more subtle. Let me turn off the
reference image by going to the wrench into Canvas and
turn off the reference. And there you have your vector style portrait
for your class project, it will be great to see your
own vector style portraits, use your own photos and apply the techniques that I have
showed you during this class. I hope you have enjoyed
following this class. Let me know if you did, I would highly appreciate it. If you would leave a class
review and if you enjoyed it, go ahead and check out my other Skillshare
classes as well. I would like to thank you for watching and I will
see you next time.
 Floortje Visser, Digital art tutorials for Procreate