Transcripts
1. Welcome to the Class: Hi, and welcome to
the Skillshare class. My name is Avraham, and
I'm a professional artist. I love teaching people
how they create beautiful pieces of artwork and how they can
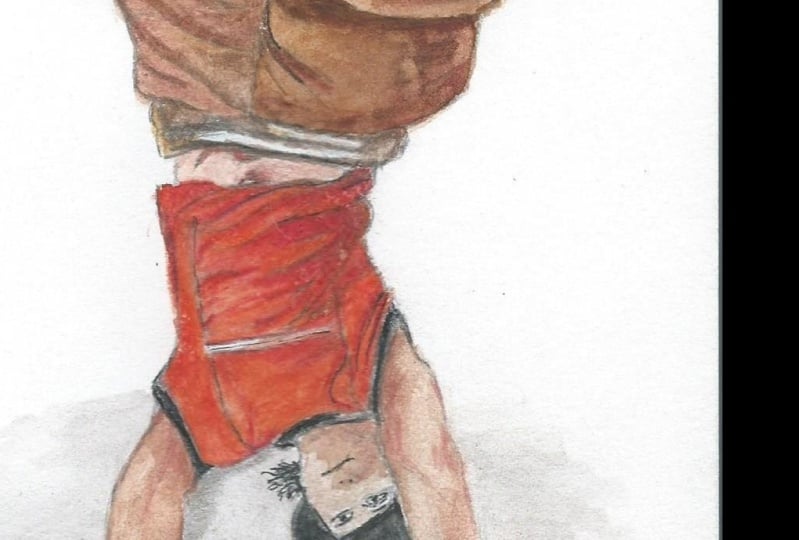
improve their skills. In this class, we're
going to learn how to paint this break
dancer in watercolor. I know that some people find
watercolor intimidating. So in this class, we're
going to break things down to small, easily
achievable steps. That way you can both enjoy the process and end up with a
lovely painting at the end. Many people also find
it challenging to paint an accurate representation
of their subject. It's for this reason that I particularly chose this pose for the class because we will essentially be drawing a
person who's upside down, it's a perfect
opportunity to learn tips and tricks to more successfully
achieve a likeness. So whether you're just starting out or are an
experienced artist, you'll be able to
follow along with me at your own pace and improve
your waterkller skills. So if you're ready
to begin, grab your brushes and paints and I'll see you in the next lesson.
2. Materials: So for this class, we need
some basic materials. We need our watercolor brush. I'll be using this
Princeton number ten round, which I really like because
it comes to a very nice tip, but also holds a lot of water. So we can paint a
while with our colors. Besides that, we need paper. So I'm using a four
cold pressed paper. Uh, and we have our
watercolor sets. So I really like this Daniel Smith
essential watercolors, these six colors here. I've also supplemented it with a burnt sienna and Pain's gray. So you can mix really can get all the colors you need with
the primary colors here. But these are little
shortcuts if you need browns or gray and we might
be using them as well. Besides that, we have water. To activate our colors
and our palette. And then I'm going
be probably using this pencil to do a rough
sketch before we start going. So that's really all
you need. And if you read, let's get going.
3. Sketching the Figure: So this bring dancer is in
a very unique position. I do like the composition where the legs and the arms
are very defined. However, the head
is a little bit hidden amongst his body there, and so it'll be a little bit
harder to draw his head. For that reason, I think
I'm going to start with his legs first
to sketch them out, get the general proportions. So it looks like his leg
foot's about that big, and then it comes out at
this angle to around here, about looks like a slightly longer than the
length of his leg, right? So if we have here, and
then it shoots in at, like this type of angle I'm going to try to get a little
bit maybe the volume, too. So it comes out to here and
like this one leg like that, and then the other
leg starts over here and comes out to
something over here. I'm just checking how high it is like this foot finishes here, and his other sneaker
is a little bit higher. And come around something
like this angle. And then we can draw the
rest of his pants leg. Actually, I want to start
from over here just because I won't get
this more accurate. So over here, I see that it sort of shoots out
an angle like this, and it has a sharp edge and then comes up in here like that. And this one comes
out like that. So I think that's what the leg on the side
is looking like. Then we can get to his torso. So we have a little bulge
for his pants right there. And then on this side, too. Okay, so now it's torso. We have seems like it's seems like it's more or less following
this line here. So we're going to draw that
something like this here. And then the backside it
comes in just a little bit, and then out to here. And then his shirt
comes around like this. And then the rest
of his shirt comes in like that small area here. And then up like this. Okay? I just want to fix his
other sleeve on this side. So it comes out and then this. I think it's over here. It's a little The
sleeve is, like, a large circle shape over here, so I just want to leave
more room for that. Okay. Sort of like this. And just looking at, like, the top or bottom, since upside down, his
sleeve is over here. And where's that relative to the sleeve opening
on this side? So I think that's pretty good. Let's draw his arm. So we have come here with
its bicep like this. And on this side,
it's a tricep, sorry. Tricep on that side,
the bicep on this side. Looking at the Ngata space right now here, formed by his arm. Or something like this.
That's where his hand is, and then we have his head
finally get to his head. As you know, I
normally like to start with a head, but over here, because of his location
and everything, we're doing it this way. So I think that leaves
room for his head. We can put in his his
eyes look like over here and his nose and mouth. I'm not sure how much detail
I'm gonna get into that. It's quite challenging
in that area. Well, we'll see if we get all the basic everything
drawn in to start off with, hopefully it'll make life easier when we're
actually painting it. Okay, now his other arm
comes around like this. I'll start on this side here, which sort of blocking his face. Mm. Again, looking at
the negative space, how much space there is between his arm and the other hand, where it ends and where his
thumb comes out here, right? So I have, like, a
thumb shape there. And the rest of his hand like this do I want to
draw his pinky? Maybe leave him leave
him for that pinky as well. We'll see. Okay. And his arm
fishing off the arm. It's a very unusual shape. So you draw what you see. Okay, so I think that's I think that's a good
starting point. Alright, so let's get painting.
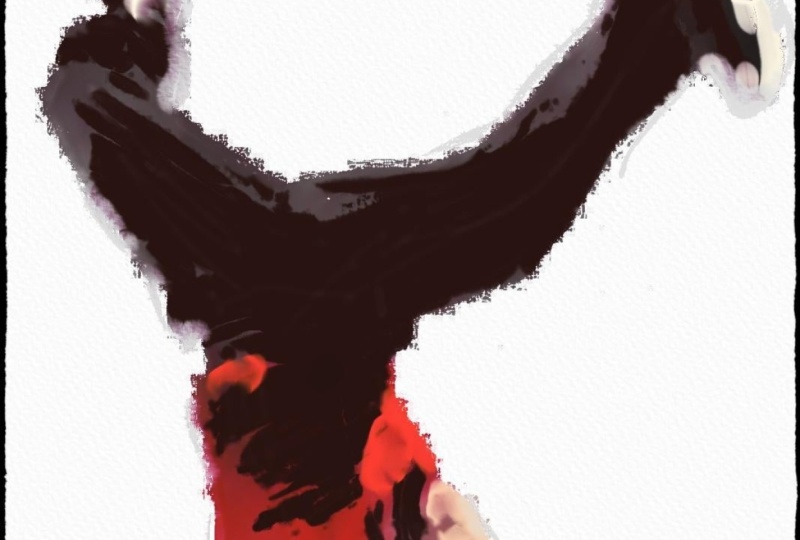
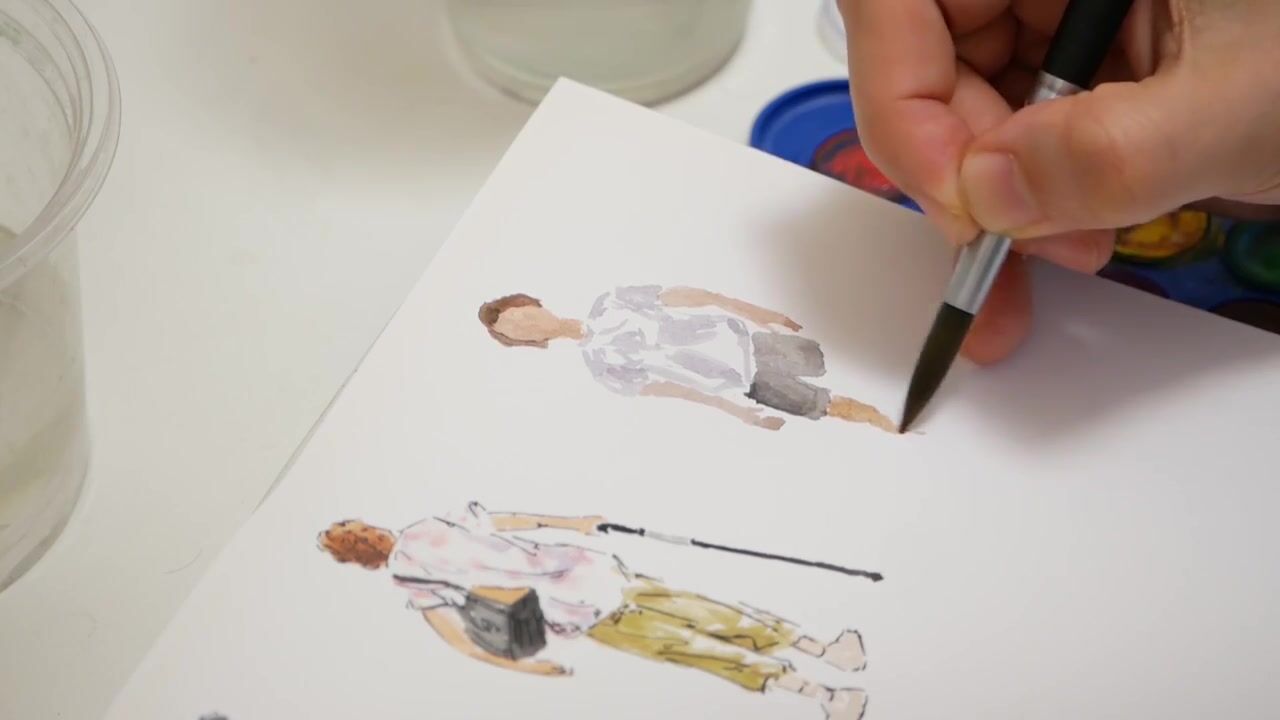
4. 04 painting: I'm gonna start actually
with the pants. I want to get all
that shape in there. So using my light side
of my palette over here, just throw some water down,
but get the brown in here. And I'm gonna make it more interesting color by
throwing in a little bit of the new gamboge
Oops goes over here and a bit of a pearl scarlet. So I'll have this brown 'cause I know his
shirt's also red, so we can have a little bit of a similarity between the colors. Okay. Make sure
it's nice and wet. Okay, here we go. So
we're going to throw in some back and forth like
this, fill in the shapes. And I like leaving a little
of gaps every soften, shows like, highlights and just gives a little more
interesting variety and texture. Okay. What I have here? Just having fun filling
in the shapes now. You gonna mix a little bit more? I don't mind the variety
or difference because it gives the color changes
just a little bit, it adds a nice
variety and for me, like a realism type
of effect to it. So um, it's just
more interesting. Doctor Phil, because it's a
large paper here, I need to, um, reload my brush
more frequently, therefore I'm doing
a smaller size. I keep picking the same colors. Mixing at more here and there
and flowing it back in. And here is part of
the shoes a little bit more challenging to figure
out what's going on there. But we'll
just go like that. And what I want to do also is come in with
a little bit darker. So let's throw in
a little bit of our French ultramlein to give a little a
darker shade to it. I could use the Paine's
gray also, but we'll see. So right now, I'm
just going to go back in a little places a few places here where I
see there's some shadows. Now, I see that it's
mixing a lot here, and that's because the
paper is still pretty wet. So it's not giving sharp definitions to the
shadows as much as I'd like. So because it's very wet, I'm going to move
on to the torso, which still retains a lot of red or we could do Let's
do his shoes, okay? Shoes in that area. We'll take some Paine's gray
in this area here. And draw in the shoes. I could see how, like, the sharpness of the stroke
is because the paper is dry. So I'm hoping it'll get fet. Sort of like that when we get back to his pants and add
in some more shadows. I just find the contours and the different shapes
I'm seeing here. Some small back and forth here. The shoe laces, things like
that. A little bit darker. Maybe some blue. Just give it a little some color
variation here. Taking a little
creative liberty here. Okay, it more point
to the top of a shoe. Good. And now we'll
go to the other shoe. I'm probably gonna
have to reload my brush with some
more color soon, but we'll go with this for now. It's a very awkward angle. So, just trying to focus on the shapes and what
I see happening, 'cause it's not how I
normally draw a shoe. If you ask me to draw a shoe
without looking at anything, this would not be it. Tell you. But by doing
exercises like this, that you really learn to
draw what you're seeing because you can't rely
on your muscle memory, what your mind thinks
a shoe looks like. Okay, over here, we have
a very thin outline. The soles of shoe, maybe,
something like that. And we have on the outside
coming down like this. Great. And now I think
our pants are, um, dry enough that I can
put in a little bit of, um, the creases, which is
what I was hoping go for. So let's see. Okay, so let's see
what get here. Something like this.
And then here we have sort of a line dark over here. Batting in these darks,
it really helps define the form with just a
little bit on that side. But the pushing my
brush down more that lets more ink or water
mix with the paints. And here we have over here. It's darker. It's
pretty dark over here. H. Like, these lines here, I'm
particularly happy with. Those are really
cool sharp and and, um, give a nice feeling
of creases in his pants. Okay. So we got that. I'm going to move on now to his um I'm gonna start
with his shirt area, which is a reddish color. Let me just clean this
palette a little bit. So I can get cleaner red. Okay. Dry off the brush
just a little bit, and let's come back in with red and add in a little bit of
our new gambage to that. It's mostly gonna be a red. Okay, leaving space
for his stomach, which we're gonna paint in
a little bit afterwards. Something like this. Hang up here. Laying down a base color, more or less of his shirt, what it looks like, and
then we'll go over it. I'll try to leave that
as a little white for the decoration on his
shirt over there. And like this angle where his shirt sleeve or his arm comes out
a little bit more. And over here like this. Coming up in a
slight angle again. Okay, so now we have
that come in again. I mean, let's add in just a little bit again
of our French ultramarine for shadows. Like this? Okay. Over here. Just over a little bit
of dark so you can d in a little bit go over
a little extra time and just accentuate that. This and we can
do even one more. I'll go for Pain's
gray this time, and we'll darken
some areas here. And since the paper
is still wet, it's going to bleed and
mix in, hopefully nicely. Let's just dry my brush and pull up a little bit
of the excess water. Okay. I do want to go over and
make it a little more red, so I'm just took up more
of our pearl scarlet. Give some really deep
color here for his shirt. Okay. Next, we're going to go his skin. And for that, I'm
gonna mix together. So we have our new gamboge and our parallel scarlet gives
a basic orange color. And then from there,
we're going to add in the French ultramarine
to cool it down a little bit to
make it more skin toned. So I see this is looking
a little bit brown. So we're gonna add it a little
bit more lighter yellow. Okay, and a touch
of touch of red. And let's see how that works. Okay. Arm? We need space for
the um sweat bands, right? Okay. That's one. And this arm is a
little bit lighter, so I'll just to add a
little bit of water. Come around like
this. And his thumb. It's his thumb and his bottom
of his palm over here. We have a pinkie comes out, and the rest of his
fingers come over here. Good. And now for his
head, which is in shadow. So we're gonna start, though, with the color we have already. Because, um, the
top of his head, at least, is actually
pretty bright. You know, it's light like some of his arm.
So let's do that. And then we can, um, add in a little bit
more of the red and blue just to cool it down and then go
over this area again. So I have that and then
let's go to his hat and, um, f sock properly. So here, it's gonna go from
the pain's gray pretty dark. And this actually
draw the pencil, but we can just draw
the shape now here. This is part of his hat, hat makes this circular
shape like this. And then over here until it goes behind his arm. Okay. And then I also just want to add in
a little bit more. I didn't really
do his sock area. So this add in
something here to show a continuation of where his leg actually
reaches his shot. Like that. Okay. And then we have also around
his sleeve here. Okay. And on this side. A
little more pain's gray. Let's make it a
little darker here. Okay. And then, um, I went into his torso. I went into his belly area, so it's pick up some of
our skin color over here. Throw that in. Like that. Okay. And we still have some color left on our brush's adding a little shading
on this part of his arm to give a little bit more three
dimensionality like this, 'cause it's in shadow. Smoothed it out a little bit. It's not really harsh shadows. It's just goes around his
for his arm, like that. And this also there's
bicep or tricep areas. His arm, top of his arm with a where it hits the floor, also. Okay. And then we can
take some of this, um, cooler color and
make that our shadow. Ground him on the give him
some grounding, right? Last thing I'll try to do here
is maybe add in the eyes. That's a little bit scary,
but we will try it out. So for that, um, be very delicate here
top of the brush. And since this area
is very dry now, so that is workable. Here. And then we have the
underside of his nose. And then for his mouth, let's make that a reddish color. I'll take it actually, Conoco and rose is a little
darker, deeper red. So I'm gonna mix that
in and mix it also with the pain's gray to get
something that is, like, a darker something
going over there. And his mouth looking like this. All right. Last thing I want to do is add
in just a touch of shadow to the
underside of his shoe. Give it a little bit of
color. And over here. And if I could do it,
maybe the top part of his sock as well, and just a little
bit of form or, you know, it's not pure white
to separate from the page. Okay, and we have to do
also his wrist band. So pick up that
deeper color again. More pale scarlet? Okay. And I do want to add in Al just the creases on his
shirt a little bit more. Now that the paper
is drier over here, we can get that get away with that with something
that looks more wrinkly because it
won't blend in as much to the glare we had below because
it's dryer paper now. A few things here and there. In this area. You know, there's actually,
I realized there's a just like there's the
curves around his arm is, there's also one
right by his neck. So add that into. Okay. And and I think
that's really good.
5. 05 Thank you: Okay. Thank you so much for taking this class
with me and learning how to paint this break
dancer in watercolor. I'd love to see what you made. So please remember to upload your artwork to the projects
and resources section. I'm always looking for ways to provide more value
to my students. So if you have any comments
or questions about this class or want any specific advice related to watercolor painting, please reach out to me in
the discussion section. Lastly, please click
the follow button so you can follow
me on Skillshare. And that way, you'll
be the first to know when I launch a new class. Thanks again so much for
taking this class with me. I look forward to seeing you
another Skillshare class.
 Avraham Nacher, Artist & Photographer