Transcripts
1. Welcome: Hey, there art lovers
and romance enthusiasts. Are you ready to
capture the magic of I Do with your paintbrush? Then you're in for a treat. My name's Avraham, and I'm absolutely thrilled to
welcome to this class. We're gonna show you how to use the lion wash
technique to create beautiful wedding paintings that are perfect gifts
for engaged couples, cherished keepsakes, or
thoughtful anniversary presents. As a professional artist, I've done many types of work, both using digital and
traditional media. But I keep coming
back to the beauty and simplicity of line
and wash painting. In this class, I want to
share with you my methods for transforming wedding photos into beautiful expressive
works of art. This class is about capturing the joy and love
between the bride and groom using simple lines and playful washes
of watercolor, so you can focus on having fun
with the creative process. There's no stress about
drawing realistically. And there isn't a long
list of materials, either. All you need is a few supplies
and you're ready to go. So whether you're an
established artist or just during
your crab journey, this class is a great way to
learn everything you need to know to great stunning,
heartfelt paintings. They're perfect as gifts, keepsakes, or just
for the fun of it. So if you're ready gets started, I'll see you in the next class.
2. Materials: To start off, we
need some supplies. And to be honest, we don't need that many to do what we're
trying to accomplish here. The most important,
of course, are going to our brushes, and for that, I recommend getting some
rounds using a round. So for example, I have this
**** Blick size eight round, and my preference is my personal favorite is this
Princeton round, size ten. As you can see here, it comes to a little bit
of a point at the top. And so for that, I
get these I can get a little more finer
lines as well as the washes while I'm laying
down the base colors. So for the size that we'll be working on, this
is perfectly fine. If you want to do a
larger size painting, so then maybe you want
to purchase a mop brush, and you can paint it holds so much water and you can
paint forever with it. So it's also really
cool a nice option. Next thing we need
are some paints, and I do have a
whole palette here that I like to use where I'm
doing colored paintings. But for this lion washed, we'll be just using one color. And I happen to like using
this pains gray that I have, which is sitting
in the far right. So you could use pan paints, but this is basically
a tube that I squeeze into the palette and then let it dry so it becomes
like a pan paint. The last thing we
need is to make the lines for our lion wash, and I have this Tambo set here. It comes with two types of pans. One is a hard tip, which is very consistent
when you use it, and the other one
that I like to use is this one is
called the soft tip. And so it looks very
similar to the hard tip. But when you press with
it, if you press lighter, it's thinner lines and press
harder, it's thicker lines. Sort of like you can see on
the packaging over here. So that's what I like to
use for the line work. The only other thing
that we're going to need before we start is to do our sketching is
doing our sketching. And for that, I recommend
the pencil when the eraser. So here I'm using a four H, which is a bit harder. Means that it puts
down very light lines. You can use a regular
number two pencil HB. I don't recommend
using soft pencils because those are they put down much darker
much darker lines, and we're just trying
to get a reference points for where
we're going to be drawing in our wash. And
now for the actual paper. So I'm going to using this
Canson A four size 300 gram, which is 140 pound. The thickness is really helpful because it's really
designed for watercolor. It's very thick, absorbs
the water and lets you play with the
washes a lot more. So it's totally something
you can So I recommend this also it's very nice
when you're giving a gift. You know, you can just
give this to people. However, you can also
use a sketchbook, as well, like you see here. This one, you can see
I've done many line and wash paintings in here in
watercolor, some even in color. And this paper is a
little bit thicker or a little bit thinner than the then the traditional
watercolor paper, I think is 110 pounds. And as long as you're
doing fairly light washes, it'll be okay if you're doing something
that's really heavy. So then it might like this one, I did over here in
color is very heavy, and the paper started to be very start to warp and wobble. So um so that's
something to consider. For the way we're going
to be doing this, we're not going to be putting
down such heavy washes. So you can see here, I've done plenty, and they
all are very nice and fine. So you can totally use a sketchbook to do
your work as well. The last thing, of course,
for watercolor is water. And I like to use two different
pans, two different cups. One for my cleaning. This one over here. Let's do it this way. One
is for cleaning. And I don't really
fill it too much. It's just really to wipe the
wash the brush afterwards. And my work worse cop is this one where I'm constantly
refilling or constantly, washing the brush off here
and wetting it from here. But again, when it comes to just using one color like
we're going doing, you don't really need to clean
off your brush very often. It's more just a matter of getting the paints wet to
a certain consistency, which we'll be going over when we get to the
actual painting. But now, let's get
out our paper, and we'll put down
our rough sketch.
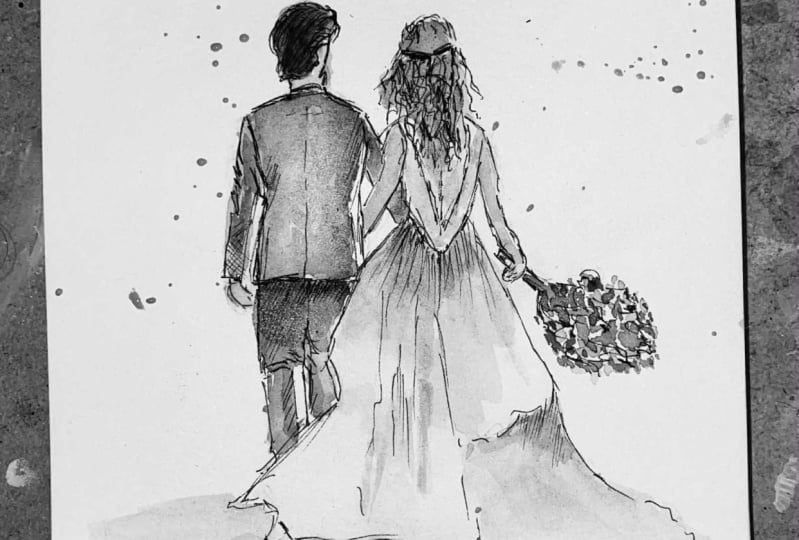
3. Pencil Sketch: So many times I just start painting with my wash and I
don't even put down a sketch. But for this first
one, I want to work with doing a sketch
to make sure we get our proportions a little
bit more accurate and the layout on
the page do better. So I'm just going to
start here putting in some really rough
and light marks. Again, I'm using a four H
pencil, which is pretty hard. And as I said before, you
can use harder ones as well. I won't go into the
soft pencil section, but use something like this. So I'm going to estimate where
the head is going to be. I always start with the head, and let's put it right
around here, right? So this head is going
to be this tall. And then moving into the
angle of the shoulders, which I think is very important. So it comes down a
steep angle like here. And I'm gauging the size. So if we have the
head is this height. So I think the shoulders
are about the same, so it almost comes like
a square corner here except it's at an angle that's longer than 90 degrees,
but something like that. Then on the other side, we have his other
shoulder because it's coming off here to
about that point. And now we have to do the body. So we'll just go with his arm
comes down to around here. That's maybe the elbow point, and then the next point
would be a sleeve ends. It's right around here. I'm not even drawing in all of the
lines to outline his body. I'm just putting in the
points that I want to get to. So we have over there, and then his hand
is about that long. So we have a little
point where his hand is. The width of his sleeve, he have to take that
into consideration. And I think the sleeve
starts to separate from the main torso part
around at this point, and then it curves
around slightly to here, and I think his jacket
ends right at this point, which is if I'm
putting it in line, I can see that was
pretty accurate because where I said sleeve
ends is right there. So his sleeve in his
jacket was right about the same point
be slightly lower. And then we come across for the other part of his jacket
and a little bit higher. We'll see where that
is if that's accurate. And in the meantime, let's go down with
his hand, right? I'm seeing from here, Okay, so it's comes out to about here. And now let's come
up to where she is. All right. I'm just looking at the negative space between
the arms right now. It comes to around here, and her elbow looks like it's here, right about a quarter of the way down from where his
shoulder to arm is, and then it comes up like this. Her top of her elbow top of her shoulder is slightly
higher than his shoulder. Alright. Her arm comes
down a little bit lower. We're not looking
for exact here. We're just looking it's
gonna be a wash, anyway. But just getting the basic
idea of proportions, okay? Then her her top of her
shoulder is over here. Her head is like this. It's a little bit
higher than his. Okay? Like this. And then we have her hair that's sort of obscuring
part of her body. She'll sort of throw
that in later. Her torso, I think, starts around here, comes in until a little bit lower
than her elbow, right? So we have this
little line there, and then her gown flows out
to pretty far down like that. And now let's go and
finish off other things. So the rest of her gown on this side
can come down like here, right? Something like that. And then for him, we have
his jacket is over here. His shirt sleeve is right
around here where it connects. I see it's also a little bit higher than on the
left side, right? So we can see that we're being
hopefully accurate here. It comes in a little bit
and then flares out. We'll accentuate that
just a little bit, and it comes in here. And now we have his legs. And basically, it's going
to come down to here. And then, like this with one, and then his other
one also comes in. Now, here you can see how the sunlight catches
his leg over there, chops in out, and
there's highlights. So I'm going to
go back and forth with my brush and possibly also the pencil afterwards
with the pen when I market it. But for now, I'm just
marking down the uh indicating where the
parts of his body are. So it comes down to around here, and then we can leave room
for his shoe at the bottom. So this for me is enough, okay? And now that we have
our rough sketch, we can I just put in a little bit more the
hair, I guess, right? Like here. And now we
have the rough sketch, we can start painting it in.
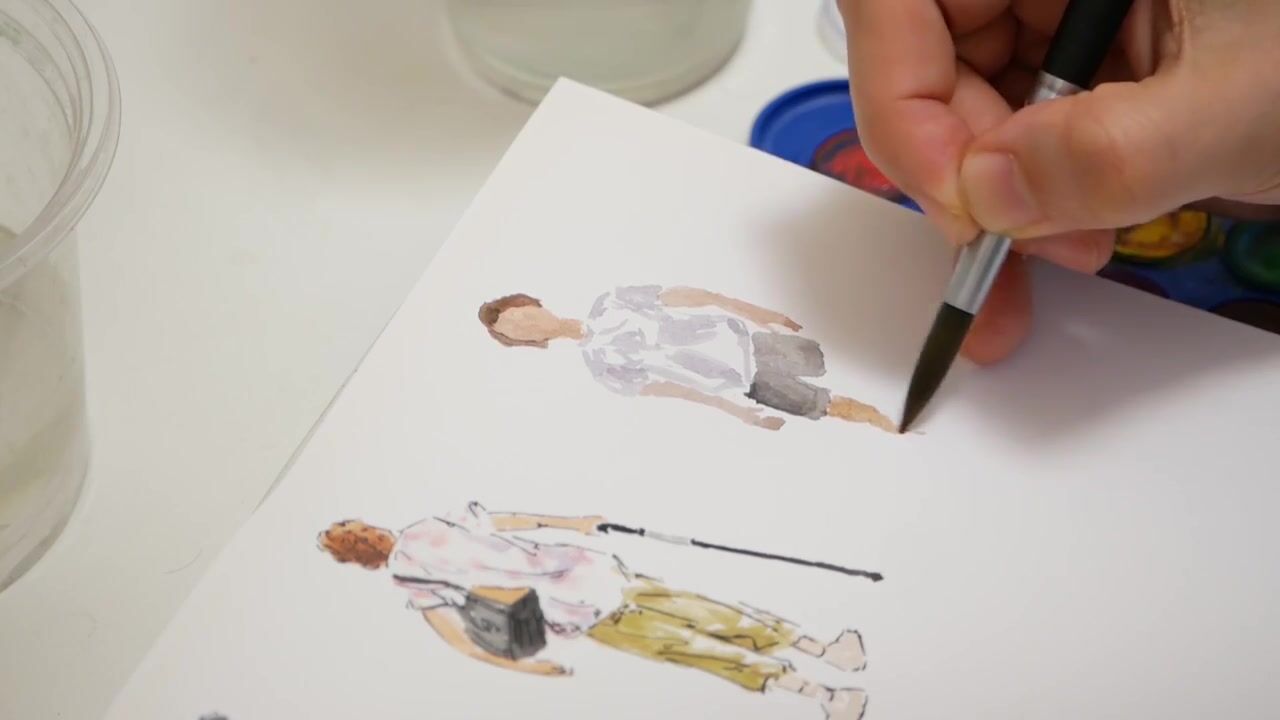
4. Laying the Wash: Now we're ready to
put in the wash. I know it's called
line and wash, but I personally
like to do the wash first to block in the
shapes and afterwards, put in the pen workk in a
loose, more interpretive style. First, we need to
get some paint on my brush and put it in mixing tray to
see how thick it is. And this to me is looking
like a pretty good thickness. I can see the color here against the white of the mixing tray, and it's not too dark. You can see how dark the uh see right from the
tube how dark that is. So this is a lot lighter, and it will leave
some ability to put down our line work
afterwards and still see it. So what I'm going to do now is just it is nice and
wet, full of water. I'm just going to
start on the side, on the man's head and start
putting down the shapes. So we put here. I can see there's a little bit maybe too much
water in the brush, but that's okay for now,
because as I move down, it will get a little bit
drier and it can get to that nice cutting effect when we get closer to his garments. So we have here his chin
comes out just a little bit, and now his neck, right? So I'm going to lay down a little some water out of the brush by
pressing it down like this. And now, it's a little more sharp edges. You can see the
difference, right? So now coming over here, cutting down for his sleeve. These are straight lines I
can see um in the picture. So I want to preserve that. And here, to the lower part
of his arm again straight, but I want to give a
little bit of texture or dimension for his sleeve, so I'm cutting in and
out a little bit. So it's not perfectly straight, even though in the
source picture, it might be, but I'm
doing like this. And then we're going
to have his hand. So, it comes like this and like that for his
fingers, maybe, okay. And over here,
continue to come down. I want to make sure I connect all this because it's not only at this point is where
differentrets from his sleeve and then come down. Again, a little bit of
texture on the side here, filling my brush just a little bit because it seems
like it's pouring out of water and
coming down here. I'm trying to continue to hit
the points where my ends of the water are so it doesn't
make these strong dry lines. I'm trying to make one
nice wash here. Okay. Add a little more water, get a little more paint in my brush, so I get some
similar consistency. Okay. And now here, see, I'm just cutting back
and forth like this, right? So it gives a neat effect. And then we want to leave just a little bit for his
feet separate, right? There's a little gap
between the two are there. And you said his pants
come out to here. Come in and I think it slightly smaller than my
reference sketch there. You can see the pencil in is
a little bit further out, but I'm bringing in
just a test here, and then there's a
little highlight where the sun is hitting the inside half of his
pants leg over there, and this is gonna
come down and join. And then over here
we have his shoe. So some back and
forth for the shoe, and I'll fold the rest in with, um, with the pen work later. So make it a little darker. Okay. Fine. Um, great. Actually I probably
wasn't a good idea, but we'll just dab it off there. Okay, so now we're up to her, reload my brush, and
we're gonna start again. So on the top, and with her hair, her
head and her hair. So I'm gonna first paint
in her hair like this. And with the brush
the pen later, we're gonna redo
this area as well, but just given some
general form like that. Okay. And now for her head, you can see I'm pressing further
down with a brush like this, and it makes it a little
softer because it mixes the paint a little
bit more in Okay, so I missed her neck. But we'll fix that later. And well, I also see
I didn't do his hand, right? That's his sleeve. That's his jacket and
we still do his hands. So we'll connect them right now. Okay, so we have
her arm comes in like this and then like that. And then we could
just connect the two together while we're here. I'd say I was on purpose, but it really wasn't I
won't lie about that. But I think it'll
work out fine anyway. So here we have the sleeve, again going back and forth
a little bit to give some texture to the shirt, the sleeve material,
it comes in like this, and it meets lovely. Okay, let's continue on
with her digging her back. Okay, we'll stop right
there and then do her other arm,
we're all together. This Did I draw out her arm? I don't think I did.
Well, here we go. We're just uh I don't think I sketched
her arm initially, but, uh here I said, normally, I'll just, just draw
it as I see it. So here, there we go. Um, that, and I'll get a
little more paint. You see this is
actually much darker, if you can see that
than what I did before. So I'm just to add little
touch of water to lighten up, and now I can continue on. I see this nice little
line thing going on here for her dress, right? And and then comes out, we're going to
first do very nice, uh, smooth for her
dress over here. Like blur it out
with lots of water, and then come back in
with a little bit, um, dryer brush to get
some details in there. So it's a little dryer brush
effect, so you can see here. It's almost what's gonna
happen when we put in um the pen later. But I'm doing it sort of
getting that effect right now. I love folds and clothing. It's just so cool. Now, this area here
is still very wet, so we can't get strong
brush strokes to show up, like, over here 'cause
it's wet on wet. We have to wait till it dries
just a little bit more, and then we can have
that happen too there. So I'm just doing this
back and forth to get show how her dress is
very see through, right? So we do that. And now we just wait just
a little bit here, and then I can add a
little bit more of the I can add a few more
watercolor strokes to her dress. So I'll just pause for
a little bit for that. Okay? So I'm just going to get
a little more light brush, a little more paint, and just
do where those legs are, something like this, right? So you have something
that looks like that, and I just want to smooth
it out a little bit, so I'm going to just
put my brush in there. Well, we just add a little
bit more here, and, uh, I'll make them look like they're maybe on the same
plane a little bit better. All these
things you can do. There. So, now we've done this, we'll dry, and then we can
come in with our line work.
5. Adding Lines: And now that the
paper is dry, right? If you touch it, there's
no damp dampness at all. So now, when we put
in our line work, it's not going to
blend or run at all. Though that is an
effect that you can experiment with as
well, and I've done. I'll show an example of that. So here, in this one
in this pink strip, in this picture right here, you can see how I
put down some of the linework before it
was completely dry, and so there's this little
blob of running paint, a running marker over there. So it's a different
type of look, and you're totally welcome to experiment with that as well. But for this one, I want to
do very strong crisp lines. And so we're going to
just start drawing. It's sort of fluid
and loose line work. So what I like to do start
with it again at the head, and I try to go around a little bit to
capture some light. So it shows, like, here, like, capturing, like,
where the sunlight would be hitting on his head
or something like that. So I know it's not
really happening. But it's a nice effect for me. So here we have his top of his shirt and over
his head like this. All right. Something like that. And I coming here
and I like to go this in out type of
effect for the clothing. So it's because it gives just more insuranc
action and life to it. So, that's what I try to do. So here, and then we have
his sleeve like this. And then for his hand, we have something like that. Okay. And then over here, we have a jacket. And we said it jacket
ends right around here. We have a curve around. And on this side, we have
over there coming in, and then we have the jacket part coming down
to meet her arm. Like this. Continuing on his legs now, we're going to do catching
a little bit of that light. You can see there's that
light on side, right. So I was just going
to capture that and then cut it out to match the
way the light is hitting where his knee is
perhaps and then coming down and cuts in out again. Here, we're going to
capture that little bit where the sun is coming
between his legs, and then we have
where the sun, again, is on this side of his leg a little bit of light
and coming down. And over here, make his leg
a little bit thicker now, even though I made painting the wash part was a little thin, but now I'm actually reconsidering and
making it thick again. So, whatever, change
your mind a few times. Okay. And then
here for his shoe, we had something like this. And then the other
shoe we can't see, but swing over there. For her, let's again, start with the hair. And this comes out like this
a little bit over here also. And her ear looks up to here, and then I want to
get that chin in which I sort of missed
out with the wash. But we can correct it
now. I think this. And I'm actually just recreating the proportion of her
face and her shoulder, even though there's just a
wash going in that area. And then here, it comes out. Okay, so that's her head. And it was her So her skin, it gets her arm, so
I'm not gonna do any jaggy things here. It's gonna be very straight to show that it's her
arm like this. Right? And then her hand comes down like this and
something like that. Okay, we have a
line for her dress. I'm trying to do it really thin. And then it comes
across here also. And this is why I
like using this, this soft tip because you can get the thin and
thin lines like that. Okay, so now we
have her outer arm, I mean, her right arm over
here and cutting in like that. And then try to follow
the contours of her arm. And our fingers. I always find figures a
little bit challenging. But I don't think about
learning that. It's like this. Okay. And now we have the
rest of her dress, right? To it like that.
And then we have nice flow on the outside
over here as well. You just have fun with
this part. I mean, you really can't go wrong
with the with contours of a flowing dress as long as
you just keep the lines flowing and stuff like that. So I just don't want
to go overboard. But that's the idea here. Alright. Okay, anything else? I want the back of her back
and get added in here. And, um, and then her hair, we didn't do enough
of her hair, right? This is all like that. And actually, what I
could do is I can go in with a little bit back
with our watercolor. Make it dark, and I can
just try and place it down just really just touching the surface the
paper to get a little bit of her dark hair in here, right? Because I don't want
to, um, too heavy. Otherwise, it's going
to make a run on the, um, the linework. And then, actually, while
we're while we're at it, why not we'll add in
for him, too, huh? So this is definitely
not how I do things, but typically, but always
experimenting and changing. So here we have that for him, and that's his that's
his his hair, as well. Okay? And while I can add in some darker lines for
his jacket, whatever. Yeah, this is a little bonus. You don't have to do this part. It's up to you. There we are. Okay, so that would be, um, the first painting, line and wash of a
bride and groom.
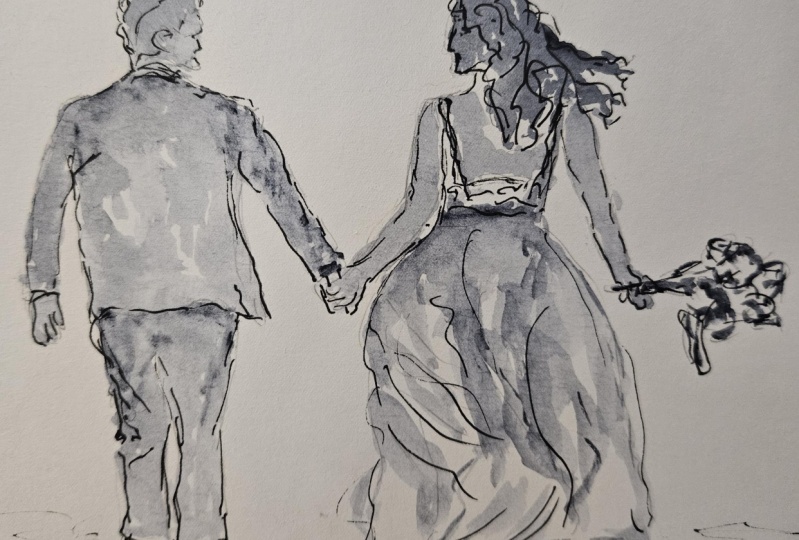
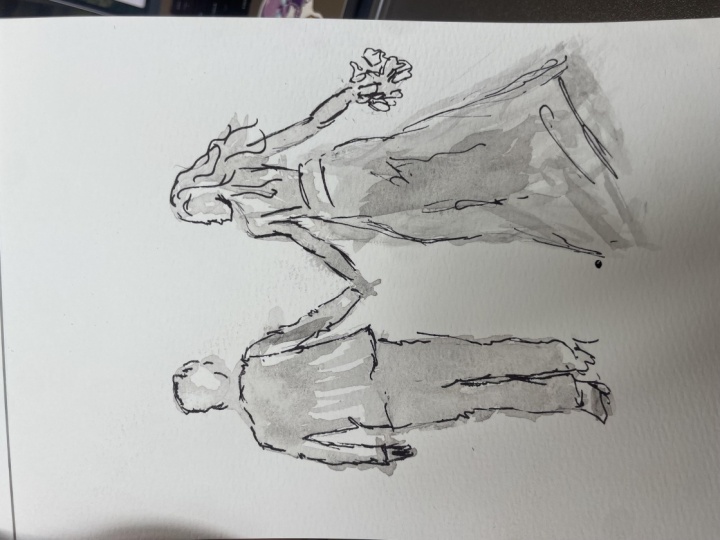
6. Bride and Groom #2: This next picture,
I'm going to try to do it without any pre drawing
without using the pencil. Though you are totally welcome
to first sketch out where the main parts of the bodies are so you can have
good proportions. So we're going to try
this over just like this. So I'm going to wet my brush and get some paint
into the palette, mix it around here, and we're going to start
with his head. So I want to make sure
that there's a good size. I see her dress is coming over. It's going to really cool the back and forth
shapes of her dress. And so we'll see how this goes. So starting with his head. I want to keep a little space
between the two of them. Like this. And the angle of his head is sort
of like that, right? So coming here, for his neck and then his
body comes down like this. I'm just pressing down hard with the brush
so it gets very wide and sort of watery
or thinner, like that. Coming in, just trying and check the angles, right? Coming here. He hand is right
around there, I think. So just leave a little
space for that. And comes in here, his jacket flares out right
around there, per se. And then we have part
of his I see part of his elbow. I think
it's right there. So we have like this and
then his jacket comes. I just want to drop my
brush a little bit, and then we can do that zigzaggy thing like
this back and forth. I want a little
darker. All right. And that's where that's
where he basically ends. And now we have her. So
she's gonna be very close. So I'm trying to
just match keep. Be very careful with the negative space
between them, right? So I see it's like
this very shallow area between the two of them. Her chin comes down
like this around. Okay, her neck and then her torso comes out
like this to meet him. I was going to dab this to
lighten up a little bit. And the water pools at the bottom because we have
that incline I'm drawing on. Like this. And the rest of
her hair comes out like that. Okay, pull the water down, and here, sort of touches there, and then comes around like this. It's fill in this space here. I know it's a lot
of back and forth. Um, For her dress that billows out, right? So that also so I have some strong dark
lines that are sharp, I'm also using the
side of my brush to soften it a little bit, as well to give that
different feel of contrasts. Here are this nice looping I don't even know
what it's clled, but it's just so cool
how it just comes around like this, right? And of course we're gonna add
in a little bit more with our line work to fill
this out, as well. So you have like that,
which I think is a pretty good representation of the scene. I get out brush. Actually, I just want to
make sure it's dry again, since we worked really
quickly this time, so we don't want
to rush this part and just make sure we just to make sure that
the paper is dry. I have a hair dry
here, which I want. All right. And now
that we've got that, let's go bring out our line
work and put this in here. So we have drying
again with his head. I'm going to try and get
the top shape of his hair, capturing a little
bit of that light. Pretend that there's
light over there Okay, and then coming around here. His collar again and his
chin just hinting to things. Okay, you know, we have a shape that comes out in this
angle and like this angle. And then we said maybe
he's where his elbow is maybe. Something like this. I would have to detend really hard to see in
the picture if there's any creases or fabric
lines for his jacket, but we'll just throw
in a few like this. And for his pants, like that. I might come in and get in
dark in this whole area because it's pretty light. Uh. So now for her, we have
her bun on the side of her head and comes in like this and try and get the
ear look like this angle. All right. Somebody like this in
her nose her neck. Okay, so now let's try to get this her hand a
little bit there. It's a little tricky
in her dress. There's a few things
happening here all at once. As the top of her dress, I might darken that a little bit so it's not the same
colour as her hand. I come back with a
wash in a little bit. But, right now, I
can ting on with her arm comes down
to around here. And then like that.
Like her dress. Okay, that was the hard part. And now we can just go
wild over here, right? Have a lot of fun.
These sweeping lines and just having lots of fun. Okay, here. And just about like that, and then we basically
have it, right? And then just a defining
line here where the bodies overlap
here like that. And I think that's really good. As I said before, I just
go to come in and darken a little bit of the top of
her dress here like that. And we can do a little
bit of her hand, too while we're at it. Don't want to get
carried away. Alright. And then Tang do another layer for his jacket to
make him just darker. Let's go and do that. So
we're gonna go and lay down some darks for the
whole thing here. Doing quick, rapid,
light brushstrokes, because I said before,
you don't want to have the pain start to run.
And we'll do his hair. And we'll do her hair. Alright. Just like that. Good. Let make his hair just touch darker. Like that. Yeah. Really happy with that. That came in nice. So is there anything else I'm
sort of missing here? What I could do is, um, just add a subtle amount of
texture or depth to her arm, so I can just make sure
my brass is pretty dry and just run over the back part just
a little bit more. Just one more time
here like this. And that will give a
um contour to her arm. Dry it off flat.
Didn't overdo that. Always lesses more when it
comes to this type of drawing. Okay. So here we are. And I'm really happy
with how this came out.
7. Class Project: The class assignment
is to create a line and wash painting using
the techniques we discuss, using either the drawings that we're going
through together, or if you have a
favorite wedding picture that you'd like to do,
so use that instead. Upload to projects and
resources section, and I'll be sure
to give it a like.
8. Thank You: Thank you so much for
joining me in this class, where we learn to create
wedding paintings using a line and wash technique. If you find this class useful, I'd really appreciate
getting your feedback on it. Reading your reviews is without a doubt the highlight
of my day and gives me so much motivation
to continue to produce the best possible
classes for my students. And if you post your
work on social media, I'd love it if you
could also tag me on Instagram at Natural Designs. I'm always looking for more ways to provide more value
to my students. So if you have any comments
or questions about this class or want any specific advice related to the line
and wash technique, please reach out to me in
the discussion section. Lastly, please
click on the follow Bn so you can follow
me on Skillshare. And that way,
you'll be the first to know when I
launch new classes. Thanks again. I look forward to seeing you another
Skillshare class.
 Avraham Nacher, Artist & Photographer