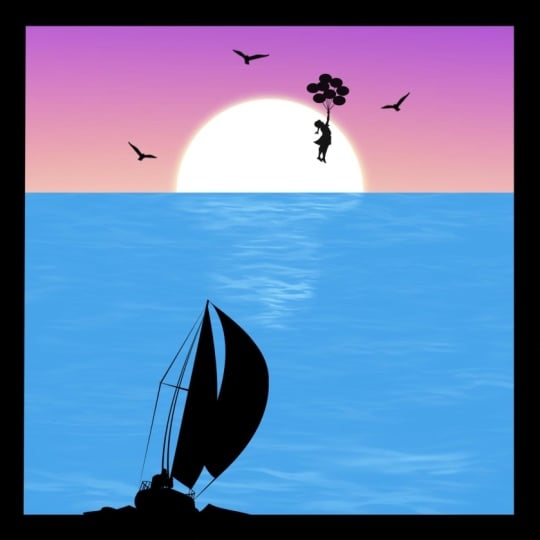
Transcripts
1. Introduction: Do you want to create stunning
digital landscapes like these while learning the
basics of procreate. Then this class is for you. Hi, I'm Julie Ermentrout. I'm an artist and surface designer from
Vancouver, Canada. I loved the outdoors
and being in nature, camping and exploring while
photographing my adventures. These photos and experiences have inspired many
of my artwork. In this class, I'm going to take you step-by-step creating these beautiful digital
landscapes while teaching you some of the
basics of the Procreate app. This class is great
for beginners, but also a fun and easy project for more seasoned
procreate users. So feel free to join me
no matter your level. I've also created a
free color palette and some brushes for you
to use in this class. If you've already got your iPad, then you're pretty much
ready for this class. So without further ado,
let's get started.
2. Supplies and Project: In this class, I'll be
showing you how to make these for nature-inspired
digital painting. The supplies you're going
to need for this class is an Apple iPad and Apple Pencil. And the Procreate app, which you can easily
download from the App Store. I've also got some
free brushes and a color palette that I've
created just for this class. You can find these in the
projects and resources section. Just download these
files to your iPad. Navigate to them
in your file out, and click on them to
upload to appropriate. Your project for this class
is to offload one or more of your finished paintings to the project section
of the class. In the next lesson, we will jump right into
our first painting. So I'll see you there.
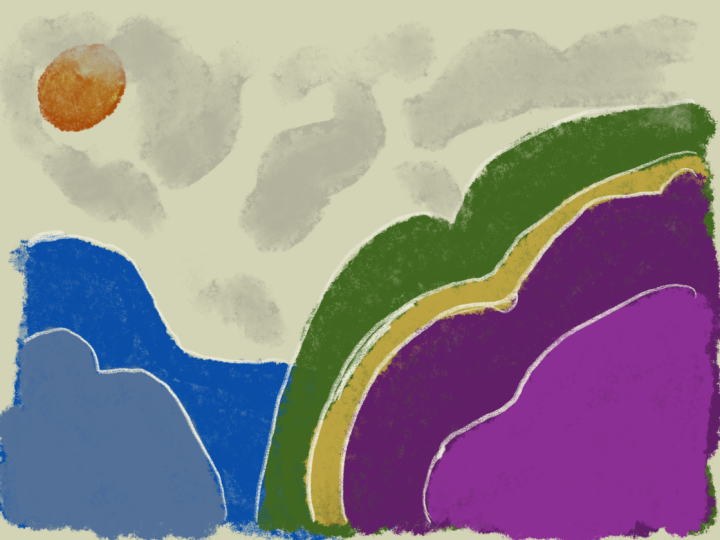
3. Crescent Moon Demo: So to get started with
our first painting, we're going to
click on this plus sign and then the
black plus sign. And we're going to create
a canvas that's 3,000, 5,000 pixels in size. On the left you can see
I have pixels selected. And I've also got it at 300
DPI and the number of layers, I've got 112 layers. Don't worry if you don't
have that many layers, we won't need nearly that
many for this project. So starting with
that color palette I created for this class, I'm going to select that
lighter blue color and the marker brush and just
make it as large as possible. And starting from the
bottom of the canvas, I'm just filling it
in with that color. And it doesn't have
to be precise here. We're going to blend this out. So now we're going to select that darker blue color
starting from the top. We're going to fill
the background. We're just going to meet
in the middle and kind of overlap a little bit. So now we're going to click on the little magic wand tool
for under adjustments. Click on Guassian blur. Now you can see I'm dragging
my pen to the right to make it more blurry or to the left to make it less blurry. I kinda like it about there. And now I'm hitting
the plus sign under layers to add a new layer. Now back to my color palette, I'm selecting this
very dark blue color. It almost looks black, but it's definitely dark blue. And using the same marker brush. Let's looking a little big. So I'm going to tap with
two fingers to undo and just drag the size
a little bit down. And now you can see I'm creating a little mountain shape
and then filling it in, just dragging from that
color and dragging it over. Now we've got these
mountain shapes. I'm going to go back
into my brush library and pick one of these
trees that I created. You can select any one of
these four tree shapes. And we're just going to
adjust the size a little bit, make it a little bit bigger, and just start tapping away. Now they will change sizes a little bit depending
on the pressure. I did set it up that way
in the brush settings. So just be aware. I've done a couple of those. I went back and just selected
a different tree brush. And now I'm just tapping again. Again, going back to
another of my tree brushes, I'm going to use all four
just to create some variety. And just tapping away
until it's solid and you no longer see the
line of that mountain, though, does keep on
adding those trees until it looks pretty filled in. Okay, I think that's
looking pretty good. Now I'm going to go back up to layers and hit the
little plus sign. Add another layer
to our artwork. Now I'm going to click hold and drag that below the tree layer. So now I'm gonna go
back to my brushes and select these stars to brush. We're just going to select the white color from our palette. Now I adjusted the
size, just a touch, and now I'm just tapping
around the canvas to add some little stars
in the background. Now I'm going to select my other stars brush and you can see these are a bit
darker and bigger. So I'm going to adjust
the size of it there and just keep changing and tapping
to give it some variety. And I'm hitting the
plus side under layers to add a new layer. Now I'm selecting this
really light yellow color and going back to brushes and selecting my marker brush again. Now I'm going to draw a really not very good circle
shape and hold it down. And then tap with
one finger to create a perfect circle
shape and fill it in. Now back in my layers, I'm going to swipe left to
duplicate that moon layer, and I just filled it in
with a random color. It doesn't matter what color. Now with that arrow slash
Move Tool selected, I'm just moving
that second circle to kind of like cut
out the moon shapes. So kind of adjust that
second circle until you got the yellow part looking how you want your moon shape look like. Next I click on the
Selection tool and I've got automatic and add turned on, just tap on that
purple circle shape. Now without touching
anything else, go back into your layer and
select the bottom layer. And now you're going
to swipe down with three fingers and
this little cut and paste dialog box comes up and then you're
going to click on cuts. Now you can go back
into the layers and swipe left on that purple
circle and delete it. And now we've got our
crescent moon shape. Now with our moon
shape layer selected, I'm going to click on
the arrow tool and go down to the snapping
and turn snapping on. Now I'm just going to
move it until it snaps to the middle of
that vertical line. Next I'm going to click on
adjustments and select bloom. And then drag my pan across
to increase the bloom. You can see what's
happening here. There's some other adjustments
that you can make. I'm just going to play around until I like the way it looks. It kinda gives it like a glow. So now I'm pretty
happy with that. So now our first
painting is complete. And that was pretty
easy, wasn't. So in the next lesson
we're going to do another painting like this. So we will see you there.
4. Mountain Sunset Demo: So to get started with
this next painting, we're once again going to use a 3,000 by 3,000 pixel canvas. We shouldn't be saved
in your list from the last painting under colors, under the same color palette, we're going to use this dark
blue color on the far right. Once again, using
our marker brush, we're going to
start creating some more of those mountains shapes. I'm dragging from the
corner to fill it in. Now we're going to
add a new layer. And then from the color palette, select the second
darkest blue color. And I almost forgot, you
gotta go back to layers and drag that second layer
underneath the first one. Now we're going to draw
another mountain shape that's a little bit taller
than the first one. Make sure you draw
all the way to the edge so you can
fill that one in, add another layer and
drag it underneath. Now using the third
darkest blue color, draw yet another mountain behind the first
two and fill it in. Now, add one more layer and drag it below the first three. Now we're going to select that lightest blue
color and draw one last really tall mountain
behind all the others. And once again, make sure
to go all the way to the I just see you can just
drag and fill it in. So now go back to
your layer one and just click on it to
select that layer. And here I'm just
pressing my finger on that dark blue to select
the color roster, go back into your
brushes palette and select one of those
tree brushes. Now I'm just tapping
along the edge of that dark blue layer
to add a tree line. So just like the last one, I'm going to use all four of my tree brushes to
create some variety. Just keep tapping along the
edge of that blue layer. And I'm just going
to keep going with this until it's pretty filled in and you can no
longer see that straight line. So just continuing to tap and adjust the size of the trees and just creating a really
nice full tree line. So now I'm going
back to my layers, hitting the plus
sign and dragging that new layer behind all
the others under colors, I'm going to select
this yellow color underneath the blue one. I'm gonna go back to
this marker brush again. Now I'm going to start to
fill in the background with this yellow
color and just kinda draw up toward the top
and back under colors. I'm going to select
this orange color and just keep on adding color. Now I'm going, I'm
selecting this blue color. Then once again, I'm
going to go back to this purplish color and fill it in until the background
filled with color. Now just like we did before, I'm gonna go under
the magic wand and select Gaussian Blur and then drag my pen to the right to make a nice blurred effect. So now I'm adding
yet another layer, but keeping it above
that background layer. Now with that really
bright yellow color and the marker brush, I'm gonna draw a circle. And once again, I'm going to
hold it down and then tap with one finger to
create a perfect circle. And also just move it
around with my move tool. So it's kind of in that little valley in
between the mountains. Again, like we did
in the last one, I'm gonna go to the wand
tool and click on bloom, and then drag my pen
just a little bit, just to add a little bit
of a glow to that sunset. So now we're going to add some texture to these mountains. I'm going to click on the actual color part of that layer. Then under the
selections that come up, I'm going to select Alpha Lock, pressing down with one finger to select that darker blue color. I'm going to use that
stars brush to just add a little bit of texture
to the mountain range. I'm using the color
both below and above that mountain range to add
both dark and light colors. And now I'm doing the same with the other mountain ranges, but I'm leaving the one with the trees in the front alone. So just clicking on the layer
and turning on alpha lock, and then just
tapping lightly with my brush to add a
little bit of texture. So now I'm adding a new layer
just above that sun layer. Once again, selecting that
really light yellow color. Now in my brush library, I'm going to scroll down to
the one that says elements. And then click on
the clouds brush. This brush comes with
your procreate app. I'm going to adjust the
size a little bit and then just start
adding a few clouds in the background to
add a little bit of texture and visual interests. So now this painting is complete and I think it
looks really beautiful. In the next lesson,
we'll move on to our next landscape painting. So I'll meet you there.
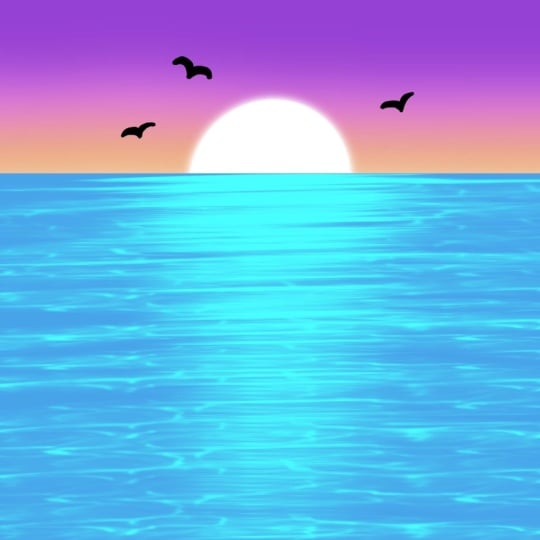
5. Ocean Sunset Demo: So we're going to start
this painting with another 3,000 by 3,000 pixel canvas. We're gonna go into
our colors and select the aqua blue color here. Under brushes, we're
going to scroll back up to our custom brush set and use our familiar a marker brush and adjust the brush size
so the highest it'll go. Now I'm going to
draw a line straight across the canvas and hold it down and then tap with one finger to make it a
perfectly straight line. Now, let it go and drag that same color
over to fill it in. We're going to add
another layer by hitting the plus sign and dragging it
underneath that first one. Now we're gonna go into our
color palette and select this dark orange in the
bottom-right corner. With the same brush, we're going to
just start filling in the rest of our canvas. Now we're gonna
go back to colors and select this pink color. And continue filling
in our Canvas. We're gonna go back to colors and choose the darker purple. I'm fill it in the
rest of the way. So now we'll go into our adjustments and click
on the Gaussian Blur. Drag your pen to
the right to create this really pretty
gradient effect. Now we're going to select this bright white color and add a new layer in-between those two
we've already created, continuing to use
this marker brush. I'm gonna draw a circle
and hold it down and touch the screen with one
finger to make it a circle. And now I'm just going to
drag and drop to fill it in. Now I'm using the Move
tool and clicking on snapping and
turning snapping on. Now I'm just going to
snap my son here to the middle of the canvas
and just drag it down. So about half of it is hidden. I'm just making it
a little bit bigger here because I thought
it looked a bit small. So non-white back to adjustments and selecting
the bloom adjustment. I'm just dragging it a little
bit to give it that glow. Now back in my layers, I'm selecting that blue layer, clicking on the color,
selecting Alpha Lock. Now going back to my brushes, I'm going to use this
ocean waves brush, which you can actually find
in the elements that I showed you before going in with
this light blue color. Now I'm making it a
little bit smaller. Starting from the top
of that blue section, just going to lightly
drag my pencil back and forth across
that blue layer. Now I'm adjusting
the size just a little to make it a
little bit bigger. I'm bringing it further
down the canvas. Now I'm going to just
keep making the brush bigger until it reaches
the bottom of the canvas. Now I'm just going back
over a few sections to increase the brightness
in those areas. So making it smaller again, I'm just going to go back and color and a little bit
more right in front of the sun to sort of give it
a reflection in the water. And just keep adding more waves here and there to
give it some depth. Just brightening up those
waves a little bit more, especially right in
front of the sun. So now under layers
we're going to add one more layer on top of everything and select the
black color from our palette, not the dark blue, black. And I'm going to select
the marker brush again and just make
it a bit smaller. Now I'm just going to add a few very simple
birds by just creating these little V-shape in the sky so we can
get even smaller. I'm actually just going to
zoom in by pinching and draw some little V-shaped
birds in the sky. So adding another
little V-shaped bird above the sun here. And one more over on the left
to give it some balance. So one more quick tip here. When you're zooming out. If you pinch really
quickly like that, you can actually make it
expand to your full screen. So now our ocean
painting is all done. And we're going to move on to our last painting
in the next lesson. We'll see you there.
6. Northern Lights Demo: Alright, so we're gonna
start with another 3,000.3 thousand pixel canvas. Under colors, we're going to use this bright blue color
with our marker brush. I'm going to drag the size
all the way up and start filling in the background from the bottom towards the top. The background of this
one is gonna be pretty similar to the first
painting we did. Using this color until it's
a little bit over halfway. And then going back and
selecting this dark blue color and just filling up the canvas
all the way to the top. So now I'm gonna go to
adjustments and select the Guassian blur and dragging my pen to the right
to create a gradient. Now I'm going back to my layers and adding a new layer on top. Now I'm going back to that
really dark blue color. Under brushes. I'm going to select one of my tree brushes. Now I'm bumping up
the size all the way and starting at
the very bottom, I'm just going to
tap a few trees. Now I'm selecting another one of my tree brushes and
just doing the same. The worst sort of trying
to create a solid mass of trees at the very
bottom of the canvas. So we'll do the
same thing with all four of these tree brushes. So just tapping and tapping and filling it in until
it's really pretty dark at the bottom and basically almost solid the
very bottom of the canvas. So make sure you have a variety of sizes of the trees here. So now I'm going
to add a new layer just above that gradient
to the background. And I'm going to select
this white color. Now I'm going back
to my brushes and using the stars to brush, bringing up the size
and just tapping on that background to add stars. Now I'm going back
with my stars brush and doing the same, just varying the pressure
and size each time. I tried to overlap them a little bit to make it
look more natural. Now I'm going back and adding another layer above
the star layer. And in colors I'm selecting this really bright green color. Now going back to
my marker brush, I'm going to turn down the
opacity just a little bit. Now I'm going to
start just drawing some wavy lines back and
forth across the sky. I'll adjust the size a little
bit to add some variety. I'm going to click
on adjustments and then go down to
the Liquify tool. With the push option selected. I'm gonna just start
swirling my brush around and making those lines look
all abstract and wavy. Now I'm going to twist them and just kinda play around with these different liquefy tools until it looks how I want it to. You might have to do this a few times to get it how you want. It takes a little
bit of practice. Now, when you're ready, you can go back into the adjustments and
select Motion Blur. Now the blur will go in the direction that
you drag your pen. So I actually want to do an
up and down motion blur. So the more I
dragged my pen down, the stronger that motion
blur is going to be. For this effect. I want
it more in the middle. You still want to see the lines. And like I said, this might take a little bit of practice. So I'm actually just going
to delete this and do it again using that
same green color. I'm just going to redraw
those wavy lines. And again, I'll go
to adjustments, liquefy and just play around with these Liquify tools until it kinda looks how I want it to. One tip is to
actually not go too overboard with the Liquify tool. You don't want it to look like, to swirly and crazy. At least if you want a
more realistic look. Though, background
or adjustments, I'm gonna go to the
motion blur and then dragging my pen down to give
it that motion blur effects. And finding that sweet spot. And I think I got it this time. So now this painting
is all done. So join me in the next lesson where we'll wrap up this class. See you there.
7. Conclusion: In this class, we created these four amazing digital
landscape paintings that you can share wherever
you like to post your art. If you share your
work on Instagram, make sure to tag me at
Juilliard and signs so I can see it and share
it to my Instagram stories. Don't forget to post
your project here on Skillshare and leave me a
review if you have a moment, it really helps me prepare
my future classes. You can also follow me here on Skillshare to get notified
about my new classes. To learn more about
me and my artwork. You can visit my website,
Julie Aaron designs.com. Thank you so much for taking
this class with me today. We'll see you in the next one. Shares.
 Julie Erin Designs, Artist and Entrepreneur