Transcripts
1. WHAT IS THE FASHION CROQUIS?: I'm going to show you how to draw the female fashion cookie. Let S, Let's first clarify. What is a cookie? Cookie is a template
or a drawing of a fashion model who represents
your target customer, who trace over this cookie
to design clothing. Here's an example
where I've drawn clothing on top of my cookie. This saves a lot of time because I don't have to keep on drying the rookie or model over and over again, design new clothes. Let's look at two
different examples of the cookie. On the left. This is a cookie
of address form or a mannequin or Drawing Flats
or technical sketches. And on the right, this
is a cookie of a model for drawing full
figure illustrations. Here's my fashion
crook, we even model, and here's examples
of illustrations done with this as a cookie. These illustrations didn't take too much time as I already
had my drawing of the model. Next, let's look at the cookie of the dress form
or a mannequin. Here are examples of fashion flats drawn
on top of this form. In this course, we'll
draw a simplified version of the full figure
nine heads cookie.
2. WHAT ARE THE PROPORTIONS OF THE CROQUIS?: The proportions of your
cookie really depend on the target demographic
that you're designing for. Thinking about how the
proportions of a cookie would vary depending on whether you're designing for their
children's wear a market, juniors market, or a more
contemporary customer, the designer market or
an active ware market. To summarize, the proportions of the fat and cranky depend on the target customer and there isn't one specific proportion. That's correct. However, for this video course, I'm going to teach
the proportion that I first learned in school. And that's the
nine heads cookie, which is pretty typical
in the industry, especially for the
designer market. I want to emphasize that this proportion
is not realistic. To illustrate that, I've created a graphic
where I've taken my actual body and I've
photoshopped it to show you what it would look like in a nice head proportion. I learned how to draw the nine heads cookie
in fashion school. And that's what I'm going
to teach in this course. But feel free to evolve their cookie to be
any shape and size. Ideally, your cookie will represent your
target demographic. So you really want
to think about your customer and make their
foci relatable to them.
3. 9 HEADS EXPLAINED: Nine heads. We use the head as a reference point because
we have to use something. The reason that we
don't just give this a measurement like nine inches tall is because we're not all going to use
the same paper size. If you pick something on the body and use that
to set up the rest of their proportions
then no matter what your media is or the
size of your media, it will always have
the same proportions. We use this head
as a measurement. So if I were to trace this head and then keep
repeating it nine times, but we would get
is nine heads from the top of the head,
the ankle bone. The reason we don't
include the feet in this equation is because this measurement of the feet can vary depending on the
shoe she's wearing. For example, if she's
wearing high heels, this measurement is
going to be very different than if she
was wearing flats. Nine heads from the top of the head to the
bottom of the ankle.
4. DRAWING GUIDELINES: In this video, we will set up the guidelines and preparation
for drawing the cranky. All you'll need is paper, and this can be any size, but I recommend
regular printer paper, which is usually
8.5 by 11 inches. You'll also need a pencil
with an eraser and a ruler. To begin, let's try nine
heads at the side of the page that are roughly
the same shape and size. You want to make sure
to leave space at the bottom of the
page for the feet. Because remember these
are not accounted for in the nine
heads proportion. Once you've drawn
your nine heads, you can go ahead and label
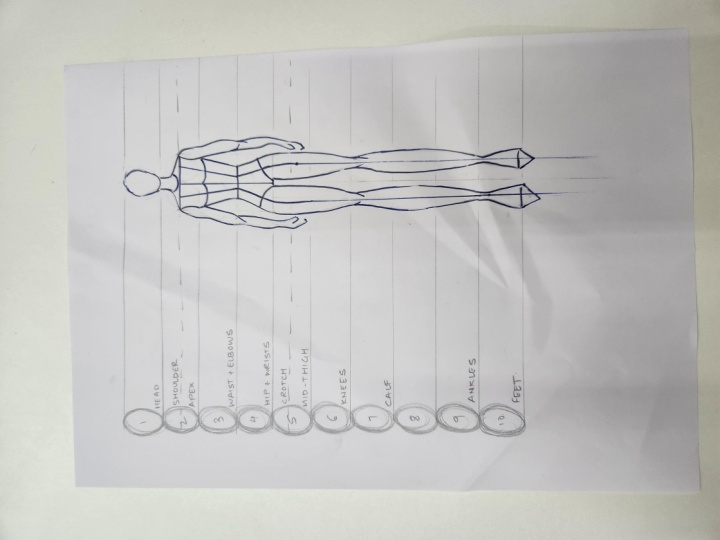
them one through nine. Next, draw horizontal guidelines at the top and
bottom of each head. Use a ruler to make sure your lines are parallel
to each other. You don't want any
slanted lines. Also makes sure the distance between the lines are the same. Add dashed lines at roughly 1.5 heads and four
and a quarter heads. Now we have all of
our guidelines. Let's start to label them with
the anatomy of the cookie. Right at one head, 1.5, shoulder to apex, three waste and elbows
for hip and wrists. Four and a quarter, crotch, five ms. Thigh. Six needs seven calf
and nine ankles.
5. DRAWING THE SKELETON: Now we're ready to draw the
skeleton of the cookie. The first step is to
draw a vertical line perpendicular to the
horizontal guidelines. Make sure you have space on either side of the line
to draw the crew key. The next step is to draw
an oval for the head. I want to make sure this
oval is the same shape and size as all the
other ovals you drew, setting up your guidelines. Then draw horizontal line about two heads wide
at the shoulders. We're going to repeat
the same step at the hip because the shoulders
and the hip are approximately
the same width. You can drop a line
down from the edge of each shoulder to find the
measurement of the hip. Next we're going to
draw a horizontal line about one head
wide at the waist. Now connects to the shoulder, the wastes and the hip. And repeat this step on the
other side of the body. Drug guidelines for the arms starting at the shoulder
and ending at the wrist. And then you can extend
this line a bit more for the hand and repeat
this on the other side. Then for the legs, drop a vertical line
down from the waist. Then draw a cylinder
for the neck and connect the neck
to the shoulders. Next, draw a small
ovals for the knees, keeping the size and shape consistent on each
side of the body. Then draw ovals for the ankles. And these should be a little bit smaller than the
ovals at the knees.
6. ADDING SHAPE: The last section we drew the skeleton or the
framework of the cookie. And in this section we're
going to add shape. The muscular structure
is what gives shapes. Let's take a detailed
look at that. It's not necessary to
memorize every single muscle. The main goal is to see how the muscles generally
at shape to the body. The next slide, I'll simplify the muscular structure in a way that's easy to
remember and draw. I'm drawing over these
individual muscles to get a more simplified shape. And what I'm discovering
is that all of these muscles can be broken
into circles and ovals. To summarize, the
muscular structure can be simplified into basic
shapes like ovals. Let's move into drunk
guidelines for the muscles. Step one, draw
ovals for the arms. Step to draw ovals for the legs. Starting with a thigh, we're gonna start from
the hip and wrist level, connect an oval to the
knee and then draw another oval from the knee to the ankles for the lower leg. Repeat this step on the
other side of the body. Step three, draw
triangles for the feet. Step four, we're going to add shape to the neck
and outline the arm. Smooth out the curve
from the neck to the shoulder and draw the
outline of the outside and inside of the
arm using the OLS as a reference for the hand. Draw simple lines. Then repeat these steps on
the other side of the body. Try to make each side of the body as symmetrical
as possible. The next step is to outline
the leg and the foot. So starting at the
outside of the leg, we're going to follow
our guidelines, coming in at the knee, coming out at the calf and
back in towards the ankle. At the inside of the leg. The knee is the landmark and the cap is where
the leg gets a little bit wider and tapers
in again at the ankle. Now your cookie will look
something like this. Don't worry if it's super rough, we're going to clean it
up and add seam lines for drawing close in
the next section.
7. ADDING SEAMLINES: Now we're going to create
seam lines and these will be your guidelines
when drawing close. Let's draw the neck
line, bus line, arm hole, underwear
and waistline. To draw the princess lines. Let's first mark the
center point down each half of the body
at the shoulder, bust, waist, underwear,
knee, ankle and foot. This on each side of the body. Then once you have
these points marks, you can connect them in one fluid line and these
will be your princess lines. Now we've created our
first draft of the cookie. It looks a little rough. We're going to clean
it up by picking the best side of the body
and tracing over it. You can lay a piece
of paper on top of your rough draft and trees over the best side using crisp, clean lines, make sure to
include all the seam lines. Once complete, trace
to the other side. So you have mirror images
in a symmetrical Croce.
8. NEXT STEPS : Ready for the next step and you want to take
the cookie just drew and create
more dynamic poses. Well, I've created
a free mini-course called Anatomy of a pose. In this course, I take everything
I've ever learned about figure construction
and I break it down into five simple rules. So by signing up for
this free mini course, you'll get a
downloadable guide which has five simple rules
for drawing any pose. And then along with this guy, you'll get an e-mail
series for me, which includes five
different tutorials on drawing different poses. This way you'll get to
practice the rules of figure construction with
actual step-by-step tutorials. To sign up, you can go to the
About tab of this course, though you'll see a link
to anatomy of a pose. So once you click on that, you'll be directed to
my webpage where you can then enter your
email address. After entering
your email address and clicking the
button to subscribe, you'll receive an email from me asking you to confirm
your subscription. Sometimes this e-mail takes a couple of minutes to arrive. Once it does, you can click yes, subscribe me to this list, and you will need to click
this button to confirm your subscription
before receiving the e-book or the e-mail
tutorials from me. And then once you confirm
your subscription, you'll receive day one with the free guide to
anatomy of a pose. Click this button. The guy will come up
in your web browser. And then if you'd like to download it to
your desktop or to your files in the
upper right corner there's a little
button click Download, and then it will save
the PDF document. I also made this cookie
kit so you can start designing right away with
hundreds of fashion templates. This kit includes
nine head figures in dynamic poses from the front, the quarter side,
and back views. These figures also come in smaller thumbnail sizes so you can quickly brainstorm
design ideas. The kit also includes details
like the head, hands, feet, and even hairstyles, shoes, handbags, other accessories
like sunglasses. There are a ton of bonuses like a technical flat template
and assemble size six, an e-book on the
walking pose tutorial, and other e-book on
drawing the turn crappy, which includes a workbook
with guidelines. The kit can be
downloaded and use digitally on a
tablet and apps like Procreate or printed and
used in hand-drawn sketches. Here's an example where
I'm using the hands and feet template to help
me construct a figure. All the templates in
this kit or proportional interchangeable so
you can play with creating new
variations of poses. Here are examples of my work where I use templates
from the cookie hit. If you follow me on Instagram, you'll see I use this a lot. It makes it easy to
draw a new designs without having to draw new
templates from scratch. To learn more about the kit, click the link in the about
section of this course. I really hope you found
this mini-course valuable. If you don't mind,
leave a comment in the comment section and let me know what else
you'd like to learn. It really helps me in planning
future course content. Thanks for sticking with me.
 Amiko Simonetti, Fashion Designer