Transcripts
1. Drawing the Eye Intro: Are you looking to
draw the eyes better? Adding detailed and
expressive eyes to your portraits will really
make them come to life. I'll show you an
organized way to draw the human eye as we draw
on together in real-time. You'll receive a
step-by-step worksheet and detailed video instruction of
each component of the eye. I'll also show you
how to measure the proportions of the
eyes on a reference photo. Then we'll pull all these
skills together and place a pair of eyes on a face. Then finally, we will
render them in detail. I'm Rachael Thia, I'm an
artist and illustrator. My style is relaxed realism. I develop this approach
because I prefer a more natural process that is realistic yet still
has an artist's touch. My philosophy of
art is that I use interpretation instead
of duplication. When I'm drawing, I'm not
just replicating an image, I'm depicting a person with personality, energy,
and emotion. Although I have a
visual arts degree, I learned in most of my
portrait skills from going to live figure drawing
sessions for many years. I draw a lot of portraits and the eyes are where the
emotion and expression are, and they tend to be the
focal point of the face. I've developed a unique
process for drawing the eyes that is
systematic and practical. This class is for all skill levels and we will
start at the very beginning. It will be broken out
into three sections. One, the structure
of the eye, two, how to draw the eye in detail, and three, how to place
the eyes on the face. By the end of this class, you will know how to
strategically place the eyes on the face and also how
to draw them in detail. Once you learn these principles, you can apply them
to drawing eyes on any type of face
in any medium. Lets get started.
2. Eye Project: [MUSIC] Your final project will be to draw a pair of eyes on a face and fully render them. This course will prepare
you every step of the way. I provide reference photos
or you may use your own. Don't worry, you
won't be on your own. As you work on your project, I will also show you how
to place the eyes on the head and you can draw
with me in real-time. Then you will take the
skills that you learned in the three sections on drawing the eyes and apply
them to your face. You will follow
along as I develop the eyes with more
shading and details. Once you've finished rendering
the eyes on the face, your project will be complete. Or if you'd like to keep going, you can render all
the features on the face for a
complete portrait. There's a bonus
video at the end of the course where I
show, in fast-forward, a time-lapse of me adding shading to render all the
features of the face. Check it out and it's up to you how far you'd like to
take your project. This is a community
environment and sharing your work is one way to
connect with fellow artists. There's a project area in
the course where you can add a new project and upload
photos of your drawings. Please post your project and sketches and I look forward
to seeing what you created. Also, let me know if you
have any questions or comments while you're working
on materials in the course. There is a discussion
area in the class, and you can post a
message there and I will take a look
at it and answer it. [MUSIC]
3. Eye Supplies: For supplies, you mostly just need paper
and pencil and erasers. Or you can draw
digitally on a tablet. If you're going to draw
with traditional media, I suggest using a softer
pencil such as 2 or 3B. Optional tools would
be an index card, a clear ruler, and a drafting compass. I will provide
reference photos plus practice worksheets for you
to use during the course. Check out the resources area of the project for all the
downloadable items. Grab your materials
and let's get drawing.
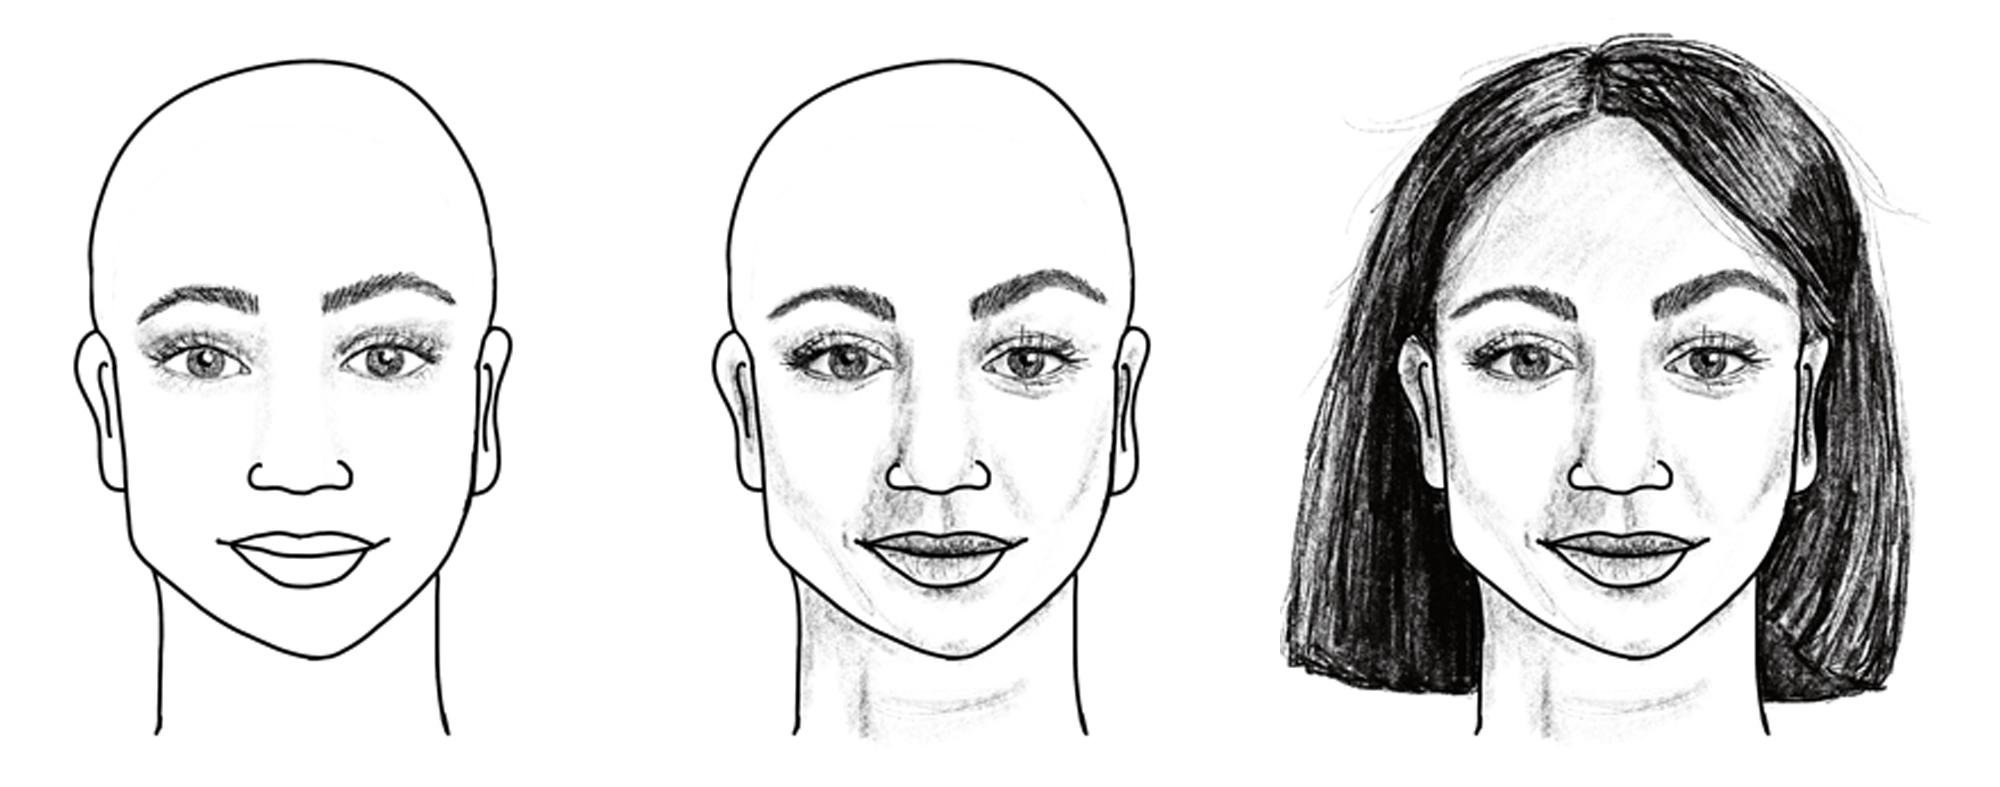
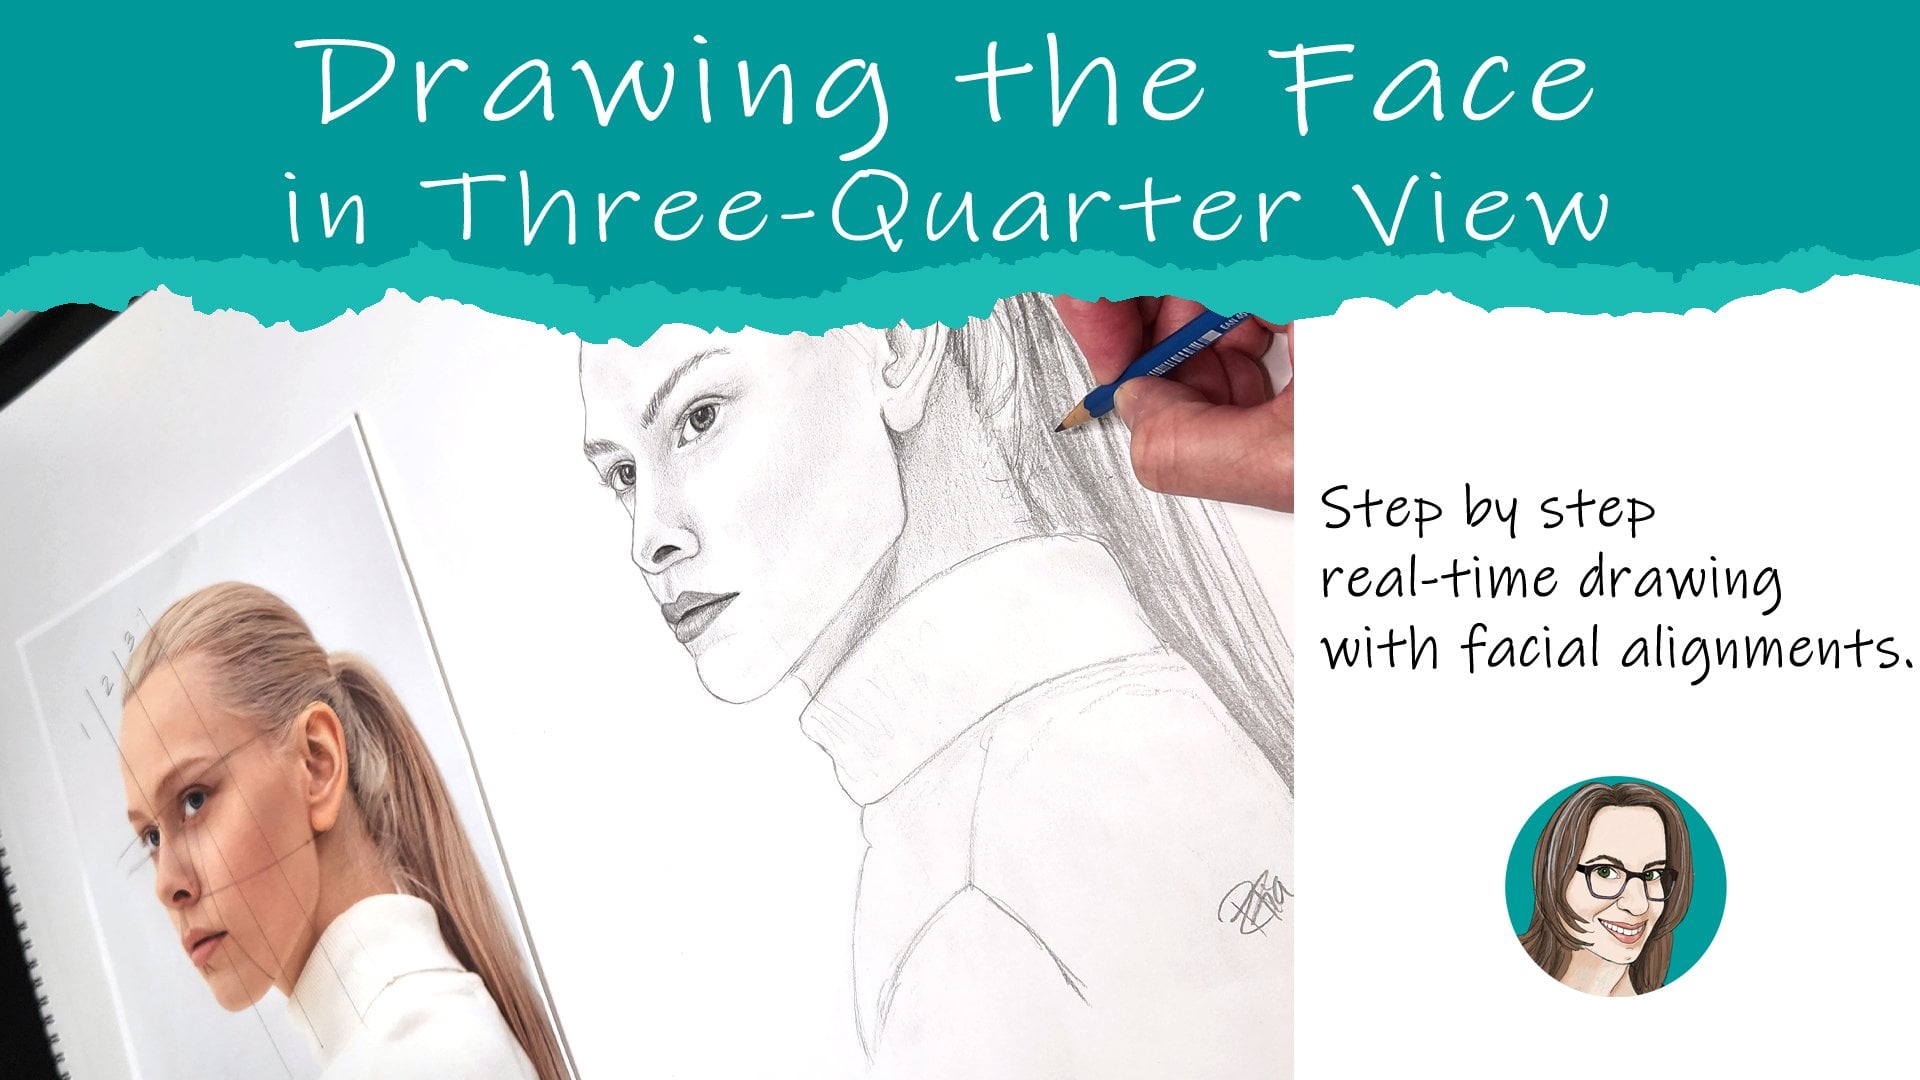
4. A1 Eyes Proportions: Welcome to the first lesson of drawing the eyes. In this lesson, I will show
you the proportions and placement of the eyes
on a natural face. I'll also show you
some examples of measuring the eye proportions
on reference photos. Let's talk about eyes. Eyes are the most interesting
feature of the face and they are very expressive and they draw a
lot of attention. When we look at the
placement on the face, they are about the midway
point on the head. That's taking into
account the entire skull under the hairline all the way up to the
crown of the head. Then you will see that
the bottom half of the head is equal to the top half of the head where the eyes cross
through the pupils. That would be the midway point, the 50-50 point on the head. This is the classic
proportion of the head where the eyes
are in the center. If we take a look at a
little bit more detail, especially the space
between the eyes, you will see that it is equal in distance to approximately
the width of one eye. If I take this compass
and I measure her eye, I can see that between both eyes is the equal
distance of one eye. They call this the third eye. Now the standard proportions say that there are five
eyes across the face, but I find that not
to be always true. She has about a half eye or maybe a little bit
further on either side. Maybe she has about four or
four and a half eyes across. Now the center eye will be going down the
bridge of the nose. The nostril flaps will probably
be a little bit larger. If you're starting on to draw, this is helpful because
if you first find the vertical midpoint and the horizontal
midpoint of the face, where they intersect
in the center, is where you would start
drawing your third eye and you could map
this out by finding the proportions on
your reference photo and then knowing that there are about four eyes across and drawing them
about the same size. Let's take a look at a real person and see
how they measure up. Now most faces are
not symmetrical, but there is a
symmetry to the face. If you want to check out
one of my other classes, I go into great detail on
the symmetry of the face. Right now I'm just going to find the center point of
this man's face. I'm going to take
a ruler and draw a line directly
through the pupils. Then we can see if that is
the midpoint with a compass. I'll go down to where I
believe his chin to be, underneath this beard, and then check the
top of his head. I can mark that for you. The crown of the head would be about here and then you can guess where the skull would
come around to the sides. That would be about the midpoint of his head
where the eyeline is. He has the classic
proportion and he also has a photo that has the
straight on camera angle, which makes it a lot
easier to measure. Now let's take a look at the
distance across his face, the width of the eyes. If I measure one of his eyes, and I check the
distance in the center, it is about equal
distance apart, if not a little wider. You'll find that a lot of
times models tend to have eyes a little bit wider apart
than the average person. If I mark here where
his third eye would be about equal distance. Then on the sides,
again, like I said, maybe only about half an eye
on the sides of the face. He has about four eyes across. If you notice, the
width of his eye is about down the
bridge of his nose, but the nostril flaps tend
to be a little bit wider. Here are some other examples
of faces with the eye and the eyes across the face
to measure the proportions. Try this out on your
reference photos or even photos of yourself to see how the eyes
line up on the head. Now that you know the
basic proportion of the eyes and their
relationship to the face, next, we will cover the
structure of the eye.
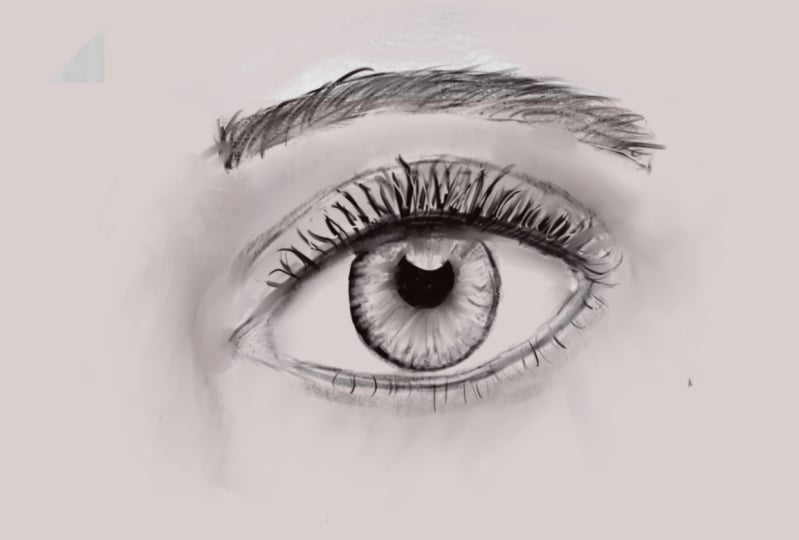
5. A2 Eye Ball Build: In this lesson, we will go over the
shape and structure of the eyeball and how that
matters when you are drawing. We talked about the
eyes being very expressive and this is mostly because of
how they are built. The eyes are actually
an eyeball that can move in several
different directions. Then you also have the top and the bottom lids that
can flex and open and close into countless expressions
along with the eyebrows. Let's take a look at the three-dimensional
components of the eye. The eye being round, is like a sphere, and usually when
you draw a sphere with the light coming
straight towards it, you tend to have
shadows on the edges. That's going to help show the way it is built in a
three-dimensional sphere. The eyelid is going
to cover that. The eyelid, remember the
eyes aren't opening. It's actually skin around the eye that lets you see
the eyeball behind it. If you keep that round
picture in your mind, it can help you to
draw the eyelids. So you have the eyelid, add has some thickness into it. Then all you see is the
iris in the center, and then the pupil. There's usually a
reflection of light. Now this happens
because the eye, when it's sideways there is
a lens on the outside of it, that you can't see here, but it would be like
a contact lens shape. Then the light is
going to come in and then reflect
back out like that. When you're drawing, you want to leave a piece of light into the eye to
show that reflection. The iris isn't usually
a full circle. You don't see the entire circle because the lid is covering it. You don't usually see the white on top
of the iris either. A funny story, our professor told us that if you ever see someone that has the white
showing above their iris, take off running because
that means they are out of their mind because that is not a normal
thing to see. The lid also has
shadow around it because you have to
think that the eye is coming towards you like that. There's a little bit
of foreshortening. Then where are the
shading is underneath, that's where you
see the lids coming together on the bottom
and top of the eye. You'll tend to see shading around the edge of
the socket like that. Then the eyebrow
would be above that. Also inside of the
eye has shading, so the rest of your
sphere would have shading on the edges if you were to just draw a
round ball like that. These are just some tips for now and then we will go into
great detail and that will help you make the
eye come alive so it has more life and energy
when you are drawing it. Now you have an
understanding of the shapes, shadows, and basic
structure of the eyeball. Next we will go over the names of all the components
of the eye.
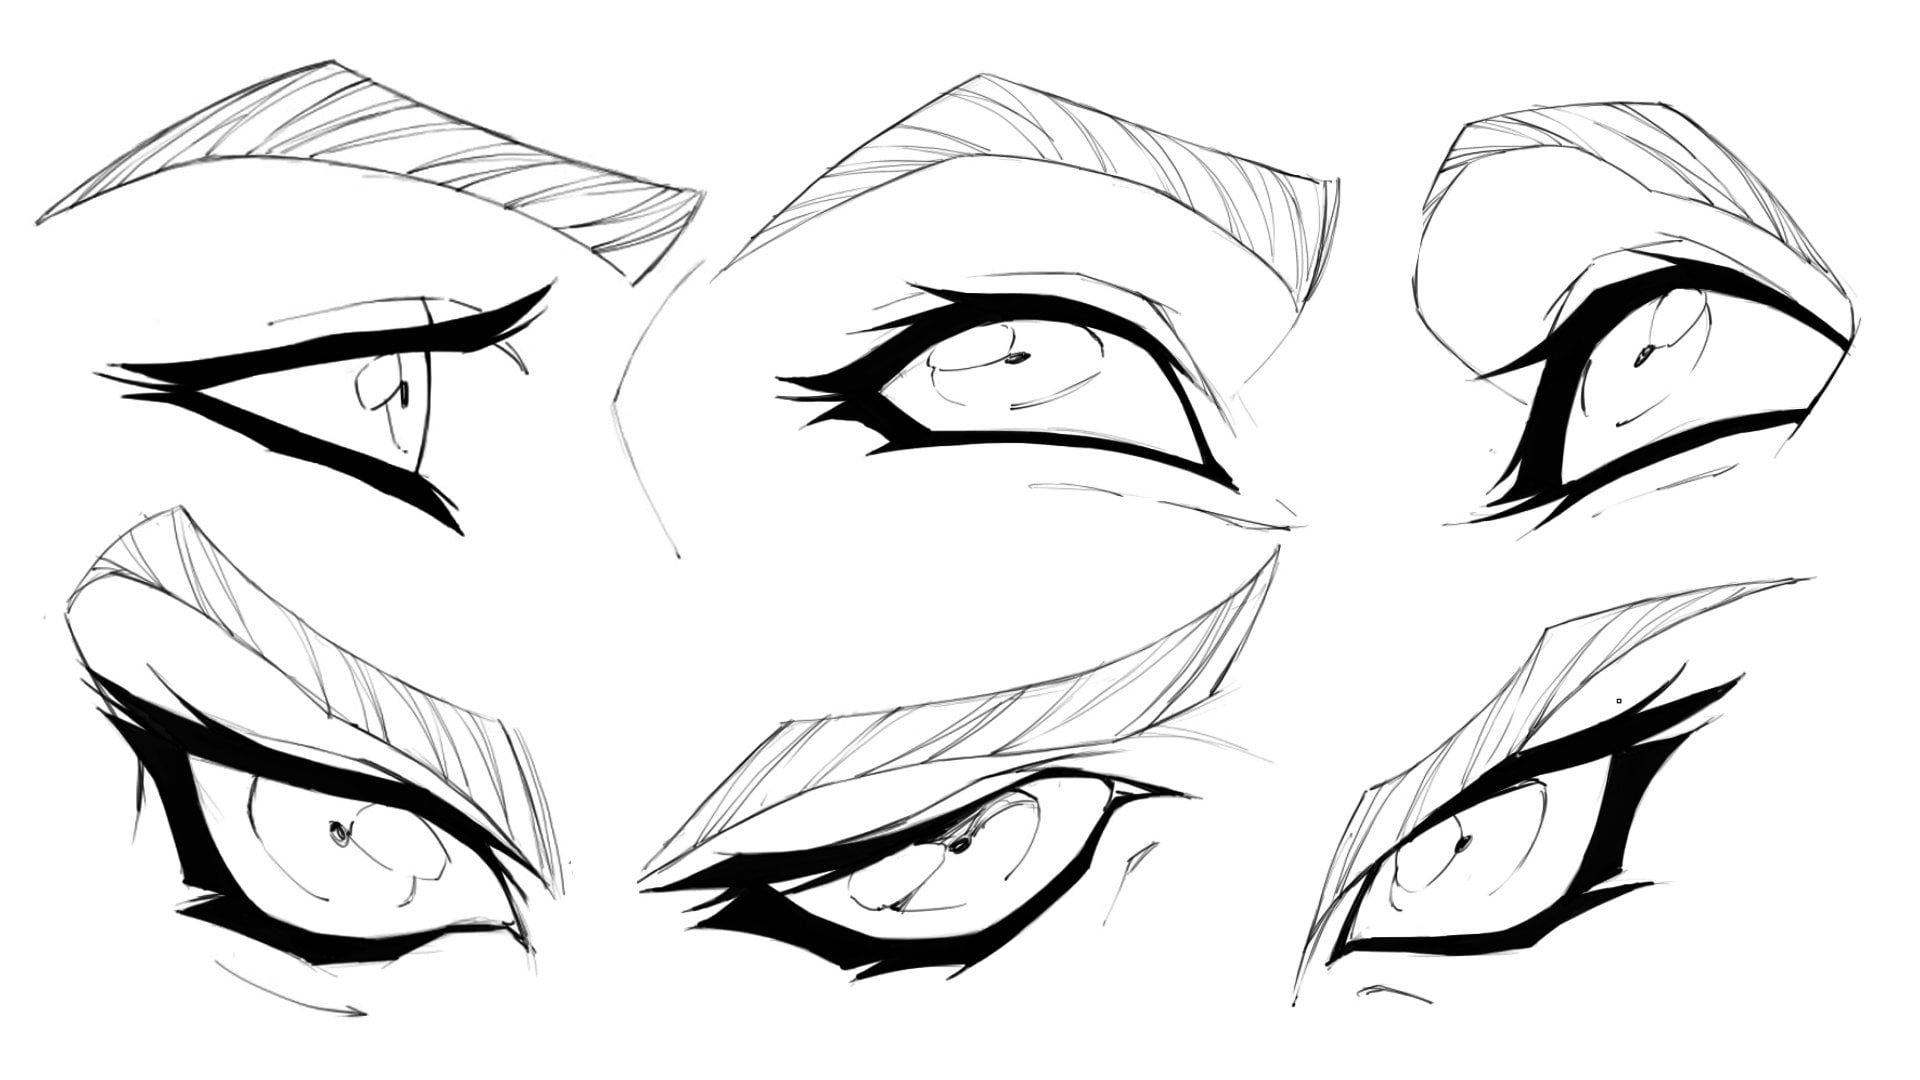
6. A3 Eye Components: In this short lesson, we'll cover the names of
each component of the eye, so you'll know
which part you are drawing and also how they will be referred to in
the following lessons. Let's talk about the
components of the eye so we have a foundation
before we start drawing. The eye, is actually made up of several different components and is an opening on the face. The opening would be the first
part that you would draw. There is also a tiny
little triangle tear duct that is in the corner of each eye that's inside
of the opening. Then you have the
thickness of the lids. There is a little ledge that is often visible when you
are doing close-ups. Then you have the iris, which is the colored
part of the eye. Then inside of that is a perfect black circle
which is the pupil. There's often a glint of
light that hits the cornea, which is like a little
contact lens shape on top of the eye. Then you have the upper lid. On most people, you can see the fold and as well
as a bottom lid. You can see the lower lid fold. The eyelashes are often clumped together and may grow upward or downward
depending on the person. Then the eyebrows
tend to grow up, out, and down. Those are the components of the eye and we will break them down and draw them
step-by-step in this class. Now that you know the names and the components of the eye, it's time to get drawing. Grab your supplies and I'll
see you in the next lesson.
7. B1 Eye Detail Foundation: Now you are ready
to draw the eye. We will break it down piece
by piece into three sections. Before we get started, go ahead and grab
the eye step by step worksheet and the
eye reference photo. It's a very large
photo of an eye. It's in the resource
area of the project, and you can download
both of those and have them printed or use
them digitally. Then you can follow along
with me in the video and draw the eye step
by step in detail. Now we're ready for the fun part of deconstructing the eye, where we break down all the
elements and I'll show you an organized way to
draw the eye piece by piece so that we can
keep track of everything. There is a worksheet in the project area in
the resource section, and you can take a look at that and download
it or print it out. It will have all
the steps that we will take to drawing the eye. Here is an example of
a completed eye that I drew and also the
reference photo I used. This is also in the resource
area of the project. The first thing that
we need to find out is the proportion of the
eye before we start drawing. We know the proportion of
the width to the height. So if we draw it
larger or smaller, that we can maintain that
same shape and consistency. The first thing I will do is measure the inside of the eye, the center part of the inside of the eye where it's
opening and closing, and I'm going to say that's
the width of my eye. Now I want to see how tall the eye is in comparison
to the width. How much height is
inside of the width? If I look at just the
inside part of the eye. Now I can take a look
at that and say, if this is one piece, I'm looking at about a third. The height looks like it's about a third of the
width of the eye. We're going to keep that in
mind when we draw our copy. Now I'm going to draw it
very large so that you can see the detail
and what I'm doing. I will start with the
inside line of the opening, the very inside part of the eye. If you look at this shape, you can trace it, get a feel for it. It has this uniform, more like an almond shape with a little edge for the tear duct. If I just draw very
lightly so you can erase, might take a few tries to
get the shape that you want. I'm just drawing
any size at first. We just need to get the
shape of the top and then we can measure how far down
the bottom will show. I'll go ahead and
use this shape for now and then I'm going to
measure my eye and see. If I look at the
width of my eye, and this is an enlargement, this is a lot bigger. If this is the width, then I know about third of this is going to be the height. You can estimate. I'm going to say one
third is the height. Then I take my card or my paper. This is just a guide so that you can have an easier way to
keep track of the shape. I've got the tear duct
and it's going to dip down pretty uniform, and then I'm going to meet
on the inside corner. I'm not drawing this ledge yet, just the inside opening. You can clean it up and
get the shape you want. It's important to
get the shape and the proportion before
you start drawing, because once you add all your
nice shading and everything and it's not the right
shape or size eye, it feels a little disappointing. So go ahead and spend a
little extra time right now in getting the
proportions right. Once we have that done, then the next part of
the eye that we'll draw will be this ledge
and hers is very visible. You can see that it tapers off as it gets closer
to the tear duct. I'm going to draw that
on the outside now. It's going to connect
on the edge because that's where the eye
opens and closes. You'll see a little
bit of ledge. This is just the thickness of the skin around the eyelid
that you're seeing. I'm going to taper that up as it gets closer to the tear duct. On the top I can see a
tiny bit of that under the eyelashes and I'll
taper that in as well. Now we have the opening
in the ledge and then let's make a little place
holder for the tear ducts. Sometimes it looks like
there is two little pieces. Next we will be
drawing the iris. If you notice, you can't
see the full circle. So we showed before that
here is the eyeball and the iris is a circle, but because of the lid you won't see the top of it and you might not even see a piece
of the bottom of it, depending on the person. So the easiest way
I find to draw the iris is to draw it
in two little curves, like parenthesis or two curves. That is the most roundness
that you'll see. This one we can
see the bottom on. Now going back to the
proportions again, you can take another
card and say, how big do I make the iris? If we want to know that we take the width of the eye again, this is the width,
and then we say, where is that iris at? The iris is here and then
that's the tear duct. You can almost see that if
we cut the iris in half, you have almost
four equal pieces. The whites are a
little bit wider on her eye than these two pieces, but it's very close
to being equal. So half of the iris is about the size of the white on
this side and same here, just a little bit longer. We weren't looking
at the tear duct. If I want to make this
one the same proportion, I'm going to look at
the width of mine. I may think about making
four equal parts, maybe the edges a
little bit wider. This is going to be the
iris in the middle. This just gives me
a little guideline for where I'm going
to put in the iris. I'm going to show the
circular part on the bottom. We're going to add
a lot more details. Don't worry. It's going to
look like a sketch for now. I'm imagining that I'm drawing the full circle that
would be up here. Once you get your
iris sketched in, you can clean it up and get the size and shape
that you want. We will draw the pupil next. Now that you have drawn the
basic shape of the eye, we'll continue in
the next lesson with the eye structure and
all of its components.
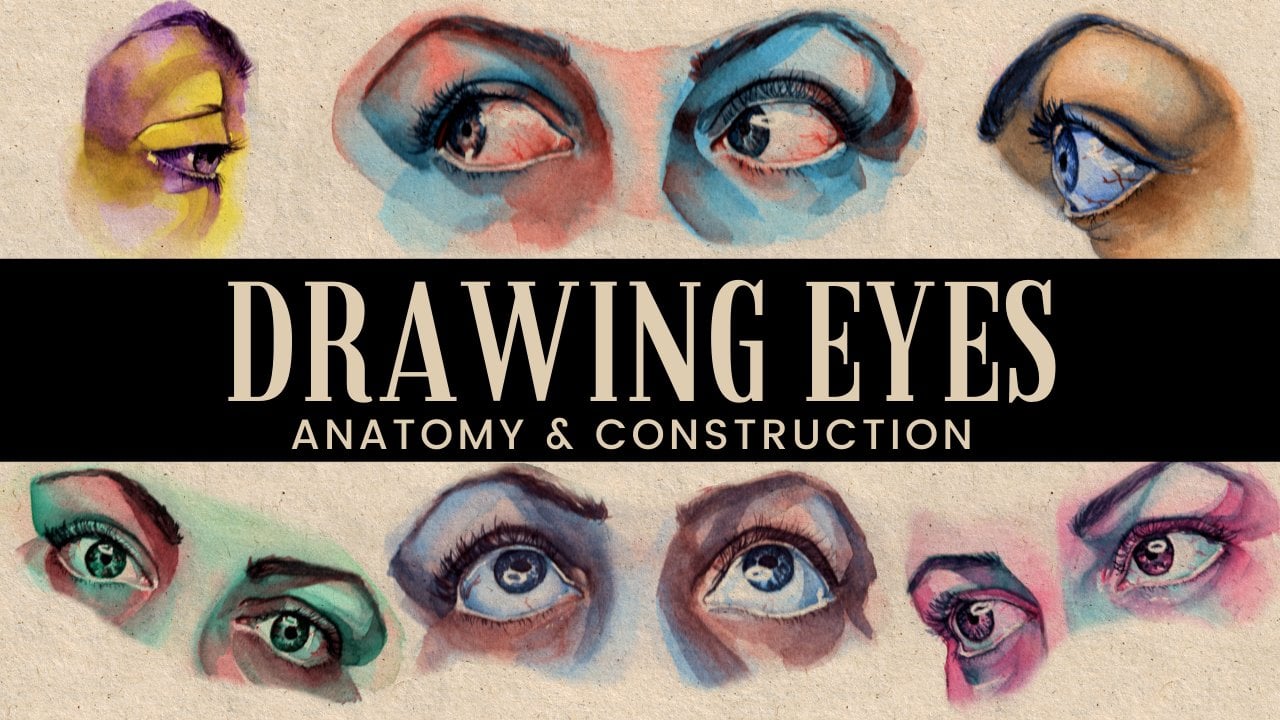
8. B2 Eye Detail Structure: In this lesson, we will draw the remaining
components of the eye, including the lid,
lashes, and eyebrow. Now that you have the iris in, the next step would
be the pupil. The pupil is a perfect circle
in the center of the iris. Remember, because we don't see the top it looks like
it's a little higher up. If you draw your pupil up here. Now the next step
before we color in the pupil is to put a
placeholder for the light. She has very large
glint of light. It looks like she might
be outside or something, but I'm going to draw
this placeholder and leave in where some of the
eyelashes are as well. This is just so I know not
to color into that area. I'm going to erase
where the pupil and iris dissect into that light. When you draw the pupil, it is pure black and
you are going to want to color with a softer pencil
and get as dark as you can. We can make that
interesting little shape that you see in the light. The next step will be to
start working on the iris. The iris, if you notice, has lots of flecks of light. It even looks all your
beautiful kaleidoscope. One way to do that
quickly is to draw a starburst or flower
shape inside of the iris. This will just give a layer of variegation so that you have some dimension to the eye without having to
draw that by hand. Just pick a point and
start going around the eye and give it a
little bit of a starburst. Her eyes are light blue. I will be shading it next, and I'm not going to go too dark because of the
color of her eye. But if you're drawing
a dark brown eye, you would want to
definitely go darker. No one's eyes are black, even though a photo may
be very dark brown, they will always be a little
bit lighter than the pupil. If you find you lost some of that texture from the starburst, you can put some of those
lines back in there. Now, there's always a ring of darkness around the
edge of everyone's eye. Even if they're dark brown, it will look like a black ring around
the edge of the eye. I will draw that part in next. You want it to be a little
bit blended in with the rest of the
iris. Not too harsh. Next, we will draw
the upper lid, if you notice the crease in her eye has a nice
curve and it starts a little bit past the tear duct and the curve gets wider as it comes out
to the edge of the eye. Not everyone has a crease. Some have multiple creases,
some have no crease. You'll have to tailor your drawing to that
individual person. I know where it's going
to end over here. This just gives me a
little bit of a guide. Then we will draw
the bottom lid, which you can see a little
bit of a crease down here. Next, we will draw
the eyelashes. Eyelashes are not little sticks, they tend to be clumped together
with several eyelashes. She has mascara on which even clumps them
together even more. The best way to draw any type of facial hair is to draw it in
the direction that it grows. We're going to go outward
from the inside of the eye. We'll just draw a few eyelashes. Then as we get to the center, they will grow
straight up and you want to draw them
in that direction. They tend to curl up from under that ledge that we really can't see till
we get to the corner. We're going to go back
and add some detail, but let's just get
the basics in. When they get to the edge,
sometimes they crisscross. The bottom eyelashes grow out
of that very edge that we see when we drew that ledge. They tend to be tinier towards
the inside of the eye. You can go back and darken a few of the clumps that
you have together. You can darken that line
around the eyelashes. The next thing we will
draw are the eyebrows. If you want to use
a card or paper, you can estimate how far out the eyebrow is going
to start and even see horizontally that maybe it's going to start around here. Then I want to see where
it's going to end. It's a little ways outside of the opening of the eye
and it's quite a bit up. If I go here, it's probably going
to end way up there. This is going to give
me a little path so that I know approximately where I want to
draw the eyebrows. They tend to have
a little bit of an angle at the very end. It helps to map it out before you actually start drawing them. Just like the eyelashes, we won't draw every single one, but we'll draw them in the
direction that they grow. The inside tended to
grow straight up. Then as they move towards
the curve of the eyebrow, they're going to lean inward. Then they will grow out to the side and even
on the edge part, they start growing downward. Once you get several
layers of the eyebrows, then we can take the side and shade it in to give
it some thickness. It helps if you have
a few stray ones so that it has more of
a natural look to it. Then you can go back
and add a few accents. Now that you've drawn the
basic components of the eye, we can get to the fun part of rendering or
shading of the eye, which brings it to life by
giving it depth and dimension.
9. B3 Eye Detail Rendering: This is my favorite part of the drawing where we
add in all the shading and start giving the drawing a
more three-dimensional look. This is where the eye
starts to come alive. We haven't done any shading yet, and that will bring the
drawing to life a little more. Remember that the
eyeball is round and we want to show
that it's curved. We'll start by shading the
inner part of the eye. You also have the
tear duct here, which usually is a
little bit darker. Then you want to
shade under the lid, especially in the
corners of the eye, the same way you would
a sphere where you would shave the edges. Now because the lids are
thick we're going to shade on the top
of them as well. Even if you look closely, you'll see the top
of the iris has a little bit of a shadow
is darker than the rest. We have that light that we left. This corner of the eye actually has an extra piece of light. Makes it a little
more challenging. The ledge is a little
bit darker as well. You can use your finger or a blending stick
to soften it up. The last part will be to
do all the outer shading. Usually the darkest spot is
in the corner of the eye, next to the nose, and then also underneath
and then behind the lid. Anywhere that helps show the roundness of the eye is where you'll
have the shading. If you want to start
to do some shading, then that's going to
bring your eye to life. When you are doing touch up, the crease is very
dark, almost black. You can add that back in. Usually you want to keep the lid lighter with a little
bit of shading on it and underneath,
they are shading. You have to look
at the difference between the makeup
and the shadow. Sometimes it's hard to
tell the difference. Again, you can blend it in and go back and
darken in some of those eyelashes that
you may have lost. It looks like also the eyebrow has a little shadow
underneath it. You can go back with an eraser and add some little
highlights to the eye. You can soften this up a little. You can use a gummy
eraser for some of the eyebrow highlights
and on the face. You can draw the
negative space here by shading under that
part of the eyelid. The lighter part tends
to come forward. Well, here's your
basic eye sketch. It's up to you how far
you want to take it, how detailed do you want to go. I know that I just want
to keep coloring it and adding more
and more details. Practice with your
eye and add as many details or shading. Usually the longer
you work on it, the more it comes to life. Awesome work on drawing
the eye and detail. I would love to
see what you drew. Please post your
drawing of the eye in the project area of the course. Next, we will work on
placing the eyes on a face.
10. C1 Eyes on Face Placement: Now that you know how to draw a
beautiful eye in detail, it's time to learn how to
place the eyes on a face. Before we get started, go to the resource area
of the project and grab the file that has the pre-drawn
head with the guidelines. It's a worksheet you can
use to follow along as I show you a practical way of
adding eyes to the face. We'll draw the eyes
in three steps. The first step is placement. In this lesson, we will take
what we learned from drawing the eye in detail and
transfer that onto a face. It's one thing to
draw a beautiful eye, but now we need to
try to put that in the context of a face. If you look on the project
area of the class, there's a resource
section with files, and you can download
them and print them or use them on your
laptop or tablet. This is a sketch of
the entire head with the skull and the face
of one of the models, and I chose her
because she is looking straightforward and the camera
angle is straightforward, and if you measure her head and that is going all the way
to the crown of the head, the eyeline falls just about
exactly in the center. So 50 percent of the face is below the eye line and
the other 50 is above it. If you remember from
the other lesson, the center point of the face is where there's
usually a third eye, and all that means is
that the distance between the two eyes is equal to the
distance of about one eye. You can see that's
almost the exact. Now, traditional proportion
is five eyes across, but I find that when I
draw the average person, that that's not true,
especially for women, I'm seeing only about maybe four total eyes across the face. A half or a little
more than a half on either side of the face, so I'm not getting
the full five across. Instead of drawing her eyes, I found that her eyes
were very dark in the original photo and
there wasn't much contrast in the lighting and so I really want you to be able
to see the difference between the pupil and the iris and the ring
around the iris. I'm going to use her eyes as my reference sheet
on this type of face. But if you follow
a lot of artists, you'll see they use
multiple reference photos, and this will give you a
good practice for that. You may find a pose you like, or hair you like, but you
want a different face, so you can practice using different reference photos that are also of different sizes, even if you draw digitally, you usually have the
reference photos smaller and you have to enlarge. We're going to do the opposite, probably going to
shrink this down mentally to fit this face. The next step is where
do I put the eyes? If you have this sheet, I wouldn't recommend
drawing on it. I tried to draw on
the computer paper and it was a little too shiny and so I traced it
onto another sheet of paper, and you can do that pretty
quickly by laying it underneath or if you have a
lightbox or even a window, or if you can't see
under your paper. Then I went for the full
face after I put the eyes on her and I render the entire
thing that you can go very simple and just
draw the eyes where you can get super detailed and
draw an entire portrait. I just want you to know
the range from either very simplistic to
super detailed on here, it's up to you how far you
want to take this drawing. If we remember from earlier, the point where the
two lines bisect is the exact center of
the head and that is where the third
eye would appear. Then you say, how big
do I make the eye? Well, if we go back to the
other reference photo, remember she had three
in the center and then maybe about a 1/2 or
2/3 on either end. Since I have the nose on here, you can guesstimate by
the bridge of the nose, you'll know it's maybe
about that wide, or you're just going to
probably have to guess and measure it and
then make adjustments. If I estimate that my
third eye is there, I'm going to check and see. If I have another
normal eye on the side, and the other side, how much is left? This is almost exactly
five and that would make her eyes maybe a little
smaller than what they are, because remember,
she didn't have the full five eyes across. I'm going to go a
little bit wider, now it's looking a
little more accurate. Now I've got the extra space
on the side for the eyes. Then we can erase the third eye, we don't need that and we
don't need the guidelines. We're ready to draw the eyes. Now when I draw the eyes, I draw them both
at the same time and the reason why
I do this is to get a consistent look and also to remember
the steps I took, because as you remember, there are multiple steps
in drawing an eye, and you want them
to look consistent. There are some artists that are amazing and they
draw an incredible, beautiful eye and half the face, then they can go back
and do the other ones. I am not that person. Until you get there I would
recommend drawing them both at the same time and only as much as you've drawn
on one eye and the other. For example, we're
going to start with the upper curve of the eye. We're only going to draw the
inner part of the eyelid, not the bottom of the lid. Remember there's a
ledge on the bottom. I'm going to leave
that off for now. I'm going to just draw the
smallest part of the eye, which is the opening, and
if I look at the curve, I'm going to say it's a pretty
uniform curve on the top. This one seems to come
out just a little more. Remember we're leaving
room for that tear duct. Now, each eye will be
slightly different because no one has
a symmetrical face, and that's going to
make the features look interesting on the face. If you're drawing
digitally, don't draw one and then mirror it. You want to take your
time and draw each one. I'm just drawing the tiny
part of the opening. I'm leaving a little room for that tear duct and
same on this one. Now, on the bottom
I noticed that they both dip down a little, maybe a little more on the edge. Not exact almond shape. We've got the opening of the
eye that looks pretty good. Now that you know how to place the
eyes on the face, we'll get to the fun part of drawing all the
components of the eye. You can use this step-by-step
eye worksheet again as a reminder while you follow along with me
in the next video.
11. C2 Eyes on Face Basics: The second step is drawing the basic
CVI including the iris, pupil, and lid. Hang in there and be
patient with yourself. The eye has many components, but drawing them in detail is what will make your
face come to life. Now you say I want
to draw the iris, but I don't know how
big to draw the iris. Let's take our card or extra paper or an
extra layer if you're digital and let's look at the proportion of the
iris to the white part. Remember the eye
is a round circle. Let's just eliminate
that tear duct area and then go to the
end of the white. Then I'm going to see the
largest part of that iris. I'm just getting myself
a little visual there. I can see that if I were
to cut the iris in half, that this is almost
four equal pieces. The part of the white will be about half of the iris, if not, maybe a little bit longer, depending on the person's
eye and how open they are. I think on this side
it might be a little wider but you can take a look and see, yes. On this eye, her eye looks a little bit larger and I can see a
little bit more white. Remember, I drew this
one slightly different. It's approximate
about 50 percent of the iris will be the white. Then remember when
we drew the iris, the iris is a perfect circle, but because of the eyelids, they're covering the
tops and the bottom. You mostly just see these
two curves on the side. I find it easier to just
draw the two curves. I'm going to go and
draw outside and inside curves and see if I can get
that proportion about right. You can check your own iris and see if it has
similar proportions. You can look at the
beginning and the ending of the eye and find the
iris in the center. Then if you cut that in half, see what the proportions are. On this eye, we're just going to put in the two curves for
the iris and then we'll add that tear duct
if you haven't already added the tear
duct to both of them. I'm going to check the
proportions on this one, see how I like those. This one came out pretty good because remember she
had a little bit of extra white there. Then we will go ahead
and draw the pupil. Remember the iris is
round and inside of it is a perfectly round circle
and that is the pupil. But again, because the eyelids sometimes it doesn't look
like it's centered, it looks a little higher
up because you have to imagine what's covered
under the eyelid. Go ahead and draw your pupils. Before we color those in, let's leave a place holder for that glint of the
light in the eye. That's really what makes
the eye come alive. If you remember, if this is
the side view of the eye, there's a little cornea
on the outside that's almost like a contact lens and
it reflects out the light. That's where you get that shine in the eye
that it gives it life. It's important to include
that in your drawing. Let's go ahead and draw
the glint in the eye. Now if you notice, this one is inside of the
pupil and the iris. I'm just going to draw
a little place holder and then I'm going to erase
where they intersect, I'm going to erase
where they crossover. I have a nice white dot
placeholder on each eye. Now you can color in the pupil. Remember the pupil
is solid black. I'm going to use a
softer pencil or 4B so that I can
make it solid black. Once you get your pupil in, now we can color the iris. But instead of just
coloring it solid, first, I like to lay in a
layer of texture. Usually the eye is
not a solid color, it has variegations and little lines and
flecks of color in it. A quick way to do that if you remember was drawing
a starburst. If you draw a little flower or colitis scope inside of the eye, you'll get some
texture that way. Leave the white part open that you have for
the glint of light. Now we can go ahead and
shade in the iris and depending on the color
will be how dark we go. She has light brown eyes, so I won't go too dark on it. I'll shade everywhere except for that placeholder for the light. The next part is the
ring around the iris. There's usually a darker ring no matter what color
someone's eyes are, even if they are very dark brown and may look almost black, but there will be a darker
ring around the edge. Go ahead around the edges
and let's darken that part. Now we will draw the lids. Remember there was
a little ledge on to the eyelid so we can draw that little ledge
here and notice that it blends in so that will be
the thickness of the eye. It does meet on the edge because that's where the
eyes are opening. We'll have the little ledge
here and blend that in. Then we can draw the top lid. Hers are quite a bit a
ways from her eyeline. If you notice, the lines are going to come
up a little higher. You can make a
little place holder so you know where your
pencil is going to go and draw a line. It can be in several
pieces to get you there. She does have an extra
line on both sides. Now, this is probably
the awkward phase. You're going to say, I
don't know what's going on, I don't like this. You have to keep
pushing through. About halfway through, people look at their
drawing and get frustrated. But if you watch those
time-lapse online, you will see that no matter
how wonderful the artist is, there's an awkward phase
that they hit about halfway through and then once you keep adding the shading
and the layering, it really comes to life. Keep pushing yourself to go with just a little bit further. You're about halfway done
with the elements of the eye and soon we will be
out of the awkward phase. Keep going and in the next
section we will add the lid, lashes, eyebrows and shading.
12. C3 Eyes on Face Rendering: In this third part, we will finish up the
eyes on the demo face. We will add the lower
lid, lashes, eyebrow, and for me, the fun part
of rendering or shading. The next part will
be the lashes. Now remember the lashes, they're not little sticks. When they grow upwards, they tend to clump
together like that. So you might see pieces of
that eyelashes and she has mascara on and that tends to
make it clump a little more. The best way to draw any facial hair is to draw it in the direction
that it grows. I will draw the inner part of the eyelashes and
they tend to be shorter and grow inward
towards the nose. Then the center part is where you're going
to see the longest. Those will clump
together as well. We can go back and
add more details. We just want to get
the basic eyelashes. Then the outside
eyelashes tend to grow away from the eye
and even downward, and sometimes they
crisscross on the end. The bottom eyelashes grow
right on the edge of that ledge that we drew. You can clean up and modify
as you add extra features. We can also draw the bottom lid. There is a small lid and a few lines underneath. Then we'll draw the eyebrow, and if you want to use
your card or a paper, you can see where that lines up. On this eye is
just a little past her TO dark and
low on this side, then on the outside of it, it's a little bit past her eye and almost
the same height, really, maybe a little higher. It has a nice curve. The curve is about a
third in from the edge. We're just going to
map out the eyebrow before we color it in so
you can make modifications. Is better to take your time with the proportions and get
everything laid out first before you start
rendering it and then you have an opportunity
to change it if it's not where you want it. Now this eyebrows
a lot different. It's coming a lot further out, about the same height though. This side is a little
past her eye, but higher. Then I'm going to draw this arc. If you see there's a
little raised point towards the last
third of the eyebrow. Now when we draw the eyebrows, we don't need to draw
every single hair, but it's good to draw it, like I said, in the
direction that it grows. So the eyebrows, the
first few pieces will grow straight up, and then they start to curve along with the
arc of the eyebrow, then they grow to the side, eventually, and then even down. We'll do that on this one. We're going to draw
them straight up and then start to curve them towards the center and then out to the side and then down for
the eyebrows on the edge. You get more of a natural look. Then we'll shave these end. After you've drawn them, given them some shading. Now that we've got all
the pieces of the eye, we're going to
start shading so we can start shading the
inside of the eye. Remember that the eye
is curved and round. Inside of the eye, we're going to shade the
corners to show that roundness. Also you can darken in your tear duct and
the lines around it. Then even the top of the iris has a little
bit of a shadow from the lid coming down
on it if you look closely. Then the same on the other eye, we're going to darken
the top and the edges, color in the tear duct. You can use your finger
or a blending stick or use an eraser if you've
got carried away like I did. Let's shave the
outside of the eye, so the eye lid is usually lighter and then the
shading is behind it to help give that look that
the eye is coming forward. There tends to be
shading on the inside, near the nose, as well as
on the outside of the eyes. There is also shading
under the eye. You can see she's smiling there. These are your eyes.
I know this looks a little odd because it looks like a mannequin without the hair and the
facial features. If you want to work on the eyes and get
them really nice, and then start working on
the rest of the features. I think it'll come
together for you. If you want to watch, I
will do some rendering on the face and bring it
to life a little more. Now you have a pair of
fully rendered eyes. Congrats on your hard
work and persistence. If you'd like to stop here, know that that is a
great accomplishment. Or if you want to keep going, you can render the
rest of the features. It's up to you how far you
would like to take your sketch from either a pair of eyes
or to a fully rendered face. Either way, I would
love to see your work. So please post
your final drawing in the project area
of the course. I've made a special
bonus video that is a time-lapse of me
rendering the entire face, including the hair on the
same worksheet that we've been using to draw
the pair of eyes. If you'd like to check that out, it's only five
minutes long and it's about a half-hour of drawing
condensed down and sped up. That's in the next video. I hope you check it out. If not, thanks so
much for taking the course and I hope
we can stay in touch.
13. Bonus Timelapse Face: Here's a bonus video I promised of me rendering
the entire face and hair using the same worksheet
we've been using all along for adding the eyes. I did get a little carried
away but I sped up the video, so it's only five minutes, but I spent about a
half-hour or more on it. Sit back and look
for some tips and techniques that I've
added to the screen so that you can see what
I'm doing when I add certain types of shading to
bring the drawing to life. I'll go over the basics for filling in the
rest of the features. If you want to check
out my other class, I go into great
detail on drawing a portrait and putting together all the
features of the face. When you draw the hair, usually you want to
draw it in clumps like pieces and sections. I'm going to draw four sections of her hair and then
I will color it in. Here's the drawing
that I finished. I took it a lot
further than eyes. I went ahead and added the hair, and flush out all
the facial features by just adding shadows, and accentuating her cheeks, and filling in her lips, and a little bit of
shadows on the neck. You can make whatever face out of the elements that I gave you, or you can just
focus on the eyes. It's up to you how far
you want to take it. I'm looking forward to seeing
what you came up with.
14. Final Thoughts: Thanks so much for
taking this course. I hope it improved your skill set and gave you
some new insights into drawing the eyes and a face and also all the
components of the eye. I'd love to hear your feedback. Please leave me a
comment or review and follow me on Skillshare
or social media. I'd love to stay in touch. Thanks so much and keep drawing.
 Rachel Fia, Artist & Illustrator