Transcripts
1. Intro to the Class: Are you ready to advance your drawing skills to the more challenging
three quarter view? I will teach you how to draw
the three quarter view by learning and understanding
the structure and symmetry of the face. We will do a demo drawing
together in real time. How is my method different from other methods like
drawing with a grid? My unique method of drawing
teaches you proportion and alignment of the face and not just to copy square by square. This is knowledge you
can take with you. The goal is to help
you draw better by identifying the alignment
of the facial features in this three quarter
view and to use key features as an anchor
to start your drawing. Then you'll use the
anchor to measure the other features of the face
with correct proportions. This technique will
give you the freedom to draw from live
models or in real life. I'm Rachel Fia. I've be
enjoying my entire life, and I also study visual arts. And whether or not you
went to school for art, essentially, we are all self taught because art
is self expression. My philosophy is that artists
are not photocopiers. We are interpreters,
and we create what we see through the filter of
how we feel and who we are. My personal style
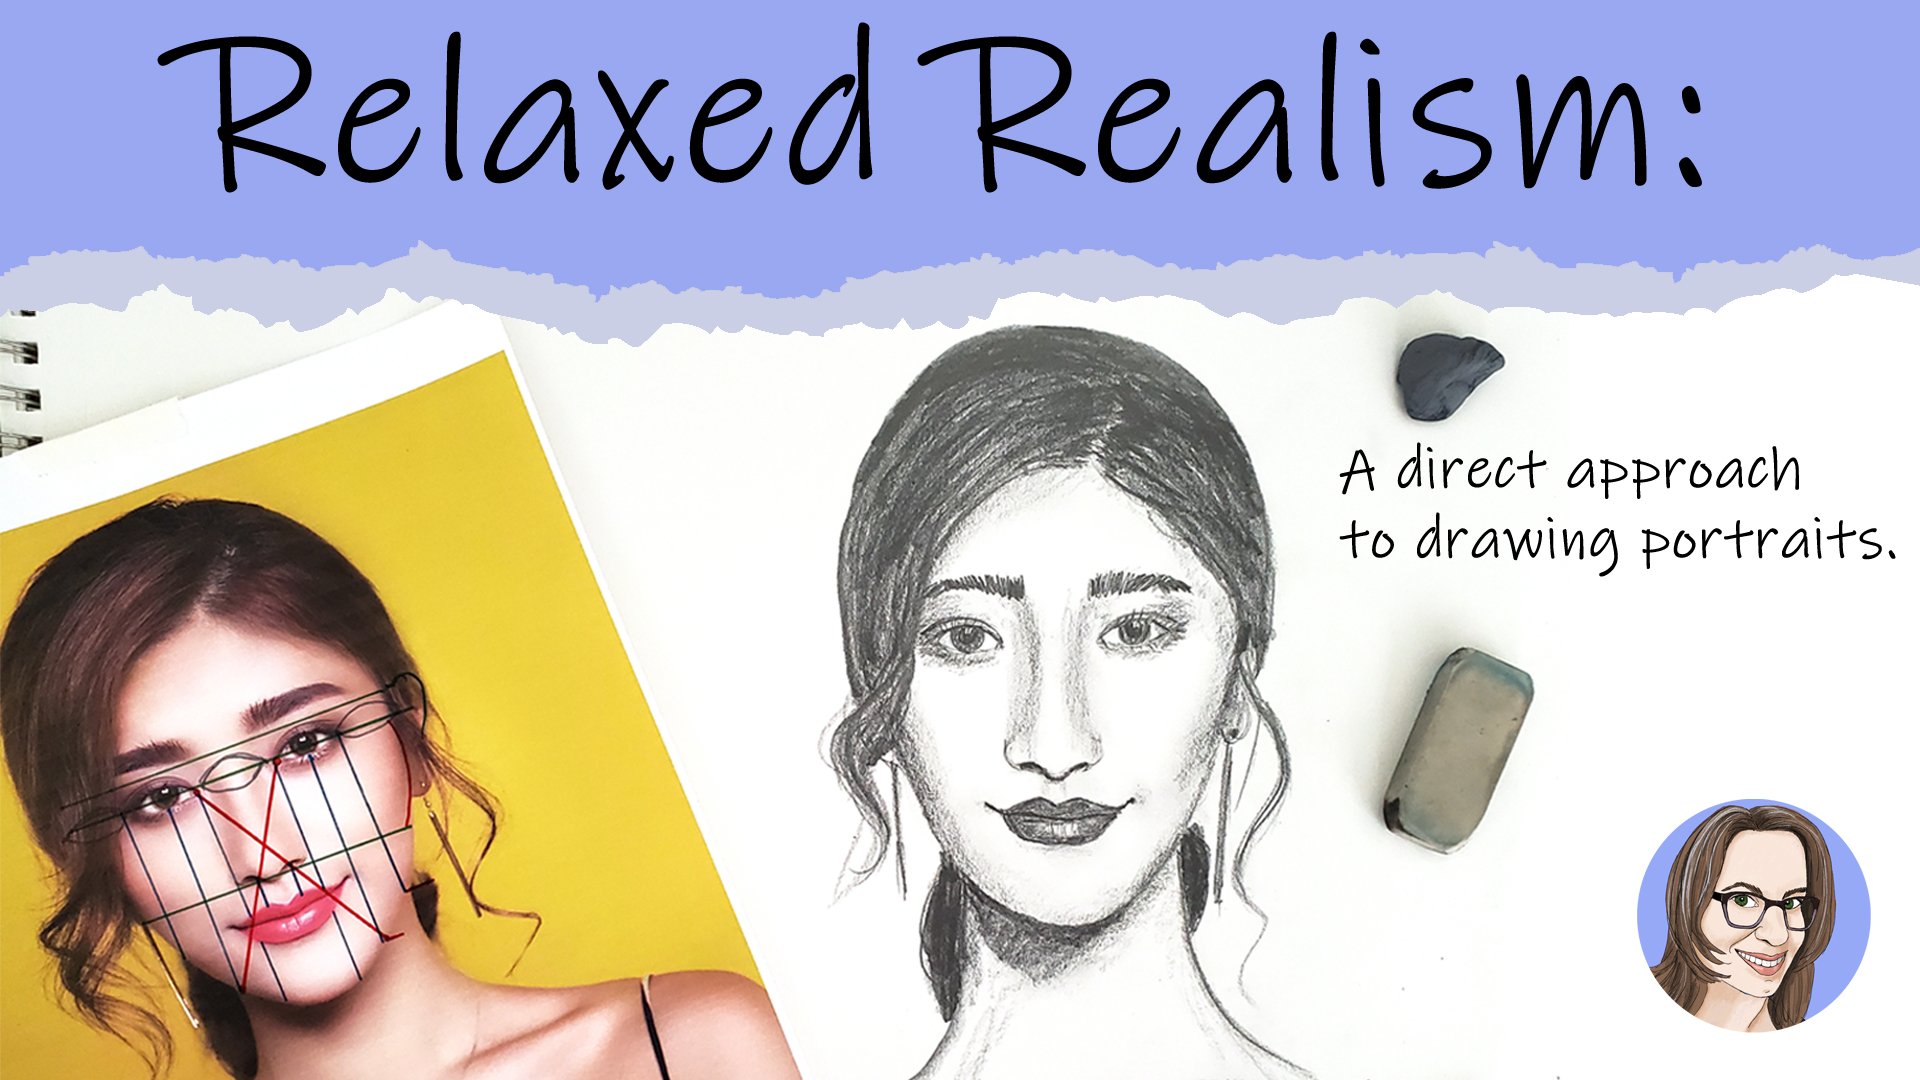
is relaxed realism. I always aim to capture
the emotion and essence of the person first and then the
likeness of the face. This class is for
all skill levels. It is designed in three parts. One, learning the alignment
of the face, two, mapping out your reference
photo, and three, using these techniques to draw a portrait in the
three quarter view. At the end of this course, you'll achieve the
skills of alignment and proportion for drawing
the three quarter view. This new understanding will
give you an advantage when drawing any type of face in
any medium in this pose. So, let's get started.
2. Project Description: Your final project will
be to draw a portrait in the three quarter view from a reference photo with
proportional mapping. This course will prepare
you every step of the way. Once you choose a
reference photo of a person in the
three quarter view, you will use the knowledge
from the alignment lessons to create a mapping guide that you'll use when
drawing the portrait. I will show you how to lay
out the features of the face on a blank paper and you will
draw with me in real time. You will follow along
with me as I measure and sketch each of the features in relationship to each other. And then we will develop
the details with shading and also revisit techniques to bring
these features alive. Once you've finished rendering the face and all
of its features, then you'll have drawn a complete portrait in
the three quarter. This is a community environment, and sharing your artwork is one way to connect
with fellow artists. There is a project area
in the class page, and you can upload images of your artwork with
text and comments. So please post your
final portrait, and I look forward to seeing it.
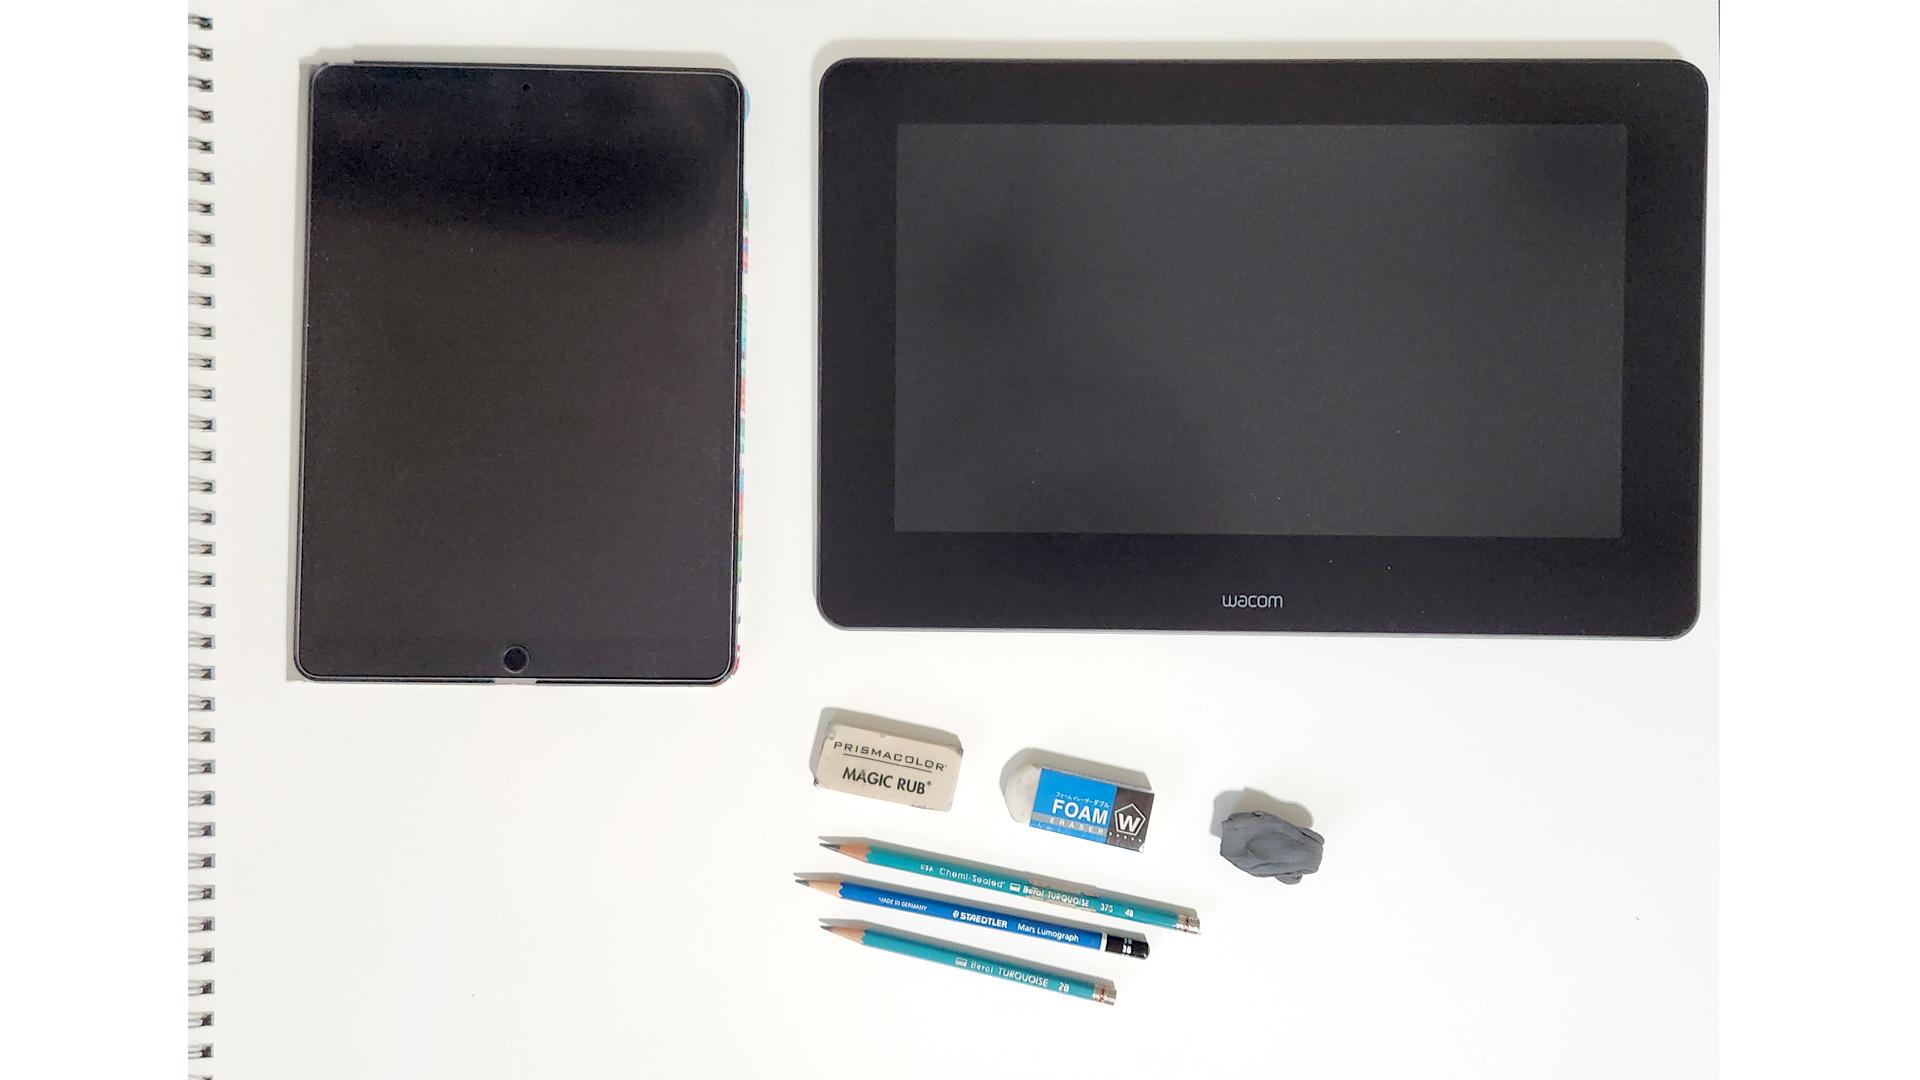
3. Supplies: For supplies, it
depends on what type of media you will be
using for your drawings. If you want to go digital
and you have a Wacom and a laptop and you want to use your favorite software,
you can do that. You can also use an iPad
that is compatible with an Apple pencil and use Procreate app or another app
that you prefer for drawing. If you're going to go
traditional media. We will use drawing paper. I'm using a very large sheet, so you can see it on the camera, but whatever size sketch book
you're comfortable with. Then definitely some
softer pencils. This is a two, three, and four B, and it'll make it easier for
sketching and erasing. Then I have a magic rub. A foam eraser, and then I would say my favorite eraser would be a gummy eraser because
you can get very precise or use large
areas to erase. The choice is yours. I will be switching between a couple of different
ones for examples, and go ahead and
get your supplies ready before we start to draw.
4. Views of Face: Let's briefly go over the
different views of the face. The first one we'll talk
about is the front view, which is where you
see 100% of the face. The next common would be
the profile view where the face is cut in
half and you see 50%, and that would be exactly
where the nose is. Then more common one I
see lately is a 25% view, just a sliver of the face. What we will draw today is the three quarter view where
you see 75% of the face, and this is probably
the most challenging. We'll go over each one of the views individually and briefly just to give you a
little bit more information. The first view we
will talk about is the front view where you
see 100% of the face, and we also say that you see all four
quarters of the face. By quarters, we
mean just measuring the face by cutting it in half directly in the
center of the nose, then again, directly in
the center of the eyes. That gives you approximately
four quarters of the face. But because of foreshortening
and the camera angle, which just means it's
being flattened out, you don't see the sides of the jaw and the side of
the ear of the face. These four quarters are just
what you see facing forward. The next view of the face
is the profile view, which is just 50% of the face. It is the head
turned to the side, exactly where the profile
of the nose shows, and the second quarter is the same as when we're looking
from the front view, it is cut through the
center of the nose, and it goes to the
center of the eye. Then from that, you have
the first quarter from the center of the eye to
outside of the eyebrow. Now, when we were
looking at it forward, the face was being
flattened forward, and so you couldn't see
the jaw in the ear. Now we are flattening
it from the side view, which makes the center of the face look a
little different. The one we will be drawing
is the three quarter view. Now, you still have the line
in the center of the nose, but because the eye is tilted, the head is tilted, you will have the first quarter
will only be a sliver, you only see a piece of the
first part of her face. You'll see the entire
nose and the profile, and then the full
mouth and lips. Then the lines also
still go through the center of the eye and
you'll see that last quarter. The last view is the
one quarter view, and that is going through part of the eye and that
one sliver we talked about, this would just be a
simple one quarter view. That is it for the views. The next section, we will
talk about symmetry and how the features line up in the view that
we'll be drawing.
5. Symmetry: Before we start drawing, I want to show you the
symmetry of the face. Now, while each side of
the face is different, it is not symmetrical. There is a symmetry, or you could call
it harmony between the different
features of the face in relationship to each other. I will show you a few of
the alignments that will help us when we're drawing
the next three quarter view. If you want a
comprehensive guide, you can check out my other
class, Relaxed Realism. This works when we have
a forward facing view where the camera angle
is straightforward, and we're going to take a
look at the first alignment, which is the top of the ears. If I draw a line from the
top of the ears across, you will notice that it touches
the top of the eyelids. If I draw a line
under the bottom of the ears while even though
they're slightly different, it will touch the
bottom of the nose. Within this frame, you have
the eyes, nose, and ears. Now if I look at
the next alignment, it's going to be vertical, I want to look at the center
of the opening of the eye, not necessarily where
the eye is looking, but the center of the opening. I'm going to line that up with the corner of the mouth and
the corner of the chin. If you notice, there
is an alignment here between the opening of the mouth and the outside
corner of the chin. The same on this side, if
I look at the center of the opening of the eye and
draw another vertical line, you'll see the other alignment. The next alignment is
the inside opening of the eye with the
outside of the nose. Some people do have a larger nose bridge
and in that case, usually it aligns with
this little curve right here on the
outside of the nostril. We're going to take a look at the inside opening to
the outside of the nose, and that's our next alignment, and the same on the other side. For the next alignment, if someone has points
on their lips, those typically line
up with the center of the nostril on each
side of the nose. These are the basic alignments. The lines will stay the same. However, as we rotate the face and look at the
different quarters of the views, they will start to move a little along the
curvature of the face and take in account for the foreshortening
and perspective from the different views. In the next video, we'll look at these same alignments for the profile and
three quarter view.
6. Profile and 3/4 Symmetry: Before we start drawing
the three quarter view, I want to stick with
the alignments and the symmetry to show you
what the face looks like as it's turning
because each view has a different look to it and I know the three quarter view is probably the most
challenging for your eyes to coordinate
all the features. Let's start with the profile. And we're going to
do the same quarters and alignment that
we've been doing. If you remember when we
were facing forward, we drew a line in the
center of the face. But the profile is that, exactly, it is cut in
the center of the face. Before the nose and mouth were flattened due
to foreshortening. I'm going to ignore
those for now, and we're going to
look at the line down the center of the face, and I am turning my
ruler at an angle just because that's the
way her face is tilted. If I draw a line through here, This would have been
the second quarter that we saw facing forward, and we also had a line down
the center of her eye. If I put another line
approximately here, that is going to start
the first quarter, which if you remember, was a
little bit past the eyebrow. This is the profile. It's only 50% of the face. We only see two quarters. Now, we just learned
some alignments. Let's add those in. We looked at the top of the
ear to the top of the eyelid. So I'm going to make
a line with that. Then we looked at the bottom of the ear to the
bottom of the nose. If you notice, these
lines get narrower, they start to converge here, a little vanishing point because her face is
actually curved. We're going to
keep that in mind. The next alignment was
from the center of the eye to the corner of the mouth
to the outside of the chin. I'm not going to draw a
straight line this time because I want to show you
the curve of the face. If I connect these dots here, there is a curved
symmetry line here. We also learned
that the corner of the eye aligned with the
outside of the nose. There's a small line
there and the center of the nostril aligned with
this point in her lip. The alignment and quarters will look completely different
from each view of the face. Next, we'll take a look at the three quarter view and
we'll do the same thing where we put the quarter
lines and the symmetry lines. Let's start with the quarters. If you remember, we drew a line directly down
the center of the face. Again, it's going to look
different at each angle. If I do that and keep my ruler at the same
angle as her face, it's going to come in
somewhere around there. I know that looks a little odd, but that is that third quarter here that you're seeing
that's a sliver. The second quarter was at the center of the
opening of the eye, not necessarily where
her eye is looking, but the center of the
opening of the eye. That was our second quarter. The first quarter started somewhere around the
edge of the eyebrow. These are the first
three quarters. The third one is just a sliver and if you want, I'll
draw a line there. This is the first three pieces that we are going to
see in this view. Let's go ahead and add
the alignment lines. We looked at the top of the ear and the top of the eyelids, put a line there,
and then the bottom of the ear to the
bottom of the nose. Again, if you notice
the lines start to converge because
her face is rounded. And so it is foreshortening and also having a
vanishing point towards the edge of the face. Then the other symmetry
lines we looked at was the center of the
opening of the eye to the corner of the mouth, to the corner of the chin. Remember, we started
to curve them because now we're looking at a
rounded view of the face. I want to draw these
three together. Then we can see on this side. Again, the center
of the opening of the eye and the
corner of the mouth, and we can only see
a piece of the chin. The other alignment line was the corner of the opening of the eye to the edge of the nose. We can't see this one because the bridge of the
nose is covering it. We can see the point of the lip, so the center of the
nostril to the point of the lip and a little
bit on that side. As you see as we start
to tilt the face, the alignment starts to look a little different,
but it's still there. It's just curved now. We're using these alignments
and quarters to map out the face so that
when you go to draw from your reference
photo or from life, you start to learn how things
are lined up on the face, and that can help you make proportion corrections
as you're drawing.
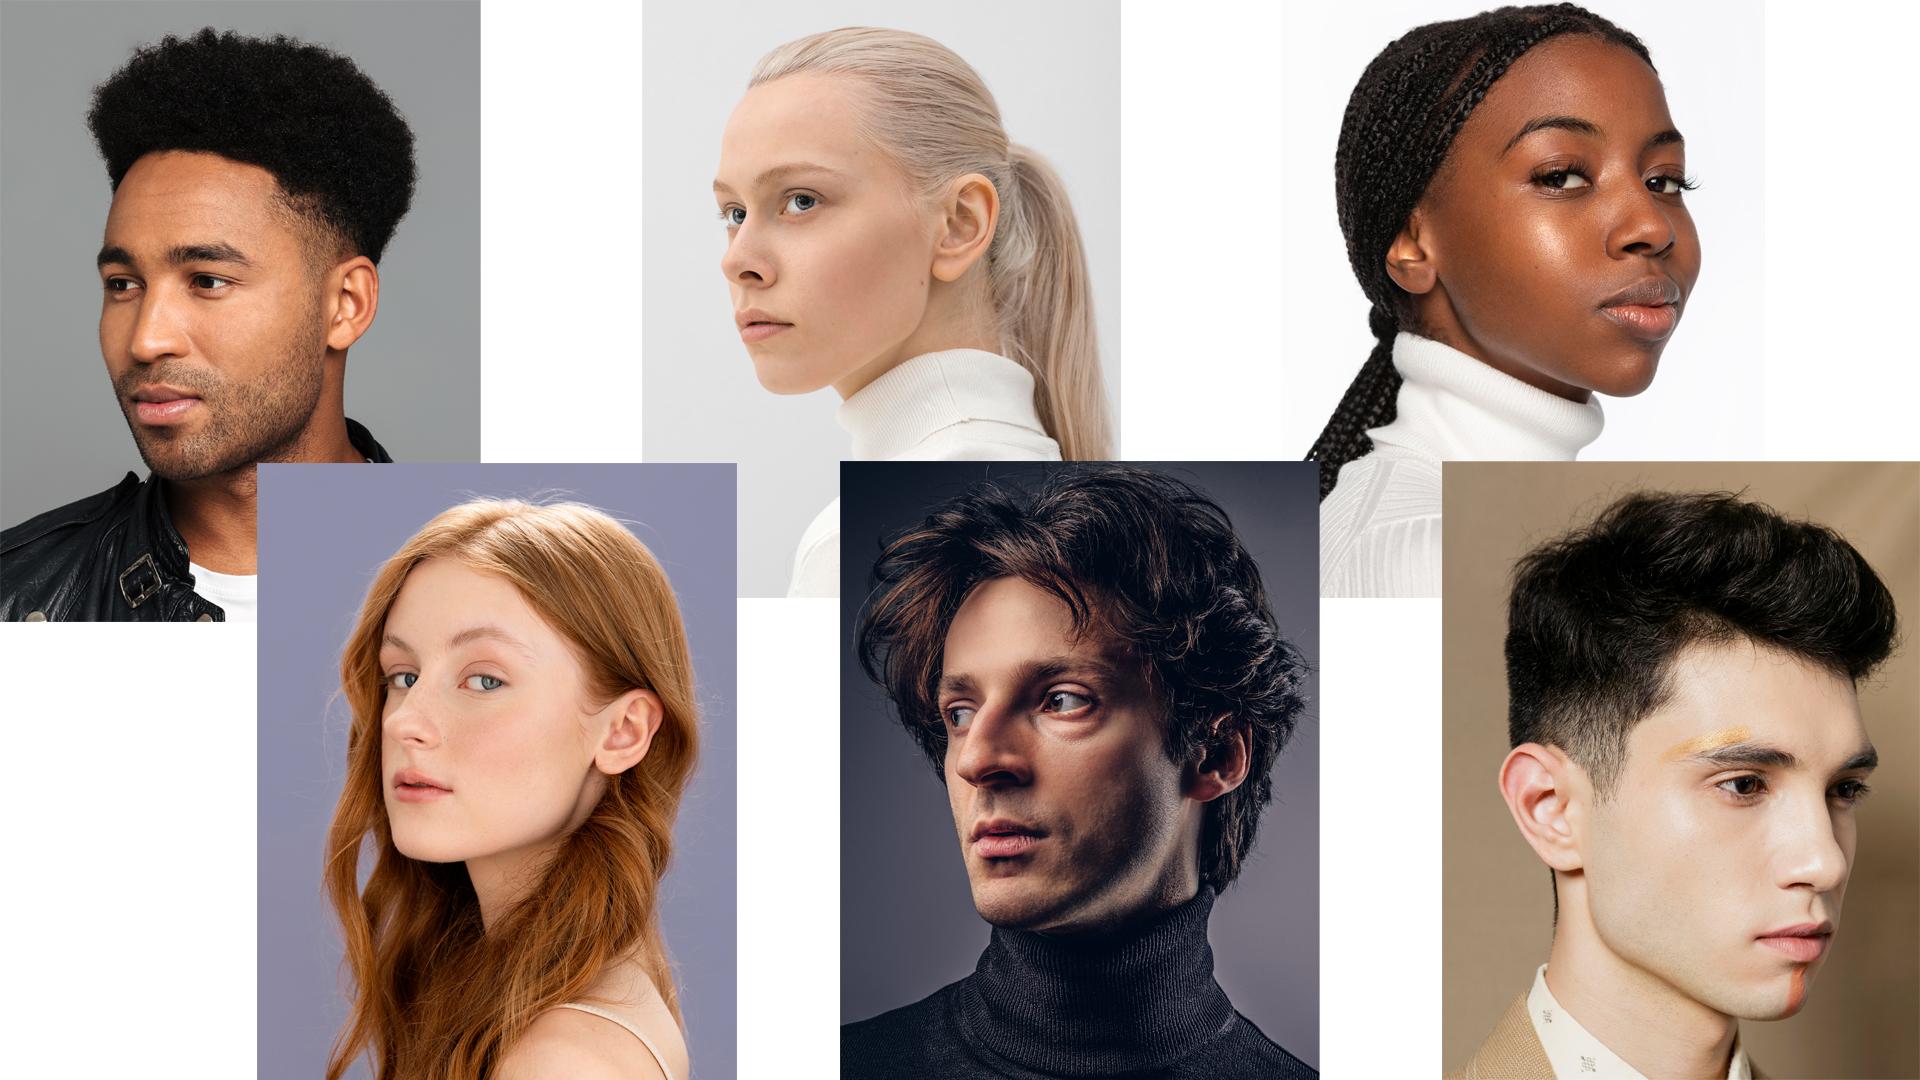
7. Reference Photos: I've put together some
reference photos for you to look at and to choose to draw
your three quarter view. One of the biggest features of the three quarter view for me is you'll notice that you're going to see the brow
and it will be a little further out than the forehead and all of these tend
to have that feature, and that's one characteristic
of the three quarter view. You will see the full eye and the full mouth
and the second eye, often, the curve of
the eye will be at the very edge of the face line. You'll see the full
bridge of the nose. Like a profile, you can see
that outline of the nose. Then you'll also see the cheek
and sometimes it will go behind the nose depending on the face features and
the camera angle, and you'll see the
full roundness of the chin on all these. I really like to see the jaw
line here, and of course, these are models, so they
have a really nice jaw line. And you'll see the full
ear and for drawing, it's a little helpful in this position to have
the full ear showing so that we can use this later as our guide post to
align the features. The ear will also
look like it's a little further back
than the head, and you only see about
a quarter of the head, a quarter of the
skull will be here, and the ear will be
coming out further. You also see the neck and some of these you can
see the front of the neck. The back, the shoulder. It's a really nice pose to
show all these little features that often get hidden when you do a forward
facing portrait. I think you'll enjoy the
three quarter view for drawing all these details that you don't always
get to see in the face. Go ahead and pick out a
photo that you want to use. It could be your own or one of these free photos that we'll use to draw the
three quarter view.
8. Mapping Reference Photo: Before we get started
on our drawing, we're going to do
a little bit of mapping on the reference
photos so that we know some of the
major guidelines and it'll help us when we are drawing the proportions
of the face. First, we're going to do
the three quarter view of the face and just put those
lines there as a guideline. Now, if you remember when
it was facing forward, the center of the face was in between the eyes down
the center of the nose. There's a little bit
of angle to her face. I'm going to draw the
first quarter like this. Then the second quarter was
in the middle of the eyes, we'll draw that quarter. Then the third one would be approximately the
same width out here, where her hair line ends. We've got the 12, three quarter view
that we are seeing. Now before we add these
other lines on here, some of them I drew straight just for simplicity
of teaching it. I'm going to go into a
little more depth now that you understand the
alignment a little more. If you think of the
face as a sphere, the head is rounded and the features on the front of
the face are also rounded. We're not going to
draw straight lines at this point now that you
understand the concept. We are going to
look at the lines of the face with a curvature. Instead of just drawing
a straight line on the top of the eyes
to the top of the ear, we're going to curve
that a little. The other thing I
want you to notice is that this part gets smaller
and this part is wider, and that is the foreshortening of something closer to you, which is this i, and something farther away
from you, which is this i. That's why this i appears
slightly smaller. The bottom of the
nose is going to be on the same type of curve, but now if the face was in half, this would be like the
equator right and then underneath the lines are going
to curve from the bottom. The bottom of the ear to
the bottom of the nose. The next line is going to be the inside of the eye to
the edge of the nose. We're going to make a
nice little curve there. It's a little subtle, but the roundness of the
face and the cheeks, there is a little
bit of a curve. Then the center of the
eye is going to go down to the outside
edge of the mouth, and then it's also
going to go down to the outside edge
of the chin here. Now, she has a nice
defined filtrum here, and that is just the
valley in between these two ridges on
the top of her lips. If you remember, the nostril
meets the top of the lips, so there's a little bit
of a curve here and here. She also has a cleft underneath her lip here and
here, under her chin. This is all we're going
to need to map out the reference photo so that we can start drawing and have
some simple guidelines. Basically, the ear is an anchor or the nose is an anchor
for the rest of the face. This determines the
proportion for the eyes and the proportion for the width in through here and
the rest of the face. In our next step, we will start drawing our
reference photo.
9. Project Drawing Nose Anchor: We are now ready to draw the
three quarter view portrait, and if you want to go ahead and get out your reference photo with all the quarter views and the mapping alignment lines. Just keep in mind, this
is a demo drawing. We are in sketching mode and it's not going to be
an exact replica. The important part is to learn the alignment of the
features of the face. With that being said, if
you're drawing digitally, it's best to put this
image off to the side and draw on a different part of your screen and not
actually copy it. I'll be using pencil, paper, eraser, and ruler.
We'll get started. The first part we will
draw is the nose, and the nose is going to
be the anchor of the face. The reason why it's
the anchor of the face is because it will
determine the size of the ear as well as the placement and size of the
other features on the face. We're going to start
very simple with just this first quarter line as a guideline and then the line
across the top of the eyes. If you remember, we drew the quarter lines at an angle to match the tilt of her head. If I want to keep
that same angle in mind and draw this
first quarter here, Then the second line
I'm going to draw for a reference point is
the top of the eyelids, is a little bit of a down
curve that comes upward and then curve slightly down where the ear will
eventually be. Keep this a loose line. We might have to
adjust it as we draw. If you're drawing digitally, you can put this
on another layer. I will start with the
bridge of the nose, which is the long top
part of the nose. Depending how you mapped
out your reference photo, we'll determine where
you're going to place it along your guidelines. Mine is coming a little bit off the first quarter at a curve here, the
top of the nose. Again, we want to
keep this angle in mind and try to
imitate that angle. Then if you say, Well, how long or wide should I make the nose? We can use i hand coordination
and attempt to draw it. We can also use a
proportion check. Let me show you how I do that. I take an extra piece
of paper or card, or if you're doing
a digital drawing, you can add a new layer
with just a line. What I'm just going
to do very simply is measure the length of
the bridge of the nose, just an approximate length. Then I'm going to say, how
wide is the base of the nose in relationship to the
length of the nose. This is the width of the nose, and I'm going to say it is approximately three
quarters wide in comparison to the
full length of the nose. This is just a guide,
but I can measure mine and see because I may have drawn mine
larger or smaller. Then I want to see
how that measures up. If I guess about three quarters, three quarters for the width, I'm looking at
somewhere around here, which is about what I
have done free hand. Just as a check for the width. Now, if this doesn't work
for you, I totally get it. Some people don't
like fractions. We want to get the basic
shape of the nose, and I can see there's
a bridge here and then it comes out just a little bit with a nice
point on the edge. I'm going to try
to get that point before I go too far on my nose. I really love the way it has a point and then a
nice curve down. Then there's a
small upward curve where the nostril is going to be and then a little rounded
area for this nostril flap. It's better to get
the proportions of the features right
before we start shading. Take your time to erase and move things
around as you need. The nostril doesn't
quite go that far. It is shaped like a little
paisley or tadpole, and I'm just going to
lightly shade that for now because I might
move the nose around. I don't want to
get too dark yet.
10. Project Drawing Outside Eye: The next part we will
draw is this outside eye, and this is probably the most difficult part of the face to draw because it looks like the eye is coming
out of the nose, and we know that's not true. It's just we can't see much
of that side of the face. One way to determine
where to put the eye is again to use the little
proportion check I showed you, where we look at the
length of the nose. We look at this bridge here. Then I can see that i is here. If I look at this, I'm going to say this is a little
less than a third. On third, if we have
this broken into thirds. This is a little less
than a third where the i is going to
appear down the nose. If I check my own
nose that I drew, just the bridge part, and
I break that into thirds. And then maybe just
a less than that. I'm going to place
my i about here. This gives me an idea of where that i is
going to come out. Again, if this fraction
method doesn't work for you, you can guesstimate how far down the bridge of the
nose the eye is coming out. We don't see the full circle and one way to think of it as
a little puzzle piece. This ris has a rounded side. I can see half of a circle and then there's a straight line where that bridge
of the nose is, we already have that drawn, and then the eyelid creates a little curve line
on top of the eye. That is the basic shape
of the Iris more or less. If you want to draw the pupil, so it looks more like an eye, the pupil is very large
and it's coming out of the top of the eyelid
and touching the nose. I like to leave a little circle or square where I'm going to leave the glint to the light. I usually move the glint into the pupil so that it's
consistent on both eyes. Then you can shade in where
that pupil is going to be. If you want to shade
where the eye is, you can shade the iris lightly, and then sometimes I put in a little zigzag pattern for
that pattern in the eye. If it gets too dark, you can
always take a gummy eraser and dab it like that and
that keeps it from smearing. If you move the
eraser side to side, it tends to smear the
graphite onto the paper. We have the basic
shape of the iris. Now the next difficult part
is this white of the eye. If you see it looks a
little bit like an egg. It's coming down and there's
a little bit of a point, and then the bottom comes back around at a curve
to meet the iris. You don't see too much
of the white of the eye. Try to get that shape of the
white when you're drawing. Don't think of the entire eye. We're going to draw this face
and little puzzle pieces. The next part we can
draw is the eyelid, but there seems to be about
three pieces of the eyelid. We have this line that we
created for the white, and there's a little bit of a ledge there under the eyelid. Then you have the curve of the crease of the
eyelid on top of that. Try to break it into little pieces when you're drawing it. And then the
eyelashes come out of that top of the part
that's touching the white. Just throw in a few eyelashes
to help you with that. Then it looks like a angled line from the eyelid to
the white part. The crease of the eye disappears
around the eyelashes. Let me fix that
real quick for you. One more piece of the eye. It looks like it comes
out like a point here is this ledge of the bottom lid. It's very subtle, but you
can put that in softly. Then if you want to
throw in just a couple eye lashes to help
you see that eye.
11. Project Drawing Outer Features: Next, we will put
in the eyebrow. If you notice
there's a nice curve here from the bridge
of the nose that just keeps curving outward at a slight angle
for the eyebrow. That comes a little bit over
the ridge of the socket. If you notice there's a
little bump here where the eyebrow is in line
with the eye lashes. If you want to draw lightly the hair is there
that'll give you a nice reference point for
the eyebrow is hitting. Then we're going to
draw this line here from the eye socket
down to the eyelid. It comes inward a little and then curves
outward towards the eyelid. Then at this corner where the
eyebrow has a little bump. We'll do a little bit
of the forehead to the first quarter and then we're going to work down the face. Let's curve. You notice there's a
curve in after this bump. And then it curves back out a nice rounded forehead
about to the first quarter. Let's leave that there for now until we get to
the rest of the face. We're going to work down
the side of the face. The next part that
is very challenging visually for your eyes is
this part under the eyelid. It looks like it's
touching the nose, and we know that's not true. Again, it's just we can't
see that side of the face. There's a little bit of a curve to it as it
touches the nose. Then we're going to
work our way down. Underneath the nose, we have these two little curved
guidelines for the filtrum, and the filtrum is just
this little valley between the peaks of the lips. We got those. They're
not very long, maybe as long as the nostril is. We'll do the first
curve of the lip, which is outward, is a nice curve outward
from this point. Then there's a
little valley right here in between
these two points. It goes downward. Then we're going to get the second point of the lip and curve
that down and out. We don't know how
far yet because we don't have our reference lines, we don't have the
rest of the face. We're going to finish
the lips later. If you notice the lips meet
underneath the top lip, but then there's an opening. I'm going to draw just a
placeholder for this opening, and I don't want
to get it too dark yet until I see the
rest of the face. We might have to
make an adjustment. Then the bottom lip touches the top lip and has a nice
little curve coming outward. It's a little bit more
inward than the top lip. It's going to curve
back around up to where when we eventually
put the edge of the mouth. The next thing I want to look at is this angle of the face. This angle of the face
is going to help us as we are drawing this
outside part of the face. If you notice, there's
another spot between the nose and the lip where you can see that
outside cheek again. It looks like it's
touching the nose. We know that's not the case, but we have to draw
this line here. A little bit from the lip
is our outside cheek. Then if you look very closely, you can see a tiny bit of
cheek in between the lips. Then under the lip, I'm
going to keep drawing the chin and I'm going to keep this angle
here that I have. The chin comes in
a b and there's another guideline set we had to show that a
dimple under the chin. There's a little bit of a
curve where that happens. We have a bit of a
straight part on the chin and here's where it starts to come
out, not too much, but a nice curve and she
has a prominent chin, and it's going to go
past this first quarter.
12. Project Drawing Inside Eye: Now we're ready to draw
the second, the inner ei. And we already had
a loose guideline here for the top of the eyelid. We also had a bottom
line under the eye lid. Keep in mind there
was an angle upward. We want to maintain that
same angle underneath the eye because this eye is a little bit higher and
larger than the other eye. If you remember
from our mapping, we had a guide line from the
outside nostri that went up and curved towards the opening of the,
the corner of the eye. If we put this line in here, this is going to
give us a guide for where to put the opening
of the second eye. We've got this little
triangle corner here, and then I'm just going
to draw the inside, not the lid, but the
inside where the white is. I'm going to try to
get that shape first, and it is at a upward angle. There's a tiny squint, you can see the muscles
contracting under her eye. There's a little bit of a squint which brings the eye lid closed. Once you get the
shape of the eye, if you notice there's
a little white triangle in the corner. The iris does not go
all the way to the end, this can help you
with a little guide. There's a lot of the white of the eye on the front
part of the eye. If you want to go ahead
and put that round iris, if you notice we can only
see part of the roundness. And you might have to make a few adjustments
to get it right. If you can get the eyes right, then the face will pop. Let's work a little
hard on these eyes. And the inside pupil
touches the top lid, but we can see the roundness
of the bottom of it. Her eyes do have larger pupils. They're a little bit dilated. Again, leave a
little white square or shape inside of that
pupil and then color, color it dark around it. Then I'll look like light is
reflecting off of her eyes. Then for the iris, I
do a light shade and then a zigzag line to show
that texture in the eye. She is looking up and away. It's a little bit
challenging pose of the eye. I might take a little bit of moving it around
to get it correct. But I think it's worth it to
get the placement, correct? The eyes are usually
the biggest part of the face for expression. Once we get the basic
shape of the eye, then we're going to
look at the lids. Just like the other one, there's an underneath of the lid
where the eyelashes are, you can throw a few in lightly. Then you will see the crease of the eye isn't all
the way to the edge. It's maybe three quarters into the eye because
her head is turned. We're going to add the
crease of the eye. The eyelashes are
growing out this way. If we want to put
some of those in, just throw in a few that way. The bottom of the eye, we
can't really see that ledge, but you can see a few
tiny eye lashes forward. When we add shading, we'll add this line
underneath the eye. Check to see that the
pupils and the eye are about the same angle and the top of the eyes
are about the same. Now that we have
the eye position, we can draw the rest
of the guidelines to get to the lips and see
where the mouth ends. If you look at the center
of the opening in the eye, we had a nice curve that went around the cheek to the corner of the mouth and a little
bit past this first quarter, which is where the chin was. That would be our
next guideline. We have the mouth about here. I like to put a little circle where the corner
of the mouth is. That shows a little bit
of opening in my opinion, and then we can go ahead
and work on the lips a little, darken this opening. It doesn't go all
the way to the end. Notice where the opening
actually is and then it curves down and up a little. Then if you want
to make the lips look a little more realistic, you can add these lines. They usually follow
the curve of the lip. We will do some shading later, but just know that the
top lip is usually darker unless it's very full because it's not
getting any light. It's not reflecting any light. Make a small adjustment to the filtering here where
the points of the lips are. And we'll add some
better shading when we're done with
all the features.
13. Project Drawing Ear: We're now ready to work
on the rest of the face. We're going to work
towards the ear. Let's go ahead and put in these
second and third quarters now that we have that
second y as a guideline. If you remember the
center of the opening of the eye was about where
that second quarter was. Then the th quarter, about that se angle, a
little bit over, you can use your
original mapping to see approximately
where that was. Again, these guidelines
aren't going to be exact, but they're going
to help us map out the face to get to
where we need to be. We can go ahead and draw
the second eyebrow. Also notice the angle
of the eyebrow. It is a little higher. Then the other one.
It starts very close to the nose because of
the way the face is tilted. The eyebrows are going
to grow outwards, and then they're going
to start going upward, and then as you go
across the eye, the hairs will grow this
way and Towards the end, they will grow down and out. You don't have to
draw every hair. We can do a little
bit of shading. But for the accent hairs, you do want to put them
in the correct direction. Work on getting that basic
shape of the eyebrow. Now that we have
the quarters in, we can work on the jaw. We know how far we can go now. We've got the jaw line
to the chin so far. And if you notice after it
hits the second quarter, there is a sharp angle. We do want to keep that same
angle as we move up her jaw. Her jaw goes past the third quarter and then has a little bit of a
turn here and goes upward. I may have drawn my third
quarter a little narrow. Use your best judgment
on where that should be. It's not necessarily straight, it does come out at an angle, the rest of the jaw line. We need another guideline to
know where to put this ear. If you remember, we had
one underneath the nose, it was curved outward, and then we have the top
it was curved downward. The ear is going to be
somewhere in between these two lines between
the eye and the nose. After we reached about
the nose height, you can see the ear
lope starts there. Ears are probably one of
my hardest things to draw. One way around that is to
draw the negative space. I'm going to draw the
outside of the ear, not necessarily
the inside first. I'm going to draw the
negative shape of the ear. If you notice, The top part of the ear is quite a ways away from where
the ear lobe starts. Maybe after where the ear lobe ends is where this top
part is going to start. Mapping out that face with different reference points is a great way to know where
to put the features. I'm going to work my way upward because I know I already
have the ear lobe. I'm going to try to
follow this shape of the ear around the back. I'm doing the outside part, and then I'm going
to come around and now I've got the outside. I'm not ready for this part
yet, just the outside. The basic part of the ear, and we can check
before we get too far, maybe the placement of it. Once you get your ear
in the right place, then we can start drawing
some of the pieces of it. I see that this top part has an inner piece and it's like a little ridge on the
whole outside of the ear. I'm going to draw
that main piece and it folds into about here. Then there's an opening
that connects to that. I'm just going to keep
this very light and loose because I don't want to
draw attention to the ear. I want to keep the
attention on her face. Then you just follow the inside. There's a little bump that comes out and a curve down that connects back to
this piece we started with. That's just a simple
way to draw the ear. Just look at a few pieces, and we're going to leave
it very light for now.
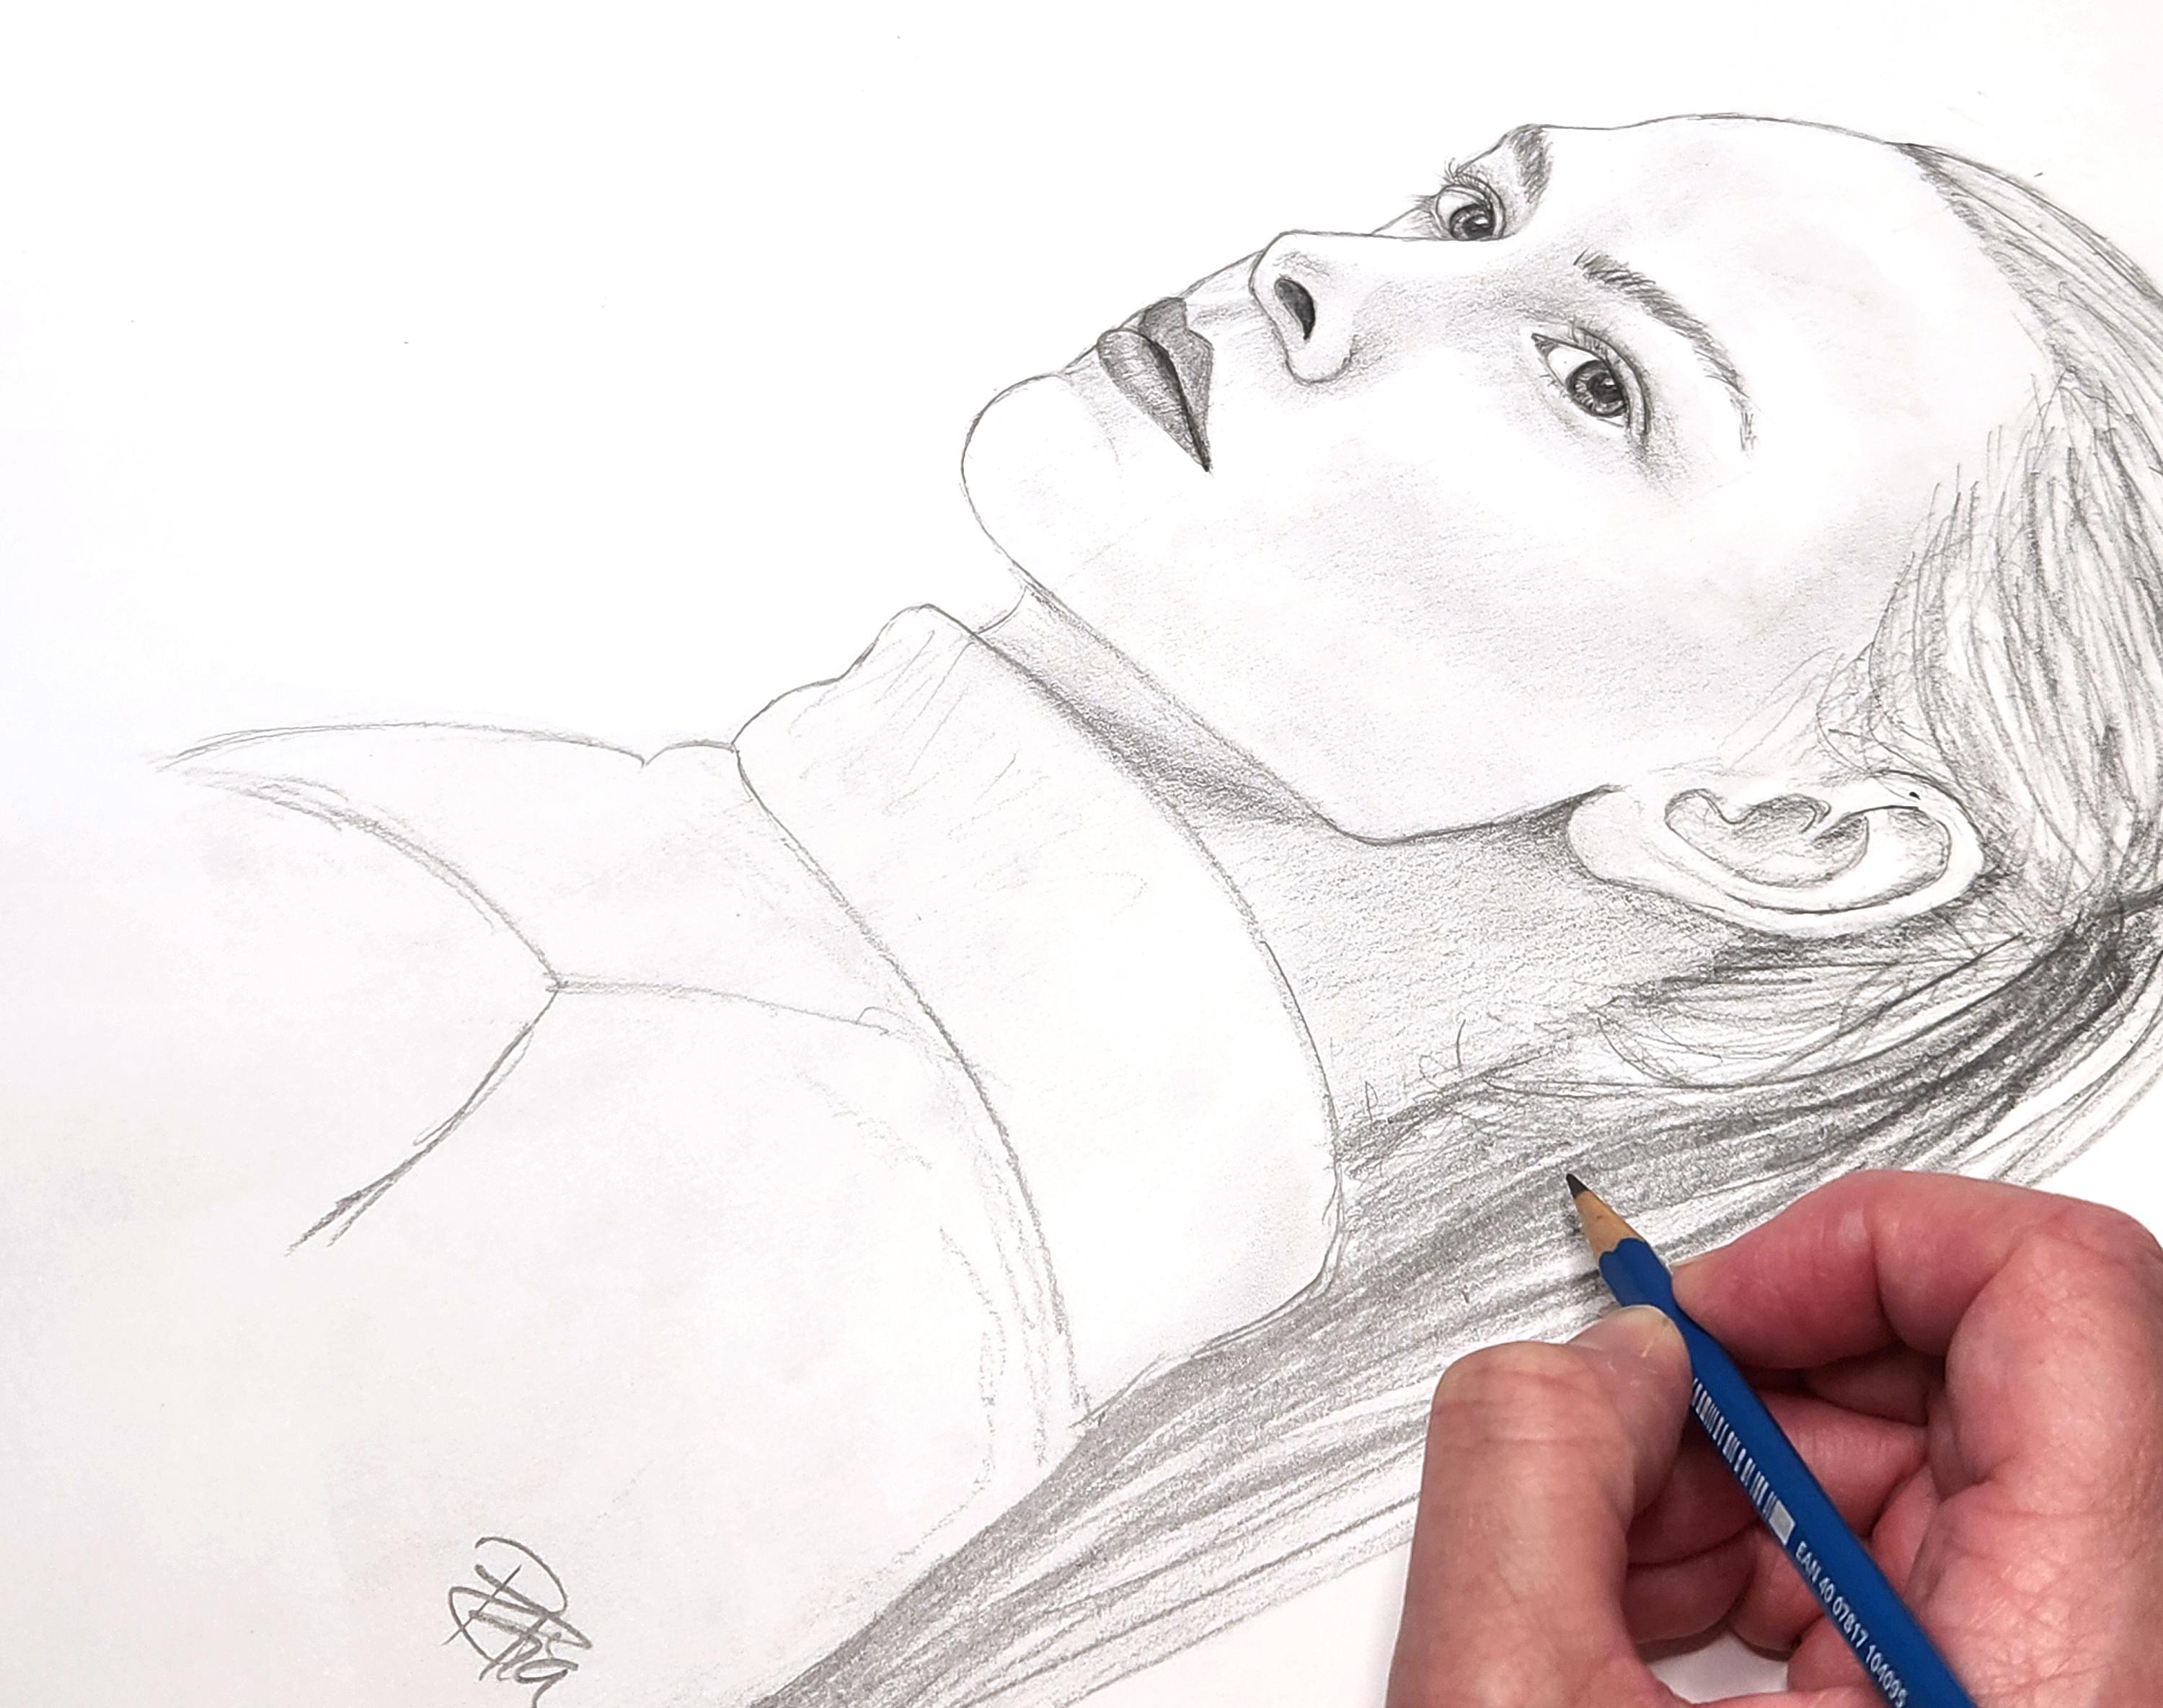
14. Project Drawing Hair and Upper Body: For those of you
who are observant, you will notice that I
move the ear a little. So just double check
some of your alignments and see how they match up with
the features of the face. And it's always better
to make adjustments now, like I said before
we start shading. The next part we will
draw is this neck here, and I'm even going
to go down into her sweater a little
to give me more of a three dimensional feel of her actual figure and not just a flat face
that we have so far. So let's look under
where her neck starts. It's right about
under this chin line, and then there's a little
bit of a curve here. Then under her jaw is a little bit of a
shadow line there. Then the back of her neck is way past maybe even like
the middle of the ear, almost to the edge of the ear. Her neck line is starting here. And it's not straight. There is a slight angle to it. We want to get this right
and then the rest of it, we will add once we
get the neck correct. I'm going to also add in
this collar of the sweater. That's going to help me
see the rest of her body. Usually the clothing
is a lot larger than the body unless
it is tight clothing. If you just want
to draw this line here for the top of the
collar and notice that it dips back and it dips back quite a ways past the neck
line and has a curve, and then the top also has a curve a little
bit past the neck. And this can just be
a very loose sketch. It's just to give some
depth to her body. One of the best ways to draw clothing is to look
for the seam lines. Here's the line of the collar, and then this seam line
coming out for her shoulder, and then that is very helpful. Then there's a
triangle point here. Then I can see more
of the sweater line. It makes it a lot
easier to draw. Then the back is pretty much
straight next to her hair. We'll just leave
that there for now. The next piece we will draw is we need to do
the top of the head, but I'm not sure where
to put that yet, so I want an anchor. I'm going to use this
ponytail here as my anchor to know how to
curve the top of the head. If I look at the placement, it is higher than the
ear and a little ways. I want to say around here is that ponytail that I'm going to meet the
top of the head to. From the back of the neck
that we already have drawn, you can see there are
some hairs that are loose and they're coming up
around to this pony tail. And then some of the
pony tail will be very close to her neck
and then the sweater. For our purposes, we
need to draw the rest of the forehead and the hair
line and the top of the head. We already have to quarter one. Now that slope of the forehead keeps going upwards
to quarter two. She has a very high forehead
and her hair is pulled back, so it makes it look
even more prominent. Somewhere around quarter two, we're going to see a hair line. Here's the hair line
itself that's on the skin. Then the hair itself is
quite a ways above that. It is in a very neat,
tight ponytail. This is where I'm going
to use this ponytail as my anchor to see where I'm going to
bring my pencil around. I just want a nice smooth curve like this for the
top of the head. Let's go ahead and fill in
the rest of the hair line. The hairs are growing out
and down past quarter three. They're coming on the temple. You can see them on the side of the face and even all around the side of the ear is
a soft pieces of hair, as well as this sharper
hair line that's up here. If you want to blend
that in a little, we're not going to draw
every single hair, but it helps to have a few
of these darker lines, and when we get into shading, we can shade the base
of it and then just use these darker
lines as an accent. For the back of the hair, I'm going to focus on the same
pony tail and I'm going to just make a really nice
long sweeping line down the back of her sweater. So curves in it, some We'll have shadow
later and just a nice, long sweeping line of hair. Again, we're not going
to draw every hair, but we'll have shading when
we're finishing this up. Now that you have all the
features of the face and all the proportions lined up and everything drawn
in a nice outline. Let's go ahead and erase
all our guidelines. We'll take a pause. You
can clean it all up. Let's erase all the guidelines, and then I'll go over
some shading with you briefly afterwards to
finish up this project.
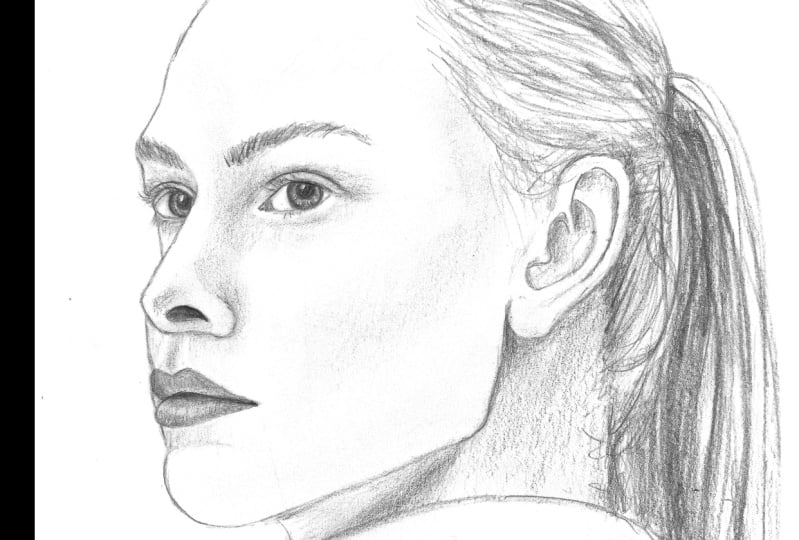
15. Project Rendering with Shading Techniques: Now that we have
all the guidelines cleared and if you're
drawing digitally, that took what, half a second. That's one of the advantages. But if you're drawing with
traditional pencil and paper, you could have erased everything and now we'll
work on the shading. For shading, I like to
start from dark to light. I'm going to look at
the darkest parts of the features first. We already had the pupils. If you don't have
them jet black, go ahead and make the
pupils very black. Then the next part I'm going
to look at is her nostril. The entire nostril is
not completely black. If you look closely, just this outer pointed
part is very black. And then as it comes
towards the rounded part, that is shaded, maybe a little bit lighter,
not completely black. Then the next darkest, we already had her mouth. If you didn't have that line nice and black, I would do that. Then I look for the
crease in the eyelid. That is a nice dark
line on both eyelids. Then I like to come in and
look for the mid tones. So We talked about the ear. I'm not going to
shade too much of the ear because I don't want
to draw attention to it. I want to draw attention
to her beautiful face. But you can do underneath these curves of the ear,
lightly shade those. There was a few darker
corners of the ear, you can add to and whatever you make dark is
going to pull the eyes there, so I wouldn't go
too dark with that. I would focus on her lips
because the mouth and nose and eyes are mostly the features that are focused on
in this photograph. The top lip is a little
bit shaded darker than the bottom because the bottom
lip is catching the light. You can see look a
little highlight. Only this part is
shaded completely. You can use a blending stick, or if you are like me, you just use your finger, or if you're doing digitally, there's a little smudge tool. Then the filtrum here is
like a little valley between the nose and the lips and
between the points of the lips. You can just have
that light there. The other mid tones
I want to look at are around the
nose and the eyes. There's a little part
here by the point of her nose that is
a little darker. Then obviously, the
corner of the nose, there is a shadow around
that outside nostril flap. Then also underneath
the nose, slightly, there's a little bit of shading It's up to you how much
shading you want to do. You could really go all into it, or you could keep it subtle, or you could keep
it mostly lines, how we just had it
a few minutes ago. It's up to you how
you want to do it. Experiment with the
different levels of shading, how dark you want it to go. This side of the face
is not as light, you can see a little
bit under the eyes. Definitely a lot of
shading around this eye. And that's going to
show the roundness of the eye and make it less
flat on your paper. Also underneath, we talked about a little bit of a line here from where she's squinting her eye where the
muscle is engaged. Then you have to distinguish
between makeup and shading. She has very light makeup, but there is some
sometimes underneath the eyelid, very subtly shaded. Then underneath this
eye a little bit. You can go down all
the sides of the face. If you want to accent
for the light, you can use an eraser and show that light back in if you
got rid of it on accident. That's another way to bring out the features is to erase
some of the shading. Obviously, the more you shade, the more dramatic
it's going to look, the more the features will pop. A little bit of shading where in that line we have
under the chin. More for the lips.
If you look closely, it's almost like a little bit
of light around the lips. This is just an eraser pen. You can add to that.
Then under the neck, you want to give her some depth. There's a lot of shading here. Definitely around this ear. Then like I said,
for negative space, I like to go behind the ear. Her forehead has some shading
here that shows that curve. Then when we get to the hair, you can do a light
shading on the hair, depending on the
person's hair color, so she's more blind, I
wouldn't go too dark. But I'm going to shade around the ear where some of the darkest points
are behind the ear. Then when you draw in your
few lines for the hair, try to go in the same
direction they are growing. Usually look a soft
downward motion. And then under the hair,
I usually like to pick a few dark parts to highlight by showing the darkest point and then some of the lighter pieces just have a few lines in it. And then we talked about these little neck hairs back here. When you have a few
messy little hairs, I think it adds to the
naturalness of it. If you want to shave
the clothing a bit, We're just finishing
up a little bit, add any final touches you
want to your shading. We're going to talk
about the cheekbone. Usually there's definitely
some shading on the cheekbone. You can blend that
in, smooth that out. Experiment with the
shading and drawing and don't forget to sign your
work. That is one thing. You should be of your work,
sign your name on it. Please post it in the class. I'd love to see how your artwork came out and whatever
you do, keep drawing.
16. Final Thoughts: Congratulations on finishing the course and drawing a full. For some, this may
just be practice, but others, this may be a first. You're taking time to learn and grow by taking a
course like this, and that is so vital
for a creative person. Also, I would love to see how your final
portrait came out. So please post that in the project area and let me know if you have any
questions or comments. I'd love to hear from you. And thanks so much for
taking this course, and no matter what
you do, keep drawing.
 Rachel Fia, Artist & Illustrator