Transcripts
1. Introduction: Hello, and welcome
to my latest class. I'm thrilled to see so
many of you are eager to learn more about character in children's book Illustration. That's our focus in this class. We will dive in into the world of stylized
character design, and this class is perfect
for boosting your skills, whether for personal projects
or professional work. Hi. I'm Iva, and I'm full time illustrator
based in Central Europe. My experience with creating engaging characters has helped
me in a range of projects, including award winning
Leg of Friends, which aired as a series on
Netflix, numerous books, magazines, and bespoke
illustrations for various clients. And during this
class, we'll start off with sketching
the simple ideas. I will guide you through using balance in character poses, both balanced and unbalanced to create dynamic illustrations. Will focus on using simple shapes to establish
proportions and poses, which helps ease the pressure of getting everything
perfect from the start. Along the way, we will weave in little stories in
our characters. I will also show you how to draw inspiration from everyday life, simplifying real
world references for your character design. This technique is
great for building a strong foundation and
developing your own unique style. Now for the fun part, we are setting our
characters in a dreamy, rainy autumn scene with umbrellas and bright
color palette. This will add an extra layer of enjoyment to our practice. I will be there every
step of the way, making this class accessible for beginners and more
experienced artists alike. So I hope when you watch
and follow this class, you will feel super happy about your illustration and
you will share it with others because I'm
really looking forward to seeing your take on
the project illustration. And when you are sharing
it on Instagram, please make sure
that you take me both in the image and
in the description because that way I can see your illustration and I can
share your art with others, and maybe you will see it
in one of the next videos. So if you don't know yet, you can find even more drawing tutorials
and classes from me. Procreate and other tutorials, and I have more than 40
classes and other content. And you can find
different topics for building your art skills. And there is a variety from beginner level to
more advanced levels. Before we dive in, don't forget to follow
me on Instagram. There, you'll find
my latest artworks and glimpses into my
life as an artist. So without further ado, let's start and see
you in the class.
2. Warm-up – Simple Standing Pose: In order to talk about
balanced and unbalanced poses, let's sketch our
first character. And as you can see,
I imported an image, which we can use
as a reference for this more basic pose where
the character is standing. So I will focus on
sketching the head first. I think the neck, torso, pelvis, and the legs. And as you know, I also have other character
classes if you want to practice sketching
poses more. Right now, I'm just very
quickly sketching overall pose. And then we can
add the umbrella. And if you're wondering, I'm using soft grain brush. So here I am paying attention where the
feed are on the ground. So they are approximately
on the same level. Then notice where the knees are And then we have
the shoulders and the jacket which is kind of opening towards
the head of the character, and then we have the waist and the shoes. And let's just
sketch nice simple hair, which is more curly. And you can also define
the umbrella a little bit. All right, so I'm just adding a shirt and a few more
of these details. And I think some
of these exercises are great way to practice
sketching characters. And then you can sketch a
little bit of the ground. And I will quickly add a face
to this character as well. Now I will reduce the
opacity of this sketch. And now I will add a few more defining details with one of my favorite
sketching brushes, which is brush number 13. So I will just add few lines to define the
sketch a little bit more. And then the other leg and a little bit of that cute outfit for
the rainy season, we can add some pockets. And then we have the other hand. And as you know, I have
also the class about sketching hands if you want to practice
drawing hands too. All right. Now I'm reducing the opacity
of the overall sketch, so I can show you what I mean on top of this
overall character. And to do that, I
will change color. I will take green colour and I will take bigger
sketching brush. All right. So what I wanted to mention here is
that the center of a gravity is usually basically
in our center, right? So if our center of
gravity is here, then you want to pay attention where the feet of the
character are placed. So I will just delete part
so you can see it better. So now we have both
of the feet here, and the center of the character is aligned where the head is. So this character is pretty
much balanced, right? So what if I take the same
character and I duplicate it? So let's just move it here. And I will distort the
legs of the character. So if you would see
character like this, you would see that it's
falling to the side. The center of the
gravity is here, but it's not aligned with the bottom foot because this leg and foot is
too much to the left, even though it's
aligned with the head. And the center of the human, but this foot is not
aligned with the center. When you see
character like this, it's more obvious that
it's not centered because you already feel like the character is
falling to the side. So what would happen
if I take the legs of this character and still
kind of distort it. So let's see if I
move it this way. So you can notice
when one of the legs is still aligned with the
center of the character, it still feels fine. But if you move the
legs completely outside of the alignment of
the center of the character, then it starts to feel like
there is falling to the side. Alright. So this one is unbalanced and
this one is balanced. So always think about where is the center of the gravity
of the human or of the character that you are drawing and if it
is aligned with the head and how the feet are
in contact with the ground. Because the center of the
gravity should be always above the kind of zone created by the limbs in contact
with the ground. You can do this also
when the character is kind of standing on one hand, for example, but
just always think, how is it aligned
with the center?
3. Warm-up – Active Poses: And here is another reference
photo for our practice. So as you can see from this one, that it's clearly
not balanced in the same way as with
the previous pose. So let's practice sketching this and then let's discuss why these type of poses are also interesting when
considering the balance, and I'm sure you
can already guess. So for this one, I will
first sketch action line, and I talk more about the action lines in
the class about poses. I will start with this loose sketch and
the pelvis and one leg. I'm simplifying here,
and then we have the other leg and the
calf and the foot. This one hand is here. I need to move it a
little bit to the side, and then we have the second
arm with the umbrella. So here, try to focus on the
placement of all the limbs. How are they in the
relationship to each other? Now I will reduce the sketch, this rough sketch,
and I will make the brush a little
bit bigger and I will add the other details. Defining the shapes. These practice sketches
are great for you to observe the volumes
of the character. But you can still keep
it fairly simple, like in cylinder shapes. So you can imagine the volume, and I have a class on volume, as you know, as well. So you can look at that too
if you want to practice, this class doesn't
become too long if you already know
all about volumes. Here, I'll just suggest the and then I'll sketch the other one and then I'll just
add the umbrella. And I'm kind of creating
this more as a gesture pose rather than perfectly anatomically
correct character. So it's still very
much stylized. Now I will sketch the other leg. This one is more in the air. Again, always try to
notice where the joints of the characters are so that will help you to pose
the character easier. Even with action poses. Because sometimes we want to
exaggerate certain things, which I think it's great. But also, you should be aware
of where the things are, before you exaggerate, kind of, like, learn the rules. So you know how to
break them, you know, like the quote, kind of master the rules
before you break them. I can make the head a
little bit bigger here. Oops, I need to swap
to uniform selection. All right. I think this is
good enough for our example. I will reduce the
opacity as before, and I will redefine certain
parts of the sketch, so it's a little
bit more readable. All right, so I will
reduce the opacity of everything so we
can sketch on top. So I will again take a different brush so
you see it better. And now I will take the
orange color as we used before because I want to mention here where
the balance should be. So we have the center
of gravity here. And the head is here, right? So if you sketch a line
through the character, you clearly see that this character is not
balanced because the feet are here and it feels like she will fall to the side because the
ground is somewhere here. I mean, there is a little
bit of perspective, so it might look like the ground is a little
bit further up, but we can sketch it here. So, you know, so why
are we talking about this pose when we talked about mostly about how to
balance the characters, not how to have them,
not balanced, right? So sometimes you will need instability in
your characters, especially in action poses, as you might have guessed. So you need to find
good compromise or a balance between unbalanced and balanced
characters to create motion in the characters
that you want to convey and communicate with your viewers the
controlled gestures. There is something that
you wanted to create, not that it happened
by accident. So now you know that you need to pay attention
where is the head, center of the gravity, and how feet and limbs are
interacting with the ground. And I thought that perfect project to practice
this more is to create controlled gestures and
balanced and unbalanced walk also how the characters
are walking on the street. And when we already
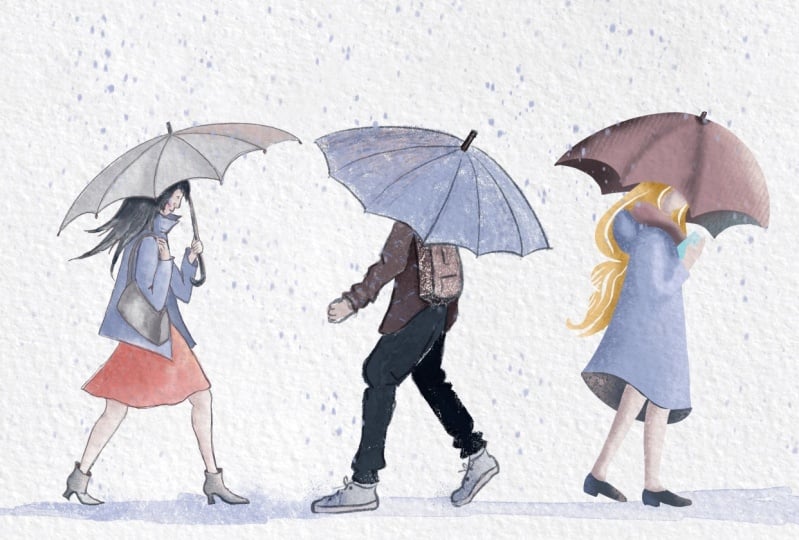
have this mood or topic of umbrellas and rain, let's create more characters kind of walking on the street in the rain because also it can be quite nice and colorful. All right, let's do that.
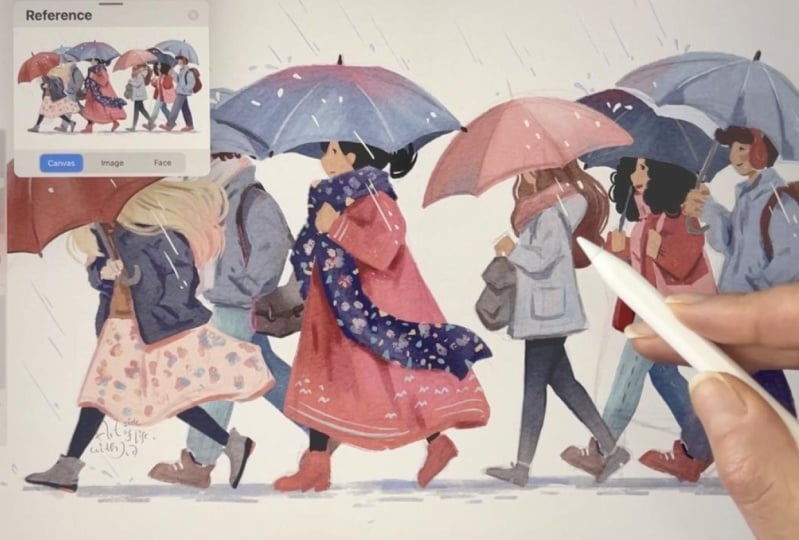
4. Project – Walking Character: All right. Let's start
sketching our characters. So for the first one, I thought we can create
more balanced character, so you can sketch a line for yourself where you
would place the head. Then we will have the torso, the center of the gravity, and then we will have the limbs. So the feet will be touching the floor
approximately where the center of the gravity is and then the second leg
can be somewhere here. Then I thought I can add
an umbrella here so we can partially cover the
head of the character, and then maybe she will
have this bigger coat. I'll just add a bigger coat here because it's kind of like
wintery or rainy season, and maybe she will be
holding a backpack. I'll just add a backpack here and then add a
hoodie for the coat. And maybe a scarf I think would be nice and then
add the long hair, which I think it's nice for this character silhouette
then the umbrella, as I said, it's partially covering the face
of the character. I'll just sketch
the umbrella like this and then she's holding the umbrella maybe with the
hand on the other side. This is the bottom part of the coat, making
simplified shapes. Then this leg is
little bit I mean, the foot is little
bit off the ground, so I'm keeping it still pretty
simple and simple shoes. It's rounded. Then she might have leggings. And the leg is
bend a little bit. And then the other leg is behind the one
in the foreground. And the shoe is little
bit off the ground. Here we just need to make sure that both feet are
on the ground, she's not flying in the air. Here I'll just step
the canvas and then I will move
this other foot with a selection tool just to
make sure that it's on the ground and align
the size of the feet. So now I'll just make sure
everything is aligned. As you can see, I'm sketching in my watercolor paper template, which helps me to add
textures on top of the colors later and also I can turn on
and off the paper texture. I will do that later
in the process. Here I'll just add a few more
details to the backpack to help me define the shapes
before adding colors. And the arm is somewhere
here and you can open variety of references that you like to combine
character like this, and I have a class
like that too, like how to combine different references
into one illustration. So if you are wondering how or why I'm combining certain
references like this, it's explained more in
detail in that class too. So you can check that out. All right. Now I will reduce the
opacity of this one and I will add color
to this character. The layer will be under
the sketch layer. I will set the sketch
layer to multiply, and I will add colors with my gouache brushes
because I like the texture of the
gouache brushes. But you can use
any other brushes that you like for this
part of the process. I will take this brush
number 23 and I will take a grayish
desaturated blue color, and I will add color to
the coat of the character. And before you start coloring, always check if the
head is aligned with the center of the balance
and where the feet are. If they are placed in a
way that you want them to. Now that you finish the sketch, you start coloring
and then you realize, that's actually
not what I wanted. I will add this grayish
color tone to the shoes. You can design the shoes
more if you like leggings, I will create in this darker
blue so almost black. I think that will
be a nice contrast. As you can see here, I'm already getting textures. If I zoom in more, I'm already getting
textures from the template. So I don't need to create so much texture if I
don't want to because, you know, template like
this with the textures, it's making my work
faster and easier. So this is an option, how you can create
textures as well. So you can work with brushes or you can use
templates like this. So now I will use Alpha lock. Oops. Actually, you
have to click here. How I usually use Alpha log
is deep and I use quick menu. Now I will use a little
bit lighter color, and I will swap to
more bristly brush. Then I can add the subtle gradient quite quickly with these
bristly brushes. I think here at the bottom, I can make it a little
bit warmer but darker. You can imagine a fog
coming from a pavement. I think that would
be pretty nice. Now I will disable the alpha
log and I will go back to the brush 23 and I will add similar
color to the backpack. Using limited color palette
for this character in a way. So everything is matching. Here from the sketch, I can already sample this darker color and I can
use it for the shadows. For that, I will take
more detailing brush, which is more thin, which
fits great for details. I'll just define this
backpack a little bit more And I will add a little bit darker
shadows here under the coat, and I'm always checking here
on the smaller preview. And I will add a shadow here where the legs are
kind of like overlapping. And I will do the
same for the coat. Here, I think I will make the shadows a
little bit more blue, not so gray as it
is on the sketch. I'll add some shadows here
and just under the arm. And we can add a pocket
for the character. Now moving to the
scarf, I think, something in the orangy maybe almost pink
tones can be nice. I will try it out.
I will swap back to this brush because it
has more sharp edge, which is nice when you are
creating bigger shapes, I think, because it
looks more defined. And also it has nice
rough scratchy texture and there are many
different brushes that I like to try
and change when drawing because
each brush can give you a different look and feel. I will use the similar color for the umbrella and then
we can adjust it. Here I will be a little bit
more careful with the edges. And you can work on different layers if you want
to have more flexibility. Then here, I want to have
it a little bit more round. Here you can hold the pen
in place and then edit the arc and that
will help you to create the shapes easier. Now I can just drag
and drop the color if the shapes are
closed and then drag to the right Now I will alpha and I will make one
side a little bit lighter. I'll just move the slider to
towards the lighter colors, take bristly brush, so I
can create a soft gradient. I need to make the brush
a little bit smaller. I can build this gradient, imagining the light coming
from the top right. Here I can make it even
lighter and maybe more purple. Perfect. Now I think I will draw the head under the umbrella
so I will create new layer and I will
take light brown color, I think for the hair,
which would work well, I think, in this case, because I'm sketching
on a separate layer, it's definitely faster and easier just to
define the shapes. And I have also a class
about drawing hair. If you are wondering
how to build different volumes
and design hair, here I will create
soft gradient as well with a little bit darker
color from the bottom. I need to alpha
lock it, of course, and then a little bit lighter from the top
but not too much, it's not the same
as the umbrella. Now we just need to create a face again
on a separate layer, which will be much faster. I think in this case, I will use a lighter skin tone because we have
already darker hair. Here you can choose what skin
tone you would like to add, of course, always try
to create variety. Here I will just go for something like this and
let's see how that works. I think in this case,
it's all right. Make sure that the neck is
placed where the shoulders are and then I can add
a simplified hand here, just holding the backpack, here I can see that I
need to add more hair. It's have that nice flow. Okay. I will adjust the scarf here. The hoodie is a
little bit lower. We can also move the umbrella
slightly lower, I think, just to cover the
face a little bit more and adjust the
hair here, I think. You can define the shoes a
little bit more, as I said. So I can add a little bit more
of these curved shapes and maybe a slight heel and I will do the same
for the other shoe. We have one character
and you can create as many characters
as you would like. Now, I will add more characters
with the same technique. I have a lineup of characters. Always make sure
that the feet are helping you balance
the character within the center
of the gravity, the head, and the legs.
5. Project – A Moving Character: So the next character, I thought we can
create the movement, which shows that the
character is more in a hurry. So we don't have to again draw the face
if you don't want to. And here, I think we can
create even bigger umbrella, as you can imagine, some of the people have
these gigantic umbrellas. And we can angle it
a little bit more towards the way the character is moving basically forward. So it implies that you have to angle the umbrella
when you're walking. Maybe I can make this
umbrella slightly smaller. Maybe it was too gigantic. And here, I'll just add the
torso of the character. So it will be more angled towards the wind maybe or
the sense of the movement. Then I will add the pelvis. We can always adjust these
things, so don't worry. It doesn't have to be exactly
like your first sketch. Here, there will be the
hand holding the umbrellas. So here we need to figure
out where is the character and where is the umbrella stick, because it will be
somewhere here, so it to the character needs to hold it
with the other hand. So it will be kind of
like somewhere here. Alright, so it can be
still the same hand, but the umbrella can't
be tilted as much. Always think how
you will connect it with the top of the umbrella. And then we will have
this maybe floaty hair. I'm drawing similar
character now, but you can, of course, draw
different character. And here, because the
character is tilted like this, 1 ft should be somewhere
here, I would guess. And then the other one will be more determined going forward. So these legs are a little
bit more wider apart, and then we will kind
of bend one of them. And this one will be a
little bit more straight. I will add similar shoes just to reduce the complexity and this foot in the back will be bent I think we can
add fun flowy skirt, like I showed you and explain the movement
in the recent class. The skirt will be
flowing here and then we can add a bigger jacket. Because I think
it's quite fun when these pieces of fabric
are floating in the wind. You can maybe add
a scarf as well. I think I will add one
character just with a scarf because that will be nice addition to
the illustration, I think. Maybe some big sweater. We see the legs well. I will add leggings
and the same here. Okay. And then a hair on this side too and the top of the jacket. So let's see. Maybe this is a
little bit too much, so I'll take this part of the sketch and I will rotate it. And I think this type of
movement is enough. Let's see. Yeah, I think this works well. I need to make sure they're
in the same height. Again, I will place
it somewhere here, and then I will move the other leg hoops,
a little bit lower. They are alged because this
one is already on the ground. Or actually what I can do, I can lift this foot
completely off the ground. So then we can have it even
more like a action pose. So we need to make sure that the feet are kind
of the same length. These two or you can add kickers and small heel maybe on these winter boots. So maybe they're a little
bit wider on the ankle. Then maybe there can be dots
or flowers on the skirt. I think that can be pretty cute. I'm just defining the
sketch a little bit more. I see what is where. But I think it should
work well as it is. Perfect. So now I will reduce the opacity of this one and kind of
merge them together. Or I can set both of them
actually to multiply. I don't need to merge them. Depends how many layers you have available in your document. Here, I need to reduce the
opacity of this one even more. So we see the colors
that we are drawing, and I will use the same brushes that I used before
for the basic colors. And I will try to use similar colors as I used
on the other character. So kind of they fit together
in one illustration. So here I will make it a
little bit lighter, I think. So here we have the jacket. Again, I will alpha lock it. I will make it slightly
lighter at the top We have this nice variety. Then I will remove the
alpha ok, draw the hair. I can use similar hair color, or maybe this time, I can
use lighter hair color. And it will be this
nice and flowy. So maybe you can create more like a blonde
character this time. If we had brown hair before. Let's see if it will be visible, maybe just a little
bit darker color. No, I think the previous
color was kind of okay. Maybe I can make it a
little bit less saturated. There will be hair
on this side too. Perfect. Now, I will
again, the gradient Maybe this character can have
pink hair at the bottom, can be pretty cute. Now let's add the skirt. I think the skirt can be
this less saturated pink, which would fit there
I think pretty nicely. It can be actually
more peachy color. And then I will add some flowers and I will change the brush
to more like a sponge brush, which will help me to create
the flowers quite fast, and in easy way. And maybe some blue flowers would be nice in
this case as well, so you can mix and match
some of these colors together to create a variety
there, maybe more blue. Yeah, I think
that's pretty cute. Now I will go back to a brush which has a more defined edge, and I will use a similar color
for these leggings here. And I will draw the shoes
right away as well. Perfect. I will
make these shoes. Also gray, maybe with darker so there is a
little bit of variety. Perfect. Now, let's add a
sweater for this character. I think we can have it more like brown color because we don't have the brown
on this character yet. Then I will use lighter skin
tone for this character. Because it's blond, so I thought it would work
a little bit better. Here we don't see the
face actually that much. That saves us some work. Here we can add maybe more of that hoodie and the
hair over the hoodie. I think that's pretty nice. Now we can add some shadows
as well under the arm. And also here under the
hoodie and basically just define these shapes a little bit more so they are
a little bit more readable, but still just stylized
and not adding too many details just to
keep it still quite simple. I'm just sampling
colors from the canvas. Here I will take the lighter
blue from the jacket. And I will just draw the second
sleeve on the other side, which I think works well. Now we just need to add
the umbrella and I will sample the pink color and I will make it a
little bit more red. I think that could be nice
this pinkish red and I will define the umbrella shape and I think on the separate
layer will be easier. All right, so we
have the umbrella. I will again use the alpha ok and I will add some
shading on the top. I will make it a little bit more pink and lighter on the top, just to have some variety, and then a little bit
darker here on the side, maybe not as much. And here, I think I can
make it even lighter maybe the light is reflecting from the umbrella even more
in certain parts. Perfect. And with a
more detailing brush, you can add some details like this umbrella end when
it's holding it together, and you can also kind of define the umbrella
a little bit more. If you like that kind of look, especially for this one, And here we don't have the
neck defined very well. So I think we can
add a little bit of this brown color here so
we can suggest that there is the sweater and possibly maybe a scarf
or something kind of going through the hair. So a little bit of
the detail here, I think would be nice. And then maybe a slight
definition of this jacket, how it's folding here
and the shadow from the umbrella and maybe defining the hair just
ever so slightly here. From the distance, it's a
little bit more readable. Perfect. All we have now
two characters ready. And then here you always
want to make sure that the feet are kind of
aligned on the ground. So here we can
always double check. And for example, if
you see that one of the legs is a little bit
lower than the other, you can always use
the selection tool and move it and see that the procreate will kind of
help you to align the legs. They are touching ground
approximately on the same level. Here we can leave it a
little bit lower as we wanted to have this foot
a little bit higher, and then you can
also tilt the foot and always compare
on the smaller view, then you can also
add the ground. So I will switch for this one, and I will use kind of this
reflected rainy surface. I need to make it a
little bit darker and adding the ground
kind of helps you basically to ground
your characters and see how they look kind of
compared in the environment. So here you can see how the character is
kind of like walking. And you can take the leg
and you can rotate it. So it's more aligned with
the center of the character, making sure that
the anatomy works also under the clothes. All right. I will sketch more
characters in the same way, and I'm looking forward
to see your versions, which I think will
be super cool. So I'll just speed
up the drawing of rest of the characters
because I will be using the same process.
6. Your Turn, Drawing Character #3 in Real Time: Wow.
7. Adding More Moving Characters to Your Scene : Go. U. Wow. Wow. Wow. W
8. What to draw next?: So I edit few more characters
using the same technique, making sure that the characters
are well balanced and at the same time with the intention to move
forward because of the rain. So as you can see, I edit some raindrops to this
illustration as well. So you can use the
same technique of coloring and balancing
the characters if you want to build
a bigger lineup of characters kind of
on the street and maybe you can add the
whole street if you want. But hopefully, you
had fun creating these balanced
walking characters. And if you want to expand on the knowledge you
learned in this class, you can watch my other classes
about characters and also about colors called
color palette and color and light
master class. Visit my teacher
profile to find them. And if you would like me to share your projects
on Instagram, please tag me in the
Instagram stories in the post and
post description. So I can help you and your art to be discovered
by more people. So thank you so
much for watching, and I do hope that
you really like your illustration and you
will share it with others. So don't forget to tag me if
you share it on Instagram. If you want me to share your
illustration with others. And thank you again so much for watching and see you in
the next class. Bye.
 Iva Mikles, Illustrator | Top Teacher | Art Side of Life