Transcripts
1. Trailer: Drawing is important. [MUSIC] Whether you're an aspiring
illustrator or artist, or you're just
trying to tap more deeply into your
personal creativity, this class will give you unique tools to start
drawing every day. My name is Mr. Tom Froese. I'm an illustrator
and top teacher on Skillshare where
I've helped over a 100,000 students on hustle world of
commercial illustration. Over the last decade
or so, I've worked for hundreds of clients
around the world, including Amazon,
Yahoo, and Airbnb. I don't think I
could have gotten to this point without
having first built a habit of drawing and sharing
that drawing every day. What if there was a way
that made it easy to draw every day and
not just doodle here and there but really draw intentionally and
thoughtfully every day. In this class, I'll
show you how keeping a daily drawing habit can be far easier than you might think. The secret is in making sure you have a plan before you start. In this class, I'll
guide you through setting up a plan
that's perfect for you and share some tips
and tricks for how to keep your drawing
habit going. You'll also learn how
to include sharing your work as part of
your practice so that you can start building an
audience of fans and friends and really open up a
world of possibility. For me, drawing every day and sharing it with
my growing audience has always been a huge part
of my creative practice. It's been how I've
developed my creative voice and it's been a
way to connect to others in a meaningful way
over our shared love of art. Whether you're a
professional artist or trying to grow
in your creativity, daily drawing is so important. I hope you can join me
as I show you how to develop this powerful
habit in your own life. I'll see you in class.
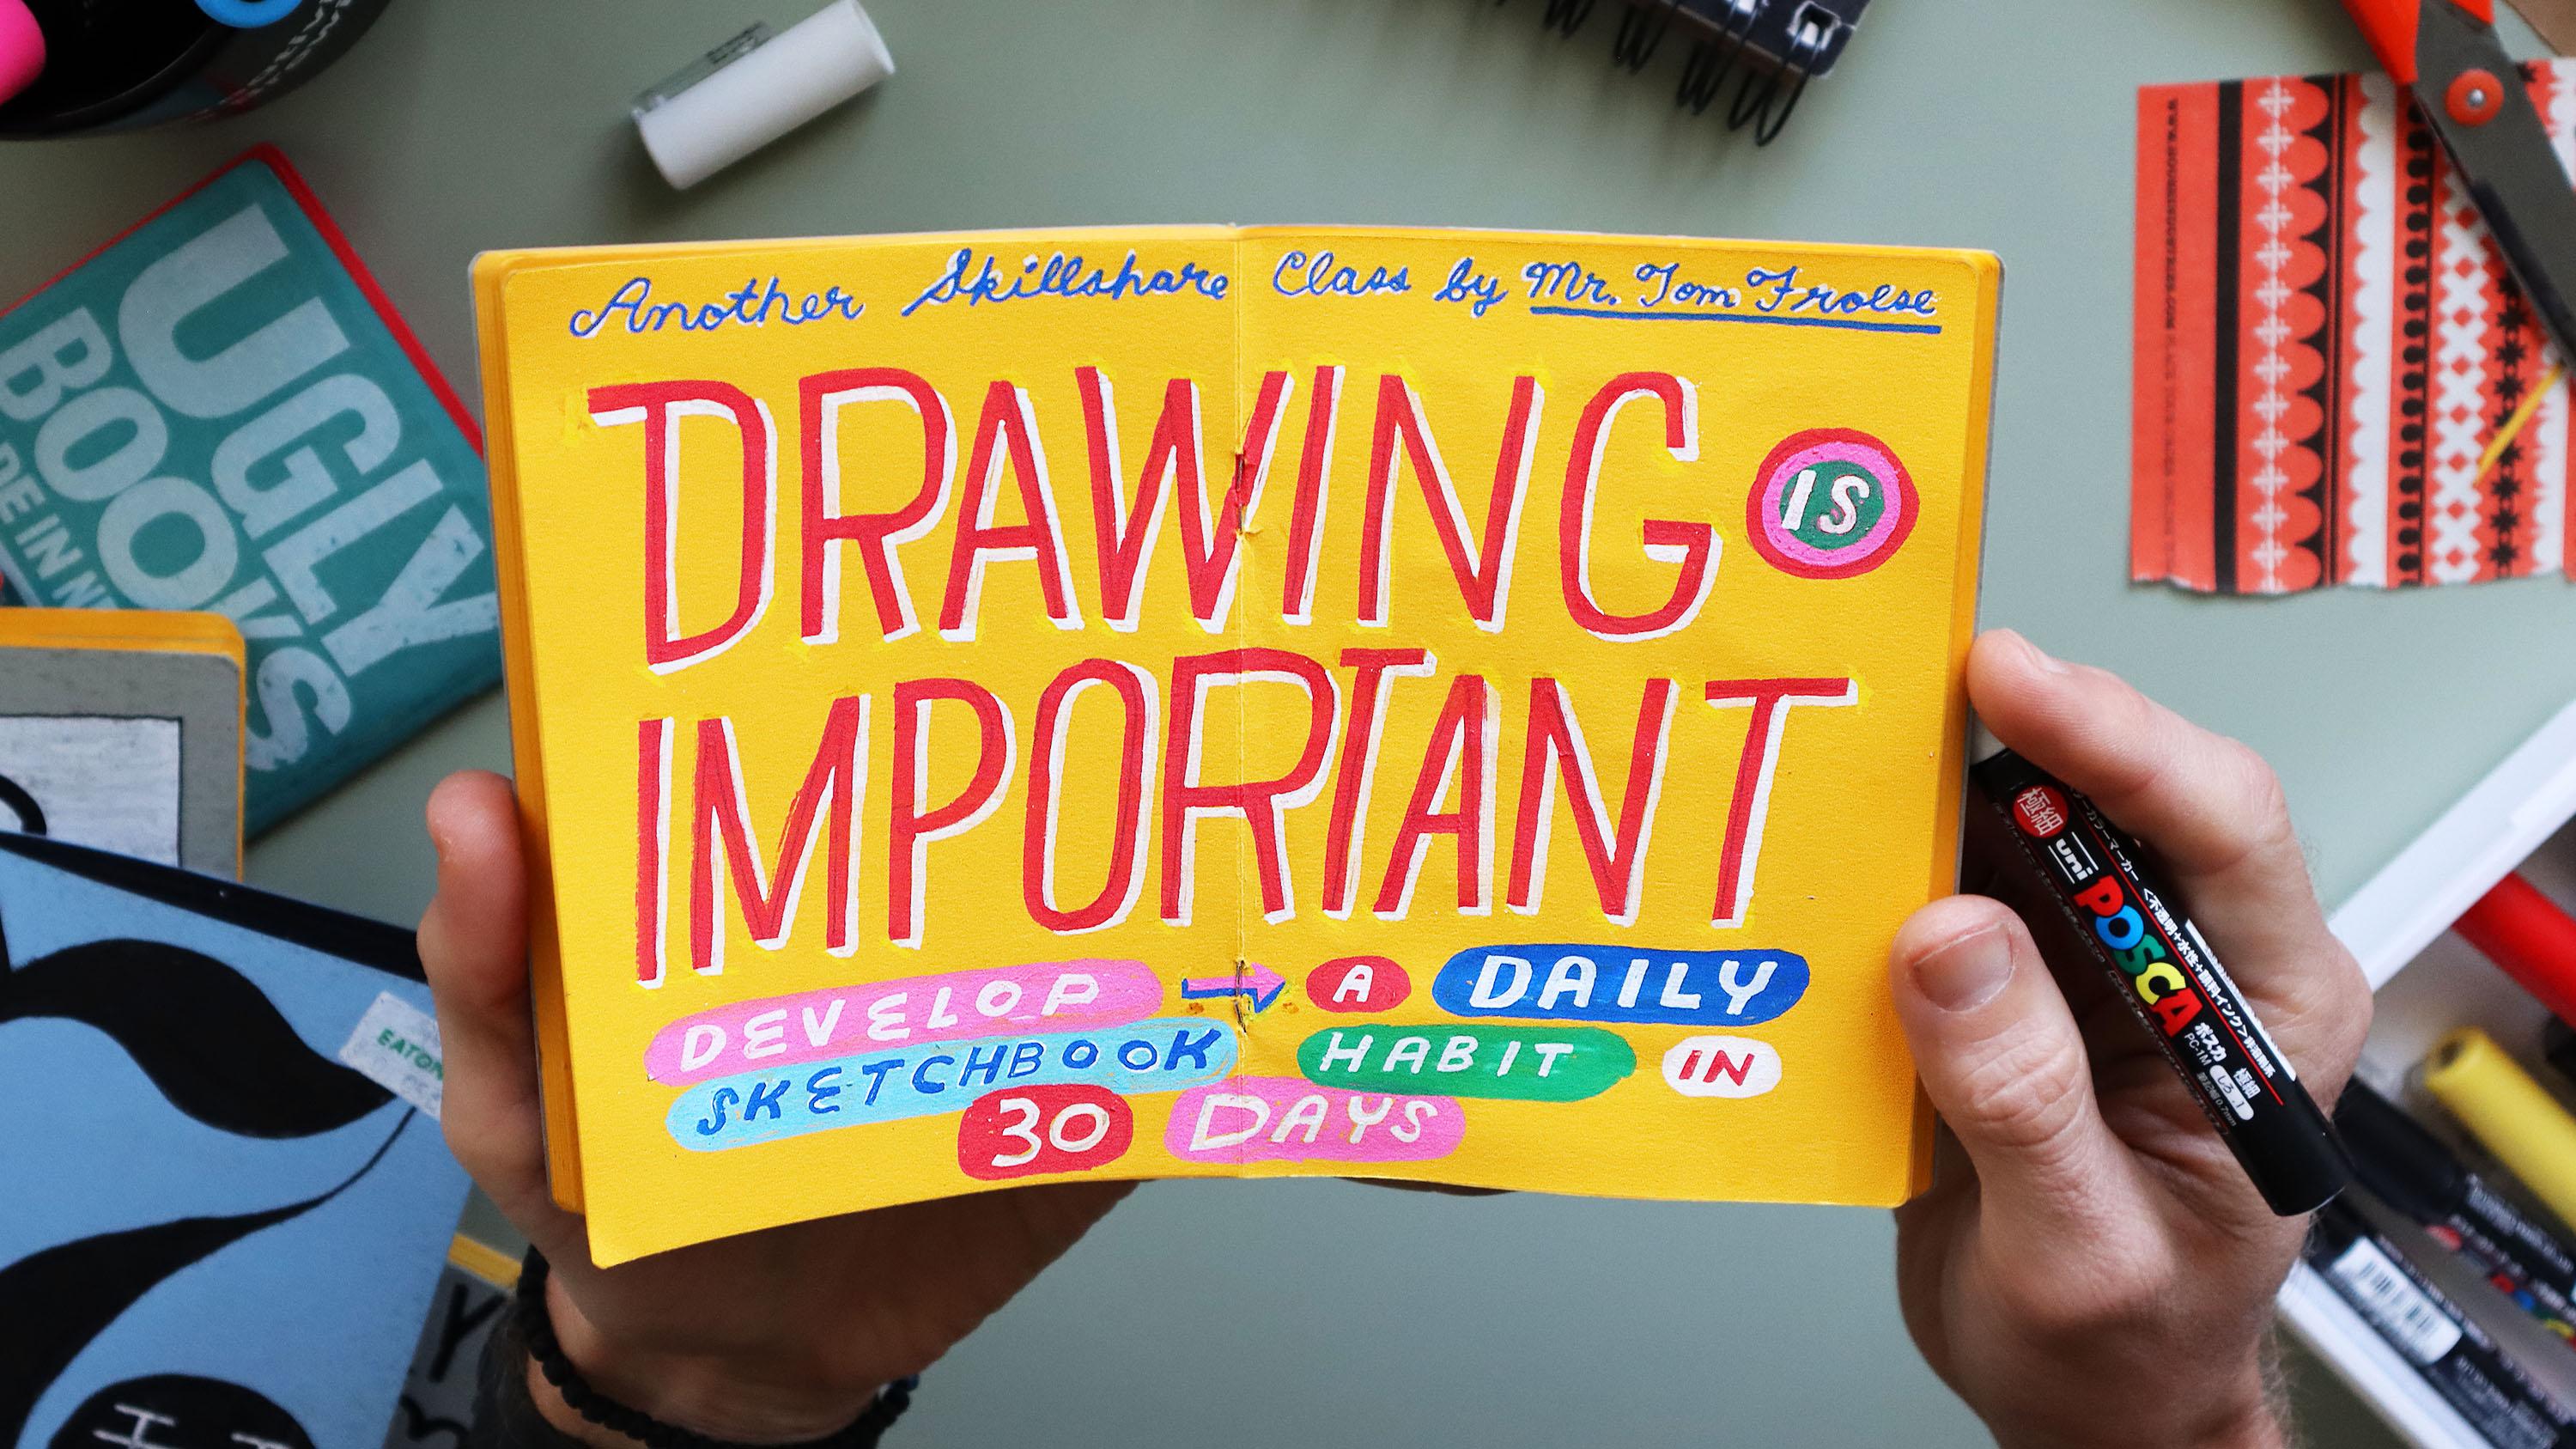
2. About the Class and Project: [MUSIC] This video outlines
everything you need to know about the
class before we begin. The purpose of this
class is to help you kickstart your own
daily drawing habit. In this class, you're
going to learn strategies and starting points for how to start and keep
up a daily drawing habit. This is not a drawing class, it's not to show you how I
draw or anything like that, but to help you
discover how you draw. The most important part of this class is really
coming up with a plan based on what inspires you
and what works best for you. This class is for anyone who
wants to draw every day, but needs a little
extra motivation and perhaps some inspiration. Now, I typically teach aspiring and professional
illustrators, but this class is
for all levels. There's no drawing
experience necessary, this is about showing up no matter how good we think we are. This class is divided
into two main parts, the lessons and the project. The lessons are designed to help build an understanding of how I approach sketchbooking or daily drawing in this class, and also in my own practice. The project is where
you get to put what you learned in the lessons
into practice. I'm going to walk
you through making a 30-day plan that's
perfect for you. I'll also give you a demo of my current daily
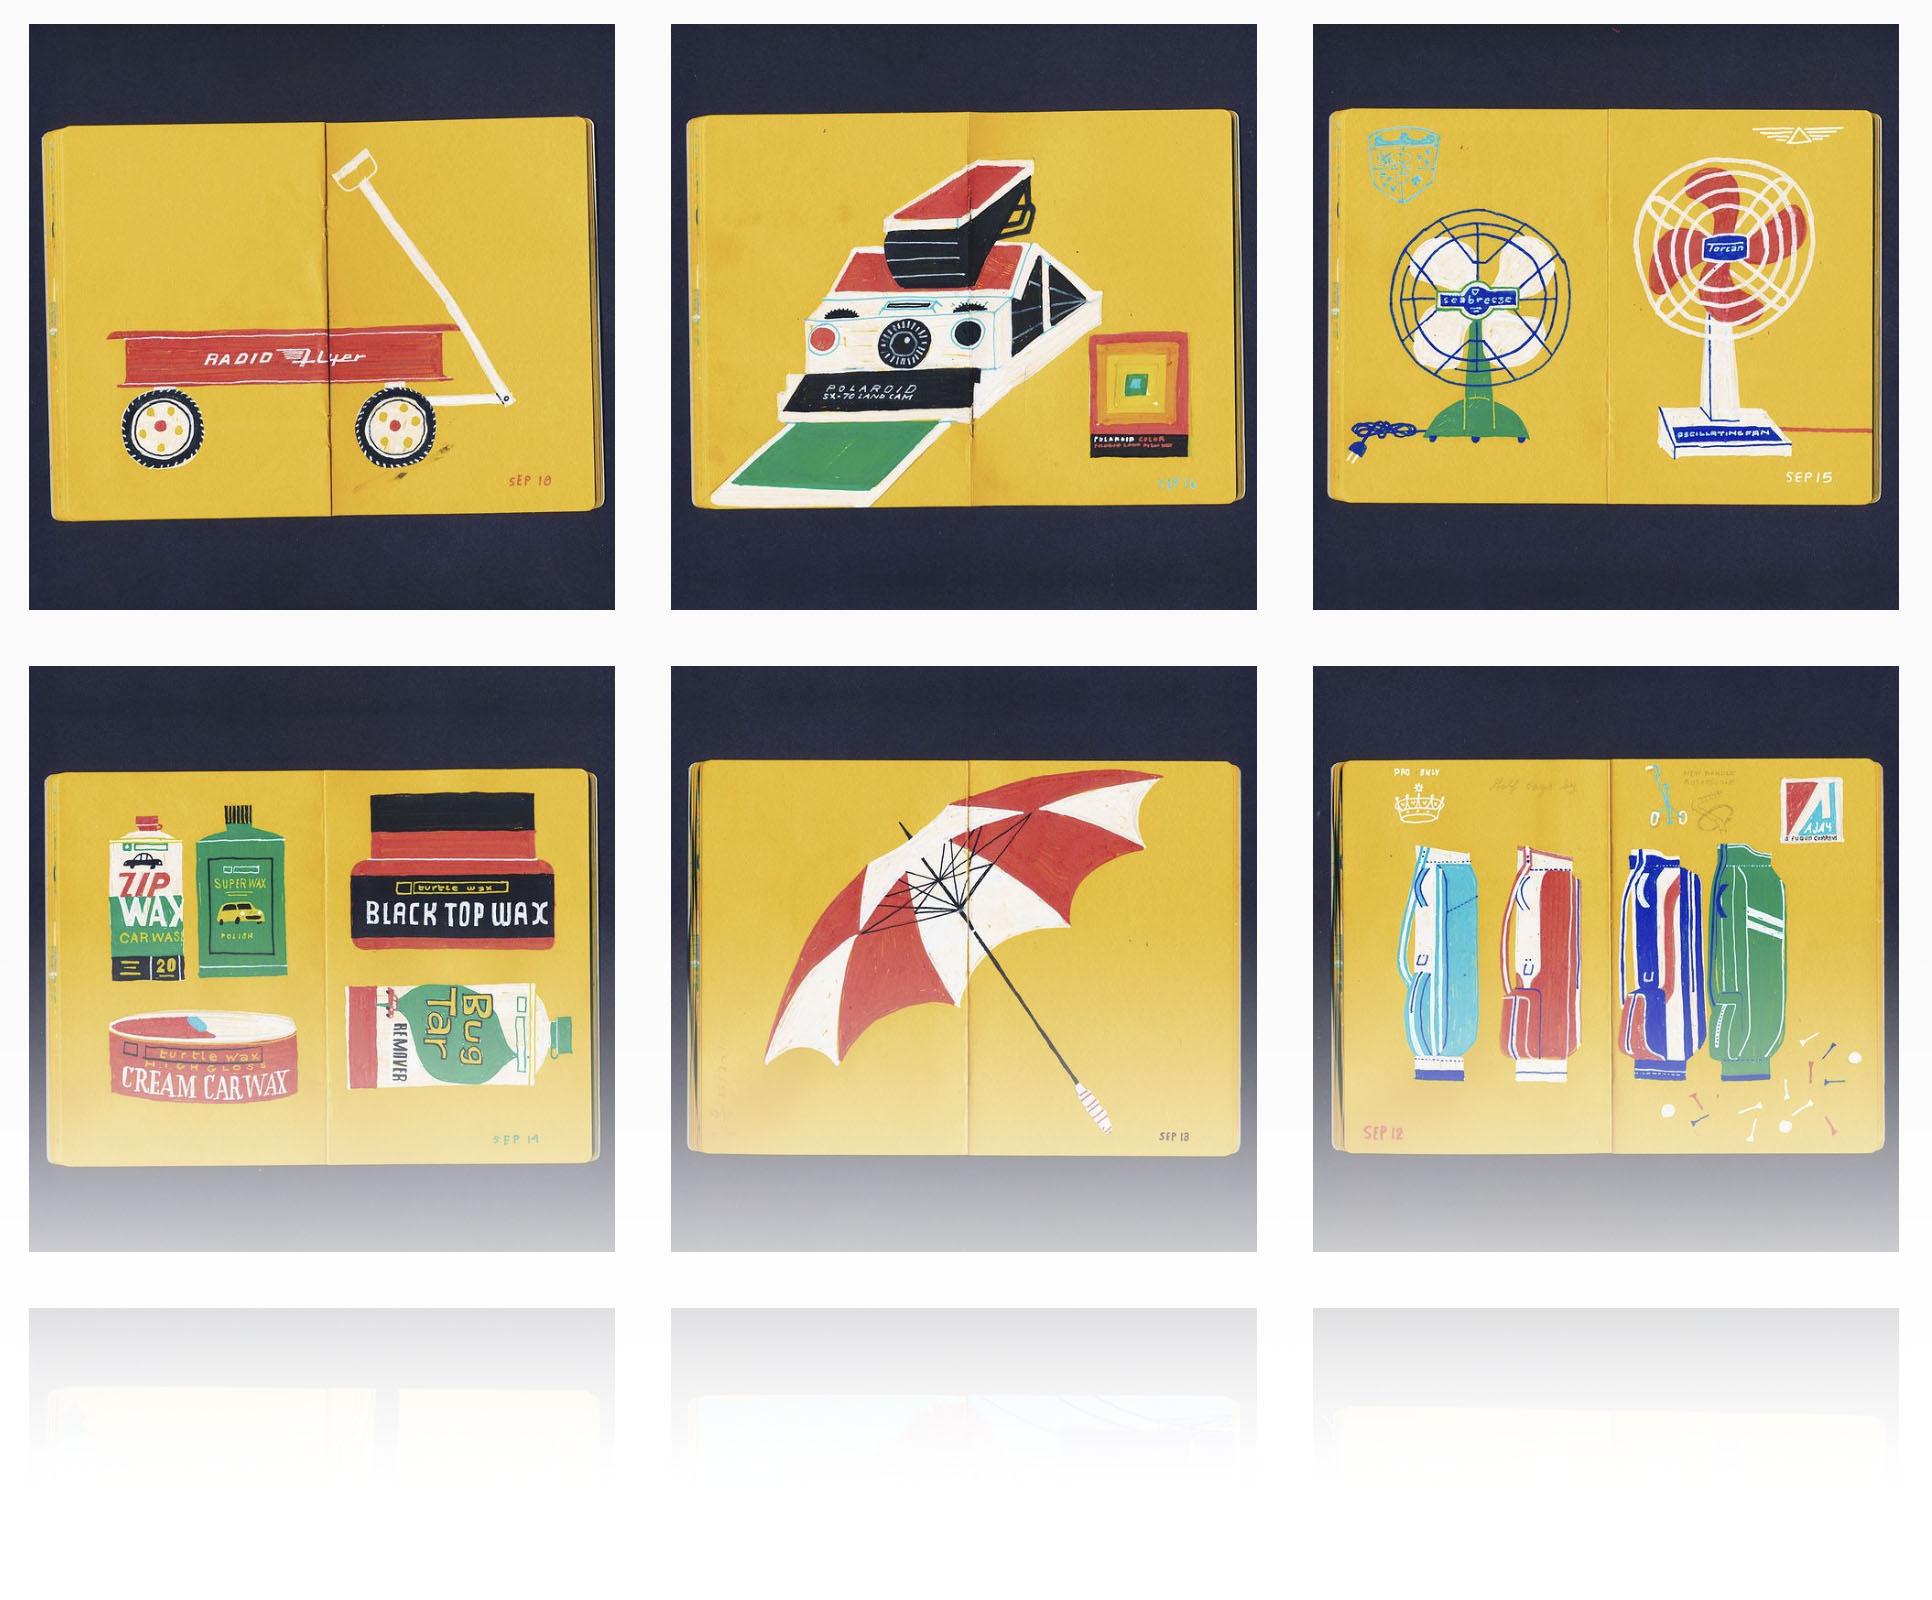
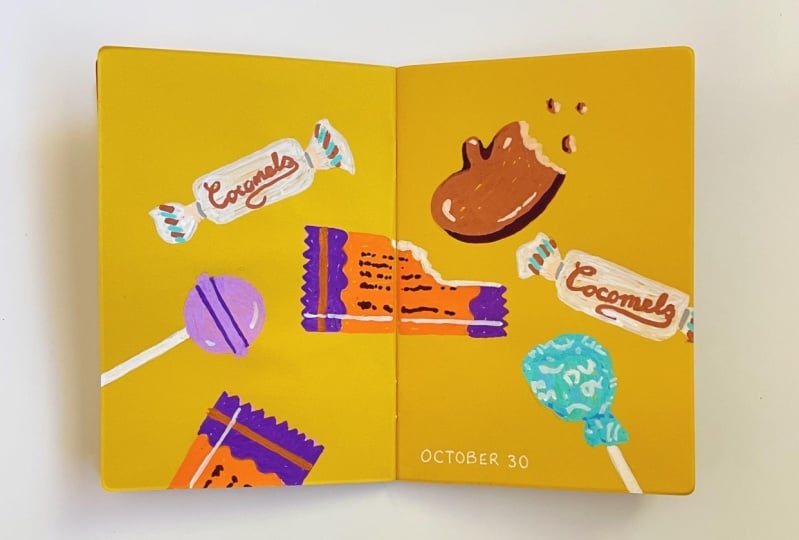
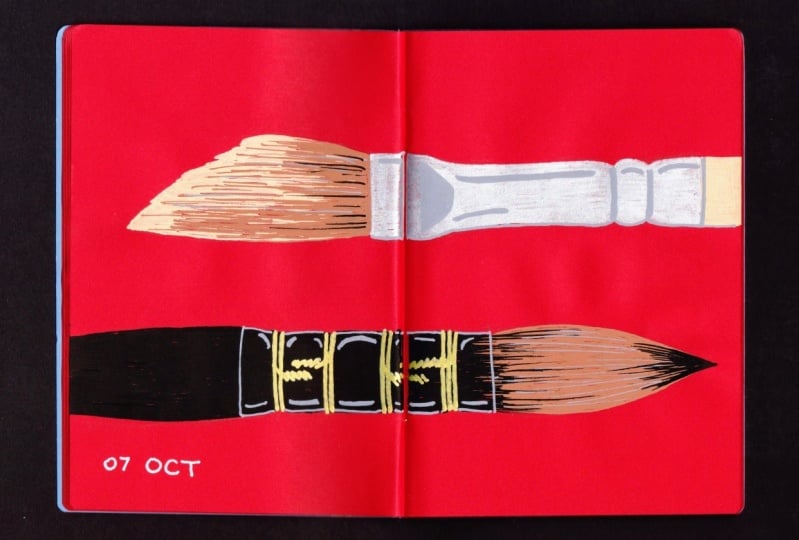
drawing process, which is drawing obscure, retro objects using ugly
books and Posca paint pens. I'll also show you
how I go about sharing my daily drawings
on social media. In terms of equipment, the most basic supplies
are going to be some physical sketchbook
and something to draw with, it doesn't have to be fancy. It can be as simple
as a sketchbook or a stack of plain paper and whatever pencil
you have on hand. If you're interested in
doing something different, perhaps using a different sketch book or different
drawing tools, you're going to get a
chance to determine that in the planning stage
of the class project. I do recommend using a physical sketchbook and physical drawing materials
because this class is about getting your hands
dirty and trying new things and maybe getting a bit out of
your comfort zone, but also finding it again
in surprising ways. For sharing your drawings on the class projects page
and on social media, all you need is a
smartphone to shoot, edit, and post photos
of your sketches. Again, in my demos, I'm going to be using
a scanner to capture my drawing and Photoshop on
my Mac to make some edits. By the end of this class, you'll have learned
how to think about daily drawing in ways that
help you overcome doubts, discouragement, and
lack of motivation. When you finish your project, you'll have 30 days worth of drawings that focus
on working out one specific subject matter
and one specific technique. At the end of the
30-day project, my hope is that you're going
to find it hard to stop, and that you're just
going to want to keep drawing every day. Of course, as we go, be sure to share your process
and your project on the class project's page
from writing your plan right through to
the last drawing of this 30-day challenge. As you go, be sure to use the discussions page to
ask any questions or share any discoveries or
insights that you have along the way with
the rest of the class. Now, it's time to move
onto the lessons. [MUSIC]
3. Lesson: 4 Reasons to Draw Every Day: In this lesson, we're
going to talk about four key reasons to have
a daily drawing habit. Now, you may already
be convinced, but keep these things in mind as you embark
on the project. The first really good reason to have a daily drawing habit is that making it a [NOISE]
part of your routine ensures you'll actually do it. You'll actually draw more. Last year, my
daughter wanted me to teach her how to draw, and as we got going, I really felt out of shape. I was really rustier
just drawing from life. I had this sense that she
wasn't super impressed by my drawing ability given that I'm a professional
illustrator, maybe she expects more from me. As a commercial artist, I hang my hat on being a bad drawer who can
illustrate anyway, but I also know that
there's more to my talent than I give
myself credit for. I wanted to be more
inspiring to her, so I decided to go back to drawing every day and sharing on my then neglected drawing is important account on Instagram. I set an easy goal
of drawing for five minutes from life each day. That was about as much as
I thought I could commit each day given other
responsibilities that I have. My daily drawing goals
and processes have evolved over the past year. For instance, it's moved from a five-minute feeling of
obligation like I should draw, I need to do this to something that I'm really excited
to do every day, it's more of a sacred
ritual for me. The second really
good reason is that you're going to grow
[NOISE] creatively. As I rebooted my daily
drawing habit this year, part of my goal was
just to get better at drawing realistically from life. In terms of growing creatively, it was more on the
technical side of things. That's the goal that got
me into drawing every day, but after a few months, I was invited by ugly
books to try drawing in their colored paper sketchbooks and to share some
of that online. Pencil didn't show up so
well on the colored paper, but I did have some
paint pens lying around, and those work to great. I'd seen others doing this drawing on colored
paper with paint pens, and as I started to do this, my technical goals of drawing realistically from life
just fell by the wayside. Now, in my journey this year, I've gone through a few phases
like drawing from life, and then I did these
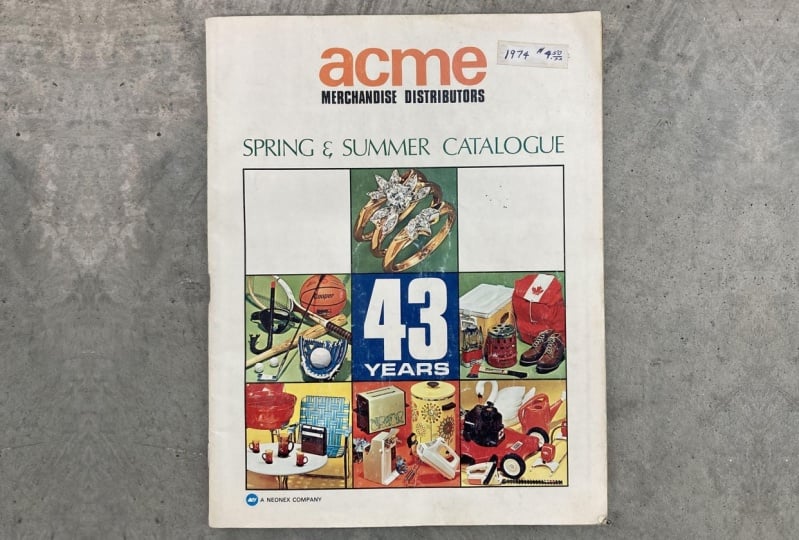
things called word salad, but at a certain point, I ended up withdrawing from this old catalog I
have lying around, and I've always seem to find
inspiration from this thing. It's weird, but this
became my music, became my source of inspiration for what
to draw every day. That's just a little
snapshot of how I've grown creatively
just from thinking, I wanted to draw more
realistically to this point where I'm drawing in a
totally different way now and I'm loving it. By drawing every day, I've been on this constant
path of trying new things, landing on them for a while, and then moving
on to new things. Lately, like I said, I've been dwelling on this current theme of mostly drawing objects from my catalog and
using Posca paint pens, but who knows what's next? As long as I'm
drawing every day, I'll constantly run into new things I wouldn't
have otherwise, I'm going to be
constantly growing. The third really
good reason to keep a daily drawing habit
is that you're [NOISE] going to discover your voice. Although it's been on
and off over the years, my practice of
drawing and sharing started a long time ago. It started while I
was in art school, that was over 10 years ago. When I was inspired by
daily drawing artists like Lauren Nassef, Wagonized, and put my own unofficial
mentors at the time, Kate O'Connor and Ray Fenwick. I had already been journaling
a lot using more scheme, plain paper notebooks,
and a mechanical pencil, so I just went with these
tools as I embarked on my little daily drawing and sharing habit for
the first time. At that time, like
many new illustrators, I was trying to figure out my style and my technique
of illustrating. I was inspired by Lauren
Nassef's blog drawing a day to digitally combined
color into my drawings. I pretty much imitated her blog, I imitated her style in a sense. It didn't matter, I was
learning and growing, and through this practice of imitation and just
doing it every day, I developed techniques
that became my own. Over time, these became part of my early illustration style, and to this day, I still use many of those techniques that
I developed then. Now, the fourth really good
reason to draw every day and share is that you [NOISE]
become discoverable. Well, drawing every
day for all of the aforementioned
reasons is enough. If you want to become
discovered by others, it's hard to imagine
a better way than sharing what
you draw every day. One observation
I've made is that almost all known
illustrators working today started by
making [NOISE] and sharing in a daily project. This is certainly true for me. Some of my first paid
illustration jobs came from others finding
my drawings online. It wasn't enough that I
was drawing every day or learning to do this in a more consistent
and focused way, those things are
really important, but I had to put it out there, I had to share. If you feel you're
too early on in your development to share
another observation I've made is that many
illustrators who later became successful started
sharing before they were ready. If you look at their earlier
work that they shared, it probably looked more raw and [MUSIC] less
confident, but over time, their work shows this clear progression
toward something more confident and well-crafted
and unmistakably theirs. Sharing your work, especially online does make you vulnerable, but it's only by standing up on a stage and singing out loud that you'll have any idea of what you're
really capable of. Sharing, whether on
social media or just in a class project can be
hard for some of us, but it's one of the
best ways to grow.
4. Lesson: 3 Pain Points of Daily Drawing: In this lesson, we're
going to look at three challenges
of drawing every day and three antidotes
to help overcome them. The first challenge is
not knowing what to draw. There's this thing that I
call the inspiration gap. This is where we feel
this huge surge of creative inspiration
but then when we sit down to actually
make something, we come up blank, we have no ideas. With our pencil on
our hand we ask, what should I even draw today? When it comes to daily drawing, the antidote to
this challenge is to know what you're going
to draw ahead of time. As part of your project
plan later in the class, you're going to have
a chance to choose a source of subject
matter for each day. That might be a list of prompts based on a topic
you're interested in, such as maybe 30 days of Halloween and then
each day you can have a list that you've
already written with different Halloween
inspired objects. As an alternative to a list
of pre-written prompts, would be what I call a go-to
source of inspiration. This will be a collection
of reference images, or a magazine, or an old family photo album, or maybe something you make up, like objects in my home that
could fit in a shoe box. When you determine ahead
of time, in your plan, what your source of ideas for each day's
drawing will be, you'll spend a lot
less time worrying about what to draw each
day and more time drawing. The second challenge of a daily drawing habit is
not liking what you draw. This is a hard one
because it's bigger than a daily drawing habit, this strikes at the heart of
our confidence as artists. Many of us feel insecure about
our ability to draw or to make images that we like to look at and think other people will
like to look at. Of course, daily drawing
is a great way to start overcoming this lack
of confidence head-on, we get better by
drawing every day. But along the way, it can
still be discouraging. How can you enjoy the
process of getting better even as you struggle to see the
growth you're hoping for? Well, the antidote
to this one is to change what your goal is
for each day's drawing. Rather than making it about
the quality of the drawing, about whether you
like it or not, set what I call a
quantity-based goal. This is something you know
you can meet each day. A quantity-based goal
is usually time-based, but it could also be
about filling a page. You might choose to draw for five minutes and if you've
drawn for five minutes, you can say you did the
drawing for the day, or if you filled a page of your sketchbook with whatever it is you're trying to draw, you did your quantity
for the day. If you said you'd draw one object and you
draw that one object, however you feel
about your drawing, you can feel satisfied
that you spent the amount of time trying to do it. That really counts, every time you get
to the page and draw something with effort, that counts and you
will grow from that. The best thing about a
daily practice is that, you're going to have another
chance at bat tomorrow. You may not like
what you drew today, but you know you're going
to get another chance tomorrow to do better and so on. The third challenge
to drawing every day is losing motivation. We all start off with
good intentions, but it's really hard to
start a new habit if it's not part of your usual routine. I think we can all relate
to this experience. We begin inspired and excited, but this quickly fades as it
starts to feel like work. When we don't see the outcome or progress we're hoping for
in our daily drawing, we'll get really discouraged and as life gets really
busy as it does, drawing won't seem like
it's a big priority. For this motivation challenge, I have three antidotes
and surprise, they also really come down
to just having a plan. The first antidote is to have
a bigger purpose or goal in mind and to know how drawing, specifically, is
going to help you fulfill that goal
or that purpose. The second antidote is to
set a sustainable schedule. This means planning how long
you're going to draw for, how often, and as
with this project, how many days you're
going to do it for? The third antidote to the
motivation problem is to include sharing as a
part of your habit, sharing as a way of
declaring to the world your intentions and that's
going to make you feel more accountable to
actually go and do it. I understand that standing up on a stage and
feeling like you're going to make a fool out of yourself isn't everybody's
favorite thing to do, it's not for everyone. But personally, I've
always been driven to make things by imagining I
have some audience, I'm communicating to
specific people and I also imagine that they're
waiting for my next host, they are waiting for my
next piece to show up. Sharing my work online makes
this imaginary audience, a little less imaginary.
5. Lesson: The Power of The Plan: The most powerful idea in
this class is the plan. A plan gives us a starting
point and a strong sense of direction as we show
up to draw every day. Without a plan, [LAUGHTER]
many of us are going to struggle to know
what to do each day. In the class project, you're
going to get a chance to design your own
plan and that's going to serve as your guide for the remainder
of the 30 days. In this lesson, we're
going to go through the five key elements
that go into this plan. The first element
is your purpose. We're more likely to
keep up with a habit if we tie it to a higher purpose. Ask yourself, why do you
want to draw every day? Abstractly, we know drawing every day
is going to help us improve our technique and find our voice and stuff like that. But can you be more specific
about any of these things? Which specific techniques
do you want to improve on? When it comes to expressing yourself or drawing in your
art or finding your voice, what do you wish
you were better at? Some examples of purposes you might have if you're
drawing every day might be to practice drawing from
life or to practice being more spontaneous and
free in your drawing style, or maybe it's to document a recent trip through drawing that could be
a really cool purpose. Another purpose might
be drawing from memory. By setting a purpose
in your plan, you have a reason to
show up every day. You know why you need
to draw every day. It's because if you don't, you won't be able to do X, Y, or Z that is important to you. The second element in
the plan is media. Your media includes
the tools you'll be drawing with and your
chosen sketchbook. Now for this class project, you may already know exactly what you'd like to work with, but maybe you don't, maybe you're still
wondering what you should choose to actually
sketchbook with. You might be wondering
if there's a right or wrong type of media for daily drawing or
for sketch booking, and of course, the answer is no. It's merely up to you
what you draw with, whatever works best for you. But of course, the
next question is, if there is no right or wrong
and it's totally up to me, how do I choose? How do I know what sketchbook or tools to even start with? When it comes to actually
choosing your sketchbook or your drawing tools
or whatever those are, I think you can really
approach it from one of two angles or
a mix of the two. The first is technique based and the other
is subject based. You can choose the tools or
technique that you want to develop and then buy
your tools accordingly. Or you can choose a
subject that you are interested in and want to
explore more and study more, and then choose tools
that might be really good for that subject. Just a quick example of each. Let's just say you want to get better at using watercolor. This is a technique
you want to explore. Then you would get watercolor
paints, of course, and then a sketchbook that can handle watercolor like all that wet on the page
and stuff like that. That might be a mixed
media sketchbook or an actual watercolor sketchbook. Now on the other hand, if you
want to explore subjects, say like urban sketching, I think a popular media type for urban sketching is pen and
ink because it's flowy, you can get a lot of
interesting lines. This would also be
the same for if you were interested in doing life drawing or figure studies in
your sketchbook every day, then pen and ink
is great for that. In this case, your
subject really drives the tools and
techniques and of course, the sketchbook that
you're going to need in your daily drawing practice. If you're stuck on the
media element of your plan, set it aside and come back to it later when you have other
parts of your plan filled in, especially purpose and subject. The third element of
your plan is schedule. Within schedule, we're
going to be setting these three parameters
that I call scale, frequency, and period. Scale is about how big your
effort will be every day. That usually comes down to
something that's time-based. But it could also be about how many pages you
fill in a session or how many objects you want
to draw in a session. I would say for this one,
don't be overambitious. Set a scale that
you know you can manage even on a
really busy day. Maybe that just means keeping
it to 5-10 minutes a day or you plan on drawing on
one page of your sketchbook. Small, consistent
efforts will always outpace well-meaning but
overly grandiose intentions. The next element of your
schedule is frequency. How often are you going
to show up to draw? For the class project,
I'm challenging you to a period of 30 days because a month is
long enough to be challenging, but there's definitely
an end in sight. Folk wisdom says that it takes 30 days to establish a habit. There's a really good
chance that after 30 days, you'll actually
want to keep going, and will be easier. [MUSIC] My hope is
that ultimately, you will want to draw every day for the
rest of your life. You'll set the period of your daily drawing
habit to forever. But like New Year's
resolutions, if we over-commit, we may just stop at the
first sign of difficulty. I'd say prove to yourself
you can do it for 30 days first and then when
you get to that 30th day, you can assess whether
you want to keep going. Just one more thing
while we're talking about setting a
sustainable schedule, I find it helps to dedicate a specific time
of day to your drawings, like maybe just
before you start work or during your lunch break. It may also help to draw in
the same setting as well to get you into that
specific frame of mind. Maybe that's in your workspace
or at the breakfast table, or on the subway on
the way to work. The fourth element in
your plan is the subject. The subject is your source of inspiration for what
to draw every day. Choosing a subject
ahead of time is one of the most important
parts of this plan. You want to avoid spending
too much time just trying to decide what to draw each
time you show up to draw. In this class project, I'm suggesting
that you draw only from observation or
what I call O-mode. That means drawing from
references or from life, and it also means
drawing things, nouns, these are
things that you can see with your eyes
and touch with your hands from photos
or from real life. While I would never want
to discourage creativity, for this exercise, I am recommending that you avoid purely imaginational
drawings just stuff from your head because part of the problem this class and this plan is trying to overcome is creative block or that inspiration gap
that I talked about. It's that I don't
know what to draw. When you have an
externalized source of inspiration,
something like tangible, something that's out there, there's no idea to come up with, you just draw the thing. When it comes to choosing your subject for
your daily drawings, there are really two
possible approaches, and these really come down
to prompts and what I call a go-to inspiration source. If you're going with prompts, you would choose a theme
or a subject and then list 30 things about that
theme that you can draw. If your theme is
downhill skiing, you're going to make a list of 30 prompts of objects like hat, boots, skis, chalet, snowman,
and stuff like that. If you don't want to do
pre-written prompts, you can use a go-to
inspiration source. That means just choosing
a specific source of inspiration such as objects from your home and you
can be really specific. You can say objects from
home that fit in a shoe box, or maybe a book with pictures of different species of trees. Or in my case, my go-to
source of inspiration is an obscure Canadian mail in
order catalog from 1974. Creative block
really comes down to not knowing what to
draw in a given moment. When you draw
things and you know ahead of time what
those things will be, you're going to be way less likely to experience
creative block. By the way, drawing
from references doesn't mean you have
to draw realistically. If your goal is to draw in a more stylized and
less realistic way, then give yourself
lots of room and permission to really
push the limits here. Lastly, the fifth element
of your plan is sharing. This is how your work gets seen. Whether you're an
aspiring illustrator trying to be discovered, or you're in this more just for the personal and creative
growth side of things, I think we all crave an
audience of some kind. Sharing includes getting
your drawing into a digital image and then having a consistent place
where you share it. Being consistent in both how
you capture your work and where you share it is key
to building an audience. In my life, daily drawing
and sharing go hand in hand. I'm way more motivated when
I imagine an audience. This makes me feel
like people are expecting the next thing for me. [NOISE] Sharing also makes
me think more about how what I'm drawing might be understood or related
to you by others, which as a visual communicator,
is very important. If sharing motivates
you in any of these ways you're going
to want to think about where you want to share
and what might be involved in getting it
up on that platform. When planning for
sharing online, you want to consider
what will look best for your chosen platform. You can ask yourself things like how you want to
capture your work. How you are going to get
that physical drawing or sketch into digital form? Then what formats does your
chosen platform prefer, like what shape should the
image be for instance? So far I've found
that Instagram is the most obvious place to start. That means we're
probably going to be working with a square format. Now, like I said, Instagram is just an obvious starting
point for a lot of us, especially if we have
an account and we have some kind of an
audience there already. But there are other options
such as newsletters, blogs, or maybe even just sharing on a closed
Facebook group. If you're interested in sharing somewhere
other than Instagram, I'm going to leave a
list of alternatives in the Class Projects
and Resources page.
6. Lesson: Some Starting Points for Beginners: [MUSIC] For those who might not have very much
experience in drawing, I wanted to fit this
quick lesson in to help give you some more ideas as
you go into the project. These are technique-based
starting points, and I welcome you to start with these and customize them
however you'd like. As am been through
these starting points, I'm going to do my
best to relate them to four of the five
elements of the plan, including purpose, media,
schedule, and subject. As for the schedule
part, of course, the frequency is
assumed to be every day and the period will be
assumed to be 30 days. But you can set the scale, frequency and period to
whatever works best for you. Just a note about subject, whatever you're going to choose, keep it to simple, tangible objects like
pineapples and cats, rather than abstract ideas like words like
happiness or whining. When you're already having
trouble coming up with ideas, you're probably not doing yourself any favors by having to think of a way to visualize
invisible concepts. If you're interested
in using one of these starting points
for your project, I'm going to leave them
as a downloadable PDF in the class projects
and resources page. [MUSIC] This one is
called draw what you see with a good old HB. In this one, you just
draw for five minutes. Well, this is an HB, it is a mechanical pencil. But if you just have a wooden
pencil that works as well. The point is you're using a basic plain paper
sketchbook and a regular pencil,
and you're drawing something that you see in
real life or in a photo. I've chosen these scissors from my [NOISE] stationary here. I'm just going to draw these. I'm going to set my
timer to five-minutes and see how far I can get. For me, the point or maybe a purpose of
drawing what I see, drawing from life in
this way would be to be able to draw
more realistically. I think that's a good purpose
for this kind of drawing. But along the way, I just enjoy this kind of
drawing because it forces me to pay more attention to things, objects that usually are
just part of the background. I don't really have
to look at them. Even if I'm using them, I don't really observe
and notice, and appreciate the details
of what they are. Yeah, just going with drawing in this way can be a
meditation, I suppose. It does feel
meditative for sure. This drawing where I'm tracing, almost tracing the contours of the object is literally
called contour drawing. I'm drawing the contours. I'm not really expressing
the object in terms of shading, certainly no color. It's tempting sometimes
to just get right into filling something in, and shading because
it's so satisfying. But I've gotten in the habit
especially when I draw from life of almost tracing the contours of what I'm seeing. If you're interested in learning
to draw more from life, drawing realistically,
drawing proportionally, drawing complex objects, perhaps even like hands in a
more representational way, a book that changed my life early on was called Drawing on the Right
Side of the Brain. I talk about this book a lot, it's by Betty Edwards. The premise of the
book really is that you have these two
sides of the brain, you have the left side, which is analytical and
symbol based and word-based, and the right side of the
brain is more spatial. Whereas your left brain wants to use symbols like
handles, blades, scissors than the more
spatially aware right side of the brain is going to be better at just describing
forms that you see, not what you think you
should see or what you think the symbol
of that thing is. One of the ideas in the
book is that in our culture we're really left
brain dominant, very analytical, very
rational, very logical. We haven't trained our brains
to use the other side, which is a little bit more, being able to actually look at things and describe shapes. That book really helped me understand how to get into a
mindset where I could draw something and get away
from trying to draw what I know it is and just drawing the more abstract
shapes that a thing is. I mean, scissors is actually
a good example of that, especially when they're open. Because we tend to
just feel like we understand what open
scissors look like. But when you actually
go to draw it, you realize that there's
lots of details and angles that you'd never
had noticed before. My drawing is far from perfect, but I wouldn't be able to
draw any of this from memory very well or from my
imagination just by deducting, just by using logic to say this is what it
would look like. There is quite a lot
going on here that I am not usually aware of. My timer is going off and
I can just say I'm done. I did my five
minutes of drawing, and if I was in a hurry, I'd be like, good, it's over. I just want to move on to the next thing or if I
had another few minutes, I might just try and finish
this a little bit more, add some extra details,
whatever it is. But for today, I'm just
going to put the date on it and how long I
spent doing it. Like I said, this is
called [LAUGHTER] draw what you see
with a good old HB. [MUSIC] This one's called
Posca plus Uglybook. In this one, you're going
to draw a simple object on one page, or spread
of your Uglybook. This sketch book is
called an Uglybook. It's the one that I've
been using a lot lately. It's the one that I do in
my demo of this class. I just wanted to offer this as just one possible starting kit. If you're looking for
some new media to try in your daily
drawing exercise. We've covered the Uglybook.
Posca paint pens. These are basically markers, but instead of ink, they actually have
literal paint in them. Paint is opaque. It goes over other
colors in a solid way. Colors don't really bleed
through them very well. For this, I'm going to
draw the scissors again. Maybe this time
I'll do them open. I'm going to set
my timer and try and just do five it in minutes. I'm going to try it before I
use the paint pens just to add a little bit of a under
sketch with my pencil. That will just help me be
more confident when I'm going to put in the more
permanent paint pen. Now in this one, because realistically my goal is actually to draw
not realistically, I'm letting myself be a little
bit more wonky here than I was when I was just drawing with my pencil in my plain
paper notebook. I'm doing some weird stuff here. Yeah, I'm just [inaudible] some crazy
things are happening here. [LAUGHTER] But I'm
just going with it. If I don't like
my pencil sketch, I don't have to worry
too much about that. I can go right over
with my paint pen. Now, it's going on a little
bit too transparent, that means I haven't
[NOISE] shaken yet. Paint pens, you really want
to shake these out first. If you can dab it, gets it pumping down from
here into the nib too. Now with Posca paint pens, you don't want to color over, over and over again in layers as it's still wet
because it will start building up gunk and
shredding up the paper too. I'm already shredding
up the paper and building up gunk
as I'm doing this, I try to just go over
once and almost like a printer fill it in without
going over past lines. Drawing with these
markers does take actually quite a bit more
time than five minutes, usually just because of the drying time and
because in my case, I'm drawing a sketch
and then I'm going over with the marker
or the paint pen. I'm going to now jump into
using a different color. I would normally want
to wait for that white to dry before
going over it. But within this five-minutes, I might not have the
luxury of time there. Yeah. You can see it's really picking up the
white turning into pink. In the actual demo
for the project, you'll see me
waiting for this to dry a little bit more patiently. This white got a bit
more of a chance to dry. It's not bleeding quite as much. Maybe for this, let's just that, we have about 40 seconds left. I guess for this part here, I'll just add a white dot
and there are some scissors. You can obviously spend as long or short of a time as you
want making your drawings. I actually spend up
to an hour doing my drawings in this
style most mornings. That's just a little bit more of a relaxed pace and more
satisfying for me. But, this is also a
fun challenge just to see how far you can get
within a very limited time. Another thing about when you draw over color
that hasn't dried, that bottom color will get onto the nib and then affect
the color negatively. Anyway, this was five minutes. Whether he put a
date or how long you spent on your drawing each day, that's your call. [MUSIC] [MUSIC] This one is called
expressive cutouts. If you've taken my
odd bodies class, you're going to be familiar
with this exercise. Without using a pencil
first, using scissors, draw simple objects by cutting
them out of colored paper. It's funny that
I've been drawing these scissors with my pencil
and my Posca paint pens, but now I'm going to be
drawing with the scissors. It's the same rules here, but we'll just do a
different subject. Maybe my subject here will
be something observational. Is it a jar with pens in it? I'm going to draw my mason jar [NOISE] just
by cutting it out of paper. It's basically a
collage exercise. Again, I just set my
timer to five minutes. Now I need to add
another element to this. If you have different
colored paper that works, I didn't have [LAUGHTER]
a whole bunch of different colored paper
where I'm right now. But I do have this
type specimen book. I wouldn't be cutting this
beautiful thing up if I hadn't already started
cutting it up sometime ago. I'm just going to [NOISE]
use it and pretend that it's not breaking
my heart to do this because it's very
lovely little book. In this case I'm not trying
to cut out shapes of [NOISE] what I see here and
use these as my drawing, I'm just using it for the
color, and the texture maybe. For this, I'll draw
a pen that work. You definitely can use the whatever's on
the printed paper. If you're using something
that's already been printed on, in a clever way. I'm challenging
myself to just use the paper as color and texture, and see what
I can do with that. [NOISE] This one
will be a pencil. Again, I'm not planning how I'm drawing these right away. It's a nice little constraint. I am not doing any sketching
ahead of time and assembling this all physical
materials [NOISE]. There's a pencil. Now I hope you can
forgive the fact that I actually don't have
glue on hand here. But a simple glue stick or school glue would
be perfect for this. You don't need anything fancy. [NOISE] Little eraser bit there. I'm actually really loving this exercise right now and it's going to
be hard to stop. [NOISE] I might go back
in, and edit this pencil. This reminds me so
much of how I started illustrating way back in
the day using Photoshop. I would basically do
cutouts like this, but just using the
pen tool [NOISE] and it was a huge proud
of myself for a long time before I started getting
more comfortable using like the iPad Pro as a tablet,
and stuff like that [NOISE] this is fun. You can see you can actually
get quite a bit done in about five minutes or less
even in this technique. I think the reason for that is that we're not planning a lot. We're just improvising and going along, and not being too fussy. Now, [NOISE] you could
probably spend hours doing this depending on
how meticulous you're going to be [NOISE]. I'll be done after this
cut [NOISE] there we are. A pen like this and
a pencil like this. Did that in about five minutes, not including gluing time. Again, when you're done, you could write down the date. How long have you spent on
it or whatever else you want to [NOISE]
add to your page. I really liked that one. I wish that this whole
class is based on this now. But moving on. The purpose here is to
be more spontaneous, to really get outside
of being careful with the pencil and to just see what happens
and have a lot of fun. I really did find
this one to be my favorite in terms of just getting out of my head
and trying something new. It all depends on
your subject to if you were trying to
draw what I'm drawing in my silly catalog with my own drawing practice
using just cutouts, I think that's going to
be a challenging match. I don t think it'd be a very
good match for me to say, try and draw a toaster, or a patio umbrella, or a fishing rod
or something like that that I've seen in
this [NOISE] catalog. The details of those things
and the nostalgia of most of those things may not translate well in this
particular technique. I think that's
really just one of the many benefits of picking a technique to focus on
in your daily drawing and really get a sense
of what are the limits? How can you push them? What are they good at?
What are they bad at? Then after a time, you can try a
different technique and see how that [MUSIC] handles the same or
different subject matter. This one is called
contours with a Sharpie. In this one, you're
going to draw your hand. Your probably your
non-dominant hand or one of your bare feet 30 times in
a simple contour style. Now, I actually
would recommend that you use a paint pen
rather than a Sharpie. Because when you draw on [NOISE] most kinds of
paper with a Posca paint pen, it doesn't really bleed through. You can see it's come
through a little bit there, but that is not
bleeding through. Just you can see the black
feudal lighter page. Sharpies, as you probably know, would bleed right through
this very thin paper. But the point, I'm
using a sharpie or a Posca in this exercise is that you have a pretty broad
point when you compare it to something like a
mechanical pencil or even a regular pencil. That just helps you not
get caught up in details. You really can't
get too detailed. Why don't we just
set the timer to five minutes and
I'll start drawing my hand in a loose fist here. This is a lot like the
first drawing exercise I showed you with my pencil
in this notebook here. But this time it's just a
much more rudimentary tool. This drawing is called
contour drawing, just like we're doing
with the pencil. What you're doing is
describing [LAUGHTER] your subject just by its contours and a few
extra little details. Try not to go back over or loosely sketch things
in you might if you were doing an under sketch for a more elaborate [NOISE] scene or a character sketch,
or something like that. You really just want to
keep the pen moving. Now I have to move my arm here to make room so I can see this. The purpose of this
drawing exercise would be to be less detailed
in my drawings, to describe more with
less, and of course, to practice a little
bit more spontaneity in my drawings, and not
being as tentative. I'm trying to be more
confident in how I draw. Because a part of me that's really wanted to correct things about this that
I think are awkward. But I also love how naive and awkward
[LAUGHTER] drawings like this can look. There's an expressive
look to it, but there's also just a lot
of character and I love that. This is where as we have
well over a minute left, I could probably ruin this. Not that this is precious, but in itself it's
actually fine. I don't think I'd want
to add much more to it. Otherwise, it's going
to start looking tortured [LAUGHTER]
and overworked. But what I might do is just add something a little
detail like my bracelet. Do I add my watch? If you overwork it, if you regret what you did, if you made a mistake, if you have time,
do another drawing, but if you don't have time, just just leave it the
next day you can try to avoid whatever mistake
you thought you made today. I'm going to say that's done. I have a minute
left, but I don't want to do anything more here. Let's give it a date. That was actually
like 3.5 minutes. Voila. In five minutes with the drawing contrasts
with a Sharpie exercise, [MUSIC] I could have
filled the whole spread, but I ended up just
filling one page. This time my quantity goal
was very much time based. What can I do within
five minutes? Of course, these are just
a few possibilities. For inspiration. I recommend
you look up the hashtag, [NOISE] Sketchbook or
[NOISE] daily drawings on Instagram for more
inspiration of just what people out in
the world are doing, or look to the growing number of student projects in this class.
7. Project Step 1: Make a Plan: [MUSIC] It's time to start your 30-day illustration habit, but not so fast, we have to start
with a solid plan. In a sketchbook or
on your device, fill out your own plan based on the power of the plan lesson
we went through earlier. I just want to remind you that, you are coming up with the
sketchbook and drawing tools and stuff you're going
to be using now. That's going to be
part of your plan, you don't have to have
those things right away. You may end up choosing
different media than you actually have on hand right now, for your actual project and that includes your sketchbook
and your drawing tools. Again, don't worry about having the right tools to
start at this point. For my class project plan, I wrote it out on my iPad, now, I won't be doing my class
project on my iPad, I'll be using my ugly books. This is what I'm using for the demo and have been
using for a long time. But it really doesn't matter where you write
your plan to start. You could write it
in a sketch book that you already have, you could write it on your iPad, you could write it
on a sheet of paper, you can write it on a napkin. The important thing is that
you write down your plan, you think about it
and you keep it. You keep that handy so that whenever you feel like you've lost your sense of direction, you can always refer back to it and that will
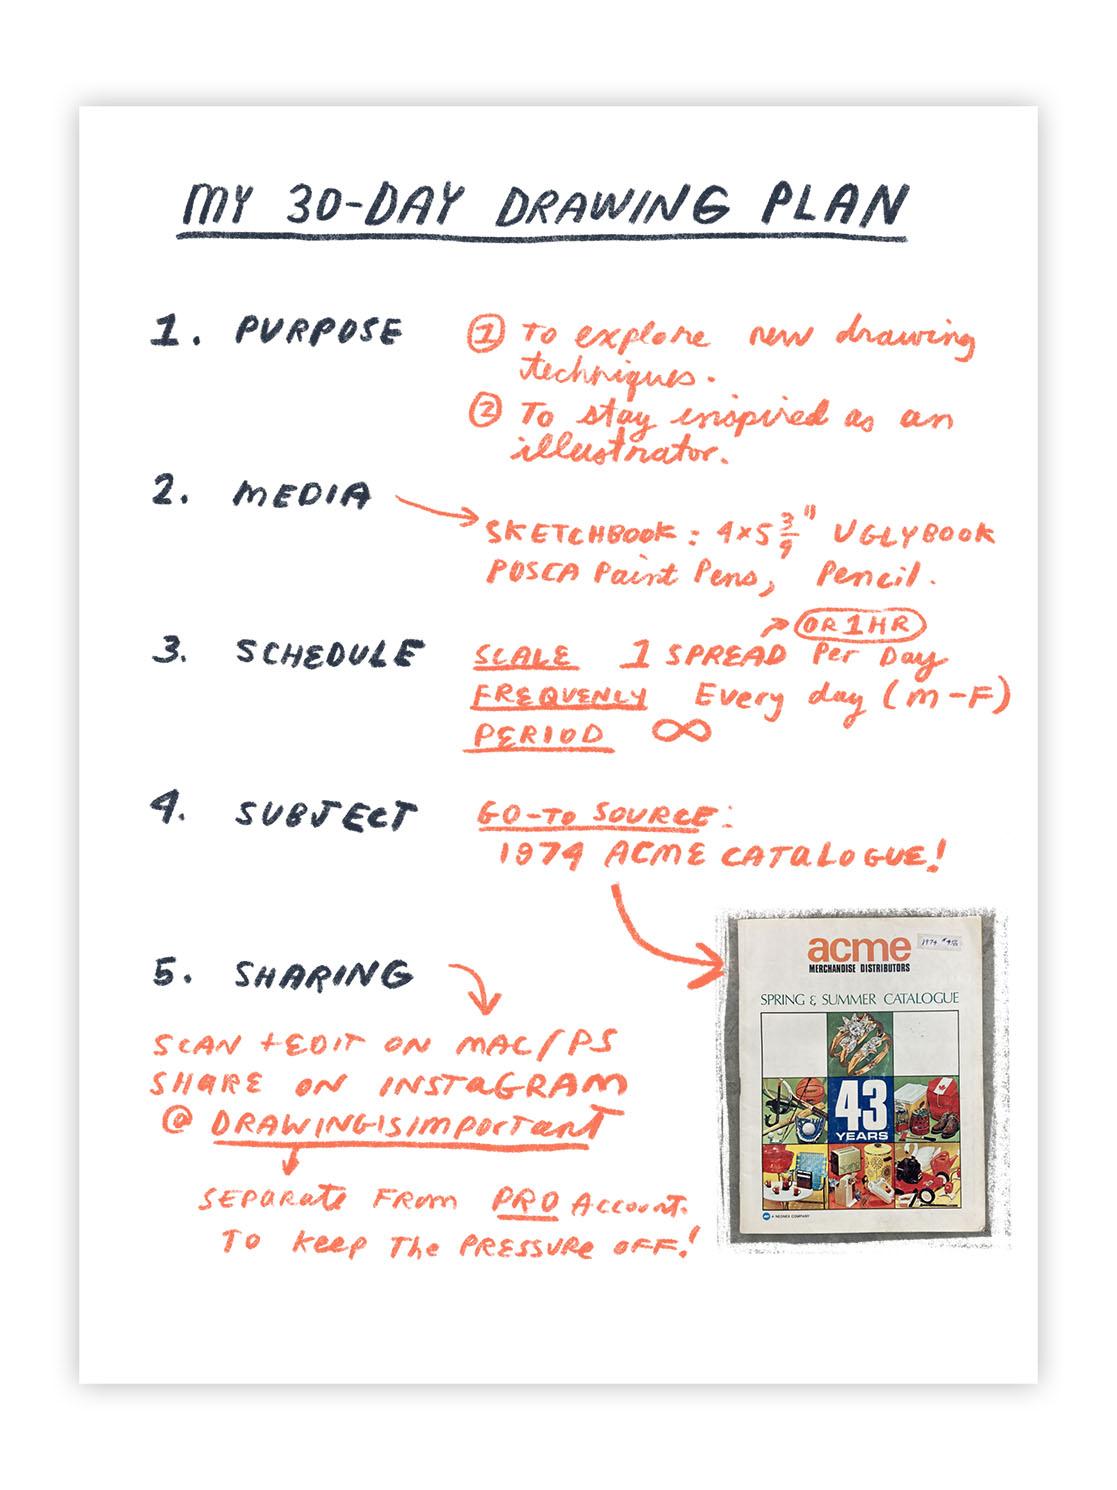
keep you on track. For my 30-day plan, I just went into Procreate
and I drew right at the top, My 30-day drawing plan and then I wrote the
five elements here, purpose, media, schedule,
subject and sharing. For purpose, I wrote, to explore new
drawing techniques and as a secondary purpose, I wrote, to stay inspired
as an illustrator. For media, I just wrote down the sketchbook I plan on using, which is a 4 by 5 and
3/4 inch ugly book and Posca paint pens
and some pencil. You can fill in that as much as you know, and
if you don't know, you can be more general like just a plain paper sketchbook, and pencil or whatever it is that you think
you'll be using. For schedule, I just wrote
down what I think is a sustainable schedule and
that includes of course, my scale, my frequency
and the period. Scale is one spread, so by that, I just mean, when I
opened my sketchbook, this is a spread. You could do one-page. I've decided to fill
a whole spread. I really like sprawling a
sketch across two pages. There's something very
satisfying about that. For frequency, I'm already
doing it for five days a week, so almost every day, so I just wrote down every
day Monday to Friday. Then for period, well, I'm cheating because I'm
already doing this project. It's ongoing, so I just wrote a little infinity symbol
there because it's ongoing and I don't plan
on stopping anytime soon. But in your schedule, if you're doing just
the 30 days and I do recommend that for this class you just keep it to 30 days, just write 30 days in there. If you ever want to make a
plan in the future though, then of course these numbers
are going to change. Now, as far as the subject goes, I've decided instead of doing 30 prompts that I
write ahead of time, I just have a go-to source of inspiration and
then I figure out each day from that
source of inspiration what I'm going to draw. I have a little picture
of it that I copied and pasted right into my class plan, something I can do is since
I'm using the iPad here. This is the actual
physical catalog that I draw from this is. What I use in my daily
drawing habit every day. My sister Cat gave this to
me a number of years ago, and for some reason it's
always just been around and I've always found inspiration
in it for some reason. Now, there's nothing inherently
inspiring about this, but it's very nostalgic for me. It just speaks to this era that it's just
before I was born, so a lot of the objects
we're in my life growing up. I recognize the tense, the barbecues, the
sports equipment, all these things like I would recognize these objects in
my everyday experience, so maybe that's why I find
this acme merchandise distributed spring and summer catalog from 1974
so interesting. Finally for sharing, I
just wrote like, I mean, you could write as simple as
I'm going to share this on Instagram or on Vero or
wherever you want to share it. I put scan and edit on my
Mac and share on Instagram, and then I even have my little Instagram account
here, Drawing is important. Now, I wanted to just
make a note here. I've decided to share on an account that's separate
from my professional account. My main account is at Mr.
Tomfros and that's where I post illustrations and
things more related to my professional practice
as an illustrator. When I started
drawing is important, I wanted it to be something that was safe
from that where I felt like I could just show up and make mistakes
and be different, not worried about
my style as much. If you look on that account
at drawing is important, you'll notice that it's like
if you keep going back. The styles changed the way
I'm sketch booking change and that's okay in this context [MUSIC] That's just a little note
that I added on there, but there it is my
30 day drawing plan. This is something that you are more than
welcome to reference. I'll leave this as a downloadable file in the Class Projects
and Resources page. After you make your plan, that can be the first thing you share in the class project. When you do that, feel free
to include some samples of your references or your go-to
inspiration source [MUSIC]
8. Project Step 2: Do the Drawings: [MUSIC] Now, if
your plan in hand, it's time to get drawing. Now, perhaps you're starting a brand new sketch
book and you're nervous about that first page. You don't want to start off
on the wrong foot and mess up your nice clean sketch book. I sometimes find it
helps just the mess that first page up on purpose, just to prove to myself
that it's not precious. From my uglybooks I've taken
to drawing on the cover. My running theme is just the number of whatever
uglybook I'm currently on, this is one, this is seven, and I'm currently on Number 8. Remember you have a plan
and now you can just cruise into it and
not overthink things. Whatever you're
feeling good or bad, push through and do the drawing. When the timer goes
off or when you fill in the page that
you said you'd fill in, you have permission to stop. If you're not happy with what you made you can always
try again the next day. Remember, it's not about being happy with what you drew, it's being satisfied that you showed up and did what you
said you were going to do. Now, just one tip
that might make your sketch book more
meaningful to you, if I'm really struggling I'll write my thoughts down
like right on the page, treating it like a journal and a sketchbook
at the same time. I really think this enriches the sketchbook experience
both in the act, like you actually
get a chance to put some words down of how you're feeling about what you drew, but then in the future
and you look at it, it's like a record. It's like a snapshot,
not just of the drawing but of how you felt. It also looks interesting just to look through
your sketchbook that includes personal
reflections and stuff like that. As you're accumulating
drawings in this project, you can constantly
be reflecting on how you're growing or areas
you'd like to improve on. You can write about this
as part of your project, like writing your sketch
book or as part of the caption in what
you share every day, either on the class project
or in social media. Now, without further ado, let's move into my demo. [MUSIC] For my demo today, I'm going to be drawing
in my current uglybook which has yellow paper. For drawing tools, I'll be using just a basic pencil
and a smaller size of posca paint pen which has
a 0.7 millimeter tip and my larger sized posca
paint pens which have a 1.8-2.5 millimeter tip. It's a bit more
round on the end. Of course, my trusty little eraser which actually comes in handy with this kind of
drawing that I've been doing. [NOISE] Let's go. Now, I can't forget about
my trusty catalog. This is my go-to source of inspiration in
my daily drawing right now and it's going
to be my source of inspiration in today's demo. I'm going to look for
something to draw out of here. It has to be something
I haven't drawn before and other than that, there's no real criteria. It's usually just
something that I look at and I think I'll draw that. Sometimes I choose something based on how
interesting it is to me and then other times if I really can't find
anything interesting, I challenge myself just to
draw something a little bit more boring and just
see what happens. Today I'm going to draw a
fishing net and maybe some of this fishing tackle
to go along with it. The first thing I
do is just lay down a preliminary sketch
with my pencil. This just gives me a bit of
structure to go over with more confidence with the
less forgiving pink patents. Sometimes I'm looser
and sometimes I'm actually a lot
more careful and try and be super tight about things but I don't put
pressure on myself to be totally loose or totally
strict one way or the other, so the nets here are going to be an interesting study and how do I capture all the little
intricacies there. If my brain gets stuck on that
I'll just move on and draw something else that I see
like this odd anchor. You can see in the picture that it's shown in
three-dimensions and I'm really partial to drawing things like on straight on view so that there's less perspective which just makes for a more
graphic picture, so that's why I'm doing that. Now, I see that
there's something on the bottom there but I
have no idea what that is. It could just be a little tiny plinth that
they put that on for the photo and so my theme
I guess today is fishing. One thing I really
like is lettering, and so I love the
little lettering on these fishing line spools. Now, as I'm drawing
these circles, I'm being pretty loosey-goosey
today but I do notice that I actually have a little
bit of a diagonal. It's either in my
hand or in the way I see with my actual eyes, so I find that if I've drawn something and it looks
right to me this way, if I rotate it, it looks totally off kilter, so that's what I'm doing here. Besides, moving things
around actually just helps draw
circles more easily. I told you this isn't
a drawing class. Now, I'm getting
all my centering of my texts like way off, but with the pencil I can work that out easily
and then when I go over it with my paint
pens I will be able to know better how to start
and where to place things. I'm just trying to
see what's going on in the graphics here. In cases that I
actually can't see, that's maybe a good
thing and I can just use my imagination. Part of what I'm doing
in these books with these paint pens is learning how to be simpler and not
to indulge myself in too many details
in what I'm drawing. This is an interesting
thing here, trolling motor. This one I think in order to capture it I need to
draw it in 3D somewhat. I'm already confused
trying to draw 3D. Again, I don't need to be super precious about my sketch. I know I'm getting
some things in the perspective wrong but if I rough it in with my pencil and just go
over with the paint pen, something will work
out and if it doesn't, I'll try again tomorrow. The controls on this
motor are hilarious. They look like they're
for an old radio or something, giant
rocker switch. I think I've got
this netting wrong. Let me just try and
get that little more. What I see, I'm really impatient
with details like this, so my brain is just
saying take shortcuts, you've got a class to record. I think even if I just do
it more diagonal like this, like it actually comes off here, the result will be better. They sag down like that. I think that's more nitty, maybe just one more
little element here. Now, that I have a sketch
that I'm fairly happy with, I can go in and start
filling it in with color. Now, often what I'll
do is I'll start with the edges of everything
with a thinner paint pen and that gives me
an edge to work within and then I can get the broader one and just
fill it in more quickly. If you're using paint
pens you always got to remember to shake them up and dab to get
that ink flowing. As I'm filling these in, I'm very linear like this, almost like a printer because if I'm too scribbly
and scratchy, if I go like this and we're
just one little spot, it starts to shred
up the paper and gunk gets all on the
tip of the paint pen, so this prevents that
from happening too much. For the net, I don't think I need to edge and I can just
use the thickness of the pen itself to go
and define this shape. You can see I'm being a
lot more confident with my strokes with the paint pen
than I was with the pencil. Now, this was yellow [LAUGHTER] in the picture but yellow on the yellow paper is
not the most visible, so I'm going to choose
a different color. I'm going to go with blue. [NOISE] I'm filling in smaller areas and these
little tight corners, I find that it helps to just
fill in the corners with a finer tip before
going the broader tip. I'm going to go on
to this guy here. It doesn't really matter
if I go over with one color and have to go
over with say black here. These colors are opaque so
they cover over one another. One thing I really like about drawing in a sketch book
versus illustrating is that I'm allowed to
leave some of my process behind more than I would
in my commercial work. It's okay to leave
my really bad, rough sketch beneath, it adds to the story and really looks good
in a sketchbook. I think sketchbooks look great when they're a bit
on the rough side. That's what they should be. I do need to wait
for that to dry, otherwise it's
going to be a mess. But this over here is
probably dry a lot. I'm going to use green
for the netting. We'll see how this goes. Now, one thing if I want to
have these lines continue, I forgot to shake this up, is I could just draw right over the frame of the net and then
go back over white later. I'm going to wait for that
to dry and then return over to here and in the picture it's blue but I think I'm going to
go with red on this one. No, I changed my mind, I'm
going to go with blue. I'm going to use this
finer tip to start just to edge in the inside
of this graphic. Now, this darker blue is dark enough that it
may cover over my sketch. We'll see what happens. Now, we'll return to the trolling motor edging in with my finer
point pen first. I am getting rough
around the edges here, but I can correct those
later by going back over here with the
white and on the edges, with the yellow, actually
using it as a white out. Now, while I'm waiting for
things over here to dry, I'm going to come
back to my net. I've given myself quite
a mess to clean up. I have mixed feelings
about what I did here, but I can definitely cover
over that and that and that. Then I just need to figure
out what's going on here. I think what I'm going
to do is just cover over all of it again
because I want to get some of how the net hangs
off the hoop of the net, the netting hangs
off the hoop or the frame part a little
bit more thoughtfully. While I'm waiting
for that to dry, I can work on some other part, such as the hook
part of this anchor. Maybe here I'll just
give it a little line to show that this part is
separate from that. Now, I totally covered
over my sketch with this darker blue on the
fishing line, but it's okay. I'm just going to go
in and do my best. Touch up some of these spots
I missed while I'm at it. Now, over here I can get some of those ridge lines of the
little handle there, and they'll be
better if I can make them imply a circle
shape over there. I can go back over
the black to make those look even sharper. Now, I have the white of the net frame here
and the handle. Then I have this white oval. I just wonder if I do
a white oval there if that's going to
work out so well. Maybe what I'll use for that color is something
a little different. If I have a color theme here, I could go with a blue. Pink is always such
a jazzy color. I'm going to use it even though I feel like I have mixed
feelings about it, [NOISE] but we'll
see how this goes. I didn't edge that one in
carefully with my little one. [NOISE] Not a big deal, but what I'm thinking
of doing is edging in the actual shape of
this little torpedo motor, and filling all those
little hard to get places. While I'm waiting
for that to dry, I can come over here, and do the inside
details of this. Now, I don't have brown, which that wood panel thing is. I'm just going to go with red. It's a very tacky
looking motor anyway, so I might as well just go
with red beside the green. I'm hoping this doesn't totally cover over my under sketch. I see the sketch poking through, so that's a good thing. I'm doing things a bit
in reverse order here. Doing my fine point last and
usually I do that first. Now, while I'm waiting
for that to dry, I go back over this, and just create a more
circular end there and there. That red is definitely not
dry enough yet to draw over. I can, however, go and do this writing just straightforward,
extended type face. Now, in these boxes
there's some number that indicates the strength
of the fishing line. I don't know what those numbers are or what they would be, something about £5 or £50
or something like that. I can now fill in my
little torpedo motor here. I have a shaft, goes down. The pink is taking a
little bit longer to dry than I would expect. The reason I edged around this in the pink and
just didn't go over and then let it dry and go
over with the white is because I was going
to let the yellow of the page come through, but now I'm doing
[LAUGHTER] this. Now, while I'm waiting
for that to dry, I'm going to come back to
my net once and for all, and only these guys are
going to come down. I'm being too hasty with
those. They look rushed. I always try and go
for a steady stroke, nothing too expressive in
the line quality itself. For me, I like to
express most of my feeling through the shapes, and the overall composition
versus individual line wisps. Well, it's not my favorite, but it's better like
this than it was before. I think once I erase
the sketch beneath, it will look neat. As for this part here, a little connection
there, and then a rivet. There's actually a little logo here and then
another connection. As for this, I have black
here and nowhere else, so I'm going to use black just like it shows in the picture. That's not really dry yet. I'm going to see
if I can push it. [NOISE] Now for most of
the line work details, I'm going to be using either white or blue ink there where these
connections are. I find these lines are a
bit on the thick side, so I'm just going to
edit them down a bit using a thin stroke over top. Got to be careful
when you're scraping these across the page like this. I don't know if you can
hear the scraping sound, but when that happens, it's splats since there's these tiny little spatters which may or may not work
out to your advantage. Right now. I don't want that. Time to add some buttons/ I can go down with
the white first. I find that the black
can be a bit heavy. I'm even going to just draw the box for this black
switch here and wait, and same with this here. While I'm waiting
for that to dry, I'll come back over here. I want to make an edit. At this point as things are
coming close to the finish, it's really like a game of
how many more details do I add or how much do I
refrain from adding more details because
once I get going, it's hard to stop, and this is when it's good to
have a time limit, especially for a
sketching habit. This one, I went over when
it was still too wet, and it murkied it up. I'm maybe even murking
it up more now. I'm going to leave that as is. This one, I just wanted
it rounded like that. That's how the connection looks here and I like that detail. Now, going back to
the monofilament, I really don't know
what that says, made in somewhere maybe. I'll just make it up,
made in, say, USA. I'm going to make up
what's in these boxes too. This one is going to say
£8 and it's going to be, how about 1,000 yards? Probably exactly what it is. Just some finishing
touches on this here with the rocker switch. [NOISE] The air might be more damp than it normally
is because these are taking a lot longer
to dry than usual. My temptation is to
draw a box around that, but I know it's going
to look too heavy, so I am going to refrain. For this little flips
switch or toggle switch, I think I'll just draw it
in. Are they even labeled? [NOISE] It's says black on it still from
when I drew there. I like that there's a
serial number on here. While I'm waiting
for that to dry, I'm going to just
edge off some of these rougher edges with yellow and then
whiting them out. It's not 100 percent perfect, but I like how it looks
a little bit obvious, again, giving that
rougher sketchbook look. Now, sometimes I try and go in, and see if I can imitate the metallic look or the
chrome look on some of these, but today I think I'm not. It would end up just
looking too busy. There's a few things
here that need to dry, but on this side, I
can start erasing. This is really the
satisfying part, [NOISE] is when you
clean it up just a bit. [NOISE] I'm going to be careful not to erase
in here because it's probably still drying
because it's so thick. [NOISE] It was still
wet there a bit. I can block those out here also. Even here, got smudgy. I'm no longer looking
at my references. I'm just adding some
finishing details that I just feel
would look better. Sometimes I'm wrong,
like there it got a little bit too detailed,
but I'm going to leave it. For the button, that. I do remember that
Shakespeare was red. I put that weight
down just to let the red pop a little bit more. I think I'm ready
to put my date down here and call it a day, but I still have to erase around these carefully because some of this is not yet dry. It doesn't really
make sense to erase anything under the paint pen because it's locked under there. It's not going away and you end up just rubbing
away the paint pen a bit, but anything around
the edges or on the inside here is fair game. I have done my drawing for the day and now I
just have to scan it, get it on my computer, make a few edits, and then share it on Instagram.
9. Project Step 3: Share Your Work!: I have my beautiful drawing and I want to share
it with the world. Of course, I need to get this physical drawing into
some digital file to do that. I also want to make a few
edits just to make sure the image is looking at
its best when I get it up. I'm also thinking about how consistent it's
going to look with all my other drawings as a series when you look
at my Instagram profile. When you go and you
see that grid of all the different drawings
that I've made over time. I like to make sure that has
a level of thought to it. For me, my workflow of getting
this into digital form involves a scanner to capture the image and then I get
it onto my computer, open it in Photoshop, make a couple of edits, and then I move
on to sharing it. In this video, I'm
going to show you my own workflow using my
scanner and using Photoshop. But I'm also going to show
you a process that doesn't require a computer, and especially it doesn't
require Photoshop. You really don't need
any special software. If you have a smartphone, you
have everything you need. But first I'm going to show
you how I do what I do. [MUSIC] The first thing
that I do is I get this onto my scanner. I'm trying to get it in
the middle of the bed so that when I end up
cropping it to a square, I have room at the top
and the bottom for that. Otherwise, if I get
it too far over here, I won't be able to get this
in the center of my square, so I just make sure that's
centered as possible. The next thing that
I do is I have just this black Bristol board and that's just nicer to me than the underside of this lid here, which is just white, but it also has lots of stains
and grime and stuff on it. The other thing is
black really lights this yellow paper powerful
and I like that a lot. I'm going to just
get this nice and centered here on my platon, put my black Bristol
board on top and close that and I'll go into
scan on the computer. [NOISE] Of course, when you're scanning
something into your computer, you'll be asked what resolution
do you want to have. I have it set to 600 here normally for most
of my projects. But honestly, when I'm scanning these things in
for social media, 300 dots per inch is plenty. I'm just going to scan that and then open that
up in Photoshop. Right right the bat, there's a few things
I want to do. Of course, I want
to rotate my image. The next thing I'm going
to want to do is crop it, I just use the crop tool here and nudge it over my arrow key. As you can see, I
have just enough edge around my sketchbook to let
it fit into the square. Otherwise, if my
sketchbook was a little bit bigger or
my platon a little bit smaller it would crop
it off in an awkward way. This is good. I'm just going to
commit that change. Now there's a few other
things going on here. One thing I just want to
acknowledge there is a streak across the scan that is
coming from my scanner. I tried cleaning my
scanner the other day with Windex and
I think some of the Windex actually got
onto the light sensor and damaged it so boo for me. But another thing that I can change is if you
look at the top here, there is a shadow
and that's just coming from light bouncing
around doing stuff. My little trick is just
duplicating the layer and then bringing the top
duplicate up here. If I just use a very
soft round brush with a very soft edge and large and I just
feather that off, erase off that edge of the copy. It just blends in enough at the top there that
when it's on Instagram, you don't notice that shadow and that's just a little
picky thing I do. There's two basic
edits I want to make after cropping the image, and that's contrast
and saturation. I'm going to just
go down here and hit "Brightness/contrast"
and this just creates what's called
an adjustment layer over top my scan. There's two sliders here,
brightness and contrast. I'm going to just adjust
the contrast here. What I want is the darks to get darker and the lights
to get lighter. Basically, contrast just makes those two extremes
even more extreme. Now, I don't want to
go all the way up to like 100 because
it's going to be overkill and it's going
to be super obvious that I tweaked the
contrast a lot there. Really, I just want
it to be a richer, more dynamic image and I find just by adjusting
contrast a little bit like that it's enough and
you can see the difference. It just helps that yellow pop-up from the black a little
more and some of the colors in here
to be more dynamic. I might just nudge
it up to add more. The second edit that
I want to make, as I said, is saturation. I'm going to go back to make
another adjustment layer, but this time it's
going to be a hue and saturation adjustment layer. Now, I don't want
to change any of the sliders here
except saturation. Again, it's going to be subtle. I don't want to be obvious the fact that I'm making
these adjustments, someone shouldn't be able to
look at my image and say, he really made this image supersaturated or he
really pop that contrast. It's really got to be subtle. It's really just about bringing out the best of the image. I think if I just
adjust the saturation a little bit, it really helps. If I go all the way to 100, obviously it's like crazy,
it looks artificial. If I go all the way down, it's going to look
basically black and white. The question is, do I want to desaturate it or saturate it, or is it enough on its own? The colors are pretty
nice on their own, but I just want to nudge
them up a little bit. With these two adjustments made, I really think that the overall
image is a lot more rich. Just to see the difference here, I'm going to just hide the
adjustments that I made. You can see that
the image that came out of the scanner is a little bit dull when you compare it to the adjustments that I made. The adjustments aren't
super noticeable, but they're enough just
to let this really pop. I'm now going to save the file. I can save a copy of the
layered file with today's date. That's just for my
own [NOISE] archives, if I need to make an edit or something down the
road, I have it. But the image that I really
need right now is a JPEG, so I can share that
on social media. [NOISE] I just save that as
JPEG and I'm good to go. This is a little
bit of a bonus tip. The good thing about having my original file
with these layers, especially these
adjustment layers, is every time I have a new
drawing and I scan it in, I can just place
it into this file. As long as it's beneath the
adjustment layers here, it will take on the same
edits and that includes, of course, contrasts, and saturation, and
that will basically automate my process
moving forward. Another bonus tip here is that if you are
really picky and you wanted some of these
speckles to go away or there's some dirt on
the platin of the scanner, or you forgot to blow away
some of the eraser bits, you can use the
healing tool just by [NOISE] doing
something like this. It's drawing [NOISE]
little circles around the specs and
then they go away. Now, I choose not to do
this every time because I really just want to
focus on drawing and then getting the thing
up on social media. The fact that it's a
daily drawing project, it's a sketchbook, it's okay for it to be messy
and a little bit unfiltered. Is just that, giving
it a little bit of extra contrast and
saturation is it just a little bit
of extra umph that goes beyond just taking a
picture with your phone. Now that I've planned, captured, and made my edits to my image, it's time to share
it on Instagram. Of course I need to get
that onto my phone. [NOISE] I just use AirDrop. I drag it from my computer onto my phone and it magically
appears over here, and then from here [MUSIC]
I can do my thing. [MUSIC] If all you
have is a smart phone, you don't have a scanner, you don't have a computer, or you don't have Photoshop, you still have everything
you need to make a good-quality image of your sketch for sharing
on social media. [MUSIC] You just want to
plan it out a little bit. [MUSIC] You want
to at least have two [NOISE] things that
you've considered. The first of course, is having [NOISE] some
background that's consistent in that's
not distracting, and that will work well
for your sketchbook. The other thing you
want to consider is what your lighting source
[NOISE] is going to be. I have a pretty even and consistent lighting source here, so I know that if this was going to be my setup
and I was going to take a photo every time I drew to get it [LAUGHTER]
into digital format, then this would work. Of course, another
good option is to use natural daylight coming
[NOISE] out of a window. As long as that's a
predictable source of light, it's not direct, and it's not casting a harsh shadows or
anything like that, then that will work as well. There is one extra challenge
where you're not scanning besides lighting and having
a consistent background, and that's getting your
sketchbook to lay flat. Depending on the
sketchbook you have, you might find your
pages really just want to bend up like that, and so you're going to need
a way to get that to lay flat somehow or just be okay with it coming
up a little bit. Some people just
use their hands. If they can just use the
hand that they're not taking their photo
with, they can do that. Another idea would be to use clips or some tape or
something like that. That's a creative challenge. I know some people would just
decide to hold their book up and whatever ends
up in the background, that just becomes a
part of their styles. It's just like, as
long as the book is filling the frame, whatever is in the background
[NOISE] just becomes part of the story, I suppose. But [NOISE] for me, I'm going to just place
this on my black papers, the same [NOISE] black
paper I used in my scanner. I'm just going make
sure it's centered, and I hope that those
[NOISE] pages can lay flat. Right now it's not looking
promising and because of the distortion of the
lens on the phone, it's looking even worse. So I need to think of a
different approach here. [NOISE] I'm going
to have to figure out a way to hold my book flat. [NOISE] Maybe my
thing will just be to hold it down with my hand and that will
be part of my story. While I'm taking this picture, you might be wondering, why wouldn't I just turn the
camera around and go into horizontal orientation and just have only the black background
and none of the table? The reason for this
is just that if I try to crop this
[NOISE] into a square, it's not going to
work out for me. I'm going to get no information above and below the sketchbook. So I need to take it in
vertical mode just to make sure I'm giving it room at the
top and bottom for cropping. You'll see what I mean when I
actually go to do the crop. I'm also trying to align the phone parallel
to the ground. I'm using the little
target in the middle of my phone screen to make
sure it's level like that. Once I've taken the photo, I can open it in just my
iOS native photo editor and make the changes here. The first thing I want to
do is just make my crop. The iOS camera app has [MUSIC] [NOISE] different
sizes as presets, [NOISE] so I'm just going
to choose the square, get my image in there. [MUSIC] Once I'm
happy with the crop, I'm going to go back
to the editing mode here and just swipe over to contrast and use the little slider here to
increase the contrast. [MUSIC] Make those
darks darker and those lights brighter without
it being too obvious. [MUSIC] Finally,
[LAUGHTER] I'm going to go over to saturation and see if I can [MUSIC] increase
the saturation, just a tad. [MUSIC] It doesn't need much. [MUSIC] Once you're happy with your contrast and
saturation edits, you can hit ''Done''
[NOISE] and then share your photo on social media. [MUSIC] Whether you choose to do this step and share
it to social media, I do highly encourage you to share to the class
projects page. [MUSIC] When you share
on social media, please be sure to use the
hashtag drawingisimportantclass and tag me @mrtomfroese so I can find your
work in the wild. [MUSIC]
10. Wrap Up and Thank You!: [MUSIC] That wraps up this class. Just a quick recap. First, we learned some good reasons why we
should draw every day. Next, we learned how to overcome three challenges
of daily drawing. Then we learned how making
a solid plan can help us build a successful
drawing project that can last 30 days and beyond. After giving some quick
technique based starting points, we jumped into the three
steps of the actual project, not included planning,
drawing, and sharing. Thank you so much for
taking this class. My hope is that by
watching through this class without even
having lifted a pencil, you'll have a much stronger
sense of purpose and direction in your own
daily drawing goals. I also hope and I strongly believe you will make
huge breakthroughs in your own creative growth
if you can push through this 30 day drawing challenge
all the way to the end. As you go through your project, please let me know
how it's going. If this class is
really helping you, a great way to let me know, and others as well, is by leaving a review. That's another class in the bag. I'll see you in the next one. Again, thank you so much
for spending time with me.