Transcripts
1. Class Intro: Hello, everyone.
I'm Marco Bucci, and I want to welcome you to my drawing class for
Experienced beginners. You know, as an artist
for 20 years now, professional for about 15 years, I mostly do paintings and finished illustrations that have color and value and
shading and rendering. But for the first four
years of my learning, it was strictly drawing. And I found that having strong drawing
foundations really benefited me and
bolstered my work, no matter what kind of medium or style I
was adding to it, be it painting or
animation or sculpting. The drawing foundations
had to lie underneath, and that's what this
class is all about. In fact, I've structured
this class in the way that I learned
drawing fundamentals. We're going to move
through the chapters in the same way that I was introduced to these principles
and concepts as I learned. I'll be showing you
the fundamentals themselves through lectures
and analyzing other work, and then I'll be showing
you how to apply them by doing drawing
demonstrations. And these
demonstrations are also designed as homework
assignments for you. You could either draw along with me or simply watch the lectures and then fashion your
own homework assignments after what you see me doing. I'm excited for this
class. Let's get going.
2. Warm Up Routine: So before we truly get started, I'm just going to spend a
few minutes talking about warm ups and how I
like to warm up. The main principle I adhere
to when I do this stuff is I don't want to have
any pressure at all, and what that means
practically is, I don't want to have
to draw anything. I mean, not anything literal, no characters, no environments,
nothing like that. I just want to start
making marks on the page. Okay. And the thing I want to
encourage when it comes to your warm up is pick a brush
that you like to draw with. My favorite brush is this kind
of calligraphy type thing. I actually did find this
brush in a Cliigraphy set. It's really not a traditional
pencil style brush. I'd just like to fill the page
with what I consider to be confident marks drawn in the way that I like to draw,
which is choppy. My lines tend to be
on the thicker side. I wouldn't say it's delicate, but it is deliberate. And this is just
what I've learned over the years that I like. I like both the feel
of it, you know, the tactile pressure that I put down on the stylus
and the tablet, or if I'm drawing on paper, it's very much the same thing. And I also like the way it
just looks on the paper. The physical way you
draw and the marks you make probably also has a lot
to do with your influences. I personally happen to be
very influenced by animators. There's a beautiful drawing
there by Glen Keen. Because of the
nature of animation, the strokes tend to be
rough, yet confident. As a result, you get these very clear, boldly stated shapes. When I do my warm ups,
which by the way, I often do just with a cup
of coffee in the morning, I do it to remind myself
that this stuff is ultimately supposed to be fun
and not at all stressful. I'm also reminded that
mark making itself, as abstract as this is, can be an interesting
thing to look at. I certainly find a
lot of beauty in just the strokes of that
Glen Keen drawing there. I can sense the confidence of the artist and almost the
effectiveness of his thinking. That comes through to
me just in the strokes. Those are the opposite of timid. That's where I want
to be as an artist. I remember this little
quote I read at a swimming pool of all places where I used to
go swimming for exercise, and the quote was, you
have to train the way you want to compete because you will compete the way you train. Now, drawing is
not a competition, but the way you practice is very much going to
be the way you draw. Even filtering down to your
morning warm up routine, I want to encourage you
to make the marks that you want to make that you
feel comfortable making. Take the pressure off yourself. Don't feel the need
to draw anything. Just start putting down
some abstract shapes, abstract marks, circles,
squares, whatever, one shape in front of another, one shape behind the next, different sizes, and create yourself a little
piece of abstract art. Something that just
gets your hand moving and your muscles
warm a little bit. And once you're finished
with this page, I never save them. I just close the canvas
and we get to work. Let's do that right now.
3. My Workspace: Because I'm recording this
class using digital tools, I'd like to quickly go
over what I'm using, both in terms of
hardware and software. I've got a standard
dual monitor setup, which is nice because
I can put reference on this monitor and then I draw
looking at this monitor. Now, this is actually a Cintiq, which means I can draw on
this surface directly. But I actually prefer to draw on my good old fashioned walk in Tools P. I've been using tablets like this
since the year 2000, so I'm just really
comfortable with it. I also like the fact
that I can lean back a little bit and not be so
close up to the screen. My styles holster
is right there. If I have to switch to a mouse, I've got a wireless
mouse right here. My keyboard is on
a movable tray, so I can slide it
in to sit closer, or if I'm using
keyboard shortcuts, which I almost always am, I can move it out
like this. Funny. On video, I can really tell that I got to dust off that keyboard. But okay, when it comes to what I'm actually looking
at on my screen, it's pretty bare bones. This
is what I'm looking at. This is Adobe
Photoshop, by the way. Now, I don't necessarily
recommend photoshop. I've just been using it since the late 90s, so
I'm so used to it. But photoshops not cheap. You pay a monthly
subscription for it. And to be honest, I
think the only reason I stick with the Adobe products, other than the fact that I've been using them for so long, is that because I'm a teacher, they give me a teacher's
discount on all Adobe products. If I didn't have that
bundle price as a teacher, I'm not entirely sure I
would stick with photoshop. If you use Photoshop,
that's great. That's all you need.
It's a great app for drawing and
digital painting. So if you're wondering which
app I would recommend if you're not using photoshop and you don't want
to pay for it, I would recommend this piece of software. It's called Krita. You can see it in the
top left corner there. It's known as a
photoshop alternative, and it really does a great job. It's tailored
toward digital art. It can do anything photoshop
can do, but it's free. I've done some work in Krita. If I ever choose to
abandon photoshop, Krita is probably the
software I'll jump to. You've got your nice
color picker over here, you've got your
layers window here. You can quickly modify your interface by docking
and undocking panels. It's also got a lot of
nice brushes right out of the box with some
very clear icons as to what the brush looks like. You can pull down this menu and access all kinds of
different brush selections. You can build them into
a favorites folder. Lots of good
functionality with Krita. So back to Photoshop here, this is more of a
surface overview of what I'm seeing
because in this class, I'm actually not going to show
you this whole interface. And the reason for
that is I'm never actually doing anything
special with the interface. I will almost always be working on just a single layer,
as you can see here. I will almost always be using
a dark color to draw with. Sometimes I'll use blue
lines or red lines, and I'm just picking
colors like that. Again, almost always,
I'll be using this little calligraphy brush that you saw me use
in the warm ups. This Caligraphy brush is part of the brush pack that
comes with this class. The file format I provide can be loaded in
photoshop, obviously, but also in Procreate, which is an iPad app, procreate another great app for drawing and
painting, by the way. It can also be loaded up
in clip studio paint. Unfortunately, the
brush does not work in Krita because it's a
different file format. One thing I'll often
do in this class is draw things that go
behind other things. So for example, you see this spherical form
I just drew there? Well, if I wanted to draw
a little square behind it, instead of just ending
the square there, I will often draw it behind the object coming out like that and completing it that way. And then what I'd like to say is I'll ghost out what's behind. You'll hear me say
the word ghosting a lot. It's a habit I have. What that means visually is
I'll do something like this, kind of hiding what's behind and therefore invisible to
us, but ghosting it. So it's not fully hidden, it's just well, ghosted. All I'm doing to achieve this ghosting effect
is sampling the white pixels on the canvas or simply
selecting a light color, and then very gently just
going over the strokes, essentially painting white
transparently over my strokes. The same thing could be
achieved with layers, but layers will slow you down. If you are a beginner
practicing your drawing, I recommend not using layers. Just use the one default layer that comes when you open
a brand new canvas. Any app will just give you
one basic layer to work on. In the event that
I do use layers, I will be sure to
mention it and show you. But don't be surprised
if that actually never happens because as far as the
lessons in this class goes, there's very little
functionality for layers. No matter which app you use, the one thing I
recommend is keeping your interface open
and breathable, don't start cluttering it with 1 million panels like this. Really, the only three
things you want to see are your layers if
you're even using them. My layers window is always just sitting
here on the right. It's just something
that I've always done. Then I've got my little
color picker here, which when I'm painting, I'd like to resize,
so it's a bit bigger. But if I'm just drawing, which is generally
black and white, I'll usually just
shrink it way down, something like this, so it doesn't take up too
much real estate. Then my canvas is as large
as possible on the screen. Usually, it's
something like this. Now, with photoshop,
you can go fancy and make your canvas like this
as big as the screen is. And you can absolutely do that if it makes
you comfortable. But for me, I often just
like to have it like this. I find that I like
having the ability to monitor the entire canvas
on my screen rather than having a super
zoomed in view where I physically have to move my eyes from this point to this point. Again, to see down
here, I'm moving my eyes a lot and I
don't enjoy that. I like working like this where my eyes can take in the
whole picture all at once. So my chosen presentation
for this class, you will only see my canvas. I will be cropping out just the drawable
surface of my canvas. That's because once
again, I'm not using any special
tricks or tools, just a basic pencil brush or in my case, a
calligraphy brush. You can use whatever
brush you want. Most artists when they're
drawing use pencil brushes, similar to maybe a
brush like this. It has a more
grainy pencil look. Okay. And this brush is great. It just for some
reason, I've always drawn with my calligraphy brush. I think because I can
get a better sense of thick to thin lines, which is something
that reminds me of my drawing with
charcoal days where you hold the charcoal
on its side and you can achieve a more
calligraphic look with it. But whatever brush you're comfortable with,
please use that. Don't feel the need to use a calligraphy brush
just because I do. I'm only using this because that's what
I'm comfortable with. And then, the last thing I
like to have on my screen at all times is the tool
bar, which in photoshop, I can collapse from a wider tool bar like this
to a more vertical tool bar, and that just takes up
less screen real estate, so I have more room
for my canvas. As I mentioned earlier, my
fingers are always hovering on the brush size hot
keys on the keyboard. Instead of changing my
brush size by going here, that's way too
cumbersome to do that. You can hear me pressing keys. That's just my middle finger
and index finger pressing the square bracket
keys which are next door neighbors
on the keyboard, so I can very quickly
resize my brush on the fly. If I'm zoomed in
for some reason, which in this class, I
probably never will be. But sometimes when
I'm painting or drawing a detail, I
might be zoomed in. Because my index
and middle finger are on the square bracket keys, my pinky can comfortably
reach the space bar key, which is the universal shortcut for moving around your canvas. Then I'll just use the
magnifying glass tool to zoom back out. Here is what this
all looks like. This is how my left
hand is all the time. Note that my ring finger is not actually doing anything,
it's just resting there. Speaking of the keyboard, I
don't use control Z to undo, and that's because I don't like to move my left hand at all. Instead, if I'm drawing with my stylus and I want
to undo something, I have control Z mapped to
my front rocker switch. To set this up, your
tablet will come with its own little
interface where you can map hot keys and buttons. The walk on one looks like this. For me, I just pick the device, which is my intos tablet. I select my pen. I would select Photoshop
for the software. Then I can go here to the
front rocker switch icon, which you can see is set
to keystroke and you can see here it set to
Control Z, which is undo. If you don't have
a walk on tablet, you'll still have a
screen very much like this where you can map
hot keys accordingly. Let's see. The only other thing that maybe you should know, and I do find useful as I have to drag this in from
my other screen. I like to have this
navigator window. Again, it's open on
my other monitor, and it's just a thumbnail
view of the canvas, simulating standing ten
feet away from your page. I find this mostly
useful with painting because it simplifies
a more complex piece. But as a force of habit, I do like to have
this on my screen. But again, because I
have dual monitors, I would put this on
my other screen. If I didn't have a second screen for this class, I
would not even use it. It's not worth the real estate. That's because you're going
to be able to evaluate your drawings just by looking
at the one canvas here. But if you do have two screens, I would throw the navigator
window on that other screen. Again, different apps will generally have that
navigator window. It just might not be called the navigator, I might be
called something else. Sometimes at the end or
middle of a drawing, I'll feel the need to resize things or move things
around a little bit. For that, I'll just use
the selection tool here. Let's say I wanted
this dot to be bigger. I would just draw selection. Then in photoshop or any app, I can activate these
little handles and move it around and scale it. You'll see me do this to
resize a head commonly or make legs longer or shorter or make arms
longer or shorter. It's things I do
often to my drawings. It generally happens midway
in or even at the end, when I notice
something's a little bit off, but the drawing is good. It's just need to
resize it a little bit. That's what I'll do. This is a very basic application
of the software, which again, any digital painting app will
allow you to do. Lastly, I think it
goes without saying, but if you're using a tablet, make sure you enable
pressure sensitivity, which generally
is on by default. If you look at my color picker, I have a black color selected. But if I press lightly, the stroke shows up as
a very light color. It's not near black yet. I can go over the
stroke to darken it. Or if I wanted to, I can press harder on my tablet and get a pure black stroke
or medium level and get a medium dark stroke. Again, that's all
done by enabling pressure sensitivity
in your software, which once again is
probably on by default. If you're interested in a
whole class about this thing, I do have a whole class called getting started with
digital painting. It covers three
popular softwares, Photoshop Creta, and procreate. It goes over this and much, much more in detail. But what you will
be looking at is simply the canvas
so you can focus on the drawing principles at hand and not the navigating
of the software. That should do it. Let's
get on with the class.
4. Chapter 1 - Gesture Drawing: The fundamentals are
all equally important, but gesture is the thing that may transform your art the most. It was for me, and
that's because gesture influences the
mood of your work, and therefore, how people will feel when
they see your art. Gesture also tends
to be a bit less intuitive because it's an
abstract form of drawing. And that can be a struggle
to get your mind into, especially if you're
used to just drawing literal lines and
literal details. But if you have problems with your characters or figure poses looking stiff or lifeless or
lacking weight or movement, gesture is probably the fundamental that's
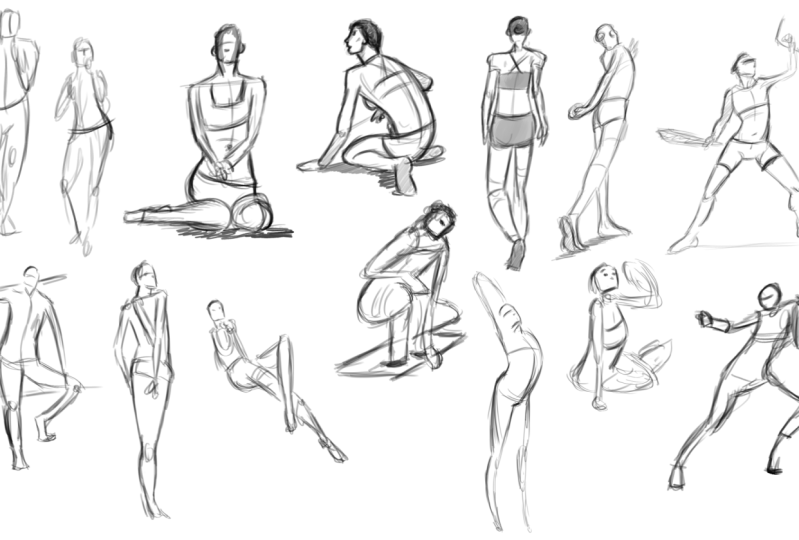
going to fix that. So let's take a look at it. To open this chapter,
I'm first going to show you what gesture
drawing looks like, or at least how I've learned
to do gesture drawings. For me, first and foremost, a good gesture has to capture the mood and feel of a pose. Secondary to that, it
should capture a sense of weight or
movement or balance, you know, something
that feels like this is a human being posing, not some robot or mannequin. They should also be
done pretty quickly. As you can see here. My gestures
take me about a minute, maybe a bit more if it's
a complicated pose. The speed at which you
gesture actually does play a role in the feeling that you can capture
in the drawing. To do this, we need a system
for what information we're looking for and an
overall sequence in which to capture it. Let's start right now developing
our gesture tool set. When it comes to gesture, I always like to
start with the head. Let's do a quick little
bit on that here before progressing
into the whole body. Dovetailing nicely
with our warm ups, the gesture for a head
is basically a circle. However, let's make
it more of an oval, an oval, of course, representing the fact that
there's a jaw here. But then to fine tune
this a little bit more, think of it as an oval
mixed with a box like this. Again, keep these lines rough. We're not trying to
draw a literal head, just something that
can be a stand in for a head. This is great. Now, if you imagine there's
an eye line here going horizontally and then a
mid line going vertically, suddenly, we have a head that appears to be looking
in a direction. Now, if you feel
more comfortable actually drawing a circle first and then putting on
the jaw attachment and then going over it,
you can do that as well. It takes a bit longer, but
it's still plenty quick. And then from here, you
can get the midline vertically and the
eyeline horizontally, and you still have
the same effect. Gesture drawing is by and large, not a three D type of drawing. However, this eyeline thing I'm recommending does have a small
element of three D to it. It's very easy, but I just
want to quickly go over what's happening with this
egg and two elastics. Depending on the angle
at which we see the egg, the curvature of
the elastics change thereby defining the angle. And it is a helpful exercise right away to practice
drawing this. You could add this to your
warm up routine if you like. The whole idea here is that
the horizontal elastic, which I'm drawing
with a blue line, represents the eye line, and the vertical elastic, which I'm drawing in red is simply a line running down
the middle of the head. The end effect is you
get something that appears to be looking
in a certain direction, and this helps capture attitude or character
in a gesture. So the first thing I do
when I draw a gesture is block in that more
rectangular egg shape, I throw in an eye line, which once again is really the only three D part
of a gesture drawing. Remember that you can
visualize this line as an elastic wrapping
around the entire form. Of course, let's pair that
with a vertical elastic, which gives our
head a direction. Now, just to show you a less
effective way of doing this. If I did the mid
lines like this, you could do this,
but the flatness will be of limited use later. It's also a bad habit to form. So just make sure your lines go around this hypothetical
squarish egg. Okay, so the next
thing about gesture is we have to connect
a neck to this head. But a gestural neck.
I don't want to start drawing like
contours like this. That's not what a
gesture is for. I recommend starting
by keeping things down to single lines
as much as possible. It doesn't have to connect to a skull or anything
literal like that. It just comes down like that. It's amazing how even this
drawing that I've got here, as crude as it is, I can
sense a certain feel from it. It stimulates a
physical sensation, I can move my body to
match this feeling. Here's another gestural head. Maybe this one is from the
side, the eyeline is here. The eyeline would
go like this and the midline is
actually over here. This being like a side view. Maybe here the neck
comes out like this. I'm looking at the
midpoint of this head and just throwing the neck
down the middle like that. Now, there is a landmark to look for when you're
gesturing down the neck, like the place to end the line, and that's the pit of
the neck, right here. If I were drawing this gesture, this being the base of the head and gesturing down the neck, I would try and aim this line, so it ends where the
pit of the neck is. You can feel this point
on your own body. It's a little hollow
there because it's between the
two clavical bones. The term pit of the neck is quite a good
description of this area, and it makes for
a great landmark. You'll hear me use
the term landmarks throughout this
chapter specifically, and what I'm referring
to when I say landmark, Is a clear distinct point on the body that we can aim
for with our gestures. Because gestures are
so flowy and abstract, landmarks help us put things
roughly where they belong. Back to the pit of the neck, looking at a side view and just ignore this anatomy stuff, we can clearly see the pit
of the neck right there. If I were gesturing
through this head, I'd have my squarish
oval shape here. For the neck, I would
gesture downwards trying to end my line at this pit of
the neck area right here. So a fantastic exercise
you could try right now, is block yourself in a quick gestural head, find a midline. Obviously, this
head is instantly pointing down or looking
down, I should say. Let's see if we can
find a neck gesture. How about if the neck
went down like that? That creates one
particular feel. But let's duplicate this
and try a different one. I'll erase the neck that I
have there. In this one. What if we had a more bent
neck shape like this. We get a whole different
feel to this pose. Maybe for this one, the head is looking upwards, like this. I love putting in
these cross hairs or I should say, elastics. Instantly it
describes a direction which contributes heavily
to a certain feel. Maybe this neck just follows the head direction
straight downwards. This landmark here being
the pit of the neck. Now, feel free to circle landmarks or put
an x through them. That has helped me in the past. It reminds me that, hey, this is an important point. It's a position I can
relate other things to, which we'll see in a moment when I begin adding shoulders. And just to quickly
duplicate this drawing, erasing the neck that's there. If we just gesture out a different neck and
the pit of the neck, of course, is here now, the pose now has a
completely different feel, and this is the
power of gesture, creating that sense of
feeling extremely quickly. Let's begin looking
for shoulders now, which also heavily contribute
to expression and feel. If I were gesturing this
pose, I'd of course, start with the squarish roundish head shape that
we've been looking at. Now, she has a slight
tilt to her head. I want to capture that
with this eye line. The eye line, by
the way, going more or less in the
center of the head. That's where the
eyes are located. And because we have a
straight on view here, let's get that line more
or less in the middle. And now I'll use the
vertical cross hair to define the middle
of the head this way. Now I'm looking for
the pit of the neck. Instead of gesturing, I'll actually find the
landmark first. It's kind of here. I'll put a little dot there
for a little x. Then I'll kind of pull
this gestural line out from behind the head
and down to this point. Now that I have that point, I can find the
shoulders against it. As you can see, the shoulders
are not on the same level. The shoulder on the right
or her left is higher. So what you could do
is simply try and landmark where you think
that high shoulder is. I think it's about here. Then I can shoot a horizontal line across and then make sure my other shoulder is just
a bit lower than that. Now, I don't actually
do it that way. The way I do it is I
use the clavicles or collarbones as a pathway
to the shoulders. The clavicle sliding right
up to this shoulder point. I find the shoulders by
following that path. Then, of course, I'll
find the other shoulder by following this path, but I still do put dots where I think those
landmarks are. I am just ballparking these positions.
This is not anatomy. It doesn't have to be perfect. It just has to capture the general relationships
that create the feel. As you can see, if I now just
continue to gesture here, following the rhythms of
the body that I'm seeing, we absolutely have a
feeling developing here. I'd like to switch gears
now and talk about the type of lines you can
encounter in a gesture drawing, there's really only
three S curves, C curves, and straights. This pose here, of this girl
jumping off the ground, contains all three,
and it is quite common to find all three
types of lines in a pose. The broadest line you can draw is called the
line of action. It goes through the entire body describing the pose
with a single line, and I'll draw right
over this reference. In this case, the line
of action is an S curve. You can see it conforms to
the shape of an S. Now, this gestural line is not a
literal S. It's elongated, very thin S. When we say
S curves and C curves, that's just the closest
letter it resembles. If you were to draw this first, you can actually pinpoint
roughly where the pit of the neck is and gesture to the shoulders like
we've talked about. If you landmark where
those shoulders are, you can now draw separate
lines for the arms. This arm on the left
is very extended. She is pushing it
down as she jumps. There's a muscle
action driving that. Generally, a good line to
show that type of action, someone really extending
is a straight. I would say this
arm is a straight. The other arm is more relaxed. It's going with the
momentum of the jump. It's not really muscle
driven, it's momentum driven. Generally, curves are more
appropriate for that. This here is a C curve, which looks like a V, but it's just a C, drawn
rotated 90 degrees. You can let that curve go right
up into the hand as well. A good landmark actually
is where the hand stops. Sometimes I will draw these little end points for
where the hands are. Another great landmark to
have is the top of the hip, which in this case
is right there. Now, this represents the top of the hip bone. You
know, where it crests. In fact, that area is
called the iliac crest. I like to find it on one side. Now, the other side is
hidden because we're seeing her in a kind of a three
quarter slash side view. But just like the line
of the shoulders, I'll follow this
to the other side, put a little mark
where that is as well. As it is hopefully
becoming more clear, gesture is very much
about relationships. You know, where is one part
compared to another part? Anyway, just like
how the shoulders began my gesture for the arms, I can use those hip points to begin my gesture
for the legs. The front leg here is a
pretty obvious S curve shape. This actually does look like the literal letter
S. The back leg, much like her arm there
is pretty straight, although I see a little tiny ever so slight S
curve on that as well. Now, notice that I had that back leg blocked in with
my line of action before, but now I've updated it. I've updated it because
I now know more about that leg as a result of
having gesture down to it. That's another important
lesson about gesture. There is no finished line. It's supposed to be messy. You're feeling your
way through the pose. Let's switch gears now and draw this pose without tracing. Of course, I am using the
reference while I gesture here. There's the overall
line of action, the S curve for the body, on top of which I can place the head using techniques
we've already looked at, and I can find the pit of
the neck roughly here. Then I'll gesture
up the clavicle and find where that shoulder is. I know it's below the chin
line, so if it helps, I'm imagining a
line from the chin and making sure the shoulder
is just beneath that. Feel free to literally draw
this line if you like. Her other shoulder is below this shoulder.
It's about here. Now I can reinforce my
gesture down the body, exaggerating this
curve a little bit, making sure that she's
thrusting out with the chest. From here, I might switch to
the arm that is extended, and I'll try and landmark
where that hand is. You could even do a
wedge shape like that. While I'm on the arms, I do
like to find the other one. These horizontal plumb lines
as they're called, help me. The tip of that hand is
just above its shoulder, so it's about here, and then I can gesture
that C curve I showed you. General proportion is
important with the gesture, although it doesn't
have to be exact. So assuming my proportions are roughly in the
right place here, which is something that
comes with practice and even I don't always get it, I'll use that hand to
find where the hip is. That is the tip of the
crest of the hip bone. It lines up with the forearm, maybe roughly about
here horizontally, so I will put a little x to plot that landmark
on my drawing. Then I might want to
just gesture down to it. Now, this is not a contour
for the back or anything. It's just adding to my
gesture and from here, much like I did with the
shoulder, the clavicle there. I like to include a line that indicates the
orientation of the hips. That is the relationship
from one crest to the other. The hip on the back side that we can't see is clearly
lower than this one. It's probably about down here. I like to include a
little curved line that shows me that relationship. By the way, it's
actually quite useful to draw a line that goes
through both shoulders, then draw a line
that goes through both sides of the hips and compare the relationship of those two blue lines
to your reference. I find those two blue
lines there to be a pretty critical
relationship in the gesture. Anyway, I can use
the hip position to gesture down toward the knee. Sometimes it's
helpful to landmark the knee, which I'll
just draw a line. This is my stop line for where the knee is. Gesture there. Notice I'm using a lot
of lines in my gesture. It's not this. This is stiff. It's flow. Think flow. I'm trying to evaluate the
physical action of this pose, not my line quality. I could simply
continue this curve, or I could find my stop point
like I did for the knee. I can see that the bottom
of her foot is more or less in line
with the back here. I'll draw that, a little
straight line there representing the shoe
and gesture down to it. Tapering my curve off at the end to simulate where the feet are. There we go. Then
the line of action I put in for the body takes
care of that back leg, but just to complete
this rhythm, there is that subtle
S to it that I'm seeing and I'm running out of space on my canvas,
but that's okay. We'll just find the
bottom position of the foot and gesture down to it. I just realized I
forgot to put in the eye line for the
head, but that's okay. It's not necessary,
but it does help. Then if you want,
you can even find a gestural flow for the hair, which also conforms in this case to a bunch of C curves really. Then over here, it's an S curve. Then if you like, you can throw a little tone in there just to signify to yourself that
this is where the hair goes. Having hair in there
does actually help you measure and check your
proportions. And there we go. That to me is a successful
gesture drawing. It captures the feeling of
this person thrusting up. It feels like the
body is in motion. The proportions appear
generally correct. Again, you don't need to fully evaluate that with a gesture, but this is a good
drawing that I could continue to build off of, which is the whole point
of gesture drawing. All right. Let's
do another pose. Right away here, to expand on that oval slash box
shape for the head, notice how I'm giving the lower
left area a little point. That just represents
the chin and jaw seen from a
three quarter angle. Then with that eye
line in there, it just further reinforces that the head is pointed in
a certain direction. This time, I'll take a
different colored line and draw those plumb lines that connect the two shoulders and
two sides of the hip, taking specific note of the difference in angle
between those two lines. In more dynamic poses, that is poses that have
some action to them, not just straight up and down. You will very often find a difference in angle
in those two lines. If you can capture it early, it'll do wonders
for your drawing. So, I'll landmark
the elbow here with a little dot and then
gesture my way to it. Then from there, I can more easily find where the hand is. Notice how that whole arm
is essentially a C curve, and even the hand
is a mini C curve. Now I can do the same thing
for the other arms gesture, which is also a C curve, except with slightly
different angles. It's flatter where the
forearm is resting. Now that I know
where the arms are, I can get this sweeping S
curve for the entire body. My blue plum line already
shows me where the hips go. Now I can landmark the
knee and gesture to that, maybe landmark the other knee, now that I have some
reference to gauge it off of. Here, just feeling my
way through the gesture. These lines I'm putting down are not contours, as you know. It's just me reaffirming
to myself that, yep, this feels like the pose. Where her right hand is
pressed up against the body, I'll use a straight
for that, right there. Straits can also help
show weight or pressing. Just going to quickly
squiggle in the hair, which is not a
necessary step at all. Here just landmarking
where that hair ends. Here's another straight
showing her left leg pressed against the cushion and then finding the foot hanging
out the other side. Now, don't fall into
the trap that I used to fall into in my early
life drawing days. I had this bad habit
where if the figure was sitting on a chair or
interacting with any object, for some reason, I just
wouldn't draw that object. But it's quite
important that you do. It'll further confirm that your general proportions
are accurate, like right here with
these chair legs. I'm actually not
thinking perspective. I'm simply measuring
where the bottom of those legs intersect
with the figure, then plotting those same
points in my drawing. Notice how the chair is
kept gestural as well. To me, this gesture drawing is a success because I can really feel the lean of the figure that she's
leaning on the chair, relying on it for support. It feels like if I yanked that chair away, she
would fall over, and that's what you
want because that's the physical dynamic happening
in the reference. Okay. Another seated pose here. The figure is balanced
with one point on her right arm and the other
point on that front leg. You can draw two lines up from the balance points and you'll usually find the
head inside there. This is a useful
tool for helping to guide you through the
gesture. All right. So I've gestured down to
the pit of the neck there, and now I'm using a
different color, I guess, orange this time, to get that crucial angle relationship from the shoulders to the hips. That angle is extremely
different here, and this pose just won't work
if you don't capture that. I tend to use little C
curves for the shoulders. That's just something
habitual at this point, but the shoulders are curve,
so I guess it makes sense. And here we go, the big
S curve down the body. Notice that this
time, I'm going for that S curve before the arms. In the last demonstration,
I did the arms first. This is just to show that
there's no specific order. Anyway, landmarking elbows and hands in relation to each other, also in relation to the s curve. This little plum line helps me evaluate the angle created
by the two elbows. Always comparing that
with the reference. Now, the hand here is bearing
the weight of the pose, so I'll use a straight. The other hand is
hanging limply, so I'll just extend
the curve of the arm. I do often like to block out the middle section
of the chest here, just as a way of keeping
my proportions honest. Now I can start with
the outer point of the hip line and gesture
toward the knee. Immediately following that
up with the other knee, whose position I can more
reliably pinpoint now and just gesturing down the
body to arrive at this leg, and here comes a nice straight where the lower leg
meets the table. Then from here, I'm
just aimlessly moving around the drawing
gesturing through it. Again, just convincing myself
that the feel is right. It might be useful to locate the general placement
of her top. Even though this
model is heavier set, that is not really
important information to capture in a gesture. Those volumes, big,
small, thick thin, that's something you build
on top of the gesture, which we'll do in
a future chapter. Anyway, she's sitting
on a flat surface here. So let's make sure we draw that flat surface
here in photoshop. I'm holding shift to draw
a literal straight line, and this just helps
me check to make sure the hands and the knees
are in the right place. So I'm evaluating this
drawing just like last time. It looks like the weight is being held by the
back arm there, and if it were suddenly removed, she would fall over,
and there's a nice flow through the rest
of the pose that I think echoes the reference. This pose here is arguably
made simpler by the fact that the clothing makes
a very clear silhouette. However, I know from teaching experience that a lot of
students would probably make this pose far too
linear straight up and down and miss the subtle beautiful
movement as a result. By the way, that little
hook shape for the ear helps communicate this
dramatic angle of the head. Gesturing down the body now, there is a subtle yet
noticeable s curve happening. She is thrusting her upper body outward and her
hips are set back, and that C curve helps
capture all that. It helps set the
stage for this arm, which is an extension
of that thrust. And let's really
capture that wrist, dramatically changing angle
from the rest of the arm. There's a lot of emotion,
a lot of action there. Here, just finding
the other arm, using the same
elbow landmark and comparisons that I always
use against that hand. I'm trying to find the lower
area of the breast line, which I think is a good
reference point for this pose. From there, I can find
where the hips are, and of course, their angle. Then gesture down, following my initial body C curve to approximate where the
bottom of the dress is. See, I wouldn't waste my time trying to find that
bottom point before. I needed the shoulders,
then the arms, then the hips in place in
order to find that point. So in a way, a gesture is a
series of educated guesses, not blind guesses as
to where things are. Notice this gesture
drawing is a little more contour based than
the previous ones. Now, I want to be clear.
Those are not final contours, but because of the graphic
nature of the clothing, it felt more
appropriate here to use some of the outer lines
as part of the gesture. And now with everything in, as I always do, just
searching around the drawing, reinforcing things, evaluating that
physical sensation that only I can feel because
I'm the one drawing this. You will feel it when you
draw like this, my promise. But even looking at this drawing as a third party observer, you should be able to sense
the thrust of the body, the movement of the pose. I forgot to mention
her weight is carried equally between
both feet here. That means that the pose
can't be too angular. Remember my little balance tip, plot two points where
the balance points are, the two feet here, and draw
vertically up from there, and the head should be located somewhere inside that area. Again, is the thrust there,
is the energy there? Does it feel like she's
reached a point of movement? Does it look like she couldn't
hold this pose forever? It would cause too
much discomfort, which means we've captured
something in the moment. I think yes, all those
answers are there. By extension, this is a
successful gesture drawing. Let's try another
one here. This is a tough pose because it
appears straight up and down, just like the last one. I, in a sense, it is. After all, the head is right in the middle of the two feet. Things don't appear to
veer left and right, too dramatically from that, but the movement is in the
shoulder and hip relationship. Here I've just got the angle of the head in the
pit of the neck. This is the same reference I used previously in this chapter. Now with the blue pencil, I'm blocking in
the shoulders and hips or the angled lines
that represent them. I'll throw the shoulders
in there against the head, but then I'll immediately
try and get the mid line. This time, stopping at the hips. I actually think I reversed that S curve compared to the
reference, but that's okay. Let's see how this
interpretation plays out. Now I'm back to
standard procedure, and marking the middle of
the arm, gesturing to that, land marking the hands,
gesturing to that, finding an overall rhythm for
the entire arm as a result. Rhythm, by the
way, just meaning, is it an S curve, C
curve or a straight? And then how are you
manipulating those shapes? Are they thinner, wider, longer? For the legs here, again, I've gestured from the
outside of the hips, not an actual contour line, as you know, but the gesture
is not a stick figure. It's more abstract than
that. It captures rhythm. A stick figure is
too literal almost. The knees are roughly at the
same point horizontally, so I'll make sure
I capture that. Then that back foot flows
almost into the front foot, although it stops
a little higher because the entire
leg is pushed back. Notice how the arm
here basically flows into the
hips rhythmically. Then from here, I'll just throw in some C curves for the hair. Now, she has on a
flowing costume, and I do want to capture
that as part of the gesture. I'll switch my color just so
you can see what I'm doing. Again, is it a C curve
S curve or a straight? I'm seeing it as a
bunch of C curves. C curves that are then
mirrored in this section here, the part that
attaches to the belt, and the free flowing bit of drapery here is more of
an S curve, I think. And I may as well map out where
the top of the outfit is. It helps with proportion, after all. There we go. Our gesture has a sense of movement like she's
walking toward us. That last figure brings an important posing
concept to mind. You may be familiar with
the term contraposto, one of those Latin art terms. It just means that most of the weights is being
carried on one leg. And when that happens,
that also means the hips are going
to be quite rotated. I'm just making this
up from imagination. I will get the shoulder line. This is a pose very similar to the last one except I'm going to exaggerate this gesture. Let's get a nice S curve
there coming down the body. You can already sense
the weight here. One hip is very high, the other hip is very
low in comparison. The shoulders are
somewhere around here, one high, one low, of course, in the opposite direction that
the hips are high and low. The arm might flow this way. This arm might flow that way. This is a fashion
model type walk. They shift their weight
constantly from one hip to the other or one side of
their hips to the other side. This type of contraposto weight distribution
is also really popular in art history,
baroque and renaissance. These are the two legs here. Maybe this leg is doing
something like this, and this leg sitting
there like that, feet are offset in perspective. Yeah, you get this kind gesture. Maybe it even flows
like an S curve. Let's get rid of
this. There we go. Maybe this foot here is not pointed the same direction
as the other foot. Maybe it's more
like to the front. Now, when you or I are
just standing there waiting for a bus or
talking to a friend, we shift our weight
all the time. It's very common
for someone to just place their weight on
one side of the hip. In this case, the
weight is placed here, which means that this entire legs rhythm is
generally straighter. In fact, I can make this leg, really straight to show that
there's weight placed on it. Okay and then maybe I
can get rid of this leg. You can see the
usefulness of gesture, how quickly I can
iterate on these poses. Because the right
leg or the leg on the left here is
free of the weight, this leg can be doing anything. It could be like this.
It could be like this. There's no weight on
it. It's free to roam. Contraposto, the secret to it lies in the shoulder
and hip dynamic, and the more extreme
you push it, the more that weight
will be apparent.
5. More Gestures: Let's take a look
at this beautiful painting by Steve Houston. His work is chalk full
of gestural rhythms. He's a great artist
to study from, if your goal is to
paint characters or figures with good
gestures and poses. Let me lay a sheet
of transparency over this and we'll do a bit
of gesture tracing. We'll start with
the broadest line, the line of action, and we'll go right from
the top of the head. It to me is an S curve, but an S curve with the most
dramatic part right there. That's the steepest angled
part of the S curve. Then it more gradually
tapers down to the feet. Now, that's all well and good, but let me erase
that for a second. I'd like to maybe elevate the line of action concept
a little bit here. Let's look at either
side of the figure. First, we'll start
with this side. The line of action here is
a very dramatic S curve. It's very much like the
mid line, more dramatic. But look at the
line at the back. This line is a much
more drawn out rhythm. It's still an S curve, but its character is very different. This back gesture line,
if we can call it that, also feeds into the arms rhythm, the arm being an offshoot of it. What I like about gesturing
both sides of the body like this is it accounts
for where the feet are. You almost start
getting a sense that this could be a three
dimensional drawing. It's not. It's still an
abstract two D drawing. But the thing I find a
bit less useful about a single line of action
down the middle of the body is that it's a little
bit more difficult to extrapolate and build perspective on this because this is just a single
line in space. I like having two lines
that play off each other. Let's go ahead and draw a
gesture of this for real. This being a profile view, I like to put in the ear and that ear instantly gives me
the orientation of the head. It's just a C curve. I'm not actually trying to draw an ear. Now, the pit of the neck is of limited use. It's about there. What is still helpful
about it is I can trace up the clavicle and find the
shoulder, which is about here. But then right away, this
rhythm from the back of the skull coming down
the form is really, really important to
me in this pose. It's such a strong
obvious progression or rhythm that I really
want to put it in. Then this S curve tapers
down somewhere over here. Again, I have no idea where
the bottom is at this point. It's somewhere here, but
I have to find it later, like building a jigsaw puzzle. I want to get all the pieces in these areas before I find
the pieces over here. Now, the front of the figure is doing more of this
as we've determined, going this and I'm
trying to work both rhythms against
each other here. Remember, these
are not contours. Just free yourself of the idea that you're
drawing something finished. A gesture is abstract. Another great landmark
I haven't talked about yet is the
base of the sternum. This point is right
here on the rib cage or right at the base in between
the two pectoral muscles. Because the sternum is
relatively close to the head, it's a pretty easy
landmark to evaluate. I think it's about
here on my drawing. I remember, especially in
my early days of drawing, I use the sternum
in every gesture because of its close
proximity to the head. From the sternum, I can find the middle of the arm,
which is a bit lower. It's about there, and I can start gesturing down this arm. Again, the arms rhythm being an offshoot
of the back rhythm. And before I find the hand, I might want to find
where the belt line is. I think it's about here. And then compared to that, the hand is about here. I'll gesture down to this form. Now I want to erase this
overzealous initial rhythm I put in because the arm is more responsible for that
part of the gesture. It's okay that I
was over zealous to start with. It
got me started. For this reason, I actually
do recommend drawing gestures with pretty light lines
because by nature, a gesture is a searching tool, you are necessarily
going to make lines that prove to
need updating later. Now, the painting doesn't
really show us the feet, but we can infer where they are. This leg is coming out and
somewhere landing over here, and the other leg is pushed back more with the foot landing
somewhere over here. Again, I'm just drawing
the base of those feet, using flattened s curves to indicate that the weight is really pressed down
on those feet. Now, for the buckets, I'm just going to get
the C curve for the handle and maybe landmark where the
bottom of the bucket is, maybe the curve of the top. This is where maybe a different color
would come in handy. I'll try switching to say a
green or something like that. I'm not trying to draw
the bucket literally. I'm just trying to show
where it might be, and I can compare that
to the other bucket. This is the bottom
of the other bucket. And the top of the other bucket. A gesture gets proportion and indications of depth
and perspective. These two buckets being different
points and perspective, they will be located in two dimensions at different spots. The bottom of this bucket is higher than the bottom
of that bucket. That's perspective
information, and the gesture does
capture some of that. It's just not
technical perspective. It's more about placement.
Gesture shouldn't take you longer
than say 2 minutes. In fact, I remember when
I was doing a lot of life drawing early on
in my drawing days. Our life drawing sessions
would open up with a series of 20 32nd gestures. Then we would move
to 1 minute poses, then two minute poses,
then three minute poses. Because of that, I learned
to gesture very quickly, and that is something I would
foster in your learning. If you're working digitally
at your computer, the temptation is just
to take your time. But with gestures,
I would actually encourage setting a little
timer and be generous. Set it for 3 minutes at first. Maybe even 5 minutes
if this is new to you, and then see if you
can crunch it down and ultimately get yourself
down to say 1 minute. If you are having
trouble estimating the placement of
things with a gesture, it may come in handy
to have a chart like this open or
even memorize it. It's not that difficult to
memorize this information. This is all about measuring
the figure in head lengths. If I were to just draw Marquee
selection over this head, if I then created another
head length here, we have the sternum,
and that's handy. In an upright
figure, the sternum is one head length
below the chin. Another head length will
get you to the navel, and if I put that
head length here, Right in the middle is the
iliac crest of the hips, that high point that
we've been landmarking. Then if you go 5.5 heads,
you get the knees. Then of course, the
entire figure to the feet is about
7.5 heads tall. Now, those are general
proportions for an adult. Obviously, if you're drawing
a child or a teenager, these head based
proportions will vary. For example, the
common measurement for an infant is
four heads tall. Maybe an eight year old would
be about six heads tall. Adults can range between
7.5 to eight heads tall. Those measurements help you, I recommend just doing them live, meaning take a
painting like this, measure the head with
your marquee tool, assuming you're
working digitally or just take a ruler if you're
working traditionally. Just move the selection
and see where it lines up. Look,
there's the sternum. It's actually a little
bit higher than that, but that's because
this figure is not standing perfectly upright. There's a bit of compression in the shoulders causing the
sternum to raise a little bit. Then another head length will essentially get you
to the belt line, which also intersects
with the wrist. If you find your gestures are just way off proportionally, I do recommend taking the
time to make these head length measurements and then landmark your
gesture accordingly. But I also do think your goal should be to be able
to work without that. Just be able to do it by eye. Like most things, it just
takes practice and time. I'd like to go a bit deeper with the nuts and bolts on
how I draw gestures. We've seen this pose before, but right now, I just want
to focus on this arm. Now, it's possible to landmark
where the shoulder is, landmark where the wrist is, and find a line of action, which is a C curve
along this arm. If you include the
hand, then it becomes an S curve. Again,
that's useful. But just like we did with that contraposto
example a moment ago, I like to look at the
rhythms of both contours of the arm or of any form that
I happen to be gesturing. It could be a figure
or a tree or whatever. To do another one of my
gesture trace overs, which I do find very useful, by the way, if we
were to just look at this contour,
what is that rhythm? Can I gesture my
way through that? It's like an S curve. And let's include that
dramatic hooking curve here. It's like a C curve
just for the hand. Now, quite often, I
find that the rhythm of one contour is different than the rhythm of
its opposing contour. For example, the lower
arm is straight here, and then it scoops up here and goes down with
a dramatic S curve. This gestural rhythm on
the bottom of the arm is different than this gestural rhythm on the top of the arm. If I were gesture
drawing this arm, I'm going to see if I can
find those differences. The main thing to
keep in mind is I'm not trying to draw contours. Even though this looks
like a contour drawing, it's still very much exploring
and finding rhythms. But what's nice about
this is it becomes very easy to extrapolate
and build form from here. Whereas if all I
had were a line of action of the arm,
down the middle, you still have to do
a lot of work to turn that into three D.
Just so you know, the next chapter of this class
will be doing just that. So when you're looking
at a figure like this, I would try and
find the rhythm of this part and then find the
opposing rhythm of that part. Just to erase that for a moment. If you like, you
could, of course, find the overall line of action, and then say from
there, if you mark to the shoulder line and
from those shoulders, build out the gesture
on either side. This back being a
bit straighter and this front being a
bit more C curvy. Now I have all this
space to play in. I could find things like the
lower area of the breast, the hip line, and I have all
the space to play within. For those of you
brand new to this, here's a quick exercise that'll help retrain your
muscles a little bit. Draw a line, say an
S curve like this. Now try and gesture
draw that with two different rhythms.
Something like this. Go through it and then try
and find a counter rhythm on the other side that complements it that doesn't just mirror it, but it runs through
the same rhythm in like a flowing winding river, something
that's interesting. Doing it like this will
prove to be very unhelpful because it's very rare
that you would ever use lines like that in
your actual drawing. Very similar and parallel lines like that tend to appear boring. Instead, train yourself to find rhythms and
counter rhythms. What I just did there is thicker
there and thinner there. Then maybe it tapers back out, and maybe this one takes a bit of time to
catch up to that, thinner thicker, and it
just feels more organic. Get used to drawing this way. Not only will it help you find energy in your
gestures and poses, but you'll find all applications
of this type of drawing and thinking in nature because nature has counter rhythms
like this all the time. While I'm here, I would
just like to reiterate that the whole point of gesture
is to be free and moving. Maybe you can hear my stylist. Big strokes, make them
long and sweeping. Try not to do this. This type of drawing
is usually destined to look too mechanical
and not very interesting, especially when it comes
to characters and figures, anything that needs to
have movement or weight, get into the habit of
when you draw one line, you immediately are looking
for a counter rhythm line to it and you work your way through the form and
through the space this way. I really recommend
working that type of thinking into your
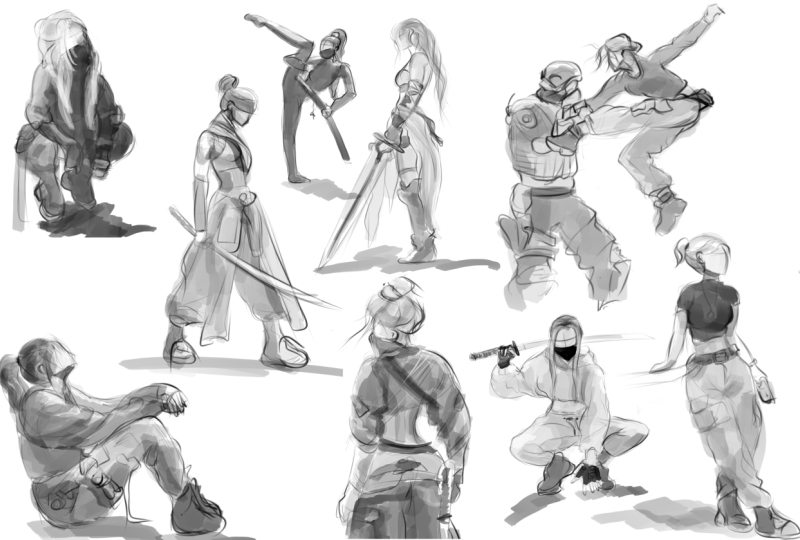
practice. All right. Let's invent a few figures here. I'm imagining a dancing
pose, female figure. Dancing poses are great practice because there's a
lot of movement. Having done the Disney
Nutcracker book, I had to paint a lot of dancers. Using pretty dramatic C curves to represent bent arms there. Of course, I started with
the head before that. Here's the line for
the upper torso, gesturing now down
from the shoulders and really trying to enforce
where those hips are. As you can tell,
shoulders and hips are of utmost importance to me to
the start of a gesture. Then down from the hips, of
course, I can find the legs. I'm going to put her
weight on the left leg. That means this right leg here can be free to do what it wants. And I'll use more of
a straight rhythm for the left leg as it's
holding that weight. Because I'm inventing
this, I'm getting lost. The middle section of
this gesture is ugly. The rhythms don't seem to
be connecting or flowing. I'm erasing the offending
areas and seeing if I can redesign them or continue
my search for them. It's when I throw
in this curve for the hips that it
starts to feel found. I finally feel like
I'm correct there. Then that bolsters my confidence to gesture down
the weight bearing leg and then compare that to the other leg and then back
to the first leg and so on. With gesture,
clarity on one part of the pose will give you
clarity on the next part. I'll call this one finished.
Let's do another one. Another dancing pose. This time may be seen more
from the side profile. Whenever someone ties their hair in a bun on the
back of their head, I always try and gesture that. Just because it's
rhythmically easy to get, then here we go with
some outstretched arms. Both arms will be outstretched, but I want to find slightly different rhythms for each one, just for the sake of interest. A big thrusting C curve for the torso with its
apex at the chest. This is typical of dance moves. Of course, there's the
all important hips and angle of the hips. I always seem to run
out of canvas space, resizing it, working my
way down now to the legs. Again, it's helpful
to decide early, where are the balance points. This time, it's both feet. She'll be in the middle
of a grand maneuver, so the feet are
spaced far apart, but they both are
carrying weight. The most weight, however,
is on the back foot, her right, which means the head is going to
veer more toward that. The head wants to be naturally in line with
where the weight is. It's just an instinctual
way we learn to move and I guess
to work with gravity. Notice I drew a little
line between the feet. That just helps me understand the relative placement since these feet are
placed so far apart. Yeah, this pose is looking good. That's a finished
gesture drawing. Gesture drawing is at the
heart of how animators work. Look at these beautiful gestures and blockings by Glenn Keen. There's so much character, and yet the drawings are
pretty abstract. I love Mickey's pose here. Look at this dramatic S curve. Of course, you can build
his head on that with his characteristic ears and
a little mouse snout here. Okay. And suddenly, we have a really interesting
pose happening. Now, where would
the shoulder be? Maybe it's pushing up
into the head here, and maybe the arm
is coming down. Maybe that back
arm is going back he is trying to use his arms
to balance out the body. Because this is such an
extreme pose balance wise, maybe the legs would
want to come back this way to further help
balance the body. It's just really fun
to explore this stuff. The scrooge on the lower left
there gains so much action. Let me just block in the eyes, so you can see what I'm looking at and the beak two, I guess. But yeah, the character
gains so much action with this shoulder pushing
way up into the head, and the opposing shoulder
being up high as well, which makes the arm raised
really high up here. And here's a hand. And the
other arm is not drawn, but maybe it's doing
something gesture like this. Maybe Scrooge is angry. He's talking and he's
gesturing with his hands. His back is really
arched like this, big dramatic C curve. Cartoons are really
excellent ways to practice your gesture because
that's what cartoons are. They exaggerate gesture. They are free of skeletons
and muscles to an extent, or at the very least,
they're much more malleable than a
realistic human form is. As a result, you can
take many more liberties with the posing of a
cartoon character. I'm not going to
be shy about it. I love cartoons.
I've practically made my living on cartoons. But for those of you who
don't want to draw cartoons, I do still think they're
valuable practice, especially when it comes
to gesture drawing. Back to normal
human beings here. Let's do one last gesture to
help close out the chapter. We'll get the eye line in. This will just be a summary
of everything we've learned. Let's get the vertical line in. Instantly get that direction. Notice because we can see her jaw in a three quarter angle, I've left that
little point there. Let's find the pit of the neck, gesturing down the middle of the neck to find it about there. Just grab a different
color to my brush. This shoulder is way up high, it intersects right like
where the nose would be. Then this shoulder is down low about in line with
the pit of the neck. I'll draw a nice plumb line
there, connecting them. You know what, the
line of the hips is roughly parallel.
I'll put that in. Typically, parallel
shoulders and hips can result in a boring
or static pose, but this pose is
anything but that, and that's due to the
lean of the body. I'll gesture a C curve. Actually, it's a flattened S curve down from the
shoulders to the hips, following the same
procedure I always do. I can actually see the sternum
through the top there. It's about here, and if I want, I can throw in This is almost an elastic band line
here around the chest, and I can do the same thing
actually around the hips. This is just expanding on
the egg elastic principle, applying it to different
parts of the body. I got to be careful though, I'm bridging into three
D stuff here. That'll be next
chapter, but we're almost at the next chapter,
so this is actually good. Now that I have
that information, let's start at the shoulder and gesture our way through the arm. It's a giant C curve
as arms often are, at least when they're bent, and that wrist just breaks into
a straight right there. You can barely see
it, but it's there. Then I'll try and find a
counter rhythm down the arm, something I'm seeing on the inside contour
of the arm there. Then I do like to ping pong from one part of the
body to another. If I just did the arm, I'll now flip over to the other arm. The elbow of that
arm is about here, which is about in line with
the wrist on the first arm. I'll gesture my way down to it. And then this arm is straight, the forearm that is straight, but the wrist breaks
into a C curve like that and overlaps
this arm, somewhere here. Right away, we're
getting some good action in this gesture. The pace I'm drawing
at, by the way, feels about right if
you're just starting out. If I weren't talking, I would be drawing about double as fast. But I do find it helpful
to think your way through the process
with a inner monologue. Again, especially if you're just starting out
with the stuff, you don't want to
stress yourself out with the addition of speed. The requirement should really be efficiency and with
efficiency comes speed. Putting lines down
that means something. In this case, rhythmic lines. There's a lot of
lines in my drawing, but all those lines
are in search of the same thing,
rhythm and flow. I've mentioned a few
times the whole idea about putting the head where
the point of balance is. This pose really tests that. She is very close to
being off balance. What I'm going to do is draw a plumb line down from the head, and I know that because
she still is in balance, but just on the border of that, I pretty much know that 1 ft should basically be
right below the head. Because if she went any further, she would start
being off balance and she would have to
fall and catch herself. It's a safe bet to
put 1 ft there. That is the foot carrying
most of the weight. The other foot
might be somewhere over here. You know what? I'm not even going
to ballpark that. I'm not going to
bother landmarking it. Even this point
here, by the way, is not even where I
think the foot is. I'm just trying to show you
where the balance point is. I'll just erase it so
no one gets confused. Okay. Back to the hips. Let's throw in a little
gestural rhythm that feeds into this beautiful
S curvy rhythm here. This is where you can
start thinking proportion. It's quite difficult for me to anticipate where the foot is. It's too far away from
the rest of my drawing. Instead, I'll erase this just to show you how I would maybe
actually go about doing it. Let's split the leg in half
and landmark the knee. I think that knee is about here. It's much easier to
landmark things when they're closer to the
rest of your drawing. I'll gesture down to that knee and now I can find a
distance that's the same as this distance to
get me down to the foot. You notice my
initial line that I had in there that I
erased was too long. And that is a
common habit that I had when I did a lot of gestures
when I was starting out. I would make the legs too long. I would get really
excited and draw these grand gestural
legs and suddenly the legs looked like they
were some alien form. I had to really pair
back on that as I continued to explore
my own gesture drawing. The other knee is in line with the first one,
so that's easy. It makes this C curve rhythm, and this is maybe another
C curve on the other side. Then it has this
awkward hitch to it. Maybe another pair of s curves. Then this foot right where
we anticipate it is at the bottom of our
blue plumb line that we drew a minute ago. There we go. Now we
have a complete gesture for this pose. At this point, you could call
it finished and move on, or if you want to just throw
in where you think the hair is a curve, S curve. At this point, I'm just
exploring the drawing, just making sure that
things feel right. Maybe we can get the contours
of her open top there. Maybe even figure
out where the ankle is where that strap
on her boot is. Make sure we understand where the feet are in
relation to each other. In this case, they're
pretty horizontal. There's not a whole lot of difference in perspective there. But it is helpful to
plumb line the feet. There we go. I feel like we've
captured a nice pose here. Feels like she's using
the correct amount of muscle to hold herself up. Still balanced, but on the
brink of being off balanced. With that comes the end
of this gesture chapter. But our adventures with
gesture are far from over. They will come back
in future lessons, especially as we start combining
fundamentals together.
6. Chapter 2 - Form and 3D Space: Okay. Were gesture was maybe a little less
intuitive at first. This chapter will be
more instantly familiar. We're drawing three D
forms in three D space. But equally importantly, this chapter is about
developing tools to see the two D surface
as a three D space. Before we even draw anything, these are tools that help
you rewire how you see, which is a critical skill for any drawing or drawing
application you want to do. Just a fair warning. This chapter is a little drier and more intricate
than the last one. There's a little more to
it. It's also longer. Take it in pieces and try and structure assignments for
yourself along the way. Okay. Here we go.
Okay. All right. In the previous chapter, we had this primer on drawing the egg. If this were an egg, we had wrapped those
elastic bands around it. This would be elastic
band number one, wrapping around the
egg horizontally, and elastic band number two, coming down the egg
vertically like this, wrapping around the bottom. We are going to thoroughly expand on this concept
in this chapter, which is all about
drawing volumes, which is just another
way of saying drawing three dimensional forms. It's important to know that
this elastic band wraps around the back of the egg
where we can't see it, but just because we
can't see it is not an excuse to not know
exactly where it is. I like to use a dotted line to separate what's visible
from what's not visible. Of course, the same is true with the vertical rubber band, and we now have
the appearance of a very three dimensional object. This really forms the
basis for this chapter. Now, right away, though, let's not limit this to just an egg. But what if we had
a flattened egg where the top is egg like, but the bottom is
flat like this, almost like a pair shape. I just said the word shape, which implies two dimensions, but this chapter is all about drawing in three dimensions. The elastic band principle,
if we can call it that, is our primary tool for visualizing things
not as two D shapes, but as three D forms. I'm trying to visualize
how an elastic band would wrap itself around this
pypothetical form. What I just drew
is like the egg. But here there's a belly. I would wrap around that belly. Then, of course, the discipline here in this chapter is to visualize how it wraps around
the back of this form. Assuming there would be an
equal belly on the other side, it would wrap around
it like this. We can grab a different
color and throw in our elastic band wrapping
around it this way. This is a very narrow ellipse, an ellipse meaning a
circle and perspective. I'll expand on that right away. But for now, we can apply this elastic band
principle to any form, which really helps us visualize it as a three
dimensional object. What's nice about
this is it represents three dimensions and we don't need shading. Shading is great. However, in my opinion, the goal of good
draftsmanship and drawing as a discipline
is to be able to represent three
dimensions without the need for shading or rendering because lines are
inherently flat things. If you can make
those look three D, you are well on your way. Now, on the subject of ellipses, let me just draw a circle here, and I want to visualize this as a three D
form, of course. I have to put a elastic band around it, but let me do that. How do I know what the curvature of the elastic band should be? For example, should the
curvature be narrow like this or should the curvature
be wide like this? Well, that depends on the angle that you're viewing it at. If I were drawing
that elastic band to intersect the sphere here, The curve will be almost at its broadest because it's near
the outside of the form. That means it's
going to look pretty close to what the silhouette is, which in this case is a circle. Of course, going
around the back of the sphere would be the
exact same type of curve. Now, if I wanted to
put that elastic band here, well, suddenly, that circle becomes very compressed and a compressed
circle is called an ellipse. What's very important to us is an ellipse is a circle
in perspective. I think it would be
quite helpful to show you this in an actual
three D program. I'm in Blender, which
is a three D program. You can see I've made a
circle and I'm able to move the camera around just so you can see
what we're looking at. Now, let me just
make a flat view. This looks like a circle. However, I'm going to now
rotate this in perspective. Let me just show you
what I'm going to do with a three quarter angle. I'm going to rotate the
circle around like this and I'll do it from a
flat view. Here we go. I'm going to rotate this
circle, as you can see, the circle as it rotates becomes a ever ever
squished ellipse. To the point where if I were to view that ellipse
dead straight on, it just becomes a line and then comes back
around the other side. Now, of course, it's
not always going to be a circle that
we're evaluating. I'll modify this, so it looks like the other
shape we just drew. Now if I rotate this around, you can see that it also compresses just like
the ellipse did, but the belly shape at the bottom adds a bit
of complexity here. However, much like the ellipse, it would simply conform to
a line when seen dead on. If you're new to this
concept of making two D objects into
three D forms, I really recommend practicing the elastic band principle with very simple roundish shapes. Here's another variation on one. So I'll pick a spot to draw my elastic band somewhere
close to when I do this, I'm comparing the curvature of this elastic band against the curvature of the silhouette. My elastic band being located more in the
middle of the object has to be a compressed
version of the silhouette. Here we go. Something like this, maybe it wraps around. You don't always have to wrap it around to the
back and this one, let's just leave
the elastic band wrapping around the front and we'll just leave
the back invisible like it would be in real life. But here's the next exercise. Now let's put an
elastic band here. The trick here is this curvature
has to be somewhere in between this elastic
band and the silhouette. It has to navigate that middle
space. It's a bit tricky. But this is how you can test yourself to make sure that you are keeping these
elastic bands in check. The curvature of this belly area is pretty wide here
at the silhouette, and then it compresses here. I'll make sure that
my elastic band has enough compression, but not quite as much as the silhouette and
then enough expansion, but not quite as much
as the silhouette. There we go. It looks like these cross sections
are tracking. Cross sections, elastic bands, they refer to the same thing. Let's put an elastic
band out here. Again, look at the curvature of the silhouette and then look at the curvature of my elastic
band or my cross section. If I say the word
elastic band too many times, I'll
start to be annoying. Cross section, I might revert
to something like this. Now, I'm a big believer
in free handing things. I am not a computer. I'm not a three D program. I have to use my eyes to
literally eyeball this. If we were to build
the shape in three D, I'm sure the cross section would be a bit different
than what I'm drawing, but I'm just making
sure it looks right. That's the key to determining success in this
particular study. Let's do the same exercise now with horizontal
cross sections. I'll put a elastic band or
cross section crossing here. Again, I'm comparing it to the curvature of the silhouette. This being close
to the silhouette, it's going to have
that same type of curvature is not quite as broad. It's going to be
around like that. If I were to find the middle
of the object about here, assuming this is where
our eye line is, that curve is going
to be very flat, maybe just a line, if it were dead center,
something like this, which is funny even though I just basically drew
a straight line, it looks three D in context
of the other lines. Then down here at the base of
the belly, as I draw this, again, I am drawing it off of the curvature of the
bottom silhouette here. It has to be close to that because it's close
to the contour. But not quite as round. I'm just trying to
thread this needle here. This, believe it or not, this simple principle is the main fundamental that
good draftsmen have. That is a strong ability to see the two D page as a three D. You may not
always need to draw this. In fact, when I draw now, I very rarely draw
these cross sections. I will draw a few and you'll see me do this
later in the class, but always I have the
cross sections in mind. When I was brand
new to the stuff, you better believe
I always drew them. My figures and studies were just littered with
cross sections, which proved to be extremely
helpful for my development, and I recommend
you do it as well. This is undeniably a
three D form here. It has gained a dimension, it's no longer a two D shape. We can't talk about
drawing forms too long without
mentioning perspective. After all, if we're
drawing a three D form, it has to exist in
some perspective. Now, I will be sprinkling perspective into this
class in tidbits. I want you to learn
things as you need them rather than dumping
it on you all at once. The first concept I
want you to be aware of is the eye line or horizon line. This is something that
eluded me for a while, simply because no one
ever told me this. You see this red line here, that's the horizon line. Now, when I was starting
out practicing perspective, I just vaguely thought
that the horizon line was where the horizon
is and that's true. But what I didn't connect
is that the horizon line is in line with your eyes or
with the cameras lens, and what that means from a practical standpoint is if
the object you're drawing, for example, this cube, if it sits below the horizon
or below the eye line, you are going to
see the top face of it because your eyes
are above the cube. If that cube rises above the horizon or
above the eye line, you're going to see
the bottom face of the cube because now
it's above our eyes. If the top of that cube were
tangential with the horizon, you basically lose all depth. The top of that cube looks
like a straight line. Even if I were to move the cube over here and we can
see the side face. Because the top of
the cube intersects the horizon line perfectly, we don't see any three D
information on that top plane. Of course, the same would be
true with the bottom plane. If the bottom plane were in line or tangential with the horizon, then the bottom of that
cube would look like a straight line
and we lose depth. Now, many of you
might have heard the concept of vanishing points. And you might be
wondering, what does this have to do with
vanishing points? Nothing. I'm not talking about vanishing points
at all right now. This is simply a property of
the horizon line or line. Again, the only thing I want
you to take home from this is that when you see an
object below the horizon, you can see the top face of it, and when you see the
object above the horizon, you see the bottom face of it. Here is a circle in perspective, so it's an ellipse, as
we've talked about. Of course, the same principle
applies to ellipses. This ellipse is seen
below the horizon line, so we can see the
top face of it. Now, watch what happens
as I slowly progress this ellipse toward the horizon,
see it's flattening out. The closer it gets
to the horizon, the less depth we're going to see because that ellipse
is getting squished to ultimately become
a flat line right there when it's in line or
tangential to the horizon. But then as that ellipse
continues to rise above the horizon line
or above the eye line, we can start seeing
the bottom face of it. And the higher it goes, the more unsquished
the ellipse gets. Okay. Now our ellipse has
become a full cylinder. A cylinder is just two ellipses, one on the top one on the bottom with vertical lines
connecting them. It's a very basic and quite
useful form, as we'll see. Because the cylinder is now sitting below the horizon line, we can see the top ellipse, and if I moved it up
above the horizon line, we now see the face of
the bottom ellipse. If I move the cylinder
between the horizon line, notice how the curves
go on the two ellipses. The top one curving upwards, and the bottom one
curving downwards. That's because the
top ellipse is above the horizon line and
the bottom ellipse is below the horizon line. If the cylinder were
down here, well, now both ellipses are
below the horizon line. Yet they still have different
curvatures because they are different degrees of
distance below the horizon line. This is extremely useful to be aware of all the
time as you draw. Now we can recall these and observe them with a keener eye. Remember when I drew
this blue line right there and I specifically
mentioned it looks flat. Well, now we know
why it looks flat. I put the horizon
line right here. That's just how I
arranged it in my mind. This part of the object
is above the horizon, which is why the
ellipse bows upward, just like we saw
with the cylinder. Of course, if we were to
complete that ellipse, we would see the
bottom face of it. That's also why the
bottom ellipse, this guy here, bows downward. It's below the horizon line. And if we were to
complete this ellipse, we would see the top face. Every object you draw has a relation with the
theoretical horizon line. Again, it's also
called the eye line. Let's look at this object here. Where's the eye line here. Well, this one's interesting. Let's look at the bottom
of the object right here. This time, we can see the
bottom of the object. If I were to wrap an ellipse around here, it would
look like this. We could see the bottom face. That means that this object is entirely above
the horizon line. The horizon line for this object would be somewhere down here. Which means we're
looking up at it, which also means that if we
were to draw the ellipse, we would see the bottom face. How about this simple
sphere right here? This one is pretty simple. I put the horizon line
essentially right in the middle. If I were to draw a cross section in the middle
of the sphere, it would be a straight
line because this line would be lying tangential
to the horizon line. If I were to draw an ellipse going across the
sphere up here, well, this one bows upward because
it's above the horizon line, and we can see the
bottom face of it. Likewise, down here,
it would bow downward. Because we're below
the horizon line and we can see the top
face of that ellipse. Switching now to
this object here, look at the blue ellipse. This ellipse tells you
where the horizon line is. We're just barely seeing the
top face of the ellipse. We know the horizon line
is just above that, probably somewhere around here. If I were to draw an ellipse
at this part of the object, it would more or
less be a flat line. Now, this is all something
I had in my mind as I drew. I didn't map this out. You don't have to map it out. But if you don't know
this information about the y line and
being able to see the top or bottom face of the ellipse or whatever
shape the cross section is, you can see how you'd be
at a huge disadvantage when it comes to
describing three D forms. And as we'll see in a later
chapter in this class, this concept has
huge implications in designing sets and
scenes and backgrounds. Okay. The next step in this chapter is to draw
some basic three D forms, we're going to start simple
but quickly get more advanced with it and we'll end up applying it to figures
and characters. Because you are a
experienced beginner, you probably know how to draw
a box. Something like this. You should intrinsically
know now that this box is seen below
the horizon line. The horizon line would
be somewhere up here. Again, why is that? Well, simply because we can see the
top face of the box. You notice the lines of
the box are not parallel. If we were to trace them back, Roughly, they converge
somewhere on the horizon line. Let's put the point right there. It doesn't matter that we're
technically exact right now. This bottom line of the box here would also roughly
converge at that point. This is a vanishing point. It's the crux of how
we make something look three D on a two D plane. It's just a point
on the horizon, which is infinitely far away where parallel lines
will converge. Because our cube is
made of parallel lines, we can easily apply this
perspective principle. We'll be using vanishing points, horizon lines, and perspective
grids in a future chapter. But in this chapter, where
we're getting used to drawing singular three
D forms in space, it's much more useful
to eyeball this stuff. That's simply because
we don't want to get bogged down with
technical stuff too soon. In my opinion, that's something
that will stunt your art. There is a time for
technical stuff, of course. It's just a bit later. I'll draw another box here. Let's do this one also
below the horizon line, and make sure when you're
drawing these boxes. Again, boxes have parallel
lines that the lines appear to converge at a common point in space,
the vanishing point. Now, the human brain is
very forgiving here. If you're off by a millimeter or even a quarter inch, it's okay. With this box, I even did
that with the vertical lines. The point they converge
at would be far below your computer monitor,
several feet below. As you can see, the
point is way down here. This helps enforce the idea that we're looking
down at the box. But you don't have to do that. There are no rules. You can keep these vertical
lines parallel. It just gives your perspective
a slightly different. The next logical
thing to get used to here is rotating a box in space. First, I'm just drawing a box, a rectangular box here. All the same principles apply. These lines converging somewhere off in the distance
to a horizon line. This time, the vanishing
point would be off the page. Now one thing about that, remember how the
vertical vanishing point we just saw was
way off the page. That kind of thing is much more rare with horizontal lines. The vanishing point for these
lines can be off the page, which it is here, but it's usually going to be
somewhere in the vicinity. The vanishing points
for vertical lines, whether you're
looking up or down, those are almost always
quite a bit off the page. But again, we will cover
that in a future chapter. We have our box, which
I'll just move over here. Let's draw that same box, a bit rotated in space. I'll start with this
line and this line. They're going to get a
different angle to them, and this top face
is going to be more foreshortened. As it rotates up. Then of course, because
we've rotated it, the vertical lines are
not so vertical anymore. They're a bit more diagonal. Feel our way down there. Notice how I'm drawing gesturally even with
these three D forms. That is the line
quality is gestural. It's like the warm up chapter. I never go away from
drawing this way. Then this bottom line
would be down here. Again, this top line
and bottom line and this line would
converge somewhere off the page to a
vanishing point, and then let's just
complete the box like this. I'm just noticing
that this box appears thinner than my first
one. So no problem. I shall make the edit,
something like this. This box is a bit taller, too. The line should be about here. We can just erase
that. There we go. We've just rotated this
form in space. All right. Let's put a box
beneath this one, but have it rotated the other
way. Something like this. Again, you really sell
the rotation with these vertical lines
now being diagonal. The more diagonal they are, the more rotated the
box will appear. Once again, this line
and this line and this line here will converge somewhere at a point in space, at least the appearance
of convergence. I'm sure if you traced those, I would be off, but that's okay. Again, the human
brain, very forgiving. Now, let's not forget the
elastic band principle. Going over the form because this is a box, it's
straight lines. It just simply aligns with
the planes of the box. By the way, the term I
actually use for these is surprisingly not elastic
bands or cross sections. I call these cross contours. They're contour lines
that are cross sections. Cross contours. Let's officially update our verbiage to
that. Cross contours. Now, when I cross contour forms, and I'll cross contour
this one here, I find it very useful to
start with the center line. If you know where the
center of your forms are, that's often quite helpful in figures and characters
and stuff because our bodies are symmetrical and the characters you design
will have symmetrical bodies, probably, at least
most of the time. Developing the habit of locating the center line of your
forms is really useful. It's helpful for placing
features like eyes, having a line for
things like noses, or the center of heads and
chests and legs and whatever. If you are practicing this, putting your elastic
bands around your forms, cross contouring them,
maybe you can start with the middle of your forms
for this middle line here. I have to make sure
it also follows the same perspective and
same for this line here. Again I'm eyeballing it. As long as it looks accurate, I will take that
as okay for this. There will be times that
I'm more strict about it, but again, that's a
future chapter thing. Here's a challenge
here, this face. Where is the middle
of that face? There is a trick to this. If you were to take two points and draw a line connecting them, then draw a line connecting
the other two points, where that line crosses
is your middle point. It's a good little
tip for figuring out tricky foreshortened
perspectives, figuring out where
the middle is. Of course, you could do the
same thing for this face, although this one probably
is a bit easier to eyeball. Just connect the two points and we instantly see
where the middle is. So helpful tip to know, but
I want to encourage you. Once again, learn
to do this by eye, even if it means minor
technical inaccuracies. My theory there is minor technical inaccuracies
can be fixed as needed, as you clean up things
later in the process, if that's a step
you want to go to. But if you are overly
technical at the start, it's very difficult to draw
with any sense of feel. Okay. But having said that,
we are still talking about technical considerations here involving form
and perspective. Back in Blender,
here is a cylinder, as you know, a
cylinder is made of several ellipses,
in blender here, I can add an ellipse
to the cylinder, and as I scrub it
along the form, you can see it's changing its curvature with
the perspective. Over here, it's narrower and the further away we get
from the camera's lens, it gets wider and
wider and wider. Of course, if you go
all the way to the end, it matches the silhouettes
of the cylinder. If I were to move that
cylinder this way, There is a point right there. The end of the
cylinder, this part here has aligned with
the cameras view, or if we were physically
standing here, the end of the cylinder would
fall between our two eyes. Therefore, we don't
have any depth information on this face. It just looks like
a straight line. I'll make the cylinder
a little bigger here so that it spans
to the right of our eyes and to the
left of our eyes or to the right and left of the cameras lens in this case. Now if I go to add a ring around the cylinder and
slide it around here. We can see over at this side
it's curvature bends right, and then right about here, it passes our position of the camera or right where
our feet would be planted. Then as we pass to the
left of the camera's view, the ellipse bulges
out to the left. As you know, that curvature
gets wider and wider as we go away until ultimately
it meets the silhouette. When you practice
drawing three D forms, you should also practice
drawing cylinders. I would say cylinders are harder to draw than
boxes because you have to be aware of the
constantly changing curvature. Remember to keep
the drawings loose. We're not trying to
draw like robots or stencils or
anything like that. The cylinder appears concave
here, but that's okay. What's mostly of
interest to me is the tracking of the ellipses. It's always a helpful
thing to draw behind to the areas that would be
otherwise invisible to our view. You can do this
with a dotted line or a faint line, whatever. In this case, to push
home the idea that this ellipse is wider
from left to right, than this ellipse is. What this immediately does is it implies a perspective grid. See, I have just implied a
grid that goes like this. As you practice with these forms and principles that
I'm showing you here, it's amazing how easily
you can invoke in the viewer's mind the sense of three D space
on a two D plane. Let's grab the cylinder here and just make
it a bit smaller, so I have a bit
more room to draw. Let's extend the
cylinder way over here, and I'll ghost out this backline so it looks like it's going
into behind the cylinder. So because this
cylinder is so long, before we put the end cap on it, what I'm thinking in my head is where is that line straight? And of course, I'm using my first two ellipses
to help me gauge this. So I'm kind of tracking the width progression between them. And as we saw in Blender, it's somewhere around
here from this view. This is where the ellipse would appear just like
a straight line, and I can draw my way to that point and then
go all the way out. And here, again, just based on the progression
that I'm observing, that ellipse would probably
have a bend like this. Something narrower
than the other side in terms of how
bulged out it is. But something like this,
almost a mirror image of this ellipse as it's about the same distance away
from the midline, and you can always do
your due diligence and indicate the full
ellipse like that. There we have a very
mindful three D form. It's the stuff you
don't hear artists talk about when they're
drawing these forms. This information generally
stays in your head, although you have to
draw it to practice it. I promise I will start drawing real things with these forms
very soon in this chapter, but we need to spend
time here because I having taught arts for
more than ten years now. I think this is my 13th
year as an art teacher, I can't tell you the
number of times. I've seen students
not hold themselves accountable to this
information when they draw. Either because they
don't know it. Maybe it hasn't been
properly explained to them, or they do know it, but they ignore it in
the pursuit of drawing cool characters
or something like that or cool poses or whatever. But if you don't
know this stuff and aren't able to draw it
with your eyes closed, any hope of getting a
convincing and cohesive sense of depth will be torpedoed. If your sense of gesture
is your weak link, that will undermine
the feel of your work. But if your sense of
form is your weak link, that'll undermine the
believability of your work. You know, obviously,
all the fundamentals have to be in place
for good drawing, but they all do
different things and therefore have different
visual impacts. If you find yourself
guessing too much on where the ellipses
would be for a cylinder, just draw yourself a
simple perspective grid. I've got myself a two
point perspective grid. Again, I'll be drawing
with these grids more in detail in
the future chapter. Right now, a grid like
this is easy to plot, and I tried to make all
the radiating lines roughly equal in distance
between each other. I just did this by, didn't use any special
tricks for that. Let's say I want
to draw an ellipse here and an ellipse here. Well, what I could do is
I could use my x trick, just draw an x between
the four points, which gives me the
middle of the ellipse. Then I can rough in the base of the ellipse into its
appropriate square. This by default gives me the correct difference
in the two ellipses. Then what I can do is just maybe extend these lines to go up. For both cylinders. Now, we're turning these
ellipses into cylinders. Now for the tops of them,
these are ellipses as well, but I don't have any
vanishing point lines drawn here. I'll
just eyeball it. Now, we know the
horizon line is here, and this point is closer to the horizon
line than this point. So this top ellipse needs
to be more foreshortened. That is less like a circle
and more like an oval. I'm merging a
developing intuition with the technical
knowledge behind it. Yes, if you want to,
you could go ahead and draw vanishing points to these areas like this
and then give yourself the x and put the cylinder
exactly in the right spot. But I like to again, evaluate it just by i, so long as this
ellipse is obviously narrower than this ellipse
or more foreshortened, your perspective is
probably going to work. The reason I'm so adamant
on doing things by i, and here I am, by
the way, just doing the same thing on this cylinder. They're a little lop
sided, but that's okay. Anyway, the reason I'm
adamant on doing this by, There's actually two reasons. One, the human brain is not
a good technical checker. Your viewer is not a program
that can check you on this. A ballpark is fine. In fact, a ballpark often
has more feel to it. Secondly, when you're drawing
characters and figures moving through the three D
space of your illustrations, say like this example here, a beautiful drawing
by Jens Clauson's. Let me just move this over here. Look at the bottom of her legs. If I just cut off the
feet for a second. Excuse me Jens for doing this
to your beautiful artwork, we essentially have
the same thing I just drew two cylinders
in perspective. Those cylinders go back to some invisible vanishing
point way over there, and these two feet
traced back to some vanishing point
somewhere over here. I don't know exactly
where those points are. I'm just inventing a
grid where the lines converge at a theoretical
vanishing point. This grid having two
vanishing points, one for each direction. If I were to further this one, it would be something like this. You can almost think of
this perspective grid as like a tiled floor. In fact, I used to
put tiled floors in my illustrations
a lot because it helped me just embed the perspective information
into the scene. It was a bit of an
artistic fundamentals cheat that I used to do a lot. Anyway, now I can ask myself
where the horizon line is. Well, where is our eye line? If we were to project a
line straight out from our theoretical eyeballs
or the cameras lens, I think it would intersect
her right about there. We're looking up
at the buttocks, I think, and we're definitely
looking up at her head. I think we're level with
the figure right here. These perspective
lines would merge with a vanishing point somewhere
over here, I guess. You can see now I'm
off on my grid, but that's okay. It
was close enough. I'll do a quick little
repair job here, getting a little more
accountable to these points. So that means if I
were to recreate a little study of just
the leg cylinders, replacing the leg anatomy
with basic cylinders. The top of the cylinder is up here and we're looking up at it, so it's form is convex,
it bends upward. This would be the area behind, which I'll just ghost out here. The cylinder would come down. Again, I don't care about
the leg anatomy right now. I'm just drawing a
cylinder. Let's just place the bottom of our
cylinder leg right here. This ellipse, of course,
we're looking down at, so we're bending
it out this way. This being the back of it. And the other leg or cylinders. These aren't legs, they're
cylinders right now. I would start about
here. Now, I'll use this perspective information to point to where I want to end it. S right here, I'd like to
draw a line that relates my two legs together and
my two forms in space. Then I'll just draw my cylinder down and ballpark
where its ellipse is. To recap, the horizon line helps you determine how
convex something is. That is how much the ellipse bends out to describe the form. You know, like this.
Obviously, when we're close to the
horizon line like here, this ellipse here would just barely be seen from
the top, just barely. Then of course, above
the horizon line, this ellipse would just barely
be seen from the bottom. That's what I have in
mind as I'm drawing. The horizon line
helps me determine that my little
haphazard completely ballparked perspective
grid helps me find the relationship in this case of the bottoms of
the two cylinders, ensuring they line up on
the same floor, let's say. This is how you can
really check your work. For example, I see an error
in my own demonstration. This cylinder is too high compared to this one,
and how do I know that? Well, if I use this
vanishing point and I plot a line up there, the top of this cylinder should actually be down,
let's say here. And the top of this cylinder, assuming the legs
are the same size, which they are on a figure, the top of this cylinder
should be up here. Getting those
placements in space correct is of paramount
importance for this fundamental, the fundamental of
drawing three D forms. Without this knowledge,
your characters will always appear flat at worst, like a cardboard cutout, or at best, like
you're viewing them through a extremely
telephoto lens, something that
minimizes perspective.
7. Freehanding Objects in 3D Space: So let's go back
to Jens lassens. I'm a big fan of his if
you haven't guessed. A study you could do
here that doesn't even involve any
drawing is simply an exercise in seeing the space that these
three D forms exist in. The first question
I'll ask myself is, where is the horizon line? Which means, where
is the eye line? Another way to imagine
that is let's say I were standing here seeing this
girl physically in space. If I were to just move my head forward in
a straight line, where would my eyes
collide with her? I think they would collide
somewhere down here. This is where my head
would bang into her leg, right about there, which gives me my horizon
line, of course, which means that
everything above the horizon line
we're looking up at, which in this case, is
confirmed by the fact that we can see the
underside of her skirt. This is an ellipse that
we're seeing the bottom of. Also, look at her sleeve here, the opening of her sleeve,
this is an ellipse, we're seeing the bottom of it. If we converted her
legs to cylinders, which the legs are very close
to cylinders, by the way, with a little shape
information applied, shapes is the next chapter. The bottom of the cylinders
would be like this, very similar to what we just
saw in the last example. Okay, so all that
information can be gotten with the
horizon line only. Next step would be, where's
the vanishing point? Again, I have no idea. There's not enough
information in this drawing to tell exactly where
the vanishing point is. I mean, even Jens Clauson's
couldn't tell you. There aren't enough points
to fully extrapolate from. However, because we do have two feet that we know are
planted on the ground, we can plot two points here. We know that both of
those points are on the same line that converge
back to a vanishing point. So all I have to do is
extrapolate that line. It's somewhere over here. The vanishing point is
somewhere in there, which means now that
I have that point, I can continue to
extrapolate and boom, I have the perspective
of this scene. Now going the other way, where's the vanishing
point over here? That is actually more
difficult to find because we don't really have two points
that are on the same line. This vanishing point
could be about here and you can draw lines
out to test it like that. Or the point, I mean, could be there and you can draw
points like this. But the closer your
two vanishing points get to each other, the more skewed or
fish the lens will be. This drawing doesn't
appear very fishy to me. If I needed more perspective
information in this drawing, I would probably
just be safe and put the vanishing point
somewhere out there. Then if I were to test that
by drawing lines here, you get a grid that
looks like this, and this looks about right. Again, think of it
like a tiled floor. If these are tiles I'm drawing, does it look like this figure is standing on this tiled floor? To me, it looks passible Now, again, it's possible to do
all of that in your head. You don't have to
draw a single thing. But if this information
is new to you, if you're not used
to doing this, go ahead and find
artwork you like, character designs
like this where both feet are planted on the
floor because that gives you a cue for the
perspective and see if you can extrapolate back to
the perspective grid. It's a super helpful
visualization exercise. You know, let's do that one more time on a very
different perspective. Here's a beautiful
illustration by Max Grech. Probably pronouncing
that last name incorrectly, but here we go. You probably will have to
scale these down because vanishing points tend to be far away from the figure
off the page usually. For this, that's
certainly the case. Again, vanishing
points are only close together when you have a
very fish eye perspective. Think like Kim Jug type stuff. But this appears to be shot with a normal iPhone if this
character were real. Just from a high up perspective. The camera is obviously
high above Wolverine here. Let's put him right there. Then what I do is just
make a new layer. Let's ask ourselves
the same question. Where is the horizon line? Well, this one's more difficult because we are fully
above the character. The horizon line is
somewhere up here. A quick point on that. This used to confuse me an awful lot. The fact that we're looking down has no bearing
on the horizon line. It's all about the distance off the ground that
our eyes are at. Because we're looking
down at the character, we know that our eyes must be physically above
the character. The horizon line is
somewhere up here. So how can we more
reliably track it? I can't just guess. Is it there? Is it there? I really have no idea. The only way I can know
where that horizon line is is to actually trace it
via vanishing points. Again, we have two feet
planted on the ground. Now, this foot here is missing.
Well, I'm not missing. It's cropped off by the frame, but we know it's somewhere here. If we were to extend
this drawing, that foot is
somewhere down here. Which means we now
have two points, point number one and
point number two, which we can, of course,
draw our line through here. Okay. There we go. Now, this still
doesn't fully help us. I'm not saying the
horizon line is there. With the example
before with the girl, I could say where the horizon
line was because I had the added information of where my eye line would
collide with the figure, which meant I had
a horizon line. Here I don't have that. My eyes would sail right over him. In this case, I need a second
line to also go back to a vanishing point and
where those two lines converge would be where
the horizon line is. So where can I get
that second line? Well, I have the hips. Point number one would be there, point number two would be there. Let's throw a line through
that and look at that. The lines converge right
there. Let me just erase that. This is my theoretical
working vanishing point. I can also now shoot a line
through the shoulders. Now, here's another
added difficulty. These shoulders are twisted. Wolverine is cocking
that shoulder back. But if that shoulder
were not cocked back, like if he were just
posing naturally, just straight shoulders, that shoulder would be
somewhere here and it more or less lines up with my
new found perspective grid. I'll undo what I just did, though, so we can see
the full drawing. I'm going to say yes,
the horizon line is indeed right there. Give or take a
millimeter or two. Again, ballpark is totally cool. Now for the second
vanishing point, and just like last time, this one is harder to
find because once again, we don't really have two points
moving in this direction. You two points that are on
the same perspective line, so I'm going to have
to take a guess. I can take an educated guess because this is not a fish
eye perspective or anything, I know the vanishing point is not going to be too
close to the other one. But there is some dynamism
to this perspective, there's a lot of depth to it. It's definitely not a telephoto
lens shooting the scene. That means the
vanishing point is not going to be too far
that way, either. Because the farther away
the vanishing points, the more telephoto or
flat the perspective. I'll estimate it
somewhere over here. I'll use the points I've already drawn on the figure, the feet, the hips to kind of shoot
some lines through the scene. Again, if this
were a tiled floor that Wolverine was standing on, in the snow, somehow,
would that work. Here the painting itself is obscuring my
perspective grid. I can't see it, on a layer, I'm just going to do
this. Ghosted out. Yeah, this looks
about right to me. That perspective grid appears just by eye to be
in the right place. You could even combine this with drawing some basic boxes. Like for example, if you look at the top
of his shoulders, as we'll see coming up
in the next section, the top of the shoulders can be simplified into the
top plane of a box. Here I'm drawing that top plane of the box, connecting
the shoulders. Now, remember, his shoulders
are cocked and rotated, that is rotated off
axis with the feet. That means the box will have
its own vanishing points. It'll still go to
the horizon line, but it'll have its own separate vanishing points due
to its rotation. But this top plane
of the box I just drew does appear to make sense
with our perspective grid. It's below the horizon line, so we can see the
top face of the box. If I were to use my
perspective grid to draw a box form
where the hips are. Again, just using my straight
perspective grid here. Drawing just the
top plane of a box. That appears to roughly
align with Wolverine's hips. Again, his hips might
be twisted a bit. My box is simply straight on
with the perspective grid, but the angle of view
appears to be correct. You could even draw
the top plane of a box where the two
feet are like this. You can now track visually
the three partial boxes we've just drawn and do they appear to line up with the
character and they do. At least close enough. Again, we're not
computer programs, doesn't have to be
exactly perfect. It probably couldn't
be. Remember, this is a human being doing
this illustration. It's probably not
exactly perfect either. Which is, of course, the
beauty of the whole thing, but that's a whole
other conversation. Okay. I want to switch
gears a little bit from vanishing points
and horizon lines and perspective grids
and things like that. Let's talk a little bit more
about wrapping our heads around drawing three D
forms in three D space. This is a quick little rendering
I mocked up in Blender, just a very simple
three D object. It's basically two spheres
that are melted together. Looking at this, there
is obviously a sphere here and another sphere
beneath it down here. Those two spheres
melt together in a contour that looks like
this. But here's the problem. If I isolate that contour,
suddenly it's flat, there's no indication that
this is a three D form. The only way we know
it's a three D form is because we saw
where it came from. But if I hit all that, this just looks like a flat
meaningless shape. How do we give something like that three D form without going in and
shading everything? Shading is in the realm of
painting, which is great. Painting has its
own fundamentals for showing three D form, but we want to do
this with drawing. The principle I want to
introduce to you is what my teacher always called
the accordion effect. Here's what it is. First, I'm just going to get
rid of this drawing. When thinking about representing two forms that overlap
in three D space, don't think about the contour. Think about the forms first. This being the sphere
that's on top, I can ghost in the bottom, then the sphere
that's beneath and I'll ghost that in for
now, something like this. Because this top one is in
front of the bottom one, we need a way to show that, and this is the accordion effect. Watch this. Instead of making
the contour simply do this. Again, that's flat,
I'll continue this contour through
the other sphere. Then here's the accordion, right there. It's a little pinch. Then from behind that pinch
out comes the bottom sphere. It's the same with the
other side as well because the sphere is in front of the bottom one all the way around. We can continue this in
a little pinch and then out from behind
the pinch and even feel free to start
your stroke behind it. I'm drawing behind the form
right now, just lightly. Then as I get in
here, I'll darken the stroke and
connect these areas. Suddenly, without any shading, just with lines, line drawing, this feels like a three
dimensional form. Oh, it's called the
accordion effect, named after these little
undulations that expand on one side and are compressed
or pinched on the other side. This is just what my
teacher called it. I'm not sure if it's actually
called this more globally, but it's stuck with
me for 20 years, so it must be effective. This accordion effect,
pound for pound is maybe the most
useful drawing tool I have ever come across. It's such an effective way of showing one form in
front of another. Remember, you can combine
this with cross contouring, the elastic band principle. I'll wrap an elastic band
around the middle of this form. Is down, it dips in a bit
where the spheres are overlapping and
then it comes out again for the bottom sphere,
something like this. Up here at the top,
it should probably wrap around more like that. Then on the other side,
the cross contour comes over top of the sphere
this way, wraps around it, disappears a bit here
because this is where it would be wrapping
underneath that sphere, and then it comes
out, of course, again for the bottom sphere, merging at that bottom sphere. Now, because I can see the
top face of this sphere, I know we're looking
down at this object. A cross contour here would
be bulging out like this. Wrapping around, and a cross contour here would be very
much more wrapping out. It's curvature would
be more pronounced. Again, these cross contours
are just there as tools to further your understanding and enhance your three D vision, if you want to put it that way. But with the accordion effect, you don't even really need to do the cross contours,
if you don't want to. I'll just draw a
cylinder here like this. Let's draw another cylinder
intersecting it going up, almost like a upper arm
and a forearm thing. The cylinder going
like this. Okay. So these two cylinders
are overlapping. Well, this looks
messy and unclear. How would I draw that using
the accordion effect? Well, first of all, let's just
get rid of all this stuff. If this cylinder
here is in front, all we got to do is make
sure this contour comes down and then we overlap it
with this accordion effect, and then out from behind
it comes the upper arm, if this is a short form for an arm, whatever this form is. Then I guess if
this were an arm, the elbow would be
about there, so we can go through it like that. What that accordion
effect implies, with that one little
line is that this is a three D form that's sitting on top of another three D
form that's behind it. With the accordion effect
in the right place, you don't need to draw any cross contours or
anything like that. Just this simple
overlap says it. I like to exaggerate
the overlap. See, I didn't draw it like this. I was not timid in just
doing a little tiny overlap. No, I extended the contour down, extended the accordion
effect line, and then out from behind it. You can see my
ghost line up here. And then out from behind it
comes the form in the back. And it looks immediately three
D. On a practical level, this accordion effect thing is really apparent on
torsos and hips. Torsoes and hips
can be thought of as two spherical forms. In this case, it's more
of an egg shaped form for the rib cage and
more of a flattened, almost spherical like
structure for the hips. Anyway, if you think of drawing a bag containing
these two forms, well, in this pose, this bag
is stretched on this side. And squashed on this side, and this is where the accordion effect can come into play. Let me just move
this over here so I can draw on a blank
sheet of paper, what I just drew
over the figure. I'll block in my first form. Again, this would
represent the rib cage area, the upper torso, and then this form
represents the hips or waist area right
down to the crotch. There is often a squash
and stretch relationship between these two areas. In many non static
poses, you'll find this. Anyway, how do we draw this? How do we wrap these
forms in a bag? Well, this side is stretched. The stretch side is always the easier side
and this side here is squished but we have to figure out where
to put the accordion. The first thing I'll
do is just ghost out the two forms here. This is why people draw lightly when they're
blocking things in. What form is on top of what? Well, because we're looking
up at this particular figure, it's the hips that are
in front of the torso. I will carry my line through. Now here's the accordion effect. Then we go back up for the
back of this figure like this. This is a very good
representation of what this pose is doing. Of course, now I could start finding cylinders for the arms. I could start finding
cylinders for the legs. Look at this. We have
a figure drawing evolving in front
of our very eyes, using these simple simple tools. Aha, but I'm getting a
bit ahead of myself. You might have
noticed I didn't use a perspective grid for that
little figure analysis. Why did I just
suddenly abandon it? There's one more
really important fundamental thing to get to before we start drawing figures and characters
with these tools. Here I've got a basic one
point perspective grid. By the way, the
difference between one point perspective and
two point perspective is obviously these
blue lines are all going toward the
vanishing point. If I were to add lines in the other direction without
using a vanishing point, they just are
straight like this. Again, we'll be drawing
backgrounds and environments using perspective
grids in a later chapter. Stay tuned. Drawing forms in perspective is
all well and good. Here's a little box
coming in here. Just following the grid
made by a vanishing point. I can trace this line here,
connect in like this. For this top corner, I trace it, it's about there, connected up vertically, and
there's my box. Drawing forms with
grids is really only good when you want those
forms to align to a plane. For example, here, I've aligned this box to
the ground plane. If I want to draw another
box on the ground plane, I could obviously use that
same perspective grid, and here is another box
on the ground plane. Let's just draw
another one over here. This one can have its top
above the horizon line, so we don't see its top plane. We see it just going like this. Trace these lines using the vanishing point to find the lines for the correct
perspective, and there we go. These three boxes are all in a cohesive space
because they're all positioned on the floor and that floor can be tracked
back to a vanishing point. But there's limitations here. For example, all these boxes
are rotated the same way. What happens if I want to rotate the box 45 degrees, like this? Well, now, this box is using
a different vanishing point. I have to invent
another vanishing point for this box to make sense. That vanishing point
would be somewhere, you know, off the
side of the page. I'd basically have to invent a two point perspective grid now for this box to make sense. And well, what if I want to
take this box and rotate it? I want this box to be rotated, maybe a little less than 45
degrees, something like this? How do I manage the
vanishing point now? I have to invent yet
another vanishing point? This vanishing point
may be over here, let's say, something like that? This vanishing point
would be here? Could see how if you just
start rotating your objects, suddenly you're going to
have ten vanishing points. While you could
keep track of that, I suppose, first of
all, that's no fun. Second of all, it takes the
life away from a drawing if you're constantly tracking
technical vanishing points. Even to add to all
this, what if I drew a box up here that's
rotated like this, rotated on two different axes. Where does this
vanishing point go? Well, this vanishing
point is not going to be on the
horizon line at all because this box
is divorced from the plane that the
vanishing point defines. If I were to just start
tracing these lines down, this vanishing point
is somewhere way off the screen down that way. It becomes pretty obvious
why I'm so in favor of learning to see space a
little more intuitively. Even if that means favoring a ballpark approach over
technical perfection. Oh, and by the way,
we would be able to see the bottom plane of this box because it's above the horizon line and also
rotated up a little bit. There's two reasons we
would see the bottom plane. But again, this
box would actually require two additional
vanishing points. One way down there as
I just talked about, and a whole other one
way down here somewhere. The takeaway is
perspective grids, while they do have their
uses are a little too limited when it comes to
drawing figures and characters, where things like arms
and legs and torsoes are going to be rotated 1 million
different directions. So the thing I do
is first I'm always aware of where the
theoretical horizon line is, and this time I'm not
even going to draw it. Although I'll tell
you, I'm just going to think about it
being right there. But instead of
actually drawing it, just think like this box is
above the horizon lines. We're going to see the
bottom face of it. Don't do this. That
would be a mistake. We can't see the bottom face. It's got to be like this because it's above
the horizon line. We can see the bottom face. I don't really it's not that I don't care
about vanishing points. It's just I'm ballparking them and I'm content to do that. If something looks wrong, like these lines maybe look
a little too long. Bring them down, mentally
making sure that this angle is a
bit different from this angle because they have to converge somewhere
around here. Again, I don't know
exactly where. As long as it's somewhere
down there, we're okay. That is, we're okay
for this exercise. Some environments will demand more clear adhesion
to vanishing points, say like a city or something. But here, we're
just trying to get our brains to think
in three D space. Anyway, depending on the type
of perspective you want, you can just make lines
going in this direction just straight here in
photoshop and holding shift. I notice I'm way off on
this line. That's okay. Just quickly correct
it. And that will simulate a one point perspective when you just hold
shift and just for fun, pick a face and shade it in. Now, if I want to
draw that same box below the horizon line, well,
it's got to be down here, because I know the
horizon line is probably somewhere there. So
let's put it here. Let's just approximate
the different angles of these lines here, converging to a vanishing point somewhere on the horizon line. The angle of this
line here should be a lot steeper, so
I'll go like that. Because again, it's got to track its way all the way back here. Then I will finish that box and just pick a face, shade it. This is not lighting
by any stretch, it's just dimensionality to our three dimensional
objects here. But now let's do
something trickier. Let's draw a box that sits
on top of this surface. I'll try and figure this out. It's going to be approaching
the horizon line, so I will strike that
line pretty straight. Then here it's below
the horizon line, so I'll hit it like that. And that box is
essentially going to be rotated on this one. Here's where I make my first
correction. It's rotated. That means these lines need
to be rotated like this. I'm showing you the stages at
which I figure things out, developing your intuition
for this thing. The box has a straight
top, so we go down. This line is just too
curvy for my own liking, let's erase it, make
it a bit straighter. This line here should roughly
be parallel with that line. I'll make those edits, and we can shade the bottom here and bring this bottom face down. Now, the line that goes here, that line is sitting
on the ground, so it should line up with that theoretical vanishing
point somewhere over here. That line needs to be like this because it's again,
sitting on the ground, the same ground plane
that this box is on and the same plane that
this box is sitting above. This top box here is not
on the ground plane, but it does reference
the ground plane. It sits above it and it's rotated the same
as the one below, so it accesses the same
vanishing points. There we go. There's our box that's
leaning on the other box. If you want to just throw
the most rudimentary bit of shading underneath to show
a bit of a shadow there. That's fine same here. This shadow actually does have some more perspective
information though. It shows where the box
is touching the ground. In other words, this point, I'm roughly lining up with
this area right here. That tells the
viewer that this box sits just a few inches behind
or whatever the scale is, a few inches behind this box. Those small differences
are, of course, extremely valuable in
communicating a cohesive space. I'm just going to tweak
actually the bottom of this to foreshorten that
bottom plane even more. So it looks like it's sitting on the box properly.
There we go. As you can see, even
though I have a lot of experience drawing
in three D space, I still figure
things out as I go. It's just the fundamental
theory stuff exists in my head. Hopefully by this
point in this chapter, I've given you a sufficient window into what's going on in my head so that you can also
try this exercise yourself. Let's do another box that's rotated in some
weird way up here. Again, am I above or
below the horizon line, I am above the horizon line. The box is going to
be rotated like this, which means we're just barely
going to see that top face. This is interesting. Even though the box is above
the horizon line, we're still seeing
the top face there. Why is that? Well, it's simple. It's because it's
rotated toward us. Vanishing points and horizon
lines won't really help us draw this box because the rotation is throwing
everything off. The horizon line,
the vanishing points don't really matter here. Now, these lines will
converge somewhere. It won't be on the horizon line. It'll be somewhere else.
But they do converge, which means you still got to be mindful of your relative angles, making sure that
these lines would converge if you carried
the lines further. Then we'll carry this
up. Throw a line there. Now, these two lines here
should be roughly parallel. I will adjust that. Then once again, this
back line here references the same theoretical
vanishing point that these two lines do, which are altogether different
than the other boxes vanishing points
because this one is rotated in a weird way. Then just pick a face, shade it in one value, and I forgot to do that here. Let's just shade
that in as well. It just helps with the
dimensionality of these things. We'll see it put to
use more when we start drawing figures
in just a moment. Let's do an easy one and put a ball back here
behind this box. Now the thing you have
to just think about is where would the ball
be striking the floor? Well, if it's behind this box, then the point that it hits the floor needs to
be somewhere here. Just like this point was
about here on this box, indicating that
the leaning box is a few inches back recessed
from the front of this box. Same thing with the sphere. The point that it
hits the floor, has to be somewhere about here. It's just behind this box. My thinking here is if I were to ghost my lines
behind this box, something like this
and draw down, where would this box end? It would end at this point here. If this ball is going to
be behind this box, well, it has to hit the
ground somewhere above this point
somewhere over here, or else it would be it would be sharing the same three
D space as the box, which of course is impossible. Let's put that ball right there. Now, a ball has no planes. Well, that's actually not true. A ball has many planes,
too many to draw. The multitude of small planes is what makes it look round. Right now, this just
looks like a circle. But if we wanted to,
we could just throw in a elastic band or a cross
contour type thing, just to give the
viewer an indication that this is a three D object. If you wanted to continue
our basic shading, you could simply throw
in a half moon shape to show that this is a ball. Again, this is not
rendering by any stretch. It's just throwing a basic value in there with the soft edge, of course, because this
is a sphere, not a box. You can see how the
space appears cohesive. Do the same thing
with cylinders now. How about a cylinder
that's resting on the ground plane coming forward. This line I'm drawing here needs to correspond if it's in the same rotation
as the box that is, it needs to correspond
to the same vanishing points
as all this stuff. That vanishing point is
somewhere around here. I'm mentally tracing
it back in my mind. All those lines I just drew
just exist in my head. I'm putting them on paper
just so you can see them. But this is largely a cognitive
exercise of seeing space, conditioning your brain to see the two D flat surface
as a three D space. The top of the cylinder has a different angle than
the bottom because again, vanishing point is
going to force that, and then we have our
ellipse on the other side. Now, this cylinder is small enough and far
enough away from the horizon line that both of those ellipses are probably going to appear
roughly the same, not enough to
really bother with. And if you wanted to,
you could throw in intermediary ellipses to show your understanding of the form. I always find it helpful
as a housekeeping thing just to ghost out lines
that are behind the object. Keep the line partially visible. That helps train your brain into further seeing three D space, but just ghost it
out a little bit. In this case, the cylinder
appears in front of the box. Then for a cylinder,
if you wanted to shade the same left face
that we've been doing, the way to go about that is to think of the cylinder
as actually a box. If the box looked like this, the face we'd be
shading would be here. Just imagine a box
encompassing the cylinder. And then just shade where that
face of that box would be. A cylinder is round
just like a sphere. Let's soften this edge. I'll even get my nice little
smudge tool out for this. The last thing we'll do on
this demonstration is put a cylinder traversing
the horizon line. It starts below it and ends
somewhere here above it. Look at how I'm blocking
in the two ellipses, and I'm just blocking in the parts of the
ellipse we can see. If I wanted to be thorough
and ghost in the backs, they would look like this, but we're not going to
see those parts. Then a cn is a toppled cylinder a little
bit. It's not quite straight. Okay goes down. Again, look how I'm
drawing choppy, the way I always draw, the
way I showed in my warm up. That's the way I like to draw. So I guess the point
here is, draw the way you want to draw what
feels right to you? And this is where
everybody's going to differ. It may be useful to show where the horizon line here is with a contour that goes straight. Now, that looks a little
awkward by itself. You probably should throw in some adjacent ones just to show the viewer or in this case, you are the viewer, to
show yourself to get your own brain conditioned
into seeing space like this. If that cylinder were
to extend further up, the ellipse would even become more pronounced
in its curvature. This one, I'll just draw
the ellipse straight, no cylinder attached
and see if we can get this to look like it's
sitting in the same space. Can do the same thing down here, although I shouldn't
put it there. Let's do another one here, see if you can get the cylinder or the ellipse, in this case, to look like it is sitting
on the floor, this ellipse, relative to this ellipse, relative to that ellipse, relative to all these tracking
the curvature of each. This assignment, we're drawing all these objects
in the same space. And this truly is a
great assignment. It's something I did. I filled sketchbook pages doing this. What's nice is even though this particular
demonstration has taken me 15 minutes to show you. That's just because I'm talking. You could do this in 5 minutes. You could do this while sipping a coffee at your
desk in the morning, but the payoff is great. If you can't construct space, it will be immediately
apparent to you and you can go back to things like vanishing points and
stuff like that. You can almost think
of vanishing points being like training wheels, and I don't mean that
in a bad way at all. But this exercise
will tell you if you still need to use
vanishing points or if you have progressed to the
next stage where you can ballpark things but
make it convincing. Okay. All right. And as a final addition
to this chapter, before we get into
drawing figures, that is before we start applying it to figures and characters, we need to be able to twist
and bend geometry in space. Let's just draw a face of a box, which just looks like
a flat rectangle in perspective like this. We just drew a bunch of those, so I don't need to explain
what's happening here. But what if we took
this point and brought it out here and kept
this point the same. Basically, we have this Now we're going to keep this point
and this point the same. What happens now is we got to go back to that point and find this final contour that
connects this down to this. Now, these lines are
curved this time, simply because the
object is bending, and then of course, the bottom one is
just going like that. I'll just remove
the dark box here. You can see what we've drawn. It's a twisted form in space. For these it's
handy just to pick a face and shade it just
like we did before. This is a playing card that has been bent in convincing
three D space. Sometimes it's helpful just to draw a curve, say like this. But imagining this is again, like a playing card
that we're bending in space and say, well, maybe then the perspective
would go like this, like this, meaning vanishing point
somewhere out there, same with this, vanishing
point somewhere out there, and then we can connect them. But this is a bit
of a mental hurdle. Where does this line go? Does it go like this? No. It's got to go behind the
object and come back down. That is, assuming we're keeping that other point on the ground, which is helpful for this
exercise, at least to start, keep it on the
ground, and then you can track your way
through the form. Again, pick a face, give it some shadow. Moving
those to the side. How about if we try one
going the other way? This time, I'll draw the
bottom two points first, and then this side
contour goes this way. Obviously, we're going to see
the top of the form here, the bottom of the form there. Actually, I'll just make
the back a dotted line, which is always a good habit
to get into, by the way, because it is very helpful to
draw what's behind things, but you want to give yourself a demarcation style that shows that it is
behind something. Then here we can
attach the other side. This is a bridge
shape or something. Then, pick a face, usually
the face that points under, if you can find one, and
give that a dark value. Okay. How about one now that
curves in a similar way, but not all the way around, not as bridge like
as the other one. In this one, if there's a vanishing point
somewhere up here, that point is going to control. All of these lines. Now, that vanishing point is way too close because
look at this. I'd be so far off there. The closer the vanishing
point gets to your object, the more skewed the perspective. That vanishing point is just
wrong. I'll undo all that. The vanishing point would
be far off the page, but I still want to make
sure that these would converge to it in theory if
you traced them back there. Again, ballparking is okay. Then just find where
the other side of the object is
somewhere about there, and draw down, and there you go. Hey, we might as well cross contour down the
center of the object. I feel like I haven't
done that in a while. Let's bring that practice back. The way I drew this
bottom contour, almost looks like a piece of clothing like flapping in
the wind or something. If I were to draw a
cross contour here, maybe this cross contour
would actually go inwards as though it were a towel or something hanging
from a clothes line. But this cross contour up
here would be more straight. Like maybe the
towel is resting on a hard ledge up there.
And just play with this. How about if we
miked our first one, but maybe gave it more
of a bend, like this. It's bent out more. But on this one, how
at this point here, it also turned under. Now we have to see this as
this side also turns under, there's my dotted line showing the back of it. We
have to see this. We can just shade that in, maybe shade this in, maybe just further ghost
out this line here. I've skewed the proportions of this little box face,
but that's okay. This is all about
testing forms in space.
8. Forms and Figures: All right. So we're
ready to take everything we've learned
so far in Chapter two, and I will try and specifically
keep this to Chapter two. So I've called up our friend
from Chapter one here. I've put a little piece of virtual tracing paper over her. In fact, back in
my early days and about 2001, when I
started learning this, we used physical tracing paper over photos of models like this, and we did exactly
this exercise. Namely, using boxes and boxes only to construct and properly show the
form of this figure. I'll start with the easiest box, which I think is the torso, which for our purposes, goes from the shoulders to let's say the belly button area. If we think of a
horizon line on her, that is if we're
looking at her through a camera lens and we moved that camera lens
straightforward, where would we collide with her? Probably somewhere around
here is our horizon line, which means the box up here, we're looking very much up at. I'm going to draw it like this, using the width of the shoulder to determine the
width of the box. And here is what
we're looking at. It's a rotated bent box
that goes down here. Because we're looking up at it, remember it's above
the horizon line, we're much more likely to see the bottom plane of that box. I will draw this box like this. Now quick side note up here. That box is very similar to the magic carpet stuff we
were just talking about. In fact, I even drew one
that looked just like this. All you got to do
with this exercise is just add the third
dimension to it. Simply give it some
thickness in this case, and do that. There you go. I messed this one up and
didn't show the bottom plane, but that's easy enough to fix. Just do this. And there we go. That's what
we're looking at. Of course, remember our gesture ran down the middle of
the form like this. It was like a big C curve, and that's all I'm
doing to this box. I'm making the box
conform to a C curve. Let's draw another
box for her hips. Her hips and shoulders are roughly in alignment
in this pose. That means that the
hip and shoulder boxes are also going to be
roughly in alignment. Now in terms of where to end this box, it's somewhere here. Now, remember, we're
getting closer to the horizon line
at this point, so there's not going
to be quite as much of an up view at the box. Let me just shade in
the bottom plane of this rib cage box
or this torso box, just so we can maybe see that difference a little bit better. This box is going
to be like this, a little bit less visible
on the bottom plane there. But still visible there because we're above the horizon line. We're looking up at
the hips and I'm just going to ghost out this part of the box because this is where
the leg is going to go. Now let me just bring back
the whole model here. Looking at that leg, can we see the bottom plane
or the top plane? Because you can't
really see both at once. You have to pick one. We're seeing the bottom
plane. It's so easy to tell because you can see a
shadow there underneath. When I construct my
box on top of this, the box goes, I'm not going
to use the shorts line. I'm going to pretend that
the box starts up here. The box looks like this. And we can see the
bottom plane like this. We can just barely see
the front of the knee. This front of the
box looks like this. Of course, the box is tapered. It's wider here
and narrower here, just due to the
structure of the leg. The knee is much
smaller than the hips. I'm going to erase this line
because it's too far down. It needs to be a lot
closer this bottom plane. There we go. Shade that in. Just for fun, I can shade
this plane in as well. I can ask myself
the same question about the bottom
half of the leg. I think we can just barely see the bottom plane of it
due to its rotation. So what I will do here is
have a box that's like this where we can just barely see that
bottom plane like that. I'll even shade it in right now, get that done early, and we can't see this
side of the ankle. So it's kind of like this. That's what this box looks like. The back leg is hidden. So let's move up to the arm. Once again, I'll ghost
out this part of the torso box because
I'll be drawing over it. But leave it in. Leave
it somewhat visible. Again, that all helps
when it comes to training your brain to
see in three dimensions. Now, again, we're way
above the horizon line, so there's no way
I'm going to see the top plane of this box, but what planes am
I going to see? Well, I think the corner
of the box would be here. Again, I'm just looking
at the shadows, going back to the figure. I'm just looking at
this shadow here. That tells me that there's
a plane change there. So if I'm simplifying
things down to a box where there's
only so many planes, I pretty much know
that I need to have a plane change on
this part of the arm. In this case, I can
do the whole arm because it's a straight arm. I can do it all in one box, but if I wanted to break the box into two, I would just do that. Of course, the shoulder is wider than the wrist and
wider than the elbow. The whole box gets tapered. Let's just throw this in a tone. While we're here, let's throw this side of this box in a tone. Hopefully, you can see
the three D effect we're getting already or the three D understanding
that we're getting. I'll hide the figure in
a second once I'm done, and we can see the full
results of our study. Now, hands are
incredibly complicated, but you can boil
them down to boxes. Essentially the palm
area that we see here. This is the dorsal
side of the palm, the part that faces up,
is just a tapered box. We're just barely able to
see the bottom plane of it. Then those fingers are clenched. They're bending under the hand. I'm not even going
to bother with them. I can just leave this drawing
alone like that, I think. Let's get the other arm in. In this case, we can
see the top plane of the arm. It's like that. The forearm is hiding
the end of this box, but I think it's
somewhere like this. Okay I'll shade in
this part of the box. By the way, let me just
pause here and remind you, you can see why I'm not
using vanishing points. Every single box would have different vanishing points and it's just not even worth it. But the horizon line
concept is helpful. Anyway, let's get
this forearm in. This is tricky. Let me
go back to the model. What plane of the
box can we see? Again, always look to
see if there's shadows. There's a shadow on this part
of the arm, just barely. That means the form is
turning and we're able to see this plane
getting shadow. That means that we need to
be able to see this plane of the box ever so slightly because that's the size of the shadow that
we were seeing. Now, we're not able to see
the bottom of the elbow, so we're not able to see the
bottom plane of the box. It's also a way above
the horizon line, so that adds up as well. Let me once again
ghost out this box, draw this box over it. There we go. There's our box. Then again, the hand,
you can just make a tapered box for the palm part, and the fingers too, it's
like it's the same thing. It's just a box you can
see the bottom plane of. You know what, don't even
worry about the thumb. Just group it all in as
one boxy massive fingers. Two things left. The head, which I've oddly left out. Usually, I start with the
head, I guess, not this time. But the head is pretty easy. They can be broken down
into a box as well. The corner of the box is where
the temple is right there and where the corner of the eye is and the
corner of the chin. You can draw this
continuous edge that connects those
things. It is a bit bent. That box can be a little bit
bent, if you want it to be. Now, we can see the underside of her jaw. Let me just
hide this again. We can see the
underside of her jaw extremely clearly. Again, why? Well, mostly because we're
below the horizon line. Actually, that's the
exclusive reason. She's not looking down or
up or anything like that. Her head is pretty straight. The only reason we're
able to see under it is because her head is
above the horizon line. We need to make sure that
our box goes this way. And we are able to see that
bottom plane of the box, and we'll just end
the box up here. Now, we're not able
to see the top plane of the box for the same reason. It's too far above the
horizon line for that. The next is pretty
simple. We can see that front plane of
it. It's like this. Let's just shade that in. Obviously, don't worry about
the hair, leave it out. And as a last step, let's
get that back leg in. I'll ask myself once again, what planes can we see? It is a pretty flat
on view of the leg. But I'm pretty sure the
way I see it anyway, we can see the plane change on this side. It's very narrow. What I will do is
start with this line, which I know is continuous
because we can't see the backside of the
box. So it's like this. Then I'll get to where I think this is and then there's the barest glimpse of this plane. Here goes down to the ankle. We'll shade that in.
I'll erase it here, so it goes behind that leg. Oh, and the feet, of course. Let's just end this box here. The feet are classically
drawn as tapered boxes. Tapered box meaning if you
had a box form like this, the foot instead would be
like this a a wedge shape. In here, you can
almost always trace the contour of the foot from
the back to the bottom. And then that wedge, we can just barely see the
top plaintiff her shoe. It's like, here's
the wedge like that. Let's just shade this face in. As far as picking
which face to shade, it doesn't matter.
Just pick one. And you notice, I'm not
even consistent with it. Like over here, I
shaded the left face, over here, I shaded
the right face. It doesn't matter. We're
not doing lighting here. This is like
educational shading, if you want to call it that. It's just to help
clarify plane changes, not to show lighting. Way, this foot, same
thing, let's just trace the outer borders
of the shoe there. Then once again, just
like the first shoe, we can see the well, I guess what's the
bottom plane now because her foot is
oriented this way, and then we can shade it
in. There we go. That's it. We're done. Just to see the full results of
our work. There we go. It's definitely not the most appealing drawing in the world, but it is extremely
three dimensional. Everything feels like it
fits together in space. Because I traced over the model, I got the same gesture that the model actually had
in the photograph. That'll be a bit harder to come by when we're not tracing, but we'll get there
in just a second. I forgot to shade
in this part of the head box, so
let's put that in. I would call this a
more advanced version of the exercises we've
already been doing. It's only more advanced because
they conform to a figure. But drawing these
boxes individually in space is not more advanced
than what we've been doing. That's the beauty of it. Here's a page from
GlenVilpu's book, the Vilpou drawing manual. Now, I was not
taught directly by GnVilpu but my teacher was one of his
protegees, let's say. My earliest drawing days, I learned in the
Glen Vilpou method, which really informs
the way I teach today. I'm looking at the figure
at the very bottom there. The nice thing about
learning to draw with boxes is first of all, you don't need to do a
comprehensive full figure study. You can just start playing
around with rotating forms and building them
together in space, going box by box here because you only have
to deal with six faces, of which only a few are
visible at any given angle. This box drawing
technique is probably the maybe aside from gesture that most revolutionized my drawing. This is the thing that made me understand that drawing doesn't have to be you putting down
finished lines every time, that there is a structure
to be had first. I'm drawing this box
that covers the torso. This is a really
interesting twisted box. I first like to start
with getting the faces that aren't overlapped
or cut off or anything. The two faces I've
drawn, the top face here and the side face here. They're both fully visible, save for the top face
getting cut off by the head, I guess, but we can pretty easily imagine where that goes. I'm drawing behind the form to find the other
side of that box. The other side of that
box is right here. That's where the
corner is. Notice that contra line doesn't
come down like that. That gives the box too much
volume on this side here. That contra needs to bend back, and therefore it comes out
from behind like this, and then we connect
it like that. These shapes are
starting to look a bit odd without just a
bit of basic shading. Even Glenvilpu there did
his shading at this stage. He just did it with
hatching with a pen, and there's a very
limited bit of this backplane we can also
see due to the twisting. There we go. If we wanted to, we could gently shade in
that backplane as well. The glen Fporawing
does not include hips or maybe the
torso covers the hips. I'm going to draw a
little hip box here, which comes out like this, I think. There we go. Let's shade in the top
face and the side face. Then now we can find the leg and this leg is not
bent or anything like that, so it's easy to draw. Just make sure that you
are connecting your lines to theoretical vanishing
points in the distance. See this line here
has an angle and this top line here is an
angle, that's different. That means they will appear to be existing in a perspective, a cohesive three D space. I'm modifying this
figure a little bit from the glen
drawing, by the way. Vpu has added a bit of
a calf muscle box here, which is an
interesting addition. We will go with that
on ours as well. There we go. Let's shade in
the front face, top face. The Vpu drawing
doesn't even have the other leg, but
let's put it in here. Sometimes it's nice to maybe gesture where you want it
to go somewhere like that, just the simplest
outline, sorry, not outline, the simplest indication of what's
going to be there. From there, it's not
difficult to construct a box. Again, I'm thinking
about the horizon line. Where would the horizon
line be on this figure? I think it's up here somewhere. If we were to project our eyes straight toward the figure, where would it collide?
I think it's up there. I'm just realizing I made
a perspective error. This neck is pushed too
far back on the shoulders. It's also a bit too
small, let's make it a bit bigger, bring
it down about here. Okay. There we go.
Anyway, because we are below the
horizon line here, it should be very clear to see
the top plane of that box, especially since the box is not rotated upward or anything. Let's pick some faces
in here to shade. Shading always makes the drawing look just that little
bit more graphic and appealing and maybe
even a bit more three D. And we'll get just the
lower leg coming down, say like this, ending like that, we're going to be able to
see the bottom plane of this box because of the
rotation of the box. We're not going to be able
to see the top plane. I'm going to modify
my lines here. Then the foot is that wedge
shape, that's like this. There we go. Shade in some of
our planes as we always do. I'll keep it
consistent this time. How about that? Shade
in the side planes. And of course, I didn't shade in that side plane. That's okay. I don't think I have
the perspective to draw the foot going down
because it wouldn't work. I could draw the vanishing
point in perspective grid, but I just know that the
perspective grid goes like this on this guy,
something like that. So because of the way
I've drawn this foot, this foot can't do what
it's doing in the pups. It needs to be on the ground,
that is flat on the ground, like this, and that allows the perspective grid
to line up properly. If I wanted the foot
to be doing what it's doing in the
Glen Vpu drawing, I would have had to reposition this foot to be much lower. That foot would have
to be down here. Let's just leave
this figure armless. I want to direct your
thinking that the point of this chapter is not to draw finished figures
all the time. Just start practicing
the rotation of boxes in the form of a figure because that always
helps you keep things like proportion in mind and
motion and things like that. Drawing just plain boxes
without context is good. It's a good practice, but you
should graduate to figures pretty soon and not just stay in abstract
box land forever. This is a good figure.
I can feel the pose. I could pose my own body
this way if I wanted to. I like the twisting
action going on, and I even changed the
reference a little bit, and that's always a
good thing as well. Because with reference,
there's a tendency to copy. If you can change the reference, it just means that
you're engaging in the material that much more. If you're ever in a bind as
to finding poses to draw, just search for Spider Man. He's probably the
best posed superhero that there is at least
for drawing practice. His poses are both human yet really flexible as to
create a lot of movement, and he's not overly
muscled either. He's a lean guy. Drawing Spider Man is actually
pretty good for study. This is his head box with a
little cross hair in there. Notice how on a box, the cross
hair is just go straight, unlike the egg,
which went around. The cross hair on a box just go straight
because after all, the box is flat on each side. This box is interesting.
It's pretty straight on. I can only see two planes, the top and the side there. You can maybe see this plane. I wonder if that can go there. If it is there, it's a
very foreshortened plane. Of course, the neck is hidden by the fact that the
head is tilted down. But let's get this top of the shoulders box,
which ends here. It crosses the head and neck
area and ends about here. When I say ends about here, I'm just doing this by
comparing to the original. This point appears to be the intersection point that I see in the reference itself. The wider you make this box, the more built the
figure will be. If you're drawing
the incredible hulk, you would really extend this
box out for huge shoulders. This is all a proportion
game as well, and drawing boxes will get you to draw good
proportions in time. Now, we can't really
see the arc of his back because his
front arm is covering it, but he's posed like this. I think I'll end this box here because I want to make room
for a hip box like this. That box is rotated like this, going out this way. The hips are different. The hips appear
rotated this way. When I draw this hip box, I have to make sure it is
slightly different in rotation. I let me just get
rid of this arrow. The hip box looks
more like this. I'll shade the top to
separate it from the torso. The hip box looks
more like this. It's occurring to me
that maybe I made my torso box just
a bit too long, so I'll just cut
into it like this. There we go, so I don't lose too much volume in the hip box. Let's give these guys just a bit of basic shading as we go, shading down the right
side in this case. Now, one leg is way out there and the other
leg is way over here. What's interesting
about this leg is it's quite foreshortened, meaning it's coming
toward us in space. As I always do, I'm going to
ghost out what's behind it. Let's draw a box
that goes from here. And we're just
barely able to see the top plane of that
leg as it goes up, and that leg is
quite foreshortened. What I'm going to do
is ignore the muscle. There's quite a bit
of muscle there in his hamstring area. I'm going to ignore
that and just get a foreshortened leg like this. That knee appears quite
big in comparison to that same box at the waist because that leg is
really coming forward. You'll find this a lot
with superhero art pushing that foreshortening. I've pushed it here even
further in my study of it. It's not quite this
foreshortened in the reference. Then I would say that lower
leg comes down like this. This time we're able to see a pretty clear side
and front plane. I'll do the glen Vpu thing and go out for the calf muscle, ghost out what's behind here, and the foot is just that, again, that wedge shape. Notice how the pose appears
to be filled with energy. There's a certain amount of torque and twist in this pose. Largely, that is thanks to that initial torso box we put in, but it's
actually more than that. It's the relationship
of rotation between the torso
box, the hip box. Then, of course, the dynamic
nature of this pose is really helped by this leg
being super foreshortened. Let's get the other leg here. This leg is not foreshortened. And I think we can
see the top plane of it. Kind of like this. The only reason it
looks like we can see the bottom
plane of the leg in the reference is
because a leg is not a box, it's more round. As it turns under, we're
starting to get a shadow. But if I were to
convert this to a box, I can't at the same time, see the top plane and
the bottom plane. Unless the box is twisted or
something, which this isn't. So I have to choose
one plane to see. And just based on where I think the horizon line is on this
pose, which is up here. Maybe it's a bit lower, maybe
about the shoulder level. But anyway, well enough above the leg that we're going to be able to see that top plane. Again, the horizon line stuff
is really helpful when it comes to constructing figures out of basic geometry like this. Let's shade in the
side plane here. Now, I can't see the lower
leg here in the reference. It's cut off by the frame, but it looks like it's coming
out somewhere about here. I have to keep in mind
my perspective grid for where this foot
is going to be. Because we know that this
leg is coming forward, there has to be enough
perspective room for this angle to happen. If this leg were too low and
this angle were straight, suddenly, that means
this lower leg is twice as long
as it should be. Because this leg is
further back in space, it also has to be
higher in two D space, because if this were
the horizon line, the closer you are
to the horizon line, the further back
you are in space. I'll put the leg
somewhere about here. That also probably means, by the way that this
box is too big. I'm going to shrink it and
maybe put it like that. I'll just invent this box that goes down here where you
can see a clear side plane, which I'll shade in now. Okay. You know what? That doesn't work. It looks like the leg is broken.
Let's get rid of that. This is good. I could have edited that mistake
out of this video, but I make mistakes
like that all the time, particularly when not
drawing from reference. So it's important that I
show you that as well. The bottom of this
leg would come from underneath the first
box like this, we'd see less of the front plane to match the amount we see
of the top plane there. So we'd see less of
the front plane, more of the side plane. Okay. And that foot would
fall somewhere in there, which leaves a good healthy
amount of perspective for us. By the way, one little
trick that I use a lot even my finished art is just put a little
cast shadow under the figure from foot
to foot, like this. It's not there to be a shadow as much as it is to show
the perspective, the perspective grid line
that would exist there. Then the viewer's
brain by itself fills in the horizon
line because we're just so used to seeing
things in perspective. And if we have the horizon
line and we have this line, suddenly, our brain is able to fill in a perspective grid. It's magic that way. Here, I'm just tweaking
little things about the pose. Of course, I didn't
draw any arms. Let's put those arms
in. Here's a shoulder or the deltoid, which is
part of the shoulder. And that arm comes down
and it's going to hit the ground somewhere just
behind the front foot, somewhere about here,
like heel level, this arm is extended straight, so I'll just use one box
for this all the way down. That arm is getting a bit long. I'll make sure I
end it about there. I'm differing from the reference a little bit because I've added my own foreshortening
of that leg. I've made that leg
come out pretty far farther than the reference. Now for the palm and fingers, which just like a tapered
box similar to the foot. Unfortunately, all
of my nice boxes behind this arm have to go. Because they are behind the arm. But what's good about this is
I was accountable to them, I know where they are in space, even though we can't see them. That's a truism of
drawing in general. A good artist will
know where things are that are not
visible in the frame. That just makes the drawing
or the painting or whatever the illustration more
cohesive all the way around. You feel like there's more
there that the artist knows that isn't necessarily
visible to the viewer. The viewer will feel when that's the case and we
trust your art more. Now, this back arm is
foreshortened the other way, moving away from
us, I should say. This box goes like this. Maybe I should pause
right here and say, a foreshortened box is simply a box that
it's exaggerated. The difference in size between the two ends
is exaggerated. This is a foreshortened box. It looks like it's
coming more directly toward us or directly
moving away from us. The thing to keep in
mind with foreshortening is because you're dealing
with compressed space, this box I just drew
was actually very long. If you want the
box to be shorter, you have to make sure
that you shorten it. That's why it's called
foreshortening. It's shorter depth wise, because it's coming toward
us so aggressively, every little millimeter
of depth it has represents quite a bit
of dimensional space. You just got to be
mindful that you cut it off at the correct spot, which can be done and learned
through experimentation. This arm here is foreshortened, not as much as the box I
just drew as the example. But I do have to make
sure that these lines are a bit exaggerated
in their angles. So it looks like it's
moving away from us. And we'll shade one
face as we always do. Then we'll get that forearm, which is a nice straight box. This one should be pretty easy. This box is not foreshortened. Because it's not foreshortened, it appears longer this
way than this box did this way because this box is foreshortened,
this box is not. Shade this in the hand, much like the foot is a
wedge shape like this. If you wanted to
draw a few fingers, you could imagine them as another box sitting
beneath the hand. I'll just throw a
little thumb box in here at the bottom because
it will look strange. Once again, my
head is too small. This is actually a common
problem that I have. I always make heads
too big or too small. It's rarely ever that I get
it perfect the first time. If I'm working on paper, I
have to be extra careful, especially if I'm working
in watercolor or something. But generally, once
I have the body and I do have to resize my heads. I'll throw that there and
it can go a bit down. The more down it goes, the more it looks like
that neck is really flexing and he's able to
through his dexterity, bring that head down like
a stretch or something. There we go. There's our
finished Spider Man box drawing.
9. Deconstructing Pro Character Design: A few demonstrations ago, I didn't start out
with boxes when I drew that sample
figure, the dancer. Instead, I started out
with ovals, two ovals, one for the upper torso
and one for the hips. And I'm thinking you
might be confused as to why I suddenly
switched to boxes. What's the material difference
here? Well, it's not much. The thing about these
round forms is you can draw them a bit quicker and to make them
dimensional, of course, you can very easily shoot
your cross contours down and I can even develop a twist
in this one by doing this. I can do all this
without having to figure out the planes of a box. This works because
the cross contour is a center line defining the
center of these forms. If I were now to
construct a box on these, it's pretty clear how
this box should go. This one has a
minor twist to it. It's not a twist, actually,
it's just a bend. It's bending laterally, bending
this way, not twisting. And this box here for the hips. Now, the hips can't
bend, they're static. They can rotate, but they can't bend like the top box is there. There's no spine there to bend, so it's a flat box. But the orientation of this
box goes out this way, whereas the chest is
going out that way. Whether you draw these
bean or round shapes or boxes doesn't really matter. I do recommend starting
with boxes, though, depending on what stage
you're at with your drawing because boxes have that
inherent dimension to them, and they tend to be a
bit easier to evaluate. But I'll just get rid of
these box strokes here, leaving behind just
the round forms. One thing boxes don't
really do for you is they don't really encourage the whole squash
and stretch thing. Like boxes don't
look fleshy at all. They're very mechanical. You might want to graduate
into drawings that have a little bit
more elasticity. There's that accordion principle there that we talked about. With this, we can start
seeing the effect of more of a human torso
pretty quickly here. I know where the
center lines are so I can go around
these forms here. Instead of say boxes for arms, I'll turn this box into a cylinder that goes
around like this. I'm just inventing
this, by the way, if it wasn't obvious, and I
can start finding a pose. Maybe this person is
gesturing outward like this. Now, when I draw
these cylinders, you can still think
about the box. If I'm looking at
the cylinder here. Well, there's a point there,
a point at the bottom, and all you have
to do is imagine an invisible point right there, which makes the box. A cylinder is really not
different from a box. It's an iteration of a box. It's helpful to be able
to see it both ways because some forms will
ask for box forms, and it can be fluid,
like for example, an elbow is fairly square. What you might want to do
is turn your cylinders into boxes right at
the elbow joint. Let me just get rid of
some of this extra noise here so we can be clear
about what we're doing. Yeah, you might want to
turn your cylinders into boxes right at the elbow joint or at the knee
joint, for example, is another common one so
that we can get a sense of rigidity there and maybe
even at the wrist, where those bones are
closer to the surface, and we can really see
how the blocky form of the wrist works
and that can lead into say a hand or something. Even up on this
wrist, let's find that knowing where
that box corner is, we can find some approximation
for where the hand is. Now, for the legs, we can simply construct cylinders
coming down here. Maybe this leg goes down this way to maintain the
figures balance, like we talked about
in the gesture. Here for the knee, you
might want to split this cylinder into
a box on the way down to the knee here because
knees are very boxy joints. Wherever the bones are close
to the surface of the skin, you'll tend to see
a more boxy form, something with harder edges. But then we can reconvert
it back into a cylinder really quickly and gesture
our way down this form, constructing the round
cylinder form as we go. Okay. And we'll make the foot kind of standing on the sort
of tiptoe kind of thing. And this leg, which goes
behind the other leg, it comes down here, and this foot is going to be more seen in three quarter view. I think it's a good
idea to start inventing figures during your
reference study as well, intertwined them, where
you start running into problems is where you need
to patch up your study. For example, if I'm trying
to fit the neck onto the top of this box here and if you're having
trouble with that, you don't know where
the neck goes, that just means you need to
study more from reference. Then once you do those studies, try and plug those studies into something from imagination
and then see how far you get. Even do a study from
reference and then try and draw it again
from your head, seeing what you remember
from your studies. We need a head box and maybe
the head is tilted this way. Now for the head,
I do favor a box. Because the head is
actually quite box like. I have another class called understanding and
painting the head. One of the core concepts in that class is something
I always come back to anyway is
how the head is like a box, and it truly is. Even in this quick
rough drawing, we have a figure that
is twisting in space, limbs articulating in
different directions. It's an awkward pose. I let this pose
evolve as I went. I didn't plan this
pose when I started. It's a awkward pose, but it does have
proportion direction. It's got some movement to it. I initially drew this figure
too large for the frame, and as a result, I made
the legs too short. I'm just adjusting that now. That's okay. Fixing your
mistakes is just as good, if not better than getting
it right the first time. It's not realistic to expect yourself to get it
right the first time. The more you draw, the more you'll get
in the zone and the more apt you will be to get
things right the first time. But the whole point of
study is to make mistakes, find where you're making those mistakes, and
then correct them. Then that leads to better
and better decisions being made from the outset. We could even think about how some basic clothing would
wrap around the forms like a tank top would wrap around the box slash egg form,
whatever you choose to do. And we'll just make this a skin tight tank top right
now because skin tight clothing acts like
cross contours defining the forms as they wrap around in
certain directions. If this were a belly top, it would probably wrap
around like this. And you can just
quickly shade in the clothing forms
just for clarity here. All right. This figure
construction exercise represents the next step in your three
D forms drawing journey, trying to construct a figure
from your imagination. Don't worry if the pose
is awkward like this. After all, we're not
using gesture yet. We're not combining those yet. Place your concern instead about making sure
things look connected, like they share the same
three dimensional space, they live in the
same environment and that the overall
proportions are okay, the leg doesn't appear
too thick or too thin or too wide,
things like that. Here is a fantastic
example by Glenville Pu. One thing I really
like is he constructs the torso with the box like we've done a bunch
of times already, but he combines it
with the concept of the squash and
stretch principle by anticipating the
box's squish right in here as the flesh
presses it upwards, and then he's got the
box for the hips here, rotated heavily this way. And that box comes
around and down, and then it's very faint in
the drawing a bit low res, but you can see a gesture
line connecting them. In this case, there is no twist. The two forms are still
both pointing outwards. It's just there's a heavy bend, a bend being this lateral move. A twist would be if
the torso box was oriented in a totally
different orientation than the hip box. This would be a twist, basically shoulders
and therefore upper torso pointing this way and hips pointing
that way. That's a twist. We are not dealing with that
though in this drawing. Let me just put that
up here for reference. This drawing simply has a bend. What I like about this
though is he's drawn the next stage and given you that fleshy feel
of a stomach here, a belly button, you can see how accessible
this would be to add anatomical details or clothing or muscles or
whatever the figure has that you happen
to be drawing. And also notice he's using
cylinders for the legs. He starts with a cylinder
coming down more square, and then for the inner thigh, he adds a bit of mass to it connecting it with the
cylinder going this way. My line over here
is way too far in. It needs to come out here. What I like about this
is there's a cylinder, but it's converted into
a box form for the knee. Then we have another
cylinder form that converts itself
to a box form. If I were to finish
the cylinder, it would be about there. And because the knee is bent, that means that this cylinder overlaps the upper leg
comes down like this. Let me just ghost out what's
behind as I always do. And that foot is tucked
in under the crotch area, so we have this kind thing. I love how Glenvillp has
indicated that boxy knee. It this big box form that really does a
good job of selling the rigidity of the knee joint. My knee box joint looks a bit high because I didn't include
the leg muscle there. There's a shoulder
that starts here, that arm comes down
in a cylinder. This arm is slightly bent, so we'll stop the cylinder
there at the elbow, sorry, and we'll
box off the elbow. While I'm here, I'll just
ghost this stuff out. We'll box off the elbow so we
can make clear that this is a more rigid joint there and that box comes in a little
bit as the arm bends. Then the cylinder form
continues behind the leg here. We should always
know where it ends. Remember, we should
know what's invisible. That arm needs to end somewhere about here, and if
there is a hand, it would be laying somewhere in here in line with
the buttox area. And then we can go ahead
and try and fit a neck. The neck more or less
fits into the top of the torso box in these
figure constructions, and the head is like
a box comes up. For this study, we'll be content at just leaving it as a box. It's a box that bows
outward for the face. When you put in your eye line, make sure it's in the middle of that box, the nose,
and eye line. If you want it to
be a bit fancy, you can cut in on a
three quarter view to indicate the eye
socket and cheek bone, creating this little
V pocket there. You can even shoot a little
mark halfway down from the eye socket to the chin and
that's where your nose is. We're instantly starting to
build on these structures. And did I make that head
too big? I think I did. Let's just bring this down. I have more accuracy when
I'm not talking. I swear. Now, the Glenville podran cuts off at the lower leg,
but we can put it in. We even know there is
a calf muscle there, so we can approximate a little bulge out for the calf muscle, and there is no bulge out on this side, at least
it's not as much. In fact, this side is laying flat on the floor, so
I'll use a straight. And you notice we have this
perspective grid, right? Because this perspective
is pretty tame, that is, it's not anywhere near fish eye or anything extreme like that. We can pretty safely assume that this vanishing point is
somewhere way off the page. I'm tracing these lines to a hypothetical vanishing point that is somewhere
way off the page, and that means I know
that this foot is correctly placed
somewhere around here. Okay. If you can, I do recommend
getting yourself into a life drawing classroom where there's an
actual model posing. The model could be nude or just barely clothed or
even fully clothed, maybe with some
tight clothes so you can actually draw
these body forms. But this is the thing that will really help
you get reps in. Of course, you can get
reps in drawing from other drawings and from photos like I've been doing
in this class. But I know that it's been super helpful for me over the years, whenever possible to get myself into an actual life
drawing situation. There's just
something a bit more direct visual connection
between you and these forms that's
a bit harder to simulate with drawing from
photos and other drawings. Anyway, there's our
finished study. So we've drawn a
few human figures. Let's now apply all these
techniques to a cartoon design. This being a piece
of character art from the Pixar film onward, drawn by Matt alti. Now, because this is a cartoon, which is a caricature
of normal human form. I got to make sure I'm
careful when I block in these initial gestures
and lay ins and forms, and the eyes are up high, so I'll put this cross
contour in here. I am using a bit of gesture
to initially figure this out. This is the first time
I've combined gesture in this chapter with
the three D form stuff. The body conforms to a
pretty clear C curve, the whole way down. The feet are
somewhere down here. There's a bit of
perspective, which I'll plumb line right now
between the feet. Just reminding myself that this line is the floor plane
that he's standing on. I already know I'm
drawing this too big, so I'll shrink it
down a little bit. His arm is somewhere up here
doing something like that, and the other arm is doing
something like this. Landmarking where the hands are. Now I can landmark where
I think the belt line is and the tilt of the waist,
which is pretty straight, and I'll also landmark or just preliminarily plot out
the shoulder line, which is also fairly straight. The dynamic nature
of this pose comes in the form of this
C curved chest. He's thrusting out his chest in a proud display of whatever
it is he's holding. I haven't actually
seen this movie, so I'm not sure
what he's holding. Some magic scepter.
I don't know. Let's start constructing forms. I'm not going to use boxes. I'm going to use my oval forms. You may have seen other
artists use this, what they'll tell you
is this is actually a blocking or approximation
of the rib cage. The rib cage being primarily responsible for the form
we have in our chest. The rib cage is
the largest volume we have under our skin there. What Glen ilku would
even do is he would plot where the sternum
is right about here. We saw this early on in the
gesture chapter, but here, Glenilpu would actually take
it further and plot out the shape of the rib cage itself, a general
shape, of course. The reason that's useful is, I don't really care
where the ribs are. That's not going to help
me in this drawing. But knowing where
the rib cage is as a volume tells me where the fleshy area of the stomach is versus where it meets
the harder hip bones here. I know from a character
design standpoint that I can play with a lot of squash
and stretch in this area. The belly can come out here, which it does in the design. There can be a bit
of squash here, which there also
is in the design. But for now I'll
edit those lines out because I don't want
to get ahead of myself. We have these volumes
for the hips. It's a squashed oval form, that's how I'm seeing it. Because this guy's proportions
are overall condensed, it's not regular
adult proportions, it's somewhere between a
teenager and an adult. I'm going to make the hips a bit closer to the rest of the torso. Now, my midline was blocked in with my gesture and
I do that often. I use my gesture
that initial C curve as a midline, and
that is true here. But I'm going to erase this stuff because it's
becoming unclear what this is. I want to keep this
to do with forms, not gesture and
those initial lines were gesture block ins. I want to keep this form
feeling consistent. This is where it wraps under right here for the crotch area. Okay. Perfect. At least I think
we're on the right track. Now what we can do is maybe
block in where this arm is. My gestural landmark of the hand is pretty
accurate, I think. I'll make the wrist
cylinder about there. And I'll draw that cylinder
up connecting it like this. The arm is a little bit angled, and then I will draw the
other side of the cylinder. Now, the actual character, the shape of that arm is more out like this
than it comes back in, but that's a shape thing. This chapter is not about
shape. The next chapter is. This chapter is
about three D forms. Let's keep that at the
forefront of our mind. I'll draw some cross
contours here to help me understand what the
flow of these forms is, the ellipses that we're seeing. There we go. Now the hand can just be a boxy form for now. Something like this.
I can even shade in a small plane here on
the side of the cylinder. Now, let's get the legs in. The legs are always branching
off the bottom of the hips. There's a cylinder here
and it comes down. Again, I don't care that
he's wearing shorts. I can overlay that later. Now, this cylinder
is interesting. It bulges outward at the end, usually people's
ankles taper in. This character ankles taper out. The bottom of that
cylinder is here. To drop behind that
cylinder would be like that and behind this top
cylinder would be like that. And that's actually a
little bit too broad. It probably would be a lot
narrower, something like this. Then the foot is also a squashed cylinder,
something like that. It's pretty continuous
with the ankle. Something like that. Those legs look a
little too long, I can adjust that later. Let's just get the
other leg in first. The cylinder is the
opposite of the first one, and I'll landmark or plot ahead to where I
want to go with it, lining myself up
with the two ankles, and then I'll just draw the outer contours of the
cylinder, which is easy enough. And now for the foot, we've got a cylinder and a
squashed cylinder here. That again, just like
the other foot is pretty continuous with
the rest of the leg. We've got this. I think what I'll do at this point just
to keep myself on track is just scale this
down to where I think it should go,
something in that range. Now the other arm
is behind his body, but it is very
useful to know where that shoulder would be
somewhere about here, the ellipse for that shoulder, coming down to where
the elbow bends here. There's that cylinder, now
we have a wider cylinder for the forearm coming up
like this. Look at this. Here's our chance to box
it off for the wrist, which leads into the hand, which is also quite boxy. That hand is pretty
foreshortened, it's coming right toward us. It's like this. Then what I can do
here is just again, box off the rest of the fingers. We don't need to worry
about finger articulations in this level of our
drawing journey. This is the fundamental part. When you are anywhere
in the beginner to entering the
intermediate level, your drawing should be much your drawing practice
should be much more concerned with sound fundamentals
than little details. That's true even at the
professional level. The only thing that makes
a professional difference, a professional will be able to think of this stuff
and just keep it in their mind as they
draw more finished strokes. A professional may
be able to put in details right away because they know the understructure
that they're working on top of even
if they didn't draw it. Now's the time to
notice that this arm is too far floating to the left, it's rotated up and
it's over here. Intersecting the head
a little bit more. We'll landmark where
the nose is, like this, drawing my own little
boxy form for the nose, like my own little
wedge shape there. I'm certainly not
interested in drawing the whole character's face
in all of its design. We'll get to more of
that in later chapters, but I do want to
understand where his neck is and his neck is this big cylinder that
almost connects to the jaw. It's like this. While I'm here, let's determine where the side of the box is for the head. It's like this if I
had to approximate it like a rounded squishy
box for the head. He's wearing some clothing,
and this is interesting. The clothing is a great way to wrap elastic bands
around our model. His vest wraps around
the arm like this. Because it hangs off the body, it comes back and wraps
around the rib cage, and we're looking
up at this garment. This is like an ellipse that we're seeing the
underside of there. Whenever you're
seeing the underside of something like this ellipse, it's a no brainer
to just shade it in dark to make it look like we're seeing
the underside of that. Then we go around and I know my proportions are a bit different than the design,
but again, that's okay. This vest is a bit longer
in the original drawing. It's in the right
general ballpark for this type of study. Now, this part, again, wraps around the rib cage. Let me undo that line. You
notice I didn't do this. It doesn't go down straight. That would be flat.
That would be ignoring the volume of
the rib cage you put in. It has to go around that form, and this is bothering me.
Let me just fix this. It needs to be a bit longer. What I can actually
do is go all the way around with it like this. And then I can find my
other side that way. Of course, the other
side of the vest wraps around and we can just barely see its
curvature from this angle. And he's got that
collar which folds out. This reminds me of the twisted box planes we were drawing in the previous section. It twists around like
a little bridge form. Again, just like we were
drawing, wraps under. Because it wraps under, let's
just shade this darker, just like we did with
the ellipse over here. He's got a T shirt. But
to draw that T shirt, we're going to have to
fill in some contour stuff right in this area. But we have our
forms to do that, and we know there's a bit of
squash here so we can get a little accordion effect for the squash as it feeds
down into the hips. Then what we'll do
is we'll just wrap an ellipse right around because he's thrusting
his chest out, the shirt is pushed
outward here. This is not in the drawing,
but we might be able to see just barely
underneath that ellipse. And then the stomach comes out. Then the belt line
of his shorts. The top of his shorts are
an ellipse the other way. See if I can pick a bright
green color so we can see it. Now this is right near
the horizon line. If I were to imagine a
horizon line on him, it's right in here. That's why we get
the upward ellipse on the shirt and the downward
ellipse on the belt line, although the belt line
is closer to straight because it's right near
that horizon line. The T shirt ellipse
is more angled upward because he's
thrusting his body upward. Let me just do one thing here. The legs are still a bit elongated. I just
want to bring this in. That pelvis is really, really squished in this design, the proportions
have been changed. It's much more of a squat shape. Then for the bottom
of the shorts, let's just ballpark or landmark where they're going to
end right about there. Maybe the other side
right about here. This is just an ellipse. The ellipse goes a
bit downward because we're below the horizon
line now is a bit down and we have this
pair of shorts here. I think this ellipse
actually does go up because the leg is rotated
subtly toward us. This cylinder might have the
ellipses going this way. At least that's how
I'm reading it. Then the other ellipse
for the other side of the shorts is here
and it comes up. At the crotch area,
and there we go. We've overlaid these
forms on there. Okay. So again, I know this doesn't exactly look
like a pair of shorts. This is not actually
how you draw shorts. It's the breakdown of
forms that exists that you need to keep in mind if you were to be
drawing this character. And of course, it's not just this character we're studying. We're practicing
fundamentals that can apply to any drawing. Now what I can do is find
similar ellipses for the socks, which are like this. Because of the
rotation of the legs, this informs the direction
of the ellipses. Just for fun, I'll put
in the shoe laces area. The shoe laces are interesting because they just
wrap around the form. The wrap around the
top plane of the shoe. Shoes are actually really
fun to draw for that reason. So many details of the shoe
are just things that describe the basic form of not just
these shoes of real shoes. Of course, let's not forget the thing he's holding,
whatever that thing is. One of these days, I'll get around to
watching this movie, and I'll just make it a
cylinder from there to there. We'll shade it in
just to differentiate it from the rest of the figure. He's got those cuffs
around his wrist. Obviously, the cuffs
are just a cylinder, a literal cylinder wrapping around the wrist, showing
you the dimension. Let's get a mid line down the
head, something like this. It goes up for the nose
down, and then down. What that mid line can help you with is the placement
of eyebrows. The break of the eyebrow
coincides with the temple, which is this plane we've
defined here already. That's where the break of
the eyebrow is this eyebrow here would break around the corner of the head
that we can't see. We have something
like this. I'm not going to bother with the hair, but it extends past his
head, something like that. Again, this is not the
time to draw hair. We'll get into that in
shape in Chapter three, which we're just
about to get into. Oh, and he has a short
sleeved shirt on. Let's get a cylinder
here or an ellipse, I should say, that extends past the arm and curls
up a little bit. Then that can just come
down feeding into the vest. It's useful to draw different
types of clothing in different colors
like a vest in blue and a shirt in red
and shorts in green, so you're fully
separating your forms. It's like naming your layers. It's boring and tedious, but it helps with organization. There we go. I feel like I'm
finally done this study. Now, you can see the difference
between my drawing and the actual final drawing of the original artist is that the final drawing
has stylistic flare. There's more interesting
shapes happening. There are all these little
details that really help sell this
character's identity. My drawing is simply not
concerned with any of that. I actively don't want
stylistic shapes here. I want basic forms,
and on that level, I would say that
these two drawings, save for a few
proportional differences, maybe, are very, very close. I would probably also guess that the artist who drew this, again, I'm pretty sure it was Matt alti did not actually have to
draw what I just drew. But they did have
to think about it. It's impossible to draw this well without thinking
about these forms. You just will never get a design that's this consistent
and graphically appealing and
perspectively sound without these fundamentals
being in place. All right. To end
this chapter with perhaps one final
piece of inspiration, I want to show you what mastery of three D form looks like. What you're seeing is
individual frames of rough animation on scar
by animator Andres Deja. As I scrub through
these drawings, I'm sure you can detect that box like structure of scars head. The thing I specifically
want you to look at here is how well Andreas Deja is able to rotate that box to ultimately craft an appealing performance for this character. Let me grab one still
frame, say this frame here. Then I'll grab another still frame just a bit
later, that one there. I'll bring both of these frames into photoshop to draw over. Starting with this
one, if I were to draw the box over this head. It's a curved top, let's say. Then it tracks down the nose and the other side of that top
face of the box is about here. Then we come down like this for the muzzle
and in like that. The mouth would be a
separate box shape that I'm not going to
worry about right now. We're just looking
at this top box. That's for that frame. Let's now draw the box on this frame. Again, it comes up this
way, meets the brow, tracks along the nose, and it's a very
narrow plane this time and coming down
something like this. And back up there. It's like a brick.
Less of a box. It's more like a
brick. It's a box form though Now let's
hide the drawings. We're just seeing those
boxes on a white background, and I'll just move
these out of the way. Look at the subtle
difference in rotation. It's the same volume,
the same brick, but this one is
rotated like this and this one's rotated up
a little bit, like that. Not to mention the
fact that there's a whole character drawn
on top of that box, but this is really the
level of subtlety you can achieve when you gain confidence or even mastery over this
drawing fundamental. I'm not saying you have to
be an animator to do this. But imagine drawing your
own characters, let's say, your own original characters
for a book or a concept art, the ability to discern and therefore choose between
subtle rotations like this. That's the subtlety and
character and acting and posing. That's what will make
someone really say, Wow. You know how to draw. It's this level of scrutiny
over the three D forms, being able to differentiate from this rotation versus
that rotation, and therefore, being able
to iterate your drawing accordingly to find the
best pose, let's say. Hopefully this inspires you
as much as it inspires me. With that, we will end Chapter two and move
on to Chapter three, where we'll talk about
shape and design.
10. Chapter 3 - Shape and Design: Shape is probably the most fun of the drawing
fundamentals because it's where we begin
to wrap everything together for final presentation. There are so many things
you can do with shape, so many different
ways to use it, depending on your own
aesthetics and style, really. But there are certain
principles that tend to work across
genres and styles, and we'll be focusing on
those and how you can manipulate them and use them
in your own work creatively. To show how they work,
I'll be applying them over several different
styles and examples. Let's dive in. I
imagine most of you who are watching this class have
seen my YouTube channel. That's probably how you
found me in the first place. And on my YouTube channel, I have lots of
videos about shape. So I imagine you've probably heard me talk about them before. This will be a deeper dive into shape than anything you've
seen on my YouTube channel. But as far as a
structure is concerned, I want to do something that I've never really done before, and that is, I want to compare amateur art to professional art. And before anyone wonders, this drawing on the left was drawn by one of
my best friends. He drew it when he
was a young kid. I think he was ten
or 11 years old. And he still has them,
and one day we were hanging out and he was
showing me his old artwork. And I asked him if
he would give me permission to use it
in one of my videos, specifically as an example
of things not to do. And he was more than
happy to agree. I'll keep him anonymous, although he's not even a
practicing artist today anymore, but I'd like to compare some of the shaped decisions made in this drawing with some of the shape decisions
made in this drawing. I think that will provide
a very clear checklist of things to do and to
look for in your work. This drawing, by the way,
is by Alessandro Barbuci, graphic novelist who
did the Skydll series. The similarity in the last
name is merely a coincidence. And I specifically chose one of it looks like a
convention sketch. You can see it's
signed to someone. This is clearly not a finished illustration that
appears in his books, but a quick sketch that he probably drew in a few minutes. I chose that because it'll
help bolster the idea that professionals think
a certain way as compared to a
non professional. Let's start with probably the most important thing I
ever learned about shapes, and I'm sure you've
heard this before. Keep it simple. The way you evaluate
a simple shape is, I call it the
kindergarten principle. If you gave a child
a pair of scissors, could they cut out the shape. Let's start by looking
at the leg here. I'll just trace it. This
shape, as I trace it, you can probably see
it just on the screen, but I can certainly
feel it in my hand. There is a beautiful flow to it. It's a flowing river. I'm swept along
by the current of this shape as it
flows off the pen. I was just describing
the feel of it there, but if you just look visually, there are not a whole
lot of changes. The changes happen
on a broad level. For example, it's thicker
there and thinner there. It doesn't go from thick
to thin to thick to thin. No, it's more of
a sweeping change from top to bottom,
thick to thin. Theoretical child with
a pair of scissors, it wouldn't take much
dexterity with that tool to literally cut this shape
out of a piece of paper. To me, this passes the
test of a simple shape. Now let's look at something
that fails the test. Let's take a look at the
dress area down here. Watch as I trace this shape. You see what I'm
already having to do. I have to change the
direction of my stroke ten different times to replicate the contour of the shape
of the dress there. If I bring this over, you can starkly see
the difference, right? That line I just drew there, you wouldn't call
it simple at all. And you would never give
that to a child to cut out. They wouldn't be able to do it. Geez, I wouldn't
be able to do it. There's too many undulations, and you might ask, well, what's wrong with undulations? My answer to that
would be, while they're not inherently bad, they don't help
this type of art. The arts we're here to learn. They don't help you.
They actively harm you. Because it creates
too much information for the brain to process. You see a drawing is
made of several shapes, even a simple drawing like this. Let's literally start counting them right now, we're
all on the same page. There's a shape for the arm, a shape for this
side of the chest, a shape for that
side of the chest, a shape for the top, a
shape for the stomach. There's a shape right in here, separated by these two lines. There's the shape for
the leg we looked at, the shape for the
back leg there, shape for the boot,
shape for the lower leg. Sometimes things are
broken into sub shapes. Like that whole hair
form is a big shape. But then there are all these smaller little sub shapes in it. That are all equally
contributing to the final piece. That hair might have five
or six different shapes in it while being contained
in one larger shape. There are a lot of shapes to look at in any given drawing. Keep in mind, this is a very simple drawing with
relatively few shapes in it. Imagine now how many
shapes are in this piece. This being a finished cover for one of the sky doll books. We're probably up
in the hundreds of shapes for sure,
if not thousands, when you start zooming
in and counting not only like these big shapes here that are very easy to see. And by the way, look how beautifully
simple that shape is. But no, that's just
the bigger shapes. Then you have all
the little shapes you're putting in there. For example, the shadow shape on the stomach
that goes like this, this all being part
of the shadow. This is also a shape and
look how simple it is. But again, we're just talking about numbers of shapes here. All the little details
that you put into a finished piece start
contributing shapes. Like the little wrinkles
in the clothing here. There's three shapes right
there, four, five, six. Every little wrinkle in the
clothing in this area is a little shape
that your brain is required to process
upon seeing this image, right down to this little
detail in the arm, how it's like a robotic arm. It's got this little
connection point here creating this little tiny shape that I'm coloring
in blue right now. That little shape there
requires just as much attention and oversight as the big
sword like shape here. Simply because if it's a
shape on your drawing, the viewer has to read it, and probably the easiest
thing to ignore in your art is adding shapes to
your work without oversight. Again, getting back to this, my whole thing, the thing I constantly judge
my own work on, my own shapes on is if I'm going to add all these
necessary shapes to my work, are they simple enough
for the brain to read instantly because our brain
is designed to read shapes. This is how our
vision just works. We analyze shapes really, really quickly in order to
discern what we're looking at. For example, I'm
sure you instantly recognize that as
Leonardo Dicaprio. But look how small
that picture is. Morgan Weisling a painter
I learned a lot from, called this the Yearbook
principle because the photos in our high school
year books are so tiny, yet we recognize
everybody effortlessly. What you want to do
in your art is create shapes that are
recognizable that quickly. If I were to boil it down to a simple shape like a
little square here, This is as simple as I could
possibly draw this square. 9.9 out of ten times,
that's the way to go. In general, there's
no real good reason to draw the square like this. Now, I know that there
are no rules to this. Maybe you want to
draw a square that's refracted in water and
maybe it looks like that. But I consider
specific situations like that exceptions
that prove the rule. In general, you want to find the simplest statement
for your shapes. That's a catch all way to ensure that you're
creating readable shapes. And if you're creating readable
shapes shape after shape, you're on your way to
a successful drawing. Going back to my friends
drawing on the left there. The other thing not to
do is over use symmetry. For example, the torso and waste is a very
symmetrical shape, the breast area here,
very symmetrical shapes. Look at this arm. I've heard people call this the
marshmallow Look. I've also heard it called
the sausage link effect, which I think is better. Creating too much
symmetry appears to be a natural function
of our muscles. I don't think I've
ever encountered a beginning student
who doesn't do this. Including me when
I was new to this. For some reason,
it's programmed into our brain to create
symmetrical shapes. Let's look at the barbuci
art on the right now. Let's look at that
arm shape again. I'll try and draw it here. It flows up like this in a little curve before coming to a
point at the elbow. It's actually a bit
straighter here. Here we go. Something like that
for that side. Notice the wide point
of the shape is there. The other side has
the wide point there. I will draw the other side of this arm shape. And
it goes like this. Again, the wide
point being here. Then the bottom of the
arm tucks in like this. So what we have to contend with when we're
drawing this arm, and this is true of many, many shapes you'll
draw as part of body parts or landscapes or tons of other things is shapes will have symmetrical
aspects to them. The triceps muscle in this arm is causing the
bulging to happen here. Bulging on both
sides in this case. But a little secret
about nature is nature almost never makes
symmetrical shapes. Almost never. What
nature does instead is a principle that I like
to call offset symmetry. Here you see how I identified the two wide points
of the shape. The axis of that symmetry
is not straight but tilted. It's offset symmetry. Let's go back to the leg
that we already looked at. You can see how the
two widest points of the leg which cross this
line here are offset. We can see the exact same
thing in the lower leg here. The two widest points
crossing this line. For some reason, doing
your shapes this way with offset symmetry is more
pleasing to the eye. Probably because that's how
nature generally works. Look no further
than human anatomy. You can start by looking where the widest points
of the shapes are. I hesitate to say
the word always. But most of the time, these points are off axis, not perpendicular to the shape. And notice how these diagonal
lines cross each other. Even that off axis nature
is not repeated generally. What you're more
likely to see in nature is one symmetry
going like that, the other one going
like that, et cetera. That is neighboring symmetries
generally don't repeat. Over here on the deltoid
muscle, it's like this. I guess this points to
another principle which is change is generally
good with your shapes, or maybe I should
say non repetition. Avoiding repetition is generally
good with your shapes. For example, if you
find yourself making the sausage link effect
in your shapes like this. This becomes uninteresting
very quickly, and I think it's because
since there's no change, your brain doesn't
have to engage really, and when that happens, the art that you're
making becomes forgettable because your viewer is actively not engaged in it. Notice I didn't
say the word ugly. I'm not saying
symmetrical shapes are ugly, they're just forgettable. To fix the sausage link effect, try and find ways of introducing
difference in the shape. Difference in these three
sections I just drew. But also now on the other side, how can I create the difference
I did on the top contour, but without repeating
the top contour? This bottom shape I just drew keeps you guessing much
more than the top one. And therefore, I would
argue it's more engaging. I've offset my axis
here, here, and here. In this case, this line kind
repeats with this line, but it's broken up by
that line, so it's okay. If I really wanted to be a
stickler for this stuff, which I often am, by the way, I do heavy editing of my
own shapes in my work. First of all, I might
make this opening here a bit offset itself, so it lies somewhere there and not in the
middle like it was, and then maybe it's like this. Now, this is just a
principle I'm showing you. I'm not actually trying to draw any literal thing
with these shapes. Of course, we'll get into
some drawing demos very soon, and I'll mention to you when
I'm using this principle. But because you use shapes to draw everything in your work, you'll find avenues to use
this principle all the time. If you're not mindful of it, you'll probably start
creating symmetry, especially if you're more on the beginner side of drawing. The more advanced you get, the more this muscle memory
will have been altered, and you'll almost never see a very good artist making
symmetry by default. They'll have done the work to change that inner programming. The other thing to
think about when you're drawing symmetry and shapes. If we're looking at
this lower leg again, let me just trace my way
down this side of the shape. Let me just show you over here. This is the one side of the leg. Now, I could easily move this line over to
the other side, offset the symmetry, creating that off axis look
I've been talking about. This is okay. You could do that, but shapes are generally
best not drawn like that, not made from the
same line twice. This line has a different
type of flow to it, a different type of design. And just like in gesture, I'm still thinking about C
curve S curve and straight. Those are the three types
of universal lines, the combination of which
creates what we call design. And what I'm drawing now
is more of an S curve. It's a subtle flattened S curve, whereas this front line
is a subtle C curve. So we still get the offset
symmetry going this way, the widest point meaning the
widest point on a diagonal. But the two sides of the shape, the contour is also drawn with
different types of lines. This type of thinking is so embedded in a
professional's mind. Look at this shape here, how the arm connects
to the torso. Let me just erase that. Notice how Barbucci did
not draw it like this. This is a symmetrical shape. Even though it's off
axis in symmetry, it's made from the
same line twice, just mirror images of itself, forming a tilted letter V, which is the same on both sides. But no, Barbuci didn't
do that. He drew this. One line on this
side, an S curve, and then a very
different type of line, a C curve on the other side. We still have the offset
symmetry going that way, and we have our two
different types of line. Also, the bottom point of the shape right there
is not in the middle. If we just struck a line upward, it's favored on one side. Moving over here now, we can see the exact
opposite in effect. Let's look at this area
of the skirt, I guess. The first thing to see
is that these shapes are essentially symmetrical.
They go like that. But even within
that, there's not a lot of oversight
being had here, this side of the shape goes like that and this side, like that. This to me is still
the same line twice. Human error has made
them slightly different, but they're not different
enough to be recognizable as a design choice.
It's just the opposite. They're close enough that it
just looks like an error. So a strong design choice is when your change is intentional. So going back to the
barbuci drawing, there are certain parts
of the body that are symmetrical like the
head, for example. The head is split
down the middle and it's generally symmetrical
on either side of that. But there are shape
decisions being made here that offset even that. Look at how the hair
is framing the head. There are different enough
decisions being made with how these lines go that introduce things like
offset symmetry, introduce different types
of lines on each side, and then that helps in
disguise the symmetry inside the head while still having it there because it needs to
be there for the head. It helps enhance it. While we're here, we can look at that beautiful hair shape. First of all, let's
appreciate how simple it is on a kindergarten
principal level, cutting it out with
a pair of scissors. These simple lines
made of C curves, S curves, and straights
are just so easy to read. Then you can look at
the widest points of the hair as compared to
say, where the face is, here and here, you have that diagonal crossing of
symmetry, the off axis thing. In this case, the hair isn't
really symmetrical at all. This area here is pretty
different than this area here, but yet the widest points of the shape cross on a diagonal. It's just something
you'll see time and time again in a
professional artists work. As well as in nature. Okay.
11. Adding Shapes on top of Simple Forms: So I'm a big fan of the movie Lilo and
Stitch for many reasons, but on a shape level, the design sense and
overall aesthetic in that movie really highlights a certain shape principle
that I want to show you. This is a stylistic idea, and for the purposes
of this lesson, let's just call it shape
DNA and simply put, the shapes in Lilo
and Stitch are round. Round is the DNA of the
design throughout the movie. I want to draw Lilo here. It's the bottom drawing I'm
looking at, by the way. With specific attention to how I'm employing these
shaped decisions. Even right away, as I've
just laid in the head shape, the nose and mouth,
everything is rounded. To different degrees. That's a Chris Sanders thing. Chris Sanders was the
production designer and director and overall inspiration
for Lilo and Stitch. He imbued the production
with this drawing style, his natural drawing style, really, that is just
full of round shapes. The hair has this curve here. That's an S curve I just drew. Here's a C curve. Going back to the jaw now to
refine it, here's a C curve. I remember reading the
style guide for this movie. That is notes from Chris
Sanders on how to draw like him because that was the assignment that the
animators had for this movie, The movie had to look like
Chris Sanders drew it. There's this image
that stuck in my head. Just imagine a square shape. Well, what would happen
if you stuck a straw into that square and
blue on the straw. Well the square would
puff up and inflate into a more bulbous square
like that with the straw. According to the style guide, that's how the character
should be drawn. As though there were
a straw inserted into their shapes and someone blue on the straw
inflating them up. That gets you started. But
the thing we still have to keep in mind is not
to create symmetry, repetition, which can
actually be quite difficult, especially when you only
have one type of shape. Especially with round shapes, we are at risk of creating
the sausage link effect, particularly with
Lilo's arms and legs, and we don't want to do that. I've been drawing for a few
minutes without pointing out anything specific.
Let me do that right now. Look at this shape right in
here, this wave of hair. When I draw it in red like that, it almost looks like a muscle. It's offset like this, off axis, this shape here. Is off axis like that.
The two thicknesses of those shapes are different. The thickness here is smaller
than the thickness there. This shape right in here is currently made with
two straights. Chris Sanders would refine that into being a gentle C curve, which then flows right
up into this curve, which creates an S curve, and then going up
into this S curve. Now, it's impossible
for me to draw without employing some gestures.
Let me throw that in. Where are her hands going to
landmark them about there, landmark the other
hand a bit higher. Even that gesture is offset. These principles can be
found in everything. The bottom of her body
is somewhere here. It's like a head length and a half down or maybe just
even one head length down, then her leg is out here, and this leg is
somewhere up here, landmarking where the foot is and landmarking
where that foot is. Immediately, I have the pose. That's all gesture stuff. The main thing you'll
notice now is I'm not drawing construction like
we did in Chapter two. I could do that, but I feel
like we've been over that. I'm trying to introduce
something new here. Of course, in my head, I'm very aware that there is a cylinder here for the forearm that
gets constructed like this. But this time, I'm going
to keep that in my head. Instead, what I'm
drawing is the shape. But this is probably
the right time for me to stop and explain
something important. When it comes to
interfacing form and shape. If I'm constructing
say her left leg, the leg that's outstretched
at the bottom there, I would simply draw a
cylinder that looks like this to split
that cylinder in half, this is where the knee
would be located. There's the cylinder
that we would have drawn in Chapter two. But I'm not drawing that. I'm drawing the shape
that fits over that. If you imagine this cylinder
as your foundation, the actual shape you're drawing, you can think of it
as a redesigning of the contours of the cylinder. And specifically, contours
that have more design to them, employing C curves S
curves and straights. That very closely adheres
to the basic form, but because we're
drawing shapes now, we don't have to draw
a perfect cylinder. We deviate from these things. You can think of the shape as clothing that goes on
the fundamental form. Just like clothing, it
hides what's underneath. When we walk around day to
day with our clothes on, no one can see our naked
bodies underneath, I suppose. The same is true with shape. The shape is what is on top, but it needs to imply
what's underneath. That's a good shape design. If you choose to draw
the basic forms, it's a very logical next step to simply now put the
shapes on top of them. I'm encouraging you though to imagine these forms
in your head. I'm drawing her main torso here, and it's this
interesting egg shape. Let me outline it
in red for you. The egg shape I'm talking
about goes like this. And notice how it
is not symmetrical. It's kind of a
deformed bean shape. It's an egg with some character or a bean or an egg, whatever
you want to call it. The gesture line of
the pose itself, the C curve, that helps
offset it from left to right. But you notice it's
got that offset axis. It's also wider at the bottom
than it is at the top, that all ensures
that that shape is kept as interesting as possible. Now I'm drawing the leg that's raised. Here's
what I don't want to do. I don't want to
make that contour and then repeat it here. This is not a strong
shape decision. In fact, there's even
a specific note about this in the il
stitch style guide. You can see in here
how stitches arms are drawn with the sausage effect,
those symmetrical shapes. Then look at how they
recommend drawing the shapes. You got a nice little subtle C curve almost straight there, mixed with an S curve, although the S curve has a little fluff right at the elbow. Now, that little
fluff right there is interesting because
you might think it violates my simple shapes rule by having too many
little undulations. But because that shape
is so simple otherwise, I think you can easily
support that little bit of extra literal fluff there. Back to Lo, I'm going
to erase that line. Okay I'll ghost out the bean shape of
her body underneath. I know I want to offset that and it's probably going
to be something like this. Now, in this case, it's
the same curve twice. It's still a C curve twice. I'm going to make sure
I make the choice that is the most clearly
a design choice, making them different
enough that it looks like a clear
design choice. I need to get rid of my
gestural mark because the foot is a little bit lower
than I initially planned. Just a little bit. Look at this. Even the toes are these little
cute little round shapes. Here's the accordion
principle where the leg bends and that body will
wrap right around there. I need a little bit
more width on that leg. Let's Okay. Let's get that. I could even put a little accordion
principle right in there, accordion effect, that is. And remember, Lilo is such a round character that the challenge
here is to draw it faithfully with the DNA of round shapes and still
avoid the sausage effect. Here's the other
side of her body. I don't like seeing the
gesture lines that dark, so let me just ghost
it out a little bit. If the gesture is
kept in too dark, it starts looking like it's
actually contributing to the shape design when it's
clearly not meant to do that. Let's get that leg in there that I've
already talked about. You get this nice tapered
shape at the top, and then a beautiful S
curvy rhythm coming down. We'll keep this S curve
as flowy as possible, accordion effect
because that foot is in front of the leg. And that heel is just
soft. It's round. My foot is a bit too in fact, my whole leg is just
a bit too long. You can do that
on paper as well. Just slice it up and move it and tape it
back to your page. Animators who animate on
paper do that all the time. Okay. Anyway, struggling
with this foot here, so I've sped up the
footage to fix it. Anyway, what I
don't want to lose focus on is the DNA shape, the roundness of the shapes, a certain roundness to it. Some forms more
round than others. For example, this arm
here is extremely round. Now, again, in my head, I know that there is a cylinder here that comes to an
end at the wrist here. That cylinder doesn't have any interesting shape
decisions to it. It's just a straight
ahead cylinder. My shape, however, fits
over the cylinder and adds that stylistic expression
to it. On a design level. Notice how this curve is
a nice sweeping C curve, and this curve is a smaller
almost question mark shaped S curve. They both have a
sense of roundness, so it satisfies the
Lilo and stitch production design
aesthetic. That DNA thing. They have the differences in
both contours that satisfy the general design
principle aesthetic of non repetition and
our hand is here. I'm not going to dwell
on hands in this class. Hands is one of those
areas where you can really dive down a rabbit hole and get really intricate with them. I have Tube blecturs
on hands anyway. But in general, I
don't really consider hands a part of a
beginner's drawing class. But the thing to note
when I'm drawing these hands right now is look
how round the shapes are. Every little finger is
its own little curve, and the mistake I just made on this hand as I made
them to repetitive. Let's fix that. Maybe this finger is like
this and then this finger comes down more like
that. That's way better. It looks more natural. Again, that's how
nature does it. If you just pose your
own hand or notice how someone's moving their hands when next time you
watch a movie. There is always some level of non conformity
to the fingers. Usually, it's the index finger doing something
different than the rest or sometimes it's
the pinky finger doing something
different than the rest. But you can look out for that
non repetition happening. Drawing the camera now
and even this camera is a inflated camera
from the straw. In fact, I think a camera
is what they used in the style guide to show the
inflation effect. Here we go. The lens of the camera
is just a cylinder. But an inflated cylinder. Let's make it round
two. There we go. That is a il and stitch camera. And before you know it, our
drawing is almost done. I'm going to draw this
bottom bit of her hair. When I do, I want to make sure I don't just mirror
the top of her hair. This part of her hair is
longer. This part is shorter. It's also two different
types of curves. I've got a more graceful s curve here and more of a
pointy one here, still round, but more pointy. I've actually changed
that from the drawing. The actual drawing
is probably better. They both work, but I can do a more angled s curve here and then a more
graceful one here. This is maybe a bit
closer to the drawing. Okay. Let's just shade this in dark because it's the
underside of the hair, similar to what we did with the underside of the sleeves at the end of Chapter two
with that Pixar drawing. Even these little
striations in the hair, I'm trying to keep
these lines and shapes offset and
not repetitive. And I'm realizing up here, you can see the
underside of the hair. Just like an ellipse,
that's above the horizon line so we can
see underneath the form. You can still be quite
rough with your sketches, which this one pretty much is, but still have cohesive
design choices, and certainly that is the
case with professional work. You can look at their
early works in progress and still see design
choices being made. It's just those
design choices are maybe more refined and
hashed out in the final. But in their roughs, because you can't turn off your brain as an artist when you're sketching, you still need to be actively engaged in what you're doing, even a good artists
rough sketch is going to show the primordial
thinking about design. And grappling with
those design principles and ideas specifically
in the shape. When it comes to
their form, usually, you'll see the form
implied by the shape, the shape being like the
clothing that the form wears. In fact, one of the
major watershed moments in my artistic journey was when I got to the
point where I didn't have to draw the under
construction first. And it took me about a year
to get there, by the way. There we go. There's our
finished Lilo drawing. I think it's close
enough to the original, but more so than it being faithful to the
original drawing. I hope it's an effective
communication here of this idea of the DNA shape, everything being
round in this case. Just to quickly do a bit of a critique on my own work here, I still think this leg
is too sausage like. This curve should
probably come down straighter there feeding
into the foot that way. There we go. That's a
much better avoidance of the sausage effect. And gesture wise, one of the things I failed to
capture was her head probably needs to be a little forward like she's arcing her back more to
reach this position. Her head just slightly
more even with her foot, and then just some
general cleanup after I made those shifts. And all right, let's move on
to some more shape stuff.
12. Honing in on Good Design: Okay, for the next
demonstration, I want to draw Kronk from
the Emperor's new groove. And I promise I won't stick with this Disney theme forever. But the reason I'm
choosing Kronk now is because on a shape DNA level, he is the exact
opposite of Lilo. This is the box for the head. Again, I'm modifying that box to become closer to what
the form actually is. The corner of the box would
be about here and down. In a way, I'm combining shape
and form at the same time. Now, let me introduce you to another shape principle that
I haven't talked about yet? I call this one
continuous rhythm. You can first see it here
and how the neck flows right into the shoulders on this
side and on this side. Let me just gesture, the
shoulder line is like that. Let me make sure I'm flowing
into the shoulders properly, meeting my correct landmarks. But yes, what is
continuous rhythm? Okay. Continuous rhythm is
when one form or one object, let's say, like a head or a neck flows into other objects. In this case, the neck
flowing into the shoulders. You can also think of
continuous rhythm as connecting two pieces that have to cross
through a different object. For example, we have the shoulder on the left and
the shoulder on the right. And in between those two
shoulders is the neck and head. Continuous rhythm
then is the tool that you use to track the
shoulders through the neck and head to
ensure that they are rhythmically connected
along the same curve. Again, rhythm refers
to the curves, C curves, S curve straights. Continuous rhythm is
connecting these forms along a simple and
often invisible curve. And I will point
out in this drawing where I use continuous rhythm. I'm sure there will be
other examples of it. Crunks proportions
are super weird. I'm not used to drawing
characters this exaggerated, to be honest. Let's
get a gesture. His chest sticks so far out, it's not even human anymore. He is an ultimate
caricature of a human. Now, this is where the rib cage actually comes in real handy. Where would I say the sternum
is? It's probably up here. That rib cage is just
hilarious, it's like this. My gesture again is acting
as my midline for the form. That ribcage wraps
around like this, meets the middle of the neck before it turns over
for the other side. Because the rib
cage is spherical, we can draw a line
that goes over the rib cage across
contour, an elastic band. Now, the waist is about here. I'll just landmark it and that's too far
over to the right. I'm just taking measurements
up. It's too far over. That waist needs to come
back about here to be in line with the head and therefore create balance in this pose. Then that gesture
comes down super narrow and let's just have it go out like this like
he's wearing a skirt or something and just temporarily landmark where the
feet might be. It looks maybe a little high,
they might be down here. He does have a little
type of skirt on. Let's put that there and the legs are just
somewhere in here. The arm then comes down
and I can compare where the bottom of the
hand is compared to the little skirt,
which is about here. Let's gesture down. The arm
has this diagonal feel to it. And then this arm is the same. It goes behind the rib cage and rhythmically S
curves its way out, and these two hands
are connected in a similar way that the
shoulder is similar angles. So this hand ends about there. There's my gesture. All my
landmarks are in place? Are they all correct?
I guess we'll see. Just ghosting out
the gesture now, so I can draw darker over it. Or you can draw on layers. I just forgot to do
that. And you notice even though Cronk is
just standing there, there's still gesture to
the pose. There's movement. There's a whole S curve
through his body. All right. So where to start? Well, I think I'll start getting the
contour of his chest. My rib cage was too wide, by the way, and I can see
that now, but that's okay. It's my underdrawing.
I'll correct it. And just for fun, I'll
actually get rid of it here. So I don't want to leave
anything incorrect on my page. The ribs were too far
out to the right. That shape comes
in. Now that shape is round and then that s curve reverses and makes a little
fish hook type shape. I'm leaving a hard
edge right there. Something I would never have
done on the il drawing. His pectoralis
muscles are defined with this again,
graceful C curve. But just like the ribs, there's a sharp hook here. I think that's where
that line goes. I might have to
correct it later. I'm not sure. Then I'm going to extend his
shoulder out further. Again, my rough lay and at the beginning
was slightly off. That's okay. Look at this. There's a strong hook. It's like a square, 90 degree corner there and it just
comes down straight line. Even this one has a slightly
more gentle curve to it, but it comes down
like a straight line, giving Cronk his
signature angular design. In fact, the whole movie, much
like Lilo stitches round, the emperor's new groove
is pointy and sharp, and I just love the design
sense on that movie too. Not to say that there
are no curves at all. When I draw the forearm here, this is quite curved. It's a hooked
question mark shape. The Emperor's new group
has a way of even making its curved shapes
feel sharp somehow. It could be because the
opposite side of that arm. Again, what I don't
want to do is this, that's the sausage effect. Look at what the designers did. Here's the biceps muscle, then it hooks in, comes out, but there's a sharp edge
this time coming way in, and that's still too
high. Let me undo that. This has to come down more
before going about here. It has to come down
to create that off axis offset symmetry. Then he's got the arm
thing that he's wearing, which is a very convenient way of showing the cylinder form. You notice even this top
cylinder ellipse that I'm drawing is
pointed right there. But I don't want to get
fixated on any one part. I want to draw from behind the form coming out
for that rib cage. Coming in for the waist
and now I can evaluate, is that waist thin
enough, thick enough. I've got two sides going here. Notice how the rib cage
is offset symmetry, if I'm tracing the two
widest points, Offset. It's on a diagonal. It's off axis. Here is the
little waistband that he has. Lot's pointed right there
just like this point. These are examples of shape DNA. Repeated rhythmic themes. A good character
design will hone in on repeated
sensibilities of shapes. Sensibilities is the key word. It won't repeat
shapes literally, but the sensibility
behind the shapes, the way the shapes
are approached. That's what's repeated. Going to rough in where this
pattern is on his tank top. Form wise make sure
this is connected. This is another
continuous rhythm thing. I'm using these rhythmic lines going over the form to make sure that the pattern on his
tank top feels continuous. Then it wraps around here. Describing that rib
cage form as it does. There that works. Let's continue
drawing down the torso. Here's another
continuous rhythm thing. If you just follow
my cursor here, the ribs go down to the stomach, right through the hips,
right into the skirt, connecting multiple things
with one continuous rhythm. Over here, I can start
with continuous rhythm. Then I can put in just
this little offset, this little hook that overlaps. This is just the designers being a little clever
and saying, Hey, I did a fully continuous rhythm there, let's not do it there. It's all in the name of
change and difference. Here's a nice little handy
cylinder for the waist. Handy because it
describes the form a nice little handy cylinder
for the bottom of the skirt, which I already described. We'll just block in a
tiny shape for his hands, which are super tiny in
the movie and rhythmically tracking from that forearm thing he has on to the other side. I know where this goes. It's somewhere here. Make
sure you get that pointy top. Then out from behind the
ribs here comes the muscle, the biceps muscle,
comes to a point, just like this point, mirrored. Again, offset, let's keep
that rhythm in check, and we go way in here
for this hooked C curve, and this one on the outside
is more graceful and smooth. We have that nice
cylinder at the bottom, helping us describe the form, and this hand is
something like this. It's drawn the same
way as the other hand. All right. From here, let's just figure
out how the legs go. Much like the forearms, there's this really interesting hook
inwards coming to a point, which then tapers down in a more graceful S
curve to the feet. Look at these simple
cut outable shapes. They totally pass my
kindergarten test. I love how the knee is drawn. It's a half square, which is a nod to the shape language of the larger design. Because he's got the
cylindrical socks on, it's a great way to understand
where that ellipse is. Let's go around the
back of that ellipse, just to make sure we fully
understand the form there. We're beneath the horizon line here so we can see the
top of that ellipse. Leg comes in and because
of offset symmetry, I know that that shallow
point needs to be about here. It's off axis, and then we can
come in to meet the ankle. That ankle is just
ridiculously thin. That rhythm is continuous
into the foot, which I'll just
ballpark right in here. Now, my gesture is off on the other foot, so
I'll get rid of it. The other foot is
more like here. I'm just looking at the
negative space between his two feet, something
more like that. The leg needs to
come out from behind the skirt or from under
the skirt right in here. A big hook here. These
two points are hooks. Notice they're offset.
They're on the diagonal. I'll tell you that diagonal
is a secret of drawing, the secret of design anyway. Here's the knee also
slightly offset. I know it's the perspective, the three quarter perspective that helps motivate
these offsets, but even in a front view, you'll find offsets
in the design. Anyway, I'm drawing that
more graceful S curve that leads into the ankle. I want to know where that leg is that's invisible
behind the form here because there's
this little bit of negative space right in
there, that's important. And then that goes behind the form again, so
it's invisible, but it comes down in this
quick fast moving C curve. I say fast moving
because C curves, especially, but S curves to remind me of
going down a slide. Like a rhythm is going down
a water slide or something. Sometimes you can think of
evaluating rhythms that way. If this were a slide, would I be going quickly down this slide or is
it a clunky slide? The goal is to aim for
smooth slides, I guess. I do often try to convert visual stimulus into
physical sensations, because I find that if I can physically feel
what I'm drawing, gesture wise or form wise, it's just another really helpful
way to evaluate my work. Art is about feel
after all. All right. He's got this little tie here
in the middle of his skirt. The only thing that's
important here is to just make sure you're
tracking that midline. Midline of the skirt is here. That becomes the
midline of this tie. One side is on that side, one side is on that side, and it goes below the skirt, and we just have this little curve that connects the bottom
of it like that. Then there's the lines here on the inside, shows
a bit of detail. For the last thing, he's
got a little C curve hat. A nice little C curve
thing at the top. His hair is also C curves, but make sure you
don't repeat yourself, don't repeat the same
size of C curve. Try not to repeat the
same curvature, either. Even these lines
here for the hair, try not to repeat them. I can just draw this
little hook shape for the cheekbone
and eye socket, and that helps me find the other side of the
hair, which is over here. There's a bit of a two straights and a C curve. There we go. Just for fun, I'll
shade this in. Always nice to graphically
separate hair like that. A little hook shape
for the nose, and that is Cronk from
the Emperor's new groove. I guess the thing I want to
point out before we go to the next demo is that this is how you study from reference as opposed to just
copying reference. What we've done
here is understand the drawing from the inside out. We've used all our
fundamentals, which is, I think the first time
we've done that so far. We started with gesture, we added in forms. We combined form and gesture, which is something I often do. They do naturally fit together, and then we wrapped up the
whole thing with shape. But we're not done
with shapes yet. Let's keep going.
13. Working with Dynamic Poses: Okay. In this
section, I'd like to contrast doing a
simpler design with doing a more complex design and ultimately show you how
they're the same thing. And I promise in
the next drawing, I'll get away from
the Disney stuff. But Mickey Mouse is actually such a great example of
simple effective design. He's easy to deconstruct. He's basically just
made of curves, which also speaks to
a shape DNA thing. Mickey Mouse and the
whole Mickey gang are really only made of curves. And if any parents out
there are watching this, you might have
identified that, yes, that photo is taken
off of a diaper box. All right. So I do want to focus on building up to shapes, not just going straight
in with shapes. I'll demonstrate more
of that approach a little later in the class, but this will be Mickey's face. Here's the nose
line going around the head and the eye line
is somewhere up here. His nose is an oval. Then it's a good thing we
have this mid line for the nose because I can use
that to find his little, I guess, I'll call
it a hair line. Now, I just want
to block this in. I don't want to get too
mired in detail already. But I do just want to block
this in to make sure I have my circular shape down
accurately for the head. I'm also using the eye
line here to make sure that let's call them side burns, even though they're not
that, just to make sure I'm tracking the side burn
shape around the ball. This is an underdrawing.
I'm using gesture and form. What I just did
there was more to do with form, Chapter two stuff. Now here we go back to
gesture. Watch this. Big C curve for the body. Let's immediately landmark
where the hip line is. It's probably even a
bit higher than that. If we're looking
at head lengths, that hip line is
probably up here more. I'll get rid of that one,
so it doesn't distract me. Now, Mickey's arms has a beautiful continuous
rhythm to it. It's this flowy S curve
thing that goes like this. The rhythm helps track the
arms through the head. The thing that
continuous rhythm does, which I believe I've
mentioned already, but it's worth saying
again because it's so important to drawing is it makes these forms so easy to track for the viewer who is just seeing the drawing
for the first time. Continuous rhythm like this makes it possible
for the viewer to read something essentially
instantaneously. Even use a thicker gesture line here for his arms
because after all, they are just tubular
forms anyway. Mickey Mouse, especially is a
character so simple that it has to read instantly for
your drawing to be a success, which is itself a very
challenging thing, especially if you're a beginner. The arm is there. Let's now
landmark where the knee is, which I'm going to
say is about there, and it has a C curve like that, and a straight coming
down this whole thing like this is a C curve. It's like that. It doesn't feel straight or edgy, it's curvy. Then even this, the legs are
hidden between the pants, but I'm going to draw
a continuous rhythm down to find the
other leg like this. Let's come down for the shoe, which I'm landmarking the bottom of where the shoe
hits the floor. Now this other shoe is
of course in the air. I'll landmark where I think the bottom of that shoe
is somewhere here. That shoe actually has
some difficult form on it. It's a folded and
bent box in space. We'll deal with that
when we get there. But right now,
we're still mostly operating in gesture land. Let's ballpark in the ears, which are ovals, and they should be
roughly the same size. Let's make sure we
get that in there. Now the eyes are ellipses which lie on either side of the
center line, of course, There's not a whole lot of
perspective to those eyes, or I should say they're drawn in the same perspective because we're seeing this head
almost straight on. In the next drawing,
the more difficult one, we'll deal with eyes that are
more offset in perspective. Then let's ballpark
where those smile lines are in comparison to the nose. They're about halfway up the
nose horizontally like this. I'll put the other
one about here. I'm noticing that these align
with that side turn line. So let's block that in. The underdrawing, the
gesture and the form, the more accurate you can be with that with your
placement of things, you don't have to be accurate at all with the final shapes. In fact, you're not supposed
to draw final shapes. That's the whole
point. Gesture and form are different
compartments of drawing. You're not tied to
the finished shapes. But the closer you can get
placement wise, the better. Mouth is interesting.
Notice the mouth is not just like that
down the middle. It has an offset to it. There's a diagonal where
the widest points are. It's offset symmetry. It's kind of more like this. I'll just ballpark it
in, drawing lightly. And then when we get
to the final shapes, we'll be able to
fully put Mickey on model because his head
is not a perfect circle. There's a chin, the
cheeks kind of squish, but those are shape
considerations. So far, this is a Chapter
one and two block in. Okay. Let's look at
Mickey's right hand. Gesturally it is a continuation of the arm. It's like this. It's probably useful
to ballpark where the fingers would shoot out
from, probably about there. I'll just make this
a whole circular form because it's
accurate to the hand. Just block that in. Then on the other side, it's
the same type of thing. It's an offshoot of the arm. Then let's block in this curve where the fingers
would shoot out from. The base of the
fingers and the tips of the fingers form curves. If you've seen my
YouTube video in hands, you know I call this
the WiFi principle. So we can actually block
out or landmark as part of our gesture where those
WiFi curves might be. You can even gesture
out individual fingers if you wanted to, like this. Maybe on this side,
it's like that. Again, even the fingers
are curving with Mickey. The thumb would be
somewhere there and this thumb
somewhere out there. Okay. Probably useful
to flip back into form mode and
identify that there's an ellipse here or
the tip of a cylinder for the shorts and that
cylinder flows in, and that cylinder attaches itself to the bigger
form of the shorts. What I might do here is
start finding those shorts. Now, the shorts themselves
are like a bigger cylinder, go like this, this cylinder has a continuous rhythm
in with the shorts. And then there's
that other pant leg, which is its own cylinder that comes out from
the shores like that. This cylinder is interesting. Finally, it breaks the
continuous rhythm. Rhythmically, if we're
tracking down from the body, this is all unbroken here
and then boom it breaks. Think of it like a water slide. A sharp jut out like that would never be approved.
Engineering wise. The other side is
pretty continuous, especially if you
look at the leg, and I'll emphasize this
with the final shapes, but the body comes down, meets
the leg and continues up. That is one unbroken curve. Now, the cylinder for the
pants interrupts that. This part right here,
interrupts the rhythm, but the rhythm underneath
is still evident. Again, I'll make sure I
highlight those things for you when I draw the finished shapes, which is going to start
happening right now. For this occasion, it might
be worth using a layer. All this was drawn on one layer. What I'm going to do here, I'll just bring my layers
window in to show you, I'll make a new layer and
I'll fill that with white. Of course, everything goes away, but I can just
reduce the opacity. It puts a piece of tracing paper over it.
That's the effect. Then I'll make another layer
over that to draw with. I'll draw on this top layer. This is my tracing paper layer, which I'll lock off so I don't
accidentally draw on that. Then here's my
underdrawing below. I'll draw on the top layer now. Now what I'm drawing are
the actual final shapes. The top of his head in the lay in was pretty accurate, I think, so I'm more or less
just tracing right now, but that will end soon. The eyes are a bit longer
than what I had and that nose is a bit further
down and a bit wider. But underdrawing
wise, they are in the right place already,
so that really helps. And then the eyes are
broken actually with this little piece of cylinder
that defines the muzzle. After all, he is a mouse and he has a little
muzzle there. I'll just quickly shade
the eyes and nose dark, which is an obvious thing
to do for this character. Then a lot of our underdrawing
was pretty accurate here, so we can trace
where we were for the mouth, going around here. Let just make sure these curves now because these are
the final shapes. Let's just make sure
they are nice and smooth like that water slide is definitely not going
to jostle anybody. Now, I think from here, I'll
draw the top of his head, which I had pretty
accurate in my rough in. I'll repeat that. But then the cheeks have more squish
to them. I'll push this up. This shows the flesh
of the cheek raising, which real humans
do when they smile. If you think of a
circle like this, well, what we're doing is
we're transferring the volume of that
circle to be at the top. The most part of that sphere is going
to now be at the top, and then it tapers
thinner at the bottom, which means that it's
squished up top, so the bottom stretches a
little bit more as it comes in. Then that will have a continuous rhythm on the other
side of the head. We find the other side
of the cheek here, same thing, it's
got to squish up. Well, it's almost like
a question mark shape. It's like I'm drawing a
sideways question mark. Whatever helps you imagine
the shape you're drawing? It looks like a
question mark or it looks like a bird's
beak or something. Whatever you can identify simple things like
that for your shapes, something that can
actually help. It looks like I've squished
Mickey's head vertically. I'm just going to
take this whole area, just resize it up a little bit. Now let's get in the mouth, which again is more
or less a traceback of what I've already
drawn. Okay. Although I think
the mouth actually does come down a bit more. The mouth is open wider, which allows me to draw the chin breaking the continuous
rhythm shape of the cheeks. Now that cheek shape can go intersect with the
chin like that. Okay. For the next
30 seconds or so, I've sped up the video to
eight times its speed, which will help you see all
the little changes I make. When you watch in real time,
it's hard to keep stock of all the little changes because they're
happening so slowly. But when you see it
sped up like this, look at all these tiny
little tweaks that are influencing how
the drawing looks. It's not really
proportions I'm editing, it's the cleanliness
of the shape. In other words, how well do these shapes pass my
kindergarten rule? In this case, if you look at the dark shapes versus
the light shapes. Notice how I've smoothed
everything out. That theoretical water slide is very kid friendly. Okay, great. What I like to do
is progress from one connected piece of
the drawing to the other. The head is connected
to the arms or it's connected to the body. I can start with whatever one suits my fancy at the moment. I think the body is the
most critical juncture here. I will get going here. This is the final shape
and already I'll undo that because I think
I want to start a little further up
the head like this. I know through my
gesture that this has a continuous rhythm right
down to the shorts, so I'll draw this curve. Trying to get it as
smooth as I can, right up to get go here,
because after all, I've prepared my
drawing for this curve. Then the other side of the
body is also see curved, but this C curve
is steeper because it needs to flow with the leg like I've
already pointed out. It's a steeper curve. It's a faster water slide. Now, in all the editing
I did of Mickey's head, my arm gesture is now too low. It needs to be up
higher up here. Let's put that in because this is also connected with the head. You notice how that
arm has a taper, meaning it's a bit thinner right here where
I'm drawing now, and then it's a bit thicker
here where the shape ends, and my wrist was way too far out on the gesture, an
embarrassing amount. But hey, that's okay. The
whole point is to fix it. I guess the bigger
point is what appears very simple can be
actually quite complex. It is common for gestures to be a little over zealous
proportionally because you're not working
with finished contours that can impose a bit of a limit on how well you're
able to gauge things. I actually have drawn McKimo
professionally for Disney, but it's been several years
with different characters, you have to get into
their proportions. I'm much more familiar with
regular human proportions. I think the arms
just subconsciously went too far in that direction. Now, to draw the arm
on the other side, you notice how I'm
rehearsing the stroke, getting that continuous
rhythm through the head, so I know where that arm comes out. Comes
out right there. The continuous rhythm is like an S curve like that,
shooting through the head. And same with the
bottom contour, it needs to be continuous
with the other arm. Then that rhythm is like a C curve that
goes up like this. I misjudged my initial gesture. I gave it an S curve.
But if I'm looking at the actual drawing here,
it's more of a C curve. But again, this arm tapers from narrow near the head to
wide near the wrist. Let's taper that shape. Tapering shapes is one easy way, probably the easiest way to
make a shape interesting. For example, if you have a shape in your drawing,
that's just like this. Well, there's nothing inherently
interesting about that. It is clean and that's good. But consider instead just
tapering it out a bit. You have a bit of difference as that shape moves from one
end of it to the next. And then make sure
it's equally clean. I'll just clean up my
lines a little bit. Now, there are no
hard and fast rules to shape, but in general, a tapered shape applied at scale across the entire
drawing will be more appealing than a bunch
of shapes that do not change that are static like
the shape here on the left. So while I'm not saying never draw a shape that
doesn't have a taper, I am saying keep in mind that too many shapes that are in the same on all
sides and from top to bottom and side
to side are prone to causing problems with monotony and boredom
in your work. Okay, so the arms are obviously met with cylinders at the end, and I'm just blocking
in the cylinder that leads us into the
hand on either side. And I think I'll leave
that alone for now. I don't want to get miired
in hands at the moment. I will go back to the
body though and block in the cylinder
for the belt line. It's a nice cylinder. The ellipse looks like this. If I were to ghost
it in at the back, it's always helpful to
think how these forms wrap around and therefore describe the larger form that
you're drawing. Let's shoot a center
line down his torso. It's like this. It's
subtly sophisticated. The form is twisting. Up here at the top, the mid
line would meet his neck, which is not visible, but the
neck would be about there. And then that midline
goes like this, veers to the right as it tracks down the middle
of a shorts like that. A quick diagram would
look like this. The torso box turned in a different orientation
than the hip box. As a result, you get a midline shown in red there that has to veer from the left to the right as it
navigates both boxes. That midline has
also helped me draw the two buttons on the
shorts, one on either side. Then now maybe we can find
the bottom of the shorts, which were a bit too
low in my gesture. I think they are
more about here. Tweaking proportions a bit. Here is a great opportunity for an accordion effect as
that cylinder comes out from behind the shorts
to form the pant leg. You notice how that cylinder I'm drawing is a bit tapered. It's got a bell bottom flare to it, slightly asymmetrical. I do like to draw
things in pairs. Let's now tackle the opposing
cylinder for the pant leg. It is more circular,
it's like this, and then it comes into the shorts with another
great opportunity for the accordion effect to show how this cylinder is popping
out in front of the shorts. The shorts come out
from behind it. Form in front is what gets the accordion
line, by the way. Then we can make sure we nail
this continuous rhythm from the bottom of that
cylinder right into the main body
of the shorts. Going to shade the inside of
the shorts a bit darker for clarity and then start drawing the leg coming
out from inside it. This leg like the arms will also taper wider at the bottom, so the ankle is
wider than the knee, like what we saw on Lilo. It's the inverse of
what a human is. A human is wider at the hips and the knee
than at the ankles. It is a common cartoony
thing to reverse that. Again, it's done to expert effect in the characters
in Lilo and stitch. Then let's get this leg coming
out from the shorts here. Bends with a pretty sharp
C curve on both legs. But again, let's make
sure that we are wider at the bottom,
just a little bit. In the original drawing, I'd actually say it's
widest at the knee, but I'll edit that
here just for fun. While we're here, let's
make sure that this rhythm tracks like it's a clean curve
to connect the two legs. I'll undo that because it
messes up our drawing, but subliminally, I want to make sure that
that rhythm is there. In other words, it's
embedded in the drawing. And Mickey Mouse has
a tail, of course. The tail is just an extension
of the midline of the body, and it is a nice
graceful S curve that sweeps around like that. Let's just rough
it in like this. It's pretty clear to
see that shape wise the feet are way wider at the bottom than
they are at the top. Let's get this general
shape working. It's like a squished bean shape, which is so common with
animated characters. We saw the squished
bean in Lilos torso, We can see it here
in Mickey's feet. It's a simplified shape
that just works so well because it's a squished
bean, so it's offset. We're using offset
symmetry here. It's narrower here, wider there. It's got all the basic
ingredients for interest. Anyway, here is a
little sub form for the instep of the shoe with
its own little cylinder here, but a cylinder that is wider at the bottom than it
is at the ankle. Then from here,
we'll just make sure we maximize the
design of the shape, making sure it's nice and
smooth all the way around, making sure that the continuous rhythm tracks from the top of the shoe through the leg
to the bottom of the shoe. What we could do here to
make the shoe feel like it's holding some weight is
make the bottom straight. Now that's not in the reference. The reference is just a
curve all the way around. But if you add a straight there and recall the
gesture chapter, a straight helps
make things look like they're carrying
some weight. If Mickey's foot is
contacting the ground, let's give it a bit of a
straight there to show that it's gravitationally meeting some
force with the ground there. Then there's just this
little design flare, little line right here. The point of that line is to show the shoe bending like that. If I were to draw
a cross contour, it would look like
that around the shoe. And it looks like I've made this whole leg
slash shoe too big, so let's just resize it. Now, this side has
the more complex shoe that I alluded to earlier. Let's try and figure this out. We ballpark the top of
the shoe as being here, and I think that's accurate, and the bottom of the
shoe is right there. The first thing I'll do
is make sure that we have a nice smooth line here at
the back or the bottom. Something like that.
Then I'll try and immediately figure out
how this box is twisted. Let me just get rid of this line here because it's
distracting now. Here's the incorrect
way to box this off. If we drew the front
plane like that and the bottom plane like that
and the side plane like that, that's not what's
happening here. That is more of a untwisted box. If I were to draw a mid line on this box is pretty
straightforward. But Mickey Shoe is not doing
that in the reference. It's more bent. On a
Chapter two form level, the box actually
goes more like this. It comes down like this. This side coming fully
down and the back of the box comes up like that. That is what the shoe is doing. It's deceptively complex. If I were to draw a midline
on this plane here, the mid line would
be about there. I could find that
using my x rule, but visually, I just
know it's there. I've done this a lot. I know it's there, but you can use the
x rule if it helps, and then that shoots
down the form like that. Then it disappears
under the shoe. We can put in this
little bottom line, which also wraps
around the form. And his shoe is not a
box, it's more rounded. I'm going to erase that
line to redraw it. Obviously, the sole of
his shoe is nice and curved in keeping with
Mickey Mouse design. It's more like that, and
I'll just edit this shape. It's like a tear drop
almost and get rid of these boxes to show it's more bubbly like form
coming out the other side. You could put a accordion effect right there
if you wanted. It's not in the reference,
but you could put one there to show the overlap. Then all we need is this
little cylinder thing, the top of the shoe, which
Mickey's leg fits into. Then we'll just edit the shape. It moves out a little
bit like this. Need a little more
volume at the bottom. The shoe was just looking
a little too thin there, there wasn't enough room
for the heel to sit there. I save the hands
for last on purpose because they are the most
intricate part of the drawing. The first thing
I'll do is just get this overall circular base
shape, the shape of the palm. It's simplified into
a circle, again, characteristic of any
Mickey Mouse thing, but it's an offset circle. It's thinner here
and thicker here. Then coming off the same rhythm, we can just find our little
palm muscle right there. So I'm tracing the same
rhythm of the hand. You can see my mouse
moving, my stylus. Mickey Mouse hands are all
about continuous rhythm. I can come down the side
here and find the thumb. Making sure it's as bulbous
and round as possible. Then I can come up the
side and find that rhythm continuing off the side of the
palm for the first finger, stopping it at my nice
rhythmic circular line here, and then finding the rhythm
for the second finger. Splaying them out, stopping
at the curve of the palm, and then find the pinky here. Again, using the idea of continuous rhythm
to build this hand. I'm not sure why there's
a.in the middle of the hand. Pretty sure Mickey
Mouse does not have a.in the
middle of his hand. What I can do is be
accountable to the midline. Here's a midline down
the form of the palm. Notice that that
midline lines up nicely with the middle finger,
which of course it should. Mid lines are a great
way to check alignment. I'm speeding up the
footage once more, starting with this little
tweak of the body. It was a little too thin in my drawing, just
making that repair. Then from here, we'll
go straight into the drawing of his right hand. Using all the same principles
we did on the left hand, it's the same hand twice, just mirror image of itself. I guess while we're
at the tail end of this drawing,
no pun intended, I just want to remind
you that the shapes become much easier when you
have that underdrawing, those Chapter one and two
fundamentals in place. B they physically drawn like I did here or just existing in your imagination because they dictate where the shapes go. And if you know where the
shapes more or less go, you can then focus on the
design of your shapes, making interesting shapes, which is what this
chapter has been about. If you don't know
where the shapes go, then having the double
task of figuring out the location of things and
coming up with a design, that is possible, but
it's an advanced task. You'll get there. It took me about two years to get there, but it's one of those stages of development that
really should not be rushed because that will likely cause a
plummet in quality. So I highly recommend, no matter what you're drawing, even if it's something
simpler than Mickey Mouse, get the structure in first, including gesture and then
building up to volumes and three D forms and then lay
the shapes on top of that. So here's our finished
Mickey Mouse drawing. Let's now go through
this same process on what appears to be a
more complex subject. This certainly doesn't appear as friendly at first,
especially the pose. But let's go through it to see how similar it is to
the Mickey drawing. Obviously, the
fundamentals never change. That's even taking into
account that this is a CGI rendering, not a drawing. But because this was
done by an animator, an animator being someone who specializes in clear posing, the tools and principles
used to create this pose is really no different than anything
we've looked at. Let's get a quick
gesture going here. We are looking way
up at that head. In fact, this entire character
is above the horizon line. I'm going to be very generous
with my ellipse up there, the nose line being
somewhere over here. So we immediately get the sense that he is looking this way. You notice I threw
in that little hook here for the jaw line,
which I like to do. Anytime a head is in three
quarter view or side view. It just helps communicate that perspective,
just a bit more. If you want to indicate
where the nose is, just do a little
dashed line like this, and I'll give you an even
further perspective hint there. Okay. So because we're getting a little more advanced
with our application, I'm going to continue
to plug in gesture here just like I did with the drawing of Cronk in the last section. But this drawing is
harder, I would say, mostly because
we're dealing with a pose that's in motion. So to find the shoulders, I'm looking at where the nose is in relation to
where the shoulder is. It's about here. I'm going to get that in and that raised shoulder really creates a lot of
tension in the body, and then I'll use that shoulder, which I'm pretty certain
about its placement to draw a continuous
rhythm line down here, the shoulders being
connected here by a C curve rhythm and find where it might come out of the head on
the other side. Already, you should
be feeling this pose, even though it's just a head and shoulders that I've drawn. Sitting here, drawing
it physically myself, I can feel this pose
in my own shoulders, the trapezius muscle required to raise the shoulders
in this position. I'll do something
I haven't done yet and use a different
color for the gesture. Now, I could gesture
down the back like this. What is the spine doing? The spine is doing
something like this, or I could gesture
down the front. The front is doing
a C curve going the other way and then a
straight going that way. I think for this one,
I'll favor the front. Remember back in the
gesture chapter, I talked about looking at the rhythms on either
side of the body. In this case, I can
evaluate the gesture of the chest area and stomach leading down
to the pelvis region, or I can explore
the backs gesture, which really is the spine, the spine being a very
dexterous part of our body, and you don't have to just
choose one side to gesture. Feel free to do both. Chances are you'll increase the amount of rhythms
you'll find coming off of either side
that you may not have found by just doing one
side of the gesture. All right, so I'm going to find and landmark the sternum here, and that allows me to
start building a rib cage. The ribs coming down from
the sternum a little bit. I actually don't really
know exactly how much, but it's something in this range to make this rib cage egg shape. Now, that rib cage is
not necessarily gesture. That's part of the
form. But because gesture and form are part
of the underdrawing, I'm using the same red
color because to me, they represent the same type
of preliminary planning. Shape is a fundamental too. But again, the shape
is the clothing that the drawing wears, right? So the shape is the thing
the audience actually sees. I'll draw that in black
when I get there. Okay, so we got this shoulder
line going like this, and the hips do oppose
it by going like this. This opposition is not only
a classic Spider Man thing, but also just a
regular human thing. Our shoulders and hips oppose
each other all the time. It's part of what allows
us to move the way we do. Even when we're standing still, you can see an opposition
a lot of the time. It truly is one of the
secrets of realistic posing. Continuous rhythm,
I'm going to gesture down the right side of the body here and just find this curve that takes me all
the way from the shoulder, down through the torso,
down through the hips, all the way out to the leg. It's this beautiful
graceful S curve, and then that S curve even bends back inwards to the foot, which is somewhere in
line here with the head. Somewhere over here.
My proportions are already looking
a little too long. I might want to just
move it up a bit. If this were drawn on paper, I would simply erase
it and redraw it. Of course, digital is a bit
more forgiving than that. Then compared to the sternum, I want to know where
that top knee is. It's just above the sternum. If I draw a plumb line
from the sternum out here, which I can just do
with my own mind's eye, I don't actually
have to draw it. I'm imagining it now. The knee is somewhere up here. Now, one side of the leg is relatively straight,
but look at this side. It's a beautiful C
curve sweeping rhythm which continuously moves
right into the foot. This is what helps
give Spider Man his dynamic nature to his poses. Everything is sweeping
and swooping and water sliding along the
water slide thing being a reference to a
previous demo where I equated rhythm to the feeling of going down a water slide. If I were to draw a
gesture for his arm, it's kind of like a C curve and his hand is
somewhere over here, then to find the other hand, I'll just kind of plumb line. It's a slight diagonal,
looking at the reference, a slight diagonal to
find the other hand, which is over here somewhere. That may or may not be a bit
too far away from the body, but we'll see when we get there. Right now, this is a good starting point for
where that hand is. Things are pretty much figured
out on a gesture level. But one thing I still
have yet to figure out is the relationship between
the rib cage and the torso. I've got this line
here for the torso, but I want to draw it
as a form as well, getting this bean shape here. Now, I'll ghost out some of my gesture line because
this will allow me to progress into cross
contouring over the form. Then now that I have
this form for the hips, I can go over that form. And maybe find the
bottom of it like this. Notice that that bottom
line opposes the top line. This is both a
form consideration and now a newly found
rhythmic consideration. Now I can start constructing cylinders which go
right over the gesture, this being the base of the leg, and I'm very conscious of the
curvature of the ellipse. I'm just relying on
the fundamentals that I talked about in Chapter two to determine which way this ellipse bends behind this ellipse
would look like that. Now, the knee is
somewhere out here. I was a little too
far with my gesture, but I can correct that
now and just get rid of the gesture where I
know it's wrong Now, the knee is kind of to
the right of my eyes, so it's ellipse bends
out the other way, but it's pretty close
to my eye line, so it's kind of straight. It's not bent as much
as the other ellipse. Now, that cylinder
is tapered because the knee is narrower than
the connection at the hips, so that cylinder
kind goes like this. And then later on, I'll build
the shape on top of that. The lower leg has a
cylinder up here. And a very thin cylinder down here and we have that cylinder
doing something like this. Same thing for the lower leg
on the left or his right. I can see that the ankle
ends just below the hips. It's about there and that
cylinder really tapers. Notice how when I
draw the cylinder, I'm observing the gesture. I'm allowing that cylinder
to bend with the gesture. Then that foot goes wider
into a form like this. The other foot, of course, being blocked by that foreground foot. From here, I can more truly find the middle of the
arm. It's about there. We'll gesture this in. This wrist has to come
back a little bit. I'll mark it about there and then gesture my way up to it, the hand is somewhere
up here now. Last thing on gestural rhythms. I just want to make
sure that the back finds a continuous rhythm
here with the leg. You see that, how it goes
behind the whole form and then can be swept out at
the bottom of the leg there. Just to be clear, that rhythm is not always there
in every pose. It's there in this pose, helping this
particular arrangement of forms with this
particular perspective, be aligned and make
sense and flow. That's true of any
rhythm, really. None of them are universal. They are just things you train
your eye to look out for. Okay. So with that, we can now move on to laying
in some shapes. I want to bring in the
reference here to talk about yet another important
shape principle. And if you've studied art
for any amount of time, I bet you've heard the
term negative space. And just very quickly,
positive space is the area inside
the silhouette. So this is all positive space, and then the opposite of
that is negative space. So in this case, the areas where we can see
through to the sky. This area I'm coloring here, this is all negative space. But the key thing to note
about negative space is it needs to be as simple
as the positive space, passing my kindergarten
rule here. Here I'm drawing
the negative space or negative shape, same thing. And I'm coloring it in
just to be clear about it. That little shape
that looks like that. You can see a beautiful
little simple arrow shape here where the head dips in
and the shoulder comes out. If we extended that
negative shape, there's the arrow here, then it curves down in a C curve and then comes out
as a straight for the arm. We have this beautiful
simply designed bit of negative space here. There's a really nice
bit of negative space down here under the torso, I would actually get
into the practice of coloring in the
negative space. Doing this helped
me appreciate how the negative space was equally as designed as the
positive space. And feel free to draw it separately too as
a little study. What shape would
you say this is? It's triangular, but this side of the triangle is wider and it goes like that. Now, if I were just editing out the foot, I'll color
it in for you. If I were just
editing out the foot, you can see how it's
like a triangle, but it's a bit rounded. Yeah, the right side
of the triangle here is wider and longer, and the top of the triangle
is angled like this. It's straight but not
a straight horizontal. Diagonals, by the way, seem to carry more
motion than straights. If you want something to
look like it's moving, just deviate from
the straight line in favor of the diagonal. This little simple shape is something that you
have to keep in mind to help you place the
positive shapes for the body. We'll get back to
drawing here now. The first thing I like
to do is start to find where some of those
negative shapes might be. Here's that hook shape, that arrow shape for the head. Notice, I'm adjusting
the head as I do that. I'm adjusting the head to make it work for that negative space. Just because we did
the gesture stage and this head was laid in
as part of the gesture, you can't just be content
to leave it alone. Everything is always subject
to revision and revisiting. I like to work my shapes down from what I
think is correct. If I've got that
little V shape here, this negative space I've
just been talking about, I can continue that line down following the ribcage
form, of course. And maybe find where
that arm comes out. Somewhere around
here, which I'll just gesture in for now. I'll complete that hand later. But right now I'm more
interested in getting that body in just because it forms
the bulk of the drawing. It's the biggest shape.
Let's go for that first. Instead of carrying that contour all the way down to here, that would involve
too much guesswork. This is often a unconscious
14. Silhouette Shapes and Negative Shapes: Okay. This next section of
shape is a pretty big one. No shape chapter would
be complete without it. We need to discuss the
power of the silhouette. What you see on screen
right now is a silhuette. A silhouette is basically the exact delineation of the positive versus
negative space. Usually you see silhouettes
as colored black. In this case, the
positive space, that is the character is black, and the negative space or anything that's not the
character is white. Silhouette is really an
incredible design tool. It's a way for you to evaluate the success or failure of
your drawing and your design. The common goal here being that your drawing should absolutely
read in silhouette. That is, without any
interior detail needed. If your drawing does not
quite read in silhouette, that's a good indicator that the audience may have
some trouble reading it, or it may take the audience some time to read your drawing. When I say reading a drawing, I simply mean understanding
what they're looking at. When it comes to
reading a drawing, this should happen instantly. Readability is one
of the main metrics we use to determine if
someone is a good artist. These beautiful
examples here by Lois, your brain doesn't have to
say, Oh, what's he doing? Oh, he's posing like a boxer. Oh, I get it. No, no, no. That doesn't happen. It's
just boom, instant read. The guy on the upper
right is sitting and leaning down,
reaching for something. The girl on the bottom
is sitting down, but with tension in her body
as she retracts like that. Obviously, the
interior rendering, that is the stuff going
on inside the silhouette, inside the positive space. That stuff is equally
impressive here, but it's really the
silhouette that determines how
quick the read is. The character you're
looking at here is a futuristic racer guy. This is actually one of my
earlier professional projects. I co created these characters
with artist Nick alislian. The initial character
concept was his, and then I took
it to completion. I'm using this project
specifically for this example because
I remember this being really my first time
where I felt like I successfully used silhouettes
in a professional way. That is, I had very clear
silhouettes in my final piece. This is the first time I really
felt I had achieved that. Part of that was
certainly working off the back of Nick's drawings. Nick oislian being an artist
I learned a lot from. Let's look at the
character's left arm. That is the arm that's
holding the helmet. If I go back into silhouette, notice that there is a very obvious negative space
placed right there. It looks like a triangle. Well, it is a triangle. That's a simple shape that
passes my kindergarten rule, and it's extremely
important because it helps show that this is an arm. You see if that negative
space was not there, well, suddenly, this entire part
of the drawing is vague. It can be anything. Maybe it's a cape
behind the figure. Maybe it's some odd
protruding body armor. Maybe he's carrying a baby, but with the inclusion of
that bit of negative space. Suddenly, it's an arm. Now, it's not important to know what the thing
physically is. It's not important in silhouette to know that this is a helmet. You can't expect the
audience to know the detail of something
in silhouette. Obviously, that's where
the rendering comes in. The rendering is where
you can help sell the story of the
character, let's say. When I say character, that could be easily replaced
with anything, building, lemonade
stand, mailbox, whatever it is you
happen to be drawing. The silhouette should
give the viewer a very direct and
clear impression of what it is
they're looking at. For example, this is a character standing
in a confident way, not a shy way, and they're holding something
in one of their arms. To some degree, there
are certain implications you can make about your
drawing in silhouette. For example, the presence of these little spikes here
and the large boots here, and even these little
spiky parts up here indicates something of
the futuristic variety. But again, that is the
story of the character, and that's really not
what a silhouette is for, but a good silhouette can
hint at those things too. Silhouettes are
such a great way of telling if your shapes past
the kindergarten rule, you should be able to go over your silhouette
and say out loud, C curve, straight, C curve, straight straight, C curve. Straight, straight, C curve. I'll stop there, so
I'm not annoying. But because your silhouette
reads on such a basic level, there is absolutely no
room here for ambiguity, which is what makes
them so useful. Can even look at
little intricacies like this negative
space I just described. It's a triangle. It's more or less an
equilateral triangle, meaning it's equal on all sides. But beyond that, the rhythms of this triangle is also
equal on all sides. That is, it's a subtle
C curve on every side. That's something that
should not escape you as you progress
with your skills. I would not expect
a peer beginner to analyze things on that level, but as you become
more professional, you're going to be more
and more interested in the exact design of something. That's where silhouette
becomes more and more useful. You know, in your
aims to produce clear and professional work. Silhouettes are also
a great way to gauge the overall shape
design of your piece. Remember in the last section, I was talking about designing a shape that goes from thin to thick and having that being a way to make a
shape interesting. Well, notice that this character is designed from thin to thick. It's thin up here at
the shoulders and thick down here at the
bottom of the shorts. This kind of meta shape
design is something I personally call a
designing principle. The designing principle dictates the use of shapes
on a grand level. It permeates the entire drawing and it is a more
advanced concept. Now, that is something that is firmly in the realm of design, and design aims to answer slightly different questions
than drawing does. You don't necessarily
need to be able to design well in order to draw, but you absolutely
do need to be able to draw well in order to design. Because this class is aimed
at experienced beginners, I do think it's helpful
to show some tips of design that you can implement along the way if you choose. One of the main
things you want to consider with silhouette is how often you're keeping
things dead simple? That is a single flowing line, be it a C curve, a
straight or an S curve. How often you're keeping
things singular and flowing versus how often you interrupt the shape or contour
with something? Back of this character is
essentially an S curve. That's its continuous rhythm. Is a pretty clear flow to
that side of the shape. But here in the upper third of that S curve, it's broken up. If we were to draw
a little chart indicating where the
break up part happens, you can see that
our chart clearly favors the red portions, the red portions being
the smooth flow part, and the blue portion
being the broken up part. What would you say
this is? Maybe an eighth of the shape is
broken up like this, and then therefore, seven
eighths of the shape is not. I don't want to get
into math here, but there's a clear favorite in the direction of
keeping it simple. The shorts on this character are pretty much simple all
the way throughout. There is nothing complex or broken up about
this shape design. It's an instant read completely passes the
kindergarten rule, and because it takes
up such a big amount of real estate in
the silhouette, what that allows is areas like this that we
already talked about, and it also allows
areas like this to be quite broken up
and more complex. I say more complex, but it's still simple. A areas like that still do
pass my kindergarten rule. These rhythms, these
C curves, S curves, and straights are still very
organized and kept simple. There are just more of them
in a more condensed space. That's how you make shapes more complex while
keeping them simple. Again, to indicate this
with a quick graph, there's a lot more
activity here, and then here there's
less activity. You can think of design,
specifically silhouette design, but this principle holds true
for many types of design as this constant game of more
complex versus less complex. In general, this is certainly a principle I abide
by most of the time. Anywhere between a 70 30
split in favor of simplicity or even going up to 80 20 or
90 ten in favor of simple, that's the golden zone.
That's where you want to be. You can combine offset symmetry with this principle as well. If you look at the complexity
here and the complexity here and you take the
midpoints of the complexity, they are on a diagonal. This design would be much less interesting if the
silhouette were like this, where the complex
interruptions like this, are equal on either side. Let's say his arm
was like down here. Now, this still works, for sure. It's readable and fine. It's just this, the area of complexity being
totally symmetrical. It's probably not the most
professional solution. That is certainly not a rule. You should absolutely
experiment with breaking that, although I suppose you can't
break it if it's not a rule. What I should say there is
you should test its limits, and you should experiment
because there are no definitive solutions
to this stuff. Guidelines and principles. The finished character
rendering here, by the way, looks like this. You can now see
there's all kinds of complexity in this area. You have folded arms, lightened shadow,
clothing detail. You've got a futuristic
belt buckle here. The nice thing about having a clear silhouette
is it affords you the ability to go more complex
inside the silhouette. I suppose that's because
on a cognitive level, the brain already feels like it understands what
it's looking at. In a way that buys
you some time as the artist to now indulge a little bit.
But just a little bit. Here's another character
from the project. It should be very obvious that this character is some
form of mechanic. Here's the finished rendering. He's basically a futuristic
pit crew member, essentially. This project never got
green lit, by the way, so you wouldn't recognize
it, which is a shame. But anyway, back
to the silhouette it was very important to us on a design level to include all of this stuff in the silhouette. And this kind of goes back
to what I said earlier, a silhouette can hint at
the story of the character. All of these protruding
elements are clearly tools. On a design level, they're poetically arranged in a curve. The designing principle would
connect these in a curve, which mirrors the curve
of his backpack here. That's how we kept all
this complexity organized. Because you're able to read
all of these little shapes, your brain expects what this character is all
about right away. That's not always possible, but where it is possible, I highly recommend latching onto that and taking it
as far as it can go. One last principle before I
get into some drawing here. I'm really a big fan
of breaking things up. I already talked about breaking
things up rhythmically, but I'm also allergic to having an overly
dominant silhouette. This character is
largely in silhouette. But I had to put this
little guy right in there, that little bit of
negative space, which I think tells
you where the body is. You can imagine his rib cages like this and his hips are here, and then that leads
into his leg. That's why I put that
negative space right there is to just indicate
where his body might be. This silhouette is like what, 95% dark, maybe even more. And I wanted the remainder here. Let's just call it 5% for now, even though it's
probably les than that, I wanted this to be there, just to break it
up a little bit. I operate under the
suspicion that the brain gets bored easily and
break ups help with that. However, because there is such a dominant dark shape here, that does afford
you the ability to break up the contour a little more than you
might otherwise would. This one has breakups on a more consistent
level, let's say. There's really not one big area where it's just
dreadfully simple. For example, here, the shorts
could have gone like this. That's what we saw
on the previous character, but it's not. It's more complex.
It's this thing. Again, I think this largely
works because it's playing off of a large,
dark shape already. It buys you some leeway here. The other thing I
want to say about these breakups is as you
should expect by now, they are very
simple, but they're also not really repetitive. If we look at the length of this one versus the
length of that one, this one is longer,
this one is shorter. Now they are generally the same C curve type of
thing, but then look at this. It goes into a wavy pattern. If this wavy pattern
were not there, and instead we had
another C curve, Well, if you do something three times, you've heard
that expression. Twice as coincidence,
three times as a pattern or twice
as accidental, three times as intentional. If you do something three times, that's when the
brain starts saying, Hey, that's repetitive.
You do it twice? Okay. But even twice, you got to be careful and that's why I think it was
a wise choice here. I can't remember
if it was Nick who did this or me, probably Nick, to just break up the type of
breakup that's happening. All right. Just one
more to close out this lecture part
before I start drawing. Here's yet another character
from that project, and her silhouette
looks like this. Now, this one in its design
is actually quite close to this one that we saw previously in the sense that it's simple. The breakup area
happens around here, and then a large bit of simplicity really all the
way down to the bottom. I guess this is
probably a good place to point out that
this is clearly not a formula because you can draw 1 million different things
using this pattern, 1 million different things in
1 million different styles. A formula yields similar
results every time. This is something you can apply anywhere and still make
unique looking work, which is true of
design principles. The other thing I find
really interesting about Nick's design here is that there is a shape
DNA to the breakup part, the breakup part being up here. Notice it's very spiky. Even though this
right here is an arm, that's her elbow right there, it's a spiky arm. Even these little
offshoots of hair, these little sprigs
of hair are spiky. There's a spike right
there, I missed, little sprig of hair here that
has a little spike shape. It's a softened spike for sure, but it's got that quality. This helps perhaps communicate
some of the aspects of this person's character to you before you even get into the
actual rendering of her. Just while we're here
before we close out, I just want to remind you of things we've looked at already. Look at the beautiful
continuous rhythm through the hair right there. That is just fantastic. I didn't do that. That's
a Nick alislian thing. He put that in the design.
I just made sure to capitalize on it when I
cleaned it up and painted it. What Nick gave me here
were rough sketches. It was partially my
job to let's say finalize the silhouette and then carry through to
the finished rendering. When I say something
looks good here, it's mostly credit to Nick. Anyway, I just love
this continuous rhythm. Straight from the
top of the head all the way down to what? A good almost half
of the body on this side is curated by
this continuous rhythm. Remember that continuous
rhythm has breakups in it. All these little red
sections are breakups. But this blue line
I'm drawing now is the continuous rhythm
that we can still sense through all
those breakups. And while we're here
on continuous rhythm, there's a beautiful one right
down this side of the body. It covers the entire body. Well, until the knees anyway. If you take that continuous
rhythm and then graph out the areas that are broken up, chart them out like that. You can start to gauge what's simple versus what is broken up. Almost always you will notice that it's in favor
of the simplicity, that is the simplicity takes
up more of the real estate. You can even spot other shape design things we've
already talked about. Look at how her head is thick up here and then it
tapers thinner here. The human head doesn't
have to do that. That's a design choice
that Nick made. It's a very interesting shape. You can look at things
like offset symmetry. I think there's a
diagonal through the head like that where
the widest points are, or even here in the shorts. It's wide here and wide
there. Look at the diagonal. These are just things you can pepper throughout
your designs and throughout your
drawings that just help raise the
interest of things. I absolutely love how
delicate this shape is. First of all, it's
a simple S curve. I think that's the first thing
we could notice about it, but also this very gentle taper. It's a bit wider here,
a bit thinner there, just barely
noticeable, but it is noticeable and then tapers
back out wider at the end. Here, I'll take away
those red marks and you can see what I mean. Even the end of this shape,
I absolutely love it. You notice it's not
symmetrical. It's not this. It's that. That is a small
difference for sure, but applied on a larger
level on a bigger scale. That kind of stuff
will turn you from a k draftsman to someone
who is actually quite good. That's because if you
gain the ability to carry these kind of aesthetics
through an overall drawing, people will notice it,
even if subconsciously. Let's put this into practice
now and I'll show you how I think about this stuff as I
draw something from scratch.
15. Designing using Silhouettes: A great way to practice this concept of the
silhouette is to have it at the forefront of mind
when you draw from life. I do really recommend
drawing from life because you're going to be able to
capture people's movement. The whole idea is when
people are moving, you have to draw quickly, and that pressure to draw
quickly forces you to think about silhouette because it's the most direct
way to a drawing. Yes, you could do this
from photos as well, but the whole problem is
that photographs don't actually stimulate you or
challenge you to draw quickly. Even if you're trying
to draw quickly, inside your head, you know it's a photograph, it's
not going to move. An pressure you
feel is artificial. If you are actually
outside or in a coffee shop drawing
people in motion from life, there is a certain feeling that presides over the
drawing experience. It's like the difference between competition
and practice. In my experience, it forces you to use these tools a
little more directly. What you're looking
at here is a drawing from life from one of
my own sketchbooks. It was drawn with an ink brush that looks
something like this. As you can see,
with this drawing, it looks like my
warm up chapter, does it not where the
strokes are made in this very bold and direct
and continuous way. You can almost see me trying to will the drawing into existence, going for the shapes
right away rather than plotting and building
with gesture first, then construction and
then finally shape. Here's what a drawing like
this looks like in action. I usually start with the head and I certainly did in this one. By the way, she is operating
a boom pole on a film set. She was staying
relatively still, at least for the duration of the take that
they were doing. I remember thinking about
the continuous rhythm of the silhouette coming down off the hair and flowing into the arm, which
ends about here. So I put that in. Then mentally, I mapped the shoulder
line, but obviously, I didn't draw it because this
is drawn with a brush pen. I can't erase this. I put in the shoulder where I
mentally map that line. Then I mentally
mapped this line. As you notice, these lines
are all on diagonals, which is so common in real life, and I drew in where
I think this arm is. The drawing probably
started like this. Then in my head, I was imagining a gesture down the
body like this. I'll leave this mark on the
page just so you can see it, although I'll ghost it
out as I always do. Of course, in the
actual drawing, I did not even draw that, but that's what I
was thinking about. That allowed me to
find this line here, which leads down to the hips, which of course is
inside the silhouette, but it was important for me to draw it to figure
out where the hips are to then know where this line comes out for the
coat she was wearing. Then this line for the
bottom of the coat is really a gestural landmark, no different than
what I would draw if this were a gesture drawing. Then that allowed me to find the other side of the
contour somewhere over here. Now, this arm, I've
drawn too far in, but in the spirit of not using the undo button as if this
were a real marker drawing, I'll just extend the arm out
where I think it should go. You'll see in a second, how
you can actually just color in the silhouette to gauge
the success of the drawing. Then from here, I
could find the legs. Now here's an important tip that I have not mentioned yet. It's something I like to
call the t principle. Actually, this is
not my invention. This was taught to
me by Glen Vilpu. The t principle says
that whenever you have something colliding or
intersecting with something else, here, there's a
leg coming out of this jacket and there's
another leg over here. The t principle says it's best to do the
intersection at a t, there's a t between the coat
bottom here and the pants. Essentially, it would be less wise to put
the pants coming out right there because now you have something
called a tangent, which can be hard to read. Because the pants are a
separate thing from the jacket, I will use the t principle
to make them come out here. Of course, another t principle to make this one come out there. To quickly show you the ts I'm talking about, here
they are in red. You can also think of the
arm as being a t principle. This is a t that's been
rotated 90 degrees and the t here as the elbows
collide with the torso. Now, you'll notice
that there is not such a t principle going on here where the hair
connects with the arm. This is either something
I will consciously allow to occur or knowing that doing so will blend the hair in with the shoulder because
one thing is just sliding right
into another thing. I might incorporate a
small t principle here, which can enhance
readability, let's say, I might just simply bring the
hair out a little bit here. In a moment, I will convert
all of this to a silhouette and we can evaluate it even
more closely that way. Anyway, to continue
finishing the legs, I would just think about
making a shape that is designed with either a
scurve S curve straight. See how I broke this
shape up in the middle. Well, my original
drawing is better. Let me just erase this
just to show you, I said I wouldn't
erase, but here we go. The leg is better drawn with the break there and then
this part is a bit longer. So it's basically
two slight C curves, but one is longer
than the other. The midpoint being right there. This one is that long and
this one is that long. Then we go in for
where the foot is, there's this beautiful
negative space right in here. I say beautiful, not that
what I've drawn is beautiful. It's nature gives you these really simple
negative shapes that help delineate forms, and then her other
leg goes down. She was wearing bell bottoms, as I recall, the leg in
widens out at the bottom. I really like bell
bottoms for that reason. They are easier to design
into your drawing. Now, her shoes were hidden
by the bell bottom. I think there was a bit
of a heel coming out there and maybe the
tip of the shoe, which I didn't even
draw in my sketchbook, the tip of the other shoe
might be about there. She was holding a boom pole, so there's the boom pole here. What you might want to do now
is just on the same layer, describe a larger brush, I'll describe a marker
brush here and just convert this into silhouette
by coloring it in. Okay, great. Now, what this allows
you to do is evaluate your shapes on a
more holistic level, let's say, I can see the larger
impact of the silhouette. It's easier to see it when
it's colored in like this. Now you can do things like start cleaning up little shapes and determining exactly where
you'd like to put things. So how does this
curve exactly go? How does the t principle
of the leg cross into the coat down here at
this negative space. Can we design it in a way that is the most
interesting shape possible. It's like a diamond shape. Do I want to close off this diamond at the
top, like this? By the way, I'm
accidentally sampling a few different levels of
dark. I don't mean to do that. Sometimes it's good just to
put a swatch here so I can just quickly sample it.
This diamond shape. Should it be an equal
diamond like it is now, or should maybe this
side close a little sooner and this side
a little longer? Maybe not, maybe it
should actually go more like something like this,
how do these shapes go. I do this in my illustrations all the time. This
kind of thing. I don't literally put things
in silhouette like this anymore just because I've been doing it long enough
that I don't have to. But I think this way. I'm always tweaking
shapes on this. I call it a non literal level. Like for example, I'm
not even thinking of these as a pair
of pants or legs. I'm just simply thinking of the shape language and keeping those shapes as
interesting as I can. Then maybe I'll mentally
zoom out and say, Oh, yes, it is a female figure that I'm painting or
I'm drawing here. Let's make sure that it
continues to read that way. Here, let's edit
my scribble lines out and commit to a
cleaned up silhouette. Does the shoulder go in
like that? That's nice. It makes the hair have a bit
more of a statement to it, like a bit more of a
visual identity as hair. Or do I go fully continuous with it literally continuous.
That's nice too. The only thing I don't
like about that is it You can't really tell where the hair ends and
the shoulder begins. You can tell it somewhere
there, but I prefer this. I should clarify something
about continuous rhythm here. Continuous rhythm
is still present. The brain still can
connect this as a rhythm. You don't need to be
literal about it. I don't need to have it exactly
be a continuous rhythm. Continuous rhythm is an
illusion that we can detect. Even here, I can now dive into a little negative spaces
for the hair if I want. This is strange, though, hair wouldn't rest like
that. I'll get rid of that. But you can see where the
possibilities are endless here. Hair maybe would break
up along the sides. I've just made two
negative spaces equal one, two, let's not do that. Let's break them up.
Difference is key. If you have a shape like this, and then you make another
shape exactly like it. Try not to do that. I'll
cross this out with red. Instead, make the
shape like that. You have a little
rectangular shape and then a triangular shape. Or if you want the
shape to be still rectangular to have
a DNA connection, just make it a different type of rectangle,
a smaller one, then maybe you have a
little offshoots of that rectangle around it. That's what I'm
trying to do here. For example, I have
two curves, one, two, I want to offset them
with offset symmetry. Ofset symmetry is a great way to accomplish
differences in shapes. You connect them with symmetry, but then you offset
them diagonally. Then I can do little things like carve
into the waist here, make it maybe a little narrower, maybe the jacket comes out more or less or maybe
the jacket is more straight. At this point, by
the way, I'm not even looking at my
original drawing, which is why it's off screen right now, I don't want
to reference that. The point of this
demonstration is to show you the power
of silhouettes and how you can sculpt
your design and how quickly you can make little iterations to perfect something. You can even draw this way. I could maybe play with her
arm coming out like this. Now, I'm not trying to draw a well constructed arm
or hand right now. I'm simply trying to see what the silhouette would look like shape wise roughly if the
arm were posed like this. And does that make
sense for the pose? If it makes sense for the pose, I would continue to go in
and refine this and actually draw a sleeve in a hand
or something like that. But does this make sense? It looks like it does. It looks like she's
holding something. I reinforces the
idea that she is definitely holding
something. I like that. Maybe the sleeve would come down because if it's a jacket, then there's going to be a cuff there that
comes down a bit. Okay. And you can
see you can make all types of visual
refinements this way. For example, do
you want to throw in a little negative space
maybe right in here? See what that did. I
opened up the pose. What do I mean by
opening up the pose? What I mean there
is I've given you just a hair more information
of what's going on there. That little negative
space tells you that the back goes like this
and the hips go like that. Even though it was not
in my initial drawing, but this is where the
exploratory nature of drawing is just so
fun and silhouette is one of your
primary tools to get you in this sandbox so you can
play around with it. Okay. You know, does the elbow
come to more of a point? This would indicate
maybe a tighter jacket. That's interesting.
You can even play with little folds in the
clothing here if you wanted to. This is all just the outer
shape, the silhouette. You don't have to actually
draw this stuff on the inside. Of course, if this were a finished illustration
you were working on, you would eventually have to draw the stuff on the inside. But on the topic of design, which is what this
section is about, this is what you should be
thinking of as a designer, and Design is really preoccupied
with the final shapes. The whole thing about
gesture and construction, that's drawing
fundamentals, or I should say draftsmanship
fundamentals. Design is what I'm doing now. It's what you do with
those fundamentals. That is to say, I'm fully confident that there is
an infrastructure here. I could go into this figure
and find this ellipse, find the ellipse here, find the top of the
shoulder box here. I know I can do
that, which is what frees me now to play
with the design stuff. Honestly, the design is done when you think
it looks good. I can't really give you any
more criteria than that. It's something that takes
context and repetition, really. Let's do another one. One job I had
fairly recently was a children's book
gig where I had to design this kid who would
be the star of the books. He was, I think, a
seven year old kid, and the creator, the
writer of the books wanted him to have
very cute proportions. This is the head shape, not the head shape, sorry,
the head dimension. Then I'm very interested
in comparing that with the shoulder dimension. Then we designed it based on
this wedge shape that would go from thin at the top
to thick at the bottom. And he would have
these very baggy pants and the pants
would kind of like they'd be so baggy that the crop of the pants
would come down like this. So the first thing I did when I designed it and I'm kind
recreating that process for you here was I was thinking about the silhouette mostly
and then proportion. And I'm using gestural strokes and landmarking and all
the stuff we talked about in the gesture chapter and even basic ellipses,
which I can't turn off. I can't turn my brain off from thinking about
ellipses like this. But that stuff is not at
the top of mind here. It's buried in the background, and his arm would
come down like this. This is a great way to just play with
overall proportions. Now, let's immediately transfer into coloring this
in as a silhouette. Because I'm not trying to draw the inner
information right now. I'm simply trying to work out
proportion and dimension, how wide is he, how tall is he? What are the shapes doing
on a meta design level? Does the head connect in with the shoulders is his
neck so short that it connects right in
with the shoulders or is there more of a neck? Basically, would the would
it be more like this? Now, the character we ended up deciding the character
would have very large hair. This would be like if the
character had no hair, then what I did was I put well, first let me indicate the ears, and ear is a great
silhouette tool, and it actually can
show dimension as well, or I should say perspective. Right now, because we can see this ear and not the other ear, we're looking at it
was a male character. We're looking at him in
a three quarter pose. What you can do is
also maybe get rid of this arm a little
bit and maybe get rid of this
shoulder a little bit to turn it into a
three quarter perspective. It's amazing how
much information the silhouette can store. This is really only available
to you as a drawing tool. If you know in the
back of your mind the gesture and form building tools that
we already looked at. Maybe this arm would come out here and this leg
would be like this. It's reading now as a kid dressed in baggy clothes,
which this kid was. This arm comes out here. I love drawing this way
because you don't have to be preoccupied with any
detail right off the bat. I can ask myself, where
would his hands land? This is where you can
look up photo reference. What's the real proportions
of a seven year old? Where do their hands go? Probably somewhere
around the hips. I'm just inventing this, but the whole point of with
silhouette is it's easy enough to quickly iterate and invent things and destroy
them and recreate them. Now, his hair, like
I said, was a big Chunk of hair like that. And that looks immediately like it's given him
some character. It's kind of this
sort of exaggerated Elvis Presley swoop at the top. And we even really play that up. We ended up playing that up
with some negative space as the swoop became
really, really apparent. We had some fun with the
negative spaces there. And I'll make sure this
one is maybe long, this one is more wide, so I'm not repeating
myself and maybe a straight there for the hair and a straight there for
the back of the head. His hair is kind of crazy
there but well cut there. You know, so it's kind
of like nice fresh from the barber kind
back of his head. Then does the ear
connect with the jaw? That looks a little
strange. Let's maybe give him a little
bit more of a jaw. Now it's a child, so the
jaw is more rounded. This is where
reference can come in. What does the jaw
of a child look like compared to the
jaw of an adult? The answer to that
is it's rounder. An adult has more
chiseled features. A little boy like this would
have a more rounded face, and that's when I can
think of these shapes now. I'm tossing and
turning between round. Tossing and turning is
not the right image because that implies unrest. I am ping ponging from round, round round, straight,
round, round. So it's mostly round to give the boyish
impression of roundness, which I think is suitable
for a little boy design, a seven year old boy design, but offsets or just
punctuated with straights. Now, is that a rule?
No, absolutely not. This section of the
back of the head could absolutely be round or rounder. And it would look just fine, but I like the design choice, let's say, it's a
very clear choice I'm making to go straight there, to really carve it out
with straights I suppose that speaks to something I enjoy seeing in people's designs, my own designs and
other artists as well. I like seeing when things are
very intentional like that. It's interesting to me. Not
to get off on a tangent here. That's the kind of thing that
AI doesn't do very well. It doesn't really
make it kind of makes the safe shape
choices all the time. And this is really
where you can set yourself apart from that
world of image making. Okay. So does he have sleeves? And if he does, do they
come out like that, and then maybe his
arm is narrower? You know, I'm kind of tracking a diagonal relationship
for maybe this sleeve. And then is this arm straight? Or does this arm go, maybe
we don't even see that arm. Maybe the silhouette is best
communicated if we just see the chest and that arm maybe
just comes out at the end. Maybe there's a hand here with some that
looks like nonsatu. Maybe the hand is just curled here or maybe there's
just no hand visible at all. The point is, look how quickly I'm able to
decide on these things, how low are the shoulders? What level of height
do the shoulders need to be at to
communicate relaxed. If the shoulders up here, suddenly that looks
a bit less relaxed. It looks like he's raising
his shoulders to me. But if they're down here,
it looks more relaxed. Now, how far down can I go? Maybe I can push it like that. Maybe this arm needs to
come in a little bit. If he has a long
sleeve shirt on, then the sleeve would be down there and the hand
would be here, and maybe there's a little
bit of negative space there. I like that to communicate
how his hand is resting. On the body and maybe there's just a little bit of a hand coming out of this side. In a three quarter
view, you usually can see the other arm. I just know this from experience
from having drawn a lot, and that's what I ultimately want any student watching this to do is don't draw from
your head all the time. Splice it in with
drawing from reference. I think the best reference
is directly from life. Photos are great. If
you can draw from life, though, please get
out there and do it. You will be doing
yourself the biggest artistic favor that way. It can simply be going to a
coffee shop or I don't know, maybe if you live
on a busy street, just sit outside and draw
people as they pass by. And try and capture people
in their day to day poses. He had shoes, and now his shoes were their own
interesting silhouettes. The kind of came out like that, and this shoe was
sort of like this, but how long would the shoes
be? Where would the heel go? Would the heel blend in with the pants in a
perfectly continuous way? I don't like this decision
right now because I don't like how the pants they don't have enough
separation from the heel. That little dip
right there is not enough to be a t principle. If I want the t principle, it would be like
this. There we go. Now we can play with taper, maybe the pants taper even more. Here's where you can
get into all kinds of digital tricks. How
about if I took this? And just moved it
in a little bit and maybe even took a selection
and distorted it out. So this comes in to reinforce my meta
shape I talked about. And then now that
I've done that, his head appears
too far forward. So just quickly grab it. Let's bring it back. And then I I don't like seeing
that selection. So in photoshop here, I can hide it with Control H and just move this
around freely. And where does his head sit? I'm just moving with
the arrow keys. You can hear me pressing them. Phonetically. Where
does his head sit? Maybe somewhere about there. That looks like a
resting pose to me. Just evaluating it visually, I don't have any tricks up my sleeve for determining
what looks good, other than experience.
That's the main trick. You can only earn that by
doing it over and over again. That's something no one can teach, can't teach experience. But what I can teach and what I hopefully I'm teaching
here is the way to maximize every ounce of useful experience that you
can get out of your practice. Maybe his cuff of
his pants should have its own T
intersection like this. That's way better. I say that's
way better because now I like that the shape is fully continuous here and then it
just breaks up at the end. You can almost imagine
the continuous rhythm here, break up at the end. I like that. Now, this is a
symmetrical bit of breakup. Again, like I said,
there's no rules. I think it looks okay here. If maybe you wanted to give
them some cargo pants, maybe you could add a
little cargo pocket here and have a little
bit of extra break up there and not a lot of break up there and offset
them on a diagonal. Sure, let's go with
that. The whole thing about design is you should give yourself iterations various
versions of the design. Now here, I want to make sure
that the cuff of the pants, if I'm doing this cargo pocket, The cuff of the pants
should be smaller, the cargo pocket is this big. I want the cuff of
the pants to be much smaller and obviously smaller. Before this, it was the same
size. Let's just tweak this. I think it should
be a curve here inside the crotch
area of the pants. You can even play with
a little negative space there for the cuff or not. Maybe that makes that
negative space too complex. Let's just keep it
fully continuous. This looks like an
effective design. This once again is a recreation of how I designed
this character. These books are not actually out yet as of the time
of this recording. Unfortunately, you won't be able to find them in
stores or anything, but I'll announce it
when they do come out. I spent years working
on these books. It is a series of three books. I illustrated two of them. Maybe the hair is a bit wider here and narrower at the tip. Maybe there's another sprig
of hair that's even smaller. Maybe something like that, or that looks a little strange. Maybe that's too continuous, maybe this. Maybe that. Again, as I'm saying, maybe, maybe it's a blast to be
able to iterate so quickly. Maybe the neck should
be even thinner. I make a joke with my own
children all the time. I squeeze their neck
and I call them chicken neck because children's
necks are just so skinny, so maybe I can really push that. That's just a bit of life
experience in forming the art. I happen to know that
children's necks are skinny. That's something
I would not have thought of if I
weren't a parent, but all kinds of
life experience will factor into your design
decisions on a micro level, like how thin the
neck is, you know. Okay. Okay. There we go. How long have I been recording?
I'm looking at my timer. I've been recording
for 13 minutes. Some of that was probably spent ming and awing and
I'll edit those out. So let's say 10 minutes, if I weren't talking,
in 10 minutes, I've got a little design
here for a boy character. And then if you wanted to, you could start
thinking about, okay, where's the eye line or this
would be the nose line, I suppose. Here's the eye line. Then I will get into this in a future
chapter of the class, but you could get into
drawing the character now. We are his eyes? Maybe
his eyebrows are up here. Maybe his eyes are
then sitting in his head in the eye
sockets right there. But again, I'm getting
ahead of myself. This is the next step, which I will cover
later in the class. You can challenge
yourself though. Where would the midline be? Well, the midline wouldn't be in the middle because this is in a three quarter perspective. If we drew an egg
shape for the rib cage like we looked at in
the form section, well, that midline would go
over the form like this and down the middle of the form there wrapping underneath
the crotch area. The hip bean shape
would be here. The leg cylinder would
come down like this, the other leg
cylinder, like that. But all of that is buried
in the silhouette. The silhouette should be a stand in for all of that information. If you can get a good hold on the basics of gesture and form, You could start with
the siloette stuff first because it's really fun. Start by having a lot
of fun and then dig into the more technical
aspects of drawing, which were covered in the
previous chapter on Form, really, and building building
up your figures that way. Even in the first part
of the shape chapter, I talked about combining all the draftsmanship
fundamentals to building up a drawing. You could use this silhouette as your initial spring of
reference for that. Okay.
16. Big/Medium/Small Shape Theory: All right. This is the final installment
in the shape chapter, and we are looking at a
beautiful illustration by Sergei Kolsov. The topic of this section is
big medium, small shapes. If you've gone on
the Internet for any amount of time to
look up art instruction, I'm sure you've heard
of this concept of using big shapes, medium shapes, and
small shapes in your designs to make them look
as appealing as possible. So I want to explain that, but I also want to explain a good handy way of
studying and practicing it. Just to continue
to preface this. I see time and time again
when people do studies, their study is trying to
replicate the reference, and that is certainly great. I've done that 1 million
times in my own study. You pull up a painting by
Sergeant and try and copy it. Make it as good as he did, which never happens, by the way. You might be tempted to look at a beautiful illustration like this and try and
copy it yourself, which again, would
be totally great. However, you don't
actually have to do that to gain a fuller
understanding of concepts. And when it comes to
big medium small, this is especially true. The first thing I did
just off camera was I cut out the silhouettes
of this character. I might as well go
ahead and throw a white background behind him
so we don't get distracted. This silhouette follows all
the principles I talked about a couple sections
ago in the shape chapter. You should be able
to identify areas of simplicity versus
areas of breakup. On a DNA level, I would say most of these
lines are straights. This is great because
this is actually a different design language
like the shape choices are different than
the illustrations and silhouettes I showed you a
couple sections ago. Okay. But what I have also
prepared off screen is this. This is just a tracing
of the silhouette. This will be the
base position for how to study big medium small. Just as an overall
philosophy of learning, I am totally cool with tracing someone else's work
in the name of study. I would never show this to someone as my own
work, of course. But before we even do
anything with that, I want to quickly show
you an overall philosophy for thinking about big
medium, small shapes. The idea is we have our canvas
here or a piece of paper, or whatever it is
you're drawing on, and we only have certain dimensions to draw within the bounds of the canvas. Within this, we need to
fill it with shapes. Because we only have
certain boundaries and limits and borders, we only have a finite amount of shapes we
can put in there. Now, your big shapes, I'll say B for big M
for medium S for small, You only have room for a few big shapes because
the canvas is only so big. Here's our big shape. You might have I'll just draw two big shapes in
here just for fun. Here's two big shapes. I'll make them maybe different values so that you can see them. To big shapes, and I am already out of room here in
this column for big shapes. This is representative
of the same thing in painting or a drawing. You only have so much
room for big shapes. You can only put a
few of them in there. Now, medium shapes, you have
a lot more room for those. I'm just going to draw
a few shapes here. The shape can be anything. I'm just making this up, trying to keep them simple, of course. And I'll quickly shade
them in. All right. Now we move on to
our small shapes, and you're already ahead of me. We have much more room
for small shapes. I will populate this with as many little small shapes as I can fit into this
little column here. As simple as this is, this is my overall
internal system of distribution of shapes. Now, don't do any math here. I'm not trying to
say for every one, two big shapes you
get one, two, three, four, five, six, medium
shapes, and so on. That's not what
I'm trying to say. It's just the idea that you have fewer big shapes,
more medium shapes, and the most small shapes, simply due to the size of the physical canvas space
that you're working on. Okay, but now we have to see how these things can be combined. Let's pretend that this is an actual drawing
that we're doing. Of course, we will apply this to the Serge olsav drawing
right after this. This is a big shape. Actually, I've made
two big shapes. One is the positive
shape I'm drawing here, and one is the negative shape of the white of the
canvas behind it. These are two big
shapes. The white of the canvas is commonly a big shape of the sky in
a landscape or something. To big shapes. Okay. Now, that's pretty much all the room I have. Maybe I could put another
big shape like here. This is a pretty big shape
here. Let's do that. Now there's three big shapes, and let's not have
a tangent there. The two dark shapes are on their own islands disconnected and then the white shape is
continuous through them. But now we can subdivide this and add medium
sized shapes. When I do this, I want
to play with overlapping these shapes as much as
I can, but not always. For example, Let's put in a few medium size
shapes that do not overlap that are also
their own islands or they go behind this one
here, we'll go behind. Maybe there's a shape over here. How about a shape that traverses all of these that
goes behind them? This is almost a large shape. But I should also mention that within the categories
of big medium small, your shapes can be
of various sizes. So long as they visually still
belong to that category, a slightly larger medium shape and a slightly
smaller medium shape. But your small shapes
should still be smaller than the smallest
medium shape and your big shapes should
still be bigger than the largest medium shape.
Here come the small shapes. There will be more small
shapes than the medium shapes, and there are more medium shapes than there are big shapes. Just like that,
there we have it. This is what you
are aiming for as an illustrator or concept artist or whatever profession
you want to be in, even if it's just
making art as a hobby. If you want your
stuff to look pretty, this is what you're aiming for. I don't know about
you, but I look at this little abstract
piece I just did, and while it certainly
doesn't look like anything, it feels interesting. It engages my eye. I'm not bored looking at it. The first theory I want to talk about is what I call the
X ray vision theory. The first big shape
that I put down on this canvas was this guy
here, if you remember. Notice how that big shape is still there, the identity of it, even though it's been overlapped
by this medium shape, overlapped here by
the small shapes, also overlapped here by medium
shapes and small shapes. Not to mention all these small shapes that are cluttering up. The shape is still
very much intact. It's like we have X ray vision and can fill in
the gap there and the gap right there and the gap right there and all
these little gaps in here. Our brains are incredibly
good at shape detection. That's what they're designed
to do a lot of the time. In practice, I see a lot
of art students being shy about overlapping
and introducing shapes that are even
close to other shapes. A very common thing
an art student will do is let's say
they draw a shape. This could represent a head
or something or a figure. Instead of putting another
shape behind it and concealing that shape or instead of putting that shape
overlapping like this, what they'll do instead is they'll put the shape
just beside it. I think this speaks to
a habitual thought that if we are creating this art and putting so much effort
into creating this art, we want to show off, look at this thing I drew
and look at this thing I drew and you don't
want to overlap them. But this is poison if
you do this enough, if you separate things too much, then everything
looks like it's on its own island or demanding
the same type of attention. The pattern becomes
boring and repetitive, like a checkerboard
or something. Really what you want is your big medium and small shapes interacting with each other. Via overlays or
things going behind, and that becomes exponentially true when you get into values, you know, a lighter
shape, overlapping, a darker shape, et cetera. The thing you do have
to look out for though, back to the X ray vision thing is you want to make
sure you don't overlap, say this big shape too
many times because if you start doing this,
Let's destroy this. If I start putting
too many shapes here, well, now all of a sudden, I've lost that big shape. I can still see the dark
shape behind there, but my brain doesn't have enough continuous
rhythm information to I don't know what's
happening here. Our shape should go like that. It went out like this. But I've lost too much of that rhythm. I can't read it anymore. If I undo, there it
is, this is better. But even here, this is
still too disguised. That shape is too buried now. Something like this
is a bit better. I'm evaluating it visually. There are no rules
to govern this. It's just, can you still see
the identity of that shape, and also to compound
on that question, is that shape design
simple in the first place so that your brain can have a fighting chance
at identifying it. If that shape were too complex and didn't pass my
kindergarten rule, then you'd be shooting yourself in the foot
from the beginning. This is the next layer of principles you lay over
your simple shapes. That is when you overlap them or underlay them
with other shapes. Therefore, asking
the viewer's brain to take in more information. Are your shapes simple
enough that they can be read in an instant. Okay,
so we're back here. Our goal now is to do what I just did with that
theoretical diagram, but inside this silhouette. And this is only
something I recommend you do after you have a
good, clear silhouette. And that's why in this case, we're starting with a tracing of something that's already
certifiably good. At least I am personally certifying it as good for
whatever that's worth. All right. My first
line of thought is, the silhouette is not
just black like that. It's not filled in with
one color. It's broken up. The guard is wearing
a white shirt and dark pants and he has a different skin tone
and a light hat, and he's got little patches and pockets, different
colored boots. All of those different
values or different shades equal different shapes. I don't want to cross over
into painting here at all, but one thing that
is true in painting, whenever you change your value, you are also
changing your shape. A light shirt versus dark
pants, that's two shapes. All right. Let's start
working in our silhouette and I'm trying to find the
shape of the shirt. I don't need to
draw it perfectly. I know there's an arm
here, but I don't really care exactly how the arm goes. No, I'm just like, the shirt
sleeve is there roughly. Then it comes down and it
comes down about here and up and then down and something maybe fix
it a bit more like that, and it goes up and then the other shirt sleeve, it's
something like this. I don't care if that's
not 100% accurate. It's not supposed to
be. Remember, this is not a copying exercise. We are trying to understand how Sergei Kolsov in this case, has broken up his shapes
inside the silhouette. Let's find the top of the shirt. It's
something like this. Again, the goal is not
to copy the reference. It's just to get the size of
the shape roughly in place. And then if you want,
you can just use the paint bucket tool
to fill in something. The reason I'm doing
that is so now I can fill in this shape,
which is the pants. I've made that shape by default by making
the shirt shape, and I'll just clean
this up here. But those are my big
shapes, two of them here. That's how I'm seeing it anyway. Now let's move on to
the medium shapes. Well, he has arms. As if we were drawing
schematically and roughly, not trying to draw
a perfect arm here. Let's try to figure
out where the arm is and the hand comes
down. It's about here. I'm just trying to design this with as simple
shapes as possible, and it comes back up here. The shade of that arm is somewhere between
the shirt and pants. I'll just quickly block this in. Now let's get this
other arm in here, which is also a medium shape. Remember, that's what
we're determining here. Where are the medium shapes. I only really had
two big shapes, one, two, shirt pants, and now
it's the medium shapes. I'll just sample the
shirt value there, and the boots are
definitely medium shapes, and I'll just put this in, grab my paint bucket
filler and do that. What you should be seeing
even at this early stage, when you start
putting in the few medium shapes is the interest, the visual interest
starts to build. In the case of a
character like this, you start understanding a
little bit more of who he is. We can start to see
clothing coming through. But remember, that's
on the literal level. As artists, yes, we
need to be aware of the literal level
because that's what we're ultimately
trying to communicate. But we also have to be able to look under the
proverbial hood of the car and understand
what we're doing with all those little nuts and
bolts that make everything up. Which is why in this
method of study, it's totally okay that this
is just a proxy for an arm. It's not a perfect arm drawing. Drawing this arm perfectly
or drawing it the way Kolsov did wouldn't really help
us any on a shape level. We just need to know in this study what the
size of the shape is, and I guess roughly
where it goes too. Now, more medium shapes. Well, he's got this big strap with a buckle that
goes like this. Let's just end it there and
that strap is continuous, or it connects to this strap, which connects to this
little pocket thing here. Again, does not
matter what any of this stuff is on
a literal level. Let's just get the basic shape
in there and in your head, categorize which camp it's in. That is, in this case,
it's the medium shapes. We are working on exclusively
medium shapes now. The whole point is this will help you be conscious
of what you're creating shape wise when you
make up your own characters. It's just a coincidence,
by the way, that I'm determining
two big shapes here and I showed you two
big shapes in my diagram. Two is not a magic number. Sometimes there's three,
sometimes there's four, sometimes there's one, it depends on the piece
you're looking at. What other medium shapes
can we discern here? Well, there's this little
pocket on the sleeve. That is a pretty clear
medium shape to me. Although we're getting a bit smaller with that medium shape, but let's just call that medium. While I'm here, let me
just color in the head, as well as fill in the
helmet as medium shapes. There we go. We are getting
close to being finished with the medium shapes.
A few more though. He is holding a button, and I am going to term this
baton as a medium shape. It is definitely on the
smaller side of medium. Like if I am also calling
this arm a medium shape, then that is a much larger
medium shape than this. We are bordering on
the small shapes here, but let's call that a medium. I'm also thinking
about the face here, the head as a medium shape, and the hat as a medium shape. I think that's it. Those are the medium shapes that
I see in this picture. What I absolutely love about this type of exercise is to me, anyway, it removes the mystery
of detail and rendering. Like, you look at
the Colsov painting and you can get enamored
by how he rendered the clothing folds and the little shiny belt buckles
versus the leather straps. That's all cool, but
rendering is different, or maybe I should
say rendering comes far after the shape decisions. An experienced artists
will be able to combine rendering in
with shape decisions. That's what it means to get
more advanced as an artist, graduating from beginner or experienced beginner to
professional, maybe. To me, what all that
implies is you're able to crunch more
decisions all at once. In this class,
though, I'm really interested in
splitting all this up. Then as you practice,
you will be able to start combining them
probably pretty quickly. But without further
ado, small shapes. This is the fun part
because small shapes are like little
buzzing little bees, little noisy things
that are really, really needed for
that visual interest. These belt buckles are
essentially squares. I'm just making squares. And whoops, I forgot a
medium shape in here. Apologies. Let me just
rewind and put this in. Again, this is a medium shape that I just happened
to miss before. This little strap here, I
would say is a small shape. Then within that, there's these little small little buckles there or straps or
whatever they are. You can even find see this little tiny bit of
shadow right there. I think that's strong enough of a shape to be a small shape. Again, we are not thinking
on a literal level. A shadow is just as much of a
shape as a shoulder pad is, assuming this is a shoulder
pad that I'm drawing, there's a little
sleeve pocket here. Again, I don't care that
it's a sleeve pocket. I care that it is a small
shape. Look at this. If I wanted to get really
interesting about it, there's a tiny little
dark shape right there, which in reality is
obviously a little shadow. But again, in the
language of shapes, we're not concerned
with discerning things on a literal level. There's an eye
somewhere around here. It's a small shape. You can think of the nostril
as a small shape. You can think of the
mouth as a small shape. There's a little
shadow under his jaw. This is a small shape. This little strap
from the helmet. Let's call that a small shape, and the shadow behind the ear, this part here under the helmet. That's a small
shape. I hope you're noticing that there are a
lot of small shapes up here. And we're not done.
There's little small shape here at the front of the helmet. The strap along the helmet
is also a small shape. You could look at
the highlight on his cheek right there
as a small shape. To me, it's identifiable enough to be its
own little shape. Now, unlike this part of the figure where
there's a lot of breakups via small shapes
all condensed together. In this area of the figure, there are still small shapes, but they're more spaced out. There's a small shape
via the shadow under the shirt and
probably another one right there. Block that in. There's probably another
one here that's triangular. The arm has a triangular
little shadow shape there that I think
identifies as a small shape. There's one there too. I'm just my eyes are darting back and forth between the
reference and my study, so I don't have enough time to recognize and
synthesize any detail. Oh, look at this. I missed a medium shape right
here in the pants. This shadow here
that I'm drawing. This is big enough to be
a medium shape, I think. Let's put that in. Yeah. This is definitely a medium size shape. I mean, it's bigger
than the baton and we call that a medium shape. But then back to the pants, there are little
shapes in here like little folds that are
prominent enough to announce themselves as shapes that are integral to the
overall design of this thing. Some of those folds
are kept so subtle that I don't think they
contribute to the overall shape. I mean, they're nice
on a rendering level. But as far as big medium
small shapes is concerned, I'm only including what I see
as being prominent enough to contribute to that
fundamental binary information. Is there a shape there
or is there not? That is upon a quick
visual inspection. Do you see a shape there or not? What I am ultimately telling you here is like, for
example, this arm, this part of the arm that
I'm coloring in red, on a visual impact
level, it's one shape. Rendering that Colsov has put into that arm is so close in value that it all merges and melts down
together into one shape. But on the other
hand, I am saying to you that this shape
here in the pants separates itself from
the larger shape of the pants in order to
become its own shape. This is what designers do, and a good designer doesn't matter if it's Kolsov or anyone. Insert your favorite
artist's name here. Without even knowing who it is, I guarantee they do
this because you can't really achieve good design unless you're
intentional about this. The boots have a little
rectangular shape there and a little
triangular shape there. These are all small
shapes again. The bottom of the boot has a
nice little horizontal shape there and it goes up. There is this little shape like this and a shape like this. What's pretty cool
about this type of study is even
though I've been drawing just the most basic
shapes and approximated even, I haven't even really been
trying to copy at all, it's starting to actually look like a decent
piece of work. Now again, part of
that is because I traced the silhouette
to begin with. Just coming up with that silhouette would
be its own day's work. Well, probably not for Kolsv, but I've definitely
struggled for a day over a silhouette.
That's not uncommon. But once you have that, doing this stuff is really fun because I feel like
you're composing, you are making a composition with the language of
big medium small. This boots I just
worked on here. Let me just outline some of the, let's call them
negative spaces here. There's one. Here's another
one, and here's another one. Notice the sizes are different. For example, he's not
putting his shapes in a checkerboard pattern like
this that I'm doing now. This looks like a checkerboard
or a leopard or something. Good shape design is almost never equally
distributed like that. There are interesting varieties, or maybe what I should say there is the variety
between spacings and sizings is what makes the shapes look interesting on a
compositional level. And you don't fool yourself.
This is a composition. A character design like
this or a character within an illustration is very
much its own subcosition. If you are only
populating the page with a character like I'm
doing here in this study, this whole statement is no different than any other
pictorial composition. It's a composition just as
much as it is a character. If there is a secret in art, a one sentence secret, I swear, I swear it's this, that the abstract level
is just as important, if not more important
than the literal level. I swear that is an art secret and in my years
of teaching students, I can pretty confidently say that most students
don't know that. I mean, I didn't know it
when I was a first student. It took me years
to discover that. Hopefully, I'm imparting it
effectively to you here. I think there's another
medium shape in this arm that breaks
it up a little bit. The shape seems to be enough
to warrant its own thing. Then, maybe if you want,
you can say, okay, this is a medium, a small
shape on the arm here. And it merges with
another one here. There's maybe another
small shape down there. Let's go with
something like that. You notice as I do this,
and I'm almost done here, but notice how many
more small shapes there are than big or medium. Most of your study will be concerned with placing
these small shapes. I'm just trying to
get enough of them in here that I can feel like it satisfies the distribution model that I showed you a bit earlier, where you have exponentially more almost small shapes
than you do big shapes. Even the small shapes
have to appear much more populated
than the medium shapes, which I feel like finally now I've satisfied
that condition. All this without taking
any real pains to draw exact shapes except for the tracing of the
silhouette, that was exact. In the context of
this type of study, I do recommend tracing
the silhouette. So at least you know you're working within the
correct framework, If you wanted to increase the level of difficulty
of the study, then draw the silhouette
yourself before moving into the inside shape stuff
that we're doing here. Just because I'm a
sticker for this stuff. One thing Sergey Kolsov
definitely did not do is make this shape so equal. So I'll just do a
quick tweak on that. You can take this stuff
as deep as you want and be as attentive to this
kind of detail as you want. Honestly, the more I do art, the more attention I pay
to this kind of thing. This is what has become
the most important thing to me, lighting,
rendering, whatever. All that stuff can
only happen or is only useful if all this big medium small shape
stuff is in place. Let's stop here. I think
this is a successful study, and we'll look at one
more related thing before signing off
for Chapter three. Here's a piece by John Neverz. You can see his Instagram
handle up there. I highly recommend
giving him a follow. He is just a fantastic artist with just immense
confidence in his sketches. The thing I love
about this one and really all his stuff is he really gets this idea
of shape breakups. I want to draw this in a way
that I would actually draw my own stuff in a way that I believe John Neverz
draws his stuff, which is just
playing with shapes, trying to commit them to
more of an intuition. Noticing things like, here's a big shape for the belly here. Here's the hips, which are off
kilter from the shoulders, shoulders, hips, gestural stuff. But in the shape category,
which we're in now, this is a big shape,
big belly shape. John Navarre says, Hey, there's pectoralis
muscles up here. This could be a good natural
way for a shape break. He gives you this little tiny little shape break up in here. Just thanks to nature, the pectoralis occurs in the
upper third of the torso. We have a one third, two thirds deal here. Nature is actually quite good at avoiding some kind of symmetry. Of course, it has other kinds of symmetry that it does employ. We have an arm here
that goes from thin to thick back to thin. And even the way he does
this little crude shading, notice how even that
has variety to it. It's like a tighter spring there and a looser spring there. I'm willing to bet
that's something that John Nevers has trained
over the years. He could probably put it
into words like I am, but some artists just
commit it to muscle memory. They find out what they
like and they go with it. Of how even the eyes on
his head are uneven. But back to shape breakups,
big medium small. His hips have some nice
little uneven lines, which are a lot of
small shapes in there. Then that parlays down into a medium size shape
for the crotch area. Then the leg that comes out is what is that a
medium shape maybe? It's a tapered cylinder as
well, which is interesting, thick to thin, which then breaks out into a big old C curve
for the calf muscle. And some nice offset symmetry right there for the
other side of the calf. That's also thanks to nature. Nature is designed that way. Here's some simple
shading and he's got this sock or boot thing that adds all kind of small
little shapes in there. To be clear, these are very sketchy little
shapes I'm making. They're not as refined as
the olsav study I just did, and that's not a knock
on Nevers work here. It's a sketch. It's the
nature of a sketch. It should be this way
as you're exploring. But the thing I want to
impart here is that this is ingrained in an experienced
artist's thinking. I just threw in a cylinder
there. Do you guys see that? The more you use
these fundamentals, the more you can
always have them be the glue of your
drawing process. Here's the other foot here. Even the way that
foot is designed, is like this wedge
like this and with the little gap
between the big toe and the rest of the toes, doing a little break up there. Even that breakup is
similar to the breakup up here in the sense that it's
one third versus two thirds. These principles are
discoverable everywhere. I overlap the sword with the leg in my sketch,
but that's okay. I've learned long
ago that it's really not important to copy
something exactly. If I wanted to copy
this exactly, I could. But to be honest, I don't see the point in
doing that anymore. Even someone like
John Neverz if you asked him to draw this
exact thing again, he probably would overlap the sword too or do
something different. I love how he's breaking up the shapes here of the clavicle. It's like this is making
a shape like that. But on this side, it's
a different shape. There's all kinds
of little small shapes being made here with the sternal mastoid
muscle here and here, the roundness of the deltoid causing some small shapes
where it overlaps there, overlaps the triceps muscle. So shading on that
triceps muscle, giving all kinds of
little small shapes. Here's a nice medium shape, that forearm coming
down to hand over here. But with some nice little
breakups of smaller shapes, or maybe these are
smaller medium shapes. I'm not quite sure in
here, just to offset that. Okay. And then we
go into the hand, which is kept nicely
in silhouette. We'll just shade that in.
Okay. Always a nice idea to shade in your shapes. It's always been a
helpful tool for me just to gauge how
strong they are. You can feel it, how easy is
it to shade in these shapes. A well designed shape will
also be easy to shade in. I'm not sure if that's a
universal rule or anything, but it's something I've noticed. I love the cross contour
here tracking down the rib cage into
the naval area, and even that naval
is on an angle, and then that cross
contour picks back up for the belly area. Then look at this little detail here. What is that a scar? I'm not quite sure. But what it is is a nice breakup of shapes. It's added this rounded
triangle shape in here. That doesn't exist
on the other side. Notice how John Nevers did not put an equal shape on that side. Whenever you can try and
avoid obvious symmetry. The symmetry you can't avoid the two arms should
probably be the same size. That should be symmetrical, but they appear offset
due to the pose. The shoulder being at an angle like this affects
how the arms look. They're not just pose the
same way on both sides. That's where gesture
comes in. Gesture can be a tool that helps you
find interesting shapes. If you have an
interesting gesture, chances are your your shapes will stand a better chance
of being interesting. Let's put it that way.
Okay. There we go. This is how you can condense
these lessons of shape, but even how gesture and form play into it and just
start sketching. I do recommend studying
other artists, let's call it sketch language, like the visual language
they use when they sketch, and I absolutely love John
Nevs's visual language. His strokes are so free and they look like
he's having fun. That's what I want my
stuff to look like. You saw me study from Glen Ken's strokes in the warm up chapter. I find the same kind of
appeal in John's work. It's in the same category, but it does look different
than Glen Keynes. Anytime you are making any
kind of mark on your drawing, try and always think of what kind of shape
is it imparting? Is it a big shape, medium
shape or small shape? Then within that, is it breaking up an otherwise boring area? When I say boring, I mean
just one shape left blank. Like if this torso
area were just blank like this, if
it were just blank. Well, you'd want to
put something there, obviously, like anyone would know you have to put
something there. But let's just say
you did it like this. Put his pectorals like that
and his belly button there. I could see many beginning artists making a
choice like that. But can you see how
it's not as interesting as what Never has did and
what I've copied is this. There's just more
activity going on, more specific attention paid
to the big medium small, and I always enjoy how
the big shape like the belly and torso area
I showed you before. It looks like a slice of bread when I outline
it like that. But can you see how that shape is untouched in the
drawing? It's still there. I've overlaid it with
this medium shape. And this medium shape and the navel would
be a small shape. And some of these shapes up
here would be small shapes. But the overall big
shape is still intact. And that's something
I use all the time to evaluate my work, as I ask myself, are my
initial lay in shapes. Those, strong pillar shapes. I call them sometimes, they're the pillars of the
work. They hold it up. Are those shapes still
intact or have I ruined them in the time it took me to put in all the
rest of the shapes. That is a very common
thing, by the way, to lay something in and it's looking strong and
then half hour later, somehow along the way,
you've ruined it. When you do that,
it's probably that you've lost the identity
of your bigger shapes. All right. I think
this is a good place to close out Chapter three. Chapter four, we will dive a little more into perspective.
17. Chapter 4 - Perspective: Welcome to Chapter
four perspective. As far as my relationship
with the fundamentals goes, Perspective was the hardest one for me to wrap my head around. There's just a few hoops you have to jump
through to convert this three D world
around us onto that proverbial two
D piece of paper. But after this chapter, you'll understand the most
common types of perspective, 1.2 0.3 point perspective, and we'll expand
on concepts like the horizon line and how vanishing points
affect the scene. We'll start off with a series of lectures and
then move right on into two full drawing
demonstrations. Let's get started.
18. 1-Point Perspective: All right. We know that when drawing
in linear perspective, you first need a horizon line, and on that horizon line, we can place a vanishing point. You can place multiple vanishing points
on a horizon line, but this is one
point perspective. So there's only one
vanishing point. And from that vanishing
point comes radiating lines both below
the horizon line and above the horizon line. Now, one point perspective
assumes that lines going in this direction are
all straight and parallel. They do not converge
at a vanishing point. Likewise, all lines
going in this direction, vertically are also
straight and parallel. They don't converge at a
vanishing point either. This is the easiest
perspective grid to draw in. I'll draw a few
cubes here quickly. I'll go straight vertically up until I hit one
of my grid lines. Then I'll follow
that grid line back, go straight horizontally on both the front and back sides, then connect the front and
back following the grid line, vertically down and connect these two front and back points
following the grid line. All right, great. Now
I'll draw a second cube, but using the top of my
first cube to help align it. I want these two
boxes to be side by side in space at the same depth. But I also want this cube to be less deep than the first one. I'll shoot a line here, and now I can construct my cube in just the same
way I did the first one, following the grid lines, and then anything that's
horizontal or vertical, I just draw it straight
horizontally or vertically. There we go. That second cube is the same height as
the first cube and the same distance
away from us and its depth is roughly
half of the first cube. Let's make another cube that aligns with the
back of this cube. This time, I'll extend the
object above the horizon line. As we know from
previous chapters, that means we're
not going to see the top face because
it's above our eye line. One point perspective is great for when
you're looking down the barrel of something like looking directly
down a street. The first thing to ask yourself, as always, is where
is the horizon line? Well, it's obviously
not there because whoever took this photo
is not 20 feet tall. If the horizon line is the
eye line of the viewer, that means the horizon line
is somewhere down here. All right. But somewhere is not good enough. We
want to nail this. Let's move the
horizon line away and bring in an average
person to gauge height. The height of a person can
help us find the eye line. Now, in this visual
thought exercise here, we need to find the height of an average person that's
accurate relative to this photo. Now, it's hard to
gauge height when he's just in the middle
of the street like that. Let's put them near a
wall because I feel like I know how tall a person is
in relation to this wall. I think that person would be
about tall in this scene. At least that looks right to me. Now I can just
bring that horizon line down to cross his eyes, giving us our eye line. Now, let's put our little vanishing
point in the middle there, and let's shoot a
few grid lines up. Hey, those look pretty good. They look like they're in
alignment with the windows. Let's do another batch
of those grid lines, still looking pretty good. Another couple here
for the top of the roofs, yep, still works. How about for the sidewalks and where the buildings
meet the ground? Here it doesn't quite align. It's just a bit
off. Now, sometimes that's just going to happen. One thing you need to
keep in mind about linear perspective is that it assumes that everything
is rectilinear, that is elements in alignment
with each other on a grid. Now, I actually do think that this photo does
meet that criteria. Modern cities often
are built on grids. I think the culprit
here is I got my eye line just a
little bit wrong. It's too high. Watch this. I'll gently lower it adjusting the perspective
lines as I do. There we go.
Everything perfectly lines up now. But
hang on a second. Now that person I place near that wall is too tall
for the eye line. So do I have to shrink
him down like this? Because now he definitely
looks way too short. I mean, who's to say?
Maybe that is right, but I still think the guy
is actually this tall. It's just that the
camera person who took this photo was crouching down a little bit to get
closer to the street. Therefore, the viewer's eye
line or the eye line of the lens was just a bit lower
than average human height. Again, because the photographer
was crouching Okay. So here's another photo.
This exercise becomes a pretty fun thing to do to familiarize yourself with
this kind of perspective. This to me looks like
just a general snapshot. Someone pulled out their
phone and took a photo. Chances are, if I just
struck a horizontal line, right where these
people's eyes are, see those people
in the distance, I'm trying to shoot right
through their eyes. In this case, I'm
reasonably sure that is indeed my horizon line. Now it's time to find
the vanishing point. Well, I'm just
eyeballing the angles created by all of these
perspective lines here. I'll undo all those.
They're sloppy, but they probably merge
somewhere about there. Then what I like to do in photoshop is just
grab the line tool. I can just draw lines like that, and I'll just start
at my vanishing point and draw a line out there, aligning with the undersides of these patio support things. Let's do one at the top
of these garage doors. Let's do one on the
sidewalk and already, it's off. Let's see. Let me undo that. I'll
start from the edge of the sidewalk and trace it
back to the horizon line, and it looks like the
point wants to go just a bit to the right of my
current vanishing point. So I'll undo what I did. Instead of drawing my dot
as a vanishing point, I'll just start my cursor
here, grab the sidewalk. There's this little faint line right there on the sidewalk. I wonder if that lines up. That's looking pretty good. Then from here, I will
just grab that part again. Let's get the top sides of these buildings
just to make sure that the tops are generally lined
up. And this bodes well. Because we've covered
so much space in the picture and the
lines generally line up, they're like 99% there. I can be reasonably
certain now that that is indeed a working vanishing
point for this shot. But if you want more convincing, you can grab more lines here. Maybe the top of these posts. Now, one thing
that's interesting, this awning here does not line up with the
vanishing point. It goes to the right of it, and this is one of
those times where you can't expect everything
to be perfect. That awning device is
added to the building and resting on a complex
mounting device. Chances are in real life, that awning is
just not perfectly aligned with the buildings. It's probably just
rotated a little bit. Just due to age and weather
conditions, whatever. Therefore, it's a bit off. I mean, it's pretty
close, though. That relationship right there, I would consider quite close. If I were drawing this,
which I will soon, I'll do a drawing very soon, I would just line it up, so it perfectly does match
the vanishing point. You know, I would correct for
those errors a little bit. But anyway, let's shoot
a few more lines. There's the window of the
shop there in the foreground. There's the ground of the
shop. Those are perfect. One thing I just want
to point out here, you see this seated
figure right there? Well, because that
person is sitting, that means that their eye line, which is here, is
below our eye line. The photographer of this image, I would assume is standing up. I've kind of proven
that by aligning the horizon line with the standing people
in the background. That means we know
if we wanted to draw a seated figure in
this perspective, we know that that person's head should be below
the horizon line. Because they're sitting,
they're lower than we are. At least their head is
lower than our head, so it goes below
the horizon line. There's one other
really important lesson I want you to glean from this. I'm actually surprised at this. This is something
that people when they gain skills in art, a lot of people still trip
up on this. Here we go. If I were to ask you, what is the physical distance between this line and maybe
this line here. You know, what is that distance? Obviously, it's all the
same across this line. What is that distance in
meters or feet or whatever? Let's just pretend because I don't know what
the distance is, but let's just
pretend it's 1 meter. That seems like it
could be about? But let's just say it is. Let's
just say that is 1 meter. But now, I'll duplicate those same lines and
drag them up this way, so they're further
back in space. What is the distance
between those two lines? You got reaction might be
to say, oh, it's the same. But no, it's not even
close to the same. These two lines here
are way further away from each other than
these two lines up here. This is due to the fact that depth compresses two
dimensional height. That was quite a mouthful. What I mean by that is simply to preserve the same distance
between these two blue lines. At this depth, this top line needs to be brought
down significantly. Okay. I just tapping the down
key on my keyboard here, it's probably
something about there. Now, I'm just eyeballing this, but I'm going to say that is about the same 1 meter distance or whatever that measurement is. But essentially now this and this are about the
same distance apart. Obviously, this
relationship keeps progressing the further
back in depth you go. If I were to draw a
line way back here and I wanted a 1 meter
distance back there, Well, I am just barely
going to even move my line, it's not even visible really. The lines are so close together
at this point in depth that you almost can't perceive the difference in
height between them. This is just something that
happens when we convert a three D space onto a
two D page like this, and it comes up
literally all the time when you draw in
linear perspective. But before all that, there's yet another really
important lesson I want you to learn about
perspective in general, this scene is as good
as any to show it. Let's go ahead and bring
back in our old friend here. Hello, sir. If I were positioning
this guy on the ground. How do I know where his feet
go and where his head goes. Just imagine you wanted
to draw someone. How would you know how
high to make them? This is actually quite
easy, but it's again, something that often
goes overlooked, even with more
advanced students. The first thing I
like to do and I did this with the
cubes a minute ago, I like to landmark where
they touch the ground. That orange line there
is going to be where this guy's feet
touch the ground. I'll just lower him down. He's standing right
on that line. Okay, that's great. His feet are fine, but how do I know
where his head goes? Is he this tall,
is he that tall? How do I know? Well, it's easy. Assuming average height here, all I have to do is make sure his eyes align with
the horizon line. The horizon line
crosses his eyes. That means that he is the correct scale for
this part of the scene. Actually, what it means is I've made him the same height as us, the photographer, the viewer. If this person needs to be a little taller than
the photographer, I would just simply make him a little bit above our eye line. His eyes are just a few
inches above our eyes. This is actually the
secret of placing anything that you know the
size of in perspective. Let me just move this guy over here along with the orange line. Let's duplicate that orange
line and put it over here. I want that same guy to now show up where this orange
line is over here. I'll duplicate our guy. Obviously, now he's a giant
note how dramatic this is. This shows how easy it is to make mistakes in perspective. Just from this point
here to this point here, which is not a lot of distance
in two dimensional space. It's only like an inch and a
half higher on my page here, and yet look at the compounding
effect of perspective. This guy is a giant. Like comically giant. He's three stories tall. It's really, really mind blowing how quickly the scale changes as you increase
height on the page. But anyway, back to
the question at hand, how do I know how
tall to make them? Well, simple, his eyes
just need to be in the same relationship to the horizon line that
the first guy was. That's it. Where was
the first guy there? Remember, I said
he's a bit taller than our photographer,
so it's about there. There we go. I just
realized I put him below the orange line.
Let me just fix that. Your relationship
to the horizon line does not change with distance. This is now how high
two dimensionally, this guy would be back there. We can put this guy
anywhere in the scene. Let's put him just standing
on the street here. Well, all you got to do is
find where his eyes are, which is again, just above the horizon line is what
we're saying. There we go. Now that guy is standing at that exact point on the
street right there. A quick little tip and trick I like to do is
just add shadows. If we just make a
horizontal shadow, We're going to a shadowed
scene here anyway. The shadows actually would be just like this in real life. Shoot a horizontal soft shadow underneath the figure and
it plants them in space. There we go. I do
recommend playing with photos like I'm doing here when you're first
learning this stuff. Don't even worry
about drawing it yet. You just want to wrap
your head around how the device of linear
perspective works. These are principles
and lessons that are actually much harder to learn
if you're just drawing it. Because if you're drawing
it, you're probably going to make shape mistakes
and stuff like that, which will just confuse your
diagnosis of your problems. We just want to get at the heart of how the perspective works, and tracing horizon lines and vanishing points and perspective grids and placing people and objects from photos
into another photo is a really great way
to fast forward and accelerate your
perspective learning. Go ahead and give this
a shot even right now. It shouldn't take longer
than 10 minutes or so.
19. 2-Point Perspective and Placing Characters: All right. Let's now go
over two point perspective. If we're using the looking
down the street analogy, which is honestly how I
remembered this in my early days. So we're still looking
down the street, but we've turned our
head a little bit. So now we're observing the
street at more of an angle. The angle is no longer
perpendicular to the street. So let's first place our
horizon line as we always do, and this is the exact
same calculation. Now, this is too low, but watch what I'm
going to do here. This time, I'm not going to use another person in the
frame as my reference. I'm simply going to ask myself, where are the perspective
grid lines straight horizontal and that street car there gives me a good
reference for that. Right on top of the red
line, right about here. I think that's in
line with my eyes. In other words, the eye line, in other words,
the horizon line. And again, what you can do is just look around
the scene and look at any point that intersects
the horizon line and say, does that point roughly intersect with my eyes if
I were standing there? I think, yes, that
horizon line makes sense. Okay, now we need to put a vanishing point on
the horizon line. It clearly doesn't go there. Just a cursory glance should tell you that it goes
somewhere over here, and that's because you
can easily determine that these angles intersect
somewhere over here. When I just did that, I can
see my vanishing point has to move just a little over to
the right there. Perfect. We extrapolate some grid
lines from that point, and sure enough,
they line up great. Again, in this scene, we can be reasonably sure
that things are rectilinear. That is, the streets
are parallel. The benches are parallel
with the street. The buildings are parallel
with the sidewalks, which are parallel
with the streets. The edges on all those things
are square to each other. You get the idea.
That's a condition that must be met for linear
perspective to work. Okay, but back to the gridlines, now, we have some other
grid lines to contend with. I'm lining up bench corners, the bottom of the streetcar, the top of the streetcar window, the distant building back there. And these lines appear to be converging somewhere at a
vanishing point as well. And of course, they do because this is two point perspective. But to find that second point, we have to zoom way out. I mentioned this in
a previous chapter, but the second point in a two
point perspective drawing or picture is often
way off the page. So let's extend that
horizon line and then we'll extend our grid
lines to the horizon, and we can now see
that our second vanishing point goes right here. And just for fun,
let's fully extend these grid lines and
add a few more as well. So let's take stock of both
vanishing points here. And look at the relationship, this distance between
vanishing points in a two point perspective
is very common. More examples of two
point perspective. We take this beautiful
background piece by Armand Serrano for
Lilo and stitch. Once again, where is
the horizon line? Well, to find that,
I'm going to look for a straight horizontal
line in the picture. I think I found it right
here, the tabletop. That looks like a
straight line to me. I'm going to put the
horizon line there. Just going to zoom out to make room for our vanishing points. As per our last exercise, I'm going to eyeball
one right here, and I did that by
visually tracing the lines back to where
I think that point is. Now let's actually
trace the lines back. I'll just pick three obvious
lines to start with. And yeah, I'm pretty close. I think the point could be
moved just a little bit, and then I can trace more
lines out to test that. Yep, it's looking good. I was able to gauge
that vanishing point pretty well because
it's right on the page. Oftentimes, one of the
vanishing points in a two point perspective
is on the page, although that's not a rule. But the other vanishing point
being so far off the page, I'm not even going
to bother guessing. I'm going to just trace it
back and find it that way. Picking two or three obvious
lines in the drawing, and now I can place the
second vanishing point where they converge
on the horizon line. As well as shoot more grid
lines out to confirm it. This looks good.
Believe it or not. If you can get here,
you're already halfway to drawing good
perspective scenes. Again, I do recommend you sit
down and do this exercise, be it with photos or with
other arts or both ideally, just to get your head wrapped
around these concepts. Let's zoom back in a little
bit and bring Lilo in there. Now, she's way too tall if
her feet are planted there. You should be ahead
of me already. We need to find her relationship
with the horizon line. We could bring her down here, having the horizon
line cross her eyes. But what does that assume? That assumes that the viewer or the camera taking
this picture, if it were a photo is exactly
the same height as Lilo. I think the viewer is a
little taller than Lilo. That means we have
to scale her down a bit so her eyes are
below the horizon line. This makes Lilo about half a heads dimension shorter
than the viewer. I think that looks about right. Now, another really
useful and overlooked tip about placing figures in
perspective scenes like this. Let's just make Lilo
giant here for a second. Now I will correct her
relationship to the horizon line. There we go. Now, what I just did is actually
quite powerful. I've just extended the floor beyond the frame but accurately. What I'm essentially
telling the viewer here, and here I'll draw it for you is that the perspective
extends like this, Lilo's feet, if that
space were in the frame, would be accurately placed, and I'm just proving that here
by drawing out the scene. This is something
I see students and even professionals get
wrong all the time. When a figure is placed in the foreground and
their feet are cut off. Honestly, the figure is more often than not
incorrectly placed, and that's because
the artist often neglects the relationship
to the horizon line. For some reason, the
thinking seems to be that if a figure is
just in the foreground, you can place it wherever
you want, but you can't. That horizon line will
tell you where to put it. Assuming, of course, it's standing on the
same ground plane. So we go back here again, cropping Lilo's lower
half out of the frame, and hopefully you can
detect the accuracy now. She is a few steps closer
to that foreground door. I consider this a composition slash perspective essential.
20. 3-Point Perspective: All right. Let's go over
three point perspective now, and we'll take a
look at this photo. The two point perspective grid lines are
pretty obvious here. We'll shoot a few this way. Then we'll shoot a
few the other way, following some street markings and the building windows there. Now, we still don't
have a horizon line. We have to extend
these blue lines up to find where they intersect. Just like before, there's our horizon line with
our vanishing point, right where those lines
are intersecting. The second vanishing point, again, way off the
page this way. I'm not going to
bother to find it because we just did that
in the last section. Now, let's pause
right here and talk about the nature of
this horizon line. It's very high up on the page. Of course, it makes sense to be that high here
because after all, we're sitting way up
above the ground, and our eye line does indeed intersect with the
fifth story there, if I'm counting correctly. When you place the horizon line that high and I'll do
a quick sketch here. I'll just use a one point grid because it doesn't
actually matter. Placing the horizon
line up high like that makes it look like we're
high above the scene. Just think of these
boxes here as cars. We're clearly observing
those cars from high above as they
pass beneath us. And the same perspective is
true here in the photograph. But let's remove these
perspective lines. We have another set of
perspective lines here, the ones traveling vertically. This is unique because in one point and two
point perspective, we just made these lines
straight and parallel. Now in three point perspective,
they're not parallel. They also converge at a point. I'm going to state
something now and then circle back later
to reinforce it. This third point
convergence only happens when you start
tilting your head down. But for now, where
is that point? Well, unfortunately, it's
also way off the page. Depending on the angle at
which you're looking down, this point can be
way further off the page than we saw with
two point perspective, and there it is way down there. This point dramatically
changes position depending on the angle or
the tilt of your head. In this photo, we're really
only barely looking down. Our view is still mostly looking out toward the horizon line. I'll demonstrate this with this little three D mock
up scene here. I've just got a bunch
of cubes sitting there. Let's now roughly match the angle that we just
saw in that photograph. So we climb up like this. Important to stop
and note here that this is not three
point perspective yet. Notice how the
vertical lines are still mostly parallel
and straight. That's because
we're still looking directly out into
the horizon line. We haven't tilted
our head down yet. Let's now tilt our
head down like this. There we go. That's roughly
what we saw in the photo. I'll zoom way out here
just to reiterate that this third vanishing
point is way down here. All right. Let's
bring this back. Now I'll tilt our head or
tilt the camera in this case, so that we're looking more dramatically down at the scene. What does this do to that
third vanishing point? Well, let's zoom out and trace some perspective lines
here and look at that. That third vanishing point is way closer to the frame now. And in exchange for that, the horizon line is the
thing way off page now. Let me show you how this looks. I'm going to guess the
horizon line is there. Let's see how close I am. We'll trace out two perspective
lines, and I'm close. The horizon line
has to come down just a bit to here. All right. But back to where we were, let's take the next
logical step from this view and look even
more dramatically down. This time like we're looking
directly down at the scene. This time, I don't
even need to zoom out to find that third
vanishing point. I'll trace some
perspective lines, and that point is
right in frame now. In fact, with such a dramatic
down angle like this, our horizon line may as well
just be infinitely far away, and we can completely
disregard it, and just think of this as one point perspective
all over again. The horizon line
would go right here. We may as well edit out the
slight angles in these lines and just make them straight like they would be in a one
point perspective. The horizontal and
vertical lines would be once again square and
parallel to each other. Remember what one point
perspective simulates. To recall a line earlier
in this chapter, we're looking directly
down the barrel at something like directly
down the street. In this case, we've just
rotated the camera so dramatically that we're looking directly down at our scene. So here's a photo where we're more or less looking
directly down. We know that the
vanishing point will be on the page here
and there it is. Now, your other grid lines
can still be parallel, but on an angle, it doesn't have to be
horizontal and vertical. Now, this photo
almost does that, but you can see
it's not perfect. These grid lines do
actually converge at two distinct vanishing
points, more like this. But if you just can't
be bothered with dealing with that tiny
bit of convergence there, you're absolutely
free to discard those vanishing points and
just make things parallel. It really won't hurt the image. The benefit is it makes
things faster to draw because you're not constantly checking those two
vanishing points. You're just only dealing with
the one vanishing point. The reason I'm telling
you all this is mostly because in my early days, I erroneously thought that
just because you're looking down or up means you have to
use three point perspective. But that is just not the case. All right. Let's do a
quick dissection of this beautiful piece
from Black sad drawn by Juan ju Gundo because this is a dramatic
downshot just like before. The vanishing point responsible for that will be
inside the frame. And just quick note, that vanishing point can be
anywhere in the frame, like here it's on
the lower left. It doesn't have to be in
the middle or anything. But I'm more interested now in the other two vanishing points. I'm going to strike
just one line this way. Now I'll move it to different
spots in the illustration. Let's check the
baseboard here first. That's a nice clear line, and you can see
that it lines up. Okay, without changing
the angle of that line. In other words,
keeping it parallel, let's check the bottom of the bookshelf at the
other side of the frame. And you can see that a slight margin of error
notwithstanding, we're in line here too. All right? That
means this part of the rug should be
fine and it is. We'll check the front of
the couch cushions here, and yep, they're fine as well. It's only when I go
up to the top of the picture frame that we start seeing a bit
of a disparity. Let's try the other
extreme edge of the frame. And yeah, there's a bit
of a disparity here too. That means that there is a horizon line somewhere
way above the picture, and these perspective lines are converging to a vanishing
point on that horizon line. But it's just not affecting
the picture very much because both the horizon line and the vanishing point are so
far away from the picture. These lines could have just been parallel and nobody would
notice the difference. There is a bit more
perspective convergence happening with this side
of the grid, though. That line lines up with the rug. But then if we bring it over here to this side of the rug, you can see it's starting
to be off already. We can check with the baseboard here and yep that's pretty off, and we'll check with the
bottom of the window sills. This is obviously off now. But even this is really not that much
perspective information. These lines still
could be parallel, and I bet nobody would
notice. I mean, watch this. These red lines
here are parallel, and I use them to skew
the illustration, so it's lines line up with the red lines and
are now parallel. I'll let you decide if that substantively
changed the drawing. I did find something extremely interesting with
this piece though, and I actually debated on whether or not to
even include it in this class because
I do think this breaks out of the beginner mold. In fact, what I'm
about to show you, I've never even
used in my own art. But check this out.
I zoomed way out of the picture in order to find the horizon line and
vanishing point. Part of the surprise is that the horizon line is
below the picture. This is extremely uncommon, as normally the horizon line is above the picture when
you're looking down. And actually, this is only half of the surprise
I want to show you. But to quickly go on aside here. I remember reading
an interview with Guarndo about the
illustrations in this book, and he said specifically
on this one, he initially drew it with the horizon line above the picture, which is how it
traditionally works. Then one day he just came into the studio to do some work, and this picture was
upside down on his table. And when he looked at it, he just liked the
feeling of it better. I think he said it gave
him a bit of vertigo, which totally fits the mood of the story in this
part of the book. So we just left it upside down. I thought it was an interesting
bit of artistic license there because when you're looking down at a
scene like this, almost always what you'll see is the horizon line
above the picture. This lower horizon line
simulates something interesting. Let's pretend this
is a scene I'm shooting and I'm shooting
down at the scene like this. The horizon line here would
be this way above the frame. But if I did this
awkward tilt of the camera like this,
well, suddenly, now I'm projecting the
horizon line below the frame, and that's what's happening
in the black SAD piece. It's an interesting
and unique bit of cinematography. All right. But now for the main surprise, what you're about
to see is something that does not follow the rules. In fact, it's something
you can do to break the rules as you
advance in your art. As we just talked
about, the horizon line is below the picture
for these lines. Well, it's above the
picture for these lines. Not only that, but
these lines don't even really converge
at a specific point. They're just
ballparked out there. Anyway, this dual
horizon line thing, you almost never see that. For that reason, I almost
didn't put it in this class. Because I don't want
to confuse anybody, but I think the
overriding lesson that I want to
impress upon you is, it's very important to remember
that these are not rules. They're merely principles. But as a palette cleanser, let's go back to
how you're going to see three point perspective, 99% of the time. Here's a beautiful
piece by Alex Ross. We're looking down at the city. Now, we're not looking
too aggressively down. That means the third
vanishing point is going to be below the frame, but not by too much,
and here it is here. Then the other two
vanishing points will share a horizon line
above the frame, and there they are right there. You can flesh out a grid from
those points, of course. If you can set this up, which you should be able to now, you're halfway to a good
accurate perspective drawing. There are, of course,
some tips and tricks and things to keep in mind when
you actually draw the stuff, and I'll be sure to
highlight those in the demo. But really, knowing how to set up the shot is half the battle. I really find it
helpful to analyze and actually plot out
other photographs and drawings like I've
been doing so far in Chapter four to help you wrap your brain around
these concepts. By doing so, you'll also undoubtedly catch
where artists are cheating and maybe not converging to an actual
vanishing point, but just ballparking it. Then you can evaluate how acceptable it is
to do that thing. Before we close
out this section, you might be wondering, well, what do you do when you're
looking up at the scene? I've been looking
forward to this upcoming little image here. All you got to do to
look up is rotate this whole arrangement 180
degrees and look at that. We're looking up. The exact
same principles are true. Just reverse the location of the horizon line and that
third vanishing point. Just following these grid lines, look how quickly you
can start drawing structures from a low
angle point of view. All right. So go
ahead and practice 1.2 point and three point, both looking down
and looking up, deconstructing the
perspective from photographs and other drawings. And when you're ready, we can try and draw
something ourselves, which I'll do in the
next section. Okay.
21. 1-Point Perspective Drawing Demo: I know I said in this section,
I would draw something, but there is one more really important thing I
want to show you. We need to know how
different types of lenses translate in
perspective drawing. One of the main
characteristics of a lens is its focal length. There are three basic
categories you see here. The focal length, which is
measured in millimeters, essentially translates to how wide or how zoomed in
the photograph will be. Now, the actual thing
those millimeters are measuring gets technical and doesn't even matter
for our purposes. What matters is how it
changes the picture. Perhaps on a more
relatable level, if you have a smartphone, you probably have
different types of lenses built into it. My iPhone 11 has three lenses, the three you just saw
in the previous slide. I went out to my back deck
and took some photos. Man, I got to restain that deck. This one was taken
with the normal lens, which is probably your default
lens on your smartphone. Now, I was just standing
up when I took this photo, it's no surprise that
the horizon line will fall exactly at the
height of my eyes, which I've just confirmed here with two perspective grid lines. Pop Quiz, is this one
point perspective or two point perspective? Well, we're not really
looking down the barrel here. Notice that the photo is
taken at a bit of an angle, like I'm standing here, but looking slightly
to the left. Anyway, that means we have a second vanishing point
on our horizon line, and you should know from
previous sections that it's probably somewhere
way out here. Yeah we'll trace some grid
lines and there it is. Way off the page. So far,
this is nothing new. But now let's look at the shot I took with the wide angle lens. I did not move my feet. I just switched lenses
and took a shot. Yes, that's my
finger in the frame. I am not a very
good photographer. Okay, but watch this. I used the same cropping here
and this is where the horizon line
and vanishing point were on the previous shot
with the normal lens. Those were its perspective
grid lines too. But notice on this
wide angle photo, we've got to make some
serious adjustments for everything to fit again. While we're here,
let's just shoot out a few more perspective lines just to remind you
how it all works. Notice here in the
wide angle shot, we're seeing a lot
more of the scene. This is what we saw
in the normal lens shot versus the wide
angle lens shot. So, let's zoom out now and find that second
vanishing point. This is how far I zoomed out the first time with
the normal lens. But now with the wide lens, I don't have to
zoom out that far. The second vanishing point has come a lot closer to frame, and this is how wider lenses affect how we draw perspective. This also means that a
perspective grid line on the ground plane close to camera and up here
above the horizon line, they are going to
be quite angled. That's another characteristic
of a wide angle lens shot. Okay, so now we look at
the telephoto lens shot. And right away, I'm
sure you noticed we see less of the scene,
which makes sense. Telephoto is the
opposite of wide angle. Here, I'm comparing
the telephoto shot with the normal lens shot. I want to show you
something interesting. We'll strike a grid line here. That's in the telephoto shot, and we'll now carry that over
to the normal lens shot, putting it in the same spot, going across the
coffee table there, and notice it still lines up. Let's try it again across
the top of the fireplace. Bring that line over,
and yeah, it lines up. This shows that a
telephoto shot is essentially just a cropping
of a normal lens shot, a cropping that is then enlarged to the size of a regular photo. A telephoto lens is essentially just a high powered zoom.
That's how I think of it. The one pretty major
drawing implication here, and to show this, I'll just
show you a perspective grid. Let's pretend this is
a normal lens shot. Well, if we're now cropping into this and enlarging
this to full screen, our perspective grid
has gotten let's say flatter because we're using fewer of the prospective lines, or at least our drawing travels less distance along
those perspective lines. In fact, in live
action filmmaking, directors choose telephoto
lenses to do just that, make a shot look flatter, less perspective, less depth. Telephotoshots have their place, but generally don't make for the most interesting drawings. The good news is, if you buy
longer and longer lenses, you could probably start taking covert pictures of celebrities
in their underwear.
22. Drawing Demo Continued: All right. Without further ado, let's put all the stuff into
practice and draw something. What I'm going to
do here is convert my two point
perspective photograph into a one point
perspective drawing. I will be using this deck
photo as reference here. This is something
that is very much in line with what I did when
I was first starting out, I would always draw from
reference because then the answers are in front of you if you can deconstruct
them properly. I think in the context of being a beginner or an
experienced beginner, yes, you should also
draw from imagination. But that should take up
less amount of space than drawing and studying
really from reference, seeing if you understand
that reference by being able to pull off a
successful drawing of it. Obviously, I'm creating my one point perspective grid here, and I'm just using photoshops
line tools to do this. You could alternatively
make a series of parallel lines and then distort or skew them into
a vanishing point. That's probably a
faster way to do it. I'm doing it this way here,
just to make sure we're all fully on board with
exactly what I'm doing. You can see my layers
over on the right there. I've put the perspective grid in its own group and just put
that group to multiply, so it shows through
the background and decrease the transparency. The perspective grid will always be sitting on top of my drawing. Now I'm just looking at
the photo and just with a very soft pencil brush or my calligraphy brush as
I usually draw with, I am just plotting out
just basic landmarks. I'm starting with pick an area
and start with it really. I'm starting with the stairway
at the end of the deck, which leads into those
two flanking recesses at the end of the deck
that have those boxes. Those are all solid
enough forms. Anything boxy is very
good to start with. This photo is good because it's mostly boxy forms
like that fireplace, for example, is basically
a series of boxes. Even the couches and chairs, while they're not literal boxes, you can almost picture them
as being contained in boxes. They're very easy to simplify into a box and then break
it down from there. What you're seeing here is video sped up two times the speed, which is actually not that fast. When you see my YouTube videos, those are often sped
up 2000 times speed. This is still, I think, a more honest look at how
the process goes. Now, speaking of process, this is just one
possible process. This is the way I did
it when I was learning. That is, I had a
perspective grid, and I tried to be as
faithful to it as possible. As you gain experience, you don't necessarily need to have the perspective
grid that fleshed out, and you don't necessarily need to always be referencing it. There's a certain
amount of eyeballing you can become comfortable with. It just really depends on how technical you want your
drawing to be, you know, how technically
correct it should be versus the feeling you
may want to inject in it. In fact, the piece that I end up with in this recording
doesn't really look like one of
my pieces because I actually don't draw
this way anymore. I have become comfortable with a certain level of eyeballing, which introduces a certain
amount of error for sure, but there is a certain amount of error in art that
can be aesthetic. And I feel like I've
spent years finding that. However, I do consider
that kind of thing beyond the realm of what a beginner should be focusing on. A beginner should be focusing on getting a technically
accurate drawing, something that feels
like it has space, three dimensionality
to it, some depth, that it lines up with
a perspective grid, and that you're able to use the tools we've been talking
about to achieve it. That is the mystery
should be gone. Every step should be
clear in your head, and if it's clear, that means it's repeatable, and that's
where you want to be. All right. So I'm doing
one of those things now. I'm finding the middle of that fireplace box
with that x trick. Remember, you draw an x between the four
corners of the face and where the x crosses is the middle of that
face in perspective. And you can see, I kept
that x very light. I think I even put that
x on its own layer and I'll use that layer for little
tricks like that later. Although really the only tricks I use is I use the X
thing a few times. Everything else is done by, but also based on the grid. Here comes the coffee table. Just to talk about
what I'm doing like the nuts and
bolts of it here, obviously, the coffee
table follows the grid. But how big the coffee table is is something you have
to determine by eye. Right now, that coffee
table is way too big. So you see I'm erasing
it. Just bring it down, bring it in, and even
this is too big. Remember a few sections
ago in this chapter, I showed you how
big that man got when I moved him just an
inch up on the screen, but I didn't change his
two dimensional size, how giant he got. Well, that's what's happening
to this coffee table. The lower that front line gets, that coffee table is increasing by a matter of several feet. Even if I just for
a few millimeters of two dimensional space, the coffee table appears many feet larger or many
meters larger, however, when you
want to measure it. So, you got to just
trial an error, really. And you'll get a sense for where these lines
go with experience. But even I messed
this up all the time. I'll draw what I think
is a coffee table, and I'm like,
Whoops, I just drew like a six foot dining table. That happens to me all the time. One of the things
I've learned about becoming more
experienced with art. It's not that you
make fewer mistakes, although you do, you do make fewer mistakes because you
know how to avoid them. But it's not that you
eliminate mistakes. It's just that you catch them immediately because you
can anticipate them. Every artist has their
own predilections. I know where I'm more likely to make
mistakes, and honestly, it's with this type of drawing, perspective drawing,
layout drawing. I'm not really used to doing strict line
drawings like this. It's honestly been quite a
while since I've dedicated a drawing to practicing perspective
fundamentals like this. About 20 years ago, I would fill sketchbook pages with drawings exactly like this. I would find I
would usually favor one point perspective
at first because it's the easiest grid
to work with in. And I would just position
myself from life, like on a street or just
looking down a deck, just like this, and I would
just practice converting the two D page into the illusion of a three
dimensional space. One of the things I
always had a hard time with was knowing where
to put the ground plane. When you're drawing
in perspective and you start your first
perspective grid, you might want to
put the ground plane starting at the horizon line. But remember that
the horizon line is infinitely far away. It's like looking
straight out into the ocean and seeing where it
meets the sky or something. You can't put the
ground plane there. The ground plane has to
start a certain amount of distance down from
the horizon line. Just like with the coffee table placement that
we just talked about, where you start the
deck in this case, that's got to be
dialed in pretty accurately or else
I could easily increase this deck by 20 meters or decrease
it by 20 meters. All right. Another
thing you could do here is just draw this
with the line tool. Before this, I've been using
just a regular pencil. But there's really no reason
with linear perspective, especially if forms are
boxy like they are here, that you can't at
least do a block in with a straight line tool. It'll ensure accuracy. Now, it will definitely
sacrifice aesthetic quality, but the idea is not that you'll finish a drawing
with the line tool, although you absolutely could. But this could just be a way of blocking things in quickly, getting a sense of
depth on the page. Because with perspective, you do need to get a few
elements in the picture, just like any art really. You have to get a
few elements in the picture in order
to start judging it. I need to get the
fireplace in, the couches, the table, the end of the deck, and these boxes
in the background that I'm just blocking in now. The more elements I can get in, the more spatial awareness
I can have in the picture. I'm at the point now though
where I feel like I can walk around in this space, and
that's a good place to be. That's your first hurdle. I find that once I
clear that hurdle, I'm able to be a little
bit more creative with my placement of things and
I can explore the space. Although, right now, I'm
just working from reference, the creativity
factor is limited. Again, that's a good thing
when you're practicing. Here's another X trick, but this one is a bit different because the top of the
house is out of frame. Notice my X also travels
off frame there at the top, and I've just estimated
where the top of the house there will end up in order to place the top two
corners of the X. The bottom of the x is,
that's easy because I can see the bottom
corners in my drawing, but the top corners are off frame, so I had to guess there. There will absolutely be
a margin of error that's acceptable and I feel like
it looks accurate enough. Ultimately, you're judging all of this by at the
end of the day. It's been my experience that a drawing that is
100% faithful to a perspective grid
actually looks a bit unnatural because nature
really doesn't do that. Even if you're in a city
that's a modernly built city, you're always going
to have some margin of error because things move and shift and manmade
things are not perfect anyway. There's also things like
lens distortion, which is, no matter which lens
you use in your photos, along the edges of frame, the lens will start
distorting parallel lines. It's less pronounced
with telephoto lenses and way more pronounced
with wide angle lenses. That's how we have
fish eye lenses with super wide angle lenses. It's that the lens
is so wide that it's distorting the parallel
lines to be literal curves. But even the telephoto lens will have that effect
just very minimally. Anyway, in this drawing, I'm not distorting any lines. My vertical lines are always perfectly vertical and
perfectly parallel. That alone is very unnatural. It's actually the case
that one point and two point perspective
really doesn't exist. At least we don't see that way. These things are art constructs. Vertical lines for us will always be converging
at least a little bit. In drawing, though, we
simplify that and we do things like one point and two
point perspectives to make it easier for us, and it generally works. But right now, I'm
doing a new thing. Notice I'm putting new grid
lines in. Well, what's this? The first thing I want to say is those grid lines are still going to the same horizon line, as you can clearly see on
the left set of lines there. But this is how you draw
items that are rotated and therefore not rectilinear
with the rest of the scene. So I'm drawing this chair
in the background there, and it's rotated 30 or
40 degrees off axis. It gets its own little vanishing point just
for that chair, and same with the other chair, that's also rotated off axis. Remember, if you rotate
enough things off axis, then suddenly our one point
perspective grid is useless. Even 1.2 point or three point, all these things assume a
rectilinear relationship, that is things parallel and
90 degrees with each other. That's when linear
perspective works best. At least that's when you can follow the grid the
most faithfully. Sometimes if you're drawing a
really organic environment, think of an old European
medieval town or something, things that generally won't line up with perfect
linear perspective. You can still put a grid on your page just to get
a sense for the space. But you'll have to
develop a feel for drawing organic curves
within that grid. That's just something
that comes with practice. In this drawing here though, I am also doing some of that. If you see the foreground
double chair there. Notice how the bottom is arced and even the
back has an arc to it. Those arcs are just eyeball. Now, there is a way to use the grid tire advantage
here as well. Because those arcs
on either side of the chair are the same, you can make sure that
the widest point of the arc lines up with the same perspective
line on both sides. In that way, you can plot out landmarks for two arcs that
are the same in perspective. But when you go to draw
the actual curvature going through those points, that's something that
should be done by. At this point, I've got
the drawing blocked in. Things are looking correct. I'll now flatten all
those layers down to one layer and decrease their
opacity and on a new layer, draw over everything
with my final lines. This is where you can be
as aesthetic as you want. I'm just going to quickly go
over things with one brush. I'm not worried about making
a portfolio piece here. I would just like to
get the study done and presentable as a drawing
that I did, not a block in. So, of course, this
is where you finalize the actual forms and construction
things in this case, that are on this deck, like
the deck posts and the rails. Those were blocked in before,
but I may not have actually drawn all planes of the posts. I may have just put a few lines in there to indicate
their presence. Now in this part, I'm
actually drawing them out. And again, you can be
as tight or loose as you want here depending
on your own aesthetics. I'm shooting for somewhere
in the middle, I guess. One thing I haven't
mentioned in this drawing, although I have mentioned in previous sections
of this chapter, I do like to shoot horizontal
lines across the frame. You can see how those
horizontal lines are relating the two boxes at
either side of the deck. Those horizontal lines just
help me reference height. The height of one
thing that needs to be the same as the
height of another thing. Well, connect it with a
horizontal plum line, like we were doing
in the gesture drawing section of this course. It's just with perspective, it's probably going to be much
more rigid of a line. I'll also begin thinking about very basic
shading, right there. I'm just picking a side of
the box or in this case, that tapered upper
fireplace box thing. Just pick a side, like we did with the Spider Man drawing. Remember from the last section
from the last chapter, pick a side of the
box and shade it in. Right there, I just shade it in the inside of the fireplace.
That makes sense. It's inside the structure,
it's going to be dark. Here's that side of the
fireplace box being shaded. I mean, I say basic shading
because you're just picking one side of the box and filling
it in with a dark value. That's how real
lighting works too. It's just the
difference here is I don't really care about
specific value control. As long as I shade something
darker than what's light. When you study actual lighting like some of my
other courses do, that's where you get into
specific value grouping and value control
within those groups. We're not dealing
with that here. So right here, I'm just
roughing in the trees. Now, obviously, the trees don't follow linear
perspective at all, but I can see just from the
photograph that they are generally of a darker value
than the rest of the deck. Mainly my approach here is to make sure that the
background that's full of trees is essentially just darker values
than the deck. And I'll try my best
to simplify that too, just like maybe two
values for the trees. And the wall has all these
little trim pieces on it that I was blocking in
using the x trick earlier. Now I'm just flushing them out a little bit with more
specific forms. Now I'm just blocking
in two planters, and that foreground one is not actually in the photograph,
I'm inventing that. These are interesting
because they force you to draw ellipses. Those planters are circular
structures and a circle in perspective is an ellipse as we talked about in
a previous chapter. Placing ellipses within
a perspective grid is an essential skill
you'll need with any environment because
you're almost always going to encounter this kind of thing.
Not everything is a box. The double chair
here is probably the most challenging
thing to draw in this study because it's got those arced arms and back
like I talked about. I'm just trying to
be careful that the arcs are drawn faithful
to the perspective grid. So what I'm doing is
the widest part of the arc will be placed on a certain line of the
perspective grid, and then it's neighboring arc, like the arc on the
other arm of the chair. It's widest point should also cross that same
perspective line. Notice here, even though this is technically a clean up phase, my lines are still pretty
scribbly as I figure this out. If I were very interested
in final line quality, I would probably do a third pass on this drawing
where I would have yet another blank
new layer on top and this would become
my new underdrawing, and I would go over
everything once again. Or this being digital,
I would maybe just pick the parts that
needed the cleanup and just focus on those parts, leaving other parts as is. Again, because I'm a painter, I almost never just do a line
drawing and call it done. All of this stuff would be just an underdrawing for
my eventual painting. And that's why self admittedly, I don't really do linework. I was going to say my
linework is not very good. I don't even do linework. It just hasn't been an area
of interest or focus for me. I mean, perspective as an area of interest as a fundamental. I'm interested in all
the fundamentals. In terms of aesthetics, though, finishing my own art with
lines is not where I've gone. It's all been painting. From here, if you're
interested in studying the aesthetic
qualities of line, you will have to look elsewhere. I am not the teacher for
that. Okay, but watch this. I have created a new layer on multiply mode and just
looking at the photo there. I am blocking in this big shadow that's cast by the
house onto the deck. I really recommend keeping big shadows like
this, just one value. In fact, if you
draw traditionally, you would just be using a single gray marker for that shadow. What I'm doing now is
with an air brush. I'm just getting darker right
in the crevices of where those couches are
touching the floor and compressing themselves
up against the wall. I am getting a little off topic
though with this shading. I'm doing something there
called ambient occlusion. I have a whole YouTube
video about that, if you want to check it out. It's basically the
darkest part of a shadow. I did do a little
bit of that before I reminded myself
what class this is, and that is off topic
for this class. But, you can easily see
it in the photograph. Look directly behind the
foreground two seater chair. See how dark it
is near the wall. It's within shadow and also a darker version of the shadow. Yeah, that's called
ambient occlusion. The ambient light, which would otherwise be filling
in the shadow, like light from the
sky, for example, is blocked in that area. So it's darker. All right. I'm working on this
background chair here, and I'm just making sure that
the whole thing feels boxy, like you could encapulate
it in a cardboard box. That's the mental image I'm
invoking when I draw it. I'm at the stage now in
the drawing in real time, this is about 45 minutes in, let's say, and that's about
a good amount of time to get a full perspective drawing
done, about 45 minutes. I think you could
do your block in in about 10 minutes or
maybe a bit more and then go over the
drawing once more in at least that same amount
of time to refine things. Here on that side wall where I'm putting all those
little trim pieces. This is where the lens
distortion would go in a real photograph and even how real person would observe
the scene with their eyes, you would probably
start getting a bit of three point perspective
there as those lines, again, way at the edge of
the frame start converging. We saw this actually in the
Black SAD piece from earlier. Remember the lines just at
the edge of that picture, we're starting to
converge a little bit. I was on record there saying you didn't have to do
that, and you don't. But it speaks to Guarndo's
experience there that he chose to get just a bit closer to how a camera would
capture that scene. All right. So right
here at the end, I've just sped up
the footage a bit more just to block
in this background, just trying to find a little abstract pattern just
with two values, maybe three values for those
trees in the back there. And it's always helpful
to flip the image horizontally to just get a set of fresh eyes
on it as you work. I'm noticing now
that I made the deck a little wider than
it is in real life. I think what's doing
it is just one thing. It's the wall on the left now that should just be brought
in closer to the chair, and perhaps that
chair itself should be brought in closer
to the coffee table. It's an error, but that's okay. It's an error within the
tolerance for this study. The perspective space
is still unaffected. It still looks like a
logical consistent space. It just happens to be a bit
wider than the reference. Once again, that
is, in my opinion, one of the hardest
parts of perspective is getting those
little measurements. How wide something is,
how deep something is because as we've seen, when you're drawing
the illusion of three D on a two D page, that stuff can get out
of whack real easily. This is one of those
things where as you gain experience in arts and
you can draw this stuff, you may just want
to offload this to a three D program.
That's what I do today. If I have to do a
drawing in perspective. To me, it's now foolish not to block it in in an
actual three D program. Let the three D program figure out the perspective
grid for you. You can then just be creative with placing things
and shot layout, camera angle changes on the fly. This is something that would be real expensive to do in drawing. Using three D programs as daily routine for
industry professionals. Of course, you then
export that and do your final actual
arts on that base. However, do not do that until you can actually
draw this yourself. You should develop a
consistent internal awareness of where your horizon line is, where your vanishing
points roughly are, whether it's 1.2
point or three point, and how changing any of those factors ultimately
affects the scene. This is where I ended up. I think this is a
good little watermark for how a study should look.
23. 2-Point Perspective Demo: Okay, for this next drawing, let's do a two
point perspective, and let's do an
interior as well, just to show how
these principles apply to exteriors
and interiors. It's really the
exact same thing. First thing I'll do is work
out a perspective grid, and I'm narrating this
one live, by the way. So you're not going
to see it sped up. You'll see it in real time. I'm thinking this will
be a kids play room. So let's put the horizon
line somewhere that might kind of correspond to kid
height somewhere maybe there. And actually, I should
do that on a new layer. So let's do that again.
I just made a new layer. And I do like to color code my perspective grid
if I'm going to do one. I'm not going to
adhere to the grid quite as rigidly as I
did the first time. I don't have to do quite as
many fanning lines here, but I do have to determine
where my vanishing points are. For this one, I'll
show you a wider shot, and if you remember
from previous lesson, that means that the
two vanishing points have to be somewhat
closer together. Let's put the first one here, just inside frame, and I'll do a few lines here
just radiating out. From this spot roughly. You already notice
I'm being a little more sparse with these lines, not cluttering up the
frame quite as much. Then I'll switch colors to
something adjacent like this red next to the
yellowy perspective lines. For this one, I'll put the
vanishing point. Let's see. Let me just resize the canvas a little bit or resize my window. Maybe I can go from here. I'm just imagining a
point right about there. And let's block in these points. Now, these two vanishing
points are pretty close together as far as
two point perspective goes. Remember from previous lessons, you've seen the vanishing point
for two point perspective be way off the page.
This one is not that. This one is pretty
close to the frame. As you can see, that means
that the ground plane here at the bottom is going to
be quite an angled line. Okay, perfect. I'll call this layer grid. And here in photoshop, I like to push this
paint pressure icon, which means I can't paint
on it or draw on it, but I can adjust other
things like the opacity. So if it were on lock mode, I couldn't adjust the opacity. I like to put it
on this one, which prevents me from drawing on it, and then I can adjust
the opacity down. Then I'll set that mode to
multiply so I can draw now on my background or I
can make a new layer here and just grab
a black pencil. Or maybe be something
not quite as black, maybe something like
this, a darker gray. One thing I like to do is I like to just put a swatch
of that up here. If I ever accidentally
sample some other color, I can quickly just go
sample this and not have to deal with going into
any color picker here. That can be used in any app. Of course, all these tools
can be done in any app. This is a kids room and I'm
imagining my own kids room, where do I want to put
the corner of the room? Well, this is dead center, so let's just put it somewhere off center somewhere over here. And then I can define this
wall following my grid line. I can define this ceiling line following this grid
line. Just there. I'm following this
red grid line, but I'm translating
it up a little bit. That means that
it has to fan out a little bit more
than this red line. I'm fanning it out
a little bit more. Of course, if I really wanted to figure it out technically, I could drag a line
and figure that out. You can see how it's
pretty accurate, but that's because it's pretty easy to gauge off this line. I really don't want to
draw using the line tool this time because I really felt stifled by that in the last one. I'm glad I showed it to you
last time, but in this one, I want to show you how more or less how I approach a
perspective drawing today, which is still
fundamentally based. But it's a little bit more free hand than what
I did last time. Here I'm just defining the room. We're looking into the
corner of the room. Then you might have
some trim up here. This would be like crown
molding trim, and we do this. You can see we're
already getting a bit of character in the lines. Let's populate the room
with its basic layout. I'm just imagining if this were a blank room that I were
moving into in my house, how would I want to use
it as a kids play room? Well, let's put a mat, like a carpet here. Let's see. I'm just tracing out, not a horizon line, tracing
out a perspective line. The carpet will go say here
and that carpet is going to be the centerpiece
of the play area, it's going to It's
going to be this big. I'm just this is my interior decorator
hat that I have on here. This is the rug, and the rug is going to
have little tassels, if that's what they're
called coming out of it. I love these little things. They add instant
detail and fun and they're indicative
of a play rug. Now these ones are going
to be much shorter. I can't draw these lines as
long because now those lines way longer these lines here
would be like this long here. Let's foreshorten them like this and they'll get almost into dots by the time
they're way back there. Remember, this is a
pretty wide angle shot, the depth is even
more compressed, meaning the length here will be much longer than the length there of these little tassels. That's just how
wide angle works. It'll enhance those
measurements. I can always for example, if I wanted to just
make that rug wider, I could just erase
this, sample my line there and just make it
a bit longer. Okay. And this is why I'm drawing
pretty loose in this stage. You tighten up as you go. Let's see, there's going
to be a window here. Let's just figure
out it's going to be a double width window. I'm following the red
perspective line, holding shift to draw myself
a vertical line going down, and then I'll just
connect it with this yellow perspective line. This is going to be a
nice little window. And of course,
windows have a ledge. I'm just going to
add a little ledge there and there's a
little piece of trim that and that perspective
is off, let's fix it. If I wanted to, I can just
shade the bottom face. Okay. Let's get the top of the window. There's going to be
some blinds here, just like these classic
cute little blinds. Now these are curves, but I'm imagining a perspective
line shooting through, and that's how I'm
determining where to tie these knots here for the blinds. If I wanted to, I always like to switch to my
marker tool here, just for some quick shading, just to shade in planes of boxes just to help
me orient myself. It's always nice to have little
bits of shading in there. Again, just pick the
side of the box, you want to shade darker and go ahead and shade it darker. What you could do at this point, just to kill some of the
light of the room, sorry, the white of the page,
made a new layer, set it to multiply and just a
little bit with some color. Just something off white. Then I'll I'll lock this
layer so I can't paint on it, and then on this layer
below will be my drawing. And what I'll do is
I'll draw draw draw. And if I want to erase that, well, I could just
use the erase tool. But what I actually like
to do is I like to just switch to white and just
paint with a paint brush, just paint white
over these lines. That's how I like to do it. But you could erase if you want. What else is going
to be in this room? Well, there's going
to be a table here, a little squarish table that's going to be a
nice play surface. This table is very close to the horizon line, which
means the eye line. It's just beneath the eye line. You're just barely
going to be able to see the top of that table. Let's bring this table down a little bit for the
apron of the table. I can shade in one of the
sides of the boxes here. Let's just figure out where
the legs are going to go. Already, this table is
looking a little bit too big. Here, I'll just
get the race tool, which I said I wouldn't do,
but let's erase this out. Of course, you could
put as I erase it. I'm erasing all my drawings. You could put these things
on layers if you want to. I'm just not going
to bother with that. I like to be able to quickly react and not have
to go over here and say, Oh, where's my table layer? I don't like to have to do that. I do want this table
to be a bit smaller. It's got to be kid size. I'm just determining
where the legs go with some loose
perspective lines. I might as well not be
lazy and let's just draw a tapered table leg here. Keeping it pretty loose, falling that yellow perspective
grid line. There we go. Maybe it should be a bit longer. The legs should be a bit longer. Let's bring them down here. Again, I'm just eyeballing. To see what works in
this perspective. You know how high does this table need to be
before it looks right. Yeah, that looks about right. Let's shade this
part of the box too. That can be a bit
darker. All right. So let's put a chair here. Now this chair is going to
be angled. But it's easy. I'm just following this
red perspective line or a little bit beneath it. So the chair is angled, but it's not rotated. So it doesn't need its
own vanishing points. And now what I'll
do is I'll erase out the table that's
behind the chair. So I do like to do that.
I'll draw something I'll draw a table or a rug and then I'll put
something in front of it, and then I'll erase
what's behind it. So I drew the chair,
erase what's behind it, and then that chair will have
its little seat following the red perspective
lines these legs are going to go back
a bit like this and I draw these little
ghosted perspective lines. This leg needs to
come out, I think. That's the way these
chairs are built. It doesn't buckle when
someone leans over. Maybe this chair could
be made more fun if it had an open
back like this. What that would
allow us to do is draw the seats of the
chair through it. Then let's just pick a
side of the chair like this back face and
just shade it in. Just for fun. I forgot
that back leg there. Whenever you have
the underneath part of something like we can see
underneath this table here. Just grab an air brush and just throw in a little
bit of a shadow. I'm not trying to render
light and shadow here. I'm just showing the viewer that this is the ground plane, and this shadow does roughly
follow a perspective grid. I'm trying to draw
a rectangle in perspective with the soft edges of an air brush that
just show us that, that's the perspective
of the shadow. Little case shadows on the
ground, really really help, especially if you can
draw those cash shadows in rough perspective
like I just did. Really really helps. The table extends past the
aprons a little bit. Let's just clean up this edge here. We are making headway. You can see we already have a space that we're working in. Let's block in some
other major elements. Let's put a big
shelving unit here. It's going to go like
this and let's just have a little fun
extended a bit higher maybe go up following this red perspective
line just beneath this. Let's go down. Again,
holding shift in photoshop, will give me a vertical line. I need to know where the wall,
the bottom of the wall is. Let's put the bottom
of the wall here, following this red
perspective line. That means that my
shelving unit can be this tracing this back, can be like this. There we go. There's the side of
my shelving unit. And let's give it
a bit of thickness that cheap Ikea particle
board they give you. It's like a half
of an inch thick. That's probably more than
half an inch, but whatever. Let's go down.
Okay let's follow, there's a wall here
for the shelving unit. It's going to go
down again, holding shift, two point perspective. I'm keeping my verticals
nice and straight. Maybe later, I'll show
you how easy this is to skew into three
point perspective, but I'll do that once I'm
more into the drawing. Now, this is way above
the horizon line up here, we can see the bottom
face of this plane, and I'll just grab my marker and just shade in my stuff there. Let's see the drawing has more character when you
just free hand your lines. Now let's add some shelves.
Let's put one up here. Let's just lay out the shelves. There's going to be one there. There's going to be one here. Following perspective lines. I'm looking at my red
perspective lines in this case, following them. Then here, let's put one in
the middle of those two. Obviously, the shelves are
above the horizon line, so we can see their bottom faces connecting them to
the back of the shelf here. Notice that my perspective line here intersects the
back of my shelf. I'm just connecting lines
here in perspective. Zoom back out to full size. Maybe this area here, maybe this is going to
be a bit of a kitchen. Like a kid's toy
kitchen right here. We're we're going
to have a tap for water with little hot
and cold water faucets, and we're going to have pots and pans hanging on a dowel
that goes across. Maybe maybe the
dowel is up here. So the pots and pans
can hang from it. To pots and pans. Of course, the kitchen
needs an oven, just a toy oven, of course. Maybe with a
cupboard next to it. Now, we want to we're putting this in front
of the shelving unit, so we're erasing the back, following the red
perspective line. This is our oven. I
probably should have made the horizon line
a different color. I mean, I can just do that now. Go back to my grid, unlock it. Describe a blue line. Because I'm getting
confused as to which line is my horizon line. Let's redo that. There we
go. Now it's a blue line. Perfect. Lock it again. Perfect. The oven needs a little window to see through and that window
is going to be like this. Loosely adhering to
these perspective lines. That's going to be dark because we're seeing inside the oven. Then here, we're going to have a drawer or cupboard
and this cover. Let's just give it
a bit of depth. It goes back a little bit. And on the shelves or any
manner of items, dolls, toys, what have you, kids stuff up there. We cars. Again, they are above way
above the horizon line though, so we can't if that is a car, we can't see the
cars wheels because the wheels are sitting on
the top of that shelf, which is hidden in perspective. We cannot see the top plane. It's hidden in perspective because we're above
the horizon line, right? I'll zoom in a bit. If this were a car, you know, we're seeing a car
in perspective, just a toy car, right?
Like a blocky car. If the wheels are
here on the car, we're only seeing
like the top of the hub caps and the
actual wheel is down here. Hitting the top of the
shelf in perspective. I'm going to erase
this out though, because this is the
bottom of this shelf. If anything, I'll just
grab my marker tool and my gray color sample
something in here and just shade the
underside of this shelf. Again, just to help us know
that this is a box form. Whenever you have box forms, just pick a side of the box, usually an underside or a side plane that's
obvious and just shade it to give you an indication of the perspective that
you're dealing with. What you could even do here
is just get a bit more fancy. Let's just shade this entire back face of
the shelving unit. I'll do the same thing here. Then what we can do is grab a white color and get back some of the faces
here that face forward. You could even just draw
with this white color. If I want to put
another shelf here, instead of drawing
two black lines, I'll just draw one white line with enough thickness
to it and there, that's the front
of my new shelf. I do this all the
time, draw with a lighter value and
pull a form out, just go in here. There we go. Basically
what I've just done with that white line is it's as if I drew two
black lines, right? But now I don't even need
to draw the black lines. I can just have the white
one, and then I can just quickly shade
underneath it. Let's see. Maybe this one is split in half. Well, just split in half. Let's draw the x.'s the point and I'm just going to race that x. I don't need
to actually see it. I know where it
is just visually. Maybe this is just going to erase this out. Switch
my layer order there. It's going to be some
sliding door system or there's a little hole
that you can see through it. This door slides
along a track, maybe. This is the inside of the cupboard and there's
a bunch of stuff. I'm not going to draw
what's back there. I'm just going to
indicate it. Of course, that stuff is the detail you might add later at
the end of the drawing. There we go. Now we have
a little sliding door. Everything lines up at
the perspective lines. We haven't done
anything to break the mold of perspective,
basic linear perspective. This is all just
putting boxes in front of and behind other boxes and getting
depth that way. What else do we have to do here? Let's figure out exactly
where this ends. It's going to end. Let's
make sure this is in line. There we go. I feel like
my table is a bit off. Yeah, that perspective
line is way. You can see my table
is pretty off there, and that's because I just
free handed it too much. It needs to be much more
angle that line does. You really got to be careful as you approach
that horizon line. Things get horizontal there. Anyway, now just putting
in what is this lantern? I don't know. Just a kids toy, which is going to be rounded. Kids toys are usually rounded. So they don't cut themselves. Let's I have no idea what these are, but
they're just things. Let's overlap. This one
is behind the lantern. Little shading at the bottom
of each little toy here. You can see I'm way zoomed in. I'm zoomed into 250%. My canvas is not that big. I think my canvas
in this case is about 1,300 pixels wide. That doesn't matter. You can
make it as wide as you want. I just made a canvas that would cover my screen,
for the most part. There's a ball on the table, and there's going to be a
round thing on here and another ball behind
this Here we go. Very quickly, we've populated
our table. That looks good. What do we need? Well, we
need to fill all this space. I want to come up with some
kind of composition here. One thing that you
do to fill walls, well, what do you
do to fill walls? You put little pictures
on them or something. This is going to be a I have a sign like
this in my kids room. It's on a string and it's made of crafty
planks of wood like that, and it's got some
writing on it, whatever, but the point is it's
filling up the wall space. I'm just noticing
here that my wall is too far back
from the cabinet. Let's bring that wall right up against the base
of the cabinet and my previous line is now just a piece of trim
there. All right. I'm going to make a new
layer because I'm going to try and dress up
this room a little bit. I'm starting to look
a little soles. I'm populating it still. It's a bit unfair to
call it that right now. But let's put something really
fun in here like a tent. The tent is above
the horizon line. There's a little ellipse
above the horizon line, and here is an ellipse
below the horizon line. To mark the base of the tent. What I could do is
actually just mark. This is going to
be rotated a bit, so I'm imagining another
vanishing point. What I'm going to do
is actually just use the line tool and I'll make
that line really less opaque. Let's see the tent pole
is going to go here, it's going to be a
cross beam there. That's going to be the
opening face of the tent. Let's see, something like that, and that tent is going
to be open this way. Again, this whole object is
rotated like 15 degrees. I'm not quite following that red perspective
line. Let's races. I'm just figuring
this out as I go. There's going to be a
bunch of rope tying these beams together up here. That rope is going to be
thick and all over the place, like a bandanna or something. It's really imperative
these lines are straight. Let's see, t use the line tool, go back there, and use the
line tool and go back there. I'm just eyeballing this
polygonal shape here. Just trying to reference
the perspective grid to make this look like it's sitting on the ground.
And this looks pretty good. Then now I can maybe
get my marker tool with a white color here and
just give it a front flap. Of course, this is in front of the unit we just drew behind it. I'm just going to erase
out the baseboard, the unit behind it. All of this goes away because this tent is in
front of all of this. And this is the stuff
inside the tent. This will be shaded in. There we go, that's
inside the tent. There we go. Let's
flesh this out here. The tent flaps are going
to be tied off here. Now I need to rediscover where the back of the tent
is somewhere in here, there's going to be
a construction beam going around the middle. Let's just figure
out the midline of this trapezoid shape,
something like this. Let's cross contour our
way through a cylinder. This is like a bamboo rod here. It's got some thickness to
it. It's not just a line. I blocked it in with the
line, but now it's just rounding out some thickness
to these tent poles. Okay. And yeah, inside the
tent is going to be pillows. It's going to be like a
little lounging area. You've got some nice pillows,
maybe there's a teddy bear back there behind a
pillow. Who knows? Just something in this tent that indicates
it's a play thing. Now, it's overlapping my carpet a little bit, which
I don't like. Let's just go back
and erase the carpet. Just as we fill out this room, that carpet needs to be
brought in a little bit. Let's end the carpet here. Follow the perspective
line and the carpet there, so that tent is in its
own little area here. Maybe what I'll do
is I'll just grab this tent and within reason, I'm able to move
it a little bit. I couldn't move it over here. Obviously, the perspective
is just wrong now. But I I could resize it and just nudge it a
little bit back here. Just to sit back in
the room a little bit. I do want to overlap, I want to overlap this
unit behind it. If I just put it to the side,
it's a little bit difficult to tell the relationship and it makes the
room look too big, too spacious, overlap it a bit. Overlapping forms like that is a really good way of
establishing depth. Just like we overlap
the items on the table. When you start getting
overlaps like that and even how the chair
overlaps the table. When you start getting two dimensional
overlaps like that, you start building a
convincing sense of depth. I've noticed a lot of students shy away from overlapping
things like that. For some reason, it's maybe a scary thing to do,
overlapping shapes. Maybe it's just not intuitive. It's not an intuitive
thing to do, and people will put one shape as its own little island
beside another shape. That always just kills
the depth of things, even these pillows,
maybe there's a pillow here overlapping the
pillow behind it. That gives this tent
a little cozy feel. There's a little
circular rug here, which is an ellipse with its
own little tassels there. Then maybe what you want now is a little table behind all this. This is just a almost
like a night stand. It's got very
limited perspective because we're right up against that vanishing
point there. You can only barely
see the side plane. And its legs are going
to go like this, I'm imagining a
table that I own. Now the leg is behind the
tent, but it goes back there, then the front leg goes there and there's a tripod
thing going on here. Let's just shade this whole
area behind the tent in. On that table, there is
going to be a little lamp. We're above the
horizon line here, I'm just barely
making the front of an ellipse and the lamp is
also going to be an ellipse. We're going to see just barely
underneath that ellipse, if this is indeed a lamp. Now the arc of this ellipse
at the top of the lamp is wider as we're progressing higher and higher above
the horizon line. That's great. Now we're
populating this court. Let's put a little
picture frame or maybe a large
picture frame here. Something like this
behind the tent. Maybe it doesn't make
quite as much sense that a picture is being
blocked by the tent, but I'm not too
worried about it. The picture frame was
there when they decorated the room, these
hypothetical parents, and then the tent was placed in front of the picture
frame because that's the only place they
could fit the tent and the picture
therefore covered up. It makes it feel lived in just give this a quick
shading. Who knows? Maybe there's another
picture frame here. And now I feel like I'm
moving a bit quicker because I'm starting to understand
what this space is all about. That's what often happens to me. I get to a point where I feel
like I'm actually living in the space and I get a little more confident
with my drawing. I'm just taking the pen tool and grabbing these walls like this. Then what I can maybe do is grab my marker tool on this top
layer that has a color on it. And let's see, I don't even know if
this is going to work. Just color the walls
just a bit darker. Just so we're not working on the same tone for everything. I'm giving the wall it's got a darker paint color on
it or something like that. Then while I'm on that layer, maybe I make the lamp a bit lighter and make the
tent a bit lighter. I'm just on my tone layer, you can see the layer
I have selected, and I'm just painting white into this layer just to
separate elements. This is obviously nothing
to do with perspective. I'm switching gears here to
basic aesthetics, let's say, and I'm just making things look differentiated
by some basic tones. I'm doing the same
thing to the cabinet. It picturing that generic white
Ikea board they give you. It's always painted
just flat white. I'm just putting that in here. These pots and pans likewise
have a lighter tone. This thing just helps present your drawings a little
bit more aesthetically. Just pick an object and assign
a different tone to it. Then once I'm happy with this, I don't like to have
1 million layers. I'm just going to
flatten. This is my drawing layer that
I'm turning on and off. Then here's my tone layer, which has the white
painted into it. It's sloppy without the
lines to anchor them down. Okay. So I feel like this room is getting fleshed out now, let's put a let's put a
chair right in here and the top face will be above the horizon line and
the arms will go out. And I don't know, it's going
to be a big comfy couch. So they go out like this. Now we're below
the horizon line, referencing the yellow
perspective lines going below. So here's the back that you sit on that you rest your back
against, I should say. And here's the back of
the chair coming down. Although that's too narrow.
It's got to be wider. This just visually, and it's
going to come down like that in the front face is going to go like
something like this. Again, this is a box. I'm essentially drawing a box. I just with rounded corners. Now we're going to
need the seat cushion and we're below the
horizon line here, we're going to see the top face of the seat cushion just a little bit because we are
approaching the horizon line. Here's the rounded face. I'm imagining an ellipse. Imagining this
ellipse like this. If it helps you to draw it, go ahead and rough in the
ellipse and then of course, it's got some thickness to it that let's just erase
out what's behind here. And instead of this line, maybe this whole thing is almost like a big bean
bag or something. I don't know. This is where you are conceptually
inventing things. Obviously, photo reference, I'm not using reference for this. If you wanted to draw a specific chair and you're having trouble
with the design, just look up reference on what a kid's chair
might look like. I don't like how the edge of the frame is just blank there. It might be nice to let's
put a potted plant, like a fake plant in a pot here, and this plant is going to have to populate the
edge of the frame. I'm not even worried about
drawing a nice plant. But I do need something here. Just for compositions sake,
and we'll just shade this. Just going to put
some thing there. I don't like to leave the
edges of the frame blank, just a quick composition tip, the simple idea of having
an item be cut off by the frame like this little potted plant is cut
off by the frame. We don't see the whole
thing. That type of thing instantly adds credibility
to your picture. Believability, maybe
is a better word. It makes it look like things
extend beyond the frame. Of course, they would if
this were a photograph or an actual representation
of a real space. All right, shading
this entire chair in, again, differentiate
it from the wall. So that's its local tone. Then I'll go a bit darker and shade the front face
of this cushion in. If I'm shading that front face, I might as well shade this front face of the back cushion, leaving the top face of
the seat cushion lighter. I'll even go a bit lighter
with that. There we go. Just to get some basic
form and maybe again, just picking faces,
shading them in, maybe I'll go in and actually darken this side face because it's facing away from the frame. We're going
out of frame here. Let's make this stuff
overall darker. Almost like a vignette, I'll
even grab the air brush and just vignette this stuff. In the Instagram filter. Just adding a little
bit of dark tone. I'll get an even darker tone. Just adding a little
bit of this dark tone as if the light is falling off. Though this is not
really intended to mimic light as much as it is to help the aesthetics to highlight the focal
point a little bit. A vignette is a cheap and
effective way to do that. It can help bring focus to the focal area
of your picture, which is in here somewhere. Then if I like that couch, my lines are looking
a bit light, I can go back in there and
figure out exactly what those lines are doing or
more precisely anyway. This is not really
a detail pass. This is more still an
exploratory sketch pass. I feel like the forms are being drawn clearly enough here. And if I'm doing concept
art for a client or just exploring my own children's book or something like that or
whatever it is I'm doing, my own illustration of any kind. This is the level of
sketch that I work in, this level of
finish. Okay, great. We still have a lot of
blank areas in this wall. I feel like this
is a good space to put another shelving unit. Any parents out there know that kids' rooms explode with
toys extremely quickly. Let's put a lower shelving unit, and this one is
like a cubby unit specifically to house toys. It comes out from the wall,
maybe as far as the chair. Something about
there. Again, just following these
perspective lines. Now, where's the middle of this? Well, let's just block in the X. Actually, before I do
that, I should just show you this is the
front face like this. And we're above the
horizon line there, so the line has to go this way. Let's see, I'll block in the x just loosely to find
this point right there. Then I'll delete the x because
I don't need to see it. Visually can have a snapshot of where the middle is.
There's the middle. Then I can draw another x very faintly here,
get the middle. And put another line there. Then I'm just imagining
an x there it is, and then another line there. Then I'll find the
middle of this line, which I can just visually do. It's right there, I think, and I'll follow the
perspective line back to define the middle of
the cubbys then there we go. I'll give thickness to
each of these cubby lines. Now up here, we're above the horizon line,
but just barely. We can just barely
see the bottom face of the top and here we're below the horizon line so we can get a sense for the top
plane of each cubby. You've got to be careful, right close to the horizon line. These cubes are going to
be pretty horizontal. These lines are not going
to have too much change in direction between them. In fact, let me zoom in.
I'm getting sloppy here. I'm changing the
direction too much of these lines and I'm
losing perspective. It's so easy to
lose perspective, loose a sense of depth and proper perspective when you're
close to the horizon line. These lines, even though that's the back and
that's the side, that's the back and
that's the side. There's not a whole lot
of angle change between them because we are close
to that horizon line. Then here, there is more of an angle change looking at
my red lines because here we are far enough beneath the horizon line
that there is enough of an angle change
now for these areas. It's going to carry
these horizontals down. There's our Cubby unit. Then of course, we want to erase any of these lines that
are behind things. Drawing intricate little
spaces like this, especially repeated ones
like these cubbies, you can really lose
your perspective here. It's worth the time to go
in there and figure it out. Then from here, let's zoom
back out, first of all. Let's go ahead and pick a face. Let's with the inside of these cubes. Actually
know what we'll do. We'll do the thing we did with the cabinet on the back wall
is we'll just grab this, shade this all in, and
then with a lighter color, let's just pull out
some of the verticals, the front faces of
these shelving units, and also the front face of the shelving unit
going that way, the cubby unit, I should say. And maybe the bottom
planes and maybe some of these bottom planes can
be just lightened up a little bit as well.
Same with here. Then maybe because we're
inside the cubby we further shade the very
backside a bit darker. Just to further
enforce that we're looking deep within
these cubby units. Picking this back
face, shading it in.
24. Drawing Demo Continued: Okay. All right. Let's go ahead and finish
this drawing up. What you see here might
look a bit different. I just had a power outage. Of course, that means my
screen recorder didn't save. There are a few
additions. The rug has a square pattern on it, but that's just squares
following the perspective grid, and I populated the
cub area with stuff. Just abstract shapes, really. You're also seeing the
drawing flip horizontally. This is a common operation in any digital painting
or drawing software. Anyway, right here, what I'm
doing is I'm just adding in a foreground little
slanted ceiling, just shading in some
ambient occlusion there, which is what I did on the deck behind the chair,
if you remember. Now, the only reason
this part looks slanted is because it deviates
from the perspective grid. Notice that faint red
perspective line just underneath the slanted part is at quite a different angle than
the line just above it. That's how it looks like
a slanted bit of ceiling. I should also
mention that I have sped up the footage
by two times again because really what
I'm doing here is more or less the same
operation over and over, following the perspective grids, maybe blocking in ellipses, Here, I'm just adding a bit
of details to the carpet, this strip or colored
band that goes around the perimeter
of it and just by y, adding a little
triangular pattern going around that
perimeter as well. Again, doing this by eye, and the only reason
I'm able to do that by eye is at this stage, I have enough just general
correct perspective in there that I can start drawing
things totally free hand. And right after I say that, here I am going back to
the perspective grid. I'm adding an object that's
going to be rotated off axis. I just arbitrarily made up a new vanishing point on the
horizon line, of course. This is going to be
just a large toy car. This car will follow the
blue perspective grid that I just blocked in
because once again, this car is rotated
a little bit. It's not 90 degrees
to the carpet. Notice that my design of
this car is very boxy. I'm creating some angled
boxes here and there, but mostly this car fits
within a bounding box, let's say, and
that enables me to reference my perspective grid
and really figure it out. Here, I'm treating
the entire car as one box and I just
shade it in one side, and just blocking in some
windows and door detail. The wheels of the car, which are coming in now are probably the hardest part of this car
because they are ellipses, but they're very
close to circles. It'll be a tough
balance to find that. I may go back and edit
these shapes later. Of course, the reason
they're close to circles is that they're very close to
being seen just straight on. They have just a little bit of perspective applied to them, so they're just a
little bit elliptical. Anyway, to plant this
car on the ground, it always helps to just grab a soft airbrush and block
in a shadow underneath it. I'll just finish this off
by defining the top planes of the car and adding just
a little tire detail there. Notice that the car overlaps
the table behind it. I've overtaken that
front leg of the table. That's the small thing that will make a lot of difference
in your perspective. Though subtle overlaps
add a lot of depth. You'll see me
continue to overlap things as we now
finish this drawing. So what needs to be finished? Well, on an aesthetic
slash compositional level, the room just needs
to be filled more. I've got a lot of empty
foreground space. And in the context
of this class, it's not so much about
filling the composition, although that is what I'm doing. I want to show you how further overlaps will help
add a lot of depth. Then because we have a lot
of this foreground space, the foreground tends
to be a great area to overlap things because if something's in
the foreground, that means that other
objects are behind it. I just drew a
elliptical foot rest that overlaps the main chair. And then I'm going to
continue that theme and draw kind of a bean
bag chair here. And this is a special thing. It's ellipses, but then I've deformed them to feel like
it's a beanbag chair. I roughed in a proper ellipse and then improvised over that. Then I've been doing, picking
a face and then shading it. This is like a
cylinder. I'm picking the side faces of the
cylinder and shading them in. Then once I'm confident in this shape and form I've drawn, just going over them with a
darker line to finalize it. Again, you're seeing
this footage at 1.5 times its
original speed now. All right. I feel
like I need something sizable way up in
the foreground. These are based
on these cushions that I own that my
kids play with. They're just these big flat
couch cushions that you can maneuver into many shapes, and they're basically
rectangular. Now, I'm deciding to
rotate these off axis, so I'm not following my
main perspective grid. I am still using
the horizon line. What I did to draw
those two cushions, they're both rotated
in two different ways. I just visually traced lines
back to the horizon line, for sure I'm wrong. If I actually trace those lines
back, well, first of all, you can't even see both
sides of the cushion so you couldn't even
do an honest check. But once again, at this
point, I've got so much, correct perspective in there that you can really improvise now and no one is
really going to know within a certain tolerance. The simple act of rotating something off of the
main perspective grid. But again, still referencing
the horizon line is a really nice way of breaking up an otherwise overly
linear piece. If you look at any
room in your house, chances are it's not
perfectly rectilinear. There will be some objects
that are off axis, even if it's just the
fact that you placed something on the counter and
didn't line it up perfectly. Those little differences
in rotation add up and make a scene feel
natural and familiar. Oh, and by the way, I am drawing this new stuff
on another layer. It just makes it
easier to erase out what's behind it because I'm
doing a lot of overlaps. Like this little
footstool here is overlapping both the
rug and the foot rest. When I say the word overlap, I'm talking about two
dimensional overlap. As in the shape of the footstool is in front
of the shape of the rug. In three dimensions,
that footstool I just drew does
not touch the rug, but in two dimensional
space, it does. This is just an air filled ball. Fun fact about spheres, they will always be circular, no matter what your perspective, they will not be elliptical. Because it's a spherical form, you're always going
to be able to see a perfectly round cross section of that ball, which is a circle. No matter what your angle. Now, I just free handed that ball so it's not
perfectly circle, but that's just human error. I think it looks good
that way anyway. It feels like it's
been played with. Notice the use of cross contours both on the cushions
here and the ball here, as well as on the
bean bag back there, just using lines that go over
the form and in doing so, revealing the form
to the viewer. And I'm just racking my
brain trying to come up with more items to place
on the floor here. I want this to look like
a room that is played in, just maybe a little
bit cleaned up. This is not nearly as cluttered
as my children's rooms, but a little bit of
clutter here will help. This is one of those
puzzle piece toys. Again, it's rotated. Look at its two side
contours and you can roughly trace those back
to the blue horizon line. Doing so ensures that it will
belong in this perspective, but it's rotated off
the main two axes. The other two sides
of that puzzle piece toy also converge, except that vanishing point
is so far off the page. I didn't even
bother. I basically just made the lines parallel. I guess I would say the farther the vanishing point
is off the page, the less you have to be
100% faithful to it, but the reverse is true. The closer those
vanishing points, the more you should
adhere to them as closely as possible because the errors
will become noticeable. That's just because
our naked eye will be able to trace that. And here's a toppled
over fabric toy box. For this one, I
didn't rotate it. I'm just following our good
old main perspective grid. When it comes to populating
this area with actual toys, I'm not going to draw
any details there. I'm just going to
block in shapes. Long as they sit on the floor, which is determined by
the perspective grid, it'll look like detail. If this were a
final illustration, I'd have to think
about going in there, zooming in and figuring out
what those toys actually are. Here, I'm just darkening
the side face of the chair, merging it in with that plant. Let's continue the theme
of overlapping and put another puzzle piece
toy on top of the first one, thereby
overlapping it. It may seem like a tedious
task to draw something in full and then overlap it only to erase out the thing
you just drew. But that is how I keep
my perspective honest. I'm sure someone like Garndo
could probably just not do that or draw something way rougher and get
his overlaps right. But for me, and this is a holdover habit from
when I was a beginner, I was taught to draw the whole object and then
overlap it with another object. Then you have to go
through the task of erasing out what's behind it, which was a lot more tedious in the pencil and paper days. Digitally, you could do this quite easily by
putting everything on its own layer that makes
erasing layers very simple. But again, I just don't like
sifting through layers. But that is totally a
personal preference and you should use layers if that's what you're
comfortable with. All right. Just a few
more items to add. Here, I'm shooting
a plumb line to measure where the top of
another chair would be. It would be a chair of the
same set as the first one. Just seemed odd to
me to only have one chair in there.
Here's a second one. Now, this one, we're seeing
it straight side on. So it's kind of a side profile. So there's minimal
perspective here, and I'm just using those
horizontal plumb lines to measure where the seat was and where the top
of the chair was. Yeah, just cheating and
just drawing it mostly in profile to get away with again, minimal
perspective there. Let's make sure to put
the shadow underneath it. There we go. Okay.
And from here, it's just a matter of maybe reinforcing some of the
drawing that's there, here, just painting out a line that should have been
hidden by the table, Darkening lines
that I feel should be a little bit more
confidently stated. On a design level now
that I see this room, this window is bugging me. It feels like it needs some country house style
upper window that's curved. I found the middle
of the window by drawing my center line up
from the lower window. Remember the centrline
stuff from Chapter two, and I'm just making this
nice arched window that I feel is a nice
architectural accent to the main bottom one. On my tone layer, I'm just painting white in the window glass sections
where you could see outside. That just helps make it
look like it's outside. Here's a rod for the blinds, following the original
perspective grid, of course. Yeah. Then now that
I feel like I've got a finished room going, I can just grab an air brush on my tone layer and just set it on color dodge mode
and just airbrush in just some shafts of light. Now, I am following the
perspective grid here. See the direction my
airbrush is moving. I'm following the
perspective grid. That's key whenever you
are indicating light, shafts of light or shadows cast from the light that you
follow your perspective. Remember that a
light beam is still a three dimensional line or
volume of particles anyway. One thing we can be sure of is that light travels
in straight lines, so it is subject to perspective. Then just one last thing
before we call this finished. I just felt the need to fill this space at the bottom right. I figured just like we did
with the second chair, let's put a second car there. I've got this bit of
drawing on another layer just because it's a late entry, I'm not sure if
it's going to work. This also allows me to
resize it a little bit. Notice the car is heavily being cropped by the frame.
That's very intentional. I want there to
feel like there's more more space in this room
beside us and behind us. One face of the car, the
left side in this case, has gotten a shadow tone, which by the way, is a different choice
than the first car, and that is totally inconsistent lighting,
but that's okay. This is not lighting per se. It's shading to show form. This drawing has the
appearance of light, which is nice, but
as you've seen, it's done with a much
more water down approach. Something that I hope you
see is very easy to apply. All you have to do is have a solid three D form
in front of you, pick a side or two
sides and shade. The other thing that I
hope you'll find about perspective scenes is for
the first few minutes, in this one, it was
the first 10 minutes. It just felt empty and boring. But as you start adding
objects in that perspective, the three dimensional space that you're depicting
starts filling up. And the act of filling it
up makes it feel lifelike. Here's my finished piece. I know in the beginning of this, I said I would try and skew this into three
point perspective. I've decided not to. I will, however, tackle a three point
perspective drawing in the next and final chapter, which is going to be a
narrated practice session. That brings us to the
end of Chapter four.
25. How To Study - Drawing From The Model: All right. Welcome to the
final chapter of the class. Practice. There will be no new information
in this chapter. But what I want to do
is prescribe for you a daily practice regimen and demonstrate how I would
go about doing it. You're going to see a lot
of drawings and you're going to see how
I actually draw, not how I demo. This is how I would draw if I were in a life drawing session, for example, or just
practicing in my sketchbook. These are exercises I do
recommend you do daily, if possible, or as close to that as you can.
There's three sections. In this first section, we'll do some quick poses from the model, and you'll see just
how quick in a moment. That will mostly drill
and develop gesture, but a little volume stuff too. Then we'll do some targeted shape studies from
other artists, seeing what other artists
do that really works and seeing if their decision making
feels right for our hand. Then we'll close with some
perspective rough ins. Rough ins meaning
something more on the sketchy side rather
than the finished stuff. Hroughout this study session, I'll drop a little
tidbits as to why I value sketching and quantity, generally speaking, over
tight finished stuff when it comes to
art improvement. All right. Let's
get started now, drawing some quick
poses from the model. So when it comes to finding figure drawing reference online. This is, of course,
assuming you're not doing it directly from life. You're choosing the
next best thing, which is doing it from
photos, which is fine. Thankfully, there are
tons of models out there who are posting
photos for us to use. Some of them even available
for commercial use, such as Juke Pub stock
here on Deviant Art. I really like her poses and
I like her photography. The poses feel like a
traditional life drawing class. You can see she's
got it sorted into various categories,
full body, props. What's nice here is you can find the same pose both
in male and female. You get different body
types, different shapes. One thing to look for
when you're looking at poses to draw is try and find people and models
who put expression into what is otherwise a basic
pose. Something like this. This is just a seated pose. But if you just follow
my cursor here, you notice there's a gesture
running through it like a C curve or maybe an S curve if you follow the leg
all the way down, and of course, it's echoed
in the male model too. Guess this is to say that
there's movement and what could have been
easily a static pose. This will help keep your
interest alive while you study. Like here, there's a
nice little turn to the head off the axis
of the shoulders. There's a pretty
extreme angle on that neck and that
angle is then broken by a curve here for the torso or a C curve going around the back if you follow
the back this way. Subtle details I look for like the arms being
crisscrossed here, adds a real human
quality to the pose. It increases difficulty
a little bit. But in exchange, you'll
get the feel for a real human pose that you can apply to any character that
you subsequently create. The next thing you'll
want is a timer. Honestly, I just use
my phone for this. But if you want to just set
it to your web browser, this page is riddled
with advertisements. But this is just
online stopwatch.com. You can set it for 30 seconds, which is where I'm
going to start and then you can hit start. It's got a real annoying bell sound effect
when the timer ends, which I will mute
to do you a favor. But yeah, that's all you need to get up and running
with some practice. These are morning stretches. Let's draw a stretching pose. 30 seconds on the clock. This is how I like to start. I like it because there's no conception that
you can capture any sense of detail or
final lines in 30 seconds. So it's a great way to
shake the cobwebs off both mentally and physically and just warm up. Not
only that, though. You'll be training
yourself to capture gesture and pose and
weight and movement. You can do that in 30 seconds, and I'll try and show you
here. So start the clock. I almost always
start with the head, which gives me an educated guess as to where the shoulders are and then I can gesture upward to the hands
in this case. I'll gesture down to
the pit of the neck, and then from that comes
the entire torso gesture, which is a C curve here. There's a cross
contour for the hips. I use that to landmark
the outer corners of the hips and I can build the
leg gestures off of that. Notice I gesture to the knee, landmark the knee,
and then to the foot. This is about what I can
capture in 30 seconds. The pose is there, and
that's what matters. Moving straight ahead, this is the same pose, but
a different angle. Which illustrates the point, your gesture should also
capture perspective, doesn't have to be
totally accurate, but it should be present. Even right now, the head is
blocking the back shoulder. That's perspective information. Then look at that
C curve. See how I've really exaggerated it. I highly recommend
doing that in gesture. It's a funny thing
that happens in drawing by pushing the
gesture like that. You might feel like
you're overdoing it, but by the end of the drawing, it usually ends
up feeling right, and I didn't leave enough room for the feet, but that's okay. And snuck in a few strokes
after the bell there. Cool. There's the pose. I can feel it. All right.
What have we got now? Oh, a mermaid pose. Cool. Let's start with
the head as always. Gesture down to the
pit of the neck. Get this nice C
curve for the arm, way too long, but I'll
correct it without erasing. Then the other arm is this
strong straight rhythm. That arm is carrying
a lot of weight, and remember straights
help show that. The torso is a C curve. And notice I'm throwing
in those cross contours for some quick volume. Then I threw in a shape for the mermaid tail and then try to find the
legs after that. And with the dwindling
last few seconds here, I can throw in a
placeholder for some eyes, maybe a little dot
for the nose, too. I find that helps.
Good stuff. Next one. This is a tough
angle for the head. I'm scribbling aimlessly
and in that messy volume, I found an eye
somewhere in there. Then from there, I can
find a jaw and a neck. The shoulders have
been landmarked. This arm is bearing weight, so it's straight.
Let's get that. It's easier. Now, this arm, where that hand is is also
where the knee is going to be. In this case, I'll start that leg with the knee
and work backwards. Notice my stylist
rarely leaves the page. I want visual evidence of my
feeling around for the pose. Somehow that helps
with the drawing. She's propped up on that box, so it was important that I at least draw the surface of it. Poses like this can cause nightmares due to
the foreshortening. But before I even tackle that, I'm going to get the
head and torso first, and those things by themselves don't have any foreshortening, C curve for the arm here, and then a straight for the back arm, which is
holding the weight. Then with those arms blocked in, I could landmark
where the knee is. Notice I shot a horizontal
line to help me find it. Then I'll find the
spatial relationship between the bum and the foot. From there, I can place
the other knee and then work my way down
to the bottom foot. If I can get those spatial
relationships close to right, I'll capture the
foreshortening by default, without having to do
a perspective grid. All right, for this
one here, there's a nice little twist in the
head. I really like that. I'll spend probably a little too long trying to get
the angle of it before I go and landmark the front shoulder
based on that. Again, the pit of
the neck really helps landmarking
those shoulders. There's the pit of the
neck, there's the shoulder. From there, I can mark the other shoulder, which appears lower. Then I can get this
beautiful C curve running through the upper torso. That front arm is
a tilted straight. The back arm is more C curvy. I guess it is a
habit of mine to get the upper torso and head area working before
moving to the legs. Now, you don't have to do that, but it is a process that I've just slipped into
over the years. And I didn't leave room
for the feet again. That's why you see
these big pads of newsprint in life drawing
rooms, by the way. You don't have to worry about fitting your drawing
on your page. You have a huge page
to work on. All right. Last time I didn't get the
staff she was holding, and this time she's
holding a sword. I will make sure I get that. Pit of the neck helps
find the shoulders. Notice the angle on
those shoulders. Then just quickly gesturing
where that sword is. Now, this time for the torso, I'm using more of a
center line approach that is starting with
the center line, then finding the outer
areas of the shape. Then for the legs, I'm
trying to find the knees and plumb lining between knees to see if I've got the
perspective right. That far leg ends up
being way too long. I should have put the arm and hand there to help me find it. Notice the plumb line
at the feet to help me find the two D
relationship between them. There we go. I think this
one works gesturally, but it doesn't work
proportionally. But that's okay.
It's a 32nd drawing. Remember to be kind to yourself on these
things. All right. Let's tackle something with some more extreme action here. Just for fun, I'm going to
use a much fatter brush. Switching up the brush like
this, I find does help. As a general philosophy, I don't like being
married to any one tool. Of course, the process
doesn't change. This time, there's no
pit of the neck though, because the shoulders are
high enough to cover it. Anyway, let's make sure we get this dramatic C
curve of the body. Notice here, I've learned
from my mistakes and I'm plumb lining vertically
to find the knee. Now I know that other
knee is a bit lower. Once I have that, I
can find the feet, the foot on the left being lower on the page than
the foot on the right. Again, that will capture a sense of perspective.
There we go. A 32nd drawing that I think captures this pose. All right. Let's switch now to 1
minute on the clock. Trust me, this feels
like an eternity after 32nd drawings. Here we go. The process is the same, except I can just take a
little more time at each step. Because I could take more time, I tend to go a
little further than the rough gesture and get a little bit more
shape in there. But here you can see the
same techniques being used, plumb lining to
find the shoulder versus the chin relationship. There's the gesture
for the torso, the gesture for the arm. Here I'll find the
far elbow first, then plumb line to
find the other elbow. I found the far one first because it was more
connected to the body. It was easier for me
to gauge where it is. And you can see here, I'm
spending a bit more time on the shape of the arm.
I have a whole minute. Anyway, because I
have that elbow, I know where the
bottom of the bum is, and then I know
where the knee is, and then I can find
where the hand is. It's like a puzzle or a strategy that you have
to think up on the fly. I have a basic framework for the order I
like to do things, but the pose itself
dictates the minutia of it. Do I get an elbow first or a hand first? Anyway, time's up. I'm just throwing in
a quick shadow on the ground to help
perspective, and there we go. Now, you know, I like
the way that turned out, but I feel like the
head is a bit small. It would have been nice
to get the hair in there. And when that happens,
I'll just spend another minute to quickly
jot in those details. And here's where I ended up. I'll still label the drawing
1 minute because in spirit, it was captured in
a minute with just less than a handful of
details added in later. Okay. Here's one of those poses that is
deceptively tricky. The illusion is that it's
straight up and down, which would negate the
purpose of a gesture. But that's actually not true. This pose is not
straight up and down. There's movement in the
shoulders, the angle there, and there is a subtle
C curve in the torso, and the plumb line of the
hips is at a different angle, a more extreme angle
than the shoulders. These are all very
subtle important things, and capturing them will
save the drawing from looking stiff or a
cardboard cutout. Anyway, once again,
I'm trying to get the torso right before
moving on to the legs. Just because of those subtle relationships in the torso area. Little ears help the
direction of the head, the little tilt there, and then I'll also block in
an eye line too. Then from here,
I'll just flesh out the knees and lower leg area, in getting a basic
sense of volume there, as well as gesture. Although gesturally there's
not much to speak of. It's pretty straight horizontal. When that happens, I'll shift my focus to mostly
look at shapes, offsetting symmetry,
things like that. Then time's up,
I'm just going to quickly throw in a
little cast shadow. If this were a real
life drawing session, the model will need 20 seconds
to move to the next pose. In those 20 seconds,
I often throw in a little dash of
something extra. All right. Let's up the
clock to 2 minutes now. And again, it's
the same process. I just have yet a
little more time now to work out things. Generally speaking, the
accuracy gets higher with time. Whereas with a 32nd gesture, the accuracy is in the gesture, not so much the finished shapes. Well, I mean, you just
saw that there are no finished shapes
in the 32nd gesture. Whereas here, you
can see I'm slowly methodically working my way from the head down the figure, and I'm in arriving
at shapes as I go. Now, the confidence,
though comes from the fact that I still
do use gesture. You can see here I'm gesturing down the body to the torso. The gesture is
still what informs that critical sense of
movement or weight, getting the dynamicism
to the pose. I specifically chose this pose, by the way, because
it's difficult. It's one of those poses that really looks straight
up and down, but it's my goal to
capture the subtle sense of movement that does
exist in this pose. Notice my gesture is not
straight up and down. You can start with
the basic difference in angle from the
shoulders to the hips. I mean, the angle is close,
but it's not the same. Also, the torso line is
not straight up and down. It can also really help to
find your cross contours, getting the volume of the form. Not only that, but in this case, because I had the arms in there, I could also work out
the shape of the torso, getting those little
negative spaces right. I'm shading her
clothing in darker just to differentiate
it from the flesh. I think it'll help
give the drawing a bit of a graphic read. The biggest hurdle a beginner
will have to conquer is removing the sense of
flatness from a drawing, especially a quick drawing. That's why I think dwelling on quick drawings is
really helpful. It's really not
that beneficial at first to develop final drawings. It's way better to go through volume of drawings,
just reams of them, and working out the
kinks of capturing things like gesture
and quick volumes. Because if you can capture
those things quickly, it means that your
eyes are tuned well. You're seeing the right things. That is honestly what most
beginning artists lack, in my opinion, which is
totally natural, by the way. These are skills you can't
really be born with. You have to develop
them. All right. Just like that, two
minute drawing done, and I think it does
capture a sense of fleeting movement. All right. A nice, foreshortened one. We're looking
dramatically up at her. The whole body is foreshortened
from head to toe, but I'm not going to
let that scare me. That's just a matter
of getting my volumes. With the tools we developed in both Chapter one and
two of this class, that shouldn't be as much
of a problem anymore. Foreshortening is just a volume that's
coming towards you. No big deal. It does
change the proportions. Maybe that's a difficult part, but you get used to
that kind of thing. With tools like plumb lining and gesture, that's how
you deal with that. Here's a nice exaggerated C
curve gesture for the body. Once again, it feels exaggerated
when I'm drawing it, but it ends up just
looking normal. For the hips, I'm
really trying to get a sense of that
elliptical volume. Because we're looking
dramatically up at the hips. Those hips are way
above the horizon line. We're going to really
see the bottom of that hypothetical
ellipse around the hips, and that really helps capture the sense of perspective
that we're getting here. This leg is really what's going to help sell
the foreshortening. Notice I'm working
out its volumes with cross contoured
ellipses as I draw it. I use the ellipses as
a landmarking tool, and then I'll build my shape from one ellipse to the next. Yet again, I'm running
out of paper space, so I'm just going to
adjust the canvas. There we go. The sole of that foot has a really
interesting shape. A bunch of weaving S curves. I really want to capture that. Just throwing some basic shading on the
sole of that foot, like it's the bottom
of a box or something. Then here's the
other leg which is hidden largely by the front leg. But because I've drawn
the front leg first, I can find it via comparing
positive and negative spaces, plumb lining if I have to, even if just in my head, although I've abandoned that leg here to capture the hand, which I think adds a bit of
interesting look to the pose. And notice my line
quality is quite soft. That's because we're
working quickly. I can't really commit to things. I work softly in case I need to change something
without erasing. I don't like to erase. I think that erasing is focusing
on the wrong thing. You should be searching, and erasing implies that you're looking for
perfection or something. These quick poses are
really not about that. All right, there's a
two minute drawing. All right. Let's do one
more drawing here to wrap up our sample study
session from the figure. This one has a lot of
energy, a lot of action. It is quite literally
an action pose, and that makes it interesting. But in terms of drawing,
I don't feel like this presents any other difficulty
than we've already seen. I'm spending a bit of
time on the head here, getting that angle right. That'll allow me to gesture down that prominent neck muscle,
the sternal mastoid. Knowing the names of
the muscles doesn't matter in this stage,
though Anyway, it does lead to the
pit of the neck, which allows me to find
the shoulders, same stuff. I'm now working out the upper torso area down to the hips. This is where that gesture
is pretty obvious, I think. There's an obvious C
curve rhythm there. You notice when I do it though, I'm still careful to include that big volume of the rib cage. It's actually quite helpful to draw very lean models
whose ribs you can literally see because
it really helps drive home just how big that
rib cage volume is. It's responsible for so much
form and shape in that area. There's a nice plumb line
to help me find the knee. Those shorts that
she's wearing are pretty great reference because
you can quite literally see the cylinder or at least
the partial ellipse that happens when the leg comes out from underneath the shorts. There was a plumb line
connecting the two knees, the knee on the left being slightly higher than
the one on the right. I gave the upper
arm on the left, just a quick bit of shading. It helps it look like
it's reaching backward. Anyway, the two props, the shield and sword are
very important to this pose, like the storytelling
of the pose. I really want to make
sure I get them in. You'd be amazed at
how difficult it can be to make the drawing look like the character is
holding something rather than the thing just being stuck to them or something. All right. So I chose
a foot to start with. The feet are equal in this pose, that is equally
difficult to find. I just started with one, then I plumb lined my way to the other. At this point, the
drawing is done, but I have 15 seconds left, so you might as well
make some lines darker, commit to some shapes, figure
out some more volumes, whatever you think will make the drawing just that
much more informative. And there we go. That's exactly how I used
to start my life drawing sessions for my first
five years of drawing, 32nd poses, 1 minute poses, and two minute poses. We filled up about an
hour doing just those. Hopefully, with this
sample size here, you get an idea of how
you can approach them. You can draw as many or
as few as you'd like. But I do recommend doing
this every day that you can. Even if it's just like
20 minutes or something. In 20 minutes, you can do, ten, 20 drawings, depending on how much time you
a lot to each one. That's valuable. It's way
more valuable to do something every day than do a lot
of something one day.
26. How To Study - Shape Focused: All right. In this next section of Prescribed study regimen, we are specifically
studying artists shapes. They're shape choices. On screen here is a Glen Keen
drawing of Disney's Tarzan. You already know I'm
a big Glen Keen fan from the very intro
of this class. And this drawing here
is no exception. It's got beautiful mark making, almost sculptural, planer
style mark making. You know, I kind of looks
like he's drawing with a hatchet. I really like that. But that's actually
already getting off topic. What we really want to study here is the shapes being used. Before I do a drawing,
I just want to show you the things that I'm drawn
to, no pun intended. For example, I love the almost triangular quality of this forearm shape like that. Then it tapers into a more
graceful C curve here, and then a sharper
curvy thing here. Those two shapes meet and because of their differences,
they are interesting. They're both simply
designed on their own and the juxtaposition of the
two is interesting to me. Now, shapes are one of the
more subjective areas of art. Just because I
like this drawing, I don't expect that everyone
will like this drawing. Although I do hope that
you see that it has good qualities to it
in terms of design, at least thoughtful qualities. No shape here is
done on autopilot. Even something as simple
as the cuff of the sleeve. I think a less
mindful artist would have drawn a cuff just like
a rectangle like this, maybe throwing a little button
right there in the middle, in the middle of
the cuff like that. But Glen Keen didn't do that. His cuff has a
little taper to it. It's wider at this side. There's also a little C curves, if I were to draw it up here. There's a little curve there,
then it goes really wide, and there's a little sharp
little curve that goes like that before coming back
to the starting point. I hope you can see just in this short comparison
up here that this shape is just visually more
engaging than this shape. And it's more engaging
because it's designed to have little differences
embedded in it. Doing that makes your shapes less predictable
to the audience. Now, you don't have to do
that with all of your shapes. But as one of my
teachers put it once, if any of your
shapes are going to be consciously seen
by the audience. That is, if they have any size to them like the
cuff of the sleeve, you should probably design them to be as
interesting as possible. I'll show you an
example of a shape that maybe doesn't have to
be quite as designed. It's the straps here
of the overalls. These are pretty small
shapes in the drawing. I mean, they're
certainly visible, but they're not meant
to steal any attention. In that case, you can keep
them a little bit more, let's say bland, but
purposefully bland. All right. Let's
start drawing here. Unlike the last figure drawing section where I narrated
things after the fact. Here I'm narrating
it live just to hopefully put a microphone in my brain and capture
my thoughts as I go. Also, I'm not under a
time limit this time, which is why I narrated it after the fact for
the figure drawings. There's no way I
could do a drawing in 30 seconds while talking
about the process. The first thing I'm
going to do though is follow the same initial process. This is the head. Here's a cross contour for the eye line. Let's throw a brow in there. Now, I'm not totally
interested in getting every shape
and every line exact. I want the shape relationships to be as exact as possible. But in terms of the exact likeness of the
character or something, that's not really
what's on my mind here. But let's just block in a face. I will actually talk about
the planes of the head in a very basic tip level
right after this. But one thing I
know is true about the head is that the
brow sticks out. Then it comes in
for the eye socket. This is a cross contour, I'm drawing, like a center line. Then the cheekbone
comes out again. Then the bottom half of the face is more or less straight, has a subtle curvature
to it like this. Anyway, what that means
functionally is for shading, I could throw this
bottom of the box like the eye socket is almost
like the bottom of the box. I could just throw that in tone and it starts looking realistic. Even the bottom of the nose, there can be a little
bit of shadow. Well there often is a
shadow under the nose. I can throw that in there.
The mouth sticks out. I'm more interested in the
overall shape of the jaw here. I really like this strong masseter muscle, the
chewing muscle that Tarzan has because
he lived his life in the forest in the jungle and his ear is over
here somewhere, and his hair cuts this nice straight line this way and then
straight line this way, only to be relieved by a
subtle little curve there, like a half moon shape. Then let's not forget
this nice little lock of hair that comes down. This is one ofthose
shapes that doesn't have to be totally designed. It's just a small little incidental
shape that comes down. The silhouette of the hair and the head is much more important
here to this drawing. Now, the neck comes
down and here's where I will switch
into gesture mode. The gesture, of course,
will help us map out the drawing so we
know where we're going. We have a high shoulder and a low shoulder.
They're about there. I'm imagining plumb lines, but instead of imagining them, let's actually
physically draw them, and then we'll plumb line the relationship between the shoulders, get
the angle right. Then from there, I
can roughly figure out a curve and find the hips. It's about there. It's angle
opposes the shoulders. This is why I draw
lightly because I don't know for sure it's
there, but it's about there. Then his leg is somewhere
down here and sleeve, I might have to reduce the size of this drawing a little bit. Okay. Perfect. The shoulder. I'm still in gesture land here. The shoulder comes down and
turns into this arm that is basically a graceful
tapering S curve is how I'm seeing it all
the way down to the hand, that is this tapering S curve. And then this arm
is more straight. It's almost like a It actually is like an
S curve as well, but a very flattened one. The closer you get to straight, the more energy the
arm has certainly that back arm seems like
it's spring loaded, ready to take off
that back arm looks like it's ready to push Tarzan off the ground at any point. Whereas the front arm
does not look like that. The front arm looks
like it's more gracefully moving with
the flow of the body. Was that back arm is the
one that's loaded to go and actually looks
like it has been going, putting Tarzan in
this current pose. Then the torso is
like this v shape. Which is classic of
a fit physicality. He's got that v shaped torso. Then we have the trapezius, the muscle that comes off
the back of your neck, making this nice C curve shape that I'm just gesturing
in just roughing in. I'm also going to
include some of the clothing in the
gesture to the collar, the shirt here that make these little interesting
little S curvy things. There we go. There's my gesture. Let's give it a little thickness
to the arm here. Indicate what maybe shapes
we might be using here, where things are the cuff
might be about there. I'm plumb lining
it with the leg. We have a nice framework here
for the drawing, I think. Now, I'll just switch my
pencil to a darker color, so I can just go over everything with my let's say finished line. Although I am going to
keep this drawing sketchy, there's nothing fully
finished about this drawing. The word finished
is a little weird. This is a finished drawing. It's just the sketchy look is what the artist is
choosing for the finish. Information wise, it's
complete, it's finished. And I think information is a much more accurate measure as to whether something's
finished or not. A finished drawing
doesn't have to be perfect cleaned up line. It can be, but there are
different types of finishes. I'm drawing some lines within the hair to support
the silhouette. These lines follow the overall shape of
the hair and they use the same lines that design the silhuette the same
straights and curves that is. Then what we can do with a Glen Kean didn't do
this in his drawing, but if you have hair,
feel free to shade it in, even if it's a blond
haired model or something. Oftentimes hair can contain some of the darkest darks in
your drawing or painting. As a force of habit, I do
like to shade in hair dark. There's a beautiful
bit of negative space here on the right. I'm using that to place the collar relative
to the jutting jaw, and this is the collar
here and it cuts in with this beautiful
strong straight. Then from just under the
collar, using the t principle. Remember the T principle, remember the t that
looks like this. Now I know that the shoulder will come out from underneath the
collar about there. Okay. Now we can find the
armpit area here of the shirt, and we can throw a little
folds action here. If you want to learn more
about clothing folds, which I don't consider
to be a beginners topic, but I have a YouTube video that I just made last month about it. In fact, you can consider a lot of my YouTube content to be supplementary lessons
that you can use to build with on top of this fundamental information contained
in this class. My YouTube channel, I would
say is targeted toward more intermediate level
artists and skips over the beginning stuff that we're looking at
specifically in this class. Once you have these fundamentals
in this class down, You can then go to my
YouTube channel and plug in the lessons a little
bit more proactively, let's say, than maybe
you otherwise could. Where the shirt opens up here is this beautiful
little intricate. I'm not even sure
what it looks like. It looks like a continent
on a map or something. This particular shape
I'm drawing right now. Here's the pit of
the neck right here. External mastoid muscle
tracks down to it. Now, I totally messed up
this part of the shape. Glen Ken did not do that. His neck he let
the neck be wider. Of course, Tarzan would have a huge neck and then
that goes in like this. Glenen didn't do this,
but I'm going to shade the bottom of the sorry, the upper part of
the neck where it meets the lower part of the jaw, just in a bit of shadow because that part almost
always is in shadow, obviously cast from the jaw. And anything that's
under anything else like underneath the collar, both collars here, feel free to just throw a little
shape of tone in there. Make sure your shape of
tone is still designed. It's a simple shape like that, and this shadow is a
simple shape like that. Always keep your shape simple. That's as close to a rule
as you'll ever get in art. There's almost never a reason to have a shape that's not simple. Even if it's a non
interesting design like the overall straps that
I just talked about, it's still a very
simple shape, right? Okay. Let's use those
shoulder straps to design this
nice v shape here. Also, we can go over
the form with it. Notice I'm not doing
this. It's not straight. It goes over the top of the
shoulder or the trapezius, I should say, down
the chest and we can get this one here, then it juts out a little bit as it has a bit of slack there and now it can come down and attach somewhere
over here to the pants. This one has a little
bit more tension to it, so it's a bit straighter and it attaches to the
pants somewhere here. We have this now triangular
torso for Tarzan. But look at this, the
shirt at the side here. It's the shirt is
slightly oversized, so it bags out here at the side. It's got this nice little shape. My shape is less interesting
than Glen Keynes there. Let's fix that. Let's make
it, it's more like that. The weight is at the
bottom of the shirt. Let's make it straighter there. Remember straights contain
a lot of weight or force, just like this arm
was straighter because it's spring
loaded, ready to go. It's pushing the whole figure forward, so it's straighter. All right bit of
correction to do here. It's occurring to me that
the torso is too long. I'm just going to
use the magic of digital tools here
to go like this. That's better. I might
even just rotate it a bit. Of course, if this were
drawn with a pencil, you'd have to erase and redraw. If anyone out there is
worried about cheating, don't be. Use the tools. Also, the overall strap. I'm going to redraw
this as well. It comes in more at an angle, which is more
appealing visually. Actually, let me
undo that as well. It's closer to the shoulder. The only reason I care
about that is I like the fact that there's less space here and more space here. That's the only
reason why I really care that this shape
goes roughly in there. I don't care that
it's exact, but I like the delineation
of space there. Then there is a nice little line for the pectoral muscles, or I should say the
pectoral muscles causing a few wrinkles
in the shirt there, and then this comes
down and straight. There we go. That's
a bit better. These little wrinkles
in the shirt, you don't even really have to know much about clothing folds, get the lines to be
uneven and straight. Then you can, you
know, track this almost cross contour
line over the form. Functionally, this is
a cross contour line that I'm drawing now,
and there we go. We have the look of
a wrinkled shirt without really understanding exactly what the clothing
folds are doing physically. Clothing folds is something that I didn't learn for
several years. As long as you put a few directional lines
in your clothing, within the cross contour
tracking over the surface. You can get to the point
where it looks like clothing that is indeed folding
and wrinkling and stuff. Here's that shape I talked
about in the opening, this nice triangular shape that mirrors the triangular
shape of the torso itself. I like that, and just a quick shading here because the arm
is pointed back. Let's just throw it in a
bit of tone. There we go. Then from that, it
fits beautifully into this curvy more
graceful C curve, then on the other side,
it's two straightes. Notice, that's so much
better than just doing this. This would be too symmetrical. Even if you offset the symmetry, you could do that,
and it's fine. This shape would work,
but it's better, I think, to do it this way, where you have curve here, and then the appearance
of a curve here, but that curve is made
of two straightes. It's just a nice again, to use the word again,
mindful design. And there's that
cuff that I like, and now that I have the cuff,
I know where the leg is. All the while, I'm tracking
this negative space here. I talked all about that
in the shape chapter, and this is where that pays off. It's one of the few bits of negative space in this drawing. There's that and there's this and maybe this
part here. That's it. There's no other
real negative space in this drawing, that's okay. But you notice that
this negative space is big and this one is small. There's differences everywhere. You should always not
to overuse the term, but you should always
be mindful of designing differences into all of your
shapes. Here's the wrist. The wrist is like an
echoing of this shape, is a curve here and then a
straight here that cuts in, and then the hand
is just loosely drawn and I will imitate
the looseness of it. Hands are another
thing that I don't believe is part of a
beginner's regimen. I have several YouTube videos, two of them actually on hands, probably about 40 minutes
of material on hands. Again, hands are one of
those things you can plug into these fundamentals and you can find it on
my YouTube channel. They are pretty complete
lessons on hands. Anything I would say here would probably be more
redundant than anything. But the tools you've
learned in this class will absolutely help you draw
hands. This is looking good. We just got to get this
other arm here on the right. It's got this subtle C curve. This part of the
arm is straight, and then the elbow or the inside of the
elbow joint is here. I'll landmark it by
way of these curves. Now, I just made a tangent. I made a mistake. Watch this. The bottom of the
shirt is here and look where I put the
inside of the elbow joint. It's continuous from that. That's not good. You might say, Oh, that's continuous rhythm. And you'd be right. But in this case, it flattens the form because the inside of the elbow is at a different level of depth
than the bottom of the shirt. This part of the form
is closer to us. Whenever you have
something like that, you want to separate it. I do not want a perfectly
continuous thing there. I'm just going to put it lower, like the T principle thing. I want to put it
lower like this and then suddenly the arm stands
out more as its own form. There's a beautiful
straight here, followed by two curves, a curve here and a curve there. Then there's the
little ancillary little sketchy fold things that are still designed. It's like three straights. I don't want to don't just do that, don't scribble something. You could scribble, but
make sure the scribbles are still forming some
cohesive design. Then the cuff of this sleeve, which is folded out, it's got this nice, again, tapered shape, S curve here, really nice
curve look at that and then culminates up here feeding right back
into this curve. To me, these shapes are not just the shapes
in this drawing, but how a good
artist uses shapes. It's like poetry. It's like reading a poem
and being enthralled by the structure of the stanzas
and the rhymes used, going off that analogy, it's boring to read a poem whose structure and rhyme
you can anticipate. It's much more interesting
to read a poem or even just a story where you
can't see what's coming next. That's what you want to hit with your shapes
in your drawing. I think it's very
much like a poem because you have so few
shapes in a drawing, just like you have
few words in a poem. It will give the audience a pleasurable experience when they can't predict what
you're going to do next. For example, this hand, the top of the hand comes out, then there's a knuckle
and the finger breaks the angle and
s straight down. And because Tarzan
is like an ape, it's hitting the middle knuckle of his finger is hitting
the ground straight. There's a lot of weight on it.
We get that nice straight. Even this little line I
just drew this curve here. If you imagine a stick hitting the ground,
it's like this. Well, the finger is
like a fleshy stick. It's going to be squishing a
bit as it hits the ground. That's what I'm doing
with this finger. Then there's another
finger here, similar principle, straight. In fact, let's draw
a straight line to track the entirety
of the fingers onto, then it's like that. I really like how the
cuff of the sleeve is cutting the hand
off at a diagonal. That's interesting too. You don't see an equal amount of every part of the
hand, knuckle there, and my cuff is a bit longer in my drawing
than in Glen Keens, but that's okay.
Bottom of the thumb. It's always interesting to
throw in a little case shadow. Maybe interesting, maybe
it's not the right word. It's informative
perspective wise. If you get a few shadows in here and the reason it's
informative is because suddenly we get to compare the vertical distances
of things and in a way, your brain can almost throw
in a perspective grid there. A cache shadow tends to be a great way of
revealing perspective. Now obviously, in this drawing, he's missing what would be his left leg or
the leg on the right, but maybe it's coming out this way with the knee up
here and it's coming down. Something like that.
We can throw that in. Then if that happens,
there might be a shadow cast from
the arm onto the leg. Um, I'm just shading
in the box, right? The leg box would
look like this. This part that you just saw, this is a cast shadow
just underneath the arm. Just like we did in the neck. I'm doing the same thing
here with the arm. It's directly
underneath the arm. So let's put it in shadow. And then if the box
is indeed like that, we can let's just stick
to the principles of the class and just shade
in the box like this. And then this is
where the box turns down where the knee bends, you know, that box is like this. The entire box is pointing
down, so we can shade that in. But I'll just even get rid
of it for the drawing. And then the cast
shadow. Be in there. We need to make sure that hand that front hand is the front
most part in perspective. It's the closest thing to us. I guess you could do the shadow like this and it
would still work. But to give that hand a nice
graphic contrast de pop, let's intersect it like this. That puts that hand
front and center. It's a beautiful little
centerpiece of the drawing. Now, Glen Ken didn't
include that shadow, but he easily could have if
he kept the drawing going. I suppose I'm breaking
the mold of GlenKens drawing here and taking it
just inch further than he did, which is not to say better. I'm just continuing
with the idea. Okay. So there we go. There's a little lock of hair
that I missed down here. A couple of folds in there. Because this is such
a little tight space in here, I'll just
shade that in. If I wanted to, I can imagine a box for the leg like this. If I imagine that box, I can shade in maybe one plane of it,
the side plane here. But I don't want to get too
heavily involved in shading. I think shading is
often used as a crutch, especially for beginning artists because the tendency
is to think that shading will make your drawing finished or complete
or even good. Your drawing should
be informationally complete without shading.
Shading is great. I mean, I make my
living off painting and painting is all about
shading fundamentally, but a good draftsman,
someone who can draw well, does not rely on shading. There we have a nice little
study of Glen Kean's sketch. I think the shape information is accurate or accurate
enough, anyway. Again, it's not a perfect copy. It's the relationships of the shapes that I
think is accurate. If you want, you can notice
little differences and say, I like the chin shape better in the original
and clean this up. It juts out downward a bit more. You can find all kind of little things that you might want to now put
into your drawing. But I will discipline myself to stop here and note
where I was successful. That's key to your learning. Make sure that once
you've done a drawing, you look at it, and you say,
where was I successful? Where was I not? In my drawing, there's a little
tangent here where the thumb just meets the leg. Notice in Glen Ken's drawing,
there's a separation here. Now that's a small
detail for sure, but I may want to adjust mine. Either I add the separation or if I'm close enough for
the leg to overlap, let's just overlap it more. Make sure I'm very conscious of the t principle that I'm now using on this hand, which is different than
the glen Keene drawing, but this works just as well. If the knee is like a box, there's going to be a box there. All right. I spent what? A 20 minutes on
that, 30 minutes. That's about the time I'd expect for a conscious shape study. Shapes take a lot longer than gesture because they're
more intricate. There's less room for searching. You have to be more
exact with them. This is a good example
of something you can do a couple of
times a day maybe.
27. Head Drawing Primer: All right. I don't
think this course would be complete without a basics of head
drawing section. Now, fully
understanding the head is a whole complex topic. I actually have a whole
seven hour course on just understanding the head. It's one of those classes that this class will prepare you for. However, because you're
going to be drawing a lot, you will have to draw
heads, I'm assuming. I wanted to go over
some common mistakes that I often see from
beginners and students, and I want you to know what they are and know how to avoid them. Just so you don't slip
into any bad habits. The character on the screen
is from Pixar's Luca. You might look at
that and say, Oh, that's a pretty simple drawing. It's the shape of the head is like this, it's symmetrical. We have it like this. The
forehead goes about there. We have the nose here, which is like a
circle shape with some nostrils, and
there's an eye here. I'm not going to get
this exactly right, but there's an eye
here. And an eye here. These are basically
just all circles. We have some large
irises looking at us, and there's a smile here and
the chin comes in like that. Before you know it, you have a cute little character design. Of course, he's a young boy, so let's give him some big ears. This is the type of drawing that most people will get right. It's very simple to
put together a head, at least a cartoon head drawing that's seen from
the front like this. Side note, I love
how the hair is like little mini
croissants or something. I absolutely love
that little touch. Okay. So we have that. And then of course, the eyebrows will just rest over
the eyes like this. This represents a
drawing that I think many of us can do, no problem. There's not a whole lot
of complexity to it. It's just a bunch of
circular or round shapes stacked up against each other. Let's just throw in the
ear cartilage here. It always helps to give
some depth to the ears. Okay. The thing
that this drawing doesn't challenge you on is it doesn't really require any knowledge of
planes to draw that. It's a roundish face drawn
straight from the front. The planes are all foreshortened into the appearance of flatness. You can squeak by here without knowledge of
the planes of the head. I see a lot of students
who draw straight on poses of the face
like this quite well. It's an appealing
design, nice shapes, et cetera. And that's great. But let's just set this
aside for a second. Where they will commonly falter
is when you have to draw the head from a three
quarter view and suddenly you're dealing with a whole new level of perspective. Here's the mistake
that will happen. I'm going to purposely
draw this incorrectly. They'll draw the shape like
this, a similar shape. Then they'll put an
eye here and an eye here and the nose here and
the smile will be here. Of course, you've
got your ears like this and you'll have
your eyebrows over here. Let me just move those
drawings here so I have a chance to
fit in the hair, and I'll just rough this in. This is where people
will start going wrong, and I'll just throw
in some irises here. The problem is this
face looks flat. It's just like a warped
version of this face. That's due to the fact
that if I were to draw a center line
down this face, it doesn't appear to
track any facial planes. It's still it's almost like a spherical face with
features just pasted on, almost like they're stickers. You know, rather than
being rooted in structure. And I think what happens is when you look at a face
from the front view like this where it sort of
can be drawn relatively flat, it tricks you into thinking that a three quarter view can
also be drawn quite flat. Take a look at this little
illustration by Mark Beam. This is a great example
of how the planes of the head look in a
three quarter view. Let's go over this
with a mid line line. The brow comes out. Then right
at the base of the nose, it's called the glabella. It goes in, then the bridge
of the nose comes back out, and this character has
quite a long nose, we'll go straight down. Then for the bulbous
ball of the nose, it comes out and then down. Then the rest of the face is pretty round as it
comes down to the chin. Now this character has
a very stylized chin, almost like a
Simpson's character. It goes quite a ways in, and then the chin comes out a little bit before wrapping
around to the jaw. So that's the center
line down the head. Let's imagine a
similar center line or a cross contour down
this part of the head. Again, the brow comes out, right where the eyebrow is, it actually comes out even more. There's a muscle there. There's
also a bit of bone there. Then look at this,
it plunges deep, deep down for the eye socket. If this character
had no eyeballs and the eye socket
were just like this, which is what our skull does. Suddenly, this is a deep
crevice that goes in. But let me undo all that.
Look at the eyeball back. We go deep in for
the eye socket and then the eyeball is round,
comes out like this. Then we have a little
plane here for the bottom lid that
comes out and then down. And then that cheek comes way out because we have
cheek bones here. The cheek plane comes way
out before tapering into a smoothish curve that mirrors
this curve to go down. This is complex topology. This is just a cute
little kid character. Let's quickly mark
this up in a sketch. Let me just quickly
block in the parameters, the perimeter of the drawing. This is how big I
want the head to be. This is where the eye line is. Now, before even
placing any features, I want to figure out
the far contour. This is the brow. That
brow is going to come out. Let's see it comes
out like this. And there's that little
bit of bone that comes out just where
the eyebrow is. Then we plunge deeply
into eye socket, which goes in, gracefully
tapering back out. Gracefully in this case,
because it's a child, chiseled mountain man would have more sculptural quality to the planes, like a
sharper quality. But the planes would
all be the same. It comes in for the eye socket, out for the cheek bone, and then we gradually come
down for the cheek. Now we're hitting the jaw here. So he comes a bit
more sharply in. I'll give this character a
bit less of a Simpson's chin. I'll just give him more
traditional chin right here, and then we come in for the jaw. What this contour
is that I just drew is very much like the center
line I'm drawing here. That line I just drew
is very similar to that contour because that's what that contour describes
in a three quarter view. Now here's the next
big thing, the globe, the base of the nose,
this part right in here. Because this is a
three quarter view, this part is going to
be compressed in space. It's going to be
foreshortened. The base of the nose is not in the
middle of the shape here, it's not here, it's over here. Because again, we're in
a three quarter view. The globa comes in, this is a nice big V shape
on this design, which is why I'm using
it from Mark beam. It's a nice V shape
here and it comes in. Let's keep track of our center
line. The brow comes out. Jets out a little bit here. You don't have to include that, especially in a cartoon design, but Mark Beam did,
and I like it. Then it comes in for the
base of the nose, again, the globlla then the bridge
of the nose comes out. Again, this characterize
quite a long nose. We'll replicate that. Then we have the nice
ball of the nose, which is pretty easy to draw. Is this bulbous shape,
and we have this thing. Again, to complete
our center line, we come down and we are coming out for a spherical
shape for the nose. Let's stop there and
put in the eyeball. Here's the critical
thing that I've seen so many students miss. The eye is overlapped
by the nose. Look at the character here. The nose line is here just
to quickly rough it in. The eye is behind it. This eyeball is behind it. If we're just quickly draw
it up here, here's the nose, the eye is behind it, and we have iris like this or
something. It overlaps it. This is true on realistic faces and well
designed cartoon faces. The eyeball is here. I'll draw the whole
eyeball first, drawing it right
behind the nose. I'm just ghosting
it in, Then I can quickly get in the eye lid, the eyeball comes
around like this. Then let's get he's got an upper eyelid that
is partially closed. Let's get that in it describes
the form of a sphere. Then this character's iris is looking down into
the right like this. But again, let's arrase
what we've ghosted. The eyeball is
overlapped by the nose. Now let's move to the eyebrow. The eyebrow is a direct
continuation from the globe up here and then wraps around
that form like this. It appears like
the eyebrow has to wrap around the head. Because
that's what it's doing. The eyebrow is traveling behind the temporal ridge
here where the temple is, and it's becoming invisible from this view because it's
wrapping around the head. Let's immediately pivot
now to the other eyeball. Whenever you have two things, two eyes, two arms, two legs. I do like to draw one then
the other whenever possible. Sometimes in a gesture, I don't. But whenever I'm finally figuring out the final forms
of the figure or the head, I do like to draw neighboring
elements together. To eyes, let's draw them
one after the other. It helps keep a rhythm. The eyebrows need to follow a rhythm that goes
around like this. It follows the top contour of the eyebrow,
around like this. This is something
any good animator knows that the eyebrows
have to follow, almost picture a unibrow. Picture like the entire
eyebrow is a big unibrow. You want to be able
to connect them. That's true with
expressions, too, though I'm not
going to quite get into expressions in this class. Again, it goes beyond the
realm of a beginner class, but connect your
eyebrows with a unibrow. This unibrow would dictate that this eyebrow would go here. Now, we want to know where
the corner of the head is. Just think boxes.
We went all over boxes in section two,
Chapter two of the class. Where would this head
be broken into a box? Well, I'll show you on the actual finished
illustration here. It's right here. The
box goes like this. This that I'm shading in
is the side of the box. And the only reason I'm
going around here is because I'm accounting for
the eye socket. If I weren't accounting
for the eye socket, it would be the side of the
box would just be like this. What this means is we have to be aware in
our head drawing. Going to undo that line, sorry. We have to be aware in our
drawing where the temple is. You can just I'm pointing
to my own head right now. You can't see it, but point to your own skull and find where
your temporal ridge is. I might as well quickly bring
up a picture of a skull. I'm talking about
this area right here. Right where that bone
is. You'll feel it. You'll feel a bit of
a depression there where the skull is
actually a bit hollow, and then you'll feel
that bone coming out. Where is that? Because
that's the side of the box. On my character here, that box is right there, and maybe I should
actually do that with a purple line just because
it's a block in line, not an actual line we're
going to see on the head. Then we can use that to go
down for the eye socket and this boy character has a very large eye socket design. Then we can come out
down the chin down the cheek and it c terminates at the bottom of the chin here, right where the chin would be. This is the side of our box, and I'll just ghostly shade this in just so we know
that's where the box is. Now I'll switch
back to a dark line and I'll place the eyeball,
the other eyeball. Be careful here. Don't put it, here's another common mistake. Do not put it too
close to the nose. Because this nose, let's go back to the
original drawing here. This nose has a plane. Obviously, here's the line
of the ridge of the nose, But this part here that I'm
shading, that's still nose. It's a big side plane
that looks like this. If you were to imagine
the nose as a box, again, imagining things as boxes
is a critical skill in art, and I hope you've learned
that from this class. Let's imagine the
nose as a boxy form. Here's the front of the nose. The nostrils would be like here. The side of the nose is like
this, the side of the box. It's a very common mistake to neglect the side plane of
the nose. Do not do that. The side plane of the
nose, in this case, rough it in like
that, which means our eyeball needs to be beyond the side
plane of the nose. Where the tear duct
is right around here. Now, this character is not
designed with tear ducts. A tear duct is one
of the common things to eliminate in a
cartoon design. You typically don't really need it and it will still
communicate fine. If you were to
imagine a tear duct, that tear duct would
be just a little bit beyond the side
plane of the nose. I'll throw in a tear
duct in this character just for fun. Just
to show you really. Then let's make sure that our bottom of the
eyeballs line up, and then we can go around and we can have our
other eyeball here. Then we have the eyelid. Again, let's line up
the upper eyelids with just a ghosted
plumb line really, and there we go. Then we have our
nice eyebrow shape, which wraps around
the temple like this. Around. Great. This is looking very dimensional,
which is what we want. I really like this
character designed by Mark Beam because he's really
emphasizing structure. Now we have a gentle tapering
mid line toward the chin, describing the muzzle of the mouth and then a
bit out for the chin. No matter where
you put the mouth. This character again, has that Simpson's mouth
way down there. I'm going to put it somewhere here in a
more traditional spot. The mouth can be drawn
with a basic line. If you want a lower lip,
you can put that in. The lower lip, just
make sure that the lower lip appears to
come out, then back down. And then that chin. Again, you can put it
wherever you want, but generally speaking, the chin should come out a little bit. In the mark beam character,
it's a very stylized one. I'll make mine a bit
more traditional, and then we go up
here for the jaw. Now, let me just
erase this nose, so I have room to draw the ears. The ear is a fantastically
fun shape in this character that I just butchered. Let's
do that better. Let's just get this cartilage in the ear lobe here and
then It's an S curve. It's for a basic ear lobe design or cartilage
of the ear design. You can shade this in
because it's a recess, and then the side of the head flares out like that,
which I really like. Of course, let's plumb line
our way to the other ear. This would be the top
of the other ear. Let's get those in line, and there's a nice bit of
perspective on this box. We have the other
ear let's plumb line the bottom roughly. We need to drop
that a bit lower. Then we go like that, and
we can shade this in. For the top of the
head, I always like to define where the
hair line would be, then this character's hair is almost like a Bart
Simpson type of thing. There's a lot of Simpsons
parallels with this character, which I didn't really realize
until just now, actually. It's almost like a child Bart Simpson and
spiky hair like that. The hair could be anything. If this character
had longer hair, you would keep the
hair line in place. You would just raise
how high the hair goes. Maybe it's something like this, however high you
wanted it to be. This character doesn't
have any sideburns, but the sideburns can come in down to the ear like
that. There you go. This is a more
properly drawn head. I should say more
accurately drawn head. Obviously, there are
no rules in art. You don't have to
observe structure. But one of the main things
that will make your art look professional or let's
just say beyond amateur, is if you have structure and then you're playing
with structure, that's something that an amateur artist generally won't do. They will default to flatness. Flatness is unfortunately what happens when you don't
have the knowledge. That's the default position. I think we generally
want to avoid that. All right. So back
to the Luca example, we now should have very
recognizable midlines. Let me just start this
one again, actually. The hair line would be up here hidden by
this tuft of hair. But we go out for the brow. Gently tapering down
for the glabella. In this character, it's
a smooth straight line all the way down the
ridge of the nose, going out for the bulbous
part of the nose, there's a plane break here. This is the underside of
the nose, so it goes down. Then let's just ignore the fact that there's a mouth there. Because again, we're just
analyzing structure here, not really facial expression. This line is a nice
tapering round, not spherical, per se, but let's call it a
flattened sphere. Let's throw a midline down this part of the head,
again, out for the brow. Then right where the eyebrow is, we plunge into eye socket. Now this is a much
narrower eye socket than the mark beam design. It doesn't go in as
far, but it does go in. Let me just erase
that for a second. It goes in for the
eye socket and then round for the
eyeball, of course. Then there's just a little
ridge for the lower eyelid, goes out then down. Then it goes dramatically
out for the cheekbone. This is one of the
most dramatic planes of the head is that cheekbone. You can see it tracking
its way along the head. It's quite a formidable plane. You can look at it on
this character too. It's a box shape that points up. Then this part of the
box points downward. But anyway, getting back to
this character, cheekbone, we go out and then
gradual taper just like this curve down
to the lower jaw. The outer contour,
just like we saw in the marked beam drawing is essentially a drawing of the cross contour here
that we just did. We go out for the brow, gently in, in this case,
for the eye socket, but in nonetheless, then out for the cheekbone
pretty dramatically. One of the most
dramatic plane changes again is that cheekbone. Then we gently turn straight and then turn
under for the jaw. Let me just get
rid of those lines and we'll start fresh here. I want you to also observe
the line of the nose here. Let's go from the
edge of the eyebrow down the ridge of the nose here. And you notice in
this case, it's a much more soft form than
the mark beam one was, but it does overlap the
eye ever so subtly. This is barely a
three quarter view. It's somewhere between a
front and three quarter. If that head were turned more, it would overlap the eye more. The eye overlaps where the
ridge of the nose is and then below the eye is where the
ball of the nose comes out. Then let's look
at this eye here. First, let's identify where the other ridge of the nose is. It's about here. We have that
glabella part right there. Then we have that nice
side plane of the nose, which in this case is
designed to be a bit thinner, but it is still there. Then just beyond that is the eyeball or the
other eyeball here. So hopefully this illustrates
how this character is drawn exactly the same way as the Mark Beam kid character
we just looked at. It's just the shapes
are different. Switching now to
this character here, which is the guy we
started this section with. Let's identify another
part of the form, the side of the box, this
temple region right here. It's where the eyebrow breaks, the angle of the eyebrow breaks. That's probably the most
reliable way to identify the side plane of the head,
is this point right here. It goes out, then it follows the eyebrow down because this
identifies the eye socket. And then we gently taper
out for the cheek. This is the side
plane of the head. If you wanted to more dramatically
light this character, with a more emphasized
light shadow relationship, You could simply shade
this plane darker, and this is shading the side
of the box and you could see it looks accurate because
we're observing structure. You could do the same
thing for the eye socket. If we wanted to deepen
that eye socket, you could just shade
this in because we know it goes downward, and I'll even shade in this
part of the eye socket. Leaving that v shape though for the globa.
See what I'm doing here? I'm leaving this v right here for the globe because
that part goes up. If we were to draw a
horizontal midline, it goes like this, out then up for the globe and then down for
the eye socket. Again, this character
is very round. He's a very young boy. He's going to have
smooth features. That's true of real
humans as well. Babies, toddlers, and children all have very smooth features. Rigid planes don't develop until at least teenage
years, if not later. Then we have this kind of thing. I've made this
character feel more plainer and sculptural this way. I've deviated from the
Pixar soft design, but the shading looks accurate, like the forms of the
character still look accurate. If you were designing
this character, it might be wise to
start rigid like this and then simply soften
the edges to taste. Just to emphasize
the cheekbones, I'll take one of the
lighter values up here. I'll just put this in where the cheekbones cause
the form to jut out. Then I'll take the slightly
darker half tone value. And put it here to represent the gentle flow of the cheek. Again, what I'm doing
here is I'm stripping this character down to the
bare essentials of structure. This is the structure
you need to know in order to then
improvise from it. By the way, the term structure and plane changes refer
to the same thing. The plane changes
are the structure. This is the form of the head. We can apply this
value to the top of the nose and then here is where the bottom of the nose is. There we go. We could also
take this shadow value here and apply it
under the chin, where that head finally turns under and meets the
neck in shadow here. We just blend these
two values together because it is a very
soft character. Just to be fully accountable, we get a mid line in. Let's do it across the
middle of the head. We go out for the brow,
in for the glabella, which tapers down
the entire ridge of the nose out for
the ball of the nose, then down for the
bottom of the nose, and then gently
around to the chin. This part of the head
out for the brow, right where the eyebrow is, we go deeply in for
the eye socket. If we were just imagining
the eye socket, we would continue that
as a concave shape. If we were going out
for the eyeball, we would go out this way. Remember the eyeball sits
inside the eye socket, and then out dramatically for the cheekbone and
then gently down. This structure is ubiquitous. Every character,
every person you've ever seen in your life
has that structure. It just logically follows
then that you want to implement that structure
into your designs, be they cartoony or
realistic? It doesn't matter. That means the profile view of the character is going to be extremely important because it's really going to show off
those plane changes. Here's how big I want the
head to be on my page, and I'll have the
head facing this way. The eye line will be
about here. Here we go. The brow comes out. Now the angle of that brow
coming out is up to you. That's the design
of your character. I'm just inventing this as I go. I have no idea what this
is going to look like. But if you know the structure, then you at least
know your structure will be right. The
brow comes out. We go down for the
glabella a little bit. Then we go out for the nose, and let's just round off the bottom of the
nose about there. Then we know that the
rest of the face gently tapers down in a
flattened sphere. There we go. The mouth is
going to be somewhere in here. Generally speaking, the
lower lip will come out a little bit like this. This looks like a female
character now because of that, the thickness of the lip anyway. Then the lower lip can be a little bit of a bump
that comes out there. Then the form goes in and
gently out for the chin. Again, that chin can be
shaped however you want, and then we go up for the jaw. And, you know, I'll
show you depending on where you put these features, it really makes a huge
difference in the design, and that's where you can
spend days, literally, iterating where things go and how exaggerated
the shapes are. Let's make this chin narrower. We're playing jazz with
structure right now. This is maybe a nice, more pleasing shape than
I had before, maybe. The nostril would be by the way located somewhere
here because again, this is the bottom
of the nose as if the nose were simple box shape. Now, where's the eye go? This is where a lot of beginner artists
will get it wrong. They'll put the eye too close
to the front of the head. Remember, there is
a eye socket here. It usually is helpful for
me to imagine the glabella. The ridge of the
nose would be here. The glabella would come up. Again, it's very narrow
in a profile view. That means the upper eyebrow
is here and it comes around. Now, where is the
corner of the box? Well, again, in profile, it's going to be about here. Where does that eyebrow
break, at the corner. Then we use that side of the box information to
draw to track through the eye socket and down the cheek to the edge
of the chin like this. Then we want to also account for the side
plane of the nose. What I do is I take a point from the base of the
eyebrow right here. Come in for the eye socket,
just like this curve did, we come in almost mirroring it, then down and we meet the
wing of the nose there. This is all nose. That leaves this
space for the eye, and that eye can be, again, you can have 1 million
different eye shapes here. But let's just do a basic thing. I'm just improvising this. It's probably not
going to be the most interesting design because I'm just free handing it without
even iterating. There we go. Let's make sure we
have a little bit of a ridge there for
maybe the lower eyelid. If there's an upper eyelid, we might have some
thickness to it there. And now I'm realizing that the
brow might be a bit short. The eyes generally
on a human head, by the way, are
located halfway down. It is another common
mistake to make the eyes located too
high up the head. A common beginner
design will put the eyes a third of the
way up the head like this. This is a trap I still fall into all the time.
You can see it here. I wasn't planning this drawing, so I accidentally put
the eyes a bit too high. Now, there are no rules, remember, it's okay to do that. You can do whatever you want, but in this case, maybe
I'll just take this, bring this down a little bit, maybe just take this, bring this down a little bit. And you notice in
these adjustments, I'm still not harming
the structure. The structure is still intact. Now I can make the brow travel a little further before
meeting the hair line. And then that head
can wrap around. The ear, by the
way, is generally located halfway back
to the cranium. If we just ghosted in a plum
line that's about halfway, the jaw would come up and the
ear is somewhere in here. Then that cranium goes back and we go right
into the neck, which is something like this. Again, from here,
you build the hair. I like to build the hair,
at least initially as a separate consideration of
shape because after all, the hair is just something
that grows on top of the head. It's not part of the
head structure, really, because the hair can do
anything from no hair at all to Fabio hair or something. But the hair just builds
itself off of the main form. Again, just like
anything else, hair shapes very dramatically. This is where you might look at a fashion book or
something and be inspired by modern trends
of hairstyles or something. Then if you quickly wanted to apply some boxy shading to this, simply take this side plane
and go ahead and shade it in. Put all of this in tone really. The hair can be even a
bit of a darker tone, I'm just doing this very
messily, but that's okay. I can just go back in and
clean it up a little bit. We know that the eye
socket goes inwards, that's the bottom of a
box which can be shaded. The cheekbone comes out. We got to make sure that
this part here comes out. That part is in light. This
is assuming by the way, the light is coming
from anywhere above, either directly above or somewhere off to
the left or right, as long as it's coming
from above the face, you're going to get
shading like this. Because we're used to seeing
light coming from above, be it lighting from indoors via light bulbs or outdoors via
the sun or the skylight, generally speaking, we
are lit from above. There we go. We have some
basic shading happening. I always do like to apply a bit of a ambient
occlusion value, which we saw in the perspective
chapter a little bit, under the chin here where it
meets the top of the neck. This area can be a bit darker. Because that chin is just
barely turning under like formwise almost like
a sphere turning under, you can extend this value a little bit out
toward the chin. Then from here, that's
your basic structure. Then from here, it's just a
matter of adjusting edges. How soft do you want
these forms to appear? If you want them soft, very
soft like the luca stuff, the Pixar stuff we
just looked at, just make these edges extremely soft and start blending things. This is obviously not an
advanced shading guide, but just in general, you can start adjusting
your edges here. Generally speaking,
I like to keep the brow edges on
the harder side and the cheekbone and cheek and chin edges
on the softer side. As a very final step, you can
put even some half tones. Half tones being values that
are closer to the light. Typically, the side plane of
the nose is in half tone. The lower lip can get
a bit of a half tone. Underneath the lower lip can
sometimes even get a shadow, just a tiny bit of shadow here, depending on how steep your
planes are in that area. If you want, you can
finish it off with just a couple little reflections in the eyes, little highlights. Again, this is a
structural template that you can use for any design.
28. Head Drawing Primer Continued: Okay. Here's a fun
little character designed by character
cube on Instagram, a highly recommended
follow, by the way, just super clean form
and lines and shapes. Let's break this
down structurally. The brow in this case comes in, but it's still out compared
to the eye socket. What we have is the
brow coming in and then jutting out for that part
right where the eyebrow is. Then let's just
ballpark. This is a cross contour for
where the eyebrow is. The upper brow comes in
ironically, then out. The globe of the
nose is about here, and we've even got some
exaggerated wrinkle shapes as the frowed brow shows
off where the glabella is. Then we have an eyebrow here. This is not going to be an
exact copy of the drawing. This is a structural analysis. Let's follow that una brow
thing all the way around. Now we know where this
eyebrow shape is, and we know where it breaks. In this case, character cube his name is Kenny, by the way. Kenny is playing with form by having the eyebrow
angle break this way. But the eyebrow angle
still does break. We know the side of the
box is about there. Now, we're looking slightly
down at this character. We're not really going to
see the eye socket taper in. That part is hidden by the brow, but we will see where the
cheekbone starts coming out. It comes out here. This is a more gnarled
chiseled character. In the Pixar example, we might have a cheek that
looked more smooth like that, but this is a gary character. We have a sharp edge
for the cheekbone and a sharp edge for the jaw as
it changes to the jaw there. The nose here is equally pointy, that ridge makes a C curve. We don't have a friendly
bulbous part of the nose, it's just a sharp curve here. Now, let's get the eyes in, classic overlap of the eye, just like we saw in
the Mark Beam example and in the Luca example as well. Make sure we get a nice
heavy overlap there. It'll make it look like we
have heavy inset eye sockets, which is very suitable for
a character like this. Remember, even the iris is
overlapped by the nose. When I draw that is in there, I'm basically drawing
a half moon shape. To indicate the overlap. We have a very wide plane
for the side of the nose. We want to make sure
we respect that as we block in now
the other eyeball. Let's make sure we plumb line something here to
make sure our sizes of the eyeballs are kept intact and we'll throw
the iris in there. There we go. We have
a nice baggy design for the lower eyelid
and same over here. It's a little less
pronounced over here, but we have another
baggy eyelid there, which is great to communicate a aged or gnarled
character, maybe. We even have some
crows feet over here. If we wanted to, we
could right now shade in the part of the ye socket here that we know goes
down dramatically, goes inward dramatically.
We could shade that in. Even this nose is very faceted. We could probably shade
in this part here connecting almost
the unibrow shape. That is something
that happens a lot with very rigid noses. As you get that shading right
under the glabella there. Now, if this were
a more human face, we would have this design. That would be a more human
version of this character. But this is a ogre character. Why not have some fun and Mr. Character cube does that
by flaring out this shape. Instead of that's a very
nice mouth he's drawn, I'm just going to simplify it down to its basic structure. It comes in for the
chin and we have this shape here and it
comes up for the jaw. And that mouth is say over here. I'm just going to keep
the mouth closed. Again, this is more of
a structural study. We've got our brow,
which is coming in, although the entire brow
form is still pushed out, but the surface of
the brow comes in, which is a fun little
change in structure, but still respecting
the fact that the brow is further out
than the eye sockets. Then we have that little
part that comes out where the eyebrow is
in for the glabella, down the ridge of
the nose, and that bulb is part of the
nose is non existent. It's just built right into
the ridge of the nose, which I think helps with
the unfriendly look. Then even though we have a pretty exaggerated
muzzle here, it still is a smooth curvy form. The structure is still there. It's just ccatured. He's pushed the structure further
out more out this way. And then there is some more fun being had with
the chin shape here. It's more like this
nice fun little curve that almost comes to
a point right here. It's like this. Then you can't forget the little
hairs coming off the guy. Notice how those hairs do not repeat in negative
space or length. It's a nice variety there that this artist has obviously built
into their muscle memory. You can tell when an
artist has done that because all their shapes
are just always appealing. Now here's a little fun thing, another deviation of structure. The temple bone
and cheek bone is actually drawn because this
is such a gnarled character. So we know that
there is a cheekbone plane that should point up here, as we've already seen. That line is literally drawn in here in this
design. It's included. It goes like this, and that line tracks its way up to the temple. And that line is shown
in the character design. This is a bit of a deviation because on a human character, you wouldn't have
the line there. The line would be here, where the eyebrow
breaks, as I've shown you in the other examples. But again, this is
where artists can play with structure.
But that's the key. You are improvising and
playing based on structure. You are very rarely ignoring it. You can choose to
leave parts out if you want or choose to
exaggerate things. That's all fair
game. In my opinion, your choices should be
based on sound structure. Because then even if you
choose to leave something out, at least then you know
what you're leaving out. If you're drawing and not even knowing what
you're leaving out, then I guarantee you're
going to leave out the wrong thing because you
just won't know any better. Then to complete the sketch, we have the cranium shape, which even this is a nice, the way this curve goes is fun and we have
something like that. Just make sure that if we
ghosted this line through, it can connect down
here and that would flow into a neck which doesn't
exist in the original, but the neck would do
something like this, I would assume or depends how wide the neck is
maybe it's this wide. Who knows? This is where
the design aspect comes in. This course largely
is not about design. It's about the
precursor to design, the fundamentals you need
in order to design well. That's why I find it so fun to look at artists like Kenny here Character Cube on Instagram and Mark Beam and the
Myriad of others. If you know the structure
you're looking at, it's fun to ask yourself, how did this artist design this? What are they changing?
What are they not changing? I'll shadow under the nose. You could once again use
that side of the box line, which is literally
drawn into this design to get a side plane
of the head here. You can almost always
shade the upper part of the neck darker as
that's a shadow being cast by the overhanging
jaw above it. You can get the recessed
part of the ear here. If we're just finishing
off this midline, this wraps around the head right in here
somewhere. There we go. That's where tools now
liquefy can come in. Because I have the
structure there, it's totally a viable option for me to start
pulling things around. If anybody here is
sculpted in clay, this is something you do
with clay all the time. You can soften the clay with heat if you're using
an oil based clay or something and just quickly move overall proportions around.
That's what I'm doing. I'm moving shapes,
moving proportions, but I am not changing
the structure. If I can just do
something like this, the structure is unchanged or at least the structure
is still intact. I'm changing the
shapes. Which certainly changes the look
of the character. Like here, I can give him
more of a Frankenstein brow. That's fine. It looks more like
Hellboy or something now, but the structure
is still there. Liquefy is a great tool for
changing your shape design, but it's not a good tool for
changing your structure. That needs to be drawn by you. Then you can do some fun
stuff like that and arrive at different iterations of
your design. All right. Just wanted to close
this section with a beautiful life drawing
by one of my teachers, Nick Collision,
believe it or not, that is a five minute drawing. Nick was and is incredibly fast. He is actually the
guy who instilled the value of quick
drawings in me. That is the benefit
that happens to your art when you can
capture poses very quickly. Anyway, I just really
like the utility of the structure
of the head here, how he quickly captures a head
in a five minute drawing. You can see underneath
the finish line, he started with a
basic egg shape over which you can build
hair or something, hair going down this way. Then all we do is carve
the structure into it. We know the brow comes out. The eyes because
this is a human, let's make sure it's halfway. Then we come in for the eye
socket, come out, nice, gracefully round cheek and chin, and we come up and then we
can maybe alter the hair line to come down and meet
the jaw right there. Nick shows us where the globe is because we're in a
three quarter view, he shows us this one side. We know the glabella
is connected to the eyebrows, you can
just throw that in. Then you can imagine
the unibrow thing. Nick did not draw that,
but you can imagine it, and then we know the other
eyebrow is somewhere here. Now, where the angle breaks
is covered by the hair. Then from here, it's almost like a scribbled bit of dark
representing the eyes. You can even shade in the
eyebrows the eye sockets. In a quick figure drawing, this is a great way
to lay in the head. You don't have to draw the
whole ridge of the nose. You got to make sure
this curve connects to a phantom ball of the nose. You can draw that whole
thing if you want. Okay. I if you drew the whole thing, it
would look like that. Nick would often
leave out this line and just ballpark where
the bottom of the nose is. He didn't do it here, but
sometimes he would even just shade in the bottom plane of
the nose, just like that. It gives the head a
quick sense of depth. You can do this in your finished illustrations, too, of course. Just Nick was a master of these quick drawings and he would put this in all the time. Then from here, we can
have that imaginary line coming down for the roundness
of this part of the head. You know where the
mouth is. The mouth is generally halfway on
that line, by the way. And you can block in with a thick dark shape the middle
line between the lips, often putting a bit
of a dark accent around the corners of
the mouth right there. Generally speaking, the corner
of the mouth will line up with the edge of the
eye on both sides. Then let's make sure
the chin comes out. If you don't observe
the chin coming out, it'll look like too
weak of a chin. It doesn't look
structurally sound anymore. So make sure that chin
comes out enough, and then we can taper
back in for the jaw. Then the neck in a three
quarter view anyway, we'll usually poke out somewhere where the chin is
somewhere around here. Then you can find the
cylinder for the neck. You can find the
pit of the neck, which is somewhere around here. Then from there,
you can continue landmarking your features. Obviously, me talking
through this, this took probably a
couple of minutes to draw. But if you're just
focus on the drawing, you could probably indicate a head in your life drawings in a matter of seconds using
this structural information. As a last step, you
might want to just mass in a tone for the hair that always makes it look
nice and graphic and popping. I like to put in
shadows under the chin. Sometimes I'll even just toss in a shadow across
the globe as well. All be careful that could make your character look a bit
too oh, as we've seen. Sometimes a quick half tone here for the side plane of the nose. If you really wanted to, you could throw the
whole thing in tone. What that will allow you to do now is pick out lighter planes. Well, choose any
plane that points up. The bulb is part of the nose
points up a little bit. The cheek bone can get a
bit of a lighter tone, this side as well, and you can get some
structure this way. Play with your edges, of course, to make them appropriately soft. You could do this
with a chalk pencil if you're doing
it traditionally, or obviously digitally, you
can just use a soft brush. In this case, he hair
line is pretty high. The head is turning up legitimately facing up
toward the sky here, so you might get a bit of a lighter tone for
her head there. That's pretty much
all the areas you want to put lighter tones in. If you want to go one step
further and add highlights, the cheek bone often does
catch a bit of a highlight. The tip of the nose often
catches a bit of a highlight, the lower lip can catch one. Even the corner of the
mouth can catch one. This is how if you had
10 minutes say to do a life drawing or not
just a life drawing if you're doing your own
illustration work or something. These are the places
I would go to to find detail and rendering information and
things like that, gesturing down to find the pose, but I'm not going to
focus on the pose itself. All right. There
is a quick primer on heads. I hope that helped. If you want deep dives into
understanding the human head, you can check out my class called Understanding
and painting the head. With that, we move on to the final section
of this course.
29. 3-Point Perspective Demo: The previous chapter, I did a one point and two point
perspective drawing. I did not do a three point. Let's do that. In this
three point perspective drawing, we will be looking up. Just because in the
previous chapter, I covered looking
down and then said, looking up is the reverse
of that, which is true. But I figured I'd go
ahead and actually draw one to show you
how I set this up. What I've done is I've
just made a bunch of parallel lines on a layer, and I've just duplicated
those lines to make a big layer of lines that are
all parallel and vertical, and then I will go
ahead and distort this. Every digital painting software you have will have
this capability. I'm using Photoshop here. In photoshop, it's
called the distort tool. So essentially, what
I'm doing here is I'm defining where these
lines eventually merge, and I'm putting them
pretty high off the page because I want this to be a
pretty normal camera angle, something you could
shoot with your phone or something you could shoot
with a normal lens, which, like we discussed previously, will tend to put
the horizon line, and therefore, vanishing
point pretty far off the page in a three
point perspective. Now I've made another layer. I should have just
kept my straight lines from the other one and
just rotated them, but I'm recreating another
set of straight lines, these ones horizontal,
of course, and this will be one side of the three point perspective
grid vanishing this way. Now, because we're looking up, I still want the viewer to
be placed on the ground. It's like we're standing
on the ground looking up, and I want that ground to be
in frame at the very bottom. That means the horizon
line is going to be way at the bottom of the page
somewhere around here. When I distort my
grid into place, I'll just make sure I'm placing the horizontal lines
appropriately. Now I've just duplicated that layer and mirrored
it across to the right, and now I'm just moving
where those lines merge. I want this vanishing
point to be closer to frame as we
saw in Chapter four. Now, I just have to be
careful as I further distort this grid that I don't change
where the horizon line is. The horizontal version of these green lines has
to be in the same spot as the horizontal
red lines because that is the horizon line where
everything appears flat. That's what I'm doing now
going slowly to ensure that. I could have just drawn a
horizon line, by the way. I didn't because I have
these principles in mind, and I think at this point,
you can do that as well. Although don't rush into that. I think if this is new
information for you, you absolutely should
draw the horizon line. Okay, so that's it. I'm starting to sketch within
this environment. It's really nice having a real dense grid
like that because I feel like it's almost like riding a bike
with training wheels. I almost can't get the
perspective lines wrong because I'm always within a few
millimeters of a reference point. Again, because that grid
I made is so dense. The downside of that is it can
be difficult to improvise, I find because there's
always a sense of rigidity as I'm drawing
within this environment. But this is the exercise. This is why it's
study and practice. You have to find out what is
most comfortable for you. Some of you out there
might really really enjoy having this dense grid always, no matter
what you're doing. If you're like me,
you probably enjoy drawing with fewer
reference grid lines. But for the sake of showing you how to practice in this class, I do recommend trying this. I'm drawing a
castle, by the way. Castles are excellent practice. Not only are they cool, but they have a lot of multi
leveled forms to them, like spies at different
levels and multiple floors, different sizes of
turrets and walls. There are a good
subject to see if your perspective is tracking from top to bottom
and left to right. So on my other screen, I just Google searched
for castle reference, and I'm just pulling
ideas from those images, riffing on the reference. Now, the actual reference I'm looking at is not
really important, and that's because I'm not
copying any one piece. What's important is
how I'm conforming all my shapes to this
three point perspective. By the way, you're seeing
this drawing progress at two times the speed. The other thing I happen
to like about castles, at least when it comes
to perspective study, is that you can practice your
ellipse drawing as well. A lot of these spies
and rooftops are hexagonal or octagonal
or even just round. But in any case, you can
practice how you're drawing those ellipses as they progress moving away
from the horizon line. The ellipse at the top of
the frame will be much broader than the ellipse nearer to the horizon line at
the bottom of the frame. And we saw that in every
form of perspective, 1.2 point and now three point. In three point perspective, it might be the
most exaggerated, though, because we
are looking up, which means the
physical distance traveled from the horizon
line to the top of the frame in this
drawing is going to be a lot larger than if we
were not looking up. That's one of those other
things, you really don't need a perspective
grid to keep in mind. Once you become experienced, things like the differences
in ellipse curvatures, you can just put that
information down with no grid and it'll start
looking like perspective. In fact, a perspective grid doesn't actually help you draw ellipses because ellipses are round and a perspective
grid is rectilinear. But having the grid there does fill the space with
the illusion of depth, which I suppose does
help draw the ellipse. Or at least it helps put you in the right mind frame to help you solve that
particular puzzle. I'm just roughing in a
little stairway there. I'm imagining the two rails of the stairway converging
at that top horizon line. It's so far up there
that those stairs are almost parallel
lines, but not quite. There is just a tiny bit of convergence there to help
sell the perspective. Now, if you feel that drawing a castle like this is beyond
your current skill level, then what you can do and still get a lot of
efficiency out of your practice is just reduce
all these forms to boxes. Just make a castle out of boxes. Don't put rooftops or spies
or anything like that. Just make it all boxes
and maybe the odd cylinder here and there to
practice your ellipses, too. Doing that removes any pressure
of designing something. Your goal there is just
to make it look like the forms are existing in
a cohesive three D space. I find that students can often get down on
themselves because they don't like the way their art looks on
a design level. Like, Oh, it's not a cool
concept that I just did. That is certainly a valid
level of criticism. But oftentimes what I see as a teacher is the
fundamentals are not even there in the first place to make something that even has
a chance of looking cool. Of course, that's where
this entire class comes in. I'm hoping to give you the fundamentals you need
to build cool stuff. I hope as you're
watching me draw this and as you hopefully do your
own practice like this, that this sketch
is really nothing more than an application
of the fundamentals. If there are any
details in there, they're just quickly
sketched in, not even pixel accurate,
not even close to that. It's the larger forms that
are accurate in perspective, in this case, the three
point perspective grid. Notice now by the way, I finally gotten to the
horizon line level, which in this case
is basically where the castle sits on the ground. And all those lines
are just flat. I've just sped up the video to about four times the
speed to just give you a sense of how I'm fleshing out this area. The big
forms are there. You can see me use those
tricks like the X tricks, finding the middle of a plane, the middle of a
wall in this case. Then using that midline, I just draw to the left and draw to the right to
find those arches. Now, when I do draw
to the left and draw to the right,
that's eye bald. The midline is not eye bald, that's discovered
with the x, but then from there, it's eyebad. Notice, by the way, I'm flipping my drawing around,
flipping horizontally. That's a very common
design trick. It helps your eyes see the image as if it
were fresh to you. It's just a great way to
spot mistakes very quickly. Not only mistakes, but
things like repetition or poor shape design or bad
design choices in general. Just think of it as a good way to get fresh eyes
on the picture. Another quick little trick and maybe one that's
self evident. You see all those arches
on the ground level. I want those to be
the same height. All I'm doing there is I'm
looking at one of them and seeing which perspective
line the top point hits and just making sure that all
the others are aligned with that same point on that same perspective line as it tracks from left to
right through the scene. That'll keep all those
arches, the same height. Another little tidbit on
three point perspective, both looking up
and looking down. The perspective grid takes on the largest angles closer
to the sides of the frame. You see now that I've got forms blocked in at both the left
and the right of the shot, those are the most angled. The lines in the
middle of the frame, those lines can almost
be mistaken as parallel. They just look vertical. In fact, there is a
line somewhere in the middle of the shot
that is vertical. Lesson there is if you choose to do a three
point perspective, you might as well make use of it and you do that by
including elements on the sides of the frame
that really show off the meat of that
three point perspective. Otherwise, you might as well just do a two point perspective, which is totally
fine, by the way. Three point perspective is not better than two
point perspective, two point perspective is not better than one
point perspective. Different ways
through which you can filter the illusion of
depth onto the page. The key point being they
all have convincing depth. From there, it just
becomes a flavor thing. What does your illustration
want or need to best express itself
and get across the story or the mood or whatever it is
you're shooting for. Questions like that are
what you branch into. When you're evolving
beyond a beginner, suddenly the tools are
there for expression. That is the tools become
a means to an end. When you're a beginner, the
tools are ends in themselves. And that's fine. You need
to master them first. The tools at first, should
be the B all end all. That's going to really
allow them to sink in. But then there becomes a
point where it's like, Well, what am I going to
do with all these tools? In fact, I remember talking to Nick Koislian about this
about 18 years ago now. Nick was my first
ever drawing teacher. You saw his work in the previous video there about head drawing. Anyway, he was just telling me that the hardest
part of becoming an artist is not the
initial studying and mastery of the tools. It's after you have
those tools in place where you have
to sit down and say, well, what do I have
to give to the world? That's a much harder question. And one that, honestly, no teacher can really
help you with. The only thing a teacher can responsibly help
you with is getting you to the point where you are ready to make that
kind of decision. Anyway, back to the
drawing at hand here. Another great thing
about castles is there is so much
room for overlap, one little vertical piece
in front of another. I have three or four
layers going here, and I don't mean
photoshop layers. I mean, layers of castle stacked upon other
layers of castle. Castles just have a way
of designing themselves. They're a fun
subject. In the end, you have what looks like
a very complex drawing. But it's really not. It's just adherence to the perspective grid and
then layering forms, one thing in front of another. By the way, I have
no idea if this is architecturally sound,
probably it's not. But I don't let that
be a barrier for you. In films like Lord of the Rings, you have waterfalls
coming from literally nowhere and people buy it
because it looks cool. But again, whether things look
cool or not at this stage, when you're a beginner or an experienced beginner
just learning, something looking cool is
a design consideration. We don't want to preoccupy ourselves too much
with design yet. It's all about fundamentals. Does the picture
work in perspective? That's the main
question. All right. To finish this off, I'm going
to add some basic shading, as I've done previously
in this class. This is on a new layer
set to multiply mode. I'm just using a simple soft ish marker brush with one value, you can see I've picked
a medium gray there. My technique here is to simply imagine this castle
as a series of boxes, which is really not a far
stretch from what it is, and then pick one
face of the box. In this case, I'll
pick the right side of the box. And shade it in. I'll leave the line work intact. Again, this is on
a multiply layer, which doesn't affect the lines. When I apply the value,
I'll try and apply the brush as evenly
pressured as possible. I don't want really too
many minor variations. I just want this to
be graphic and clean. Things are either in light or they're in shadow,
no in between. That's a basic shading approach and really all we need
for a piece like this. Even professional and
more advanced painters will use this technique
to begin their work. Then from there, they'll
add all kinds of little subtle values
and variations, like half tones and
things like that. In this case, we're just not even going to
bother with that, but you can achieve a pretty
convincing sunlight effect just with two values. In fact, back in my earlier
days, for the longest time, I would carry around
a physical sketchbook with a black ink
pen and one marker, kind of a medium gray
marker like I'm using here. With just those
two drawing tools, you could capture sunlight. And by the way, the shaded
areas that are diagonal, these parts here, hose
are simply cast shadows. All I'm doing there is picking a direction for the
sunlight and making sure that where I do choose to put cast shadows that those
diagonals are consistent. I don't want you to get
distracted by things like cast shadows.
Not in this class. You notice I didn't really cover cast shadows
in this class. I don't consider them part of a beginner's drawing curriculum. They're distracting. That's
in the realm of painting. Now, it is a fundamental
of painting, but it's painting nonetheless. Let's get the drawing,
the draftsmanship down, and then you can move
on to that stuff. I have lots of other
classes as well as YouTube videos that covers the basics of
painting like that. I feel like what
we're doing here is understanding drawing
from the inside out. It's way less about how to
draw a castle or how to draw the human figure and much more about understanding
the form of things, their three dimensionality, the shapes that those three
dimensional forms produce, and how to tie all that
together with gesture, or in this case, tying it together with a
perspective grid. I personally feel
quite lucky to have been introduced
to this method of learning how to draw
because I feel like this gives you the potential
to draw anything. You can go wherever
your interests take you and apply the principles
and techniques accordingly. I mean, I've been doing this
stuff now for 22 years and I have yet to find a subject where this stuff doesn't apply. Anyway, I finished my
shading pass and I have flattened that shading
pass onto my line layer. Now I'm just looking
at areas that feel blank or unresolved
or maybe even incorrect and taking
some time to address those things now before I
forever close this drawing. I guess maybe that's
a good thought to leave you with
for this course. Try your best to consider
your practices as disposable. The lessons you learn
are indisposable, but the stuff you produce. As one of my friends
once put it, draw into the garbage can, make mistakes, have
successes, it doesn't matter. Just get the mileage in with constant practice and
targeted practice, and then a failure is
really as valuable, if not more valuable
than a success. Everything you produce then will be a stepping stone on your way. For me, it's always
been more about that than trying to produce
something to post on Instagram.
30. Outro: Congratulations. You made
it through the course. The tools we just went over for the last eight or so hours. They can sustain your growth
for years. They did for me. I actually didn't get into
painting or anything like that until about three years
into my drawing journey. And for those three years, I just used the tools
we just learned about. Now, you don't have
to wait that long. In fact, I think you
should get into things like painting and illustration
and finished work. But when you study, I do recommend practicing
these fundamentals separately, rather than trying to study them while making
something finished. To that end, I've put together
a little PDF document, you'll find it with the class, and it contains several
different daily study regimens that you can follow along if you want some
prescribed study. The regimens are pretty heavy
on figure drawing because figure drawing tends to be the best gateway for
every type of drawing. If you can do figures well, chances are you'll be able to do many other things
quite well too. So check out that
PDF, and of course, don't be afraid to replay chapters you've already watched, probably several times,
because if you're like me, you'll find new
little nuggets along the way with each
successive viewing. All right. Thank you again
for checking out this class. I truly hope you've enjoyed it, and that it helps
your drawing journey, and I want to wish you all
the best with your work.
 Marco Bucci, Professional illustrator & teacher