Transcripts
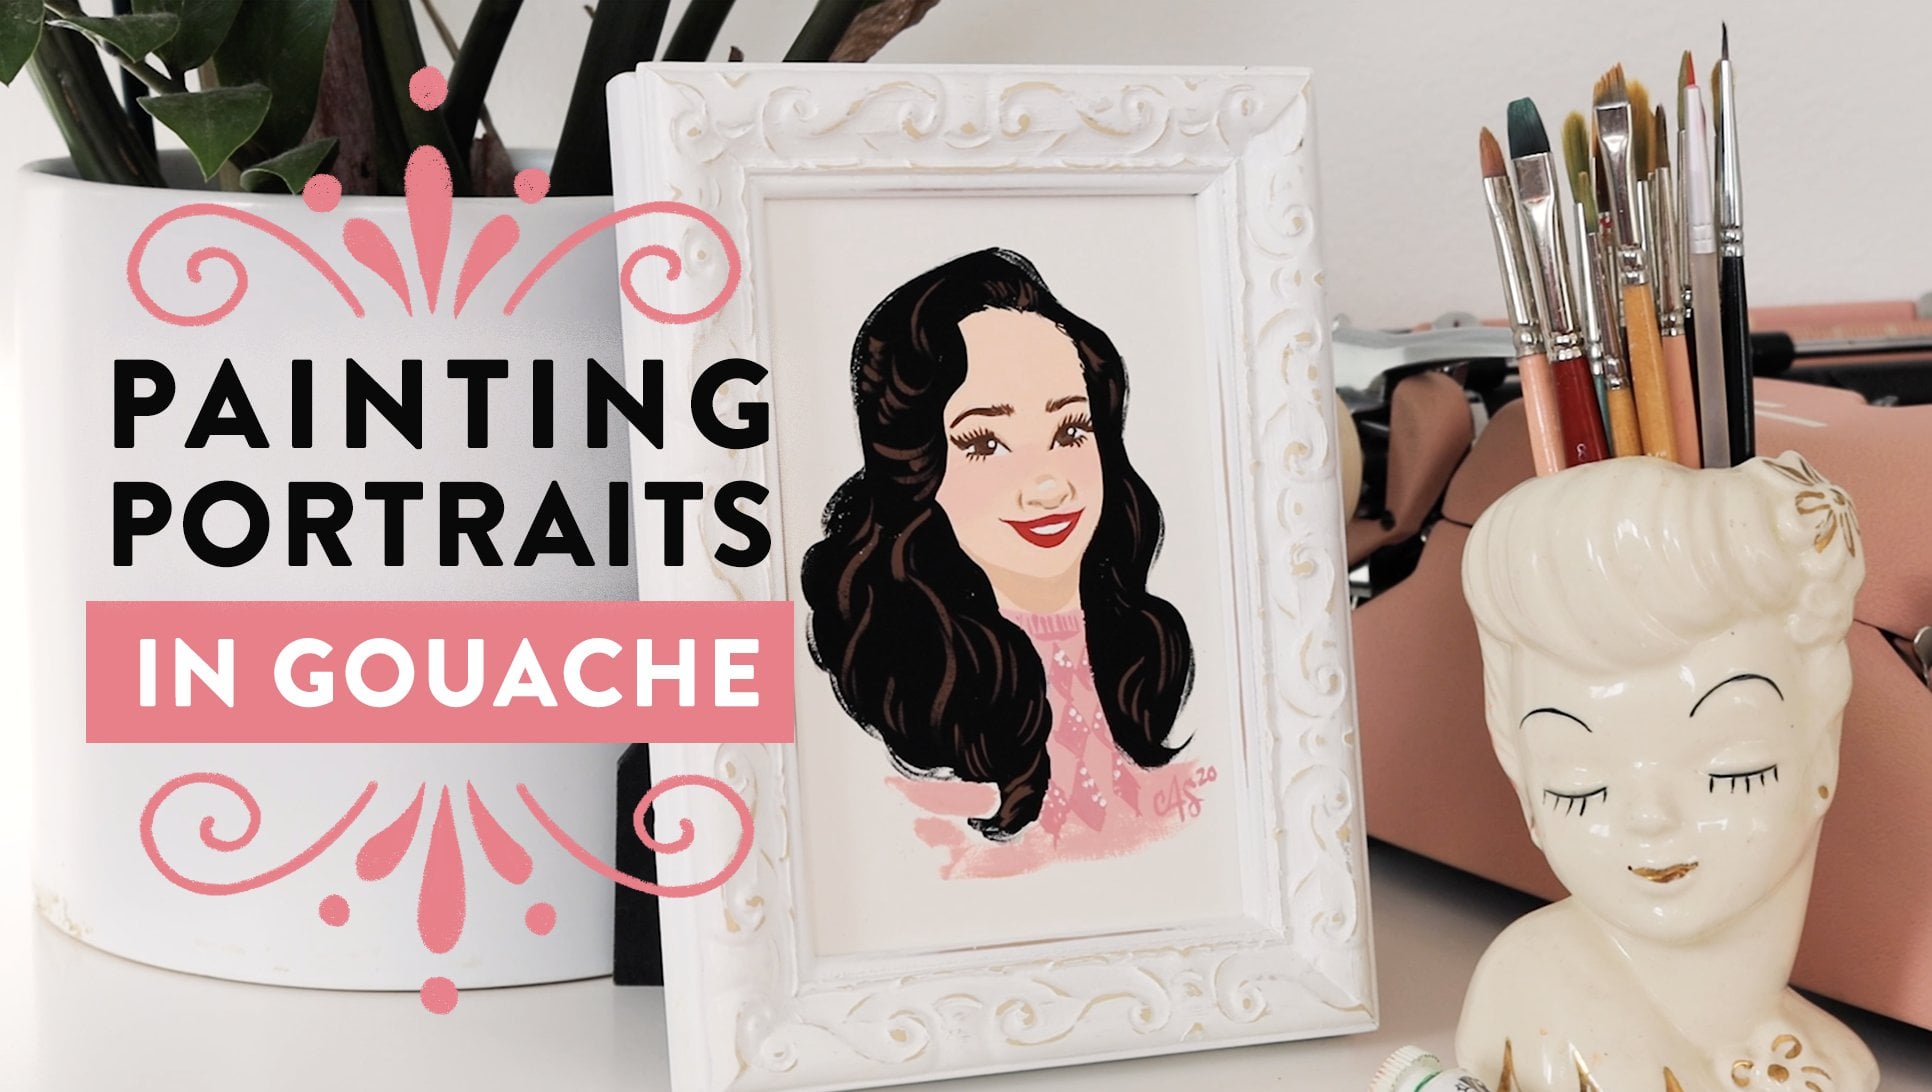
1. Introduction: Hi. I'm Ann Shen and
welcome to Drawing Faces, the Art of the Modern portrait. I'm an illustrator and
author based in Los Angeles. I've written and illustrated four books that have been
published by Chronicle Books, Bat girls throughout
history, legendary Ladies. Nevertheless, she wore
and Revolutionary Women. I've also illustrated my
first children's book, released a global
home collection with Disney and worked with
companies like Facebook, Adobe, and Jenny splendid
ice creams and Dolly Parton. I also love creating
online classes to help people connect with
their creative practice. Painting portraits has been
a huge part of my career. I've illustrated
hundreds of women in history that have
led to other jobs, illustrating the beautiful, diverse communities we live in. Learning to draw portraits
from models in real life and from reference photos has taught me so much about
seeing other people. See it as an exercise
in developing empathy and finding the
beauty in everybody. Now it's also a meditative
practice for me. I I'm warming up for a
day of illustrating. I often like to open up my
sketchbook and my pinters folder full of portraits and
draw from there to warm up. No matter where you are
in your creative journey, learning to draw faces better is going to make all
your artwork better, especially if you've always wanted to add figures
to your work, but find that it falls apart when you try to draw the face. People always ask me how I
draw portraits of people, so I'm going to
show you how I do it and the techniques I use. I'm going to teach you the
foundational skills and the practices I do to help
you draw faces confidently. With this class, I'm
going back to basics, and we're going to be
drawing from observation. We need to learn the foundation
so that we can shape our own creative practice
to suit our own styles. So all you need for this
class are colored pencils or even a graphite pencil or a ballpoint pen if that's
all you have and some paper. Learning the basic
foundations and best practices for drawing
portrait is the best way to get better fast as you develop your own style and move on
to your mediums of choice. This class is perfect for
artists of all levels from beginners to
advanced artists who want to refine their craft. By the end of this
class, you'll have three full portrait
drawings from three different perspectives
and the confidence to practice more and draw faces on your own. Let's get started.
2. Class Project: Hi, and welcome back.
Let's dig into it. Today's class project is to
draw a portrait with me. For those overachievers,
I will also be doing draw throughs of a three
quarter perspective and a side profile view, and you are very welcome
to draw along with me. The more practice you get,
the faster you get better. Faces are what
people look at most. They're what babies
recognize first in life. Faces evoke so much emotion. Just think of the
face of someone you love or even loathe, and you can think of all the emotions that brings up in you. The way you, the artist
creates the portrait, also says so much about
how you see the world. We'll be using reference photos to draw faces with confidence. I provided a folder of reference images that we're
going to be drawing from and then extra images and folders within that folder so you
can practice on your own. You can find that in the
resources section of this class. First, we're going
to draw a portrait from the full front view, which means that the model is looking directly at
the camera at you. I'll go over how to simplify the shape of the head, jaw line, and neck, break down
the proportions of each face and
placement guidelines. I'll even show you a trick for
measuring without a ruler. Then I'm going to break
down how I draw the eyes, the eyebrows, the
nose, and the mouth. Finally, we'll finish off the drawing with
rendering the hair, and I'll show you techniques for getting different hair textures. And then for those who
like to go the extra mile, I'll do a whole draw through
of the three quarter view and the profile view so that you can
follow along with me. A very common perspectives
in portraiture. Please make sure to share
your portrait drawings in the project section
of this class so that I can cheer you on, give you advice,
and encourage you. By the end of this
class, you'll be able to draw portraits
with confidence. Now, Mimi in the next
lesson to get started.
3. Materials: In this video, I'm
going to go over the materials that you'll
need for this class. I'm going to be using
traditional materials in this class for the
sake of accessibility. But if you want to use your digital programs,
please feel free. All the rules and
principles that I teach in this class will apply
across all drawing mediums. So for this class, I'm going
to be using a drawing board. This is just a
piece of MDF board. There's also like drawing
clipboards you can get, any type of board thin board
surface that you can use. I'm going to be using one
of my favorite sketchbooks, the Mixed Media
Strathmore sketchbook. It's 7.75 " by 9.75 ". I really like this
kind of sketchbook. I like the paper.
It's smooth but thick and can hold a lot
of different mediums. And as we'll be sketching
with color pencil, you can see it picks
it up really nicely. I also like to keep this little flap so that I can rest my hand on it when I'm drawing so that I don't
smudge it with my palm. That's useful. I
also like to have a piece of scratch paper
that I'm going to put behind pages when I'm drawing so that the pencil
doesn't transfer over. I have a extra sketchbook here. I'll show you what
we'll use that for when we're doing the
setup in the next video. I'll be using colored pencils, but feel free to use a number two pencil or whatever you have
available to you. You'll just want to do
your lay in lines lighter, and I'll indicate that in the lessons as we're
going through it. But if you want to draw with me, exactly as I'm going to do it. I love using these fabricstle
polychromos pencils. They have a little
bit of oil in them, so then they don't
smudge as easily, but give you that nice,
rich texture and color. They're very smooth to use. So for me, they're really worth the money and
really satisfying. I'm using the colors cinnamon. Coral, burnt sienna,
and walnut brown. Since we're using pencils, we are going to need erasers. So I like a thin eraser
like this so that it really gets into little
tiny spaces to erase, like the whites of
the eyes, et cetera. One of my favorite
discoveries last year was a mechanical eraser that has a small tip because
then you can really get into erasing the fine
details very cleanly. Since we're using pencils, I like to use a manual
pencil sharpener. It's just nice to be able to control the
sharpening process. An electric pencil sharpener tends to eat up pencils
a lot sometimes, so I like to be able
to go low and slow. And then the final
thing you'll need is your reference photos. I'm going to have it pulled
up on my iPad like this. I have a folder of reference photos that I've gathered from royalty free websites
like Osplash and Pexel. The folder is available in the resources section of this class, and you can either pull it up on your iPad or laptop or phone
or you could print it out. You're going to want
the image to be approximately this size in relation to the sketchbook because it's easier
to draw from, like, about the same size, at least when we're
starting out, then you can see
all the details. Alright, now that you have all your materials,
let's get started.
4. Proportions: In this video, I'm going to
show you how to break down the proportions of a
face so that you can lay in the foundation
for any portrait. First, we're going to set
up to draw correctly. Have you ever drawn a
paper flat on the desk, only to pick it up to look at it straight on and
everything looks off? That's because your
perspective is skewed. Here's how we fix that. One of the biggest
challenges I see when people are drawing observationally is not setting up the paper right. You want to angle the paper by using an
easel or drawing board. And this is how I do this very, like, cheap and easy. I'll just take an extra sketchbf put it underneath
my drawing board, so it creates a slight
diagonal angle. And I put my sketchbook
or drawing paper. And my reference,
both on this so that I'm looking at everything
on the same plane. And this angle up towards me, the slight angle up towards me, I probably would do a
little bit more if I wasn't demoing a
class so that it's even more directly angle
towards my line of vision. But even this will help
you see a little bit more correctly the proportions
and the perspective. So I have the reference
image pulled up on my iPad. You'll either have
it printed out or pulled up on your
screen somehow, too. I have it about the same size
as what I'm going to draw, which is a little larger than my practice drawings because we're just going to do one
portrait on this page. I'm going to start with
the cinnamon pencil, which is the lightest
one to start the laying. Now I'm going to
show you a trick for measuring without a ruler. You take your pencil and
you put one end on one side of the head and then
use your finger to mark approximately where the other side of the head ends. So you start like this. You mark where that part ends. And then you use that to measure approximately where the
other side of the head ends. So that's the diameter
of the circle, the ball of the skull. And the thing about
being an artist is no one is born knowing
how to draw a circle. Everyone starts by practicing with light lines,
finding the circle. And everyone is making
the right marks. It's that practice that
helps you identify which ones are the right marks as you practice more and more. Now we're going to use
that same technique with our pencil to measure from the top of the head
to the bottom of the chin. So that helps you mark
where her chin goes to. Okay, so once you indicate the set where the bottom of the chin is based on
our measurements, then you want to lightly
draw in the jaw line. Really observing the shape of the jaw line for each
portrait you're drawing. But you can still keep
it light and general. Now that you have the
ball and the jaw line, you divide it in half, and that's where the eyeline is. Usually the curve of
this will indicate which direction the head
is tilted up or down. Since she's looking
straightforward, it's pretty much a
straight line across. And then we do the same thing vertically to indicate
the middle of the face and where this would go through the
middle between the eyes, the middle of the nose, and
the middle of the mouth. And again, because she's
looking straight on, it pretty much is
just a straight line. Then you will divide this
from the eyeline to the chin, divide that in half, and that will be the
bottom of the nose. And then you divide
the space between the bottom of the nose
and the chin in half, and that is generally where the center line
of the mouth is. For the eyes, generally, we're going to go in and
measure the same way. And generally, eyes are
about one eye apart. And then you kind of measure where it comes in from
the side of the face, which is about half
the eyeball length. So we do half the eyeball
length, and that's one corner. And then we do the
eyeball length to mark the inner corner and
outer corner of the eye. But this varies on people. And so getting the
proportions right on people is a huge part
of getting the likeness. So paying attention to that when you're measuring for
each portrait that you're drawing based
on the reference or the model that you're looking
at is really important. So for her, we're
going to go back in and continue indicating
the corners. And then we also, once we have the head and proportions of the features in the landmarks of the feature is
pretty much in. I also like to just generally gesture in lightly the direction
and shape of the neck. Again, the pose we're working from is pretty
straight on and neutral. But a way to, like, get gesture, which is the direction
or general movement of the character is to use your pencil to measure
from shoulder to shoulder. And you can see
there's a slight, very slight angle she's at, and we try to do the same thing. Like, we try to draw
that same angle in. You can even exaggerate it a
bit when you're drawing it, sometimes you tend
to stiffen up. So exaggerating it exaggerating a gesture helps it really
come through in art. It's just how it works. And then you can use a
corner of the skull, not the hair because hair can obviously be a lot bigger or
poofier or different shapes. So we usually take
can kind of see the skull probably
ends about here. So we take, like the
corner of the skull to the shoulder to see how
far the shoulder goes. So hers kind of
goes right there, and then this corner here.
That was about the same. And then I'll just
lightly gesture in 'cause we can't really
see this 'cause it's hair, so I'm just guessing here. I'm lightly gesturing in.
The neck and shoulders. That just gives some placement and weight to your portrait. Now that you've learned the
basic proportions of a head, you can practice
the same draw over breakdown over more
portrait photos. To help you really practice
and understand head lay ins, I prepared a worksheet
full of portraits for you to practice drawing over
the foundational lines. You can follow along as I do
the exercise drawing over the worksheet to
make sure you really understand breaking
down the proportions. You can find this worksheet in the resources section
of this class, and you can either print it
out and draw over it with a colored pencil or follow
along digitally like I am. The more practice you have, the easier it's gonna become for you to be able to observe from a model and understand
how to draw. Me mean the next lesson where
we're going to go over Is.
5. Drawing the Eyes: In this lesson, I'm going to show you how
to draw the eyes. The eyes are the most expressive and emotional parts of a face, so I think it's the most
important part of a portrait. All eyes are structurally
skin over a ball. These muscles are called the obiculars oculi muscles
that open and close. So those make the eyelids
the shape that they are. There's a little bit of
a triangle at the end of one side and a little bit of a hollow and triangle
on the other side. The eyelid is generally not a smooth half circle
like I just drew here. This is for simplicity's sake. So when you are drawing an eye, one of the biggest
mistakes is people just do two curves like this when really the eyelids more
complicated than that, and the best way
to really steady an eyelid is to look
at the eye and make it find as many of the straight
edge angles as you can. So for her, there's about three. There's one up, one
across, and one down. But the many beautiful different shapes
of eyes out there, there are so many different
ways eyes can look. And so really paying
attention and making the eyelids straight
angles and lines. And then you can
smooth it out as we draw it and really noticing how the eyelids close
and interact with each other and how
the corners meet, that's different on everybody
will really help you get a likeness and create differences in your
character's faces. Also, a lot of people have different types of eyelid
creases above their eye. She has more of a tiny hooded. It's almost hooded, but
it's not fully hooded. It's a little bit of a crease. So I always want
to indicate that because that creates more of a shadow above the eyelid to
create that double eyelid. And then you want to go in and draw the iris is the colored part
of everyone's eyes. The iris also has a
pupil in the middle, which is always the darkest
part because that's where it's literally an open
hole into your optic nerve. You want to make sure
to leave a reflection because eyeballs generally
have moisture in them, then that will
cause a reflection. If there's no reflection, that can create a
really uncanny feeling because if there's no
reflection, there's no life. And then, generally,
the outside, the iris is colored in the color that the
person's eyes are. It's a little darker underneath the eyelid it casts,
like, a slight shadow. And then usually it's
a little lighter on the opposite side
of the reflection because it is a ball surface. So the light kind of goes
through it like that. So that's just how it works. Usually, the iris is covered
by the eyelids because the size of the iris is just larger than the
eyelids usually at rest. If you can see the entire iris, that usually makes
someone look very again, uncanny because normally you can't see someone's entire iris, or it makes you look
very surprised. Both generally never
things you really want. And then as you're
drawing eyelashes, you want to kind of
cluster them together. You don't want to draw them like one at a time like that because
it doesn't look natural. Eyelashes actually kind of
grow a little bit curved, and then they're usually in
little triangle clusters. And that looks just more complimentary and
natural to the face. And again, these are
general foundational roles. You can always break them. You can always stylize and
do whatever you would like. But we're learning the roles
to break the roles here. And so then above the eye,
there's always the brow. And again, I'm kind of using measuring to figure out
how far the brow is. It's like half the eyeball with high, and that's
where it starts. So generally the eyebrow, I like to draw one
hair at a time. And in the general I'll
lay in the general shape. So usually the eyebrow, one third of the
way above the eye, the arch goes up for this is
especially true for women. Men usually have busher
eyebrows that are straight. Women tend to have eyebrows that are a little
thinner because they're less hairy and then go up into a little arch and then
finish more into a point. And the corner usually
at an angle to the corner of the
corner of the eye. And so that's generally how you draw the
brow above the eye. And I'm especially
using her as reference. So this is how I would do
it based on this reference, but the steps would be the same no matter what you're drawing. So I'm going to
draw in both eyes, and you can follow
along as I do it. I'm going to use
the cinnamon pencil to lay it all in and then start using my darker brown pencils
as I commit to the lines. I know there's always
a lot of demos of the right eye asking you
to draw the left eye. The approach is the same. Like, look for those angles because people's
eyes are sisters, not twins, just like eyebrows. So just pay attention like her left eye that I'm looking
at left eye is a little bit bigger and less of a crease than her right eye
as we're looking at it. So I'm still using that same technique of finding the angles. To draw the opposite side. I'm drawing this a little
darker than I would like you to draw just so that
you can see it on camera. Because, again,
these are the lay in lines, meaning, like, the guidelines and not
the final drawing lines. Since we can't see the
tail of her eyebrow there, that's where, like, no ink
generally it ends there. At an angle to the eye
is helpful to kind of imagine where And with the
direction of the irises, remember that eyeballs look
in the same direction. They move in tandem generally. And so, once again, I'm looking at how
much white space there is basically
and leaving that. I'm doing the same thing here. Now I'm going to go in with my burnt sienna pencil
to really start committing to the actual eyes. This is where using
my little guide. My little guard is helpful. And I'm not doing it here because I don't want
to block the camera, but usually you want to, like, look over as close straight on as possible of your drawing. It just helps you see
it more accurately. Now that I have
the eye laden and I'm committing more
to the final drawing, I'm smoothing out those
curves a little bit. But you can see it still
maintains the shape of her eye more than if it was
just a half circle curve. That's the goal to
get a likeness. For women, I generally like to add more eyelashes
and more pronounced. It just gives more of a
feminine flirty look, which is what I like
stylistically in my work. And for men, generally,
even though in real life, men tend to have
nice long lashes and thicker lashes
because they're hairier. When I'm drawing men, I don't emphasize the
eyelashes as much. This is where your creative
license comes into play. This is where kind of emphasizing the types of
people and gender roles you want to see come into play when you're expressing
yourself through your art. Like, you could choose to do the opposite in your world if
that's what you want to do. You're the creator
of your world. Or you can choose for
it to be a part of the characterization of
the person you're drawing. See, that one I started
with the brow first. Like, there's really
no harder set rule, but once I get into
the flow of it, I like to just go to
what's interesting for me. So this side has no
crease, I can see as much, but there is a shadow where
a crease probably is, so I make that a little darker. And usually the reflection is in the same place because the light is coming from the
same direction. So here I'm kind of seeing my brow is a little bit
too low on this side. So I'm gonna go in
with my eraser. I races away the bottom. Generally, I don't get too dark in the
corners of the eyes because it just helps to let it soften and not
draw as much attention. You want the attention
to be focused on the iris itself more. So some areas you can choose
to just put less emphasis on by not making us dark
or letting fade away. So and then I'm going to add in a
couple lower lashes. It got too dark and
too straight here, so I go back, erase it. I go back and erase it. And I just add a
couple of outer lashes because they're the ones
you can see the most. At this point, I also
like to go back in with my cinnamon pencil and
just shade in this kind of triangular hollow that gives
shape to the eye socket, gives some dimension to the eye socket and
also allows the bridge of the nose to start to come forward 'cause it's
a lighter color. Cause anything
that's colored in in value or darker
in value recedes, anything that's
lighter comes forward. Now that we've done
the eyes and brows, let's move on to the nose.
Meet me in the next video.
6. Drawing the Nose: In this lesson, I'm going to
show you how to draw a nose, which can pose a challenge for a lot of artists because
it's something that comes forward in space and involves a little
bit of foreshortening. But I'm going to break it
down so it's easy for you. The nose is hard to draw because
it's actually more three dimensional and comes forward
towards you in space. This is a side view of the face. So it's a wedge off of
your face, basically. When it comes to noses, the less you do, the
better, honestly. I like to start with
just indicating the bottom shadow of the nose, which usually is an upside
down triangle because the nose is a Think of
the nose as a wedge form. This is the front view.
This is the bridge. This is the front
view of the nose. This is a side view of the nose or a three quarter
view of the nose. So basically, it's a wedge shape that's coming forward
towards you in space. These are the side
nostril floors. I like to start with
just indicating the bottom shadow of the nose, which will be an upside down
triangle because the nose comes forward in a
little triangle shape. Now, again, most of these are guidelines that can change
from person to person, which is what makes
people's faces unique. Once I indicate the bottom of the nose shadow
as a light triangle, I like to go above
the line and add in the shape of
the dark nostrils. Now, you can see the shape
of her nostrils here, and I try to get as close as
possible to the shape there. So this is above the shadow. And then you kind of
measure where the flare ends by using your pencil and measuring
straight up and down. So hers kind of goes up to the a little bit past
the inner corner of her eye. So I'm going to
indicate it here. And here. I'm also going to use my
pencil measuring method to make sure that the length of the nose is a good distance, is a correct distance, rather. So like I said, the
guy line is that it's halfway between the
eyes and the mouth. I'm going to use my pencil to measure this to the
bottom of the nose. And so it's in a good space. Then I'm going to
measure the nose, the bottom of the nose to
the bottom of the eyebrows. So this actually
is a little low, and I think it's I drew
the face a little high. So I'm going to fix that by just moving the triangle
up a little bit, and then moving the
nostrils up a little bit. Okay. So we're in real
time fixing things with how you're drawing it. I love this electric. I love this electric. Eraser. Okay. So now that
we have the side of the nostrils and the little
shadow, but penciled in. I also like to do a little bit where the ball of the nose, which is where the
tip of the nose is, I like to indicate
it very lightly. We don't really draw that in. This is, again, another
kind of marking nose because if you do draw it in, it kind
of looks clownish, but you can stylize it, so it doesn't so that's pretty much where
I'll leave the nose. Sometimes I'll also add
in like here there's a little bit of
directional shadowing and if you squint your eyes, you can see that one side has a little bit more
shadow than the other side. So what I'll do is
usually indicate, like, kind of, very
lightly shaded. Just to again, give the nose a little bit
more of a dimension. And usually the shadows
are coming in to kind of create that
bridge of the nose, which is coming forward, but it comes forward because you're drawing everything around it. And now I'm going to go in with my actual committing pencil and which is the burnt sienna and actually draw
in the nostrils. She has very small nostrils or, like, yeah, cute
little nostrils. And so I make sure to, like, shave that down a bit when
I'm doing my actual drawing, drawing the nostril holes. Hers are a little
bit more horizontal. Sometimes people have ones
that are more angled. And again, these
little differences is what creates the
likeness in a portrait. So her nose the ball of her
nose is a little higher, and you can tell because
this little septum part goes down a little
past her nostrils. On some people, it doesn't go down because they
have a flatter nose. And again, these are
all things that you notice as you draw
more and more people. So I'll do a light shadow
because this part, this little triangle,
I'll actually go in with cinnamon to do that. Okay. I'm going to go back,
do the nostril. Go back in with cinnamon. I like using cinnamon to do the shading because
it's not as aggressive. And it's all about value balance in making a good portrait. And you can see, like,
if I use the walnut, it kind of made the shadow the same color as the nostrils, but you can see that that's not actually what's
happening here. So I like to go back
in with cinnamon to create the little shadow. That's the triangle, that's the bottom part of
the nose wedge. Oh. This part right there
of the nose wedge. And then send them in to draw the little shadow underneath
the nose, as well. And then that's
pretty much where I'm gonna leave the nose. Sometimes I'll shade in the
bridge or not the bridge. I'll shade in the little
part at the top of the nose, but she doesn't really have one. Some people have a
more pronounced one, so I might just
leave that there. I might erase it
later. Who knows? I'm going to actually add in a little bit more shadow with my walnut brown
underneath the nose. Just to create some more
difference between the bottom of the nose versus the
shadow on the nose. And so that's pretty
much where I'm going to leave it for her nose, drawing in the
nostrils, the septum, the shadow, and the
side of the nostrils, and then shading in one side to give the nose a
little bit more shape and placement on the portrait. I really think with noses, the less you do, the better. Now that you've learned
how to draw a nose, join me in the next video to
cover the mouth and ears.
7. Drawing the Mouth: In this lesson, I'm going to show you how to draw
the mouth and the ears. It's a good time to sharpen your pencil if you haven't
had a chance to yet. A sharper tip makes
it easier to draw. Okay, so for the mouth, we use the same pencil
measuring method where we use our pencil
to see one corner, the width of the mouth,
and then the corner lines up pretty much with
the center of her iris. So we go here and indicate
one corner, the size. You can either use the
center of the iris method. Or the measuring method. Now with the mouth, like I said, this line between the bottom of the nose
and the bottom and chin usually is where
the mouth seems. The top lip we generally draw is thinner than
the bottom lip. And we lightly pencil in the top lip with a dip in the middle because she has a
very pronounced cupid's bow. Some people don't
have. Some people have softer ones
or smoother ones. Again, another point
of differentiation between different faces. The top lip is always darker
because in dimension, in space, lips look like this, if this is the side view. And therefore, the top lip
is usually facing down, and it's in shadow because
it's facing down a little bit. So the top lip is darker, and I usually just shade
that in to indicate it. Make sure the seam of the lip
is pronounced the opening. And then she has a little
bit of turned up corner, so I make sure to
highlight that. And then with the bottom lip, you can use your
pencil measuring method and see that it's double the size of the top lip or you could just use that
to indicate to learn, since this is about the
same size to indicate where the bottom of the
lip is from the opening. And then generally,
instead of drawing a harsh line which can look
too harsh and cartoony, I like to just lightly shade
in the bottom outline, but not like connect
it completely. Because, again, it's not
like one full shape. It's two moving muscle
pieces that touch. And so I'll shade
the outer side. And also, mouths don't actually have a hard outline
unless you're wearing, like, a bold lipstick. And so that's also
why I don't really use a dark outline when
I'm drying a mouth. I'll use shading instead, and so I'll just color in or
paint in if I'm painting. Just the outside shape. Shade in the outside shape,
so I noticed there was, like, a little pronounced
corner there. But I'll leave the
center right here, a little lighter because that shows the
fullness of the lip. That's the part that
comes out right there. Or comes forward in space. So that's a little
lighter and highlighted. Sometimes I'll go back
in with my dark brown, which in this case,
is my walnut brown. To draw in and make the line between the lips a little bit more pronounced or anywhere where it's
a little darker. And then I'm actually
going to take my coral, which is pinker. To really shade in the lips because it's the pinkest
part of the face. But pinkness really adds
some or rosiness in general, depending on how much
melanin is in your skin, rosiness in general, just adds more life and
warmth to the face because it indicates
where blood is flowing. I might actually add in a little bit more walnut
brown on the top lip. I'm using little strokes
upward and outward so that it creates a little bit more direction and lip texture. Um yeah. And so now that we
place the mouth, we're actually going to
go in and place the ears. So you see usually ears. You can't see the top here, but ears start where
the brows start, and the bottom is pretty much aligned with the bottom
of the nose on her. Since we can't see
the top of her ear, I'm just going to cover it
with the hair that's going to come in and then draw the scoop and then indicate a little bit of
the inner shell of the ear, based on what I'm observing, which is, like, a
backwards three. So I don't usually
pronounce the ears too much or I like to keep it a little more loose and gestural so that it's not the focus since ears are further back
than the face in space, so you kind of just want to
keep it loose and gestural. I'm just going in and defining the jaw line a little bit more as her face starts
to take shape. I like to go in and create a little shadow underneath
where the lip is sometimes. Like, hers is really pronounced. So I like to go in and just, like, indicate a
little more shadow. And I can also use the eraser to create
more chin because there is more space between the chin and the bottom of the lip than I had originally
loosely planed in. Now that we've done the
mouth and the ears, let's move on to the hair
and finishing details.
8. Drawing the Hair and Finishing Touches: In this lesson, I'm going to
teach you how to draw hair, which is one of my
favorite parts. We're also going to go
over the finishing details that really pull a
portrait together, like contours,
shadows, and blush. Getting the different
textures of hair is where your materials can
really shine through. I start the hair on a portrait by observing
the overall shape, basically the
silhouette of the hair. And that's what we're
going to lightly lay in. So her hair parts right above basically like where
her iris ends right here. And so that's where
I put her apart. And then it hits about where
the arch of her eyebrow is. So I make that a landmark
as well for myself. And this is all stuff
that's gonna become really instinctive for
you when you're drawing, so you're not gonna need to use all these landmarks as
the more you practice. So practice a lot. Okay. And then, let's see. Her hair, like, the
height of it goes past her skull and is about the
width of her eyebrow high. I'm going to lightly sketching the outline shape of her hair. This is just informational for you, so don't worry about it. Looking more stiff or
anything like that. Okay, this, some of the
hair goes off and covers. This is what I like in a
sketchbook when you're like, just drawing over stuff. It's for me, it just looks
like a working sketchbook. Okay. Okay, now that I have
in the general shape, I'm going to get my
darker brown color, and I'm going to get
my little hand guard since I'm going over
lines I read drew. And since her hair is
basically straight and smooth, I like to just go in with long long even lines to indicate the texture
and direction of the hair. At her part, I'm using shorter strokes to indicate
the direction of the hair, giving it a little bit of
volume and coming out. And you can see here there's a little bit of shine right there. And so I'm being a little
lighter and letting the pencil just taper off. And then I'm going to pick
it up again here and back into longer strokes to
indicate leaving this area, the color of the paper to indicate that
there's shine there. Since her hair is
long and smooth, I'm using longer strokes to match the texture
of her hair. I also am indicating here that the hair you can see is
wrapping around the back. So there's a little bit
of a curve like that. So I'm really observing the gesture and direction
of the hair and trying to draw basically that direction
in or I'm trying to draw in the direction that the hair
is going because then it really captures the
movement of the hair. And hair is all
about movement and gesture and shape
more than the face, even, because hair
is very movable, obviously, unlike your
features are what they are, but people can
express themselves and change their look
through their hair so much. That's why I also
like drawing hair. It's such a personal expression. And a great way to
capture the portraiture. And when you're
doing a portrait, it's more than
just the likeness. I mean, the likeness is one
of the most important parts, but a photo could just take
a portrait just as easily. So I like to think, what else am I adding
to this portrait? Why am I drawing it instead
of photographing it besides, you know, I like to draw. And with that is adding in
the personality, the depth, the feeling of a person
that you just really don't capture just by
looking at someone. That's something extra
you can add as an artist. Okay, so her hand is in this. We're gonna ignore that
for now because that's a whole other class
I'm gonna have to make to get into drawing hands. So we'll just kind of
invent what the hair. How the hair ends here. And you can kind of see it gets looser and wilder
towards the ends. And so I'm trying to capture that looseness in
wildness, as well. And since our hair is lighter, I just kind of let it fade off and not really
fully color in. I might come in with
my burnt sienna, my lighter brown just to add in some more local
color and texture. Just adds a little
more interest. But again, this is
specific to color pencils. If you're just using
a pencil to draw, then maybe you're varying
it based on value, which means the lightness and darkness, and you're
making this part. You're just focused
on the values of it. Like, this inside part is a lot darker because it's
closer and behind her. And then the hair as
it comes forward, you leave that and let it be lighter, as you can see there. And I'm just going to draw
on the rest of the hair. Use your strokes to indicate the direction of
the hair growth. Notice the fine baby
hairs and how they attach and grow from the head. These baby hairs really help the hair look like it's sitting on the head versus, like, a wig when there's just, like, a really straight line. The main lesson I
want you to take away from drawing hair
is that you just want to draw the hair in the direction
that it's flowing or going or growing because that just
makes it look more natural. The hair also comes
in as negative space. To create negative space is the space around the
space of the object. The object being her
lovely portrait, her lovely face and body. Notice the shape of
the negative space. It's like, curved here, straight
along her neck, sloped, little bit of curve, and then straight back up in the her ear. And that also helps shape your portrait into the likeness. Drawing is constantly
measuring and looking at the relationship of lines and shapes
next to each other. And that's how you can learn and grow faster in your observational
drawing practice, learning how to really
see something or someone. So I'm going to do a couple
more loose hairs here because she has
more loose hairs, it adds some nice
movement and dimension. Now that the hair
shape is basically in, I'm also gonna go in and do more of the
finishing touches, which is adding a shadow
underneath her chin, which I'm going to start
with a cinnamon pencil, actually, I want to make sure it looks right before I fully
commit with a darker pencil. Put this here. I'll
indicate usually there's two neck
muscles that come down, you can kind of see hers. They get highlighted
because they come forward, so I'm just putting the marks there to indicate
where they are. So when I'm shading it, I can keep that in mind. Now the shadows being cast by the chin because your head
comes forward over your neck. And depending on the
direction of the light, her light is pretty much
straight on kind of coming from this side
direction a little bit. So it's a little bit to
the left, the shadow. And then there's some shadow where her hair is in
front of her neck. And then it comes down
to where this hollow is. And then you can see
a little bit right here a shadow for her cloud. I'm gonna use my dark
pencil just to loosely gesture in the top. We're not gonna get into drying
clothes too much in this. But again, all this stuff
is loose information, so I'll just leave it
like this very loose. But this is all
information that, again, can be a stylistic
choice of how you want to finish the clothes, or you can I have to make
a class about drawing clothes on people in all types
of fashion illustration. But that kind of
gives you a gesture and a feeling for
the whole portrait. And now I'm going
back and looking over all my proportions, it helps to look over like, have it look directly more
tilted towards you straight on because this is where you
could see where maybe areas of perspective are skewed because of the way you're looking at it. And I can see because I'm having it more flat so that I
can film it for a class, I can see that her hair is
not big enough up here, so I'm just adding more volume. Hair is a place where you can add more volume or exaggerate
what's already there, because it just looks Honestly, it just looks better a lot of the time if there's
a lot of hair. If it matches the
portrait of your person, like, she has a lot of hair, so adding more hair is not taking away from the overall
expression of her portrait. So I actually think
it looks more like her now with the
hair being bigger. Okay, and then the final
touch I like to add in besides adding in a little
bit more of the shadows. Okay, so I like to
take my walnut brown and go back in to some
of the darker shadows. And you can pick
that up when you swing your eyes and you can see the colors kind of simplify more and separate into
their value groupings. And so you can see it's a little darker along the side
of her nose here, little darker just
underneath her nose. And then emphasize this. I'm actually going to indicate the shadow on the inner
shell of her ear. And then the final
finishing touch is adding in all the little
rosy touches of blush on her. So I take my oral pencil
and I just lightly I do light curvy strokes because I'm going along the
contour of her cheek. It's darker along
the edges and wider, and then it gets more narrow, like the shape gets
more narrow because you could see the front part of
her cheek here is fully lid, so it's not it doesn't have
that rosy shadow on it. And then I do the same
on the other side. And this creates volume and depth for your character
or for your portrait. And again, this is another
area you can stylize, but we're learning
the foundations and basics in this class, so we're learning the anatomy
and structure of what we're working with while making
a modern portrait. And I'm gonna go
back in. I think her lips could be
a little darker. So if you're drawing
this with just a pencil, you could just press harder. Since I'm using some colors, I'm going in with my
next darker shade. And I'm trying to color
in in the direction of the lips or not the
direction of the lips, but the direction of the lip, the skin on the lips,
which is up and down. I also feel like I made her bottom lip
a little too large. So I'm going to go back in and I'm gonna go
back in and shave it down a little with my
electric eraser. Okay. Okay. And then I'm going to
just double check again. I feel like I placed
her eyes a little bit too high, which happens. That's why you
practice a lot more. So I'm gonna just
add in a little bit more of the shadow underneath her eye to help bring the eye down a little bit more without actually
having to erase and redraw. Yeah, I think I
like the way that it's emphasizing her eyes more. I'm going to go in and add a little bit more
shadow here too, just to add more depth. Don't ray it to sharpen
your pencils as they're dulling down so
that you can have a little more control over it. Since her eyes are darker brown, I'm going to go in, actually, with my walnut brown, my darkest brown
color to emphasize and create some more value
difference and depth. So I added it to the pupil
where it would be the darkest. And then I'm adding it to
the lash line because that also would be the darkest and
drawing over some lashes. Pulling out some lashes. In the color in the dark color, not actually pulling out lashes, but pulling out lashes. Alright. I'm also
going to shade in the iris a little bit. I'm using a light
touch with this so that it's not
darker than the pupil, but I like the way it
just adds a little more. Wait to your drawing. Wherever there's most
contrast between light and dark is usually where
the eye is drawn, and the eyes are the best place to
emphasize on a portrait, so I like to make sure
that's the part that has the most contrast
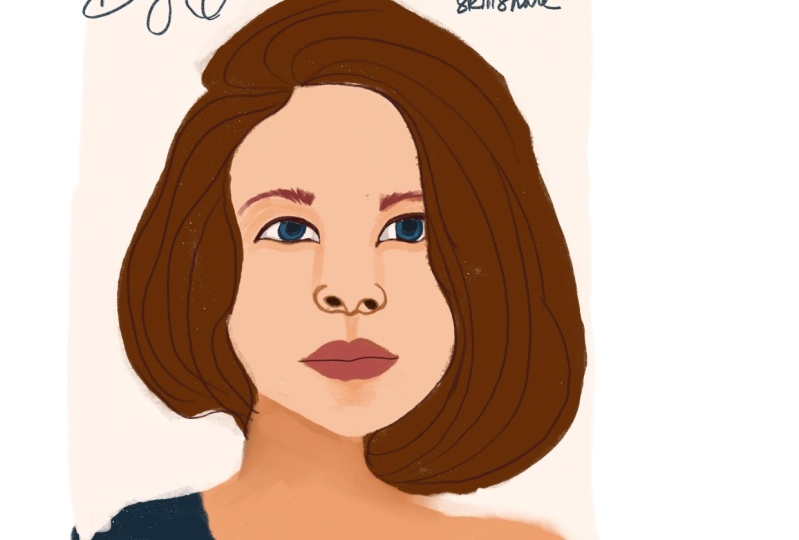
in a portrait always. Congratulations.
You've completed your first portrait
from top to bottom. Join me in the next couple
of lessons where we try different perspectives
on the portrait to deepen your
portrait practice.
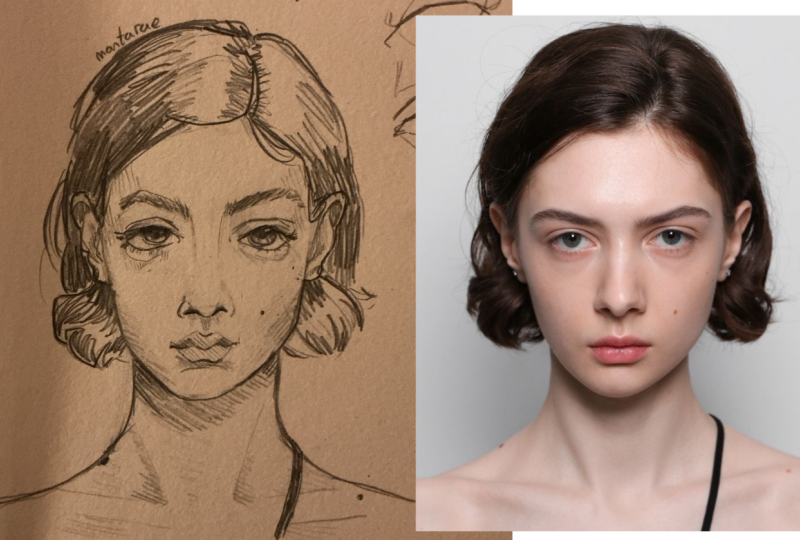
9. Three-Quarter View: Now that you're
comfortable drawing portraits face forward, we're going to do a
three quarter angle. Different perspectives can set different moods for portraits. A three quarter angle can be
more dynamic or romantic, depending on the expression
of the face you're drawing. The perspective
from which you draw a portrait is a creative
choice in your expression. I'm going to demo
by drawing through this three quarter
portrait reference. It's in the resources section of this class so that
you can follow along. And I'm gonna talk
through it, but I'm just going to draw through
the whole thing now that you know all the breakdown of how to draw all
the different parts. And then I'll talk you through
it as we do this together. Alright. I always start with my littus cinnamon,
pencil for lays. I like to indicate the corner
of the draw line here, and then the ear
conducts to the corner. So just indicating that lightly. Since her hair is a big part of the overall
silhouette of her, I'm also just gesturing that in lately right now just to make sure I keep the proportions of everything else
in relationship. Okay. I just want
to make sure it's the right height
and width overall. Now, you start with the
eyes on the eyeline. It's really where the middle
of the eye goes through. And so, usually the
toplet is above it. Iris is right centered on it. See a little curve of
the eyeball there. You can do the lower lid. When it's at a three
quarter angle. You don't see the full
length of that eye. So you want to make sure you measure how far away
that eyeball is. So it's about the same as the perspective you're seeing
width of that eyeball. So then I made a mark here for where the corner of
the next eye starts. Remember, we're drawing looking for
the angles in the eyelids. Irises are always looking
in the same direction. I'm gonna leave
that for a no for the now I'm gonna go
to the nose next. Now, from the three
quarter angle, you can really see how
the nose is a wedge. I'm just simplifying the
shape of hers right now. But you can see the
bottom, like that. You see that side
since it's covered. So then we go in the ball of
her nose is more pronounced. Oh, wait. So we draw on
the line of the eyes. Make sure to divide it
in half for the base of the nose and divide it in half
again for where the mouth. The line of the
mouth is. So that's where you know where
to end your nose. Again, the more
you practice this, the more it becomes
intuitive, and then like me, you don't really
do it when you're drawing a portrait as much, but it really helps, especially when you're
inventing characters. So to practice a lot using photo reference
or drawing from life really puts this
information into your brain, so it becomes autopilot when you're drawing and
inventing characters, where you don't have reference, which is ultimately, I think, what a lot of
illustrators want to do, be able to draw people in your illustrations
that tell a story, and you may not always have the reference you
need to do that. And now we're gonna
move on to the mouth. She has much a much more
pronounced upper lip. And then the corner of the mouth goes up a little bit past the
corner of the eye. So I'm going to indicate
it there with a mark. Again, softly shading it in in the direction of the
lines on the mouth. Her bottom lip breaks the line of the side of
her face from this angle. So we go a little bit of that. Her mouth is very,
very slightly open, so I'm just going to indicate and you look at the shape of it. It's a little like that. Then we're doing the
same thing where we coloring the outside
softly of the lip. And then we check to
make sure that the chin is in a good
relationship in shape. So we're always looking for
the shapes to the mouth. No Then we go to the brow, which is a little
bit above the eye. Hers is in a neutral position. Browse and eyes are where a lot of the expression
comes through, and I'm going to
teach another class on getting expressions
and portraits, but I really want you
to get the foundations of portraiture in this class. And now I'm just going to
also just lay in roughly how the hair is coming out of that. So her ears mostly covered. Let me just go do that. And I'm moving it in the shape
and texture of her hair, which is a little more well, which is a lot more curly than the last portrait
reference we were using. Think of the lane basically
as the underdrawing before you go in with the darker
lines of your final drawing. It's where you're doing all
the observational work. I'm going to go in with my burn sienna to further
finalize the lines. This is where I'm finding. So with your cinnamon,
lighter pencil, you're finding your way to the general shape and
gesture of the drawing. And now with this
medium brown color, I'm committing to what I
think are the right lines, unquote, for my drawing. So it's not as sketchy
anymore as I'm committing to the
lines in the drawing. And there's no real, like, rhyme or reason or order
it needs to go in. I really like to
draw intuitively from what feels right in the flow and what's
catching my attention. Like, I was trying to get into the eyelashes, and
then I was like, Okay, I want to come back
down to the iris to make sure I'm
placing it right, and she's feeling really
grounded in this. Then I'll go back
to the eyelashes, or I'll go back to making sure that eyelid
crease is there, 'cause everything is also
in relative to each other, so the more you slowly
build in everything. The more you slowly sketch in everything and start
to commit to lines, the more relationships
you can see, which will kind
of show you where everything really
is supposed to go. It kind of is a puzzle
that comes together. You just see the tiny
side of the nostril on her the left side
that we're looking at. Now the shape of her nostril, I'm really looking at the
overall silhouette shape, and then the outside
of the flare. And then I see that there's a shadow where the
opicular oculi muscle is. Lightly, lightly, lightly.
Shading these in. And drawing her brows. Another really good
way to figure out brow placement is using
the side of the nose. If you use the side of
the nose and have a line straight up through using the corner of the eye
as another point, that's where the
eyebrow should start. Then you use the
side of the nose, go through the
middle of the iris, and that's where
the arch should be. And then you go
through the corner of the nose to the corner of
the eye as two points, and then you go further
up, and that's where the tail of the
eyebrow should end. Again, general
guideline for drawing eyebrows or how I draw eyebrows. There are 1 million
different ways you could do that
or measure that, but that is a measuring
trick for you. Now, this one we only
see a tiny bit of. So that's what I should
try. Okay, since we're doing the lips and
hers are quite rosy, I'm actually going
to use the pink. I'm just going to jump to
the pink instead of using the brown as the base, and then the brown
will come in again. But I just want to lay the underneath as
this rosy undercolor. And then come in with
this to really comment. So I can see the shape. I did the angle wrong
on her lip there. It doesn't go out like this. It's more like that
instead of like that. Just to show you
what I was seeing. So I'm doing more
and fixing that. Simplify everything
you're seeing, even though it's on
different planes. The planes help you see where shadows and
structure should be. But the actual shape itself helps you create the likeness and translate what you see into what you draw. I'm always going back and
adjusting everything. 'Cause everything is
related to each other. So going back and
adjusting everything as, like, the lips came into
form, now I'm like, Okay, the nose, I can see
this triangle of shadow there with a little
highlight in the middle, so I want to, like, just
kind of shade that in. I might go to my
cinnamon again just to make sure to make it lighter before I fully commit to a darker shade or a
darker shadow, rather. You can see she's lit from the her left side
or her right side, left side that we're looking at, because you can see the nose
highlights are right there. So I'm going to leave that. Now that I have the features
pretty much locked in, I'm just gonna use
Bern Sienna to come in and do the outer
outline of her face. Notice really things
like the space with how the eye comes
out, how it's related. So the eyeball actually is
a little bit more inside. The eyelid wraps around the eyeball and the corner of the cheek comes
out like that. The right here, there's
a tiny space between where you can still see
the side of cheek before the bottom lip breaks that line, and then you come back in again to where the bottom
of the cheek is. See, the bottom of
the nose aligns with the bottom of the corner
that you can see of her ear. I'm going to also commit in
the placement of the neck. So you can see the neck
is actually this wide. Okay, so you got
a good placement. Because it connects to
the back of the skull, not just the face. And that's why it's not like
over here or something. So notice the
placement of the neck. So the skulls actually
much bigger like that. I'm going to leave
the shirt for now, and we're gonna
get into her hair. I'm going to use a darker brown. So since she has much
more textured curly hair than our last portrait, this is a great
opportunity to show you how to do different
textures in hair. So you basically just
want to draw it. The same thing that I
mentioned in the hair lesson, you want to draw hair in the
direction that it's growing. And when it's curly like this, you're doing a lot
of little circles, basically, depending
on the tightness of the curls in the texture. But for her, it's
very tight curls. The girl we had before
had straight hair, and so we were doing
long strokes like this. And so you can see the
difference between the way your pencil marks
can create texture. And so, again, we're looking
at the overall silhouette. I'm refining it.
Since the hair is very curly instead of refining it with
straight lines now, which I had done with
the layan pencil, I'm refining it
with little curls. Make sure you're noticing, Okay, there's a deper which kind of correlates to right
above the brow. So I want to make sure
I'm getting that shape. And then it ends pretty much with the bottom of the noses. So doing that. There are areas where
it's going to be denser, and I'm still using the
same coloring technique. But the circles are
overlapping, so it's denser. But it still gives
you that illusion of the texture because of the way I'm laying
down the pencil marks. And I'm using more
force so that I get more dark values like
you would if you were using a normal
regular number two pencil. Then when I get to the edges, I get a little lighter
and looser with a light touch of those curls. And then I also look at the general shape of the
shadows and the lights. So the way she's lit, the hair in this general
shape is all very dark, and then this is looser and has a little more shine
and reflection. So I just want to make sure to note that when I'm
doing the texture of the hair. Oh. It's a good practice to stretch your hands frequently
when you're drying, just to keep your
muscles limber. I'm adding in medium
value browns here just to make it blend
together the hair. Hair is a big characteristic
feature in this portrait for this lovely model. And so I'm really taking my time to make sure I get
the expression right for. Since I'm shading in a lot, it's okay to have
a duller pencil. It actually helps you
do more coverage. Because the point isn't as narrow as if it
was a short pencil. I'm adding in all the details
and the texture details on the on the outside because
it isn't a solid shape. It is hair that is
moving and alive and growing in all
different directions. And you just want
to make sure to capture the life
and spirit of that. I'm just gonna go back in
and just add more shading in the parts that I know
are in shadow more. Like, you can see that
it's turning and it's curved when there's a shadow part
and then a lighter part. It's kind of hard to tell
what part of her hair is in shadow and what part is the
shadow her hair is casting. So I'm just doing my
best to guess to me. I actually, I think
I pulled her hair forward too much there
you can clearly see a line where her forehead is So the hair is coming forward from there, but the forehead still is in front of the
hair at that point. Okay, now that we've
done the hair, since this model has a lot
of melanin in her skin, I'm gonna go in and do
the shadows instead of in cinnamon in the burnt sienna. And I'm shading and all the
patches of shadow I can see. Going in the direction of
the plane of the face. So this is a little bit
angled this way towards us. This is a little
darker here as well. So we lightly draw in the shape of the shadows that we see
and then fill them in, mostly in the direction
of the plane. Okay. Now that I've gestured
in some of the shadows, I'm actually going back in with my walnut brown
pencil to then bring the eyebrows into the same
value shade as the hair, which is a much darker brown. So these are my final lines
that I'm going in with. I'm also redoing the eye
with the final lines. You can even save the
eyelashes for this part. You don't need to
even lay those in. Noticing the way the corner of her eye I think she has
more of a straight. I add a couple eyelashes here. I go in and also darken the nostrils cause that is also one of the darkest
parts on her face. The one we can see is
much darker than the one. We can't see as much, so
we emphasize that one. I also when I squib my eyes, I can see that the opening of the mouth is a little
darker portion as well. Then I went too hard,
sows go back and race. Going back in and making
some of the shadows darker. Especially in the neck
since it's below, there's not as much difference because of the way she's lit between the jaw line
and the neck because, again, of the way she's lit, but you can still see
the shape of the shadow, and it's much darker right
underneath the jaw line. I'm gonna go back in and
shade this darker as well. So I'm doing an
overall I'm doing an overall light wash of the sienna Burnt
Sienna over her because, again, she has more melanin
in her skin than I last. Portrait. I want to leave any highlight areas, actually, just white or
the color of the paper. You can go with your eraser
to carve out some of those. Like the tip of the nose, a little bridge
of the nose area. A little bit on the
flare of the nostril. Definitely a shine on the lips. M. Now, this side is darker. So I'm doing the shadow of the nose in that little
triangle we talked about. But it's a little angled because obviously the nose
is a little angled. Leaving, again, the
shapes of the highlights. We're always looking for
shapes as guidelines. Okay, and now I'm going in
and darkening the areas that have shadows under the eyes, the side cheek, where the
hair is, casting a shadow. You don't even have to get
into this much shading if you don't want to when you're
doing just pencil drawings. But I just thought I'd
show you how I do this. If you did want to, have it
be a part of your practice. So now that I did that, the
darks don't look as dark, so I'm going in with the dark brown to once
again add more pigment. And create more contrast around the eyes where it's
more expressive, the corner of the ear. I'm using Burnt CNA my
medium brown for the shadows because the hair is the
darkest part of this portrait. And so I don't want
to pull it out except for areas that I
really want to emphasize, like, the eyes and the eyeline. And then I'll blend it in for
things like the eyebrows. Really use it for the nostril, blend it in for,
like, the mouth. Since the shirt is black, also a good place to
use the darkest brown, then it looks black in contrast. However, I'm not gonna
colour in the shirt. I'm just gonna just draw in all the shape so that you get the impression of the shirt. W. Okay. Now I'm taking a look back at the overall
picture and thinking about areas where I can create
more value contrast. And clarity where there's not clarity on what's
happening there. If I want it to
have more clarity. Sometimes you just want
things to be very gestural, like, the shirt
is very gestural. But I want more shading
back here to create more depth and dimension
with the hair. So I'm going in and adding
that, adding more color. Okay, I'm just going to add a little more touch
here on the nose. The eyes. Want to. So you don't really see a shine on this eye because
of where it is, but I'm gonna add it
anyway because it just adds a little more
life to your drawings. And photographs, it's capture
life better than drawings, so you always want to
use every tool you can to capture more life
into your drawing. Alright. With that, we did
a three quarter portrait. Now that you've drawn a
three quarter angle with me, practice with more portraits. Along with the folder
of reference images, I gathered for you in the resources section
of this class. I also put together
a Pintresbard full of portraits for
you to practice from. For our last lesson, we're going to draw a side
profile together. Join me.
10. Side Profile View: Now that you're comfortable
drawing portraits face forward and in
three quarter view, we're going to practice
another common perspective, which is the side profile view. This is a common perspective in storytelling because
in side profile, characters can be
interacting with each other and is one of
my favorites to use. So we're going to pull up the
reference image that's in the reference folder in the resources section
of this class, and you're going to
draw along with me. We're going to start
with this model the same way we started all
the other portraits by drawing the ball of the head that makes up the round
base of the skull. So her skull kind of
goes to about there, and that's where Okay. So actually, I want it
to be a little bigger. Great. When you draw
in longer lines, it's easier to draw
circle than to try and do a sketchy little line one. Try using your whole
arm to draw instead of just your wrists where you
can get kind of tight and it's just easier to draw smooth gestural lines
with your whole arm. Okay, and now we're
measuring from her chin to the top of her
head. It's about there. So we're not going
to worry about all the different landmarks yet. We're just doing a
smooth general line down to indicate where the top of the head
curves in the face, the general curve of the face. So we're using straight lines as much as possible.
That always helps. And then we're going to draw the line where the
middle of all this. We don't see the
back of her neck, so I'm just going to do this. But so her eyes are
pretty much horizontal. They're not curving
up or down in terms of the way the
head is directional. It's just looking pretty
much straightforward. Now, the vertical line
is this, basically, the one going
straight up and down. And then we're gonna
divide this in half, and that's where the
bottom of the nose is and divide this in half, and that's where the
middle of the mouth is. We're also going to look
diagonally. Oh, sorry. We're gonna look horizontally
across and see that her eyeline is actually
where the top of her ear is, and her ear is about
This far in. Hmm. This far in from the side
of her face over here. So we're just gonna
lightly mark that in. We see that her ear. So when you're
drawing older people, because ears and noses
are made of cartilage, that actually continues to grow a little bit as you get older, so ears and noses
tend to be a little bigger on older models. And will one day happen to you. So now I'm going to go in
and look at all I'm going to simplify all these curves into straight lines
as much as possible. So you can see, like,
the brow comes out here, and then it dips
back in for the eye, and then the nose comes out, but further than the brow
and also at this angle. So that kind of
helps me figure out where the tip of the nose is. And then the I think it's called the fulcrum
above the lips right there. Lips get a little thinner as you lose some volume
as you get older. So you can really see the
angle of the lips here, where the top lip angles down, and then the bottom
lip angles up. And then you see it. I love
this little dip underneath the mouth and then the
protrusion of the chin here. So now you're really
getting the profile, right? Like, you can simplify
this into angles. And then as we're refining it, really observe the
way the nose curves, and then comes back in and
connects with the face. And then I notice actually
her front the fulcrum of her lip is at an angle comes further
out than where her eye, the bridge of her nose is. So I'm actually going
to pull it forward. And then the lips kind of
stay in the same spot. The lips are pretty
much aligned with the way the corner
of the cheek is. If you look the
corner of the nose, the corner of the lip is that
angle. So we're doing that. Of course, the bottom
lip also comes out. Making her mouth much bigger than originally.
I had originally drawn. And then, again, that curve underneath the mouth and
then going straight out, and then back in
again for the chin. Go back in with your eraser. So you're constantly
measuring things against each other and at angles with each other to make
sure you're checking your proportions and
everything looks good. I'm also going to
gesture in her hair, her long silver hair. You can see the shape here
is what you want to draw. You see her hair
comes up a little bit from the base of the skull. And then I'm going to use lines again in the
direction of the hair grow to draw in the interior shape. I'm going to do
reverse C for the ear, then the hair goes behind it. Like that. And I just want
to measure from the mouth to where the hair starts
to make sure I'm good. Yeah. So, her hair is very, very straight. So trying to use long
lines when I can. Again, you want to draw
with your whole arm, not just your wrist, where you can get
shorter strokes, but with your whole arm, you
can get the longer strokes. So her jaw line is a
little less pronounced. It's a little looser. So it's about like that. And now I'm going to start blocking in where the eyes are. So this is actually
the bridge of the nose, and then
dimensionally, the eye starts, you
can see about here. And this is the eye socket. And the eyeball is
inside this socket. And then you have the
eyelids and really observe again using simplifying it into angles
like I taught you. The eyeball curve and then the bottom of
the bottom eyelid. So the top eyelid closes a little bit over the
bottom eyelid on her. And this is the
angle up and open. And then the eyelid, the bottom eyelid curves
and wraps around there. And then the iris, you see just partially
pupil even less. I'm only like that for now, since she has very light eyes,
I'm going to leave that. I drew a line indicating where her top crease
is right there, but it also comes down. Her brow is right here, and her hair is very light. And as you get older,
you do your brows thin, and she has light colored hair. So it's a very light brow. It's in foreshortened
perspective, so it's not like the brow we see even from the
three quarter angle. And just notice it pretty much ends at the corner of the eye. So now that the eye is in, I notice the bridge of the
nose goes about the length of the eye comes in out, I mean, and then you
can see one nostril. Again, we're looking
at the shape of it. It's a little curved triangle. Her cheek protrudes in front
of the corner of her nose. So we're going to
draw that line in. Again, this is drawing
an older face. Some things are in a
different placement. The muscles are in a different place than on a
younger face, for example. So her cheek is more pronounced and has drooped down
a little bit more. And so we emphasize
that just so we can make sure we capture
her age and leance. There are more lines on
a face and older face, so I want to make sure we're not drawing
every single one, but we're gesturing in some just to give her that
gravitas that she deserves. And also, it just helps indicate age and diversity
in your drawings. I'm gonna gesture
in just her collar to give her more grounding. They say the nose is
only mark to see how far out the arms go? No. Now we're going to draw. This is a really nice reference
for how to draw an ear. You have the outer top curve, which is usually bigger, and then a lower bottom curve. So it's a backward C. And then you draw the
inner shell of the ear. I less is more with ears, but that's up to you. I draw the inner
shell outline here. And then just draw another one, which is this line. And I go back to
refining that hairline. Now that everything's laid in, I'm gonna go in with my burnt sienna and start
committing to the final lines. Since she has much less
melanin than our last model, I'm really just gonna use burnt sienna as the
darkest color for her. But again, everything
is relative. Everything is relative
to what you're drawing. So make your own
choices on that. Maybe you just want
to leave it with the cinnamon and go back
in with a heavier hand. Maybe you just want to use the burnt sienna on things
like the darkest parts like the nostril, the top eyeline. Since I'm keeping in
this color palette, I'm not getting the
blue out to do her eye, but you can if you want to. Gonna use the burnt sienna just to drin where the
crease is darkest. I'm actually gonna use it to
go into here for the ear. Okay. And then I'm going to use
a little bit here for the bottom of the neck. Just use again, when
I squint my eyes, that part is darkest to me. I'm gonna use a little bit right here with the seam of the lips. Finish off the chin. And then I'm actually
going to bring my coral in my pinky
coral in to do the lips. Even though it's not the
color of her lipstick, it's within the
color of my world, so I'm going to use the
cinnamon to add in a little bit of the shadow under the nose that plane of the
nose is facing down, which is really prominent
in the side profile vio. I'm also going to shade
in a little bit of the eye socket because you
can see that it's going. There's a shadow shape
there being created. I'm also using cinnamon to add in the laugh lines and
wrinkles on this model, because the lines are soft. They're not harsh
lines as we get older. They're just lines that we
earn for living a good life. And it's a badge of honor
and privilege to get old. So, it helps to
squint, too, to, like, really just pick up
on the lines that are emphasized and unique to this person because they'll be the darkest
ones that jump out at you when you're looking. There's usually lines
around the eyes and around the mouth cause
those are the parts of our faces we move the most. And then I'm gonna go
in and just erase my I'm gonna go in and
erase my guideline there just so I can
see it more clearly. I'm also going to erase back. This brown guideline. And now I'm going to just use the burnt sienna to
darken her brow a bit, but very, very lightly because, again, she has a
very light brow. If you have a gray pencil or using a traditional
pencil like this, it'd be great for
doing gray hair. So for the sake of this,
I'm going to go back to a pencil and use a pencil with you for the people
who are using it. So most of her hair is white, but you look for the shapes
of the patches that are dark, and that's what we're
going to draw in. Like right here, And since her hair is long
and straight and smooth, we're mostly working in long Smooth, straight lines. And the shaded in
parts just help indicate the direction,
shape, and movement. But since our hair is so silver, we really don't have to do a lot in terms of shading it in. So I'm actually
going to go back to my Burnt sienna because
it works better for the color story
of my sketches. But you can see how that was easily done with a
graphite pencil. And I like that the
graphite is adding a bit of a cooler tone to
my burnt sienna. 'Cause Burnt sienna
is a warmer broom. Always making sure that the
proportions are accurate. So I made her hair
to full back here. You can see it's a
little darker back here than forward, so
that's why I'm using. More color and more
strokes back here. And you'll notice
when I'm drawing, I'm always moving my entire arm, never just my wrist and
settling in a place unless I'm perhaps
coloring in something. That's how you get the
smoothest, most confident lines. Alright. So I think we're at a good
stopping point for her. Actually, I might
add in a little bit more brow, shadow here, pronounce the lower eyelid
a bit more with her, since her overall color
is so much paler, there's not as much color
we need to use on her face. Since she does have a
spot of pink right there, I'm going to bring that in. When you're coloring in
something that's more of a toned area instead of a
line indicating something, just use a really light touch. And I'm almost doing,
like, big ovals over each other to
create a really smooth, blended area with the paper. And then since I
put the pink there, I'm gonna put a little
pink in her ear, too, I see some in
the tips of the ears. I see that the pink
is kind of going. Maybe a little bit
over here as well. I'm adding that rosiness
just adds a little bit more. Light into your painting. I actually think actually think this front
plane right here is not as pink as I made it, so I'm gonna take it back a bit. You can also lightly erase with your manual eraser so that it also blends
into the paper more, but, like, picks up
some of the color. Alright. And with that, we have our profile view. I hope you enjoy drawing along, and we'll practice a lot more
on your own with a lot of the reference photos I
gathered for you. We did it. We drew through three different perspectives of portraits, and I hope it gave
you the confidence for drawing portraits
going forward. Join me in the last video for last Thoughts and tips and tricks to take with
you into the future.
11. Final Notes & Thank You!: Congratulations. You made it. You've learned the
foundation of drawing faces. You drew faces from
different angles. You learned how to measure
without using a ruler. I really hope that you
take what you learn in this class and practice,
practice, practice. Remember that you
can always practice just different parts
of the face in isolation until you feel
like you really nailed it. I hope you have the
confidence now to draw any portrait you desire, and I hope that you learn
the rules so that you can break the rules and find your own style in
portraying people. Please remember to share your drawings in the class projects. I love to see it
and cheer you on. If you enjoy this class, please make sure
to leave a review so that other people
can help find it, and it encourages me to
keep making more classes. Thank you so much for joining me in my drawing faces class, practicing the art
of modern portrait. I hope to see you
again soon. Back. Okay, Duchess, what do
you think of portraits? What do you think of portraits?