Transcripts
1. Introduction: Hi, welcome to drawing
amazing flora Aloea. If you want to master drawing
these botanical wonders, you've come to the right place. My name is Patricia
Caldera and I'm a professional art
teacher and illustrator. In this class we'll draw this unique and medicinal
socculan step by step. Allora is a fascinating plan to draw because of its
unique texture and shape, making it an excellent
drawing subject for artists. We'll start the class by getting some references and
resources to help us better understand
the Alloia plants and create a more
accurate drawing. Then we'll start
drawing right away, starting with the
basic shapes of the leaves as well as a
nice spot for your plant. Once that's done, we'll refine our sketch
and add details. This will bring our
drawing to life by adding texture details and
shading to our lover. Next, we'll clean everything
up and draw the line ut this is a step we take to
have a very clean drawing. Then it's time to
color our drawing. I'll show you how
to choose colors, including palettes
that you can use, and we'll come up with
different versions for our beautiful,
succulent plants. This is not a theory class. You'll get a bunch of
downloadable assets and sheets, as well as an assignment to
practice your own lovers. By the end of this class, you'll have drawn and color this beautiful succulents and have a new artistic
skill to show. So are you ready
to start drawing? Join now and I'll see
you in the next video.
2. References & Resources: Hello, artist. One of
the best ways to improve your drawing skills is by
using reference images. This video is all about
references and resources. Since we're talking
about drawing suckling such as the Aloevera, one place you'll find many different angles
and reference images is the paper website
Pintras.com Not only are there literally thousands of beautiful pictures
to choose from, but you can also be
very specific and search for the species
of aloea that you like, syst that are quite
a lot of them. I've created a painters
board filled with beautiful succulents
that you can use for your own drawings
and studies. I will leave you a link so you
can easily find the board. Other than that,
you can always find some great reference
images over at Pexels.com and
Unsplash.com These are two of the main ones. I love to browse now, and then you can also find inspiration in art
books or even games. These are especially great if you're looking for
different styles and want to study them to
improve your own art and style. Another important thing to
keep in mind is that if you find any reference image
that you like, save it. Save your references
on the printers board to a local folder
in your computer, tablet or phone, or even printing out to have
a physical copy. What's important is that
you have these resources ready to use and to
get inspired by. Finally, you can also
take your own photos. Take photos of plants
you have at home. And keep them in your phone
or folder in your computer. If you're out and
see a scan plant or flower you find interesting,
take several pictures. Take pictures of
different angles. Even this will be great as feature reference
or inspiration. In this class, we're going to draw the most common allover, the one you usually find at the supermarket or
regular stores, might even have a home
for a bit of extra help. I'll leave a few photos that you can download and
use as reference. All right, that's about it. Take your time looking
for inspiration. And whenever you're ready, let's start drawing
some amazing succulens.
3. Drawing The Basic Shapes!: Low again. Now that we saw some references and
cut some inspiration, it's time to start
drawing our low Eve. I have here a document
opened in clip studio paint, but you can use any
other drawing software or even draw it with
a pencil and paper. I already have here a layer. And I'm going to grab my pencil here and use the red color, just because I like to use
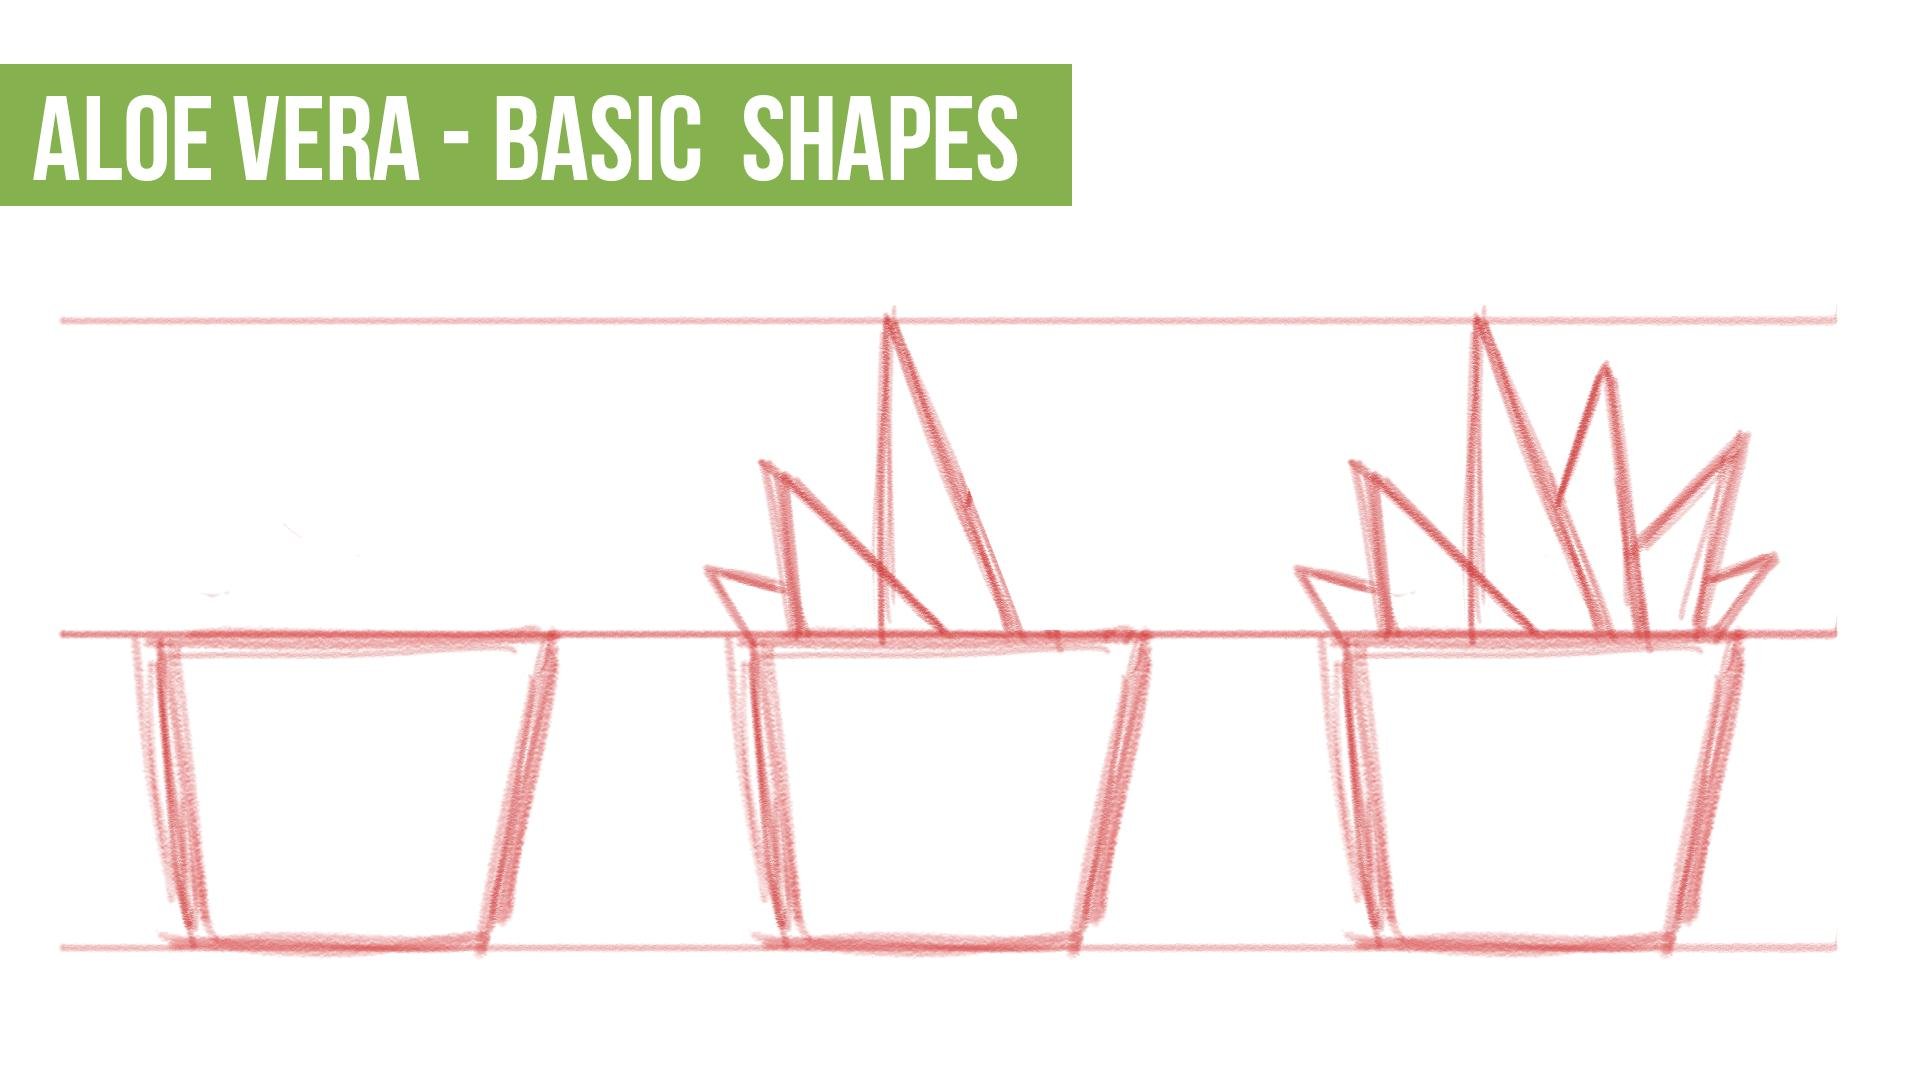
the red color when sketching. And I'm going to start drawing the basic shapes for our plant. First things first, I'm
going to start by drawing a horizontal line to
use as a guideline. Sitting on this guideline, I'm going to draw our pot, the pot where the
allover is going to sit, let's make it a
little bit bigger. I'm just going to transform here and make it bigger
so you can see it. Well, this is a sketching phase. Your shapes don't need
to be perfect, okay? So don't be afraid of doing messy lines on going
over several times. Just draw a simple shape. It can be a bitropsium
shape like this, it can be squared or
even a rectangle. It's totally up to you. Now, I'm just going
to very quickly duplicate this shape and continue drawing
on the other side. Just so you see all the
steps one after the other, we're going to set up how high
is our lower going to be? I duplicated the guideline. We have two guidelines now, and now I'm going
to duplicate them again and move them up. This is by choice, just so we don't get
lost without drawings. Our low vary is going
to be this tall. Now I pick up my pistol
again and we're going to draw very basic shapes
for the Llover, we're going to use triangles. Straight line, and the
other can go a bit slanted. There we go, one triangle,
now to this side. Another triangle, now a
smaller one right here. That's the same to
the other side, but change their
size a little bit. It's more interesting if you want lover or even any plant, you'll notice that the leaves, or each part of them,
goes everywhere. Now another one here, finally a smaller one. And there we go our basic
shapes for our allow. Of course, you can do
it taller if you want. Instead of duplicating
this distance, the distance of your pots, you can maybe do it twice. And your alloia goes
as tall as this. It's totally up to you. All you have to know is that
these are your basic shapes. You start with a trapezium
shape or a squared shape. Anything you want, it
doesn't need to be the final shape you're
going to have at the end, but it should resemble
the final shape. You will have then triangles
for the leaves of the alloy. I'm going to leave a template with all the
steps we've done here. You always have it as reference for other drawings
you might want to do. Once you're done
with the shapes, we're going to
refine our sketch. I will see you right there.
4. Refining Sketch And Adding Details: All right, welcome back. We have here the basic shapes
we just through previously. Now it's time for us to refine our sketch and add any
details we might want. Here is my sketch. I'm going to lower
the opacity of my basic shapes and then
create a new layer on top. Now I'm going to pick
a darker red here. And I'm going to go over all my shapes but
adding more detail. For example, one
thing we can do is give a more interesting
shape for our pot, right? Let's start here till here. We don't need to be
perfect with your lines. I'm going to add a slight
curve here at the bottom, just because I feel it's cute. Now here, that rim
of flower pots, since we're going to have a very symmetrical drawing here, I'm going to copy this layer, then paste it, transform. And then flip horizontally, there we go, and move
it to the other side. Now you can draw the
whole thing if you want. If you are still
learning how to draw, I do recommend that you
do the whole drawing, just so you get more used to it. On the other hand, if
you are in a rush, this is a thing you can
do from time to time, just so your sketches
are a bit quicker. Let's connect both sides. All right, let's do the same thing here with
another horizontal line. And there we go. As you can see, my lines aren't
perfect right now. That's totally fine. This is just a sketch. Now the next thing
I'm going to do is I'm going to add bits
of dirt here and there. This is something that is
a little bit optional, but I do like to add a little
bit of dirt showing in my plant drawings
because I think it adds something a little
bit extra to the drawing. For now. I'm not going to add any detail to
the flower pot, but we will play with that
later on on the class. For now, keep it really simple
and then we can play with our textures and patterns or whatever else you want to
do with your flower pot. Now we're just missing
our actual lo plan. So let's go through it. Instead of drawing straight
lines like we did before, going to start and add
some curves to them, we're also going to remember which ones are
on top of the others. For example, this one is
behind, so we don't need it. Now, let's do the
same on this side. As you can see, I am
following my previous lines, my previous shapes, but giving them a more interesting look. This is mostly just going
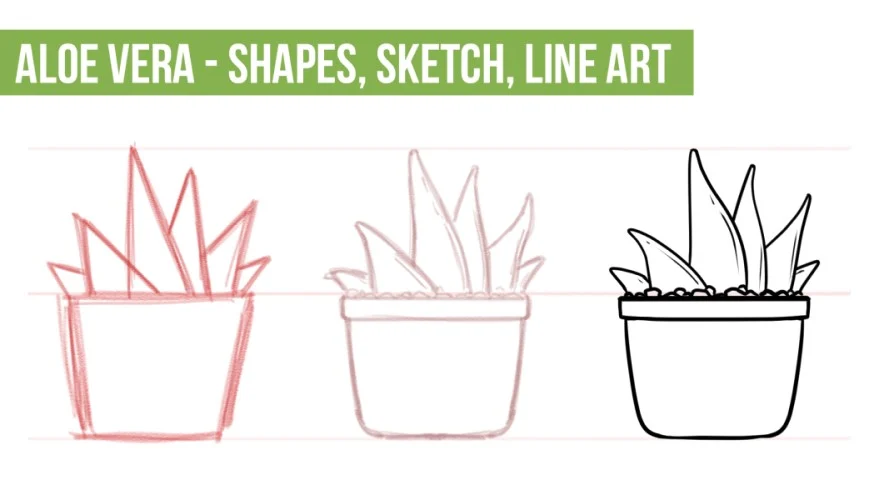
to move this to the side. There we go. So you can see the first and the second sketch. First we added some shapes, just very basic shapes, so we have something
to lean on as we draw. Then we went in and refined our sketch
with a few details. Can even go in and out
here a little bit of a line just to add a
little bit of a texture. These are things
that are totally optional or you might want to add more
details if you want. These are things that you
can explore as you learn and as you get comfortable
with drawing plans. For now, we're going to
keep things very simple, as simple as possible, while still having acute
and interesting drawing. This is it for our sketch. Feel free to take your time, practice your sketch
more than once if you don't like the result or if you feel you
can do better. Whenever you're ready, you can follow me to the next video where we're going
to clean our sketch and give a final
look to our drawing.
5. Drawing The Line Art: Hello artist, and welcome back. Our drawing is almost finished. Now what we're going
to do is clean all our lines with
some finished lineup. What I'm going to do is I'm
going to lower the opacity of my detailed sketch and create
a vector layer on top. Now in clips to the paint, you can use something
called the vector layer. This means that while you're
drawing in this layer, your lines are vectors. If you need to, for example, resize your lines,
it doesn't matter. Your drawing won't
lose any equality. As long as it's done
inside this vector layer, drawing won't lose quality. This is very useful when you're doing things
like line up. Once we have a new layer on top, I'm going to pick here the color black and I'm
going to grab a brush. Now the brush you're using
is totally up to you. Use something that is
comfortable for you. If you are new with
the drawing software, take your time exploring
the different brushes that are available and
see what you like. If you're drawing
this traditionally, you can perhaps use a pen, any fine liner, or even just continue to use any
medium that you prefer. Now, all you have
to do is going over your previous lines as slowly as you want until you have
something you're happy with. As you can see, I'm going to be repeating my lines
a lot of times, which is perfectly okay. Don't get frustrated by
it. It's not a crime. Repeat your lines as
many times as you need until you are
happy with them. That's the most important thing. Another thing that might
help you if you're just starting and don't feel very confident on your lines, or if your hands
are very stable, is you can use stabilization. Most strength software
nowadays have stabilization for the pen and that might help you have more stable lines. There's no shame in using tools to help us
in our drawings. Just go over your
lines one by one. Don't rush this, Your biggest
enemy is rushing things. There we go, the
flower pot is done. Next we have the bits of
dirt that we drew before. This can be very irregular. Feel free to have
some fun with this. There we go. Let's
start our tall leaf. As you can see, I repeat
my lines a lot of times as well until I am happy
with what I have. There we go. All we are missing now is a small lines
of details that we drew before it's done up, we have our drawing of a lower varia plants
from start to finish. We started with some very
simple and basic shapes, then added some more detail and personality to our drawing to finally have some final
line art ready to color. That's going to
be our next step. Take your time with
drawing your lines. Try different things. Try different brushes even,
or different materials. Just have fun with it. And
whenever you're ready, follow me to the next video. Where are we going to add
color to our drawing?
6. Choosing The Colors For Your Aloe Vera: Hi, and welcome back. Now that our lo Vera
drawing is finished, this is a great opportunity
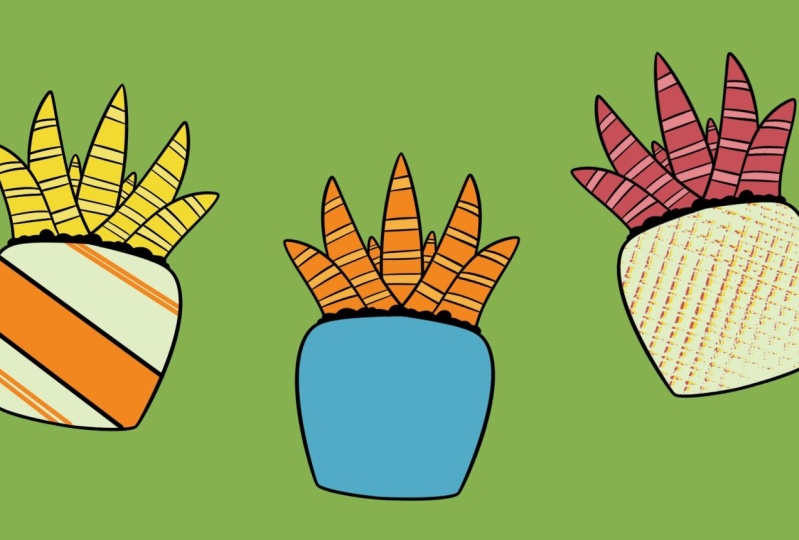
to add some color to it. Generally, succulents come
in different tones of green, blue, or even slightly purple. However, we can be a bit more
creative with the colors we use depends on what you
want for your drawing. You can choose a very
traditional hood, or paint your circle and yellow, orange, or even pink. It's all up to you. You can come up with
your own colors, explore the color wheel, and have fun experimenting. Another option is to find a fun color palette
online on Pinterest, which we talked about before. You can find beautiful
color palettes. I even have a board
full of them, so I leave a link if you want to explore it for random
color palettes. You can also go to websites
such as Schoolers.com which will generate several
different color palettes that you can use
on your own works. You can even make a game
out of it, for example. First color scheme that you generate is the one
that you'll use. This way, you'll need to
be even more creative. Since this is a simple drawing, I'd recommend to keep your
color palette quite limited. Let's say a maximum of two to
three colors and use that. You can also use
color harmonies, such as the monochromatic or
complementary color scheme. Finally, before we
start coloring, I just want to give
you two quick tips. The first one, when
using color harmonies, don't forget that you're
not stuck to one tone. If you choose the color
blue, for example, don't forget there
are several tones inside the blue color. It can be more or
less saturated, more or less bright. Be creative with
this information, especially if you're using a
monochromatic color scheme. And the second, when using any kind of color
palette or scheme, be balanced with your colors. A good way of doing
this is choosing one main color that will
occupy most of your drawing, while the others
have a smaller role. This way, you can create a
nice harmony in your drawings. With that said,
let's start coloring our low vary and the
process ideas for it.
7. Coloring Your Aloe Vera & Vase: Hello and welcome. I have here my file with my line art of the
low vary plant withdrew throughout this class. Along with three palettes. I'm going to give the ones to you at the end so you
can download them and use the same colors I am using if you want or
you can use your own. We're going to start with
the first one from the left. For that, I'm going to first add a new layer below my
line art like this. Then I'm going to
grab my paint bucket. We're going to start
with this one. What I want to do before
starting to color my image is I'm going to be sure that my pet pocket is set to
refer to other layers. I'm just going to grab a
random color when I color it. The software will
have into account all my lines and paint
inside of those, even though those lines
are in another layer. Let's start coloring our lower. I'm going to start
with the darker ton and color my plant. There we go. Now I'm going to use the blue for the flower pot. Now I can grab a brush and
pick the other color I have. Add a few details. Let's see if you've seen
a lawyer very before. You know, there are different
plants and sometimes they have some texture or a
little bit of a pattern. For this one, I think I'm
going with some dots, Something very simple like this. As you can see, I'm being
very random with this. I don't really have a
plan just going with it. And there we go. Let's
go for the next one. Again, I'm going to
add a new color. This time we can try
another coloring method. For this one, we're going to
use the first color palette, but before that, let's draw a different pattern
on our flower part. Let's add here a few
lines like this, something very random,
just two lines. And we have a different
looking flower pot. You can come up with
something different. For example, one thing you can do if you don't know
what to do with your flower pot is again,
go on the Internet. Go on printers for example, and look for different designs. There are so many things around, something might inspire you and you can use that
for your drawing. Now we're going to
use another method which is using our magic one. Again, I have it to
refer to all layers. It has into account my line art. I'm going to go into the places I want to
color, for example. And then I'll press
Shift on my keyboard. As you can see, a small
plus sign will appear. That means I can now add
more to my selection. All right, everything we
want to select is selected. And now I can go over
to my color palette and grab my purple and start
adding it to my drawing. Now, this coloring
method is more useful if you're doing
something that has gaps. For example, line art, you chose to have some
gaps on your line art. This might help you do that instead of
using the magic one. For example, you can use the lasso tool and make your own selection by
hand, for example. It also works, it is
totally up to you. Now let's continue coloring. I'm going to grab
here, dark blue. And I'm going to pick
the places where I want it to be, here and here. And pick here, our light
pink. We can do the same. Let's select both of this now, add the color to it. That is mostly done. Now this time I'm going to add color to our dirt
here using black. You can use a brush
at the end to fill any gaps you
might be missing. Let's go for the last
one in which we're going to use a
monochromatic color scheme. Again, I'm going to create a small pattern in
it, very simple. Let's add some
geometric shapes here. I don't want them to be perfect. I want them to look a bit messy. I think it's more fun that way. I have here a very
messy pattern, some dots here and there. And now we can start. Coling'm going to grab
my paint bucket again. I'm going to start, Even if you want to use the
color scheme I'm using, feel free to try different
ways of coloring. For example, adding the blue to the vase and green to the lens. But you can do something else. You can come up with another
organization of your colors. These colors, as you can see, are too close from each other. But as we talked before, when you are using a
monochromatic color scheme, you can use several tones that are inside of those rights. Let's change things up a
little bit. Here, there we go. That looks better.
Can even go maybe a little bit darker
with this is good. Now we are missing one color
from our color scheme. What I'm going to do is add
some stripes to our lower. Very simple, just like this. These stripes don't
need to be perfect. Remember that plans
aren't super perfect. You can make that
an advantage and something to make your
drawing more unique. We are done with our coloring, now let's go in and
add a few shadows. It doesn't need to
be super detailed, but just a little bit
to add more depth, something a little
bit extra drawing. What I'm going to do
is I'm going to create a new layer on top of my colors. These are my colors. And
then I created a new layer. I'm going to clip it
to the layer below. And then I'm going to set it to multiply and lower its
opacity a little bit. Now I'm going to grab my
brush and I'm going to pick here the base
color of my drawing. Let's say that I'm going to pick where the light
is coming from. I'm going to say it's
coming from the left. By clipping your layer
to the layer below means that whatever I do outside
of the layer won't show. It's still there.
But as you can see, it's almost like
there's a mask in it. You are masking it
with the layer below. This way, if you're
going out of your lines, it's no problem if the light
is coming from the left. That means I'm going to draw
my shadows on the right. All we have to do
is just go through your drawing and
add a few shadows. As you can see, very simple. You can add a
little bit extra to your drawing and some more
depth in a very simple way. Now let's do the same
for the other drawing. With that we are finished with
our lower value drawings. This is it, very simple shapes. Have fun with it,
but don't leave yet. Follow me to the next
video where we're going to talk about your
assignment. I will see you.
8. Your Turn! Assignment: Hello and welcome back artist, it's time for your assignment. We went through all
the steps needed to draw a circulent plant
such as the aloe. Now it's your turn. Don't forget to download all the materials
I've shared with you, such as reference photos, step by step process
of the base shapes, the template of our
three main stages of drawing and aloea. And the color palettes along
with the coloring template. This can be used both as
reference and inspiration. For example, you
don't need to use the same colors I use in this class. You can
choose your own. As for the pot of the aloea, feel free to be creative
with it as well. You can create a pattern it differently or even add
some texture to it. Take your time
with each step and experiment with your
aloe vera drawings. Your goal here is to learn
how to draw a Llovera, but also have fun with it. Once you finish your drawing, don't forget to
share it with me. I always love to see your
art and give some feedback. Have fun with your
assignment and stick with me for just one final video.
I will see you there.
9. Before You Go - Conclusion: Hello again. Thank you for
watching this class on drawing unique and beautiful
flora such as lover. I hope it has been fun and that you've enjoyed
going through it. If you found this class
helpful or have any feedback, I would appreciate it if
you left me a review. It helps me a lot
in creating and updating new courses
and classes for you. Also, remember to check out
my other classes on drawing. I always try to keep
classes easy to understand and very
practical for artists. If you've enjoyed this one, I believe you will also
love my other classes. Alright, that's about it.
Thank you for watching. And as always, keep on drawing.
 Patricia Caldeira, Illustrator | Digital Artist | Designer