Transcripts
1. Introduction: Welcome to this course
where you'll get to create your unique dandelion composition
from real life nature. Hi, I am an yesterday snack, an artist and illustrator of over a 100 children's
picture books. I especially love adding flowers are pretty decor to
my works of art. I feel that when
it comes to art, there's nothing better than
copying from real life stuff. It's the best way to find and play around with
your own unique style. It's not copying
someone else's work. Not even a photograph
where the photographer chose the specific angle in
which to take the photo, you get to choose what angle, what direction, where the
lighting is coming from. It's learning to look and to pay attention to the details
that speak to you most. And then putting it
down on paper or in some art form in a way that
you're most happy with. If you're a little
concerned that you haven't had so much training or studies in the
technical aspect of art or colors or techniques. Don't worry, because
in this course, I'm here to show
you that there's no right or wrong way to do it. It's just looking and
creating what you see. You don't need any
prior knowledge or training to be creative because
it comes from within you. This is just a fun occasion
to play around with some lines and colors,
brushes and textures. I'll be using the iPad and
Procreate for this course. But you can feel
free to join me with any art medium that you choose, watercolor or markers,
or crayons or color pencils can all
work just fine as well. For the class project, I'm inviting you to come up with your own flower composition, whether it be a dandelion or any other flower
that you choose, you get to put it together
in a way that is most satisfying to you for what
you want to use it for. I'm so looking forward to seeing all your beautiful flower
compositions and works of art.
2. 01 Welcome: I'm so happy that you've
decided to come and join me in this course on creating
this lovely dandelion. As I mentioned before, I'll be using the iPad with
procreate and an iPad pencil. But this course can work with any other art mediums as well. I've used the same
techniques and tips with paints or color pencils
or even markers. So don't limit yourself
with just one form of art. It could even be fun to try
out drawing the same flowers, but with different
art materials. And then you find out which
one you enjoyed this. For the next time,
let yourself be inspired and have some fun, and maybe experiment and challenge yourself
with something new, something different that you've never tried before, before. Some of the classes you will
notice that I've included different slides with
different strokes or shapes and lines that I've used to draw
my dandelion flower. So feel free to use those
if they can be of help, but don't limit
yourself to just those. You can also just
draw along with me, follow along as I
copy my flower. But I encourage you, if you do have real
life flowers to take that and play around
with your angle, your lighting, your shapes. These slides are just in
case it's of help to you, or if you'd like to
refer back to them later on in drawing maybe some other flowers or
maybe if you don't have a real life down
the line to copy from. I've also included
them as downloads in case you want to use
them for another session. Or just as a reminder of some
of the things that you've learned from this course
and in case it's helpful, I've also included
a color palette. Well, that's it for now. Let's get started
with our flower art.
3. 02 Drawing the seed head and stem: I'm going to start with one of my flowers and I put it next to me so I can
have an example of it. So I'm starting out by
choosing my brush stroke. So I'm going to use
a dry ink for now. And I'm going, oops. I wanted to get to
drawing this one quickly before it all goes away. So I make sure I have
my layer in place. I'm going to start with
the circle in the middle. I think the thing
about drawing we'll flowers is really
looking for the details. Knowing what to look
for, how to look. Not just seeing, but actually really
looking, paying attention. I'm noticing that these are all little, tiny little seeds. They're all in the middle. This is where the seeds
of the flower live. Then I'm going to
change my color and find one that's
fitting to my stem. I see I noticed that it gets
lighter and then darker. So I'm going to start with the light part and I'm
going to put a new layer. What I like about this
brush is that you can push harder and it
gets a little thicker. You also can notice that light
is the light coming from. I'm going to add a little
light on this side. Kind of helps it to
stand out as well. And going back to this screen, I'm going to find a darker
shade for the bottom part, which even kind of turns
into a brownish red. So to just little strokes. So as you can see,
I'm just working with strokes here because this is
kind of like a pencil brush. And then you can always blend
it together if you want. With your blending option. Then erase to make
it still realistic. Be my stem.
4. 03 Baby leaves and seeds: Now we're going to pay
attention to the little leaves. So back to my green. So you can find here
in your history, to make it easier, I might go with a new layer
again for the leaves. Each part of my smaller, each part of my flower is going to have be on
a different layer. In case I want to
change anything, alter anything later on. I notice that it's straight
and then it kind of curls out Towards the end and
thins out as well. Thins out and curls
out a little bit.
5. 04 Drawing the seeds: And now I'm going to
make the little seeds. So if I pay attention
to one seed, I'm going to place
it right here. So they're all coming
from the center. Here's one, here's the
part, the real seed. And then it thins out. Really thin. And then into all these little
strokes coming out. Let me try that again. And let's zoom in so you
can see what I'm doing. I'm just drawing little strokes coming out from the center. And that's basically it. So what I could do is duplicate this layer and then
move it in place. I could move it and put, lays it all over my flower. Then I could move this one also in place to make
it into a center. Or I could place these
around the flower. These are the ones that have
already fallen and flown away with the wind. And I'm going to
make a new layer for all the ones
still on the flower. That way I can really look and pay attention to
the flower again, which I see that all
the long strokes are coming out like this. Of course, there's
some on all sides, which our flower that
we're drawing is not 3D. So it's gonna be hard
to capture that. On the ones in the front. There's also some
in the bottom here. And then I'm going to just do my little I'm going to
call them star shapes. I'm not sure what the
real name for it is. You kind of do these
all over the place. If I wanted to, I could
have made that on a different layer
and make a few. Let's see, I'm gonna make
some smaller ones and bigger ones, some half ones. And then I can duplicate
that layer to save me some time and move it around, place it somewhere
else on my flower. Like so. I can always add to it, fill up the empty parts of my flower to put some in
the center here as well. So there are different
ways that you can draw or paint a dandelion, but this is just one
way that I do it. And again, I'm going
to duplicate it and move it to the side or anywhere
actually on my flower. So when you zoom out, you're not going to see
that many of the details. So that's why I'm
not going to get too detailed and make
these all over the place. Just a few more in the center. Maybe. There's something so satisfying about making
these little shapes, even though I'm going quick, just makes me think
of little stars. Sending out my little wishes. For me. Drawing, painting flowers is so relaxing
and so meditative to think about the joy it brings me the thoughts that brings me. Alright, so it's looking nice, starting to take shape.
6. 05 Flying seeds: I'm going to make
a few more flowing in the wind because
that's what they do. I'm half ones. And then I'm going back to my dark color to add in the
bottom part's little seeds. So this might look
very complicated, but when you actually do it and you just copy your flower, turns out to be simple thing.
7. 06 Cotton ball: I'm gonna go back to my leaf layer and make
a new layer there, and go back to my light color, maybe lighten it even
a little bit more. Now I'm going to change my brush stroke,
maybe two hearts. But it up. So you might not be
able to see unless I take off the background color. And it's kind of giving, giving it that fluff.
You could say. That fluffiness of a dandelion. This brush just
kind of adds to it. If you wanted to, you can
add a few puffs as well into the sky, into
your background. Now it's looking a little
bit more like dandelion. I might even add a bit
more to the sides. We can still see the
center little bit. Alright, let's change
our background color so that we still have it. We have our dandelion.
8. 07 Highlights: I'm going to go
back to my leaves and add a little highlight to sun is coming this way. If I wanted a little lighter, I just changed the opacity. That way. It stands
out a little more. If I wanted to, I could
also lighten this a bit and make it brighter. Wanted a little whiter. Depends if you want to keep
it on white paper or not. So we have our dandelion.
9. 08 Stems and leaves: What I'm going to do is place these into
a separate group. And that way I can have my other flower
here on this side. Going to use the same
green that I had. And first just do
the general shape. Kind of notice where the leaves, I cut this one out,
place it there. And here my flower. To move it down a little bit. Here are the leaves
holding up the flower. Feeding the flower. Saying Come see,
come see the flower. I love it when the flowers have their little set of leaves
supporting them like that. And these are the babies, so there's not
very many of them. I think it's beautiful
though how they start like this and then
they fill out older. So again, it's paying attention. I'm just copying here. Copy it and the
style that you want. Segment a little bit. So as you can tell and
nothing's really perfect. With my strokes,
it's kind of rough, but I think that's
got its own charm. Wildness to it. Wild flowers are not perfect. And maybe that's what
I love about them. So if you pay attention
to the leaves, they have their
different little leaves within their main leaf. You could kind of make the
thicker part for salon, which leave that
stems from leaf stem. You could say. If you wanted to, you could also just cut it
out and copy it. Like a Christmas
tree, you could say, except it gets a
little bit wider, the leaves a little bigger and wider as they go
towards the top. Then after you do a few, you kind of get the general
idea of the leaves. You can even make them
yourself without copying, without looking like each one to be a little
bit different. Actually, I noticed that
it's easier to start from the bottom and work your way up. If you're not happy
with certain parts, this part I'm not so happy with, so I'm going to move it a
little bit this direction. It gets smaller and maybe
there we have our leaves.
10. 09 Flower bud and detail: I'm going to pay
attention to the top now. It's still a kind
of a green color, a little bit lighter. So I'm going to make
a new layer for that. So it depends what angle
you want to see it. Look at it this way. Fighter again. And I'm just making
little circles. You see how you translate it to, and it's got a
little pink in it. Let's give it a little
touch of pink on these top ones because
they got a little bit of sun. Zoom in here. I'm just giving them
a little C-shape. And again, for my leaves, I'm going to pay
attention to the middle, again to the stem, then give them a
little highlight. The stem is pretty thin, so I'm just going to give
them a very light thin line. And the leaves, I noticed that the middle a little
bit lighter as well. I'm going to give
that be changed, my stroke too thin. So now you can sort
of see it taking shape just by adding
a little highlight. It's really how we
see the light coming from sun or what
direction we see it from. I'm not really going through
any of the techniques of drawing a dandelion, because I think it's
important that you find your own way,
your own technique. And that's the wonderful
thing about copying a flower from a real one. We're copying anything
in nature, any object, even not copying it from a photograph or
somebody else's painting. The trying it yourself not
only builds your confidence, but it helps you to see, to pay attention, to
notice the details. Because we all notice and
see things differently. So there we have our
dandelion leaves.
11. 10 Flower stem: The last part to do, I'm thinking a new layer
is for our flower. So if I make my dandelion puff, not
sure what it's called. I'll make that a little
smaller and move it there. And move my leaf. They're closer to the side. Then we have some
space for our flower. Again, I take a little
time just to reflect on what I see, what I noticed. You can even turn it different
sides of the flower. That way you know
how it's shaped. It's made us even
from the bottom. It might give you idea of
how to actually create it. And also you can decide
which angle you want. I'm making sure I'm
on a new layer. And I follow the general shape with some rough strokes again. To start with. A little bit thicker on
the top, I'm noticing. And it thins out to the bottom. And this time I'm going to add in some shading right away. Change my size and my opacity. Know if it's shading or just darker strokes
underneath here. And towards one
side of the stem, which is definitely
the lighting. Because my light is
coming from my window, which is on the
right side of me. So already you can see it taking life just by adding
a little bit of shadow. And while I'm at it, I can already do a
little highlight too. So there we have the
stem of our flower. If you notice, there's
even a few little, little things sticking
out on the sides. Maybe they were leaves
or trying to be leaves. I'm trying to copy
as much as I can. Sorry d bringing it some life. So there's our stem.
12. 11 Yellow Petals: I'm making a new layer
for the flower. Now. You notice and look closely, it has some brown
parts on the bottom. So I'm going to
start with those. I have a brown here already. Sure, I'm on a different layer. And my brush maybe a
little smaller so that I can like those little points. Okay, well first, now
it'd be the time to decide angle of your flower. Let's see, I had
turned it this way. There's a bug. It's what you get when you
work with wild flowers. You can always expect a
visitor or two on your table. So some are facing up, some are down, some
are facing outward. I'm making a new layer
now for the yellow. And I'm going to try to match the yellow color as
much as possible. You can even take your flower. Notice that's a little
almost fluorescent color. Then you try it
out. I get again, these are the same size
as these brown ones. Do. They get a little pointy on? Towards the end. I'm first just doing my
general shape of the flower. So if I were to
see it as a shape, I would make it a little oval. And then I work within
that oval to fill it up with some of the
petals are behind. Then you can decide if you
want your brown colors. Brown pedals in front
or in the back. And you can keep adding to it. I might even change a few colors because it's
nice to have that variety. And if you look closely, there are different
shades of orange, different shades of yellow. Which I might make
a new layer four. And I'm going to make
the orange ones behind. Kind of fill up
those empty spaces. So it's not looking great yet. Don't worry. There's some flowers that only
look good towards the end. And then I'm going to go
back to the yellow and make it a lighter yellow and make it on top a bit lighter. Again, this is the lighting
and also the petals. They have different colors. Not sure if there's one petal that has the same
color as another one. I know it's like that
with some things, a lot of things in nature. So that'll be interesting
to research that. So how is it looking
not so hot on it? From close up that I think from a distance
it looks pretty good. Go back again to my yellow. Mix them on top again. Because that's the main color. And if I wanted to, I can always bring the
brown onto the top. Although now it's
not fitting so well. Let's try a new layer. Lets me go back to Brown. Because I sort of
changed the shape of my flower where it's going. So there's sort of made me
in the back and the bottom. I think that's close enough. Some of the stem goes a
little bit higher and has even darker strokes. I think that's pretty good. It's a very simple
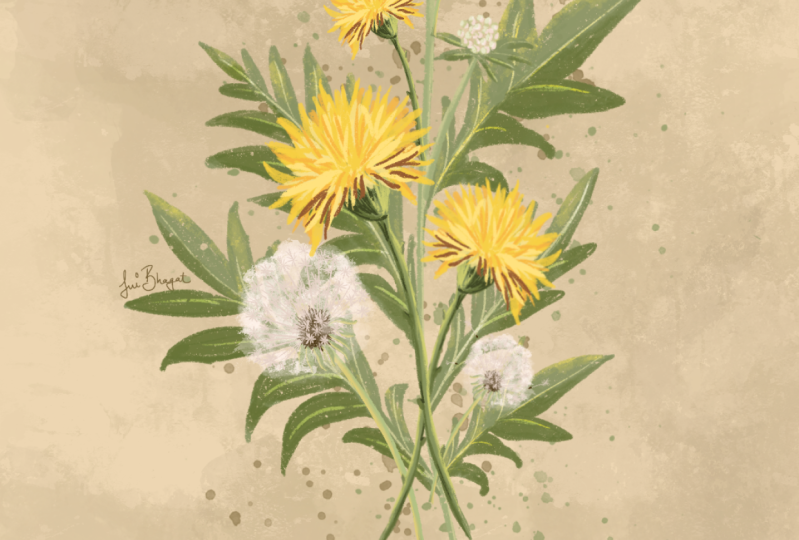
version of it, but we have there, we have our dandelion
flower in all its glory, in all its beautiful
cycles of life.
13. 12 Shading the leaves: I'm going to give us leave just a little bit more
detail, maybe more shading. So I'm going to make a new
copy and make a clipping mask. That way when I work on it, it only works within that shape. That can be very practical
when doing some shading. So I'm picking this color and just going a little bit darker. And I'm going to change
my brush to hearts again because I like that
it's so varied. I'm going to give a
little bit darker color to at least half of the leaf. Some lights already just that helped it to stand
out a little bit more. And now I'm going to go
back to the light one and pick another color
for some highlights. I'm going to do a new layer, start a new layer,
again clipping mask. And this time I'm going
to maybe overlay. Let's try overlay. It's going to kind
of give it another, give it some extra brightness. I can change the opacity, bring it down a little bit. So you don't have
to get that detail. You don't want to wait to do it. We have it there. Maybe I'll give a little
extra highlight to these shapes here. There we go.
14. 13 Individual Flowers: I think I'm just going to merge all my layers for each flower to make
it easier for myself. There's the leaf and the group. And I have my three flowers. So now that we have, are three parts of the flower. For this last part
of the course, we're going to make
something out of it. I'm going to start by
choosing one of my leaves. I put my three fingers and
I duplicate that part. I take my three
fingers and I copied. And there it made a copy. And that way I can
move this one around. I can flip it horizontally. I can change the size. I can even add it to my
flower if I want to. You make it a
little bit smaller. And I'm going to
go again with this one and duplicate. There it is. And a new layer going
to move it and flip it, changed the orientation of it. That way I have my flower
with some leaves this time. I'm going to do, I want to make a
copy of this one. And I'm going to
join these together. Now. I have my flower with the leaves and my flower
without the leaves. I'm going to duplicate
this one as well. Just so I have a copy
of it. This one too. I'm going to duplicate
again, take off one. So I always have a copy of it. And now we can start to
put our picture together.
15. 14 Flower composition: So I'm going to turn it around this way and also
turn my flowers. That way I can have
a vertical paper. This one again, I'm going
to duplicate and also rotate rotate it manually. Swine I'm going to hide. So we have all the ones
that I want to use. I might hide them so there's
not too much going on. So I'm going to start with
the base of my flower, the base of my flower design, which will be this one
because it's the biggest. So I'm placing it
in the center of my page a little bit
towards the bottom. Now I'm going to add my dandelion flower
without any leaves, since there's already so
many leaves going on. So this part is loads of fun. It's really how
you want to do it. What fits your style, your mood, and depending on what
you want to use it for, oops, I meant to
do horizontally. So I can make this one
a little bit bigger. I don't like them to be totally symmetrical already since
it's the same flower. I'm going to duplicate it again. This time, make it a little bit smaller and also
a little shorter. So I'm just going
to take my eraser, kind of curve my stem
and bring it here. So it's already starting to look like a little flower design. I'm going to get another one, flip it horizontally,
and this time I'm going to make a
little beady one up here. And you can also decide where your picture
do you want it? I want it underneath. Underneath this one.
I place a dare. You can feel free
to move it around. And I might duplicate that one. I like the little ones and transform it
to the other side. So as you can see,
you're kind of playing around almost making a pattern. And now I'm going to go
back to this flower, which I left out before because we already
have so many leaves, I'm going to just steal
one of the leaves or coffee more like duplicate. So I'm just going to
trim it a little bit. That way. I have my lease. It's a little baby leaf or
I can make it another size. I can just have it
be alone like that. Now, I'm going to maybe place this a little
bit more towards the top and see what I wanna
do with that one. Bit big. So I'm going to place it there. I want to see if
it's even going to match or fit my flowers. It's got a little bit
different shadings. Could fit in as well. Going to duplicate and move it and flip it, swell
different direction. So you see you play round where you want it
on your picture, on your flower design. Don't know if it fits here. I think I'm going to erase the extra little parts that don't really tie
in with the flower. This part, we don't even see the seeds. They're too light. I'm going to change my
brush to cards as well, just so we can follow the
same pattern of the brush. And I'm going to trim it, make it a little bit smaller. So there's less puff. And that's the basic, just how I make my
flower patterns.
16. 15 Background: So black was quite nice. You could have gray, you could have beige. I'm going to place all the layers that I'm not
using that I'm just hiding that preserving for I ever want them by themselves
placing them there. And on top of that, I'm
going to maybe choose a beige color. Like that color. It looks nice with
the yellow and I like the rustic look of it. And if you wanted to, what's really fun and
what I enjoy making is a little bit of
a darker color. I'm going to choose another
brush, hearts I like. And I'm going to give my
paper a little texture. That way. It kind of
looks a little bit old. If you wanted to go in the back. The flower, back of the flower, you can go even a little darker. I also like to play around with different kinds of brushes and different colors on
different parts of my paper. And afterwards you can
also play around with how light or dark you want it. If you really wanted to, you could also add, I'm going to make one more
layer and add some flicks. So I think it's a little touch that I'm going to
add to my foot. You decide when it's
enough for you. Make them a little smaller, make some green ones can
also change the opacity. You decide. So those were some of the
finishing touches and our background for this picture.
17. 16 Give it meaning: So for this part of the class, we're going to make something
out of this picture. I like to use my paintings, my flower designs for something special and
something meaningful. That speaks to me. First of all, I might merge these so I have some
more space to work with. Together. I merged the ones that
don't touch each other. So that way if I ever
want to use them again, I can, I like to remind myself of what these
flowers bring me. So for that, I'm
going to either use a font so you can add some texts and type up
whatever you wanted. You could write it yourself, which is what I'm going to do. So I'm going to
pick the brown from my background and
go even darker, almost black but
sort of grayish. And I'm thinking of a word that flowers could mean for me. I love the yellow, the tyrannous of them. I am going to choose my dry ink brush and
I'm going to write. But meaning this
flower could bring me. I'm not a letter artists. But there's something
about imperfect text. And perfect that
it's not a font. I can move it wherever I want. I can make it bigger or smaller. And if I wanted to, I could even give it
a little background. And you have your own little
either journal prompt card, you can turn on the question on the other side about happiness. What makes you happy? What lights you up? Or you can use it like a little Oracle card
or meditation card. Meditate, reflect
on this word for you as you enjoy your
beautiful picture. So I hope that this
was a fun project and that you learned
something from it and that you'll be able to go on
and pick your own flowers, find your favorite flower, and maybe draw it painted or use it for something
useful and meaningful.
 Agnes De Bezenac, Designer of Tools for Wellbeing