Transcripts
1. Intro: Hi, I'm Jen Heathcote. I'm an artist living in Milwaukee, Wisconsin. I'm going to show you a technique I learned several years ago to draw Celtic Knot. You don't need any drawing experience to take this class. These knots might look complex, but it's actually a really simple technique. As you'll see you start by laying out a grid and then just follow a few simple rules to fill in the not So once you've learned it and practiced a few times. It's very straightforward. A large night will take a while to draw, but once you got the hang of it, it doesn't really take much sought after you've done this. At up this class is for anyone interested in drawing Celtic nuts just of the drawing project, whether you want to make something to hang on your wall or your fridge where you want to make something like a card. This class is also for anyone who wants to learn a kind of meditative, doodling technique. As I said before, it's really very easy one to get the hang of it. And this class is also for anyone who wants to learn how to design Celtic knots to incorporate into another creative project. I love carving spoons, and I decided this one needed not on its handle netting. Designers sometimes incorporate Celtic knots and two cable pattern. You know how to carve Stone. You could make a Celtic cross If you're looking for more inspiration, look up. The Book of Kells Online Book of Cows is a 1200 year old illuminated manuscript of the New Testament. It's full of incredibly beautiful drawings that incorporate, not work and other repetitive motifs into your paintings depicting important people in events from the Gospels. So in this class, I will tell you about the materials that I use. Although you just need a pen or a pencil and some paper to get started, I'll show you how to set up the grade, draw simple lattice and then I'll show you how to add complexity to your designs. And finally, I'll go over some common mistakes you might make and what to do about them. Your project for this class is to draw some nuts. I hope you're excited to get started, and I can't wait to see what you come up with.
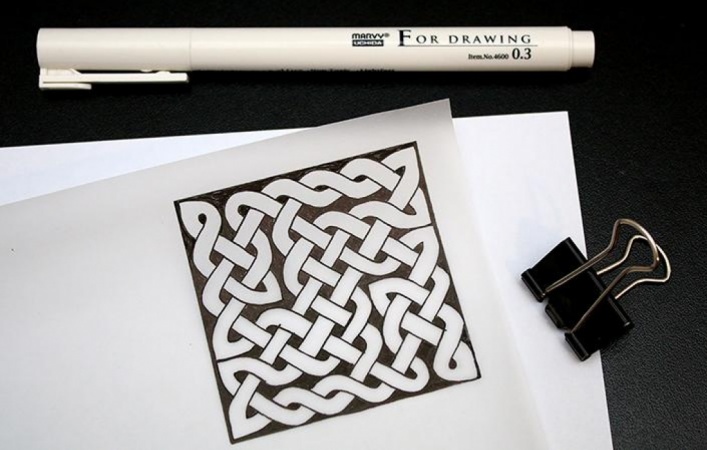
2. Materials: to learn how to draw, not you don't need anything fancy, just a piece of paper and something to draw with. Whatever you have on hand will be fine. If you're just interested in doodling or if you're designing and not to incorporate into another project, you can stick with that. But if you'd like to end up with a nicer drawing, there are a few things I want to consider. My preference is for black ink on white paper, but you don't have to go that route. Some materials, like regular pencil, will tend to smudge. Colored pencil was much, too, but not as badly as regular pencil. And I found that there workable. If you're very careful, I drew these green and blue nuts with colored pencil and you can see on this blue one. I added some shading to make the vaccine for three D. My favorite pen to use for nuts is this occur of pigment micro. These air felt tip pens with archival ink. They come in a few different colors and different widths. Asper paper. It really depends on what you're drawing. Medium is, since I like to work with think I use paper with a very smooth finish. This prevents the ink from bleeding into the paper like this. If you want a specific brand recommendation, I like rodeo paper a lot. It's very smooth and the migrant pens don't leave through, and it's not that expensive. Strathmore 300 Siri's Smooth surface Bristol paper works well, too. If you want a heavier paper, keep in mind that on smooth paper, ink will take longer to dry, so you'll have to take some care not to drag your hand through the wet ink. Once you've mastered the basic technique, you might want to use a ruler or some graph paper to do your layer, but you definitely don't need these to get started.
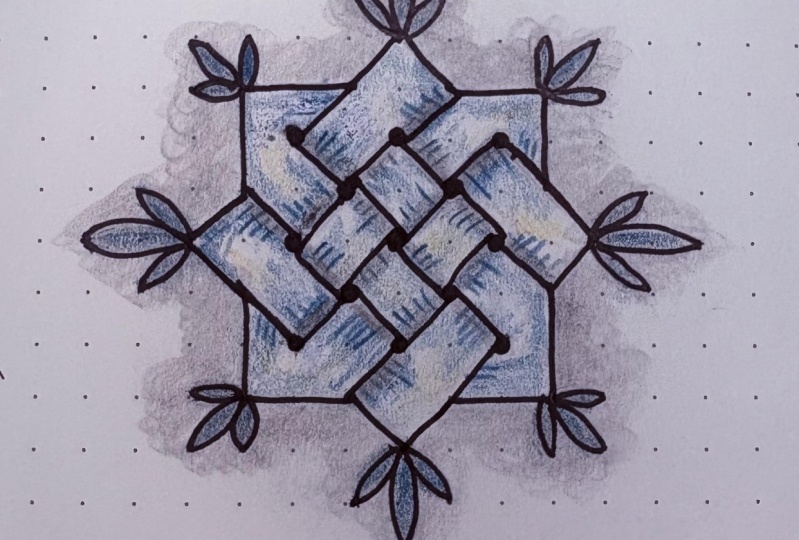
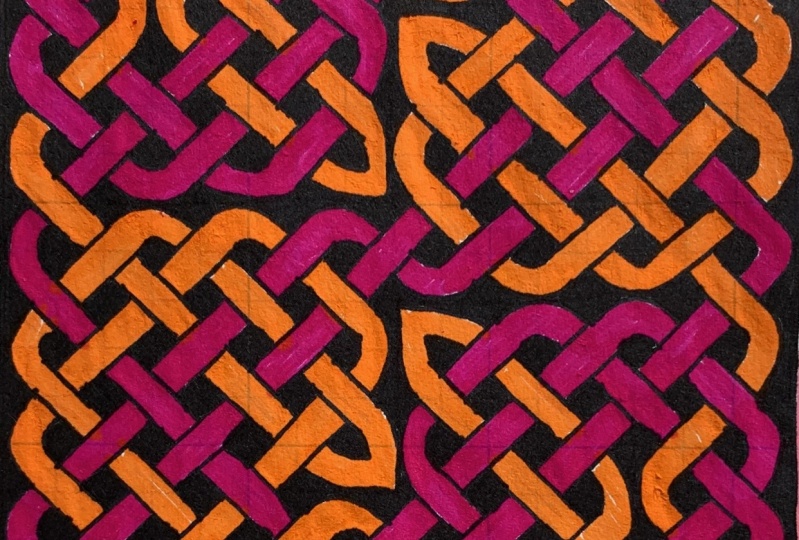
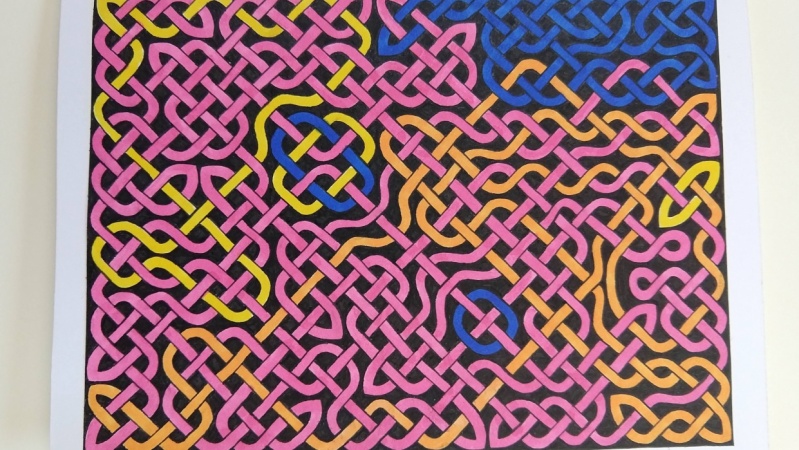
3. Simple lattice: in this lesson, I'm going to show you how to draw a simple lattice. Not this is just practice, so use whatever pen a pencil and paper you have on here. I'll be using a very blunt tip marker so you can see clearly. The first step in drawing a night is to lay out a square grid of dots. It doesn't have to be perfectly square, so I often just draw them free hands like this Later on in this class, I'll show you how to use a ruler or some graph paper to do a more precise layoff. This grid can be any size you want, but I think by by six is a good size for your first. The next step is to draw lying around the outside of your great Or I could draw just outside the dots so you can still see them. Now go back through your grade and put a dot in the center of every square. Notice that now you have a grid of smaller squares oriented on the diagonal to the original squares you drew. These smaller squares are going to be the units. Where's that you used to draw the not. So when I refer to squares in the rest of this class, I'll be talking about these smaller squares. You don't need to shave the middle pencil. I'm just doing that to show you what I'm talking about, though if you're having trouble visualising the squares, you could try color them in like this. If you think that would help, I'd also like to point out that there are these triangular spaces around the outside edges of you're not, and you're going to treat these differently than the square spacing again. You don't have to color them, is what you can in your life. Now it's time for the exciting part. Actually, drive the night. I find it helps to think of the dots as pains or pegs that stick up out of the paper. And the not itself is a three dimensional piece of string that I'm physically leaving around the docks. In this example, if you follow the path of the yellow straight, you can see that you always leave the straight over one under 1/1 Underwood and so on. Start pick a square and draw two parallel lines across it like this. That's the first piece of story. Try to keep it centered in the square and try to keep the width of the spring about half the width of the square. Now imagine following the path of string down into the right. It just went over. So in the next square that I have shaded with pencil, it's got to go under. Then in the next square, it goes over again. Now just keep going across the page, following the path of the street. When you get to the triangular space by the border, leave that blank for now. Now you can pick up the paths of the other strings that run perpendicular to that first string and just keep following the pattern of over under over under. Try to keep the width of the string really consistent and try to keep the paths of the strings flowing smoothly across the page. Don't worry too much about perfection, though. These knots are visually quite busy, so once you've finished, most inconsistencies or mistakes will be much less noticeable. Also, I think the variation you get from hand drawings really gives the finished this way. There's one common mistake that I want to address right away because beginners often make it, and that is to just connect the dots. If you do this, you'll just end up with some hand drawn graph paper. You really need that negative space to make it actually look like a woman, Gladys. Now I'm going to show you how to deal with the triangular spaces around the border walls of your knock. It's pretty simple. Every time a string is about to run into a wall, it makes a 90 degree turn. So take a second to make sure you understand the path this drink is following and then draw a smooth connection. Then you can work your way around the not drawing these connections. Way corners actually followed the exact same rule as the walls restrict hit one wall, makes it 90 degree turn and then immediately runs into another wall. It has to turn another 90 degrees, so 180 degrees total. I almost always drive that appointed like this, but you could make them right when you finished all the quarters. Congrats. You've drawn your first night to really make it pop color in the background, then take a picture and share it in the class projects
4. Checkerboard Method: Now, I'd like to show you a second method for filling in the lattice that I call the checkerboard method. You may have noticed that because we're following a pattern of over one under one, every other square has its piece of string going in the same direction, and you can take advantage of this fact to draw a lot faster. Here are colored in every other square, and you couldn't see why I call this the checkerboard. The strings in the gray squares are all going to go in the same direction so you can pick a direction and draw them in all it. Waas. Once you've done that, go back through the lattice and fill in all the white squares going in the other direction . I find that it's easier to draw lines in one direction than the other, so I end up moving the paper around a lot to accommodate that. This is what makes the checkerboard method a lot faster for me, then working outwards, one square at a time. But I think that working outward one square at a time, it's usually a little less confusing, which is why I taught you that method first. And when I'm drawing a larger night, I always end up jumping back and forth between the two methods, just doing whatever makes the most sense to me in the moment when your first practicing the checkerboard method, you may or may not want to shade in every other square like I've done here. I think some of you will find it helpful to see you to visualize the checkerboard pattern. But others of you will just find it more confusing because it makes the paper look so busy . So just do whatever works for you. Once you've got the center of the lattice building, work your way around the border just like you did before. So get this method or try and draw another practice matter to, and be sure to share a picture of your work in the class projects
5. Internal Walls: By now, you've practiced drawing a few simple nuts, and you're ready to move on to making things more complex. You'll do this by adding what I call internal walls. There are three simple rules to follow. Withdrawing internal walls. The first rule is connect the dots always start and end your line on a dock. The second rule is to only draw lines parallel to your border walls. So with my paper in this orientation, all of my walls will be vertical or horizontal. The third rule is that walls can only meet or cross at a doctor. So here, if I wanted to extend this wall to the left, I can't because it would cross this vertical wall in between two dots, so I have to leave it as it is. These rules also apply to the outer border walls. You can't really see here, but there is a dot where these walls connect. As long as you follow the three rules you're not will work out. But I recommend that you start with just a few of internal walls, adding more as you get more comfortable if you want to follow along with exactly the same pattern is me. You can pause this video and draw this layout, which is in a five by six dot grid. As you can see, drawing internal walls has divided some of the square spaces into triangular spaces. You treat these spaces exactly the same as the ones around the outside edge of your Not every time a string runs into one of these irregular spaces by a wall. It makes a 90 degree turn. If you're using the checkerboard method, the checkerboard extends across the page, skipping over the internal walls like this, so figure place to start and start filling in the lattice like before I leave. The triangular space is empty at first. If you're drawing a larger not, there's no need to fill in all of the squares before you come back to the triangular spaces . But do fill in the surrounding squares before you take on the walls. That's because you'll be able to draw these connections much more smoothly. If you can see where this drink is going and where it's coming from now you can start connecting the curves of the walls, as I said before, the internal walls are exactly the same as the external walls. Whenever a string runs into a wall, it makes a 90 degree turn. Corners are also exactly the same, so take your time in practice. Negotiating some internal walls ID like to show you a couple examples of some internal wall configurations that might be a little bit confusing at first. Sometimes the path of the string will bounce around more than once before it gets back to the ordinary lattice. When that happens, just take a second to visualize the whole path of this tree before you start to drive. This will help you to keep the path of the string flowing smoothly across the page thing. For this long, narrow space, make sure you can see where the stream is coming from and where it's going and then draws. Moved. Connection By now, I think you can see that where you lay out your internal walls is where you really get to be creative. Design your dot. I have a few examples here for you. This long, narrow not repeats a couple of small motifs along It's like this not also repeats a few small motifs, and this one is laid out with rotational symmetry If you rotated the paper 180 degrees, it would look the same. This one has no symmetry at all. Also, you're not Doesn't have to be a rectangle. You just need your border walls to follow the same rules as the internal walls. And they also have to be continuous. I'll post some of these pictures as PDS, so you can take a good look at them if you like.
6. Ruler: Once you've gotten the hang of drawing nuts, you might want to set up your dots in a more square, even bridge. My favorite way to do this is with graph paper. You can buy graph paper or download a pdf with any dimensions you want. The lines on this paper are quite light, so I like to draw in the dots with a marker. Then slide the graph paper under your project paper and trace. If, like me, you don't have a light table. This only works if your project paper is relatively thing. This is one reason I really like using Brody a paper. If you're using a thicker paper such as Bristol Board, you'll have to use a ruler to set up your dots. There are many ways to do this. I'll just show you one. This method relies on the square of the edge of the paper Lina Ruler up with one edge of the paper and draw line lightly with a sharp pencil, then do the same across the top of the paper way mark out the dimensions of your not on those two lives. In this case, I'm doing 16 centimeters by 10 centimeters now measure how far your mark is from the edge of the paper. Here it's 3.5 centimeters and make another mark farther down the page the same distance from the thing. Then you can connect those two marks with your ruler. After all, life now measure the dimension that you want on that line. Here it's 10 centimeters again and connect that to the measurement made on the opposite line. Check to make sure the length of this line is the correct way in this case, 16 centimeters. If it's not, you made a mistake or work working accurately enough. Once you're sure square switched to a and start marking the dots. Do the borders first, then fill in the middle. Depending on your pen and ruler, you might get ink on the ruler and then end up smearing it across the paper. So watch out for that. After all the larger squares are laid out. I think it's easier to just draw the dot in the center of each one by I
7. Mistakes: in this lesson, I'd like to go over some common mistakes and what you can do about them. Sometimes two sections of your strength don't line up neatly. Just try to connect them as best you can like this. When you draw a line that extends beyond the square, supposed to be it and into a turn angular space that makes it difficult to draw a smooth connection. Just do the best you can and try to avoid it in the future. If you draw a little past the line marking the edge of the next string like this, you can make the line a little thicker, then do the same to the line on the other side of the street. That will make the thicker lines less noticeable in the final drawing. When laying out your dots, sometimes you'll draw a dot in the wrong place. When that happens, you can draw on internal wall to cover it up. At some point, you will make a mistake in the over one under one pattern. This could be really confusing while you're dry, but the finish not will actually look just fine Here. You can see this string is going to have to go under under. The best thing to do in this situation is to contain the problem area. So work your way around, keeping to the usual over under, over under pattern. Now I've worked my way around and I've got one square left. It's supposed to go up to the left, which would be fine, but that would give me a section of over three under three. So I'm going to drive this string in the other direction because over to under two is going to look much less obvious in the final piece.
8. Conclusion: thanks for taking my class. I hope I know you've got the hang of laying out Dodds and drawing a simple lattice and that you're starting to think about how internal walls can affect the overall design. I'm looking forward to seeing your dry, so please post pictures to share with the class. And if you have any questions, don't hesitate to ask.
 Jen Heathcote