Transcripts
1. Introduction to Perspective Drawing: Why is it important to
understand perspective? It's important because
everything around you, your coffee cup, your phone, your laptop, the
furniture around you, basically everything that
humans have designed and made, they have straight angles, their boxes, their
rectangles, cones, pyramids, cylinders, and because
they are regular shapes, it's important to understand
how to show them in space so that the illustrations that you're creating
look realistic. And a lot of times if
you don't understand how to draw things in
proper perspective and properly in
your illustration, things are going to look
a little bit wonky. They're not going to quite look like they're
put together right, your angles are going
to be off and it just throws off your
whole illustration. The great thing is
that perspective, even though it might sound
like it's difficult. There's 1.2 point perspective, three point perspective, it's honestly not that difficult. I'm going to break it
down in this class for you in an easy way to understand and in
an easy way for you to draw so that when you
are creating illustrations, for your books or for other projects that you might
be working on that you'll be able to create spaces for your characters to exist
in that are believable. I'm Mirka Hokkanen and I'm a traditionally
published picture book and freelance illustrator. Over the years, I've
worked on books. I've worked on murals, I've worked on key chains, seed packet illustrations,
multiple different things, and understanding how to
draw things in perspective is an important skill for you to have in your toolbox
as an illustrator. In this class, we're going to simplify perspective
for you so that it's easy to understand and easy for you to apply for illustration
jobs in the future. So if you're ready to jump
into this class, I'll see you
2. About This Class: Welcome to the perspective
drawing class. I wanted to be
kind of a hands on class where you're
going to be practicing, drawing things in perspective. And instead of it
being super nitty gritty and very detail oriented, I wanted it to be more of a a practical class
where you can immediately take the things that you're learning and then put them into practice and improve
your illustration skills. And so we'll start
the class with just working on what is 1.2 point
and three point perspective, and then we'll work
on figuring out how to draw pyramids
and cylinders and different kind of kind of house structures or triangles on top of houses and also how to combine different
shapes together. And then at the very
end, I'll show you different ways that you
can put those in practice, and we'll do a couple of
different simple exercises. I have some reference photos that are part of this
class that you are welcome to download if you don't want to find items around
your house to draw, but I really do
highly recommend it. But if you want to have some
extra things to work from, you can download the photos
and use them as drawing references for some
exercises in this class. All right. And I'm sure
you are ready to go. So without further ado, let's go look at One
point perspective first.
3. 1 Point Perspective: So let's get started with
the meat of the class. So we're going to
be talking about three different kinds
of perspective. We're going to be talking
about one point perspective, two point perspective, and
three point perspective. And so let's start with
the easiest one first, the one point perspective. And so when we look at things
in space, you can see, so I have two examples I have a little box that
I have right here, and I have the cap. And I've taken photos
of this cap against a light background
just so it's a little bit easier to see. As you have a circle and it tilts away from you
or towards you in space, you can see that it
starts as a circle. And then as it tilts away, it keeps turning
more and more into a skinnier oval until it
becomes a straight line. The same thing very much
happens with a box. And so if we have the box when it's straight
up towards us, it's going to be square
and then as it starts tilting you'll notice over here that so as it tilts further out, the front that kind of stays in the same spot
will be the same, but as it's tilting
away from us, the sides will shorten and
the back will shorten. And so it will keep going
further and further in the same way as the circle
until at the very end, it's just a square
or just a line. And then that way to our eye, to the camera on to the eye, it looks like it's
turning away from us. And these are kind
of the very basics of what we're going
to be dealing with. And so when we have a
one point perspective, that usually means that things wherever you are
looking at the object, that object is square. So right now, so if my
eyeball is over here, and then the box is
kind of straight. So I'm not really seeing underneath the box and I'm not really seeing above the box. I'm just looking at
the box straight up, you know, This would be
kind of my eye level, the box is in the
middle of my eye level. And so when we're looking at something where it's
right at the eye level, So when we're looking, so
let's say this is going to be our horizon line. The horizon line is
always our eye level. So if we have a person
standing over here, the person when they're
looking when they're looking, their eyes would be
on the horizon line. And so if we are
trying to draw a box, let's say this box is going to be just a little bit below, I'm trying to make these
horizontal and vertical. And so we have a box over here. And let's say with one
point perspective, we just get one point
on our horizon line. So if we want to go straight in, we would then draw
straight lines. And you could do this so if
you are working on a paper, you could just use a ruler
and just draw straight lines. I'm just using With Procrey, it has this really great
opportunity where it snaps. And so there would be where
my vanishing point is, and then I could eyeballs, what would look to me
to be about a square. And so everything is exactly horizontal and
vertical like that. Then if I wanted to, I could erase all the
extra lines that we drew and then there
would be our square. I'll draw it a little bit
darker so it's easier to see. When I'm drawing this in space, I'm really just eyeballing it. Let's say then there's
another square that's a little bit further out, and so I'll draw that over here. We have another square
that's over here and let's say that our vanishing
point is right around here. I'll do it with a blue line. This box is not going to be the same angle as the
one that we just drew. I'll draw my straight
lines again. There we go. Then if you
want to make it a square, you have to eyeball it. But as you draw more, you get better at figuring out what looks like a
cube and what doesn't. Then we can just make this
a little bit darker again. Hopefully that makes sense. We could draw a
little dotted lines, dashed lines over here to
show which line is behind. And there would be
our second square. So it makes it fairly easy to figure out where
things are going to be. And so if I wanted
to, I could draw one up on the top and
it would work just the same way no matter where I
draw my vanishing point at. This is our one
point perspective, pretty easy to figure out. The important thing to
just think is that we have straight up and down lines and then everything get
goes to our horizon line. And so our line, and we could also move
this line up and down, depending if you wanted
to move the camera and look up at things
or if you wanted to move the camera
low and move down. So you could also move
your horizon line up and down depending what kind of a scene you wanted to draw. And now that we have
a basic understanding of one point perspective, let's look at two point
perspective in the next video.
4. 2 Point Perspective: Last video, we talked about
one point perspective. And in this video, we're going to talk about
two point perspective. And so when we start talking
about two point perspective, so if we look at this box, and for the one
point perspective, this box was straight
up and down, perpendicular to the
viewers space, your face. But then now let's
say this thing tilts. It tilts one way or another. And so now the
only thing that is perpendicular to you is
just the vertical lines. And so now the horizontal lines are both receding away from you. And so at that point, we can look at two
point perspective. And so to draft a two
point perspective, again, we need some sort
of a horizon line Ops some sort of a horizon line where
your eye is going to be. And so I'm going to draw a
horizontal line over here. And so then to draw
our rectangle, we just need to know how
tall the rectangle is. And so I'll do a
height over here. And then we so for one
point perspective, we have one uh, vanishing point for
two point perspective, we have two vanishing points. And usually the
vanishing points, you want them to be
kind of far away. And so I'll put
them as far away. So usually if one is
towards the middle, one is out of the picture. If this one is in the picture, then that one is
out of the picture. But for the sake of
this illustration, I'll make them both kind
of far away over here. And so from here, I would
draw one line this way. And so this is going to
be one side of my box, and then I'm going to draw
another one down this way. And so there's one line, and then in order to
do the rest of my box, then I would kind of
have to eyeball it. So everything that is horizontal is going
to be horizontal, so I will draw another
horror sketch. Well, that's not quite a square. So let's go, I think, to my eye, that looks
about a squares. That looks like about a square. If I go right here. A little bit less, and
you can always adjust it. It's always easier to adjust
once you have something. And so this line and this line, these ones are all parallel to each other in two
point perspective. And then everything else goes. And then from this point, I'm now going to draw
a line this way. So all these lines, all the sides going this way, are going to go to
this vanishing point, and then from this corner, I'm drawing a line to
that vanishing point. And now that will give me
where the top of my box is. And then from there,
I would drop down. Another horizontal line,
and then same thing from this point to here, draw a line. And that should line
up right around there. And so then that would
give me my cube. And so it looks
like it's a little bit taller than a
cube right now. So if I wanted it to be it looks like it's a
little bit too high, so I could either adjust this part to make
it a little bit lower or the other option would be just to move
these lines out. But that's close enough for now, and then we can
draw another one. So we'll make this one a little
bit lighter. We'll draw. Let's draw another square
here, we'll do the same thing. We'll draw one over here,
and we can even move them. So let's make one over
here and one closer. So let's move them a little bit. So this will give us a little bit more of
an extreme angle. All right. And then I'm going to eyeball.
That looks pretty good. All right. And because this is the eye level is in the
middle of the shape, we actually will not
see any of these guys. We technically don't see
anything inside of the box, but also we can draw those two. So from this corner, I draw up here here. And then I'll draw two light
lines from this corner. To this corner, and then
we can make them straight. And so right now it
looks like it's almost a square they're almost
on top of each other. These back lines will be here. And so the same thing. So
here would be my cube. And I can see that
this side to me, looks a little bit
more rectangular, so I could easily fix that by bringing my
line, just a smidge. I could bring that over
and then fix my lines. And so then I would
just have to fix all my lines because then
that changes everything. And so then I just redraw these. And so now it
actually looks like the back line over here is just about exactly in line
with my front line. And then we could do
one more example. We could do a box
that's really high. Let's do another one so we can move our horizon
line down this way. And then let's put our vanishing points
over here and we'll draw a box over here. Okay, so here's the height of our box. So
we'll go from here. One, two, three, and four, and then I need to do
my vertical lines. So that looks like it's about a square and once you
practice this enough, it becomes easier to
see things in space. And so I recommend that you just draw a lot of actually
draw in person. So take some cardboard
boxes and draw them. And so I'm just going from each corner that
I've just created. So from these two
corners over here, and then for the back lines, so I could draw this
a little bit darker. And kind of the further out you go with your kind
of field of vision, the more distorted items
are going to look. So I need to figure out what
my backline over here is. This back line over here. And then I also know, so I'm a little bit
wonky right now. So I know that this probably needs to go a
little bit further out that way for that to be
horizontal or vertical. There we go. So this just
needs to go over a little bit. And so if you're doing
this with the pencil, then it's always easier to
draw a little bit lighter. These little Um, there we go. All right, so there would
be my box in space. And so as I was saying,
depending where your horizon line is and where
your vanishing points are, you kind of want to stay
in a fairly small range. And as I said, the further you go out to any
of these areas over here, you can see how much this
corner is distorted. In reality, they probably
wouldn't be that distorted. And so that's why it's always a good idea to kind
of whatever you are drawing to kind of then just
keep everything over here. But it's nice to have
kind of your drawing or your sketching area smaller and then make sure that you
have your reference points. So then everything
that you draw. So if there's multiple,
so let's say I'm drawing multiple
buildings over there and they're all receding
down this line, then I'll be able
to make everything. Um make everything look like they're receding
nicely in space. But as I said, the
further they go out, if I had one over here, it would be at a very
incredibly extreme angle, which would just look awful. So I wouldn't want to be
doing anything over here. Now that we have a basic handle
on two point perspective, let's look at three
point perspective.
5. 3 Point Perspective: The last video, we looked
at two point perspective, and in this video, let's look at how three point
perspective works. And so over here, I have a picture of a box taken with kind of a
close up lens with my camera. And so it's a little bit blurry. But as you can see, in the previous instances
where we've looked at, we've either had one line that's kind of
perpendicular to what we're doing or we've had maybe two lines that were perpendicular to
what we were doing. But when we are
what we're drawing, but when we have three
point perspective, that means we have
none of the lines are actually going
straight perpendicular to our picture plane or, like, the plane
that we're viewing. And so if we look at
this picture over here, we can see that, you know, obviously it's pointing
kind of this way. And so we can draw our lines and see where
they actually match up. And so I'm just going to
be moving these lines, and then this should probably
match up right here. And so that would be one. And then let's see where these lines match
up. There we go. And then this line. There. And so now I've gotten all these lines kind
of drawn through, and then I can tell that my horizon line runs through
these points over here. And so for my three
point perspective, here is one point, here is two point. And so just finding them from the photo and here's
my third point. And so then if I was drawing anything else into this scene, let's say it was a city or
I want to do more boxes, then whatever I was
drawing if I wanted them, I can kind of draw supporting lines from
these points already in your picture plane or the farther you get
closer to these points, the more distorted
things are going to be. So a lot of times it
would be better to kind of stick much closer to this area so that
things don't get too warped inside of whatever
you're trying to draw. And so let's just I'm just drawing a bunch of
lines over here just so I have some references. And then we can make them a little bit
less light. And so. So now let's say we wanted to draw another box in
front of this one. So then we can have, let's say, we'll do a box over here, and they're kind of
next to each other. And I'm just kind
of trying to I'm looking at these lines
that I've already drawn, and I'm just trying to stay kind of at the same angles
with those lines. And so I'm thinking that this is going to end
up hitting over here. And so there could be one, and then we can make a
really skinny one, I guess. And this line actually needs
to come back this way. And then I would
follow this line over here and go up a little
bit further if I need to. And then this would be
hitting right around there. Let's see. How are we going right over here? No, this ops. We've got too many lines. This needs to go that
way. There we go. And so, like I said, these things don't look
super square anymore, just for the fact that they
are so far off from where our main our points are. And so here we could
just remove that, and, you know,
they're all going. And so now it's in three
point perspective. But because our
perspective points are kind of very
close to each other, it's looking kind of wonky. And so when you're working
with three point perspective, really, like I said, this photo, I took it with
kind of the close up lens, so it's pretty distorted. And even in the photo, it kind of doesn't look like
it's three dimensional. It looks it looks pretty wonky, even though it's just
this box right here. And so the tip for
working with any kind of three point perspective is just having your perspective
points really far away. And so let me just start a new so let's say our horizon
line is over here, and then let's say we'll
have one over here. Let's say this is
going to be where our items are going
to our picture plane is we're going to be
drawing inside over here. So, let's say we have one
perspective point is over here, and then let's say
one is just really, we need to move everything up. One of the usually the
top or the bottom, one should be almost
pretty much like it should even actually probably
be way further than that. Um, because otherwise, things
just look kind of wonky. So if you really
want to have one, we could have one, something
like this, for example. And then from here, you could start drawing your building. So let's say I wanted
to draw Oops, a box. So let's start. Let's put
our corner right here. And so draw some lines. I'm kind of sketching it
in my head as I'm going. So I'm thinking I want
it to be something. Let's say I want it to be
kind of a cube over here. So I want it to be
something similar to this. And so now I want to I want it to be
kind of in the middle. So from here, we'll
go down here. So it looks like it's kind
of straight up and down. So this is where the center
of everything's going to be. Go from here. There we go. How tall do I want this to be? So maybe it'll be this tall, so it'll be close to the height. There we go. Kind of
original drawing over here. Go. So the top of it, we can't see the top because
it's above our horizon line. We can't see the
bottom of it because it's below the horizon line. And then if we wanted to
put the points in there, we could grab points. And you could just as well, as I said, do this
on a piece of paper. I would probably actually
get more accurate results and then draw our
lines over here. So this one's going to
be almost the same. I could technically pull
it all the way down here. Oh. And so there would be our little square drawn in three
point perspective. We could erase all the lines. And then if you're working on multiple rectangles or
buildings over here, then you could keep, you know, don't
erase your points. And so everything
that's aligned with this square or
rectangular box would then align with those points, but then so this thing is
kind of sitting like this, or I guess it's more like this, so you can't see the top or the bottom with
the horizon line. But then if it's a box that's
sitting on the ground, then everything else would
kind of be but you might have things that are if it's
turning in space this way, then these two
points would move. And then if it's turning
in point this way, then you could move
your third third line. And so just depending how
it's oriented in space, um, not everything in
your illustration. It might not line
up to these points, but everything that is kind of perpendicular or everything that is squared up with this box would use
the same points. And so hopefully
that makes sense. And now that we've
talked about one, two, and three point perspective, let's do a quick mini
recap in the next video.
6. Review: Then I just wanted to
do a little bit of a recap just to nail
these principles home. And so for one
point perspective, both if we think about a cube, it's got an X and
a Y and a Z axis. And so if we're looking
at one point perspective, the X and the Y axis are they
stay square to the viewer. So they're horizontals
and verticals. And the only thing that's
changing is the Y axis depending on where you're
doing your vanishing point. Then when we get to
two point perspective, only the vertical lines
will stay square, and both the X or both the Y and the Z axis are going to go
to your vanishing point. And then when you get to the
three point perspective, then all the angles or all the edges are going to be
on an angle to the viewer. And so that's just
kind of a recap of the three different kinds
of perspectives and the differences between
them. And you can have one illustration, maybe that combines both one
point perspective and two point perspective. I usually I don't know if I would put the third
point perspective in there. I guess, you know, if you have
the one point perspective, you could have something
that's kind of square to the viewer, and then the two point
perspective is once we start getting it kind
of on an angle like this. And then when you have the
three point perspective, is that when you really want
to have kind of emotional you know, you're looking
at something from really high or you're looking up at something like buildings or a person or
something like that, then you're turning it on, you know, on the axis
going up and down. And so, like I said, it depends. You can use all the
different perspectives in one illustration, but they all kind
of need to be used cohesively so that
everything makes sense. And so then in the next video, let's look at some
practical applications on how to put the knowledge of what we just
learned into practice.
7. How to Measure in Perspective: In the last video, we talked about three
point perspective, and we did a little
bit of a recap on the three different
kinds of perspective. And in this video, let's look a little
bit more about practical applications
and division of space. And so I have kind of
two examples over here. And so let's look
at this one first. So usually when we're
drawing illustrations, we're not just
drawing blank boxes. We're drawing buildings or you might be drawing farmland
or you might be drawing cars or whatever or trees
and things like that. And so we need to know how
to divide our space up. And what I mean by that? For example, over here,
I've divided this up, and it's very easy if I'm illustrating something
straight up and down, and let's say I have four boxes that need to be evenly
spaced over here, it's pretty easy for me to just draw four squares and have
everything evenly spaced. But what happens when we tilt
and we tilt the other way? Because now this is not straight towards the viewer and
very, very quickly drawn, let's say we have a
road that's going away from you and let's say we have light posts or
something over there, and so they're going to be
a little bit further apart. But then the farther you get, we have the phenomenon where
things will get closer together the further away
from you that they get. And so how do measure something like that when we're drawing things in perspective. The easiest thing is
if you are drawing something that's evenly spaced, we'll talk
about that first. And so if we're drawing
something that's evenly spaced, let's say our horizon
lines over here. Let's say we have a
tall building over here and it's going to recede
into this point over here. And so let's say this is
our building right here. So if we're trying to
divide this up evenly, what I want to do is I
want to figure out where the middle of my building is so that way we
can measure half. And let's say we have a building over here and I
have some windows. My whatever I draw
onto my building, everything is going to be
going to the vanishing point. Let's say there's a
row of windows over there and there's a second
row of windows over here. And so I'm drawing vanishing
points for those and let's say this is the size of
my window right here. Then all the horizontals
are going to be horizontal. These ones are going
to match right here. Now, how do I measure even intervals and add
more windows over here? The way that I would
do that is I find what the middle part of this is. I could either
eyeball that or if you are using pen and paper, you could use a measuring stick, so I could even almost
measure over here. I could put it in between
and now I know 1.5. Then otherwise, if you
are using Procreate, you can also use
the drawing guides over here and it will give you different kinds of squares. You can adjust your square. You can edit your drawing guide, you can adjust your
squares so I could make the squares bigger. I could move this to
the point over here. Now I could make this I could do thirds, if I do quarters, that would be halves,
however you want to do it, but now I figured out
where half of that is. We'll turn that back off now
that we know where half is, we'll draw that with the blue
and then to figure out now, all I have to do to figure
out another section where my windows goes
is go from the corner, go from the middle
point, and up. And so wherever this hits, this is where my next
segment is going to be. And then I can keep going. So now this would be where the next set of
windows would be, and then I'm going to I don't have to do
the middle anymore. I know that the middle
is over here and then do square line then
you can see how I'm drawing all my horizontals
are going horizontal and then all my angled lines
are going through my middle Xing right there or crossing right
at the middle line. That's how I can figure where
all the middle lines go. Now I could eyeball where all my windows would go on
those lines that I just drew. And they would just recede, so on and so forth all the way until I got to the
end of the line. That's how you divide
up things evenly. Then let's say in
another case where we have something like this
where things are not even, what happens when
you tilt this way? How do you figure out where the different
differences in lines are? For something like
this, what I would do is let's figure out
our horizontal line. All right let's say this is something that I want to figure out how to
draw on an angle. Let's say here's
my horizon line, we'll draw it so that
we're looking at it from above. There we go. And so a little bit too big. Let's say we're
drawing it right here. Here's the face of our
house and we need to figure out where on
earth do these go? Then let's do our other
vanishing point over here. I'm just drawing my
building ready over here. And so here's my building. Now I want to move this over here. How do
I figure that out? Let's say if I'm
doing it digitally, if I was doing it on paper, I would measure what my
different measurements were. If I'm doing it digitally, I can move things around a
little bit easier. But if you think about
this line and bringing it, you can bring these
lines all the way down. They're not quite square here. Basically, I want to bring
this all the way down. Then I want to make
another horizontal line. Now this line over here would
be this line on an angle. Because I'm working digitally, I'm going to bring this
guy and mark it over here. Let's make it bring
it down a little bit. Then we can use a different color again just
to help us a little bit. Now I can mark all my lines. So these are my starting points. It's almost non
existent over here, that's going to be very skinny. Now I know that this line right
here is going to be here. I know that my door
is going to be here. Then there's this slightly
thicker piece right here. Then the same for
figuring out the sides, that I can work those down here. Just move it out of the way for just a second. There we go. I know that this is
pretty far out there. But now I can bring
this all the way over here even though it looks
like it's huge over here. I probably in most cases
would eyeball this. But now this is
going to be in the proper and then we could
draw on top of everything. Then we can start one more and now actually
draw this was top. We made it a little bit smaller. So we had these lines
that went all the way up. We had our thick lines that went like this and
then we had the door, and then we had this over here. That's how I would
figure out how to get the different lines for both horizontal and vertical
lines and dividing them up. So it's a little
bit more cumbersome and it might take a
little bit more time. A lot of times what I would
do is just eyeball it. If it's just taking a space, so let's say this
goes down this way and let's say that
the space needs to be divided up into thirds. A lot of times if I can do it, I would just eyeball
it and try to see that here's
thirds over here, and then let's say I
need to do thirds, go on the other way,
there's already this line over here that's
actually pretty good. And then you could eyeball it. So there's nothing wrong with
eyeballing things either. But if there are things that
you need to be a little bit more mindful about
where placement goes, this little hack of just bringing your lines all the way down to a horizontal level, that's a way that you can figure out how things are proportioned. In the next video, let's work on a little exercise
and draw a house.
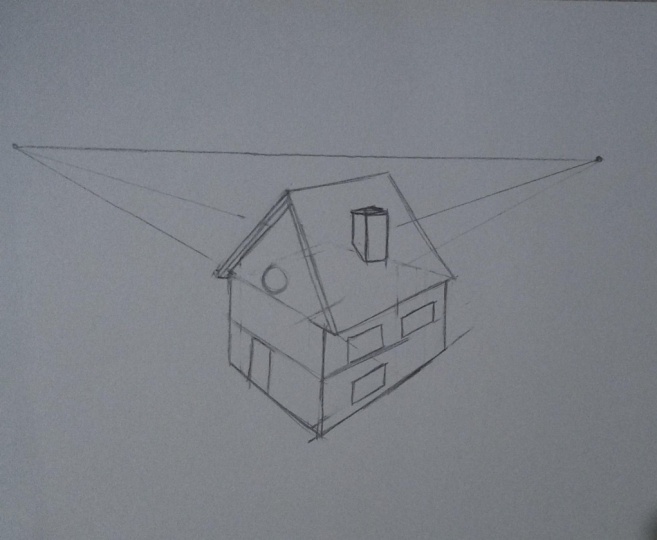
8. Exercise: House & Pyramid: Last video, we looked at
how to divide space up as it's receding into a
perspective point. And in this one, let's do a little exercise on drawing
triangles and pyramids. And that's getting us
ready to draw houses. And so let's draw
a simple house. And so to begin with,
let's just start with our horizon line over here. And then I like to kind of
sketch what I'm doing first. And so I'm going to imagine that our house is
going to be here. So it's going to be
something similar to that. All right. And so let's work our vanishing points in
over here somewhere. And so we'll start with one over here to a straight up
and down line over here. Let's do this guy down
this way. There you go. Our second vanishing
point is over there, and then divide it up
a little bit smaller. And so now we have the
base of our house. And so we've got
a cube over here. You can imagine there's windows, whatever we have over here, but now we need to
build a roof for it. So how do we get the roof? And so to start, we want to draw a triangle
on top of it here. And so I'm going to
draw an X and figure out where everything
goes straight. So we'll move that over there. And wherever this line goes, I just continue that up. And then depending how you
want your roof to look, I'm going to bring this
down just a little bit. So do I want a
really squat roof? So our roof could be
pitched like this, or we could have more of an A frame and have our
roof pitched really high. And so it just depends on the look that you
want for your house. So I think somewhere in between those two is
probably going to be fine. So let's go right here. Just like that. And out. And then we're going
to do the same thing for the back over here. And so I can take this
and I can run a line. And then I'll know that
this is my roof over there. Can run a straight line
from there and then run colline from there, and now I know where to
draw my roof over here. So we'll do one, and
then, technically, it'll go back behind over here. And then the roof usually
goes a little bit past. So the roof usually doesn't end right where the edge
of the house is. It usually kind of
extends beyond. And you have kind of eaves, I guess, or whatever
it's called. And so to just extend our roof, one thing you could do
is just move this V or A A frame over or you can
continue all of your points And then just move
these lines down. And then wherever the edge, it goes a little bit
beyond passed over there. So let's do another layer a little bit darker and
draw everything in. So now we have
everything over here, so let's start drawing
a little bit darker. We could also extend
it just a midge past the edge back
behind over here. And so I'm just drawing a line to match the line back
behind over there. And then if we want our roof to have a little bit of thickness, I could just add a little bit of an extra line like that and then continuing
to our house. And then keep tracing
all my lines. And so now we have a house
that's pretty convincing. And our angle over
here is pretty severe, and so I probably would
have been remember when we talked about that
we depending where our depending where
our points are, it's usually a good idea
to kind of draw close. And so this point is
pretty extreme to me. So I really probably
should have moved this point down so that I would have been
able to make this a little bit less
severe of a point. And then, so just
by moving, well, then I need to adjust
everything else over here, but just very quickly. Go. And so now when
we look at our house, it's got a little bit
less of a severe angle. And then if we wanted
to add a chimney, we would just want to make sure. So I'm trying to match. Actually, these don't look
like they match at this point. There we go. But just
trying to match. So if I'm trying
to do a chimney, I can draw the base for
the chimney over here. And then I would
just go straight up. Let's say this is how tall
our chimney is going to be. Yes. Thanks. Then we're just about at
where the horizon level is, so it'll be pretty much
just flat over there. And so then we have a
chimney for our house, too. And so that's how you draw a simple house
with a roof on it, and then let's look at just
a simple pyramid next. And so if we're
drawing a pyramid, we can do that with a
two point perspective. So let's see where let's say, we're going to be
drawing it here. And so let's go right here. W's the other sides. I want to look fairly squarish, I guess, you could say, and then I'm going to do same thing. I'm going to go corner to
corner, bind out the middle. And with the pyramid, all
the sides come up together. So then I would just draw
straight vertical line. And then depending how tall the same thing is with the roof, if you want to really
squat pyramid, I could draw my lines over here. If I wanted a really
tall pyramid, I could draw my lines over here. So let's just we'll
just go right here. And so that could be one, two. And so here would be the
front of our pyramid, and then our back is almost kind of the same. There we go. And so then this
would be our pyramid. So understanding how
to figure out where the middle is and
extending your lines and adding roofs or
building pyramids will help you not only in
obviously drawing buildings, but it will also help you in drawing characters,
too, for example, drawing a canopy for a tree or drawing different types of hats
and things like that. And so it's just a useful skill to have and to understand. And then in the next video,
we'll do a little exercise just to practice drawing shapes in the different
perspectives.
9. Additions and Cutouts from Shapes: Mmm. So let's take some
time and put our skills to practice right
now. That didn't. And so what I want you to
do is just you can grab a piece of paper or I'm
working, again, digitally. But you can if you're
working on paper, you just need some
sort of a ruler and a piece of paper
and probably an eraser. And then if you wanted
to have a pencil and a marker to be able to make kind of darker
and lighter lines, that might be useful, too. Alright. So what I want
you to do is I want you to draw a horizon
line for yourself. And so that's just
going to be a line that's going to go horizontal. And then I want you to practice
drawing boxes over here. And they can be different
kinds of rectangles. They can be cubes or
they can be rectangles, just kind of whatever you want. And so that's kind of the
simplest thing to start with. And so you can watch me draw a couple and then
go off on your own, or you can listen to my voice as I'm drawing and draw
yours at the same time. And so you can work some that are going to be in
one point perspective. So let's say this one is going
to be straight towards me. And so as I said, they
can be kind of sketchy. So I'm going to do my one
point perspective over there. And so that's obviously
not super square, so I'll have to kind of fudge and make things as
square as I can. So obviously, this line needs to go up a
little bit over here. Alright. And then if you're working with
pencil and a marker, you could then bring a second. You could then kind
of erase your lines, or then over here, I'm
drawing on a separate layer. There we go. And
then from there, I can just do very light lines
or I can do dotted lines. So it's kind of up to you,
however you want to do that. I taught at two.
And so there's one. I can draw, then
draw another one. And so there's
another rectangle. If I wanted to draw
another Shoot, just keep my points over here. So if I wanted to draw
another rectangle or square on top, if I wanted to continue this, I could draw, keep continuing these lines
to go straight up. And then that way you
continue them straight up, I could keep padding. These don't quite line up, but we're close enough. So in these kinds of situations, you just do your best and
you might need to fudge it a little bit
since I need well, actually, this looks like it's actually not going very
straight. Where we go. And as I said before,
if I wanted to add windows or anything
else over here, they would all line up
with my points over here. So say I wanted to do
two lines of windows, I would just draw lines up here, and then I would divide
them evenly like this, and then that would get me my
where my windows would go. And so Procreate makes
it pretty fast to draw these lines over here. And then, let's say we want to draw a different
house somewhere else. So I figure out how I
want things to go first. And then from there, and
so, like, over here, now my things are way too there my vanishing points
are way too close. And so, as you can tell, as I'm moving away
from this picture, there's no way that a regular thing would have
this crazy of an angle. And so it might be a good idea to move my points
out a little bit. So let's move this coyote here. There we go. Right? Let's see. And so you can draw
many things over here, and you can keep drawing
and you can keep adding. And so, now let's say I want to draw another box
next to this guy. And the boxes are
going to be aligned. And so I'm just
drawing where I'm like. Where do I want the box? I'll try to make it
kind of centered. So there. And go. I'll go straight up and down. No. Alright, so there we
have another box. Then so we can just drop the opacity down and now come in here and draw
this on the top. And so there's our box
and in the same way, let's say I wanted to do
a cutout of something. So let's say I wanted to do
a cutout inside over here. Tim wanted to, um And so let's do a
little bit of a cutout. So I'm going to draw them to figure out where my vanishing
point for this guy was. I think it might have been
somewhere around here. Hopefully, that guy was
somewhere over there. And so now I'm going to imagine this line
being erased. Alright. So now I want there to
be a cutout over here. And so I'm just going
to keep adding. So it's really
great when you have the so let's make the cutout. We'll make it this big. There we go. And so brings up
pass it deep down, and then we can
actually draw here. So we have lines going
straight up and down. And so now we have a
cutout out of our box. And so knowing where your vanishing points
are just makes it easy to draw different kinds of architectural
architectural elements. And then it's easy to add to them and move things
around from them. So I want you to just practice drawing different kinds of
boxes, adding to the boxes, add boxes next to them, add them on top of each other, cut areas out, add things in. And now that we practice
drawing cubes and rectangles and cutting things out and adding things to them, in the next video, we're going to practice drawing some pyramids and some
cylinder shapes and how we can apply those in
different perspectives.
10. Cylinders: In the last exercise, we were practicing drawing our cubes and rectangles in space above
and below the horizon line. And in this one, let's look
at cylinders a little bit. I just brought this
series of photos over here to show
Illustrate once again so that when we have something a circle or a round object that's facing
straight towards us, it's going to be obviously the
shape of the object round. And then as it
tilts away from us, it keeps getting skinnier and skinnier until it becomes line. And so with that in mind, we'll use that to
illustrate our cylinders. And so we'll start
with cylinders first. And so, again, we'll start
with drawing our horizon line. And then a lot of times when
I'm working with cylinders, and so a cylinder would be basically when we
have two of the same, and then they're connected. And so this would be our
average cylinder over here. And a lot of times
what I will do is I'll use whatever kind of
square objects that I am. So let's say if I
have a table and my table is drawn like this
and so here's my table. If I have something
on top of it, then a lot of times I'll
kind of draw it try to draw it at about the same angle as what I drew the table at. If you want it to
be a little bit more if you don't have a lot of other
things to reference, then what I would start by doing is drawing a cube
around it first. And so here's what
I mean. All right. So here would be if
we were to draw. So you could always
start with the box, and then what you
could do is you could estimate where the
middle for each one is. And usually I just eyeball this. But you could do your measurements if you
really, really wanted to. And to do the measurements
for the halfway point, you could go from one corner to another corner and then go
from your vanishing point. And so you can see this dot was actually a little bit off, and then I'll go from this
vanishing point here. I'm gonna do the same
thing over here. So we can start a new layer just to keep this
a little bit straighter. And so now I have
a box over here. I have the middle
parts all figured out, and now I need to draw an
oval inside where the oval hits all these parts over here. Alright, so I'm
going to draw just pluck my canvas over a little
bit to make it easier. Alright. And then I need
to grain down from there. Cleaning that just a
smitch there we go. And so now I know because
the lines of this would be straight up and down
just like my box. And so that way, I want to just make sure everything
is square over there. And so now I draw another
ball inside over here. And so there would be
a cylinder that would be in a good perspective. And so then you can
practice this and draw a couple that
you could draw one. So let's draw one
that's over here. I'm using the same
points over there. So I could use these two
over here. And then? Well, this should be
probably horizontal. And then I could figure
out my owls over there. And so those would give
me a little bit of guiding points on how
to draw my cylinder. And so then we can combine
some shapes again. So we'll do a box group here. Maybe it's kind of
skinnier on this side, and then let's say we wanted to do We'll do a circle over here, so we'll figure if we wanted
to do a proper circle, then I could to straight
and straight pull in. And that doesn't quite
look as square to me. So I'm going to take that. And now let's say I wanted to do a hose or something
coming out over here. And so then I would figure out. So here's my middle quints. And so here would be my oval. And then I would just connect. If it's a straight if it's a tube that's
twisting and turning, then you'd have to
twist and turn it. And then if I really wanted
to get the size right, I could even continue
this square that I had. Where the opening was in the same way we
did the cylinder. And so I continued lines through each
one of these squares, and now I'll connect. So let's say this opening is
this big handle handle here. And that should
connect over there. Kind of close, not quite, so I'm gonna move
it just out just to smdge since I know not my. Not everything's
actually, you know, hitting over there perfectly. And then I'll figure
out my middle lines. So here, here, and then draw. And then we would have this
kind of drawn in perspective. So hopefully that's
useful for you. And in the next video, we'll just look at some ways to apply the skills
a little bit more.
11. Exercise: Items Around the House: You notice we changed
locations a little bit. What I want you to do for
the next exercise is just go about in your house
and try to find items that are regular
shapes to draw. You can get various collection, and so I'll show you what I
have over here on the table. So so I have a random collection of items
on the table over here. We've got some playing
cards, ink bottle, thread, and you can see they are
squares, there's cubes, toys. If you have kids, you
might have legos, there's a candle,
different sizes of boxes, toilet paper rolls
would be great. Just anything that you can think of that's got kind
of straight sides. And what I want you to
practice next is just taking these shapes and you can just take
them individually. And you can look at them from different
angle, you can place it. I could place it higher,
I could place it lower, and I could draw it
from different angles. If it is hard for you to
draw items in practice, what you could do is
you could take photos. You could hold it with
one hand and take photos of items in
different directions. And so just practice drawing different looking items from different angles and figure
out how they look in space. And then once you've drawn a couple of different
kinds of items, you don't have to worry about shading or anything like that. Once you've drawn a couple of different items in
different poses, then you could combine and add multiple items,
you could stack them. You could, put them in
front of each other and then just practice drawing
little still lives like that. If it's hard to draw just
straight up live, still lives. Then what I'll show next is what you can do if you take photos. We have a guest appearance
from our cat Rex over here. So I'll take a couple of photos, and I'll show you what you
can do if you are having a hard time figuring out how to draw these things in space. So when you're working
on your drawing, a good idea is to have I have a little whiteboard that I taped a piece of
printer paper on, so it's not precious in any way. I have just a
regular old pencil, I have an eraser, and
then I have a ruler. And when you're drawing, it's a good idea to have your drawing surface at an
angle so that it's kind of square in alignment
with your face instead of it being flat and then you're looking at
things at an angle. So everything at this end is
going to be closer and then everything at this angle at the far end of my
paper is farther, tilting it up and drawing on
an angle is really helpful. I've set up a little still life over here and I'm going
to start sketching it. The big thing with working on a sketch is just making sure that you get the
big things in first. You don't want to work on
details or anything like that. You just want to make
sure that you're getting the main
shapes in there and then you can worry
about making things square and lined up afterwards. Then I'm also measuring, so I'm thinking, this
is about this tall. That's about twice. The height, so I need to make that a little bit taller and then
I can measure. I'm just holding my pencil
up and I'm measuring things with my pencil and
with my finger and figuring out how things are. That's about that.
They're almost the same. Then I can measure that
the same on my paper too. I've gotten my main shapes down over here instead
of drawing the lid, I'm just going to
draw a cylinder. I'm going to erase
just a little bit so I can draw things
a little bit nicer. But we'll just go from here. That looks pretty good. And then it's got little
knobs on the top, but I'm not really worried
worried about that. And so there is kind of my
what do you call it, my thing. And so if I really wanted to, I could try to see how
I could see if my lines are going anywhere close or if I need to fix
them up a little bit. So hopefully, you look
at all these lines, you can see that they're
all kind of headed in the same direction. The only ones that
are not headed in this general direction are these two are going to a
different direction. I really should move
these guys over down this way if I
wanted it to be more of a perspective this way. If I wanted everything
to be more parallel, then there would
be my two options. I could either make a vanishing point right
here and then make sure that these lines also
match that vanishing point. But looking at where I'm
looking at these items, I feel like my horizon
line is somewhere way further further out way
further up over here, up here. And then my other
option could be to maybe it's over
here, and then, um if these guys go here, then I could move everything
else and match that. It's up to you how
you want to do it. Since most of these lines are matching this
one, right now, the easiest might be for me
to just change these ones, that would be there. But I feel like that
really messes with the way that I'm seeing these
rectangles over here. And so now they would all
kind of match up this way. But if I'm looking at it from
the way I'm looking at it, I feel like this is
going more up this way. So to fix that, this is going at a
little bit, actually. Maybe like that. It's not
quite that severe of an angle. There we go. Then
I could also move. These guys would then need
to be a similar angle. So if I'm going
this is my angle, then these guys could go on
a similar angle over here. So this way. That's why it's okay since my lines are a little bit loose, I can still fudge
these kinds of things. They have a very, very far away vanishing point over there. There we go. Now that we've gotten
everything sketchy, we can take I said earlier that if you
wanted to use a marker, then you could use a marker to really highlight and it makes it a little
bit easier to see. I said, these don't
have to be perfect. We're looking for just understanding how
things lie in space, understanding how to draw three objects in space so
that they look believable, that they look
three dimensional, and so that we can then use these skills when we
are drawing characters, buildings, and just
objects around the house. As said before,
we're not worried about shading or anything
like that right now. And so that's my little
still over here. So there's one more thing that I wanted to talk
about really quickly. Sometimes it might seem like your eyes or your camera
is playing tricks on you. I just wanted you to be aware that things will always look different from a picture than what they look
like in real life. And one of the reasons is
because we have stereovision. So right now you are looking at this block from the
lens of the camera. You're looking at
it from direct, you have one direct
line of sight. When you are looking
with your eyes, you basically have
two eyes and you have one eye that sees this from a slightly different
angle and another eye that sees this block from a
slightly different angle. Then your brain makes the image of what this thing looks
like in three dimensions. So I just want you to be aware
of that as you're drawing, you will always see a little bit more and a little bit
more comprehensively and understand things a
little bit more three dimensionally than
what a camera angle will see your drawings
over here will be a little bit different than
the picture that you take of your item. Or you're still life,
but it'll still be good practice to do both. If you're having
a very hard time looking at items and
drawing them in space, then I do recommend that you take a picture and
then work from photo. Once you get
comfortable with that, then do try to work
off of real life too. In the next video,
we'll just look quickly at some
different techniques to understand
relationships in photos from photos or still
lives that you've taken.
12. Using Photo References: So in the last video,
we were out and about in our house drawing
different objects. And if you are having a hard
time figuring things out, as I mentioned, you can take
photographs of objects, and you could print
them out similarly, you could print out small on a piece of paper in the
middle so that that way you have room to draw around
it or you can put it digitally on a canvas and then you can move it around
as you need to over here. I wanted to show you a couple
of ways on how to work from photos to try to
figure these things out. For over here, what I've done is I've posted one of
the photos that I've taken and what you
can do is now it's very easy to see if we
add a grid over here, so Procreate has a drawing guide and you can see it over here. And so if I add grid, now, it's easy for me to
see in relationship to horizontal and vertical lines
how things are angling up. And so it makes it a
little bit easier to see which way the perspective. So eventually, these things
will all um I I overdo it, we could see that all
those lines go over there and these
lines would end up meeting around
over here and then we would have a third point
perspective down there. Adding a grid layer on top of it helps you figure out
what the angles are, how things are moving
away from you. Then also, I wanted
to just show. You can also then
practice drawing the perspective
points and figure out where things are receding. Over here, I've just
drawn straight lines. You could do this
with the ruler, but just make sure that
whatever object that you print, you have it small enough
on your page that you have room to draw all
the different points. I make that a little
bit, lower opacity, you can see my structure
underneath and then I just drew all the
lines receding from it. That's one example. Then I have this guy over here and I
did the same for that. Over here, this
picture over here, you can see this picture, we can see the tops of images. The horizon line is going to be somewhere above over there, and then we can see that
things are coming in this way. And then I started
drawing my lines and you can see that I couldn't even get to my vanishing
point over here. But you can see my other points lined up about over there. You'll notice in this photo
that not everything is always lined up perfectly
straight with your canvas. And so there might
be an instance where your horizon line
might be completely different and then you're
drawing your item over here, and then you have
and then we have a cube that's tumbling in
space and it's not square. Well, except for the
face, I guess, but um, your horizon line doesn't
always or your vanishing line doesn't always need to
be straight up and down. That's the point I
was trying to make in a very long way. All right. Then lastly, I wanted to pull up the picture of the items that I was drawing earlier
in our living room. I took this photo and we've got many items and it might be a little bit hard to see
the different angles. So if you are drawing
on a piece of paper, what you could actually do is you could just
divide everything up by inches and draw
a grid with inches on the top and then on the
bottom with Procrit, again, you can get a drawing guide and you can make the drawing guide
lighter and darker. Then I've actually drawn a grid just to make it a
little bit easier to see. Then again, now you have
a grid structure on top and I made it a little bit darker so it's easier for you to
see on the camera. Now you can look, we have a straight up and
down line over here. How is this in relation?
How are these things? You can see that try a
new layer on the top. The distance over here
is less than over here. So I know that this line is coming in on a
little bit of an angle, and this distance is
even bigger over here. I know that my vanishing point, everything is kind of coming in at an angle, and
you can really see it. This is really close over here. So that just gives me ideas. And so then I could use those as just references if I'm trying to draw then things over here, so I could start just
drawing my biggest uh, my biggest try to get
my big shapes first. And then I can see
what kind of an angle, then I would look, all
right, what kind of an angle is this
coming off of here? What kind of an angle is
this coming off over here? If I imagine a horizontal
line over here, this one's coming off
at an angle like that, and that one's coming off at
about an angle like that. It just makes me actually
a little bit less. It makes it easier for me to draw my shapes because I have
something to compare it to. And then I can see that, okay, this point, this point right here is actually
on this side, this corner and when
I've been drawing it, my brain has been thinking
it's on this side, so I got to make
sure when I draw this that this point
stays over there. These things, your brain your eyes tend to think that
you're seeing it one way, but it's really
going the other way. That's just good idea. Then because it's also
receding a little bit, this is smaller and
this is bigger. And so, like I said, I don't need to draw
everything perfectly yet, so we'll draw main.
And then, same thing. This one's kind of receding
or going in a little bit, and then let's see, we've got our lid, and it goes let's see, it's about in the halfway point right around there
between here and here. And then it goes down. Here's our candle and then we've got this item that starts right around where this is right below where the
thickest part of that is. If my lid is coming
up over here, then I'll do my point
right below that. Then again, looking at what
angle this is coming down. It's somewhere around there. And so that's how I would start. That's how I would use the grid to move things around over here. And now we'll speed
up and you can watch how I put together the
rest of the still life, or then you can choose to jump
to the next video already. And so hopefully that is
helpful if you are having a hard time with drawing
things in perspective. And in the next video,
we'll look at how drawing shapes in
space is really helpful in drawing environments for your characters and then actually drawing
characters themselves.
13. Application & Examples in Illustration: That we've kind of gone
through a bunch of exercises and learned how to
draw things in perspective, I just wanted to show
a few examples of how to put that in practice when you're illustrating books. And so here I just have
a couple examples. This is the man who
didn't like animals, illustrated by Lewin Fam. And so over here, we
have a living room, and you can see
how all the items are drawn nicely and they look like they
belong into that space. And I just thought it was
a fun contrast to then the chaotic scene later in the same book where we
have the same living room, but we have all the
animals. In it. And so knowing how to draw
things in perspective will enable you to draw great
illustrations like this. And then this is Pig
town Party by Leon Cho, and it's another fun example
of a little town scene. We're looking at it from above. We see multiple
different streets. And so it's just really fun, a really fun scene
into Pig town. And then this is
an interior scene, another interior scene by Scalou from the book
Boo KouNeeds You. And so these ones are not
too extreme or anything. And then I wanted to just
show a couple of examples of just more extreme
viewpoints and how that can heighten the emotions
in the illustration. And so this is an illustration that's one of my illustrations, and it's showing
we're looking down. We're in a city with
big tall buildings, and we're looking at
this little red house that's highlighted
in the middle. That's kind of showing out
of the shadows and we're getting this sense
of how lonely and kind of tiny she is in the city. Then we have sorry, these are just
pictures from books. And so over here we
have an illustration. We're looking down again. This is from the Grotin
with Benji Davies and we're having this moment
at the end of the book, where the monkey is kind of leaving and it's built this
little hot air balloon. And so it's kind of the kind of the turning point or
the ending of the book. Then we have this
illustration over here where we have
this great piece. This is kind of before
this big crash. So we have this
heightened emotion that something is
about to happen. So we have this train that's
headed into the chimney. We're looking at
things from above, and just this great kind
of S curve is taking us into the into the chimney. And so it's just a really
fun as our eye follows it, we are feeling like
we are traveling into the chimney with the train. And so I thought this was
a really fun illustration. And then we've got we're kind of looking
at straight above, a lot of I found a
lot of books that had examples of looking at characters
straight up on the bed, and then the bed
is kind of shown in a very foreshortened
perspective. And so this is from We don't eat our classmates
with Ryan Higgins. And so over here,
Penelope is thinking, and usually it's
either some sort of resolution or somebody's afraid or something like that. And then this is from down, also from U Looking at down. And this is from Dan
Santa after the fall, and I have another illustration, we'll look on the next
page where we're doing the opposite where we're
looking from down going up. Two. And so then we have
some low points of view. So this is also from Dan
Santa after the fall. And here we have the character and you can just see
some of the buildings and things that give us an
idea of where we are in space. So we are looking at things up. And this is also by Dan Santa. It's from the book, Ono How My Science Project
destroyed the world. And you can see over here, we also have kind of it's not as extreme as we have on
the top illustration, but we still have this great and all the action lines
kind of give us an extra heightened awareness in the way her
arms and legs are, and we're looking at
things up above that gives us just great emotional impact in
this illustration. Then this is from Peter Brown's creepy pair of underwear and we have
Jap it and we're looking up and we have this kind of a cliff
hanger on this page. He opened the drawer
and dot dot dot, and then we see what
happens on the next page. And then this is fun. So this is just part of
the pay half the spread, there's a little
bit more over here, an illustration by Ben Mantle
on Bunny's on the Bus. And we can see that
we're above or kind of very close to the eye
level on the street. But then we have this bus
that's been drawn from, you know, so that it looks
like it's high above, and it's given us this
great sense of movement and the craziness that's going on over here as the
buses you know, usually buses don't fly. And so as this bus is
flying through the town, and so it's just given us this great excitement and
movement through the piece. And then kind of quickly, I just wanted to show
how then knowing how to draw shapes in three dimensions will help you with
your character design, too, and also with helping draw your characters
more consistently as you're drawing
them in the book. So once you know how to draw different shapes and you know
how to turn them in space, then it's easy to take your character and then
move them through space. And so this illustration is from cartoon animation
by Preston Blair, and there's another illustration that I wanted to show
you from the book. In this illustration,
you can see how you can build the characters
from basic shapes. So there's triangles, there's ovals, there's
circles, squares, and just understanding
how to draw things in three dimensions will then help you draw them in
different poses. If you've enjoyed this class
and if you found it useful, I hope that you take
just a couple of seconds and leave a nice review. It doesn't take more
than maybe two clicks and a couple of seconds. You can either just
leave five stars and if you feel up for it, you can write a short note on what you liked
best about the class. If you've done the
exercises in the class, then you should also have something to post in
the project section. It's very easy to post. You just click down
below in the projects and resources and there's an
upload button over there. And if you have any questions, feel free to put those in
the discussion section. So this is a very basic class, and there's a second
class that's going to be uploaded soon after
this one where we're really going to dive
deep into designing interior and exterior
environments for picture books. I already have a class
posted that's all about forests and woodlands
and nature environments. But this next class will
center on man made structures. And so if we have a city scene, or if you have an interior scene like in a kitchen
or a living room, different ways that you can
compose those illustrations. So thank you for
taking my class, and I'll see you in
the next one. Bye.
 Mirka Hokkanen, Illustrator/Author/Printmaker/Educator