Transcripts
1. Introduction: Hello guys. This is
Apple has a dipole. Welcome to my class. In this class, you
will learn how to draw characters with
the help of alphabets. Yes, you heard it
right? In this class. You will learn how to draw anything with the
alphabet from a to Z. This class will help you to
learn the alphabet as well, less enjoy with that
drawing from the alphabets. The materials required are
very simple, which are benzyl. It is a green shade
color sketch pen. If you are wondering how
to start the drawing, do not worry in this class. I will not only teach
you how to draw, but also make you feel
as a professional. Some extent, this class will be benefit
for the beginners. Are the kids who are fond of Brian and art without any due. Let us start our class. In this class, the topics
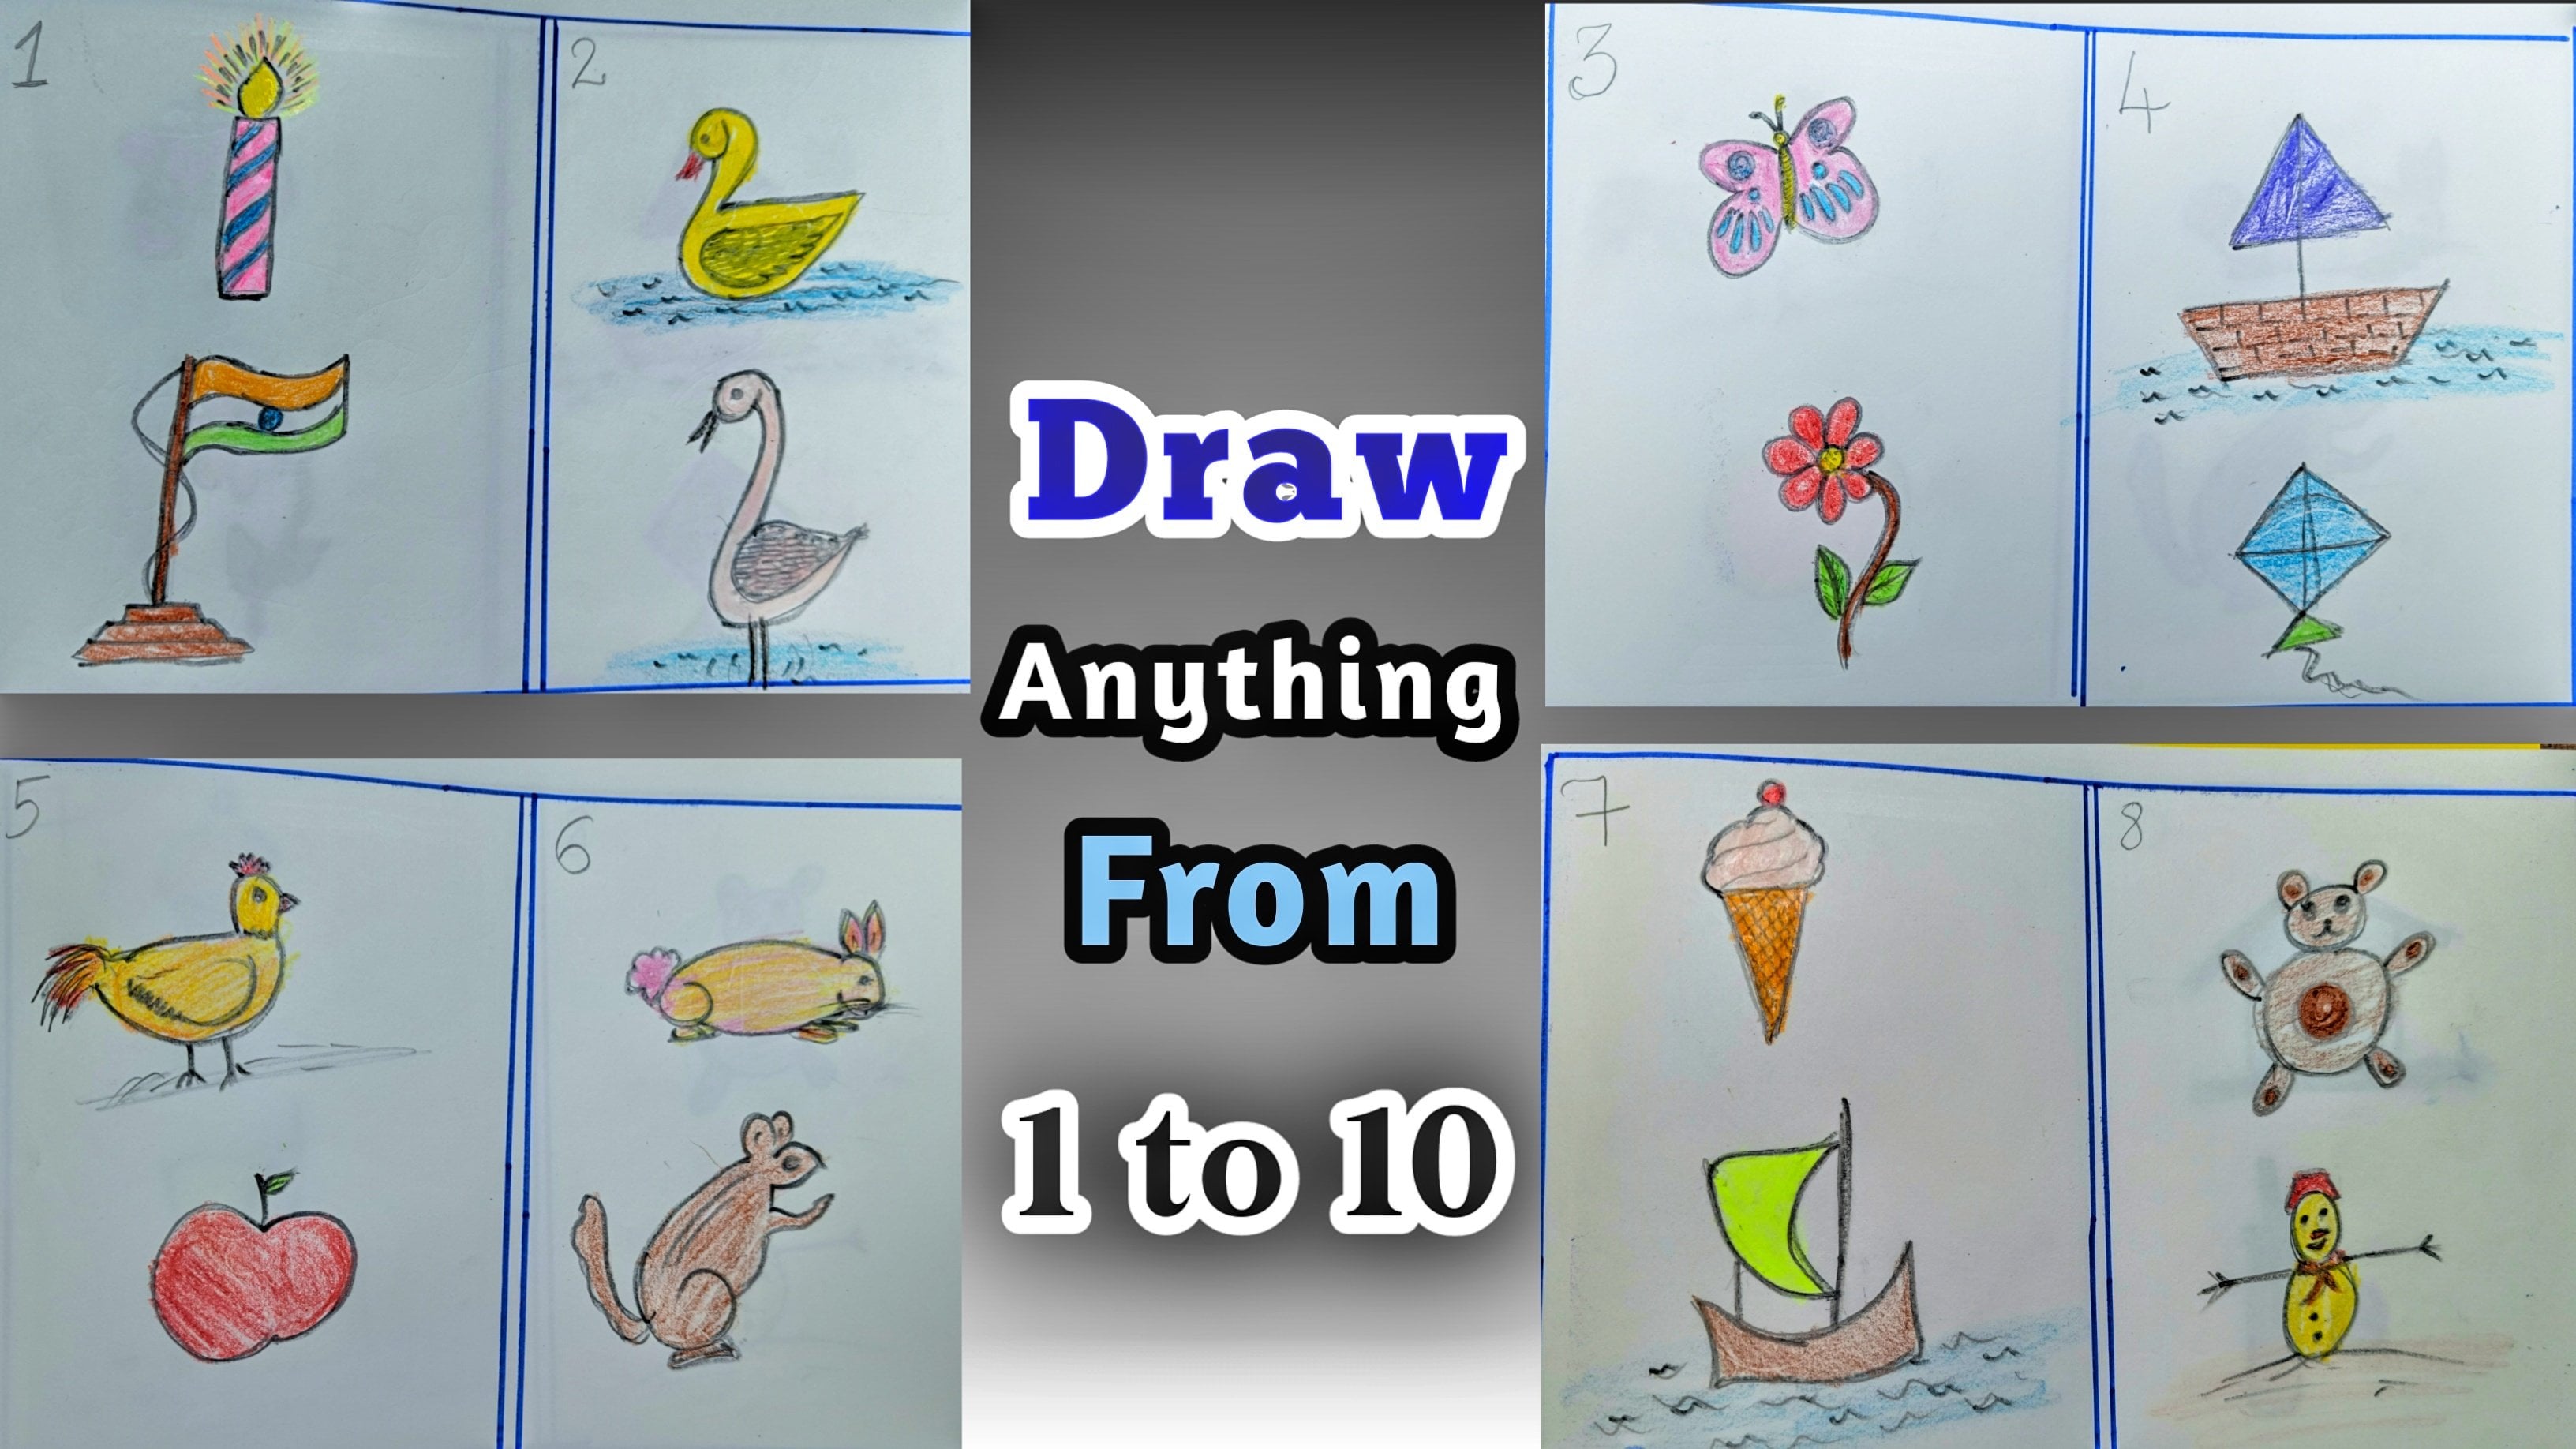
which will be covered, our draw anything A2, Nash, draw anything from F to J. Nash, grow anything from K to draw anything from
P to T. And last, draw anything from YouTube. So come, let's get started. My friend.
2. Draw anything from A to E (Part 1): So now first, let us start
with the drawing that is growing anything from a to Z. So before starting, let us
first write the alphabet. So first, I'm considering the first phi
alphabet, that is a, B, C, D, and E. So let us now start with the drying with the
first alphabet. That is. So to draw
with the letter a, let us first write the letter a. So this becomes our letter N to start with drying from me, they can draw anything. So I have chosen to
draw a heart in that. So let us draw
another line in that. Let us add some more lines. Also add one more line. Now, let us draw the straight line
opposite to each other. Hendra non-line. This becomes our hat. Let us now draw the
door, farrowing hut. I hadn't middle
line to the door. Now, let us add some windows to eat those small rocks on
the book side of the house. Let us now draw the
down part, The Hurt. Add one more line. Here. We have completed the
drawing from a later. Within a few minutes, we have completed
our drawing from the letter a and
develop as a hurt. So now let us go to
the next alphabet, that is letter B. With the help of letter B, we are going to draw a
beautiful butterfly. First. Let us draw the line in order to have the
shape of the butterfly. So I'm drawing the B
portion in the curve it. So you can see we have
drawn the letter B. So now let us add some beautiful
texture to our letter b. So let us draw the
body of the butterfly. Inside the body. We can draw some lines. So same thing, you have to draw to the opposite
side of the butterfly. Add an antenna to our butterfly. Illustrate it much more higher. I am just giving a
perfect outline. So now vectors add some beautiful texture inside
the wings of the butterfly. Try to add the shape of the
texture inside the butterfly. As you can see, I'm adding
the beautiful texture of the butterfly to the
opposite side of the slide. Also act to the down
part of the butterfly. Add some more texture
to or butterfly. That is, adding a small circle to the wings of the butterfly. Here we have completed the beautiful butterfly with
the help of alphabet B. Now, let us go to the
alphabet, that is Alphabet, see, with the help
of the alphabet T, we are going to draw a beta. Edtpa. So first, let
us draw the alphabet C. Will add another line
to make a complete circle. Now, let us face of the beautiful teddy bear
and add cute ears to it. Then add two eyes and
mouth to avert TeddyBear. Nicholas make some dark
color eyes. And MT. No tessitura to hand
for the teddy bear. And continue with it too. Next day today we're so you
can see from the letter C, We have drawn a
beta for the beer. So now let us go to
the next alphabet. That is alphabet D. Letter, D, Letter D. With the
help of letter D, E are going to draw
a beautiful bird. Servers. Let us add a small line
towards the top of the letter D. You can draw a
small line in debt. Now, vectors add a small beak. Let us add a small, I do the bird. So you can add the
birds topmost. Now, let us draw the
tail of the bird. How to add some of the feelings. Now, let us draw the
wing of the bird. Let us draw the
tail of the bird. Then now you can get
some features for the boat veins where you can add some of the design
to the bird's wings. So here we have almost
completed the bird. I feel that the AI has
been a bit larger. Arrays. And select a
draw this small i. So here we have completed
the alphabet B. So you can see
from the letter d, we have drawn a beautiful bird. So now the actors go
to the next alphabet, that is alphabet e. So let us draw the letter E with the helper, the letter E. We're going to
draw the elevator. Now. Let us draw the adjustment line towards
the opposite side of the letter e. So you can
draw a line just inclined. Here. Also. Add some
more lines to this. This becomes our
stair or elevated. So if you have made any mistake, we can address with the eraser and try
to adjust the lens. It is not necessary to
draw a perfect line. This is just an illustration
which we are drawing. You can also use scale, also, trying, but as
a free hand style. I'm drawing as a part. You can add is the image tag
if you have drawn wrongly. So here we have completed
the first phi alphabet. That is a, B, C, D, and E.
3. Draw anything from A to E (Part 2): So now let us color the trunks. I have chosen the sketch
pen to color the drawings. I have chosen different
colors. I'll sketch pens. So v will use the color for coloring the
different alphabets. So now let us keep aside
all the sketch pen. So first, let us start
with the red color. I'm using red color to
the top most of the hurt. So you can see you can use any color as per
your preference. It doesn't matter. You can use any color. The more you color, the more exciting
part it will be. So here we have completed
the top proof of the hurt. Now let us move to
the, another color. As I said earlier, make use of later color and the darker color contracting
because this one, we give much more
effective to overdrawing. So as you can see, I'm giving another
Laker to color the lighter color to the
second part of the herd. So now I am using another color. There it is, a yellow color. So I am giving it to the
third part of the heart. So try to complete this shape. Fill only gaps
between the color. So I have given the three shades and now
am giving the final one. So now I'm using that dark color that is brown to the
last part of the heart. You can see that I'm giving in this pattern because this
will complete the drawing. Look. Try to not Mr. Kohler with
the other colors. So Crockett fully vine, growing and giving the colors. So now we have finished
the coloring of the top most part of the head
with four different colors. So now let us color to the
below part of the herd. So going with the below
part of the head, neck, and start coloring. So now I'm using the green color to color
the below part of the head. Be careful you coloring the herd because you can also have the chance to
coloring the window. So do not color the windows. You can use colored tests
per year preference. I'm just giving the color
full shading for this heart. While coloring the below
part of the heart, you also need to remember, you should avoid the
door while coloring. Coloring will make much more
attractive for the kids. Kids love to color the drawings. Different types of
scholars. While coloring. Leave the window part because I'm going to use a different
color for the window. So now we have completed the coloring of the house
into green color, furnish. Let us use the blue
color for the doors. So first, let us color
the one part of the door, and then more today
and verified. Now, let us color the
another part of the door. Now. Color. They've been dose
with the blue color, lettuce color, both the
windows with the same color. So you can see I have color, the doors and the windows
with the same color. So now let us collect the
down part of the hat. I am using a dark blue color for the below part of the herd. So try to color the whole
part with a dark color. So you can see here
we have almost done with our drawing and also
coloring of the heart. So here we have completed
the coloring of the heart. So now let us give
outline to the heart. So I'm using the black
color to outline the heart. So a big carefully
outlining as this, he's an embed to our drawing. So first I'm drawing a shape. Now let us color and
your down line with the black color sketch
pen to draw outline to the all had no windows
in another window. And then comes down. But after finishing the door, try to draw the down part. So now we have completed
the outline of the head. So this make our completion
of the coloring, outlining of the heart. So now let's start the
coloring of the butterfly. So far butterfly, I'm using the light blue color for
the outer part of the wing. So be careful. Here, you can see that there are different texture present inside the wings of the butterfly. So never tried to mix with them. So don't be in a hurry. Try to give outline slowly. So we have completed the right side of the
part of the butterfly. So now let us move to the left part of
the butterfly wing. Let us color the lower part
wings of the butterfly. So trying to color the
lower part of the wing carefully while coloring
to the butterfly. They're not leave any
gaps, will be uncolored. Butterfly features are
beautiful design by denature, different features
and different colors. So try to keep one color in till the blue color of the outer layer of the
butterfly has been drawn. Now, let us color the
other part of the wing. So I'm coloring
they don't pack of the wing carefully color leaving because they are small, tiny structure or features inside dealing of the butterfly. So we have two color on Liddy
outlined part of the wing. Now, let us move to the top
wings of the butterfly. So let us color the upper
part of the butterfly. So you can see that I'm coloring the top part of dealing
with the light blue color. So you can choose any color for the wings as per
your preference. So here we have completed the outline part of the
wings of the butterfly. So be careful, Riley, we're shading because we need to choose a color which will
also give the contrast. So for the inner part
of the butterfly, I'm choosing orange color. With the blue color, I am choosing orange color. So while coloring
the inner ring. The butterfly lead
the small circle, texture and color,
the remaining part. So now let us move that down, but I'm living here also. We have to leave a
small circle texture while coloring the inner
wings of the butterfly. Try to color all
the uncolored part of the wings of the butterfly. Now, let us move to the
left side of the butterfly. So trying to leave
a small circle and color of the wings
of the butterfly. So finally, here we are
coloring the upper wing, but the butterfly try to color in a same way as
I am using the same style. Be careful while coloring the inner part of the butterfly. So here we have completed the inner wing
part of the butterfly. Now electors color. This small circles inside the wings of the butterfly
with the red color. Color, I'll default circle inside the wings
of the butterfly. After finishing the wings, I'm coloring the inner
body of the butterfly. So here I am using the yellow color for the
inner part of the butterfly. Try to color all the inner
part with the yellow color. And also color the face of the butterfly with
the yellow color. Here, we have completed the
coloring of the butterfly. Now, let us go to the
outlining of the butterfly. So here I'm trying to
start with the face. Then the body of the butterfly. Try to cover all
the lanes inside the body of the butterfly with the black color sketch pen. So outline slowly and
don't be in a rush. Here, we have completed
the outlining of the body. Now, let us move to the outlining of the
wings of the butterfly. I am outlining the inner
wings of the butterfly. And now the outer ring
of the butterfly. Then down but being
of the butterfly. Then the next part of the
butterfly outline slowly. Know the left-wing
of the butterfly. So now let us move to the
doll thing for the butterfly. Here we are outlining the inner part of
the butterfly wing. Now let us outline the outer
part of the butterfly. Also claim they don't bat
wings of the butterfly. Tried to outline all the
part of the butterfly wing. So here we have completed the coloring and the
outlining of the butterfly. So now Records color.
The next letter. They taste, alphabet C. We're
coloring the teddy bear. To color the teddy bear. I'm using that brown color. So first, I am coloring. Today we're here with
a dark brown color. Also color. The other part here. Now let us move to the
face of the teddy bear. Here also, I'm using
the same color that is darker brown color to color the face with a
brown color as clothing, eyes, and mouth of the Teddy via complete the remaining gaps. The color. Here, we have
completed the face. Now, let us move to the body
part of the teddy bear. Here also, I'm using the same brown color to
color the teddy bear. As you know, that
the teddy bear hair, the same pellet that
is dark brown color. Most of the teddy bear will
have dark brown color. So let's try. I'm using brown color. After finishing the
teddy bear body. Now, this will do
the teddy bear hand. Now, the other side hand. Now, let us color
the teddy bear leg. And now the, another list. Here. We have completed
the gallery update, Eddie, we're now, let us give
outline today. Today be it. Here. I'm using the black
color to outline it already. We're first letters outline
the face and the ears, and eyes, and mouth. Then outline the whole
body of the teddy bear. Outline the two small
hands of two teddy bear. And also these tools,
mountain lakes. Here we have completed the planning and the
coloring of the teddy bear. So now let us move to the
next alphabet, letter, alphabet D, to color the bird. I'm using green color. So first, I am coloring
the face of the bird. While coloring the bird, leave the iPad and color
the whole face of the book. Then I will color the body back with
the same green color. Also, I'm coloring, they don't but with the
same green color. While coloring, you can choose any color as per
year for reference. So I have choose a green color. So at that, most of the
words are in green color. Now, let's choose another color. Here. I'm choosing
the yellow color for the remaining
parts of the body. Now colored. They don't part of the body
with the yellow color. So here we have
completed the body part. Now, let us move to the feather. But yeah, I'm choosing
the red color to color effect of the bird and also the crown of the word
with the same red color. And also colored the beak and the tail of the bird
with the red color. Here, we have completed
the coloring of the word. Now, let us give
outline. The bird. So I am starting with the
outlining of the word. So for the ground and Nash, they face and the eyes, and the mouth and
the body part of the bird outline the wings of the bird. So now outline the
tail part of the bird. So here we have completed the coloring and the
outlining of the bird. Now, let us move to the next alphabet to
color the ladder. I'm using that dark brown color, like this color, the left side. But after finishing the left part, now let us move to
the right side. Here also tried to
color the Aldi part of the lighter color, lean, slightly, go downwards so that you
will get a perfect coloring. After finishing the right part. Now, let us collect
the ladder steps. So try to color one-by-one all the ladder steps. So now let us color
the last ladder step. Now the top most ladder step. So here we have
completed the coloring. Now, let us give
outlining to the ladder. Here also, I am using the black color sketch pen
to outline the ladder. This outline the left side. Now let us give outline to the right
part side of the ladder. Now let us give the outline. Today, steps of the ladder is outline the steps of the ladder with the
black color sketch pen. Now, the last one, let us give some dark outline to the ladder steps one-by-one. So here we have completed the coloring and
outlining of the ladder. So here we have completed
the a, B, C, D, and E. We have drawn her from B, we have drawn butterfly. From C. We have drawn
a cute teddy bear. And from D we have drawn bird. And from me we have
drawn bladder.
4. Draw anything from F to J: So after refinishing,
drawing and coloring of the
alphabet a, B, C, D, and E. Let us now further go and draw from
the letters from E, F, G, H, I, J. So first, let us start with the letter F. Draw or
outline the later. This year flutter.
Now draw a shape. So much pride to
draw from the top of the line till they have
this small circle. No, try to draw the interface part where we can draw a C like structure, right? To draw the eyes and the
nose of the penguin. For this letter, now, draw the body part that is
stomach of the penguin. Draw half to the penguin and join the half part to the down part of the
year flatter line. Now for the dawn
part of delight, try to draw this man
legs of the penguin. Nash, draw the wings of the penguin in the
inner part of the body. Try to give a shape
of the wings. Then also try to give
the shape of the leg. You can also erase the part where you have
been drawn wrongly. Here. We have completed
our F Letter. Brian, that is a
cute thing going. Now, let us draw
with the alphabet G. So first, try to draw the alphabet G. You can
see that I have drawn alphabet G in a half portion where I am just not
extending the line of the, deep below the top of the G, you can draw a big and falling
with the attaching towards the G. Also you can grow
wings to the ln of Digi. Draw a small eyes to
the face of the hand. Draw the upper crown
life structure towards the head of the hand. Make it bigger. I then altered draw the
crown of the hand, right to adjust all the
portion of the face. So you can see this is
the face of the hand. Yes. We are done
with the face of the hand after
completion of the g. Now, let us go to
the alphabet hedge. Now, you can see
we have completed drying off letter
hedge. Parties hedge. I tried to Ashton the down part of the hedge with
their bit slight lead down. Now, for these two are the
three legs or the hedge. Now from the top of the hedge, left side, drop
height, and face. You can see I'm trying the
hand slightly more towards it, down the neck and join towards the right
side of the hedge. Also at is like this because I didn't find the
face to be as a perfect one. So try to draw again. Then make the neck a bit
thinner than before. Right? To end it up
with detail at the end. For the eyes, then you can also give some of the wings to it. Yes. Here we are ready with
the hand with a letter hedge. Now, proceeding
with the further, let us draw with the letter I. Draw a straight line
of the letter I. After drying the straight
line of the letter I, you can draw an adjustment drain with that becomes a
stem of a flower. Further, draw the
petals of the flower. You can draw small,
heart-shaped flower. Once done, try to make
the leaf of this flower. We can add the extra
petals for the flower. Add another leaf to the
adjacent side of the flower. Here, we have completed our beautiful flower
from the letter I know. Let us go to the another
letter that is alphabet, the alphabet j in half portion. And then try to draw another
line of the letter J. From that, draw. Symmetrical j along
with the letter J. Continue with that to draw a half semicircle
upside the letter j. This gives you the Emory law. From the letter J. You can give some other features
where you can draw inside some features
in the umbrella. So here we have completed with the drawing that
is from letter J. Here, we are finished here, f, g, h, I, j. Once we are done with a
range of different alphabet, let us proceed with the
coloring of this drawing. You know that banking
have a color, basically a black
and white color. So I'm using a black
and white color for the coloring process. Try to outline the pink in it, the black color, by coloring it. In the same time with
the sketch plane. You can see I'm
outlining depending so that we will not miss
any uptick colors. Try to give the outline for the lower part
of the paint green. Now you can see I'm just
coloring the oral body part with the black color sketch pen Live in the face and
the stomach part. Try to color all body parts
with the black color. Also, there are some mistake. You can cover it up with
the black colored outline. Once you are done with the face, go to the lower
and the penguin D latch to be colored with the same pad and
the black color. You can also color wherever
there is missing the colors. Yes, yeah, we are completed. Almost the penguin. Try to get the
outline carefully. Here we are done with
the coloring and outlining of the penguin
with the color sketch pen. Let us go to the
hand phase drying, which was drawn from
the alphabet G. So I'm using a yellow
color to color the face. So trying to color
the face of the hand with the yellow color
to the oral phase. The yellow color for
the overall phase. Once you have done with the
coloring of the face, now, take the red color and tried
to color the Km of the hand. Also color the beak of the hand. Once we are done with the
coloring of the hand, let us now go to the outline, the face, it, the black
color sketch pen. You can see first-time
drawing the letter G, then gave wings. Then the big. Then comes the ice. Then it finally, I am giving
a hotline to the pump. Here. Do we have completed
the coloring and outlining of the Han faced Nash? Let us go to the
coloring of the hand. Draw from the alphabet. So here I'm using a yellow
color to color the body. So tied to first color, yellow color from the
overall body of the hand. Once you're done with the
coloring of the yellow color, then use red or orange color
to give inner color shading. Try to color it red
color for the column. Then for detail of the hand. Yes, here we are done with
the coloring of our hand. Let us now outline the hand with the black
color sketch pen. Try to give a black highlighted
feature to the hand by outlining. For each leg. It's finger, body, it swing. And finally, it's come. Uri finish with
the completion of the coloring and
outlining of the hand. No. Nash, let us go with
the coloring of the flower, which is drawn
from the alphabet. I am using a red color
to color the flower. Color carefully all the
petals of the flower. Now you are color in the
left part of the flower. Now, we are coloring
the middle part of the flower after
the completion of the middle part
and the left part. Let us go to the right
part of the flower. Color. The right part of the flower are almost done with the
coloring of the flower. Once we are done
with the coloring of the flower with
the red color, let us go to the leaves. The leaves with the green color. Also. You can color
first left side leaf. Once we are done
with the leaves, let us go to the coloring this temp by using
dark green color. Yes, we have completed the coloring of the
flower with the leaf. And this time, let us now outlined it with the help
of black color sketch pen. To outline carefully with the black color sketch pen. Yes. The flower petals are done. Outlandish temp. Then they list. Yeah, we completed with the coloring and outlining
a beautiful flower. Also, you can use some
pink color shading inside the flower to make it
look much more beautiful. Now, let us go with the coloring of the umbrella
drawn from the alphabet. I am using the different types of color to shade
the top of Amarillo. So first, I'm using pink color to the first Bush
and then second, I'm using a light blue color. So tied to use the
different colors to shade the umbrella,
to look colorful. Nice to use a yellow color in the total portion
that I'm using. Color for the fourth part. Similarly, you can use
different types of color as per your choice for coloring
the umbrella niche, right, to use the orange color for color in the fifth
part of the umbrella. Then I am using a low color. Finally, I'm trying to end
up with the red color. Once we are done with coloring and they all potion
of the umbrella top, then let us go for the
handle part of the umbrella. So you can see I'm using brown color to finish the
coloring of the handle. Once you are done with the
coloring of the umbrella, let us play to
outline the umbrella. First, start with the lower way, but then outline the
semicircle part at the top. Then the final portion, which are being
colored differently. Now at the end, try to outline the
end of the handle. So now at-large, try to give the outline for
the end of the handle. Here, we finished the coloring and outlining of the umbrella. You can see we have
drawn a penguin from F, Hence phase from G.
Then hand from hedge, flower from and finally
umbrella from j.
5. Draw anything from K to O (Part1): Asker completion of the
drawing from the alphabet G, H, and I, and J. Now, let us start
the drawing from the K. Yeah, yeah, yeah. Oh, so first, let's
draw the alphabet. Right? To draw alphabet. Brush. Draw a straight
line for that. At the adjust tend to straight line coming from
the main straight line. So this becomes, as it get alphabet for this gate alphabet. Now, try to draw from the face from the left
side of the top most line. You can also draw an extension
to the top of the line. From here. Draw the phase, try to take it from
the left side. You can draw a phase line with the stomach and slightly
down towards the tail. This becomes our bird face. And then detail. Once you have completed
the body part, try to draw his eyes. Then it's baked. Then later, let us move to the
draw, the wings. But we are considering
the bird opening. It brings the half of the top k. Vectors, draw some wings. Try to draw a being
in a leaf from, and then add the features
of the another wing. And finally the another being. So birds have many wings. Lot of feathers. Try to add the wings. Then from the wings, you can give different types of features where they can
draw the curve line. Then the inner feature of the feather where you
can give some designing. You can see I'm just
using some designs to elaborate the feature of the feathers of the
wings in a proper way. You can use different
types of design to make the triangle looked
much more beautiful. So far, the ending part, I'm just using a small
half circle line. Once we are done
with the feather, then this completes our drawing of a bird with the alphabet. We're going further
with the alphabet k. Let us now draw
with the alphabet. Now. Draw the alphabet
here in the drawing sheet. For that, let us draw a
lamp, lightning lamp, which has been used for
decoration purpose, or for the lightning at
the night in the house. So you can see, I'm just drawing another
line for rate base. We can also address whenever you find the mistakes
from the eraser. Now, draw the two lines in a text and also for the ending. You can ask trend away
from an ending yell. You can just add
some lightnings. Now you can draw a lamp, make two lines in
the adjustment, and one at the top. You can add some features for giving the lab day
decoration item. I am trying to use the
opposite direction, length. Similarly, we have drawn from me and the
Mickey Mouse face. So you can see I have
drawn the Mickey Mouse from where it gives a
two ears and the face. Also try to draw their eyes, eyebrows, nose. Then this smiling face
of the Mickey Mouse. Also you can erase wherever
you find some mistake. So you can see here I ended
then we have somewhat. So I'm just adding an AI feature and making
the eyes to look perfect. I'm just adding the
smile as a good one. Here we have completed the
drying for Mickey Mouse. Now, let us draw with
the alphabet yen. So fresh. Try to do the alphabet
here in the drawing sheet. Once you are done by
drawing with the alphabet, now it is make a feature or
a drawing from the alphabet. Certainly will try to draw any
integer that is a worrier. This alphabet letters give
another lane or extended. Then let us add a middle
line with the extension. Also make two adjacent length to the opposite
direction at the end. Then you can add the legs. Then those small hands. You can also add any ingesting. Then our ninja phase, try to draw a
circle, has a face. Then, as you know, ninja will not show their face. So we are making a mask here. Two eyes of ninja and the mask right towards
the end of the face. Here. We are done with
their groin offer Ninja. You can see from n we
have grown being in jail. Now, mine further. They will grow
from the alphabet. So first, draw an alphabet. Then for the store will
make some drawings. So with the alphabet dog, we can do many other Brian's
from the o, like ball. Then we can also draw
from or has any job. There are many things you
can draw from the letter or I'm trying to draw
a different one. Surveying, draw a cat from o. To draw a cat. First draw letter O. Then draw its eyes, then it smallness,
and then mustaches. Then let us draw their ears. Also, you can elaborate
the eyes where the cat is looking to
the top or upwards. And then let us draw
the cat's body. So here we are
drawing a cat body. You can also try to do
its legs joining here, not trying to draw its
tail and add some line. Also you can add is the part where it is not
being done properly. Yes, we have completed
with the left part. The body is feature into to wash and cats have two
colors or two shadings. So here we have completed
with that, right? Yeah, yeah. Oh, pumpkin. We have drawn birds
from the lab, from EM, we have drawn Mickey Mouse
from in ninja and from a cat.
6. Draw Anything From K to O (Part 2): Nash. Going further, let us now color the drawings which we
have drawn from the alphabet. So first, let us color the bird. So far the body part, I'm using the green color. So I'm just coloring the full body part
with a green color. And also you can add some blue color shading
inside the body. As blue color has been met. It is not been visible,
but it's okay. It's looking great. Now, try to take the red
color and use for it. Then also, you can check at
the lower end of the bird. Once it is done, we are using an LO color for the outer part of
the savings feature. Try to first color the yellow color for the
outer part of the wings. Then use an orange color for coloring the inner
part of the wings. Be careful with the coloring because you need to
complete filling. And also you can see a black pencil sketch is
giving us a direction to shed. And also the features
of the inner drying is visible for us for
the further outline. So try to color the
drying carefully. Keep on shedding and the
color has been filled. Also, I'm using the orange color for the lower end of the wing. You can see I'm
just coloring with the orange color for the
middle part of the savings. Once we're done
with the coloring, I'm using a pink color to color those middle bubbles to make it look much more beautiful
and enhance when you can see we have
completed with the bevel coloring
and the outer wings. Once we are done
with the coloring, we will try to outline with
the black color sketch pen. Now, to outline the bird with
a black color sketch pen. Also in the areas wherever
it has been featured. You can outline the wings now. To outline the wind
with the black color, then big circle, the portion of the outer ring
and the inner part. Also. You can get features to the inner birds feature by giving different
features in it. Tried to give features of the inner wings as dead
feature, the outlining. So here we are completed with our beautiful bird spreading. It features to fry. So once we are done, we will go through the alphabet. Lamp handler or lampstand need to be colored with
a black color first, because the handle might
be the black color. I'm using the different colors. Here you can see I'm
using an orange color, the fielder decoration point. Then a pink color towards D3, adjacent side of the
coloring of the lamp. I'm using a neon color to give and radiant
feature from the lamp. And lastly, I'm using a
red color for the lamp. And finally, a blue color
from the left outer portion. You can see I have used
and different colors from the lamp because it might
look a bit different one. Now, try to outline this lamp
with the black sketch pen. Yes. Here we have
completed the desktop. Now I'm pushing. Then they decorated portion
to be outlined carefully. Then finally, the land portion. Here we have co-related
with the drying, coloring and outlining
our first lab. You can erase the lower part. Hey, there where God extended
as the edge tendon feature. Coming from the coloring
of the Mickey Mouse. You know that Mickey Mouse comes in a black
color with the hair. First, I'm trying to outline the Mickey Mouse face so that I can do the
inner coloring. Also am just giving the outline in the
first stage itself. The face is being outlined. The blast catch pen. Mind further, I'm
coloring Mickey Mouse. See here the top portion
in the blast sketch pen. Keep on coloring until you finish the portion of the head. Yes. Once you are
done with the head, now, let us move
towards the face. Also, you can see there are small gaps when I need
it to be colored. Try to fill those gaps
with the black color. Once we're done, we will add a similar then
to the Mickey Mouse. Now for the face, I'm using a local feeling. I love color for the face, right? To color the yellow
color for the chin part. And towards the lower end. Also here you can
see we have missing, I'm the black color
from the outline. So next time, never tried
to colors from art line. Alice tried to
color the art line. It will prevent in the over
the merging of the colors. Yes. Yeah. We are
almost done with the coloring and drying and outlining of
the Mickey Mouse. Now, let us color for
the latter yen drying, that is our ninja. So first, try to
draw a circle of the face that you can
also draw the mask. Then later, you can also
give some shape to the mask. I've been in gas phase, first gray to colour the downwards up the mask with
the black color sketch pen. Now, drunk or color
for the top of the face of the ninja with
the black color sketch pen. Do not leave any
place uncolored. Once we're done with
the face of the ninja, then make the coloring
for the eyes. And also you can give some feature by
expanding the eyeballs. Nash tried to color
the body of the ninja. Outline the body with
the hands of the ninja. Tried to outline they
had with the state. Also you can outline
this tach of the ninja. Now, let us outline
the legs of the ninja. Once we are done, we will be colored for the
lower body part of the Ninja. You can see I'm giving a
shading to the lower part. Then I'm trying to fill the colors wherever the
color has been not failing. This is because we have
overall body to be colored. So try to make this
pattern as this will help coloring and also
helping coloring format. Now, we will try to color the upper body part in
the same way, right? To first give a shedding from the black color
sketch pen in the, oppose it that extent tied
to color it so that they cannot miss any colors and
colored index ninjas body. Once we're done with the body color in with
the black fetch pen, let us move to the
legs and eyes. So here we will be used a little color to shade
or color for the hands, for the legs, and the face
area, which is visible. Here. We're done with
the coloring for ninja. Now, let us move to
the coloring of a cat, which is made from
the alphabet 0. First, use orange color for
the oral phase of the cat. You can see I'm using orange color for the
face of the cat. Once we are done with the phase, let us color the ears. After coloring the face
and ears to the body area. Here you can see I'm using the same orange color to
color the oral body area. Try to color the orange color
for the overall body area. We taught this in any
portion and colored. Once you're done with the body, let us go to detail, To Color detail with the
orange color in the half path. And once the tail has been done, let us give an allo color towards the inner
part of the body with these yellow color to color the inner body nourished for
the less right to color. Then for the half
portion of detail, let us color a bit dark blue
color for the end of detail. Finally, let us start with
the outlining of a cat with a black color sketch pen
to outline the face, then the ears, then the eyes, the nose, and then the phase. Once the face area
has been completed, try to outline the body area. Try to outline the
body of the cat. Then the inner body of the cat. You can outline the legs. Then finally with the tail. Yes. So here we have completed
the outlining of detail. So from K, L, M, N, and O, we have drawn the
following drawings. From K. We have drawn the
bird from yell, we have drawn the lam from him. We have grown Mickey
Mouse, from Yen, we have drawn ninja, and from o, we have
drawn a cute cat.
7. Draw Anything From P to T: So after we finished drawing and coloring
of the alphabet, that is K, L, M, N. And no, Let us now go and draw from
the letters P, Q, R, S, and T. So first, let's start with the
alphabet P. Draw or outline the letter P. So
with the help of fee, we are going to draw the buret, but the letter P will
become the face. Like this, ad I and
B to the palette. Now add chrome to it. After punishing the face. Now, let us draw the
body posture of the better it is the body, but because I found that
it is not drawn perfect. Now, try to draw again
the beak of a padded. Now. Draw the neck of the
padded two lanes of the neck. And then trying to
draw the body of diabetic a curved line and
add more detail to it. Now, let us draw another curve lane joining
to the part of the neck. Let us draw a two small legs
of the bedded after legs. Now, the tail of the buret. You can add as the body, but if it is not drawn properly, try to draw a perfect
body, but alphabetic. Barrett face, it's
very difficult to draw everything as every times. It is okay to redraw and
make it a perfect one. So let us add back to it. Now, I'm addressing
the alphabet it. Let us draw another I do it. Also. Let us draw the
grown up divide it. Let us give some
outline to the parrot. Draw the leg after finishing
with the letter P. Now, let us move to the, another letter that is cubed. To draw the alphabet q. With the help of
the alphabet cube, I'm going to draw data types. So first, let us draw the
face of the third dice. Then lettuce grow,
and let us now add another n and two
legs for the third dice. So here I am giving some beautiful texture inside
the body of data types. So here I'm drawing a different kind I've designed inside the
body of the dice. You can also draw a different
types of texture or drying or design inside
the body of data twice. Draw an irregular
semi-tropical structure for the turtle's body
so that it gives a hard open shell of the top
most body update or twice. Here, we have
completed data type. With the help of letter Q. Now, move to the another letter that is with the handbook. Later, we are going
to draw a rabbit. Now. Let us draw small
eyes and a nose and mouth. Let us add the image
tag that I bet. Let us draw a year to derive it. And also add one
more year to it. No, let us draw the
hand of the rabbit. Let us add another hand. Now, I had a stomach. Can add a small lake
at the end of the lab. It tried to add another
leg. Finishing the leg. Let's add a cute tail to it. Let us make the eyes
a bit darker one. Here. We have completed the
rabbit with the help of the letter r. After finishing
with the letter R. Now, let us move to the next letter. That is yes. The first letters
of the alphabet. The alphabet is in
the groin sheet. With the help of the military is here going to draw this fan. So first, let us graph
the neck of this bank. And then the body of this one. You can use the eraser if you have made any mistakes
while drying. Time to draw from this fan, we need to make AS alphabet
a different shape. Fear you can use a pact with the half line a bit smaller
than the lower part of this. So let us make the face
of this term and add the NIB of this trend here
that test the body part. Now let us add the
wings of this one. Now, draw the button
lane to the neck of this one and draw
a texture to it. I'm erasing detail part
and I'm drawing again. So here we have completed
this ran in the alphabet. Yes. Yeah, I'm adding
some water to it. So here we have
completed the drying. Now, let us move to the next
alphabet, alphabet fabric. Now let us draw the alphabet. So with the help
of the letter P, I'm going to draw the guide. So first, just add
a line and draw a triangle shape and
draw a bottom two lines. Let us draw a curved line inside the guide to give
some texture to it. Now, the tail to the right, like a triangle shape and
add two lines to eight. Now, let us draw
the two decayed. So here we have finished the pencil outlining
of the letters. Now, let us color the
drawing of the alphabet. The first letters in the letter. That is. So I'm gallery that tail of the pad
it with a light green color. So the pattern will be
in the green color. So I'm using that green
color feature to it. So now let us colored
the body of the pickup. Here also, I'm using the light green color to
color the body of the pickup. Try to color the whole body
with a light green color. As you can see, I'm coloring the whole
body of the peacock. While coloring fill
and fill gaps. Now, let's color the
crown of the buret. Then the face of D-pad. It tried to color the face of the pair it with the
same lady green color. Color in the face. Please do not color the
eyes of the padded. So let us color the beak of the parity
bit, the red color. I'm using, the red color and also the outline of the crown. And also for the next debate it. So here we have completed
the coloring of the buret. Now, let us give outline to the pad it with the
black color sketch pen. Here. I'm using the
black color sketch pen to outline the parrot. Fish, outline the face, and then the body
part of the pad it while giving outlining right to some features
to the wings. Now, let us outline the legs of the buret and then the
tail of the planet. So here we have completed the coloring and
outlining of the buret. So now let us
alphabet that is Q. To color the dice. I'm using the dark brown
color to color the body. But of ditto ties tried to color the whole body, but they're dark brown color. Filler in ditto
ties also tried to fill the unfilled gaps
between the colors. Now, let us color
the face of data, eyes and hands. And another hand. Now let us color the legs and the last
leg of the two dice. So here we have
completed the coloring. Now, let us move to
the outlining part. Outline the body and the face, and the hands and the
legs are bitter taste. Now, I'm beautiful
texture inside the body of the guitar ties with the help of black
color sketch plane. So here we have completed the outlining and coloring
part of Detroit ice. So now let us move to
the next alphabet. That is here. I'm using the yellow color
for the face of the rabbit. Also for the both ears. Text color the legs and the
body part of the rabbit. And they haven't updated
with the same yellow color. Try to color the whole body part of the rabbit with
the same color. And try to fill key
gaps in-between. And also give a little color to detail part of the rabbit. So now I'm using the pink
color to color the inside the ears and also inside
details of the rabbit. So now let us give outline
to the rabbit body and hand. And then the lower part and
the bird legs of the rabbit. And also for two-tail. The upper body pack. For the eyes and for the space, and for nose and mouth. And for the most tech on. So here you have completed the outlining
coloring of the rabbit. So now let us move to
the next alphabet. That is yes. Here. I'm using orange colored to draw the
body of this rank. Tried to color the whole body of this trend by using
the orange color. Now, let us color the wings of this ran with the
same orange color. Now let us move further. Let us collect the neck of this trend and then the face of this one. So here we have drawn a completely by using
orange color sketch pen. So now I'm using blue
color for the water. These two N is always visualize where it
lives in the water. So considering this, we have drawn a friend who
is in the water. So here we have completed
the drying of the order. Now, let us move
to the outlining. But so here I'm outlining the face and the neck of
this van and the body. And also living part of this one with the
black color catchment. Here also, I'm using the black color sketch
pen to outline this one. Now, let us add
some more texture and featured inside
the ring of this time. And also add some
more features inside the body of the swing with
the black color sketch pen. So here we have completed the drawing and the
outlining this rank. So now let us move to
the next letter that is alphabet T. Here, I'm using the light green color to draw the one
part of the guide. For the, another pad. I'm using that dark green color. So try to share it with the
help of paddling color. Now, for the, another part, I'm using that dark blue color. So try to color the part with the help
of dark blue color. So for the last part, I'm using the light blue
color color, the Aldi part, with the help of light blue color for details, but I'm using the yellow color. So here we have finished the coloring I'm
taking right now. There it is, small outlining
part of the guide. So first outlining the
body of the guide. And then the inside part of decried smarter texture
and detail part, and get rid of the height. So here we have
completed the drying. From B, we have drawn
from Q, we have grown. From our, we have drawn
rabbit from minuss, we have drawn span and frumpy. We have drawn guide.
8. Draw Anything From U to Z: After completion of
the drawing from the alphabet P, Q, R, S, and T. Let us now
crowded drawings from the alphabet U in
our drawing sheet. For this view, we shall
make the drawing. So we will make a frog
from the alphabet. So slowly try to
draw the upper eyes. But then another
eye of the frog. Frog from my alphabet U. You can see I have
drawn the eyes. Then I'm going to draw
the face of the frog. Try to draw the face of
the frog from their mouth. And this molten
inside the mouth. Once we are done with the face, that has now dropped their legs. So first, grow small. Legs are different than
the other two legs are drawn with visualization as if they are hoping
and titin position. You can make the legs. Again. You can see that they are different
shapes of the leg. So I'm just erasing with the
help of it is for the legs. And then I'll try
to make the perfect Let's make it a bit thinner. Yes. We have to make the
drawing and get perfect. Once we are done with the legs, let us also adjust for the areas where I need to
look in a proper manner. You can see I have just
shaped the iPad of the frog. Once we're done with
the trinomial alphabet, you notice now start with the alphabet V. So let's
draw from the alphabet. We first draw the alphabet
week in our drawing sheet. Then for this, we'll try
to draw in parachute. First part is we draw a line, then make a half
cone like shape. This also can look as
an ice cream cone, but we're making as a parachute. So add additional line to the
feature or the parachute. So we can add to or just
like light or three or four for the degradation
purpose and the parish. Then you can add the
base of the parachute by just drawing a square shaped and they blow
up the balloon. Also, you can give
some feelings in debt. So here we are completed. The alphabet has a parachute. Nash more in further, we will try to draw. The drawing can be
alphabet w. So first, let us now draw the alphabet
w in our drying ****. Draw w alphabet in
the drawing sheet. Then tried to make
the alphabet W bit extended from the Android lines and join towards the lines. Now from the top may
hit ground band width. You can add an inner band to it. It also, you can add two adjustment line
from the ending part. Then add the down line to
make a debating drumstick. This make our drum
complete with the help of w. After making lettuce
at the drumsticks? Yes. Here we have
completed the drums. Also, you can add a trade
from the drums as a handle. This can play with or
drain from the alphabet w, where we developed a
dram with the drumstick. More in further, notice, draw from the alphabet at first, brought the alphabet ads
in the drawing sheet. That adds right to make
an adjustment opening. Shot, fish mouth. Then since. Then add gills. Then finally, the shop
page for the left side. But also you can make ten pale of the Shark Fish. This complete a drawing
from the ads lactase shark. Now, let us draw a
triangle from the right. So draw a alphabet. Why in a drawing sheet? Debt? Why added cone
like stopwords? Here? With the help of why? We add Brian and adipose. Add two eyes and given a small mouth in the
face for the purpose. Then add Intel's for the
below part of the service. You can add any number of unsymmetrical shape of the
TEN tests for the atop was. So here we have completed our drawing of the octopus
from the alphabet right? Here. We have completed
the drying from u, v, w and edge NY Moines. Further, let us draw
the alphabet and said. So now you can see I'm
doing the alphabet, the alphabet Z in
the drawing sheet. As you can see here, I'm drying it alphabet when I'm trying to pull in Tibet
plaques as if faced, then this comes the
nose part of this epa. Also, you can add it
wherever you find, there are some mistakes. This cups the nose
part of the zebra. Here. You can add a chair. Also slightly make
it bend words to template the look of the
Zebra as if it has setting. Now. You can add two
years of the zebra. Then the eye of the zebra. You can see I am giving another length of the
neck of the zebra. Now. Add the ZBrush steps. You can add dish tapes
wherever you want. Because this is this
unique of the zebra, where it is fun, attracted from the scripts. I am erasing the nose to
make it a little bit good. Yes. You can see I'm
adding the Nudge tool. So here we have completed
zebra from the alphabet, said also tried to
add wherever you find these strips to be visible
and make it look attractive. Once we are done
with the drawing, they attach, start
with the coloring. So first, we will
color the frog. I'm using light green color
catch pen to color the frog. So I'm using the
overall color green for the coloring
purpose of the frog. For the overall body. First, I started legs, then with the left
side of the face. Then I am going to the
medial side of the face. Also. You can color
they're small two legs. Then you can also give coloring of the same green
color to the right leg, which is being in the
sitting position. Try to continue the coloring of the green color
for all the face. You can see I'm coloring even the eye portion
and the mouth portion. Keep on coloring the frog until the colors have
been fully colored. Once we are done with the
coloring of the frog, let us go for the outlining with the
black color sketch pen. Outline the frog legs first. Then the face of different
slightly towards the ice. Then the right
portion of the face. Then D, right like the frog. Small portion, legs of
different It's been outlined. The blast sketch pen. Finally, the mouth to be outlined with the
black sketchpad. They can area is being left out. You can also color wherever the green color
has not been colored. For the tongue area, you can add the red color. And v Here, we are
done with different. Now, let us color the
parachute for the middle area. I'm using a red color to
color the middle part. Second, I'm using
the yellow color for the parachute coloring. And finally, I'm using
the blue color for the short outline of
the lash portion. Tried to color in different colors as a parachute
looks very beautiful. Pen color with the
different colors. Finally, with the
help of brown color, I'm making that down
basket portion. Finally, it a blank sketch pen. Try to give outline
for the parachute. Here we have completed with the coloring and outlining
of the parachute. Then now let us start with
the coloring of the drum. So first use a dark
blue color sketch pen for coloring of the drums. You can use the down
part of the drum as a dark blue color to color the dark blue color for
the oral down area. Drums. Drum is an instrument of them music is being played
for the music purpose. Finally, we have
cultivated from W, Brian or Federal, you can color the upper part of the
drum with a neon color. This will give a
more elaboration and would feature to the drum. So you can see
whenever we tried to color from the darker color
to the light and color, they get much color. So try to avoid this. Nash. Let us use brown
color for the upper drums. Nash let us color
with brown color. They don't stand up the drum. Also let us color
with a brown color. The upper dams also. Let us now color the
inner part of the drums. For the inner part, I'm using the yellow
color for the drums. Once we are done with the
coloring of the drum, then we'll give a pink
color for the coloring of the tread which is been
as a handle for the drum? Yes. You can see I'm using
the vibrant round dark colors because the dram usually looks much more attracted
in the dark color. Once we have done
with the drumsticks, let us go for the
outlining of the Trump's. First start with the upper
layer, then the drums. Then did ramps body. You can segregate
the two lanes of dW. Finally, you can have art
line for the Trump's bread. So you can see I have
left out with some areas. You can just give a
coloring of the pink Nash. Let us go with the outlining
of the shock phase, which was drawn from
the alphabet X. First, tried to outline the
shock at then the black, Let's sketch pen, then
the tail of this shock. Finally, the lower part, also the things of the shock. Notice colored with
the light blue color. First, start with the left
part of the face of the shock. Then they face of the shock continue coloring
till we finish. Then the gills and different
to be colored. Shag. Finally, colored detail with a blue color sketch pen
To Color carefully. Way you will not miss
any color unshaded. Yes, here we are done with
the coloring of the fish. Nash. We will color the orange
color for the autofocus. You can see I am just using orange color shading
from the left, then the opposite direction towards the coloring
of the autofocus. Now they're discolored. They can turn off the auto bus. Once we are done
with the coloring, we will use a black
color sketch pen to outline the Auto Pause. Go to eyes, then a phase where they are
toppers, it's been smiling. We can also enlarge the ice then Gibbs
outline for it enters. Yes. Here we are done with
the coloring of the art of us. Moving forward. Let us color for this. So as Deborah has the
black and white strips, we know that we can just
outline first with the Zebra by outlining its features of ice here and his body towards
the end of this evidence. Then let us give the
outline for each trips. Trips are busy, butter
has been outlined. Again. You can add another
strips wherever you need it. Now, for these tapes, you can color with the same
black color sketch pen. Here we are using the black color sketch
pen for ZBrush trips. You can also add other
scripts and rushed to be left uncolored as our drawing
sheet is white in color. So here we have completed the coloring and shading of
outlining from these ad. Finally, from the alphabet U, we have drawn a frog. From me. We have
done a parachute. From w. We have drawn the drum. From ads, we have drawn
the shock fish from why? We have drawn the autofocus and from desert, we
have drawn zebra.
 Abul Hassan