Transcripts
1. Introduction: Hi, My name is Diana. I'm a graphic designer and photographer. Welcome to my skill Shared cost. Do yourself the buying process for this class. I will be teaching you how to make an accordion style with We will go over all the material sent tools that we're going to use for the project. I'll walk you through step by step on, creating the different components of an accordion style look book and show you how to put them all together. This class is open toe all levels and no experience needed to accomplish the project. This is for anyone who would like to learn some basic book bite Ning and also wants to create their own design to make their project for the class project, you'll be creating your very own according style of book. Take photos of your finished project and share your images with everyone in the class gallery. If you are ready to learn how to make an accordion style of book, then head on to the next video materials and tools
2. Tools & Materials: Okay, so let's talk about the materials and tools that you will be needing for this project. Let's start with the covers. So these are the mat boards that already cut two dimensions that I want him to be for the project. I like Matt boards because they are thicker and 30 year that chipboard. You can also use chipboard if you want, but I prefer matte board. So this is gonna be for the front and back cover, and then another part of the cover, um, is the materials were going to use to wrap the cover with? I have some fabrics here just to give you an idea different kind of fabrics that you want to use, um, have different colors and design. So, um, probably for this spread project, I will be using this one. Um, you don't have to use fabrics. You can also use, um, decorative Kraft paper like this one. Or I believe we can also views cloth papers and they are available at any craft store. So that's for the covers. And and this is the paper that we will be using. And this is a water color paper. It's cold press and also you can use you can buy Buy it from crap store Now for the tools. Ah, Stamos. Still ruler I I highly recommend using a stainless steel ruler because it's a lot easier use it, especially when we start cutting. So if he couldn't invest on a stainless steel ruler, um, I highly recommend it. You can find it also crap store and very inexpensive and will also be using pair sisters from when we start cutting our fabrics or Kraft paper, whatever it is that you're gonna use to wrap your covers And right here we have two different kind of two different kinds of cutting tool. So we have exact tonight It's really sharp. Um, so I got this one because it has a rubber tip handle, and it's a lot easier to hold it special when you start cutting its more controlled and it doesn't slip. Then I have this, um I guess box cutter tool. It's also sack total brand. It doesn't have to be exact. A brand. It could be any any brand that you want to use, but we're gonna use this when we start cutting the matte board. Um, okay, it's for the cutting tools. And here's a bone folder. We're gonna be using this when we start folding are textbook text block will be the watercolor paper, and this is what we're gonna use for this spread. Well, that's what I'm going to use for the project. I'm gonna show you how to make um, next we have Elmer's glue. Um, again, it doesn't have to be in Elmer's brand. Any craft bond tool can work for this project. This one is good for both fabric and paper, and it dries clear and it's acid free. You want it to be acid free. So whatever images that you're gonna be gluing onto your tax block, it's gonna it's not gonna have this yellowish residue as it you know, um, as they age, I believe so. This glue this what were what I recommend and then brushes? Um, nothing fancy. Doesn't have to be very expensive. Any kind of brushes you can use. We will be using this for when we start, um, gluing materials together. And I have a small bull ra here, and this is where we're gonna pour the glue and and we're going to dip our brushes here and that's how we're gonna apply the glue onto the materials. So I prefer using this because it's a lot cleaner and you have You can control the amount of blue that you will use onto the material instead of just using it straight from the bottle and squeezing it out from it. And it's just gonna create this big bigness. So So that's it for the tools and materials. Now, I guess, Let's start with, um, the next video, and I'll show you how to measure and cut and fold your textbook right?
3. Text Block (Making Marks and Folds): Okay, now we're me. Our test this 40 looking for cheaper. So just for to take our order, Paper making marks the full marks. So let's start for marks. Since our this measure by inches and you already cut our boards, the perverse that we're gonna be using for the according now, our text block it's gonna be for it's measured again. You're putting. It's gonna be really useful starting mission stuff because we can use the grids mission. So go ahead and start making my worse. It's best for this. - Okay , so now we need are full Moore's All right. Text flop. We're okay. Text to I think this. Okay, we're gonna take our work and our folder just fine. Okay. For the 1st 1 I'm inside the paper. This I used to tip of our bone folder. Just lift the paper. And as we are doing that are starting to We're creating a crease here. This is what you're doing. And make sure to Chris. Right? Hold on. A builder. Very so slanted side of your Have that preys. No, crease. I see it. Yeah. Have that priest right there are going to full sure just of your paper there's And then again, we're gonna take our own father in other side as well. We're also gonna do so we're gonna keep doing this, Uh, fully to me. All the cops, it we need Teoh and finish this fast. Forward it and just okay. Here we go. Use folded. According stuff. Text block.
4. Text Block (Connecting Text Blocks): All right. So now, way to text loss here that we are going to live together to me. Textbook. I'm sure you have earlier kidding, Owner. What for? So now the terrible used just to connect the other text. So what we have here is our crap bond. Live in a bowl and brush. So just gonna poor so right about that. Now, I don't know if you can really see it anyway, so that never a lot so you don't waste your blue. So are to text pools. You have to make sure there what were you doing to the other is gonna line up perfectly. So I'm gonna take this and this side of this other textbook and just check make sure pulled direction. So yeah. So now gently pull this. You're gonna take our brush did it too. And we have this much matter. Make sure you don't go over get grace line right here. So just all the blue, not a no. I put too much because we're gonna press a text block to this tab. And you don't want any glue losing. You know a way to decrease this paper so you don't get blue I met. Could, All right. It's like having testicle. Sure, it pulls nice and just I just Okay, so we're just gonna let it. I just just
5. Making the Covers (Measuring and Cutting): in this video, I'm gonna show you how to measure and cut your board. So what I have here is the that little going to use for the covers of more according look book. So before I measured this, I have my photos, that booth inside that according so the reason I have this ISS because we're gonna base the size of the image. What size cutting boards. So for this image, is this our photos? When we went out camping to be there and I decided to create a 40 and look a friend So just something special instead of like, you know, putting the photos in anyway, So I'm gonna Mischer. It's four four by four now, since the since the photos that were boom that I'm going to go onto the text Lakis four inches. You want to add the police inch of margin? I'm at work that way. If we have an inch of margin, we can add happen inch Teoh textbook. So I'm gonna go ahead and measure this here for so for another inch five in business because we will be using grids. Yeah, Okay. - Going to cut it. So when you are cutting that board. Make sure you have please here. Perfectly line. And right before you start cutting, make sure you have their fingers pressed onto Ruler s. So that way, you know it's not been asked. You start. And when you do cut putting a lot of pressure onto the lake, you're gonna do several cuts. So basically, you're gonna keep going on ward separate. You can add a little pressure, but not so much that you do not want your blade. Yeah, on your marks. Too much pressure, you know? No, that's
6. Wrapping the Covers (Measuring and Cutting): Okay, so we I just finished cutting our map boards to mentions that we wanted to be. Now we are going to measure our after it so we can make so you can wrap it to. So what I have here is the fabric that I chose for this project already. Materials, but for this video much. Okay, so I'm gonna take one of the mat boards, place it top of the fabric just to see how much material. So I like to have at least an inch of material. It can be a little over it. Really? The pants on the size of your text block because your text walk little recovering the the collapse of the fabric once he blew it to the board. So I'm gonna go ahead and under the textbooks. I'm going. I'm going to pull this down. So this right here is just probably a little over an inch going to fold it. Take game, take this side and they're gonna take text. Goal, Please cover. Oh, yeah. So way have less than less than 1/4 of an inch exposed inside. So that's definitely wraparound are So go ahead and cut this So I'm just gonna leave the man work here. I take mine a pair of scissors to cut the fabric. So I'm gonna go ahead and just fast forward it from this point. So, Chad Raber, we know that we have plenty of materials to wrap around. So go go ahead and cut another piece for the other.
7. Wrapping the Covers (Gluing): Okay. So finished cutting fabric. The materials that were used to cover Matt over here. So now we are going to glue it. And do you take your paper? Okay, so this is the outside over, and we have a crap bomb here. I went ahead and squeezed out. Some blew into my goal. My paper here that we're gonna use to apply the glue to the fabric. So take the Met four places. Okay? If you really want to be accurate with the measurement, you can always use the grid lines from your man cutting that. So now what we're gonna do, we're gonna take a corner of your fabric, pulled it over and full, just kind of use your fingers to down and press it down. So you want to take into that corner, hold on to that former down, and then start pressing the material on the edge right here on the edge of the math board. So what you're doing is you're creating some crease lines to help you. Well, the crease lines will be we'll use is guide to where you're gonna be applying the flu so you don't go over. You don't put too much glue into the fabric. So now, um, something Chris ones are very against. I can see it. We're my stopping point for the blue. So I'm gonna dip my brush here and star applying some glue. Okay, Not too much. Just enough. Since this fabric is really thin, I really don't need to put too much. And you don't want your blue to bleed through your fabrics. Take that corner, start pressing it down. What I love about this really states perfect. Yeah. Okay, so we're gonna do all that to a lot each corners of the the average. So we have three more here. I'm gonna go ahead and fast forward on this point. - Okay ? So just just finished blooming all four corners. Now we're gonna take each sides of and pulled it over. We're gonna put glue and fold it over. So we're going to start with flying blue inside the fold right here. Not too much, just enough. So we're gonna press that part, Okay? Do so too much. Okay, so now we have blue inside way are going to applying blue, going live to your interior. You really need to brush it because the glue isn't dry that they were quick. But you also do not want to take your so you can just move this quickly as you can, but also at the same time making sure that you are applying enough glue and you're heading the ride. Please. This So you're not missing spot. So now we have the blue cool down. Make sure to grab, grab and hold as tight as possible. Okay, Just press onto the map board, keep pressing, keep working on that fabric. So it's nice and tight. You can feel it if you have some slack. Okay, That's no there. So I'm gonna go ahead, finish the rest of the lapse. I'm just gonna go ahead and fast board from this point.
8. Combining Text Block and Covers: okay for this video, we are going Teoh, combine our textbook in our covers That's already been wrapped with fabric. You can see they look different. I made a mistake rapping, one of whom I couldn't even remember. But anyway, I minimum stake and I didn't notice that I over the fabric. So now they I have blue and white polka dots, but I kind of how it looks because kind of, you know, shows the difference. I see you have the front and the back or the back or the front. Anyway, So there's happy accidents. I guess so, Anyway, we're gonna combine this two components together, textbook and covers. So we have our blue. And for this one, I'm using a bigger brush because we're gonna boo this full side of the textbook onto the cover, so we're gonna need a bigger brush. That way we can pick up more blue compared to using a small brush. So bigger brush for bigger areas and small grows for small areas. Just like you already poured, squeezed out some blue in my bowl, just moved to the side. This we're going this I'm going to take my one of my covers, place it right there and then grab text. Just figure where. Okay, So you want to make sure that your textbook part of the textbook, right? It's gonna be global. So I think my center. So you just want to see what it would look like. Go. All right. If you don't want to lose that, please. You can also say your pencil on creating more. That's up to you. That's one week to do it. So So you know for sure that your text block is gonna be placed in the center. Go ahead. And I think this over, and I'm gonna start. Make sure when you pour glue to the watercolor paper, too. That your warning blue. You have area. And also make sure you're getting old just so this I would recommend using a wide, flat brush. - Okay , So good living. And for those that many marks on your cover, Sure, but your text. Okay, so just press it down. It just you can even take your folder. Okay. You can take your bone folder and make sure that you're Texas law. This? No, I sleep. Press on to cover. We'll go. Sure. That flew six safer. So now I'm gonna go ahead the end of the text block. So we're just gonna leave that? Yeah, the other cover. And we'll do the same thing that we did. Since this is a perfect square, you really don't need to check it. If iss right, it's on the right side. But for those that are doing, like, a tangle size, please make sure that before you blew your text block to your cover that the orientation of your cover matches the orientation, the other. So if you have, if you have your cover in a portrait format, make sure the other end of the, um, text block. I mean, the other cover is also port in a portrait format. For this one. I have square. They're perfectly matched. All right, So yes, - over . Please take your don't know where. Pressing on for sure. Blue. Right. So just gonna like this, we're gonna just let it go
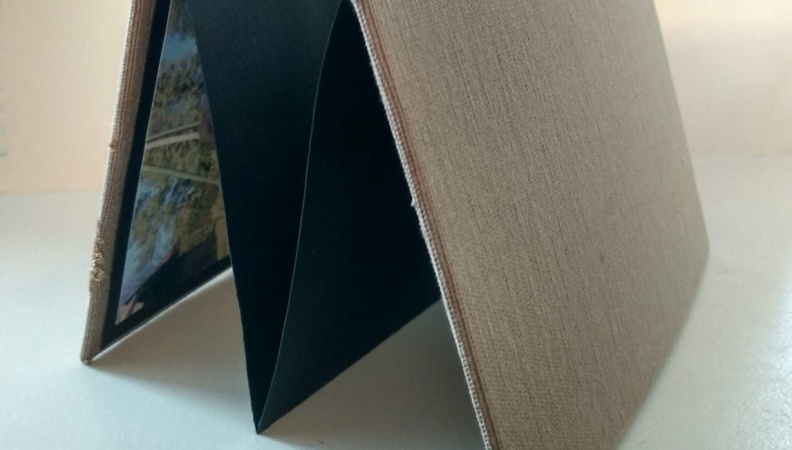
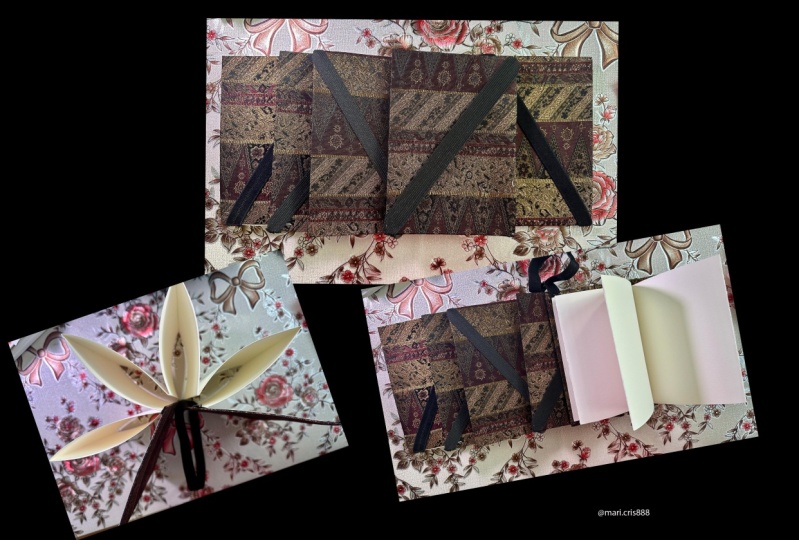
9. Finished Project (Final Thoughts): Okay, so I already finished blooming the photos onto the textbook, and this is what it looks like. So happy having came there. So they started photos I took when we went to the there for camping trip. That's my little girl right there. Miss Yamada on. She is just chin outside. It's a summer and summer here. South Texas is very very. There's my husband and my other daughter right there. There's me till seeing my daughter Rhoda, enjoying her ice cream, taking Sophie's and where we were just chilling here. The river. It was amazing to the other side, and there's more photos. There you go. So you said 40 style football. I am the Una and thank you for watching my class video. I hope you had fun learning some basic book binding process. And please don't forget to share photos of your finished project. Can't wait to see them by
 Diana Caragan Stinyard, Artist/Designer/Photographer