Transcripts
1. Welcome To The Class!: Hello everyone. My name is will Elliston
and in this class we're going to learn how to
paint a majestic turtle. They're marvelous
animals to paint in watercolor with their
distinctive characters, offering loads of
artistic opportunities. Their shells for look
fascinating textures are a playground for
the watercolor brush. From vibrant turquoise
to earthy browns. Turtles have a beautiful palette for our watercolor
paintings as well. Through the process
of painting turtles, we can explore the
delicate interplay of Colors, tones, and textures. I've been a professional
artist for many years, exploring lots of
different subjects from wildlife and portraits, cityscapes and
countryside seems. I've always been entranced by the possibilities of watercolor. But when I started,
I had no idea where to begin or
how to improve. I didn't know what
supplies are needed, how to create the
effects I wanted, or which colors to mix. Now I've taken part in many
worldwide exhibitions, been featured in magazines, and been lucky
enough to win awards from well respected
organisations, such as the International
watercolor society, the masters of
watercolour alliance, Winsor and Newton, and the SAA. Watercolor can be overwhelming
for those starting out, which is why my goal
is to help you feel relaxed and enjoy this medium
in a step-by-step manner. Today, I'll be guiding you
through a complete painting, demonstrating a variety
of techniques and explaining how I use all
my supplies and materials. Whether you're just starting out or already have
some experience. You'll be able to
follow along at your own pace and improve
your watercolor skills. This class is too challenging
or too easy for you. I have a variety of classes available at different
skill levels. I like to start off with a free expressive
approach with no fear of making mistakes as we create exciting textures
for the Under-Layer. As the painting progresses, we'll add more details to bring it to life and
make it stand out. I strive to simplify
complex subjects into easier shapes that
encourages playfulness. Throughout this class, I'll be sharing plenty of
tips and tricks. I'll show you how to turn
mistakes into opportunities. Taking the stress after of
painting in order to have FUN. Also provide you with my
Watercolour Mixing Charts, which are an invaluable tool when it comes to choosing
and mixing colours. If you have any questions, you can post them in the
discussion thread down below. I'll be sure to read and
respond to everything you post. Don't forget to follow
me on Skillshare by clicking the Follow
button at the top. This means you'll be the
first to know when I launch a new class
or post giveaways. You can also follow me on Instagram at will Elliston
to see my latest works. So let's dive into the
captivating world of painting turtles and explore
all the possibilities of watercolor has to offer. Are you ready? Great, Let's begin.
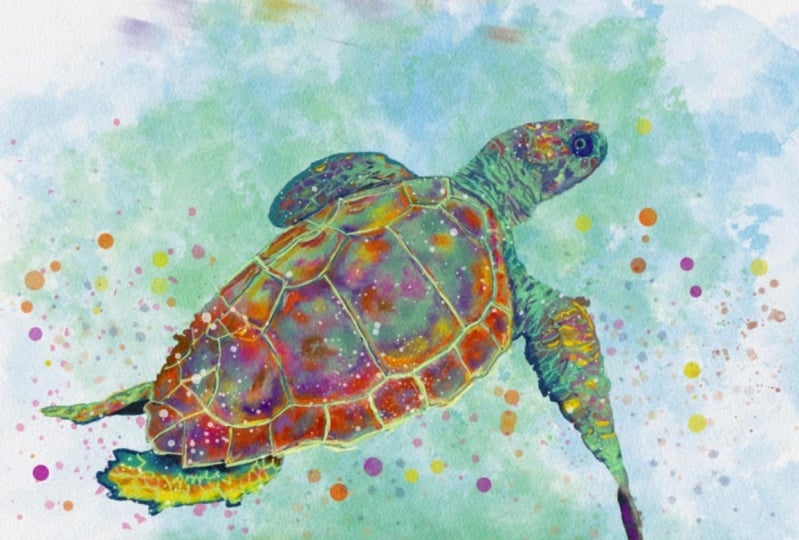
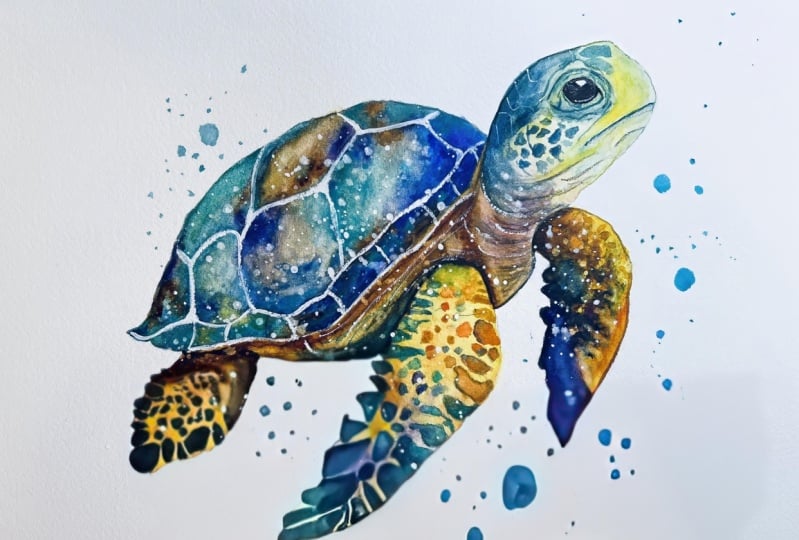
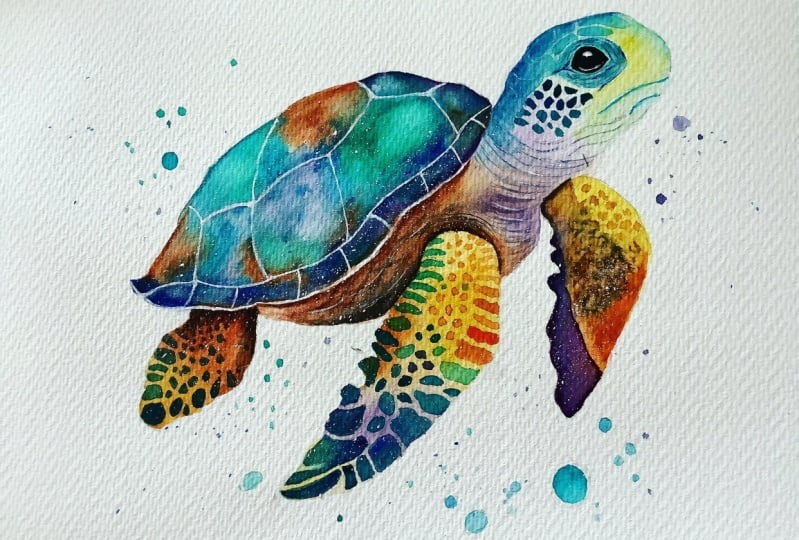
2. Your Project: First of all, thank you so
much for choosing this class. I'm thrilled you're
here ready to Alicia creativity and
painting a colorful turtle. During this class, we will explore different
watercolor techniques, including wet on wet glazing
and dry brush to bring out the vibrancy and texture of the turtles
skin and chow. We'll also delve
into color mixing, enabling us to create a harmonious and
eye-catching palette. There's a nice range of
expression and detail in painting Turtles with elegant layering of
bold and painting The Scales and exciting textures
and painting The Shell. In the resource section, I've added a
high-resolution image of my finished painting
to help guide you. You're welcome to
follow my painting exactly or experiment with
your own composition. As we're going to be focusing on the painting aspect
of watercolor. I've provided templates
you can use to help transfer or trace the
sketch before you paint. It's fine to trace when using it as a guide for
learning how to paint. It's important to have that
under drawing, correct. So that you can relax and have FUN learning the
watercolour medium itself. Whichever direction
you take this class, it would be great
to see your results and the paintings you
create through it. I love giving my
students feedback. Please take a photo
afterwards and share it in the Student Project
Gallery under the project and resource tab. I'm always intrigued to
see how many students have different approaches
and how they progress with each class. I'd love to hear
about your process and what you learned
along the way. Or if you had any difficulties. I strongly recommend
that you take a look at each other's work in the
student project gallery. It's so inspiring to see
each other's work and extremely comforting to get the support of your
fellow students. So don't forget to like and
comment on each other's work
3. Materials & Supplies: Before we start the painting, Let's go over all
the materials and supplies you'll need
to follow along. Having the right materials can greatly impact the
outcome of your artwork. So I'll go over all the supplies I use for this class and beyond. They're very useful to have at your disposal and we'll make it easier for you
to follow along. Let's start with the
paints themselves. Unlike most of the materials
will be using today, it's a lot to do
with preference. I have 12 stable colors in my palette that I
fill up from tubes. They are Cadmium
Yellow, Yellow, Ochre, Burnt Sienna, Cadmium
Red, Alizarin Crimson, Ultramarine blue, cobalt blue, Cerulean blue, lavender,
purple, Viridian, Black. And at the end of the painting, I often use White Gouache,
but tiny highlights. I don't use any
particular brand. These colours you can
get from any brand. Although I personally
use Daniel Smith, Winsor, and Newton
for Holbein paints. So let's move on to brushes. The brush I use the most is a synthetic round
brush like this, a Skoda per brush. For this Van Golf brush. They're very versatile because not only can you use them for detailed work with
their fine tip, but as they can hold
a lot of water, they are good for
washers as well. That also quite affordable. So I have quite a few
in different sizes. Next are the mop brushes. Multiple brushes are good
for broad brushstrokes. Filling in large areas and creating smooth
transitions are washes. They also have a nice tip that can be used for smaller details. But for really small details, Highlights or anything
that needs more precision. I use a synthetic
size zero brush. All brands have them and
they're super cheap. Another useful brush to have is a Chinese calligraphy brush. They tend to have
long bristles and a very pointy tip that perfect for adding texture or creating dynamic lines
in your paintings. You can even fan them
out like this to achieve for or the
other textures as well. And that's it for
brushes onto paper. The better quality
of your paper, the easier it will be to paint. Cheap paper crinkles easily
and is very unforgiving, not allowing you to
rework mistakes. It's harder to create
appealing of facts and apply useful techniques like
rubbing away pigment. Good-quality paper, however,
such as cotton base paper, not only allows you to read
work mistakes multiple times, but because the pigment
reacts much better on it, the chances of
mistakes are a lot lower and you'll be more likely to create
better paintings. I use Arches paper because that's what's available
in my local Art Shop. Awards spray is
absolutely essential. By using this. It
gives you more time to paint the areas you
want before it dries. It also allows you to
reactivate the paint if you want to add a smooth line
or remove some paint. I also have an old rag or teacher which I use
to clean my brush. Cleaning of the Paint
before diving is in the water will make the
water last a lot longer. It's always useful to
have a tissue at hand whilst painting to
lift off excess paint. Also, you never know
when an unwanted splash or drip might occur that
needs wiping away quickly. I also have a water droplet
to keep the paint is wet. When you paint, it's
important to have them a similar consistency to what
they're like in the tubes. This way, it's easier to
pick up sufficient pigment. A hairdryer is useful to
have the speeding up the drying time and controlling
the dampness of the paper. And lastly, masking tape. And this of course is just to hold the paper down still onto the surface to stop it sliding
around whilst painting. Also, if you plan on
painting to the edge, will allow you to create a
very crisp, clean border. And that's everything
you need to paint along. I encourage you to experiment and find out what
works best for you. Now let's get on and
start the painting
4. Drawing The Main Shapes: So to start off with
a sketch, as ever, I'm using a soft lead, this one's a to B.
I'm just going to break everything down
into small simple shapes. Gonna do them first and major
shape which has The Shell. Then the little limbs
coming off them. Little spheres. The head can come up
here. An already. You've turned the simple shapes
into something that could be easily recognized
as a turtle. And I'm just going to add
a few more of the details. Few organic Shell patterns here. The neck. Starting to connect all these simple
shapes and add to them. You could do this
with most subjects or animals you want to paint. Breaking everything down
into simple shapes. Using the rubber to
do any corrections. Then going to smaller
details like the eyes here. At this stage, when I'm using
my pencil very lightly, I can easily, easily just rub out and make any corrections. Before I go into
the fine details. These don't wanna go into the
fine details until you know the larger picture is correct. And you can take more time
doing that once you know the main layout is all correct. I think I'm starting
to get to that stage. I think it's all correct. So now I'm going to take my time to add in a few
of these details. I'll do this off
camera because it just takes so much time adding all, all these little details. And I'll use the rubber to
clean up some of the lines. And in the next video,
we'll start the painting and get your drawing
to that stage.
5. Painting The Shell: I'll be using my
regular palette, but I'll be emphasizing
Cerulean blue, the Burnt Sienna,
maybe some purple. And this tube of
Cobalt Teal Blue. I'll be using to get some really nice rich turquoise colors. We'll start off with the Shell, because that's where
we can really exploit. Some of the nice
watercolor effects and textures can express
our freedom there. I'm just gonna go
straight from the tube here and just put
blobs on the lines. Because I want the dark areas to be on the outside
of these shapes. Then we'll use the
Watercolour to push them out. Use the water to mix
them and spread out. I'll start that's the
Cobalt Teal Blue. And I'll get some
Cerulean blue here. These two colors, when
they mix together, they're so beautiful
I like tropical sea. Don't be afraid if you lose, your lines will come back to
that later in the painting. At the moment, it's
just about creating an express four color
palette on your page. Paper. You don't have to get this. You can use viridian green straight from your
normal palette. More Cerulean blue here. I'll take a bit of a
different blue here. Really explore, maybe
I'll take some purple just to show you the different
effects you can achieve. I'm going to take
some Burnt Sienna to a few thick blobs
of this as well. Burnt Sienna, the IOUs
from Daniel Smith. And it's great because as it mixes and dilutes
with the water, it really goes very vibrant. Now, I'm going to wet, add some water into
these, these palettes. Hands. Pure water because
we're going to create a nice wash to
intermingle everything. Create your favorite color. It's gonna make a
turquoise color. One bit a bit more blue, one bit a bit more green. So using my number eight
is Skoda brush here. I'm going to fill this brush. Starting at this end. I'm just going to go over it. Activate that pigment. Making sure don't
go over that line. You can go over the line
if you want as long as it doesn't go so far of the line. And I think to keep
the playfulness, long as it doesn't hold you
back from your playfulness. And you'll see as
these colors merge, they create such a nice effect. They intermingle. Some of the heavier pigments, overlap, the lighter pigments. And they'll come
through and really show nice pretty sections. You don't need to worry
about the white lines. Because we'll come back to that at the end
of white quash. More green here. I think it takes a bit more selecting a bit there. Now I just want to leave
it to do its magic really. Maybe I'll do it. Maybe I'll do just that as a
very dangerous thing to say. Maybe I'll just do
that because just that sometimes there's a mistake
that you will regret later. But I think that's
okay at this stage.
6. Painting The Under-Layer: Now, while that is drying, we can move on to the
Under-Layer of the limbs. For that, I'm going
to have a kind of Yellow Yellow and Yellow
Ochre that's for the base. Maybe Burnt Sienna. Just there. Just The Under-Layer, of course. Make sure you don't
touch The Shell. As well as they
all come bursting back and intermingle
and we don't want Not yet with this painted
that section there, then I'm taking some of this yellow and starting
from the other end. Connecting them. Again as
this is the first layer. We're ignoring the little
patterns that they have. Taking some mothers
Burnt Sienna, very thick pigment again, I'm just layering it on there. Same similar thing here. Let's mix it up a bit though. That's start with
a yellow up here. Then maybe it goes through
orange down here a bit. And then once that's
what we'll mixed in, a nice complimentary color
to yellow is Purple. So let's a bit of purple
in there, just a bit. Then they can go back to
Yellow right at the bottom. Now I'll do a
similar thing here. Let's start with
a yellow up here. The thinner, you keep the
Yellow more vibrant it is. It uses the white of the paper
to highlight it even more. Then as it comes down there, Let's take a vibrant
red, mix it, make a nice bright orange debits. And then as it dries,
it will blend nice and smoothly. It's very wet. It's difficult to get hard
lines so you can be a bit more free with
your blending. See how all those dry brush marks we put at the
beginning have started to melt out and create
some nice blends there. I'll have Purple on that side, but I want there to be a hard
line there for the shadow, so we don't really need to worry so much about that
at this stage. Going to clean my brush like a tiny bit of
water on there, create some patterns,
more exciting patterns
7. Painting The Head & Body: Now I'm going to paint the
head part of the head, starting with this yellow here. Let's make it a kind of
greenish yellow for the head. Connecting it there. I'm a bit more yellow, I think. Just whatever you feel like
I'm saying all these things but how I'm feeling at the time, if you want to put Yellow there, if you want to put
Purple there, you can. I'm just showing you
the different options, but you can experiment
with your own little. You put your own spin on it. I'm going to take this purple and a bit of purple and there. Maybe bring that up a bit. I think this body, I'll have a bit
toned down a bit. And do that. I'm just going to add
a tiny bit of black, Purple back in a bit. The Shell is still wet, so I'm making sure I didn't connect The Shell the
top of the shower yet. Absolutely. Spills out. Extolled the edge. Still wet, it will bleed out. Now, I'm going to
use a hairdryer
8. Strengthening The Tones: I'm just doing a
few corrections to the Tones. Won't
necessarily correct. So just a few things
that I think I should add that to be a bit
over darkness there. Where the patterns are. Just bring that down
a bit. Just a bit. Maybe here I can. Yeah, a bit more blue,
turquoise color. Now starting here, I'm going
to add darker pigment again. I use this to thicken
up the pigment a bit. Rather than the palette. I'm just going to put
some dark pigment just in their use. Just a bit of water light wash, bring it out to
blend it out a bit. Didn't want to do that on
the first time around just because I think he would
have gone out of control. Britain, the second layer, you've got more time to correct and change things. Excellent. Pigment again, using the tip of the brush, just adding the text
is there on the skin. Okay, around here. I can think of the
thick pigment in there and getting more Burnt Sienna. A line just underneath
where the shell starts Cleaning the brush and
living it. Blend out a bit. Blending out by first doing
a stroke of water and then interfering with it so
that it moves around. During these lines like
wrinkles in the direction. The term turtles neck. I went over there but
I'll clean that up a bit later. Happens to everyone. Now I'm going to start
adding the textures. The the limbs, legs, the thins. Not sure what they're called. So to do that, I'm mixing
some dark turquoise. And I'm going to
change my brush. Because this brush I've just noticed there's
losing it's pointed it. It's going to have to use a
fresher brush, a new brush, same size, a bit newer,
that has a point there. So I can really get in to
the details a bit better.
9. Painting The Scales: And this is the time-consuming
part, which i'll, I'll speed up because
there's not much to learn over than repetition of just painting out
these little patterns. Now I go over the
edge a bit of yellow because it creates
a nice border. Overlapping into the white. Makes it more dynamic. Sorry, I create these kind of organic looking shapes around the edge and then in
the middle there more circular, more like little dots. Like a mosaic from adding
little mosaic in into their smaller, the closer they
get to the body of a Shell. I'll do a few lighter ones here. Eventually you can just
do one little stroke. They fade into the Shadows. That's one of them done. Let's
move on to the next one. Okay. This one's a bit more
detail to the central one. Is there gonna be
the central focus? So you got to spend more time and concentration on the middle one
than the side ones. But still have FUN. Funding, having FUN is
most important parts. Wet it a bit like
that and then add different colors while it's still wet and then
it will bleed out. And let me show
you example of how to do quite a dynamic one. So start off by wetting the area like that. While it's still wet,
one end can be green. You can pick up some blue and
drop it in the other side. Mike, keep that
little dot there. Because I'm going to add
some in later anyway. Then on the other side, some green, then maybe some purple. And then not just mixes it
all up and that creates a nice interesting flow. What kind of like the
Purple aspect of that? I can clean up that way because I want
to add more colors. Blue and green. Green as well in that one. So I'm mixing greens. Green on one end,
Blue in the middle, and Purple on the other end. Then doing variations of
those free colors all around. Painting the outlines. Then filling in the middle. Purple. Can you talk to green? That's Phyllis, up with
a bit more Cobalt Teal, stealing colors from the other, just to keep it all unified. Trying to keep the edges
smooth rather than jagged. Lightest, blue one right here. The green. They go, I think I'll get them. Have them a bit greener. Right here on the corner. This is a good practice
for brush control and how to manipulate the brush. Do what you wanted to do. Practice your finesse
and detail work. Make this one a bit darker. Mixing more of the
green. Turquoise. Going to start to
Mixing this brown, make it more vibrant
in this Burnt Sienna. So much easier to paint
when you're brush has very fine tip. And as it goes up, I'm going
to mixing some yellow, maybe even some vibrant
orange in one of them. Just to really make
it pop. So Blue. The very top pure yellow. Wash that out a bit,
make it a bit messy. Few more details here.
10. Adding Shadows: Okay, Now I'm going to add the blue and purple
shadow there. Start off again
in these corners. I'm just going to go in
with some heavy pigment. Now I'm going to mix
the palette again. Mix some nice purple. Starts off of that
down the bottom here. A nice hard edge here. For that lack. I can put
little dabs of blue in there. It should be a lot
wetter actually let me make it a bit wetter. Having pain. Now. Blue here, at the top here. Dance Sienna, Black. Following the edge. Connecting it. Then blending it. Flicking around with a brush, make it come out
in an organic way. Maybe a bit darker. Red, Purple again, thicker and bluer. Leaving a few gaps to
make it interesting. I can do a similar thing I can. It makes it an orangey, does too much orange. More like Yellow. Start adding with thin fin or
limb patterns here. Come on there but
have shading maybe
11. Creating Texture: I'm gonna do something
quite drastic. I'm going to add a
bit more pigment here because I think
there needs to be a bit more contrast. That's pure Burnt Sienna. Right? They're going to wet it again just to smooth. Maybe take a greenish, turquoise and do the thing here. Safe to look in that line of it. I'm not going to draw it
off with the hairdryer. Flick some water on
their pure water. Wait a few seconds. Okay, a bit more texture on
the underbelly too, a bit
12. Painting The Face: Now I'm going to
paint the head here. Starting off with
turquoise, green. Almost the same color. As the Shell. Fades out. Stronger here. Then smoothing that line again. If it dries this rabbit
in a circular motion, how blend a bit more smoothly? Now, I'm going to wait
for that to dry a bit. Actually let me does need to be a bit darker
right on that edge. Okay. Then to paint in the mouth is just
a very simple line. A line with thick pigment. Then very, very smoothly. Adding another line underneath. The water will blend down. Shadow, giving, giving
us the illusion of LEP. Same thing here. If you have a wrinkly
lines here just to add to the feeling of it. Okay, back to this green. Going to start painting the eye. First of all, I'm going to
play to the outline of it. Don't worry about the
middle because we will paint that in solid black. When it is drawing
a few more lines. More lines coming
off it like that. Then there's the hairdryer
again just to dry it off. Now I'm just going
to emphasize with my pencil because I've
lost the line of it. Where the middle of the eye is. I'm about to paint it black. I just want to make sure
that's absolutely correct. Okay. Now, getting quite a
lot of black on my brush, filling that in completely. Now I'm going to
wait for that dry. While it's drying, we can
paint a few more Scales. Notice how we've painted, always painting with just
the number eight brush. As they go lower down, I'm just making them
slightly lighter. Pulling the painting together, or at least The Head together. With a few more details. To add a bit more yellow here, just to add a bit
more definition. Bit more 3D
13. Patterns On The Shell: Now I'm guessing
my White Gouache. This painting out the shapes, Shell, the pattern. I can very faintly see the
lines, but it doesn't matter. You can if you can't
see the lines, then it doesn't matter.
You can make it up. Making sure I've got
a very fine edge by playing down the brush has. Then just to such
a small thing like this makes a big difference. Really makes it
visually, makes sense. No, I can't see the
pencil lines at all. Here's how I'm just going to
make it up as I go along. Don't want to overdo it,
so I think That's fine. And then around the bottom here, no time for just a few
little dots going along.
14. Adding Highlights: While I've got this in my hand, I can do the highlights. I, I kind of curvy triangle. I'm going to do a similar
thing up here. The pattern. Few more details. Tissue in hand and a wet brush. Painting, plain water. Some of those scaly Shapes rubbing away like cleaning up that
mistake I did earlier
15. Painting Bubbles: Now what I'm gonna do is add some artificial
Bubbles or Splatters. Use the turquoise water
colour to do that. Starting off with this big one, just to get things rolling. Just gives it a feeling. Like it's not just
floating in the air. It's actually in the
sea or in the water. For the up. Quite
a lot like that. Go up here and do
the same thing. That needs to be
perfect circles. They're not perfect circles. Just bubble-like Shapes, Splatters. If you want to. Maybe make one a bit more green, then one that's much
bluer, just Blue. This bits easier if you
have your brush fully loaded with water than it just falls off the
brush quite easily. Okay. I'm going to dry that off. If you pull up just before
it completely dries. If you either tissue and
pull away some of them, it'll give it the texture of a kind of bubble
because there'll be darker around the edge
16. Optional Splatters: Then the last thing to do, which is completely your
oxygen as everything is. So you can adapt this
to how you want it. I'm gonna take a larger brush, my Chinese brush, but it doesn't matter what brushes as
long as it's a bit larger. And I'm just going to take
again the White Gouache. You might want to cover your belongings or do this
outside or in the sink, because I got a bit messy. Let's do a few white Splatters. Again to add to the idea
that it's in the water. You don't have to
do that. You can check the before and after. And if you don't want to have that detail on your painting, then you don't have to leave it as a little
option at the end. So that's it. I think I'll have another look in a couple of days time to see if
there's anything else. But let's sum it all up.
17. Final Thoughts: Welcome back and congratulations
on completing the class. I hope you had phon and if you haven't already given
this painting ago, now at the time to put what
you've learned to, to action. Throughout this class, we've
explored the beauty and intricacies of turtles as
subjects for Watercolor, relearned how to make the most of the nature of watercolour, allowing the pigments
to blend and create a sense of movement and
life in our paintings. Through experimenting
with various techniques, we created depth,
richness and realism. We explored how different
colors relate to each other to create
a pleasant harmony. By using a range of values
from light to dark, we were able to achieve a
three-dimensional effect, emphasizing the form and
texture of our turtles. Remember, watercolor painting is not just about technical skills, but also about expressing your creativity and
personal style. I encourage you to continue
exploring, experimenting, and pushing your
boundaries to create your own unique
watercolor masterpieces. As we come to the
end of this class, I hope you feel
more confident and comfortable with your
watercolor painting abilities. Practice is key when it comes
to improving your skills. So keep on painting
and experimenting. I want to express my gratitude for each and every one of you. Your passion for watercolor
painting is so inspiring. And I'm honored to
be your teacher. If you'd like feedback on your painting, I'd
love to give it. So please share your painting in the student projects
gallery down below. And I'll be sure to respond. If you prefer, you can
share it on Instagram. Tag me at will Elliston as
I would love to see it. Skillshare. I also love seeing
my students work. So tag them as well at Skillshare after putting
so much effort into it, why not share your creation? If you have any questions or comments about today's class, all want any specific advice
related to watercolor? Please reach out to me in
the discussion section. You can also let me
know about any subject. Wildlife will see me
lightly to do a class on. If you found this class useful, I'd really appreciate
getting your feedback on it. Reading your reviews fills
my heart with joy and helps me create the best
experience for my students. Lastly, please click
the follow button up top so you can follow
me on Skillshare. This means that you'll be
the first to know when I launch a new class
or post giveaways. I've hope you learnt
a lot and are inspired to paint more in
this beautiful medium. I look forward to seeing you
again in future classes. Until then, happy painting
 Will Elliston, Award-Winning Watercolour Artist