Transcripts
1. Introduction Dip Pen Inking Sunflowers: A sketchbook journals is the perfect place to start experimenting and learning new tools, drying out ink and debate couldn't be easier. And today, I'll show you how to use water-soluble ink. A few depends. Couple of nerves and ever loved sketchbook. The rest is up to your own interpretation. We are going to tackle how to use your dopings. While drawing sunflowers. I sketch book is the perfect place to start a daily practice. It doesn't matter what you want to learn. If it's in regards to creativity, your sketchbook journals should be the first place. You turn to. That way you can revisit them, see what you've done before, and also improve on previous projects. Whether you are using your defense to write or to draw, they will be creative doors opening for you as the possibilities become endless. I've even added a workbook and that will give you ample opportunities to practice your doping inking. We will be fermenting and taking a different approach to using all of your tools. The small little blocks will be your own pieces of work. I will add the inspiration and give you guidelines and you can follow along easily. During the class, we will take on bone, six strokes. Drawing in there sunflowers and filling in backgrounds with hatched lines. We will take a look at textural elements and alternative ways to use your dependence. In the bonus video, we'll take a look at how you can ink with fine liners, especially if you don't have Dupain's and a part of ink yet. Even with regular fine liners, you are sure to enjoy this process. We'll go over some of my secret techniques and covers some topography in your own handwriting. I'll show you a few quick drawings. You can copy mine from the templates. And then I'll show you how to easily ink in several projects. I'd suggest you to hang on to those pages as we are going to tackle quite a few things in this class. Come on over for a dip pen inking experience. I'll see you in class.
2. Tools & Supplies : So here I've pulled out my nerves and put them on my sketchbook so that I can show you how to insert your lips properly. When you look at the bottom, you'll see that the nerve is curved. That curve will fit into the nib holder. Inside the nib holder are jacket ages also in a smallest circular curve inside. And that will secure your lips. When you put them into loosely, the nerves will jiggle around and fall out when you want to draw. When you push them in properly, you will feel some resistance and also a tightness when you try and pull them out. I'm testing out some of the nerves on my sketchbooks edit. I can feel what the point feels like before I start dumping them into any ink. Right? It's also interesting to note when you have a look at your nerves, how much ink you would guess they would carry. So just inspect them a little bit and try and imagine what you could do with those. Once we get started. I always suggest picking a nerve that is center so that you can practice without feeling like you need to perform in some other way. When you first open your package and see your nerves, they may look like they are ready to use. But the manufacturers do add a sealant layer on top of the nerves. They depict in a fluid that will dry, clear and you won't be able to see it. So the way we get rid of that is by gently soaking our nerves in water. I unfortunately did not safe the footage for that, but it's easy enough to do that, make sure you draw your nerves as well. And something else I've seen other artists do is they just burn the nib in the flame. Now, that will also get rid of that coating. Next up, I'll just move these brushes from my sketchbook to show you the ink. I generally use an intense black ink from walkman. It is water soluble and you can get some interesting techniques with that water-soluble characteristic. Hi. Hi. By now, you may be wondering in what sketchbook I am working. This is my own sketchbook. It was designed as a journal with quotes. The quotes, are they to help you through all of the pages and to guide you on your sketchbook journey. I have been known to inspire my students on a regular basis. And I was encouraged by a group of them to create my own sketchbook so that they can have a place to discover and explore and grow. You can find your own creative voice among the pages of a sketchbook. And it will be a place that you can use to draw, right? And come up with new ideas. Your art and your expansion is available in your sketchbook. It doesn't have any specific prompts, but it is a place designed to give you inspiration. It has 16 pages between each quote, and it's just enough space to keep going until the next one. You can discover and explore and grow and find your own voice within each of the pages, I invite you to be creative and play. Always have your sketchbook handy so that you can enjoy drawing and painting as much as I have over the last couple of years. The sketch book is available on my website and I welcome you to your own creativity. You can of course, use any type of sketchbook you like, or just work on white pages. You can now proceed to insert one of the nerves into a nib holder so that we can start drawing in the next lesson.
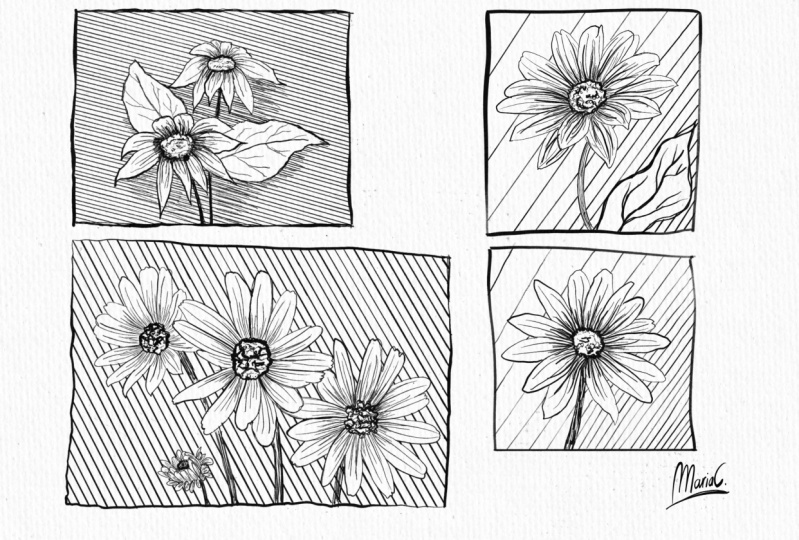
3. Class Project & Workbook : I'll let you have a quick look at how I draw out the little thumbnails. I have provided a complete workbook for you. And each of the sections are divided into headings with little blocks for you to fall in your own work. You can add your workbook or an image or two of the work you've completed in there. As your class project. You can also do some of the drawing work and dipping inking in your own sketchbook. And if you have one of the welcome home additions or to better, all you have to do is add a picture so that we can all adore your drawings. If you feel that you cannot draw yourself, you are more than welcome to trace some of my images. I have provided all of them in and around the workbook. You'll see that I have four blocks here of projects I want to tackle. And I would encourage you to also make use of as many practice sessions as possible. Because the more you practice, the better you will get at drawing. And the more drawing and the more you will have practice. So all of these pieces will add up in the air. And every 15 minutes do count. Once your drawings are done, you can quickly grab some nerves and your favorite ink and just dive in straight away. Mostly. It's that very first one that scares us and frightens us away. If you can just get that first one done. It doesn't even matter what it turns out like or whether you're going to like it or not. You can keep on practicing and you can make it better next time. You just have to start some way. Once you've downloaded your workbook, you are ready to start and it couldn't be easier. I'll show you what the pages look like and we can get started with your first drawing lesson.
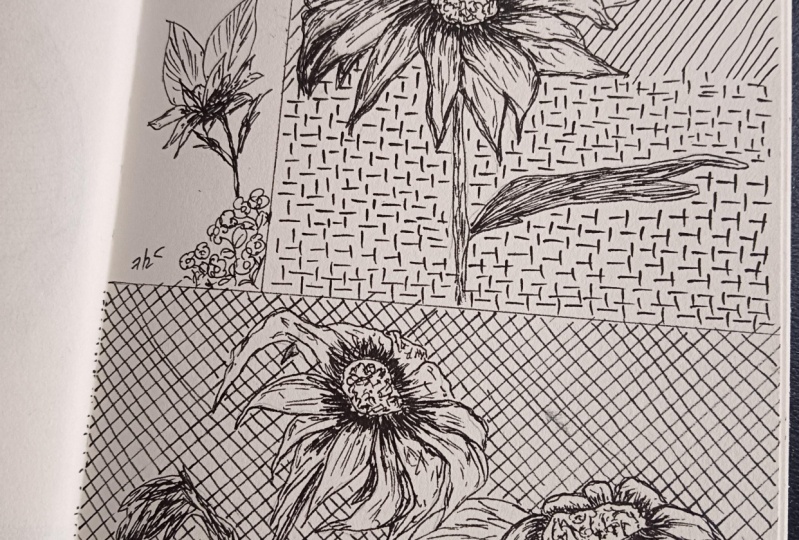
4. Start Small: Start off with a jacket outline and then create lines that look like see parts in the center. The petal at the back is moving backwards. So you can only see that front up heaved part, remainder to draw one or two or three lines from the center, it will radiate outwards. Note that the leaves appear larger as they come around the center, and some of them are tucked behind others. You can interpret the basic lines for yourself and just follow along if you want or create a new flower altogether. I'm still following the same principles where I have the centers of their flower petals darker and the tips of the petals lighter. For this one, I'm putting a nice dark stains that will be pushed back to the background, creating the illusion that our flowers of forward. You can vary the lines by putting them closer together, spacing them out a little bit further, or even pressing down to thicken them up some more. Inking in the back flower, much the same way I did the front with just a little bit less detail. Remainder to draw one or two or three lines from the center will radiate outwards. I'm still following the same principles where I have the centers of their flower petals darker and the tips of the petals lighter. Then going around the leaf and outlining it. As is with just a few lines for the veins. Or outline the square with nice thick lines and then start inking in with hatched lines. Now this is not crosshatching as cross-matching means the lines overlap each other up and down, left and right. And then also on the diagonal. Here, I'm simply adding background hatch minds so that we can have a distinctive front, much like we did in the first one, except year. I'm going to try and keep the lines evenly spaced. Remember, you're practicing know, hatching on these pages. So why not try a variety of it? The trick here is to keep your pain ethic exactly the same angle. And then moving up, down, up, down, up, down, up, down. And every time you make that downstroke to put the paint onto the page and draw the line. That is excellent practice to get your spacing correct and to also draw your lines parallel to each other. It takes some practice, but I promise you, you'll get it right. Hold on to that idea, because in the next part, we are going to tackle those textures.
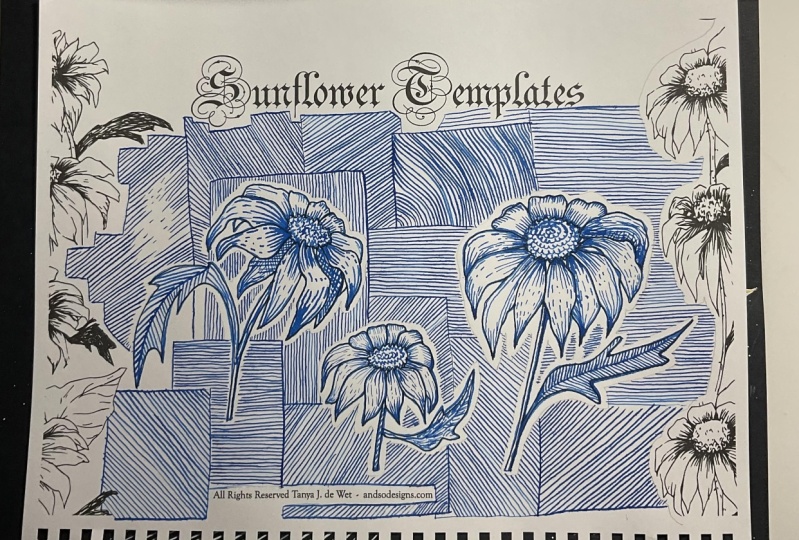
6. An Accidental Blob: If you spill a drop, that's not the end of the world just incorporated into your drawing. Didn't intend to finish this one now, but here we are making the best of the situation. And believe me, accidents like this do happen and you just have to go with the flow. A good way to pretend like it didn't happen was to make similar accidents on the same piece. So see how I over fold the nerve to create the thick and thin lines. When you do thick inking like that, make sure your ink dries before you smear it with your hand accidentally. Like these lines here that we drew earlier. I accidentally swept just lightly my hand across the page. As I moved the camera and not thinking back, the piece wasn't dry yet and it happened. So if you want to be very precise with your sketch books, just keep that in mind. So the way to get those over fold lines is to press hard with your nerve onto your surface. It will give you a synchronized and when you just softly touched the page, you'll get thinner lines as well. Also when your nose runs out of ink, a fresh blob of ink on that. Nope. We'll give you a thicker blob of paint. And you'll see when you start experimenting with your own inking as well, how much fun it is to create those surprise inclines. And one thing you shouldn't be afraid of is really going for it and experimenting or look at that. The angle made the ink drop from the bottom right into that pool. So it doesn't matter at what angle. A more upright angle will give you finer, thinner lines. And when you see how much it grabbed ink, when the ink force in contact with that puddle over there. So you can create beautiful ink blobs. Or you can be really precise when it comes to drawing no lines. So over here, I want a little more sickness and I'll just grab more ink and add it to that puddle. Go just look. And you can even connect tonight by dragging ink from bulky areas into other areas. Just like that. Let's do a little bit here, swan. And that will bring that whole piece together and ensure that this set of sunflowers look like they belong together. And because I used the same techniques for that one and the same textural elements on that one. Each one of these are individual, but that also look like they belong together. This one looks like it belongs to the set. It's in. Simply because the lines match. Maybe I won't, even as the leaf lines in the back, I'll leave this one leaflets and just create that border around it as well. And white. And as promised, or move on to the inking of the typography next.
7. Inking Typography: Because we are fighting times before mentee.com. I finished line work in pencil, so it's quite easy to follow your own handwriting backwards and upside down. Once that is done, because you are following the inky lines. So we'll start off here and just cover. Okay. Looking at it. Okay. Hello. Do you think it's worth it? At the end? And the bad actions? Good day, good day.
8. Pep Talk: While I ink in the second block, I want you to understand how much practice you will need. Your sketchbook is such that you can take it along with you every day and try and work in at least 15 minutes a sketchbook journey so that you can improve that one specific thing you are trying to work. And the same goes for dip in ink work. The more you practice, the more precision you achieved, and the better you will get at understanding where to lay down your lines when 2 second them up, and how to create movement in your pieces. I hope you do take a new sketch book sessions, as that is the perfect place for you to practice and to hone in on your scale. Hi.
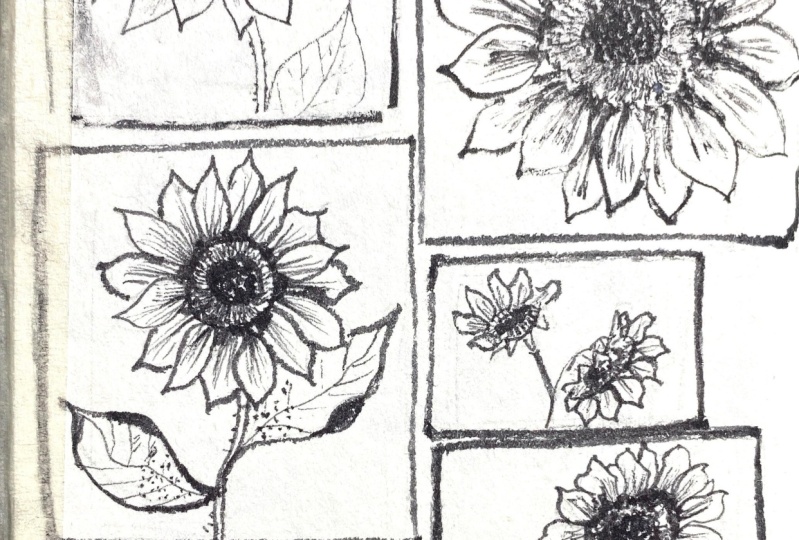
9. Bonus Video - Sunflowers with Fine Liners: Welcome to the bonus video. We are going to ink large sunflowers across a double spread. You can find my large sunflower templates in the resources below this video. You can download that PDF and print it out while you use it as a workbook throughout the course. I know I've mentioned it before, but sometimes we forget things. I'll quickly draw out mine. And I know our sped up this video. Parties still a lot of helpful information that you can look at. As soon as you've drawn out your basic outlines, we can prepare to ink in this project. You will need one of your favorite inking paints. I'm using the fine liners here that I have in my drawer. I'll start off with the leaf that's facing me first. That one is in front and therefore overlaps all the other leaves in this one. When we work around the center area, we will have a darker bottom area, which means we can make our marks more densely. And as we move upwards into the shiny glistening area, we will have less seed heads showing. Make sure that you do all your ink work very loosely and we don't want it to look like an outlined coloring page. Be sure to vary your marks across each of the petals as we don't want them to look stamped out. We want variation. We will make most of our marks closer to the center where the petals come together. That will show us where to look, because that will be the most interesting part. As we move around our sunflower, we will tuck the extra petals in behind the ones we've drawn already. That way it looks dimensional. You'll have a perception of depth. Remember to create your leaves floppy and soft. As that is the nature of a sunflower petal, they are soft and they do blow in the wind. We can create that illusion by drawing our lines loose and scattered. We are going to vary the angle of each of the petals because we don't want them standing around like soldiers. These are fun petals that dance around that saved her head. I'm going to fill in the leaves with an autistic hatching line. Scratchy look. Simply because I wanted dark leaves and don't want to color them in solidly and creating texture this way. Remember how we discussed textures? So just play around with your line. Shapes and blind lanes and full in the leaf shape. Moving on to the second flower, I'm starting in the center where we have the seeds of the sunflowers. By making jacket outlined marks that look like little seed heads glistening in the sun. We will create those jagged valleys and peaks on to the center where our seeds are. Again, starting with the front leaf that faces you first. Remember to darken up those center, meet up points for the petals and keep those ends of the petals nice and soft. And Bluetooth also, don't add too much inclines there. As we want those petals to look like they are translucent. Move around the sunflower ahead and skip and dot and make your little marks so that you can feel that petal as you shape it. Remember your accent colors, meaning darker in the center and lighter as you go out to the tip and have fun and be loose, don't be too tight and don't create symmetrical, even spaced lines. We're being nice and loose and free with the sunflowers. The second leaf getting a little bit of attention. While I just draw in a few scattered, vague. I'm adding a little bit of detail on the stems by giving us that Harry look of a typical sunflower. On the third flower, we are doing exactly the same thing as we did for the other ones, except this time we have more of a front facing flower. Outlining those insights was skipped areas. And again, starting with the front most facing petal. Something to keep in mind when working with flowers and their petals, is that the petals will always radiate from the center area. And the center will always be positioned on top of a steam. So that way, you know that the leaves and petals all come together in that center. You get to practice more texture effects on those leaves. And you can absolutely add more leaves than the ones I've added. Especially if you want to have a little bit more practice just for in as many leaves as you like and practice those texture hatching marks. They are brilliant exercise in loosening up your linework. I'll give you a last few tips while we finish up this project. And that is to make your marks deliberately. But don't be too strict. You want your mark to mean something on the place that you put it down, adding the places where you want interests. When we have streaming light on a subject, you'll always have a distinctive light area and a definite shadow area. And when we are inking, we have the perfect opportunity to reserve are white for the lighter areas and to enhance our shadows with our black lines. In this case, there are no other color values to work with. So you have to approach it with light and dark highlights and shadows, much like you would do the node 10 studies. I started the law Sunflower by drawing in the stem and adding those hairs initially. Then going over to the head, making those up and down little strokes that resembles a seed. And again, following the pixel's moving from the inside outwards. The recipe is basically the same, doesn't matter what direction your flower is pointing at. The basic lines will always follow a certain structure, and that structure can be repeated across many flowers. I think this is the reason I love inking so much. Whether I'm working with my dad pins or with fine liners, there is an distinctness, strong contrast between the white of the page and the black of the line. It's dramatic and it makes an absolute statement. With every line you make, the contrast becomes more and more visible. And that is what will make your ink work interesting. A few nerves, that ink pot and all your drawing dreams will come true, I promise. Enjoy the process. It's both therapeutic and it also brings a gorgeous result, experimental little bit, and see if you might like to add ink work to some of your other projects. Especially when we're working in our sketchbooks. This is the perfect opportunity to experiment. And if you haven't invested in nurbs or ink yet, please be sure to grab a basic set so that you can get the hang of things. And as you progress, you can buy more sophisticated tools and inking product. But you don't have to spend a fortune to have fun with dipping in Kyiv. I have one final tip for you, and that is to leave your book open overnight to prevent all those nasty smudge marks, and then erase your pencil marks the next morning. Your picture will be crisp and clear and absolutely stunning. I hope that you enjoyed your inking process and that you also enjoyed working with sunflowers. Maybe this was your first time and I congratulate you on 66 completing this class. I would really appreciate it if you shared this class with your friends. And also leave me a review. I had loads of fun presenting it and also compiling the PDF for you. I'll see you in future classes. Bye for now. Thank you for joining me. You guys.
 Tanya J. De Wet, A Creative Mindful Life