Transcripts
1. Intro: Hi, my name is Aaron and I'm a graphic artists and a
digital art instructor. In this course, I'm going
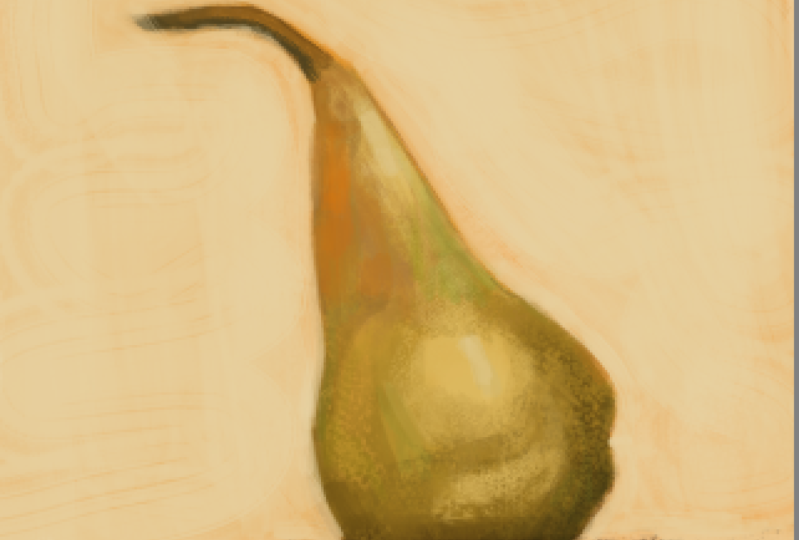
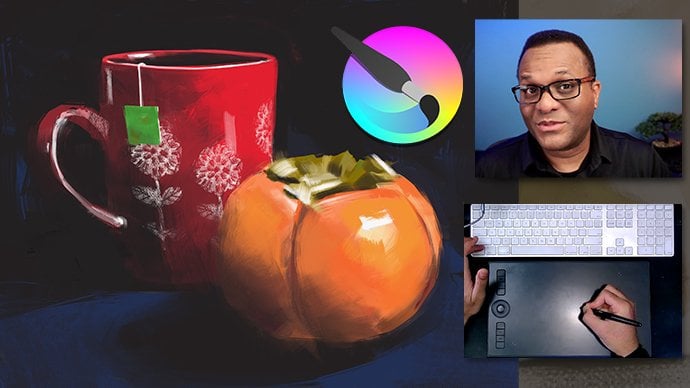
to show you how I work when doing a digital painting of a very simple still-life. And this is what we're
going to be drawing. And I've uploaded the
photograph so that you can use that in order to upload
a project on your own. And in this course,
I'm not going to go into details about
how to download the software and specifics
on using the pop-up palette. I covered that in my course, which is called digital painting
and Crito, a quick one. And that I have, I do a digital painting
in black and white. So this is the next step. But I will show
you everything you need to know in order to create a very simple
painting like this. In this course, I'll show you, I'll be showing you
different techniques that I use when
digital painting. Like guide the use of layers, sampling colors, creating your own colors
and things like that. And again, this, I'm
keeping it very simple. I'm going to
progressively become, create more courses that
get a bit more difficult. But this one is quite simple. We're after this
painterly style, which is kind of loose. If we were painting an
actual oil painting, this will be called Alla prima, which means painting
it all in one session. If this was oils, all the paint would be wet and
we'd finish it all up and, you know, maybe an hour. But this is actually isn't
gonna take that long. It's very simple. I'm going to save more
complicated things for later courses. But we're going to, this is
what we're going to get into. And I hope to see you
in the next video.
2. The Project: So for the course project, what I'd like you to do is to do a digital painting of this pair. This is exactly the same thing
that I do in the course. And I'm bringing this up now because you can either
wait till the end of the course after you watch all the videos and
do the, do the work. Or you can follow along
with me and do the project. I recommend following
along with me. And then you can just
take it step by step. And you can download this file right here under resources. And once you've
completed the project, just click right here on the green button and upload
it to the project area. And I'm going to click on that. And you can see
right here, you can click right here to
upload the image, give it a project title
and a description, and feel free to upload works in progress if you'd like
my feedback on it. But I also really like to see your finished work
and don't be shy. Everyone's at a
different level and everyone will develop
their own style. So it doesn't need to
look exactly like mine. So I'm looking forward
to seeing your work.
3. Setting Up: This one, I'm gonna be showing you how to
paint and critter. And we're gonna
do a very simple, as you can see, still life. The photo that we're
going to use here is from Vince Bala Schneider. Okay, Anyway, this
is from Unsplash and that's where I have
gotten this photo. So if you want to see
any more of his work, you can find that there. And to follow along, you
can download a copy of this image from the resources
area in the sidebar. So I'm opening up credit right now and I'm
in version 5.6. And to start things off, I'm going to choose
new document. And I'm going to choose one of these predefined
presets here are predefined and we're gonna go
down to US letter 300 PPI, that's 300 pixels per inch. I'm going to choose that and
I'm going to hit Create. And I'm going to zoom
out just a little. And I have a mouse, I'm using a mouse right now
and I'm just going to use the scroll wheel to
zoom out just a little. Soy can see the
entire thing here. Alright, as you can
see, it has opened up and we have a paint layer. We are going to use this paint layer and the
background layer is white, but we're going to
create some new layers. And I'm going to show you some more things
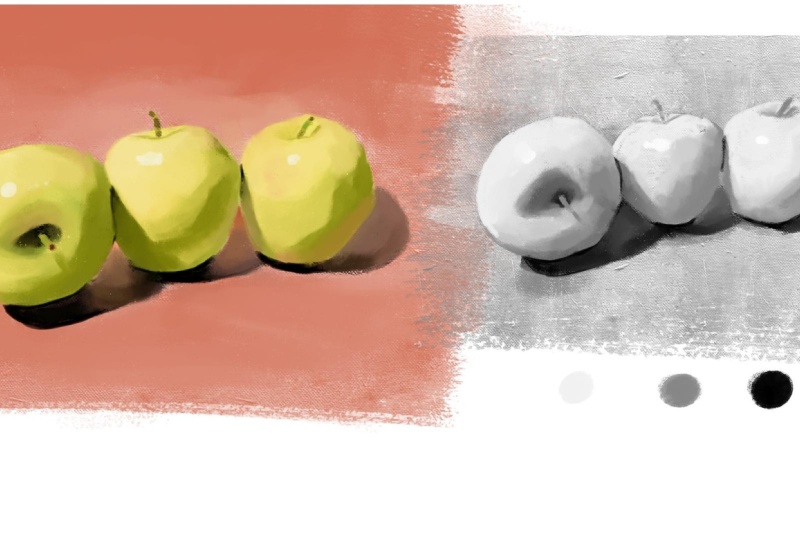
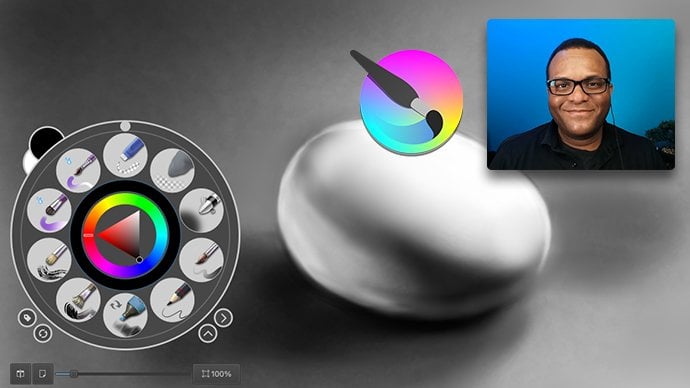
beyond what I did before in the previous video, when we did a black and white
still life of a boiled egg, we kept it really simple. I mostly use the pop-up palette. That was 90% of the
interface that I use. But that was the
advantage of using the pop-up palette is it's so easy to get working
within Krita. This time, I'm going to start
working more in the way that I work more naturally. I use a combination
of the pop-up palette or in some of these
other tools here. So I can move around a bit. It just depends on what's
most comfortable for me. And you can choose what's most comfortable for you as well. If you have a very small
screen that pop-up palette really comes in
handy because you don't have to fill so much of your screen with
other menu items, these doctors and things. Alright, so we're
gonna get started again to open up
the pop-up palette, I'm going to right-click. And right here you see this tag. And I'm going to click on that tag and there's a
bunch of presets here. Well, you may not have because yours will probably
be a fresh one. So you won't have many of these, but I believe one of the
presets here is called Paint. You should have
these brushes here. If you don't have as
many brushes here, you can change those
in the Preferences. I'm gonna go up to the top here and choose
Krita preferences. And right here, you just come all the way down where
it says pop-up palette. And you can change the number. I believe the default is nine, and I bumped mine up to 14. Okay, so I'm gonna hit OK. But you can see I can click
that up and click down. And I'm just going to hit Okay. Alright, so now we're just
going to start painting.
4. The Sketch: Okay, So here's my
pop-up palette. I went back in and change
this to 1010 is the default. And I'm using paint
brushes again, I have a bunch more in here, but you should see
paint as a default. I just want to make
sure that we're working with the same thing. So a couple of my favorite
brushes aren't here, but I will demonstrate
how to add brushes and show you where
to get some of these brushes that are
some of my favorites. Where to get some
of those, although some of these brushes
are actually here. Okay, so now we have these
ten brushes here in paint. And the first thing I'm
gonna do is start a sketch. You can see we have
my paint layer and I'm just going
to right-click again and get to
the pop-up palette. If I don't want to go to the pop-up palette
to get my brushes. I can come over here to
my brush presets darker. Right here. I have I've typed in my what
I labeled squishy brushes. Let me just put
that back to all. Here's a little menu
here so you can choose those same types of brushes. You can get them in a pop-up
palette or you can put them here in this darker
and there's paint. And you can see there's
a bit more brown, a few more brushes in
here that you can access, but the pop-up palette
set to tin is right here. Okay, so the first
thing I want to do is I am going to go
with very fine brush. I'm gonna go with this. What is that called? Basic details, six details. I'm just gonna go with
that one and use that as my drawing, my sketching pencil. Okay, so from here, I need to change the color. And you can see up
here in this bar, the Options bar up here. It's tan and, and, and white. Before I do that, I
like this tan here, so I'm gonna put a bit of
a wash in the background. So first thing I'm
gonna do is right-click and I need to pick a nice brush that'll give me a nice wash. I'm going to try
this canvas brushes. See what that looks like. That kinda has a
nice look to it. So I'm going to click, I'm going to right-click to
bring up the pop-up palette. And you can see I have
the color wheel here. I can click here to
change the color. And you can see it's changing the color within that
little triangle. And then within the triangle
I can choose light or dark. So I'm going to go to
a nice brown color, which would be an orange. And then I'm going
to drag it towards the gray a little bit. And now we have a
nice little brown. And I want to enlarge my brush. I'm going to
right-click to bring up the pop-up palette again. And here's the size of my brush. Although I tend to use the
bracket keys on my keyboard, the left bracket key
to make it smaller and the right bracket
key to make it larger. Those are right next to the, just to the right
of the letter P, as in Paul, the bracket keys. Alright, so what I'm
gonna do here is you can see here's the
shape of the pair. Let me make that a little
larger and I'm just going to switch out some color in here. Just, this is just
gonna be my background. I may change this
or cover over this, but this is basically
going to be my base. And you can see it's
on paint layer one. I want to add a
new paint layer on top of this in case
I mess things up, I'm going to, I can
get back to this. So right here in my layers, I mean, my, my layers darker. You can see it says
layers right there. I'm going to click right here and on that plus symbol,
oops, I hit it twice. I'm gonna hit Command Z
or Control Z on a PC, Command Z to undo that. And I got to get rid of it. Or if I wanted to delete it, I can just click on
that little trash can to delete the layer. Anyway, I'm going to
click on the plus symbol. Here we go. So now I'm going to right-click, go back to my pop-up palette. Choose this nice, fine brush, the fine tip brush. And I'm going to right-click again to bring up
the pop-up palette. Actually, something that
I'm not seeing here is my advanced colors. Click on that so you can see you can choose your colors here, advanced color
selector right there, and that would be the default. So this is a little larger, so this might be a
little easier to choose some of these colors and
you have these things here. You can choose colors. Alright, so from here, I'm just going to drag
this over to black. And that's gonna be
what I use to sketch. Actually, that's a
little too dark. So I'm going to right-click and make it a nice dark brown. I think that looks good. And now I need to
sketch this out. The way I'm gonna do this is
you can see my drawing here. The base of the
drawing is down here. But I'm going to put
that right here. And I'm just going
to drag straight across and try to get a
straight line as best I can. That's gonna be my, my line. Okay, so from here, I'm not really satisfied without straight
those lines are. So what I'm gonna do from
here is you see that dotted that box that says the
rectangular selection tool. What I'm gonna do
here is select that. And I'm just going to click
over here in the corner and draw out a box, a rectangular shape here. And this is going
to be a select. It's going to have dotted lines. And you see there's the dotted lines are what
they call the marching ants, because it looks like a
line of ants marching. Alright, so now I'm gonna
go back to my brush, and I'm gonna go back
to that larger brush. Doesn't need to be
quite that large. So I'm going to use
the left bracket key to reduce the size. And now I can just draw extra. I'm still on the eraser. I'm going to click off of that. And now we can just draw
in here and you see, it will make that
line right there. I'm eventually going
to get rid of this. But for now, that gave me
that nice straight line. Alright, so I'm going to need to get rid of the marching ants. So I'm going to go
up here to the top and go select, de-select. And you'll see the
marching ants disappear. Okay, so now we have this shape. I'm going to go back
to my fine tip brush. And you can see, I'm
going to break this, this pair down to shapes. You can see a big
triangular shape and you can see this
big circular shape. Quite easy, but often when you're working with
things, it's great. It's a good idea to break your, break the shapes down into
very geometric shapes. And I'm just going to
make a circle here. I think that looks good. In anything I don't like, I can come back and erase. And I think that looks okay. I'm going to come back and
clean this up a little bit, but now I'm going to draw
that triangular shape on the top and make sure you're paying attention
to the composition. I mean, this is a very
simple compensation. It's just a very simple image. And so I'm just kinda sticking
it right in the middle. And I'm trying to get
the angle of this right. So I'm moving over here on
top of the reference image, and I'm just kinda
move in a line up and down just to
get a feel for it. And then when I come over here, I can move that
line up and down. So I think maybe this needs to come over
just a little bit. Okay. And there's my my
triangular shape. I'm going to shave the
top of that off and then maybe add some roundness
in here so it blends in. Now I'm going to
choose a larger brush here, and I'm going to write, while I'm kinda choose a
larger brush and I'm going to click up here in the
Options bar, that eraser. And now I can erase
some of these things. There are plenty of
erasers if you wanna go over here to the brush presets. If I just choose all
paint, move that to all. You can see I can move around and get lots
of things here. And there's a couple of erasers here right at the beginning. So you might want to do that. I usually stick with the just make my brush and erase it because it
adds a bit more texture. Although I'm going
to change that just so you can see
what that looks like. See this is a nice
simple round brush. I can increase the size up here in the Options bar
and there's the opacity. So I don't have to, I can leave some of the lines
like when I erase, I like to leave
some of the lines. It just has a nicer feel to it. I don't want to get
rid of everything. So if I drop the opacity, it will soften this brush up. Here we go. Let's try that. So you can see I'm
softening those lines without but if I scrub enough, they will go away. Right? I'm going to right-click, go
back to that nice brush and then I'm just going to
work on the shape of this. Alright, so I think
that looks good. Now I'm just going to
come along here and try to get the shape right. There's this little piece here. Guess I'll do that. If you don't want to add that, you don t have to add it
if you don't like it. And I think that looks good. That looks nice and pair like. When I draw these lines, I tend to do more angular lines. Rather, so much. I don't know, I find
it easier to do these angular lines and
make curves everywhere. And then I just soften them up, soften them up later. Although these are pretty
a pretty circular. And I'm just going in and
looking and changing. And one of the things
you wanna do to check to see how your drawing is going to
zoom in and zoom out. So you can right-click and
right here in the ticket, bring up the pop-up palette. There's the menu, I mean, the zoom in, zoom out
and I can zoom out. And it just gives me a good idea to see how things are going. And I'm still on my brush tool. Just going to add that stem. With this drawing. You don't really need
to be too accurate. Because it's a payer as
long as it looks like a pair, you are good, but you still want
to try to keep it a little bit like I position this a little wrong
and this my stem, that long stem is not
going to fit in here. So I can readjust
everything here. But I think for me, I'm just going to shorten
that stem a little bit. That'll be a little
easier for me. So it's all up to you. You control what you want
to put it in the piece. Alright, that looks good. Now I'm going to go to
this smaller eraser. And I can scrub that out. If I make that larger, hit the bracket key, you can see the brush is
getting a little larger. We go, okay, so we
have knocked in. So what have we done here? We've put in what we would
call an underpainting. If this was real life. I come from a background where I used to paint in real life now, mostly I just paint digitally, but you would put
an underpainting to add a bit of color
to the background. And it fills up all those
holes in the background. It also adds a bit of interests. As you can see, it looks
very painterly here. Although I think one
thing I'm gonna do here is move everything down. You can see here in my layers panel it
says paint layer two. I want to move this down
because I have a lot of space here and it's feeling
a little crowded at the top. So you see here, there is this thing
that for headed arrow, that is my move tool. And if I click on that, if I click on an area where
there is solid color, I can move this whole layer. You can see I can shift it, but I want to hold
the Shift key so it will snap into place and
just go straight down. And I'm just going to lower
that till I think that looks nice. I think that looks good. So now I need to deselect it. So I'm just going to
click anywhere in the background and it
will de-select it. Okay, so we have our sketch. Actually I'm going
to label this layer. I'm going to put that label, that double-click
on those words. And I'm going to call
this sketch right here, that paint layer one. I'm going to
double-click and call that underpainting under
painting and hit the Enter key. And I'm going to click back on the sketch layer because I want, I'm going to make
a new layer and I want it to appear on the top. So I'm going to click
on that Plus symbol. And this next layer is
going to be our block in. I'm going to double-click
and call that block in. I may we'll probably just continue working
on the block in, but I may make another separate layer and I'm breaking these layers up a lot, but I don't always
break them up so much. Like I will do an underpainting
as a separate layer. I will do a sketch
on a separate layer, and then I just
paint from there. And then from there I
will add new layers. And if they don't work
out a delete them. And if the I like them, I'll either leave them as
they are or I'll merge them down into that
the main paint layer. Okay, So from here, so I guess I'm going
to cut this video here and I will move
on to the next video.
5. Blocking In: Alright, so here we're
going to block this end. So I'm going to
right-click to bring up my pop-up palette
and choose a brush. Oh, something's happening here. Okay. I'm trying, I'm right-clicking to bring up the pop-up palette, but I'm on the Move tool. I'm not getting the
pop-up palette, so I need to go
to my brush tool. And now, hang on. There we go. And now I right-click, it brings up the pop-up palette. Alright, so the first
thing I'm gonna do is just block in some
of these colors. And I'm going to do this, see what this looks like. Because again, these
aren't my usual brushes. So you want to play
around and see if you can get a brush
that you like, find something that
looks good to you. Actually, I kinda like that. This one, yeah, this one. It has a nice canvas see look to it and it'll be a nice way to block things in without
filling things up too much. Actually, let me see. This one. This is the one I want it. So I'm going to hit
undo Command Z to get rid of this things
that I did here. I don't want you to
try to copy that, so I'm just going
to block it in. And what you wanna do
when you do the block in is basically what we're doing is we're breaking
everything down to very simple, simple shapes. So if I look at this pair, you can see I have this area
with the shadow down here. And then there's a bit
of a bright patch here. There's a bright patch here. And this area is in shadow. This areas and shadow There's a bit of a reflection
right here. So we're going to try that. If you want, you can sample the colors that you have in the, from the your photograph or
you can create your own. I typically will create my own, but I guess for this video, I'm going to just sample the colors and we're going
to see how that goes. So what I'm gonna do here
is I'm going to drag my photo into the image and
it says insert as new layer. That's the very top one. I'm
going to hold the space bar. Actually, I need to
go to the move tool. And the spacebar gives me the
hand and I can move around, but I want to go
to the move tool. And I'm going to click
and move this up. Okay, So from here I
can sample the colors. So I don't want you to rely too heavily on the colors
that you're sampling. Make sure you think
about the colors. So I may sample and then
change them up a bit. But this is just to get
me in the ballpark. So I'm gonna go to
my Eyedropper Tool. And the eyedropper
is right here, and just watch the color
palette right there. I'm just going to sample
this base color right here. There we go. That, and you can see, you think this is sort of a
greenish color, but it's more of a
yellowish color, which actually surprises me. But everything is relative, but I think it's the
combination of the brown and the yellow makes this
kind of look greenish. But here it's sort
of a grayish yellow. So feel free to change
the colors as you like. So we have this image
on the new layer. I'm going to click
on that eye right there and turn that off. Now we're back in case
you didn't catch that. Here's this layer on top, but it's covering
everything else over. I'm going to click on the eye
to turn off the visibility. And now we are on
our blocking layer. Now I have to select the block and layer because
I want to paint there. I'm gonna go back to my brush and I'm going to block in this. Actually, you know
what I'm gonna do? I'm just going to scrub
in the whole thing. You can see there's nothing
else on the layer but this, and I'm just going
to fill it all in. And we'll add some of
the other colors later. Alright? And if you have any holes, don't feel the need
to fill every hole because it will if it
if it's a little rough, it just it has a bit more feel, a little bit more interest. And I'm going to
turn my brush into an eraser by clicking up
here in the Options bar. And I can just trim that
back just a little so I can see my sketch
a little closer. Okay? Alright, so now
I'm gonna go back, turn on that, go
back to the photo. I'm going to click
on the visibility. And I'm going to sample
in this darker area, I'm gonna go back to the
eyedropper and choose down here. This is actually
throwing me off. I'm really surprised this is a lot more yellow than
I would have thought. Okay, so I'm going to
hang on, click there. And then I'm going
to turn that off, make sure I have the
paint layer selected. Go back to my brush rather than come up here and type
in choose the brush. I'm just going to hit
the B key, B as in boy. And now I can get
that color there. Although what I like
to do a lot is sample the colors and put them here. And then I can always
get back to them there. And I don't know if
you notice what I did to get that
eyedropper this time, rather than going back to it. I'm going back to
the eyedropper tool. I just hold the Command
key on a Mac and on a PC that would be a,
the control key. I'm going to go
back here and I'm going to choose this dark color, although that's pretty dark. I really don't need to sample this, but I'm going to try it. Here we go. I'm going to
hold the command key. My brush turns
into an eyedropper and I can sample that black. You can see it's
all the way black. Now I'm going to turn the
visibility off and I'm just going to smoosh
in some of that black. Doesn't need to be precise. Alright, now I'm just
trying to get an idea of what other colors do I need? I have that light color, so I'm going to sample here, turn that layer off
and you can see I'm still on this layer and I'm just going to put that in there and
maybe knock that in there. I'm going to turn this back
on and see what other colors. Let's see what we
got right here. Turn that off and I'm just going to knock
some of that in there. You can see it's a
little bit different. Let's see, I think let
me try this one here. There's really has to be green. No, it's not green. Alright, so we're going
back, turn that off. We still, the, the blue layer is on and I can sample that's
pretty much like that. Alright, so I'm gonna move
this back up so I can see it. And we're just
going to block in. This one doesn't have a lot
of dramatic colored shifts. Alright, so, but I'm
going to go ahead and knock them in. I'm
going to click here. And I'm just going to
go along this bottom. I'm going to click here again. I'm using a brush. I mean a, a drawing tablet
and it's pressure sensitive. So make sure you have that. If you're working
with a, with a mouse, you'll need to adjust
this opacity a lot, um, which will make
the stroke lighter. So here we go. I'm going
to try this with my mouse. So you can see that's a 100%. I dropped the opacity. It kind of lightens it up in it. It's a little
easier to build up, but I'm going to
put that back up to 100% and go back to my mouse. And I'm just going to
add these colors in. I'm just sort of
stroking them in, but don't be shy. Take, take bold strokes and you can see what I'm
doing is I'm painting. I will sample the color. I'll hold the Command
key or Control on a PC and just swipe in a stroke. So here I know, I can see that. And I'm just sort of
swap, swiping these in. And again, as I said, I'm
just blocking them in. I'm just making everything
really simple, simple shapes. And I'll come back with that. One of the things
you wanna do is squint and the squinting. I probably should
have chosen a photo with more dramatic
color differences. And this would have
been a little easier. But maybe next time. But I'm going to come
across the bottom. And sometimes I scrub, but mostly I'm swiping
and I'm just sampling. Again, I'm holding I hold the Command key to get the
eyedropper and I sample. If you want to come over here and click on
the eyedropper, sample the color, and then
go back to the brush. You can do that, but
it just takes off.
6. The Background: Alright, now, I want this brush, I mean that brown in here. I'm just going to make
my own right here. I'm already on this brown. I'm just going to drag this up and you can see I
get a nice brown here. I'm going to do something
a little different here. I can reduce the
size of my brush. And, but I don't usually do that because if I reduce the size of the brush and let's
see what happens. I can come in here
and I can take my little brush and make one. It tends to be a little
stiff like this. I think the working,
It's perfectly fine. But what I do, maybe later I'll add
details that way. But what I typically do
is is I'll just swipe across this and then I'll turn that to an
eraser and I trim it off. And that way, I think, I just think it has
much more interest. And this is one of those times when I might make a
new layer temporarily. So, you know, like I want it
to swipe across here so I would make it a new layer
and then come back here. I'll do that on the
next shape here. So I'm gonna make a new layer. I'm on my block in layer
I'm going to hit plus. And right here what I'm gonna do is I want to make
that a little darker. So I'm going to
sample the black, but I'm going to sample in this area that has
a little green, you can see it's not
a 100% black and I'm just going to swipe
across the tip of that. Okay, and now I'm
going to turn that into an eraser and I can trim that back and maybe
I don't get all of it. I just think that just
looks a little bit more interesting in painterly. Then just going in here with a very sharp brush and
back on the paint. Let's see. And you can see
I'm kinda touching at it, but now I can go back to my
eraser and swipe that off. And that's just one of the
ways that I go about painting digitally to get something
that looks like I painted it. Now what I'm gonna
do here you can see is that is what I just added. And I don't want to
have too many layers. So I'm going to right-click
here in this panel. And I'm going to choose
merge with layer below. Hang on, Merge right here. Here it is merged
with the layer below. And you can see now
they've merged. So it's all the
same piece again. And now I could come
in here with my brush and start tightening this up. But you can see I have a
white background here. So what I wanna do here is I'm going to sample the
white background. And I'm just going to
add a few strokes here. And you can see I've
added a few strokes here, but I didn't press
too hard because I want some of this color
below to shine through. Now I'm going to hold
my command key and sample or Control on a PC and I can sample that and
you can see now I have something that
looks a little different. It's a different color. And I'm going to make my brush a little
smaller because it's kinda moving a little different. And feel free to use whatever brush you
feel comfortable with. To be honest, this one's
feeling a little wobbly to me and I feel like another brush would give
me a bit more control. Something else that I
do without thinking is I said you can control
the size by right-clicking. You can control the size
here in the pop-up palette. You can also control the size
up here in the Options bar. You can control the size with
the left and right bracket. You can also control the size
by holding the Shift key and dragging to the
right and to the left. And this is what
I do most often, but this one might take a little while before you
get comfortable with it. So try it and see how
you feel about it. And you might you might
not like it at first. I think it takes a while
getting a feel for it. Like right here. You can see, I want
to come across this, but I don't want to destroy
this black just yet. So I'm going to make a new
layer here in the Layers bar, in the layers darker, I'm going to click to
make a new layer. And now I can come across here. And I can just really
go to town on this. If I decide I like
it, I just leave it. If I decide I don't like it. Whoops, I will take it away. I don't think I need these
color patches anymore. I actually did, I don't
think ever use them anyway. Loops. And you can see I'm
just trying to make something that looks painterly. Want it to look
like oil painting. You, that's not necessarily
right or wrong. It's just that's my background. So that's what I
liked that look. And try to use a
large size brush. Okay, that looks
pretty good to me. Alright, so here I can, my eraser come across here. You can see I can
bring that back, but I'm kinda grooving on
what's happening here. So I'm just going to, since this is all one
color in the background, it's a seamless background. It's probably the
big white paper. And it curls down along the back of the wall so
you don't see that corner. We go and I kinda I
think that works, although it's a
little dark for me. I'm going to sample
that white in the corner and see what
I can bring in here. I'm just brushing it in lightly and don't feel the need to
solve everything all at once. You can always come back to it. Or you might decide, Hey, I kinda like what
I did right there. And I'm just going to go around the shape of this pair
just a little bit, just to sample if I add too much white and paint over that with a tan
and I kinda like that. Okay. So I think I'm done
with a block in there. I've actually, I think I
finished that a long time ago and I finished
this area here, touching up the background. I think I'm going
to touch over that. There we go, paint over that. And now what I'm gonna
do is make a new layer. And now I'm going to
start adding details.
7. Sargent Brushwork: And when I say details, I don't mean detail. I want this painting
to be loose. So I'm just going to add
in strokes, a few strokes. Like one of my favorite painters
is John Singer Sargent. And the way he paints. And if I, maybe I'll add some
samples of his work here. I haven't found it yet, but it'll be around here and
in this video somewhere. And if you zoom into it at a distance, everything
comes together. But when you zoom in, you see lots of beautiful strokes and it almost looks like an
abstract painting up close. But when you zoom out, it all comes together. And that's what we're after.
8. Adding Detail and Finishing Touches: I'm going to zoom out here,
I'm going to right-click. And I'm going to use
that tool right there. And I want to take a
look at it and you can see it sort of has that shape. It kinda looks like a pair. And so I'm going
to zoom back in. I also, you can use the,
if you're using a mouse, you can use the role wheel on the mouse to zoom in and out. And I usually have the mouse sitting next
to my drawing tablet. And I just grabbed
that to zoom in and zoom out spacebar
to move around. And there we go. Okay, so now we're going
to start adding details. And again, we're not going
to add a lot of details. So I'm going to click here
and let's see what some of these other brushes look like. Let's see what that looks like. Whoops, I'm going
to sample there. I'm just testing the brush. One way that I think
you can really get lots of more interest and
make things look more painterly is by adding
different brushes. Don't, don't just stick with
one brush, although you can. This is just the way I paint. I could paint this
with with one brush. Maybe I'll do the aisle
to the next one with one brush just to
see how that goes. But see here, I add this and
it just adds these strokes. And although I'm
not liking that, it's looking a
little too brushy. Okay, I remember this brush. I like this one. And what I'm doing is I'm just sampling and coming back over. Let's go back to this one, this canvas, a
little canvas brush. I'm going to add a little
of this green in here. I want something
a little heavier. Let's see, we got here. We go. This feels more like a pastel. Yeah. And I'm just adding that color. Two, we get a nice color here. I'm going to cheat a little. It seems to be a
little darker here. I can either make it lighter here or I can make
it darker here. I'm going to choose
to go darker. I'm going to sample right here. And you can see that
the color here. And then I'm just going
to move that excuse me. I'm just going to move that dot up to the dark just a little bit and let's see what
that looks like. There we go. That looks good. I'm going to make my
brush a little larger by using the Shift key. And I'm just adding
in bits of color. I'm going to sample
here the lighter color. Add a little light there. If you reduce the size of
the brush because I don't like the way the textures
are coming in here. Sample that. Maybe add a little of that. Now sample from here. So it's a different color. Definitely, you see there's
a highlight right here. This is reflecting
off of it paper. So I'm just going to
add that in here. If I want to trim that back, I'll just sample a darker
color and go over that. Let's see, we got a
little light right here. I'm not trying to make
this a 100% exact. Obviously, I'm not going to push the detail in this too much. I just want the sample. This is basically what they would call an Alla
prima painting. Where basically you
paint it all in one session and you will have, the Canvas will still be wet. This isn't something that
I plan on coming back on. You can see I'm moving
down on this dark here. I'm going to sample it and
push some of that in here. If you notice, I'm
not really blending. I will get into blending
in another painting. But for this one, I'm just using the brush strokes and
adding those strokes. Here we go. I kinda like that. Here. You can see that's
not that's black, but that's more gray. So I'm going to get in
here with a small brush. Actually, I'm going
to make a new layer. And I'm going to come
across here. Hang on. B. We go, oh, my brush seems to
have locked up, scaling up and down. Let's choose a different
tool and come back to it. Whoops. Here we go. I'm going to hit the white. Knock that back. I kinda like the way
that's happening. That was a mistake to be honest, but I like what's
happening there. I can see some orange here. I'm going to sample some
orangey brown up here. Not enough that we go. I'm going to zoom out,
take a look at this. It needs a bit more definition, is looking a little
too wishy-washy. So I'm going to switch
brushes because this is more of a pastel brushes. The icon is a brush, but it really looks
like a Pastel. Pastel to me. Alright, one thing
with this brush, you can see, well, you can't see, but I have a drawing tablet and
it does not rotate. Okay. So I'm gonna have to
I can't control the angle. So you can see if I use one
of these other brushes. Well, hang on. Which brush was I using? Some of the brushes will rotate when you That's the
one I just picked. When you move them, hang on. Okay. As you can see, this moves
around and twirls and thanks. Alright, so be aware of that, but not all the brushes do that. If you're working on a, on a, with a mouse, this won't matter, but right here,
this will matter. I'm going to click
on here. You can see this brush doesn't move. So if I want to
change the angle, so if I if I come here and I go, okay, that's straight
up and down like that. Now I want to change the angle. I'll right-click. And you can see right here, it says angle right now
it's at 90 degrees. I can either put in a number, I can click here, go up or down. Or I can rotate this
a little window here. Here, you can see I can
flip it vertically, reset angle if you want to
put it back to the original. I use that reset a lot. The rest I don't, But
you see right there. Okay, so now I'm going to
click to get out of this. And now I have an angle. Okay, I like this brush. This was a brush that
I used to use a lot. The only reason I don't like
this brush more is because I can't control because the angle is I have to
manually adjust it. You see how I'm just slotting
in basically colors. I hit reset and changing that angle. Let's see what else we got here. Okay, now I'm gonna go
in here with this dark, maybe get some detail. I'll hit Reset angle. And I'm going to sample, whoops, that was the reset was flat. Change that up. There we go. Now I can cut across there. It's starting to come into life. One thing that will really draw your attention is like it's
still looking a little muddy. But you can see right here
in this image there's that white almost
goes to the black. So I'm going to sample that white and really push it in there next to
that, that black. And I think that'll make
this pop quite a bit. Okay, I'm almost done with this, but let's see, maybe do the
same thing on this side. Okay, I'm going to push that
black back a little bit, reduced the size of that. And by reducing the size, I'm actually making the brush
a little, little sharper. And be careful, like I'm outlining just
a little bit here. Be careful not to
outline everything. Just kinda go with the flow. And again, this is just going
to take some practice like here I see there's a highlight
here, here and here. So I'm going to click on there. And then I'm going
to lighten that up a bit and maybe knocking, maybe a little more. Some highlight. One
of the things that the highlight will also
do is we'll show texture. If you have a really
shiny highlight, it's going to make the
object look smoother. Okay? And you can see
these highlights are actually making this
thing start to pop here. I'm just going to
go on along here, adding a little contrast, sharpening these edges here. Because right now as I said, you see it's really mushy, but I'm trying to get
rid of that machinists without without losing
my that painterly look. I can come in here and
sharpen that edge here. Maybe sharpen along here. And see because
of that contrast, I don't really need
to add a line. And I kinda like that. Maybe a little more
green in there. Change the angle. Whoops, that was the wrong way. Here we go. And I'm exaggerating here
with these highlights. But something about
when you add highlights just really makes something pop. Alright, I'm doing something
here that I wasn't, that I forgot that I do. Another way I zoom
in and out is rather than going across
there is I will hold down the Command and the spacebar and
drag up and down. And that's on a Mac and on a PC, it will be the control
in the space bar. And then you just drag
up and drag down. Alright, so that's how
I zoom in and out. Alright. I do wish
there was a way to, to key command to change
the angle of that brush. Who knows there might be, but I haven't found it yet. And see, if you notice, see this is the thing I like best about the brushes
where you can. It rotates automatically
is when I'm adding in these little background bits. Having that, I'm changing
that angle really, really makes a difference. I think. I just got it. Make this. Here's something else. Another way that
you can actually, I was talking about
adjusting that angle without a quicker way to change
the angle of that brush. As well as like I'm
having trouble getting my hand to go in that angle. I can right-click, bring up
the pop-up palette and we can tilt our canvas so I can
grab that little dot, drag it around this
side and you see the angle of the
brush stays the same. But now I can just
kinda touch across, hit across the edge of that. And then I can rotate it. However I like. When I'm done, I'll just click on the dot
in the beginning, that, that dot right back. And it'll go back the beginning. So I'm going to zoom
out. I'm holding the command key
and the Spacebar. And I kinda like that. I'm not 100% satisfied. I'm going to play
around with it a bit. I'm going to make one
new layer, blank layer. I can start merging these down. But for now, I'm going
to add my own thing. I'm going to stop
sampling these colors. It needs more so I can see, what I see here is
a bit more orange. So I'm going to add a
little orange in here. And again, remember I'm
on a new blank layer, so I don't have to
worry about it. There's no fear of wrecking it. And you can see I can add
the little color and I'm just going back with the eraser. And I'm not erasing
what's below it, which is really nice. I love color. I got to
add some color to this. I'm just going to let
loose a little bit. Another thing that I
like to do is when I, when I started
drawing and painting, I used to use prisma colors and grown accustomed from
using those prisma colors. And over the years. So now I kinda miss
those colors and they used to have lots of bright
colors in my drawings. Some sampling that
and I'm going to bring that towards the green. We get there. And I just really liked those extra colors that were in my drawings
because of that. So what I sometimes do, we'll go online and I will find a Prismacolor, the
example sheet. And I will use those
to sample the colors. So I don't know if I
can legally do that. If I can put that
up, pull that up. But it's basically just a
bunch of circles and things. I'll probably just
show it briefly. And you can see if I bring
that into the drawing, I can just sample those colors. And it, It's not such so
different from drawing normally. So you can see now
I'm just going back and sampling colors. And what I'm doing is I'm
sampling these colors. And then where they
mix is where I'm sampling to get a new color. And I'm going to zoom out here. And this is pretty much
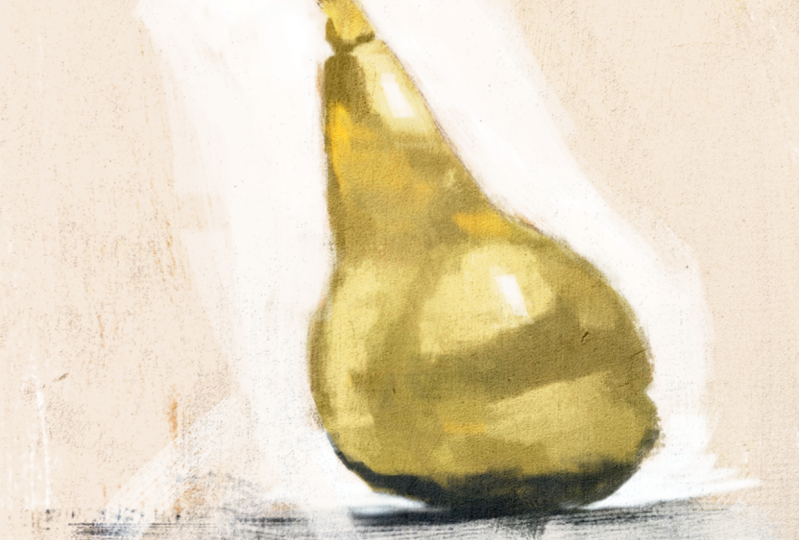
the entire drawing. Here we go. So that's it. It's very simple. It's supposed to be painterly. It's not an exact replica. If I want it to be
an exact replica, I could go in and
spend two hours drawing on that
and adding detail. But this is what I'm after.
9. Saving File And Uploading Project: Okay, so at this stage we're
pretty much done with this. So I need to save this so that I can upload it to the
project they're area. And the first one, easy way, the simplest way
to do this is to just leave everything
as I have it here, and then just take a
screenshot on, I'm on a, on a Mac and it would be Shift
command and I'll hit four. And then you see I get
this little target thing. And I can click, hold my finger down on
the mouse button and drag out till I get the entire
image and release. And it will save a copy of it on my computer desktop and
it'll say screenshot. And then I can just
go in and rename it. And that way I know
this is going to be a small enough file size to
upload to the project area. Another way that
I can do this is I can save this version
as I have, as it is. And I know that it's going
to be the proper, you know, it's gonna be a large
file and it has the layers in case
I want to go back. But what I'm gonna do is
I'm going to flatten this. I'm going to flatten image. And it's telling me it's going to basically destroy everything. There we go, so
everything is flattened. And now what I'm gonna do, and make sure you're careful. Actually what I'm gonna do here just to make sure I
don't mess this up. You can see it's named paired
digital painting critter. I'm going to go File, Save As. And then I'm going to
call this small version. And I'm going to save that. And that way it also will
protect you from that autosave. Won't accidentally save over now that I've merged everything, but now I also want to reduce the file size of this image. So if you look
here in the image, you can see that
the outside area is showing me there's
more to this image. So what I'm gonna do is come
up here and I am going to choose Trim to image size. And you see it crop that
extra bit out there. So that will reduce
the file size a bit. And I'm going to scale image
to new size right here. So again, I'm up here,
I'm under Image. And right here it says
scale image to new size. And I can reduce the actual image size or I
can reduce the resolution. I'm just going to
reduce the resolution. And this is because we're
gonna be uploading this onto, onto the project area. And this really doesn't
need to be very large. So right here, this
says resolution of 300. I'm going to change that to 70. Well, I'll make that 100. Okay. And this is going
to reduce the file size, the original file size on
this was saving out as a JPEG or a PNG at
about nine megabytes. And that's a pretty
decent sizes again, on Skillshare's project area, the maximum file size
is eight megabytes. So I've saved this out, change the resolution
from 300 to 800 to 100. Now, this is already
a small version. Actually, it's still in critter. I'm going to go File Save
As to save this as a PNG, which is best for
viewing on the web, JPEG is better for print, but either one is fine in this circumstance, this
doesn't need to be, this isn't critical, and
I'm paying attention to where I'm sending it and
I'm going to save that. And I can further reduce the file size here there's
large file size, small. When you see this, it'll
probably be on one. And I'll just click here to move that up to the
mid point at five. The lowest being one is
the largest file size, and nine being the
smallest file size. Okay, so to check the file
size here again, I'm on a Mac, so I can click on this
and go Command I. And it will show
me the file size. File size is 1.1 megabytes. Again, the easier way
to do this is to, is while you in credit is to just take a screenshot of it. And if you're on a PC,
I said that on a Mac, take a screenshot and on a PC, I think you use something, can use something called
snippets to take a screenshot. But that should be very easy. You just change the file name. And now we're going to
upload this to create a smile version pair,
small version pair. So now I'm just going to upload this image to the project area, so that will fit in here nicely. I'm going to come back to here. And you can see where
it says Create Project. I'm going to click there. And I'm going to upload the
image by clicking here. And I think this small version, I've done a couple of
these, as you can see, small version pair, and
you can see the file size is 1.1 megabytes
and that's a PNG. The, this was the original file. You can see it says 9.5 megabytes
and that was too large, so I had to reduce the file
size to get this to work. So anyway, I'm on the small
version, 1.1 megabytes. And I'm going to click on that. And it's loading. There we go. And I'll just hit Submit. And I'm just going to
give this a title. I've already typed
this out so I can just copy and paste this. So my project, you can
name it whatever you like. And this is a copy of the
digital painting that I created for this class. And now I'm happy with that. And I can just click
publish and that will upload to the project area, my example of the project. Alright, so this is what
it looks like when it's, once the project is uploaded. I hope this was helpful and I look forward
to seeing your work.
10. Wrapping It Up: I hope you had fun with this, and I look forward to seeing
you in future courses. Bye.
 Aaron Porter, Illustrator