Transcripts
1. Welcome!: Welcome to developing creativity and drawing skills. Do you remember as a kid lying on your back looking at clouds and seeing dragons and elephants for I2 in the sky. Throughout this class, you will haunt us this natural creative ability by learning how to find inspiration in your everyday surroundings, develop your creativity and push through creative block by learning how to create quick sketches, photographs, using Procreate. You'll use these skills to create your own quick sketches that will transform everyday objects into the unexpected. And what I like to call a photo mash up. These skills will help you identify the basic shapes needed to draw and to find inspiration in your everyday life. The fact that the sketch is a quake means we won't get lost in detail all perfection and your projects will be clean, quick and simple. Hi, I'm aid, the founder of creative design and desert dwellers, a desert inspired lifestyle brand. I'm a self-taught graphic designer, surface designer, and water colorist, and I've been a commissioned artist since I was ten years old. My art is strongly influenced by the environment and the culture I'm currently exploring. If you pop on over to my Instagram profile to see if you can guess where in the world I'm spending a lot of my time these days and follow along with me so we can explore new cultures throughout together. This class is perfect for beginners or more advanced artists who are new to Procreate. Your lessons will be kept at an introductory level, but I'll be throwing in more advanced tips and tricks as well. By the end of this class, you will learn drawing techniques, how to find inspiration in your everyday surroundings. Push through creative block, and you will know your way around the basic features of Procreate so you can continue your creativity independently. We'll be using the Procreate app and the Apple pencil to draw. But you can also follow along by printing your own photos and drawing on them with a pencil and markers. You can be a beginner in drawing and to begin to use it in Procreate. I use these exercises to get creativity flowing instead of staring at a blank screen. It's also my go-to warm up exercise before I begin creating coloring book pages or just beginning my artwork. It helps me focus on the essential shapes that make up the items I plan to draw. So I can simplify my illustrations into outlines only for the coloring page. During this class, I will walk you through three quick sketch photo mash ups, and we will build on your skills. In each sketch. We will focus on something as ordinary as lampposts using photos I've provided for you. We will then turn these three photos of different lampposts into three new objects. A pair of balancing scales and old-fashioned gentlemen and the UFO. During each quick sketch, we will explore basic tools on procreate, and I'll be sure to introduce you to more advanced shortcuts as well. We'll be using photo adjustments, layers, pen tool, selection tool and much more. After this class, you will know your way around the basic features of Procreate so you can keep creating on your own. These quick sketches will help you identify and draw basic shapes that form complex objects to create your own illustrations, to give you some context. I live in a compound in the middle of the desert. All of the homes in the compound look exactly the same. The nearest town is over an hour away, so I can't go there for inspiration. I found that was challenged to find inspiration for my art because everything look the same, even down to the furniture in everyone's homes. So I challenged myself to search for new perspective. And my 60 seconds sketches were a result of that. I found that my community really loved the 60 seconds sketch theories they wanted to participate in what I was going to draw next. I love asking them to join in. And I love seeing the extraordinary world I created in our very own town. This class will teach you the foundations for finding these sort of inspiration in the everyday and turning the ordinary into the extraordinary. You'll never on say the creative possibilities around you see you in class.
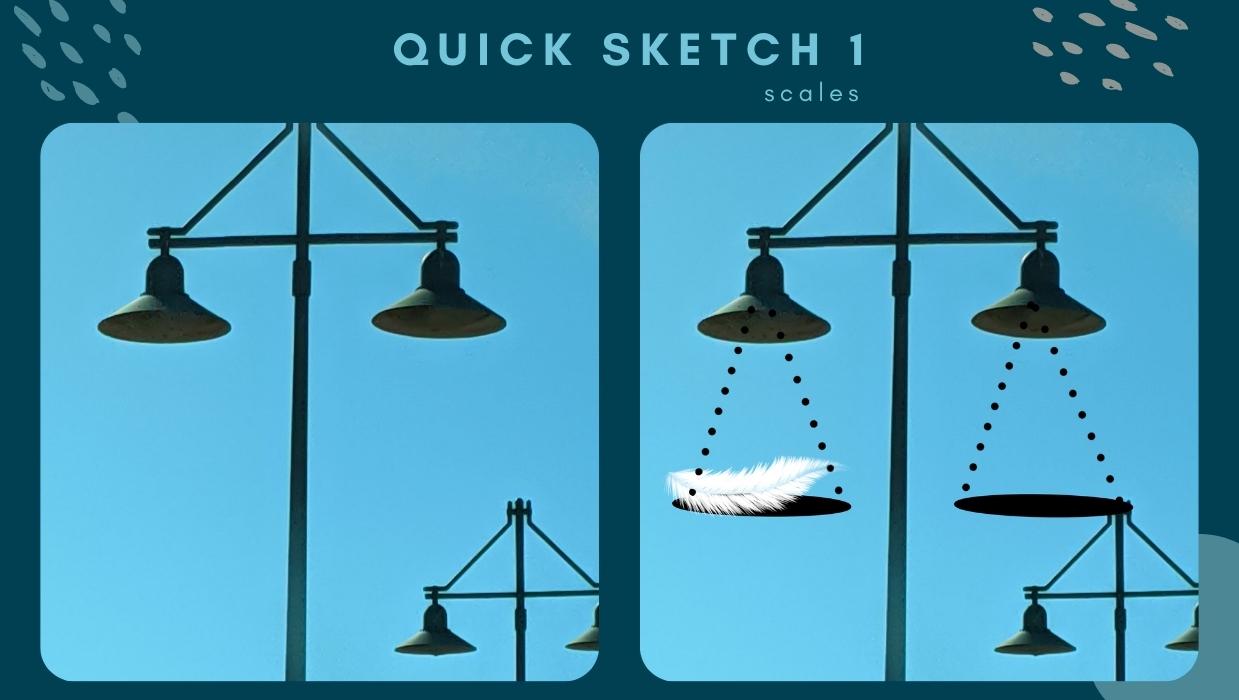
2. Scales Mashup Canvas Preparation: Let's prepare your Canvas VOCs quick sketch. We are going to be using a reference photo. And I'm also going to show you how to put the photo on your actual Canvas. So if you're more comfortable tracing, you can do that too. Let's get started. First, let's open Procreate. To open our canvas, we want to choose photo here because we've already saved our photos in our photo album. Just tap on the first fighter that we'll be using as a canvas. And it'll open it up for you. You can use two fingers to pinch and zoom and move your canvas around. And a quick two-finger pinch brings it back to screen size again. Next we want to open our reference photo. That's tap the Actions menu and choose Canvas up here. And down here, we want to open our reference photo by tapping on this small slider. Right now it's showing me the canvas we want to choose here for image and then import image. Here's our reference photo right here. You just tap on that. So now you can move this anywhere around your screen. I'm left-handed, so I actually like to put my reference photo up here. But if you're right-handed, you may prefer it over there while you draw with this hand. I also want to show you another way that you could use this reference photo if you don't feel confident, even with identifying your shapes at the moment, tap on the Actions menu again. And at the top here we're going to choose Add. Next we're going to insert a photo by tapping here. Let's open our reference photo. And now it's inserted it here. If you open the Layers menu, just stop here. You'll see that we now have a new layer of our inserted image here. What are you tap on the N right here. And we're going to adjust the opacity down to about 50 percent. So now you can see this image on top of that one. So that's going to make it easier for you to trace. Just tap outside the menu. While we're still in the layers panel, choose the plus icon at the very top to add a new layer. That's going to be our drawing layer. Let's rename it while we're also in this menu. Tap Layer 3. Choose Rename. And let's call this one shapes. Hit return and then just tap outside the screen to get out. I will need to open our layers menu again by tapping up here and tap on, make sure that you have your reference photo is selected. We can even quickly rename that right now to reference photo. While we're in here, let's label all of our layers. Let's tap on layer 1, Rename. And let's call this one canvas. We don't want to draw on either of these two. This is why we have another one on top so that all of our illustration is non-destructive. Cake. Now, we want to choose our reference photo. We're going to get out of our Layers menu. And we want to move this one around so that we can fit it in here nicely so that if you want to, you can trace on top of that. Let's go ahead and choose the Transform tool. This is a small arrow icon up top. Now we have these blue nodes that we can move around. We can make our photo smaller or larger, and Rigoletto around. I'm going to make this one a bit bigger by grabbing some side notes and dragging them up. And I'm just going to adjust this to that. It's almost in the center here. Great. Now let's make sure that we are on our shapes layer. By opening a Layers menu and choosing shapes. You can see that you've selected it because it's blue and the rest of them are black. Tip outside the closer menu. Next, let's choose our pen and our color. Tap on the brush menu up here. You want to choose down here on your brush library, we want calligraphy. Yours might be opened on something else. So let's choose calligraphy and the mono line, you can see which brushes selected again because it's highlighted in blue. Tap outside to close the menu. Next, you're going to want to choose your color. I basically use black for these sketches because it keeps it simple. Up here. He may not be able to see that. Let's choose a different color. Now you can see it here. It gives you the circle. We can move things around and you can see the color is changing. Let's go to classic. And to get black or white, you can just double tap with your pen in these areas. I'm choosing black. So I'm just going to double tap and tap outside to close that menu. Let's have a look at the weight of our line that we'll be using. I think that's still a bit too thin. I'm going to move it up maybe to 50 percent. And let's take a look at that. For the purposes of drawing on this, I think it's completely fine, especially with these quick sketches. The heavier the weight of your line, the most simple your image will need to be and the less detail you can add. And that's one of the main goals of doing a quick sketch. Use a two finger tap to undo. I think that's a great size. And again, that is it about 50 percent. Now you'll canvas is ready for quick sketch. Next we're going to be looking at basic shapes.
3. Identifying Basic Shapes : Now we're looking at the basic shapes to create the balancing scales. Or you need to know how to draw a triangle and a circle. Let's get started. Next. Let's draw the basic shapes that we can see here. We have a triangle. I'm just going to quickly draw that in. Hold your pen down as you draw the line, and then it will straighten it out for you. Up here you can also see that that opens up a new menu that says Edit Shape. So you can have a line where if you choose, make it an arc, and then you could actually adjust that if you wanted to. We don't need to do that. So we're just gonna do a two finger tap to undo and put it back to line. I'm going to tap outside to close this menu off again. Let me draw another line. This is just a rough sketch so we don't need to worry about anything being perfect. Draw and hold, and again, draw and hold. Great. Now we've got our triangle. Instead of redrawing that again over here, we're going to go to our Layers panel. Go to swipe across, which opens up a new menu for you. You've got lock, duplicate or delete. Let's tap Duplicate. Now we have two layers of triangles. Let's go back to our Transform tool up here. Use the fingers, slide it across. Venice, show you something else here. Do a two finger tap to undo. Let's tap on snapping down here while this menu is open and magnetics. Now when we go to move and new layer across, can you see how it snaps in? You have some guidelines here that show you where it's snapping to. Now, this is exactly locked in at the same height. Here. You can see our blue lines letting us know that that's on the same horizontal line as your other layer. Great. Tap the transform icon again to get out of that menu. We want to open another layer here because we need to draw our next shape here, which are ellipses. Tap on the plus symbol in our layers panel. Great. This time we're going to use two different ways to draw an ellipse. The first one, which will probably be the easiest, make sure that you have your pen selected mono line and that we are on the right layer. Let's rename that layer quickly by tapping on Layer five, rename, Let's call this one ellipse. And let's choose our pen monoline, tap outside to close. We're going to start drawing a circle and we're going to hold down so that we open up that new menu again. You're ready. Okay, see how I'm holding it down and I can move this around. It's just move it to you think it looks like the right shape. Remember, we don't wanna do this exact shape because it's the wrong perspective. We're looking more up at this particular piece and this photo is actually looking more down. All right. Okay, forget we can adjust this now by choosing editing shape. I'm going to bring this in by choosing the blue nodes. And I might score should a bit more to the perspectives gyrus, right? That's great. Let's copy and paste that one again. You can duplicate it here, or we can do a three finger swipe down, which opens up this menu here. And we can choose copy, three-finger, swipe down again, and choose Paste. Let's have a look in our Layers menu. You can see our extra pace right there. Let's move it across by choosing our transform tool, which is our arrow icon up here. And dragging across. That looks great. Drag this color across, leaving a finger on the screen and releasing. Let's go to our other ellipse by opening the lions, choose ellipse and fill it in again. Now I see join you triangles and your ellipses next book and look at a more advanced technique.
4. Drawing Advanced Ellipses: Now we're going to work on using the selection tool for our advanced ellipses. You notice in this particular lesson that we develop a halo around one of oscillations. This just happens to be a bug in the program and I've isolated aims to make sure that you knew how to troubleshoot around it. It's always good to explore different ways that we can work around tricky situations that we come across when we are creating. Let's have a look. So that's one way that you can draw an ellipse. Let's open our layers menu and turn these layers off by tapping the checkbox there and there. While we're in here, let's open up a new layer. Let's go ahead and open the selection tool. And across the top here you have four choices we want to choose ellipse. We're going to pull down our pen, press it down and hold and drag. And here you can see the dotted line of the selection. I'm going to try and make that around about the right size and we can adjust it later. So right now you can see closely, if I zoom in this section here, is the one that we can actually fill in with color. I'm going to choose black for some reason it's popped over to red. And I'm going to click and drag straight into that open space with no lines on it, and it fills it in. Let's go ahead and choose our selection tool so that we can adjust this. Let's go ahead and move this over here. Because I'm going to cut and paste this section and delete that one. So here we are. I'm going to choose this again. Let's go back to selection. Freehand. I wanted to just draw a line all the way around this three fingers swipe, cut and paste. Now this one is separate from this one, and we can go ahead and delete it. Now let's choose our new ellipse right here. Let's rename that to selection tool. Selection ellipse. So you remember, that's how you got that ellipse. Choose our transform tool, which is the arrow. And now we can drag this across. If you finding that things are jumping around too much, go back to snapping and turn off magnetics. So now it's a lot smoother to move around. And we can go ahead and grab these blue nodes and adjust this to fit nicely. In Skiles. Nice. We don't want to waste too much time on it because the idea of this again is it, It's a quick sketch. To add your next scale, you will open up your Layers menu over here, drag it across to the left and choose duplicate. To move it, we go to our Transform tool and we just drag it across. Right.
5. Adding Final Details to your Illustration: Next you could choose to put something on days scales if you wanted to. Maybe she go into your colors, you might find a Goldie color. I seem to have one in here already because I'm always using a nice mustard, a gold color. Let's open a new layer so we're not damaging anything that we've already drawn on. And I like to move my canvas depending on how I'm drawing. I'm going to put in some gold coins here. Again, this is just meant to be super fast. Don't worry about anything, nothing special. This has got to be quick. All you need to do is do something simple enough that it conveys that message. So just by doing a few little coins here, I've now got money could be grained depending on what somebody else sees when they see this image. I'm just going to quickly close off our reference photo as well by just tapping the X in here. On this side, had an eye might be, I'm going to balance money and love. I'm just going to choose red. You can go across here to your disk and move it around to find the right color that you want depending on what you would like to draw in this area. Okay, I'm going to choose red. And again, I'm going to come in here. It doesn't matter if I'm on the same layer, but for good practice, good practices, we will open up a new layer here. And I will just start drawing some little love for love and money to a few around this way. Remember you just got to use your two fingers to swivel your canvas around. All right, and there you have it. You have now balanced love and money by simply drawing two triangles and two ellipses. And you created your first picture.
6. How to Save & Export your Photo Mashup: Great. Now let's make sure you can share this on social media by tapping your actions icon. And across the top here you want to choose Share. And down here you have all of your different options. We want to choose JPEG and save image. There's one more fun thing that you can use on social media. Let's go across to video and we have the time-lapse recording. Let's export time-lapse video and choose four wake and say video. Now you'll be able to see exactly what you did. And you can post that is only 2.5 seconds long. And you could post that on social media for something fun for your followers to watch. You have reached Milestone 1. Remember to post your first photo mash up to the class project section. That's a really great way to connect with other classmates to get feedback or to ask me any questions that you might have had during the class. I can't wait to see you away. Once you've done that, let's get ready for our next clicks. Get.
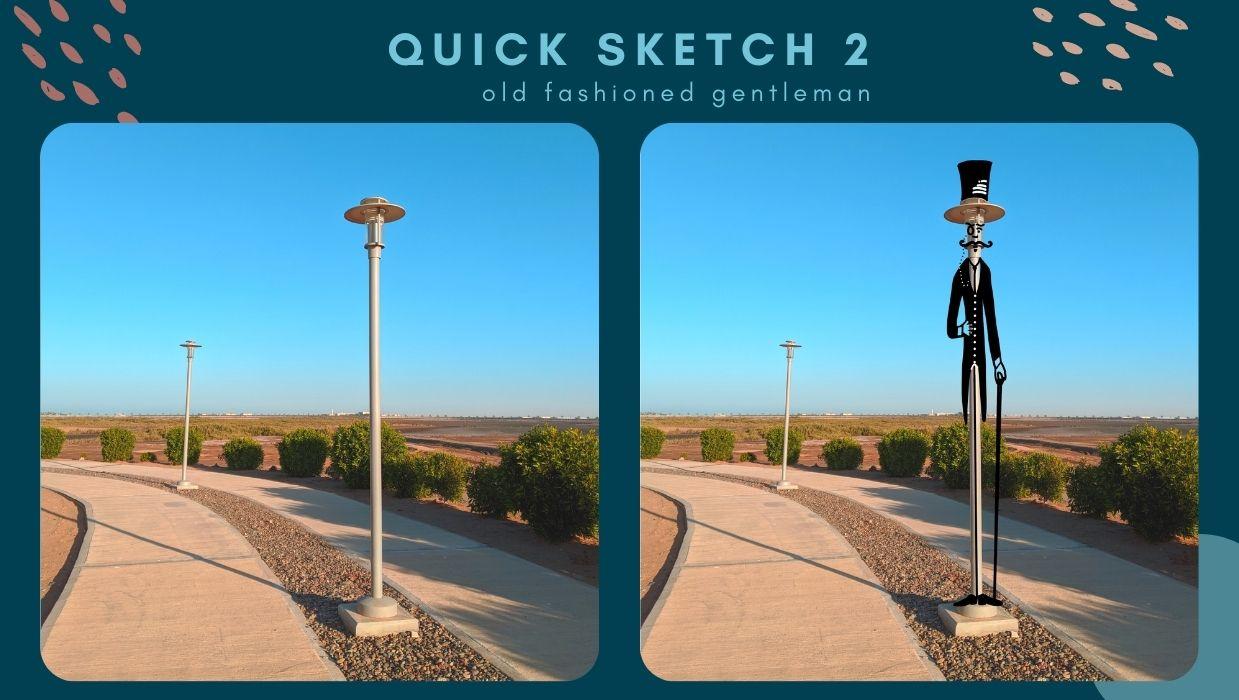
7. Gentleman Mashup Canvas Preparation: Now let's prepare your Canvas for the old-fashion gentlemen. First we're going to move across heat of photo. And we're going to choose this one that we saved earlier. Next, let's go to actions because we want to open our reference photos actions and across the top we want to choose, Add and insert a photo. Remember these ones are PNG so they have a clear background. So we can move him as we would like. If you wish to trace straight on him, which is what we'll be doing for the class, leave him here. But if you would like a solid background, I'm going to show you how to do that now so that he'll be easy to say when you add your reference photo. So let's go up here to layer and tap Layer 1, which is our canvas layer. And we're going to add a new layer right here. What we're just going to do here is fill this in with y. So let's go up to our colors and choose even just something as close to y. It doesn't really matter. You double-tap in that general area to get Wyatt. And we're just going to drag and fill. Let's go ahead and open our layers again and make our reference photo a little bit bigger. That looks fine. Let's go ahead and save this one. Go back to our wrench icon, which is our Actions menu. And we want to choose at the top here, Share and JPEG. Save image. Excellent. Now we can go back to our Layers menu at the top right. Select Layer 3, we don't need that anymore. Swipe across to delete. We also have another reference photo included in here. I'll just quickly show you. I go to Add and insert a photo. We have this one here. So you may choose to use this one. You may like the hat on this one or the flower from that one. Shoes from that one. But you might like the jacket on this one. So sometimes what we do when you choose inspiration is you actually choose different parts of different images and create your own. I'm going to go ahead and delete this one because I think this is the style that I'd like to go for. Okay, let's tap outside to close our Layers menu. If you don't want to trace and you would like to draw your own gentlemen, let's open our reference photo and we'll walk through that again. We're gonna go back up to our Actions menu, which is this small wrench icon. And you're going to choose Canvas up the top. And along here we have reference. Just tap on that slide are there. Right now it's showing us canvas, but we want to use image and import image. Let's choose the one that we prepared with the white background. Again, if you're right-handed, you may wish to put that up there, but because I'm a left-hander, I'm going to go and move that all the way over here. Okay, so we can zoom in on him and use him as our reference. And if you go into Trace, you can follow along with me right here. What I'm going to do here is adjust our reference photo by tapping on the Layers menu. Okay, he selected. Now let's go to our Transform tool, which is this small arrow. And I'm going to make sure along here with this other menu that opens up. I'm going to choose free form because I want to squash him. I don't know if you saw my original image, but he's very skinny because the pole is very skinny. And I'm going to line it up just about where I'd like it to be. His feet are down here, waste arms and his hat. Now I'm going to go back across to our Layers menu and tap on the end. And I'm going to reduce the opacity down to about 50 percent on this slider. That looks good. All right, your canvas, he's ready for the next step. Now I see getting foster up preparing a canvases. Next, we're going to move on to the basic shapes. And this drawing will be a little bit more advanced with more layers. I'm connecting lines between the shapes. That'll be easy, I promise.
8. Identifying Basic Shapes: Now that you canvas, he's ready. We're going to start looking at basic shapes to create the old fashion gentlemen. Let's have a quick look at the basic shapes that inspired this particular mash-up. I'm going to go ahead and hide our reference layer. And you can hide them here by tapping the checkboxes in your lives menu. This section here is what inspired the photo mash up because just this small ellipse right here reminded me all the brim of a top hat. One of the close if for some reason on this particular day, the sun had highlighted these two areas here which made them look like eyes. This look like a nose and a mustache or a mouth. So all of a sudden I'm saying faces and hats in a lot pole. And of course that's the brim of the hat and the top hat. My original idea was to draw a train coming along the tracks here as these gentlemen waited for work. And I was going to draw a brief case instead of a stick. Let's take a look at this light pole here. Because this is so tall and skinny. I needed my old fashion gentlemen to be tall and skinny too. I used, incorporated this to be the leg soldiers to a really thin line down here for the legs. Then you can just make some triangles down here for the basic shapes of the feet. Because here, oops, here his feet are going to be together. Then we'll adjust them. We have looked at the fate here that definitely in triangular shape. Next, let's look at his jacket. We pretty much have a diamond shape here or a cat shape. Remember, he's going to be very skinny and he's looked howls up also. So you can even do a why they're caught out like that. So I'm just wanting you to say here at the basic shapes that we've got inside our actual image that you can draw from. And even for his coattails, we've got 12 triangular shapes right here. I'll turn him off again so you can see how this image is basically being formed by diamond shapes, triangle shapes, and lines. And again up here you are going to add a rectangle. You can add some shoulders, three here. And this is just going to be your basic outline for your men. And days. He's stick, which again is a very thin triangle. And we've basically drawn from only triangles itself, this whole image. And that could be your sketch layer. But don't worry, we're going to go through and we will trace what we need to in the next lesson.
9. Drawing the Top Hat: This quick sketches a little bit more details and we'll be using more lions. And for this one, all you need to know is how to draw a diamond, a rectangle. Triangles are few dots and we'll have some connecting lines as well. Let's take a look. Okay, let's open our layers and let's go ahead and name them again, tap layer, rename, and this will be L Canvas. So we tap here, choose Rename and reference photo. Next up, we're going to have our shapes layer. And here will be our sketch. Okay, let's go ahead and start with our sketch. Double-check our brush, Brush Library, calligraphy, monoline, and checkout brush white. Again, I think that's a good size. I am at about 20 percent double-tap to undo once you've tested your brush. And I'm going to just reduce from the layers panel out reference photo by tapping on the ANA, want to adjust the opacity again to make it a lot lighter because I want to say the features that we can use in this face. So now I've moved this reference photo down to 16%. We're still on our sketch layer off, so that's tapped to get out. Let's go ahead and start with the hat and draw a rectangle. Remember to keep your pen down. And we'll open this up so we can adjust it and move it. Get it right now the hats going to move out a little bit at the top and more narrow down to the brain. Hey, that looks good. I'm going to go ahead and fill this in just with the slide up from one side to the other. If you wanted to tidy this up, you could choose your eraser, make sure that we've got our monoline chosen. That's under calligraphy in your brush library. And you'll need to adjust the size of this. I'm just going to come in here and just bring back the lamp because I don't want to lose the feature of the brim of the lamppost, which is also the brim of the hat. But for the hat, I actually want to fill that in. We go back to my brush, and now we're going to tap and drag the color all the way across. Okay, I might even just edit that does a little bit more and bring it in just at the sides with an AAC and my eraser. Press and hold. I'm going to edit my eraser shape. And I'm just going to go and remove that by hand. Let's try it on this side as well. Press and hold. And I'm going to keep that as an AAC. Exaggerated a bit more. That's fine. Tap to get out of that menu. And then I'm just going to go ahead and do the rest of that erasing by hand. Let's have a look. All right, it looks a little bit big. I'm going to tap on my Transform tool. I want to have free form because I don't want it to stay uniform. And I might just squash that just a little bit. I think that looks good. Great. Now let's move on to his suit jacket.
10. Drawing the Suit: Make sure you've got your paintbrush selected again. Tabulae is and open a new layer. Let's rename actually out sketch layer as TopHat. And the next one, let's call that suit. Okay, Let's have a look at the suit jacket. Just double-check that we are on our next layer, which is suit. And maybe we might need to turn up our reference photo. A capacity again to about 30%. Okay, let's start drawing. We've got a couple of triangles here. One there, and one here. Remember that this is a quick sketch, so don't worry about your lines. Alright, we can decide if we're going to fill those in in a moment. Let's go ahead. So it looks like this is his chin right here. So perhaps we might do his feet that might be called a cuvette. You would do that and put a couple of dots, just another triangle, triangle. This is a V, So let's do a V here, okay? And then we have another rectangle shape here, which is essentially the width of the pole. And you could do a few more dots down the middle for his jacket. Next, let's draw in his color. Looks like it comes in like this. Again, more triangular shapes right there. You can either round that off here with a few curves for his neck. Because this is a quick sketch. I'm not being too particular about adding new layers in here. But if you would like to, you could certainly make new layers for each piece that you draw to make it easy to edit and to undo mistakes that you feel like you might make. Okay, Next we've got the shoulders that are going to come out here. And that is going to be like one, be a rectangle. And another one here for his shoulder. And their rectangle. Let's just try and hold up hand down to straighten that out. Now we've got the hands 12. They don't need to be anything special here. Let's open a new layer. Let's rename this layer. We have delays at a plus, and we're going to rename this to stick. And let's go ahead and draw a line down here and fold in edit the shape if you want to, across and down again. And wait for that to snap into place, I'm going to grab my color and drag it across and just get that little bit there. All right. I think a stick is still a little bit too wide, so I'm going to go back to my transform tool. I wanted on Freeform, and I'm going to just slide it in to let's really thin. And I'm going to tap to get back out. That looks great. Now let's draw, go back to our suit and let's draw the outside of his jacket for this piece. I really like his jacket to come down into the poll with some little tile cut pieces coming here, just to accentuate that these are his legs. And we're going to draw this down like that. These oldest you're connecting lines, remember with this. As long as you draw and hold, you can move your line to where you'd like it to be. I think it can come out to about there and see just poking out a bit here. So I'm gonna go ahead and edit the shite z mean and just tuck that in behind the line and tap to get out. All right. I'm just going to draw another straight line down here to the base of his shirt. And now we're going to do straight lines down the poll and I'm going to tuck them back up in a V shape. Let's move this across. Remember when you draw your lines to hold it at the end of your line and tap to get out one mole straight line, hold it down. I'm going to just bring that one back in so that it's in line close enough because this is a quick sketch tap to get out. And then I'm going to do the tile coat way back up here to give it a nice V shape. And again, I'm holding it and adjusting to get it to the rights, but that looks great. Now the only thing I need to do in order to color in his tail coat is make sure that my shape is connected and make sure that it's connected nicely to the base of the tail cut tap to get out, zoom in. I'm going to draw this line down to match the base of the tail coat. I'm moving it around. Nice and tap to get out of that menu. Okay, the next thing we need to do is draw a line for his legs and then two triangles for his fate. Just because this is such a narrow pole and I don't want to lose the image of the pole. I still want people to say that it's a lamppost. I'm going to go ahead and adjust my pen size to be quite thin. Okay, let's start at his waist coat and come all the way down. And we keep and hold it to about there. And I might just adjust it here. Like that. There we go. Great. Now let's go and pop on his shoes and he is almost done. One triangle for this shoot. Move it around about there, 1, 2, and another one for this foot. And then now that you've got your basic shapes for the feet, I'm going to go ahead and drag and drop color into these two pieces. And I'm going to use my eraser tool just to play around with the heels. Dislike that. And another, he'll just lack that. Off the end. I will probably make my eraser a lot smaller here. Remember this is just a quick sketch and it's just to get you drawing. All right, and now we will need to just fill this inner loop it around his pants line and make it more like a shape of a shoe. But all you need is a triangle for the very beginning to form your basic shape. All right, Let's drag and drop some color in here. I think I'm going to give him a black waistcoats here. And here. I'm also going to give him black black sleeves. Fill that in up there. Do that little bit by hand. These pieces would look nice if they were white. So that's go in and double-tap the white section, touching it out, and then pull a color in and drop. I'm leaving the centerpiece clean because I want a lot post to show through. He's looking great. I might even give him somewhat hands just to make them stand out a little bit more. And zoom in on that too. Think of pinch. Great.
11. Adding Final Details: All right, I'm gonna go ahead and make a new layer and we have what chosen. Let me just check my pen white, then make that a little bit bigger. I'm just going to add a little accent on his hat here. So to turn it around and just draw some accent lines. Just as a bit of a retro feel. Give it a bit more depth. I'm going to go back to black because I'm just going to draw in basic features of his face. Tab in the bottom corner, you might be on disk, so just tap in the black area on your disk. Okay, Let's zoom in here. Let me see. I think I'm just going to put a big old mustache because this is what reminded me of a mustache. So I'm gonna give him a nice big curly mustache right here. Great. And I will give him a little nose. He's just going to have dots for eyes. Eyebrows. Don't waste too much time with your face. Let's maybe spice up a bit. Let's go to our selection tool. You might have drawn yours in the right place. And I'm going to freehand select, which means I can draw all the way around here and move him up. I think that looks good because now I'm using this pot for his mouth. Okay, The other thing I'd like to give our old fashion gentlemen is a monocle. So I'm going to make my pen white, smaller. I'm just going to close the reference photo. You keep feels open if he's still using it. Here again, 1%, okay, for this third, because I'm going to adjust it. I'm going to open up a new layer for the monocle. I'm going to go ahead and rename this Monaco. Okay, Let's zoom in and to draw a perfect circle again, remember you draw around, join your pace and hold and put your finger down. Can you see that it's snapping in to a perfect circle? And if we've got this menu open here, we can edit the shape and we can move it around and squish it again. Okay, I'm going to adjust the size. If you want to adjust the size, put your pen in between the nodes. Otherwise it ends up stretching it out of shape. Again. You just bring it back to circle. Okay, I think he's I paste looks good. Attempt to get out. And now I would like this to come around and join his jacket. And I think I'm gonna do that in white. So I'm just going to choose that from up here, which is my past color. I'm going to open a new layer underneath the molecule. So top layer 7 here, which is the face and press Plus. And you control a really thin line. So you could have, your brush size is super small and just draw a thin line, which will then go down to some kind of clip holding on his Monaco. Or you can move your brush size up a bit to create some dots that will come around to make it look like a chain. We're going to get behind his mustache and we'll just put it right there. I don't know about you, but I think his top hat still looks a little bit too wide. So I've gone back into my layers and I've gone down to our Top Hat. I'm going to choose our transform tool and free form down the bottom. I'm going to go ahead and zoom in, and I'm just going to try and squish it just a little bit. And I might even move it up to the top of this page right here. Now I'm going to go ahead into this pace where we have the accent. I'm going to choose my selection tool, freehand, and I'm just going to grab this little accent here, go back to transform. And now we can move that up to where we'd like. Just gonna do a few more adjustments on the Top Hat. Grab out calligraphy and mono line and just tuck this in a little bit nicer here. Oops, wrong color, black. And just tuck that in there and go through with my eraser and keep the shape of the lamppost. So that photo mash up is nicely integrated. All right, let's go ahead and turn off our reference layer. And I think he looks great. It's very obvious that he's an old fashion gentlemen, but it's also really obvious that he's a lamppost. Nice work. You're halfway there, you've reached Milestone 2. Can't wait to see how you all session gentleman ten doubt.
12. Saving and Exporting your Photo Mashup: Let's explore it out. Old-fashioned gentlemen and site, I'll time-lapse. Okay, You've done a great job with your old fashion gentlemen. Now we're going to go ahead and export by going up to your wrench icon, which is your Actions menu. Going across to Share and JPEG. And save image right here. Also, don't forget your time-lapse video, which is also in the Actions menu. Go across the top to video and export time-lapse video. I just want to take time to explain here with longer illustrations that you do. You may want to choose the thirty-seconds that because ours is so short, it's 30 seconds or less. So we're choosing full length and say video. Fantastic. Now you're ready to share the your project section. You're halfway there, you've reached Milestone 2. So it's really important now that you go ahead and post your exported photo mat up into the project section again so we can connect feedback and also say what other people are doing in the class as well. Last one more advanced. Let's move on to a UFO from another lamppost. See you there.
13. UFO Mashup Canvas Preparation: For us, it's right, I mash up. We're going to explore more advanced techniques now that you know your way around, procreate a little bit more. But first, let's prepare our Canvas. Right now you moving on to the third milestone in this class. And we're going to be building on the skills that we previously led. And we'll be learning some new ones as well. Let's get started on preparing our Canvas by tapping fighter here and importing this vita right here, which will become a UFO. You can see here this is already drawn for us. We also want to add in our reference photo and our cutout photo. So let's go back to our Actions menu. Go across the top to add and insert a photo. This is the one that I'm going to cut out, but you can add the one that you would like to be being done by the aliens. I liked the way here that she was looked like she was being pulled up with her jump. I'm going to turn off that layer for now by tapping the Layers menu and tapping the checkbox right there. Next we want to add our reference photo if you would like to trace as well you can. So we can go back to actions or walk you through that. Actions, add and insert a photo again. We're going to work on the body of the UFO first. So it might be a lot to import this 1 first. Let's go and reduce the opacity through the layers menu. Tap on the end on the selected layer and reduce the opacity to about 50 percent or whatever you think works for you. Now, we'll go across to our Transform tool and we're going to move it around so that spin it around a little bit using this green node right here to make it a bit more level to match this here. And then we're going to make it a lot smaller by grabbing a corner node. Yeah, regard, and that just gives you an idea of where you might put your whites, what that might look like as they change shape so that zoom in here, you can see these aren't perfect circles. Again, we're just working with loads of ellipses around here. Let's grab the Transform tool again and just make this the shape of our lamppost by choosing free form. And let's just pull that down a little bit just to match the shape a bit better. And we can squish it in a bit too. That's close enough. If you want to go ahead and trace. If you're not feeling confident yet, you could even turn the opacity right down. I'm going to go ahead and turn off this layer by opening our Layers menu here and tapping the checkbox. And just as a quick reminder, if you want to open a reference photo instead, open your Actions menu, tap Canvas. And down here we want to tap the slider for reference. Again, it brings up the Canvas. Let's tap on image and import image. And you could choose this one as your reference or this one. Let's work on this 1 first for your reference image. Now you can actually pinch and zoom your reference image. And if you can see this line up here, that's where you can tap and grab and move it across to wherever you need your reference image today. Now let's move on to making sure that we have the right brush and the right color and that we have a liar ready to draw on. First, let's tap on the Brush Library. And again, we want calligraphy in our brush menu here, and one eye line. Next, we're going to tap on our color palette here and make sure that we are in black. You might be on the disk and you can just change them across down here. Double-tap in the area where you want the color to debate or usual history as well. And the classic view just double-tap down here. Next, we want to open up another layer by tapping our Layers menu and tapping the Plus sign. Let's rename this one by tapping on my, uh, foal and tapping Rename. This is going to be ab shapes layer. And let's go ahead and rename these ones as well. This one, visual reference photo. So tap on, tap on the layer inserted image and rename reference. The next one we're going to tap on the inserted image that we're going to cut out. Rename. I'm going to call this one cut out. And let's rename Layer 1 to Canvas. Canvas is almost ready. Next up we are going to adjust the photo using the adjustments menu.
14. Adjusting Photo to Create Mood: Now that you've prepared your Canvas ND paintbrush, we're going to start adjusting our photos. We can get some really interesting background colors to create new just by moving a few slides. I'll show you how. Let's go ahead and adjust our photo. I'm just going to turn off this reference photo for now. You can just tap it and then choose the small x in the corner to close. You can open again anytime on the actions canvas and reference. Let's check that we're on the right layer first by tapping on the Layers menu and checking where on Canvas. Next we're moving on to the Adjustments menu, which looks like this magic wand up here. Next down here, we're going to choose hue, saturation and brightness. And we're going to be applying this effect to the whole layer. So let's choose layer. Down here, we have the hue, the saturation, and the brightness. So if we play with the brightness, we can turn it down or all the way out. And to undo what you've done, either a two-finger tap or you can do one tap. And it'll bring up this new menu where you can apply the effect cancel, undo, reset, and preview. Let's look at preview and environment. I'd like to make this just a little bit broader so that more detail inside out soon to the UFO I will show is going to make it just the smallest bit brighter. Now you can use that new menu by tapping and choosing Preview, and you can see the slight difference in brightness. Next, let's have a look at the saturation by bumping it all the way out. You could even go with something like this because this is such an unnatural lie and white too much color. But because it's a UFO, it could suit that particular mood. I'm going to bring it up just a bit to about 75 to 80 percent. Because now I want to really bring out some interesting Hughes across here. Let's move the slider across and see what happens. I really love this crazy purple and green for usr. Photo mash up. The apricot, violet and blue also looks really cool. Let's bring it back across. Now we've got this amazing pink ground and Min sky. And again all the way across. Go ahead and play around with these on your own and see which mood that you would like to create for your UFO. I think I'm gonna go for this green and pink color and the UFO. Then I think that the colors that I'll choose for the beam would be yellow, which will really stand out against this background. Okay, once you've done that, let's move on. I can't wait to see what you're working on, what colors you chose for your mood for the Canvas. Next up, we're going to look at the basic shapes of the UFO.
15. Identifying Basic Shapes: Now let's identify the basic shapes that make up this UEFI that we're about to droll. All you need to know is how to draw a few dots and some triangles. Let's get started. And now let's move on to identifying shapes. As we think about basic shapes in our environment to find inspiration. You can say here that this one is already looked like a usr to me. We're going to be doing a few dots around here without pen and a few triangles up here for the light beams. Now let's have a quick look at the basic shapes that we'll be drawing and why I chose this pace and why did it remind me of a usr? Firstly, I took this photo because that particular shape that was the inspiration for the rest of the scene that we're going to create, which will be down here of the main light vein and the object that you've chosen being, being adopted by the aliens. I took the photo with as much contrast as possible between the object that we're drawing and the sky so that it really stands out against the background, which you can say here. So that's something to keep in mind when you are taking your own photographs. I've also left in the photo enough room down here for our light beam and the object that we are going to be placing in the middle. So when you are taking the photographs for your own photo mashups, you need to think about the framing. So here you can see I chosen angle, I even got down low with my camera so that more of these was up in the sky, much like a UFO would they? And I've also left plenty of room down here for the rest of our photo in my shop.
16. Color Palette Selection: Depending on what color your eyes feel, background, you are going to want to choose a different color for this particular phyto adjustment that I've chosen with the pink and the green. I'm going to use yellow in here. Let's go and have a look at different colors depending on what you've chosen, that special finger down on your usr. And by doing that, can you say that it changed the color up here? Let's go and tap on a color palette. Let's move across the bottom menu here, two How many? And along here is where it will actually give you different colors on the color wheel, I'm going to choose tetra Reddick. That will give me the 4 opposite end of the color wheel. So long here you can see this one would probably blend in too much and it's not really standing out. Let's go back to the color menu. Let's try out the green. Standing out a lot more, but it's just similar to my background. Open our color wheel again and choose the yellow. It's kind of a golden yellow here, so I'm going to brighten it up like that. How does that look? Still not bright enough for me. I'm gonna go ahead and move this just a little bit to create a brighter yellow. Just play around with choosing your colors and what stands out the most. I also want to check what the yellow looks like against the green background. Still not bright enough for me. I'm going to bump that all the way up and bring it closer. So that's nice, a nice lemony yellow. If you'd like this exact color, you can move across to value and type in the hexadecimal code, which is hashed or pound symbol E, B, C, 937. Again, you go down to the bottom of your color palette menu, across the bottom and tap value. And in the hexadecimal here, you can type II, B, C, 937 to get the same yellow. Let's have a better look at this yellow that looks nice along there. And I think it also looks nice against the green. Great. Let's move on to the quick sketch lesson on you we're doing is adding some dots and some triangles, which will create lots fewer UFO.
17. Drawing UFO Lights: Let's move on to the quick sketch lesson. Or you were doing is adding some dots and some triangles, which will create lots feel UFO. Let's go ahead and check out layers and we are on the correct layer for drawing. Let's zoom in. And my brush size is at about 35, 36 percent, and I'm on the yellow color. Now I'm just going to add just dots with my brush along this area here. Great. Now I also want to add some lights up here. I want my lots to look even across here. One in the center, one on this side, on this side, and then you just put them in the center of H space. Great. Now we're going to be moving on to drawing our triangles, which will cost a lot from our spaceship. Let's open up a new layer for my Layers menu and tap the plus symbol. Let's rename my layers here. Tap on shapes, Rename, and call these lights. Next, we're going to call this one glare and new layer Glare because we're going to add a sheen coming out from the lights. Now that we're on a new layer, remember that whatever we draw here, we are not going to affect the layer below. Zoom-in and just draw your triangle. Remember draw and hold. And if you press one finger down, can you see how it snaps into place? So now your line is perfectly horizontal across the page. Let go with your pen first before you release your finger. And again, draw and hold. And just move that around. I'm gonna go ahead and fill in are shaped by dragging the color across and releasing. It looks like we missed a bit just down here. Okay, I'm just going to move this away from our image so I can see it more clearly. And I'm going to adjust the opacity down to about 55 percent so that we don't damage this particular layer because we're going to be playing around with a little bit. We're going to mask this layer so we don't damage it. Tough on your layers and glare. And in this menu, you want to choose mask. And you see how that's opened a new layer up across the top. What happens here is you don't actually choose a color when you're using a layer mask. Or you need to remember is that black conceals and the light or white reveals. And I want to show you what I mean by that. And the only thing you need to know here is that we're not erasing it and actually damaging the image. We will be drawing on this mask layer. And when you use black, that hides, black conceals. And if you move to white, white reveals. So you can bring it back again. Even if I go ahead and hide some of that, some of our layer, you can see that it's still fully intact here. I can even delete the mask layer. And you can see that nothing has actually happened to our original layer. This is why we are going to be using the mask so that we can play around with it and not actually lose anything here. Okay, Let's tap again, open up a mask layer down here. And remember that black conceals and white reveals much like shade or the dark of night means you can't see anything. And during the light of day you can see everything. So it's an easier way to remember it. Now let's go ahead and choose a different brush. So I'd like you to try three and to see what effect that you actually like in the light theme. The first one we're going to try is the touch ups and the noise brush. Before we start doing this, Let's, let's bump up our capacity again so we can really see the changes that we're making. K were on our layer mask. We have our first brush, which is noise brush under the touch ups menu. Let's have a look at what this does along here with a little bit of pressure. And it's giving us a nice BMI style. Move that up. And I probably won't the end to disappear mostly, and especially in here, that doesn't look too bad. I'm going to save this one, but I'm going to go ahead and copy it so that we can try different brush. Let's go ahead and delete this mask layer and make a new one by tapping on your layer and mask. Let's try out a new brush. But first let's turn off these layers across here so we can only see the one that we're working on. Let's go back to brushes and sketching up here. And let's have a look at bonobo chalk. This is another gritty brush, but it might give you a different effect and it's just nice to know that you can play around with different brushes to get different effects or slightly different effect to make your, your illustration just the way you want it. That's double-check again that we are on the right layer mask and that eye color is black so that it conceals. Or brush is way too big. Let's undo that paint stroke and come back in here with this brush. So this is definitely a different texture. It seems to be a bit softer, but still creating a nice effect here. And again, I just want to soften the edges here. And soften the edges over here. Blend that in a bit. Hey, that looks pretty interesting. Let's save this one and open our layers menu. Turn off that layer and swipe across and duplicate. One more time. Let's get rid of our newest mask layer by swiping across and choosing delete. Turn on the glare that we will be working on, tap it again and choose Mask. Through the next brush I thought that we could try out. If we go back to our brush library is under airbrushing and soft brush right here in tap outside to close. Let's check that we are on the layer mask again and that our color is black. To conceal. This one's a lot smoother. Might need to actually make my brush a bit smaller. Cross here. Okay, and then we can try out these different ones in here. So I'm just being quiet, gentle with my pen and you will feel the difference when you create pressure, when you apply more pressure. And let's just clean off this section down here. Okay, Let's go ahead and rename these so we know which one we're using. The first one, the first glare here, rename. We use the soft brush. The next one below it, tap on glare, rename. And this one was bonobo. Bonobo. And let's tap out third glare layer. And this one was the glare and noise brush. Great. This go ahead and move our glare soft brush layer and choose our transform tool so we can actually move it and have a look at what it looks like. I'm going to use the green node to move it around like this and line it up with one of the lights there. Before I manipulate any of these, I want to move back to our Layers menu and open glare bonobo and the layer mask. Make sure that we've selected glib and oboe and put that one in here. Next one I'm going to have a look at and I'm going to turn on the glare noise and the Layer Mask. I'm going to swivel that one in the opposite direction with the green node and bring that across here. And let's move our glare noise over here, zoom in and have a look at them. So this is our soft brush. This is our noise brush, which is nice gritty texture. And this is our bonobo. Choose which one you like and delete the others. I think I'm going to choose. I'm going to choose this one here, which is the noise noise brush. You can always check which layer it is by tapping it in the Checkbox to turn it on and off. Okay. You can delete these or you can just turn them off so you don't see them. But I think I'm going to delete them so we don't get confused. Now I want to go ahead and manipulate this, but I want to copy it first. So swipe across on the glare on that you have chosen and choose duplicate. Make sure that you've selected the right layer and grab it and move it across. I'm using the green node to swivel it around and line it up. For this particular line. I think I'm going to have them on angles coming up more like this. So let's move that one. I'm going to make another copy of our original glare noise by swiping across and choosing Duplicate, make sure that when you do move it, that you have the right layers chosen. So here we have glare noise. And I'm going to move that around by grabbing the green node. And I'll move that on an upward angle again too. Okay. As you can see right at the moment, they're all probably too wide. So I'm going to go and adjust them so that they all just look a little bit different. As we've got our Transform menu open, you can see that we have our options down here. So first I'm going to use free form. I'm just going to squish it in so that it's a lot thinner. The reason why I left it wide first was because it makes it easier to shade into the narrow parts here. But now that we've finished that we can actually manipulate it and make it smaller and center. I think that might be a nice size. I'm going to move across to my next glare layer and do the same. What we've got an extra one there, perfect. Here we go. What is high that one for now and go back to this one. But this one, it's not going to be shooting all the way up, so we need to squash it a bit, I think to make it look like it's coming out more and I'm just going to squash it a bit more. And this is something that you can really play with it to make it your own, to move it around. Hey, and then we'll move across to our other gland noise and flatten that one out as well to around about the same the same width as that one there. Nice. Okay, I'm going to add a few more glares in there now that we've got a bit more room. And then we'll just do some final adjustments on that so that it looks a little more blended in. I'm going to open up this space that we had and tap on that. And again, use the green node. Hold your pen down and scribbler across to about there. And let's copy that one by tapping on it, swiping across Duplicate. And again, make sure that you've got the right one chosen. So tap on gland noise and drag that across down here. I'm going to flip this one over to flip horizontal, just like that. And let's go ahead and squash it by choosing your transform tool. And we're still in free form. I'm going to bring it in at the sides like that and turn it around a little bit more. Still more like that sort of fits in nicely between these two here. So you've just got to work. You've just got to play around with that until you get an angle that you think looks visually pleasing. Back down here to our other glare noise. Move it around and squash it up. And I still want to scribble out to sit a little bit more so that the angle looks a bit better. Okay, Now I'm going to bring it in. So that is not as big. And same with the one above it. Glare noise. If you aren't sure what layer you are using, you can just tap the checkbox in here to turn them on and off. You can also go through and label these if you wanted to. So this is where noise, right? So that's tap rename and do Glenn noise, right? Just doing R for right. If you're getting confused with your layers, you can move up again. This one is where noise center you can see by the shape of it. Tap on it, rename gland noise, c for center and alkaline noise over here, tapping on the checkbox to see which layer you're on. Glare, noise, tap, rename, and let's choose left for this one. And then you can see by these others that they are this one here and this one here. Okay, I think now it's time to just adjust these and blend them in just a little bit more and even shorten these ones on the side. So let's work with glare noise left. We've got that one chosen and bring it in a bit. And then declare noise, right? Bring that one in a bit too. Sometimes I like to just zoom out and have a bit of a look to see is a blending in. It looks really, it looks really stiff right now. So now we need to work on it to blend in. And part of that will be to adjust the opacity that start on the top and work our way down and our Layers menu by tapping on the end and bringing it down. We're working on this one right here. Can you see it disappearing? I think around 50 percent works quite well. Okay, tap the layer again and move down to our next layer, which will be this one over here. And bring it down to about 50 percent. Tap the layer again to close and move down to Glenn noise on this side, tap the end and 50%. Next, we want glare in the center, tap the end, and move the opacity slider to 50 percent. Again. And let's move down to glared noise, right? Image across layers. Glare noise, right? Chap the end and move the opacity slider down to about 50 percent. I'm happy with these, but we can move them later if we want to. But for now, I'd like to blend them in a little bit more. So I'm gonna go ahead and make sure that first of all, all of those layers are visible, then I'm going to put my finger down on all of them, make sure it's selected and pinch them together like that. Now you can see that all of these have joined the one layer or so that we don't damage this. But I'm going to go ahead and make another layer mask here. By tapping the layer and mask, make sure that black is selected and my brush is from the airbrushing menu and soft brush, I'm going to move up my brush size. Let's have a look that looks like a good size. It's at 5%. Now I'm going to work on the outside of this here just to blend in the edges a little bit more so it's not so stiff. Even down there a little bit. And can you see by doing this, I'm not damaging any of the other layers underneath because we're working on our own layer. So if I go back now and turn off this layer mask, everything is restored as it was before. Let's zoom out and have a look by quick two-finger pinch. I think that looks fine. But now that I've blended it in, I think it could use a little more opacity. I'd like this to have a little bit more color. We've already gone ahead and pinched all of our layers together. So you'll see this is the maximum capacity that we have. But in order to create a bit more depth of color, I'm going to swipe across and duplicate. Can you see how that immediately brightened our layer right here? I'm gonna go ahead and pinch and this one together. All right, I think that looks fun. Next we're going to move on to the large beam that comes out of the UFO.
18. Drawing the UFO Beam: Next we're going to move on to the large beam that comes out of the UFO. That's open a new layer and call this one, Rename and call this one name. I'm using my yellow color again, but you could experiment with another color official. I'm going to move back to calligraphy and monitor line. And I'm going to pull down my line while holding my pen down on the paper. I think I want my beam to touch down around here on the road. Okay, I'm going to move my brush size down. Let's have a look at that. Alright, that is at about 35 percent. Great. Zoom in just a little bit. I want the light to be coming out of this centerpiece here on our spaceship. Holding it down. Alright, I think I probably wanted to becoming out to the curb may be great to get the same angle and to make it uniform, I'm going to go back to my layers. I'm going to copy my beam layer. I'm going to go to my Transform Flip Horizontal and I'm going to drag it across here. Match. Can you see how it snapped in there? Remember are snapping menu here. Okay, and now I'm gonna go ahead and join them up. But first I'm going to pinch my two layers together so it's one pace, which means I'll be able to fill this in with color. Remember if your lines don't meet here and here and you don't have one solid object. It's literally like pouring paint in a bucket with a hole. If you do this, it will cover the whole shape. Tap, two-finger tap to undo, you need to seal. We're going to need to make these joint up. Press and hold. Move down to the bottom and press and hold so that you can easily move your line around. And now we should be able to fill it in by pulling and dropping the color in there. The next thing I'd like to do is to add, I'm going to turn my canvas around. I'm going to add an arc from here to here. Remember to hold down your pen so that you can move your arc around. And now I'm going to hit an edit shape just to make sure that it is Edit Shape. You can see that they've drawn an arc for us and assisted our drawing. Make sure that those ends meet. And I'm going to fill that in as well. So if we tap to get out and drag and drop, I'll color. The next thing that I want to match is up here. I want the beam to be shaped in the shape of our original picture. I'm just going to draw another arc, press and hold it at the shape and just make that may in nicely tap to get out. Okay, that looks pretty good. It's coming over a little bit on the edge here. So I'm gonna go to my Transform menu and just bring it in a little bit. I sure I'm on free form here. And let's get out of that menu. That looks pretty good. No one's going to notice from a distance. And again, because it's a quick sketch, we don't want to mess around with being perfect. We're going to do the same thing that we did here. So let's go in and Moscow layer. Choose your favorite blending brush. I liked the bonobo. I'm going to go ahead and choose the bonobo, which was under sketching and the Niobrara Chalk. And for this one we're going to need a big brush. So let's bring that up and make sure that you're on black. Remember that black conceals and white reveals and test that out. That looks pretty good. Just worked through there. Remember you want it to be more solid on the outside and clear through the middle. Now that I'm making this the largest size, I'm not really sure that I am a fan of the bonobo. I might actually want to keep some of the texture on the edges, but I'm probably going to switch to the soft brush just to blend it in a bit more. And I just want this to be quite transparent for the cut-out that we'll be doing in the next lesson. Let's just blend is so it's not so solid on the bottom here. But you can still say that really faint line along here. Okay, I'm going to go up to my brushes and I'm going to choose the airbrushing and the soft brush and blend in a bit more. Test out my brush. Too small, bring it up on about 13 percent. That's pretty good, I think. Just to soften it up just a bit. Once you're happy with your blending, taps your layers and the N on your beam layer and reduce the opacity so that it blends in more and looks more like a live thing. I'm at about 6869%. Smooth it down. Just to have a look here, I'm happy with about 60, 65. Rather. Good. All right, all of this now is ready for your cutout, which we'll do in the next lesson.
19. Cutting Out and Object: Now you'll UF always ready to adopt it. Let's work on cutting out the fight I that you've chosen or the one that I provided. And we're going to put it in the vein. Okay, Now we are ready to move on to using the selection tool to cut out another photograph and add that to our photo mash up. Remember we added that in at the very beginning when we were preparing our canvas. So let's go ahead and turn your cutout layer on. What I'd like to do right now is adjust her so that she fits the size of the beam a little bit better before I go ahead and cut her out. So I've selected my cutout layer. I'm going to go across to my transform tool. And I'm just going to go ahead and move her so she fits in the beam nicely. Let's have a look at that. I'm just going to reduce the opacity here. So I can see her. I think she's the right size compared to the light pole. And I want to add just that extra dimension of it looking like someone walking along the street was abducted by this alien lamppost. Okay, let's move up the opacity now that we know she's the right size. Another neat trick that Procreate has, if you want to turn all of the other layers on and off, you can press and hold. And it turns everything off so you can see what you're doing, which I really love. I really love this feature. Next, we're going to go ahead and cut her out. So we're going to think of our selection tool like a pair of scissors. Once you open this, you have your menu down here. You've already used your lips in your first quick sketch. Now we're going to go ahead and use freehand. What I'd like to try and see if Automatic works and if it does, it'll take out a lot of work for us. So let's choose automatic. Let's tap on her and see what happens. If I tap and drag across. It is pretty much selecting most of her until we reach the threshold where it starts to grab other objects. That actually looks pretty good. We don't want this bit here or anything around the outside of her shoe. But considering she's going to be behind the light beam layer, the detail of her isn't really that important. And again, it's a quick sketch, so this is why we'd wanna do things more quickly. I do want to show you the free hand style low as well. So let's tap to undo and go to freehand. With the freehand, you'll want to zoom in and you will actually draw around the very edge of your shape. Can you say here the dotted line? Again, it's like a pair of scissors. We are cutting her out from her background image. When you are cutting out at ease, a good idea to try and stay on the inside of the object you want to cut out rather than the outside so that you don't have that halo effect around the shape. I'm just going to go ahead and speed this up and I'll see you at the end of cutting her out by hand. Okay. If he gets some stripy lines like this just to a two-finger tap to bring you back to your last point of contact. Now that she is fully enveloped in the cut-out line, we're going to do a three finger swipe to open up our copy and paste menu. And I want to cut and paste. Now if we go to our Layers menu, you will see that she has been removed from here. And she's now in her own layer. So we can go ahead and remove our cutout layer by swiping across and choosing delete. And there she is. Okay now that she happens to be in the right place, but I do want to show you how to move around your layers just in case yours didn't appear in the right spot. Choose the cutout that you would like to move, press and hold. And now you can see that it will move with your finger. So if we put her on the top, she's not really behind the lot, so we want to move her back down underneath the beam layer by tapping and holding and placing her there. Now that we've placed your under the beam, I feel like I need to clean it up just a little bit more to make her more visible. You could do that in a couple of ways. We can open up our Layer menu and go back to beam and press N and reduce the opacity again. But then that really takes away from the brightness of the light beam. So I'm going to do a two finger tap to undo. And I'm just going to remove some of the noise that we have here on the light beam. Tap the beam layout and make sure that you tap Layer Mask. I'm going to go ahead and choose my soft brush again in my Brush Library, which is under airbrushing. And work on this again, checking that I have black chosen because black conceals and white reveals. Let's see how big my brushes here. I still want a little bit of texture on her arms as she gets closer up. But I think that looks a lot better just by lightning it up just a little bit. You've just completed your third photo mash up. Let's go ahead and save and export so that you can post in the project section. Right? You finish your third fight. I mash up. Now let's move on to exporting and pristine.
20. Saving and Exporting Your Photo Mashup: Okay, We should be getting faster at these. Let's go ahead and export, fight a mash up and get ready to post. Let's go ahead and size. We have up to your Actions menu and go across to share, and go down to JPEG and save image. Next to share your time-lapse video, move across to video in that same menu and choose Export time-lapse. So again, our sketches so quick that we cannot fill up the thirty-seconds of the compressed footage. So you'll need to choose full length and say video. Great. Now you're ready to parse these to the project section. And please feel free to ask me any questions. I can't wait to see what colors you chose, what you chose to be abducted by aliens. Next, let's move on to the class project. Now that you've saved, you are ready to post to the project section so we can see that you've completed milestone and betrayed. Again, Let's connect with other people in the class and bounce ideas off each other. And I'm happy to answer any questions that you might have coming up. Next, we're going to talk about E working on your own project with your eyesight eyes. But I've also included plenty of inspiration. Fido is end canvases that you can use as well. We'll see you there. Let's move on to the next class.
21. Class Project: After completing our three quick sketches, you'll know your way around procreate so you can create your own photo mash up independently. I've chosen this project for you so you can practice these skills you've just learned and testing out your creative I, your ability to find inspiration in your everyday surrounds, like in a kitchen, draw items in the fridge, or even on your own street. I encourage you to post your project in stages so you can connect with both me and your creative community. In this class. You would take your own photo or you can use the photos with the prompts that I've provided as well, then post this photo so we can join you on your creation. It's always great to hear what others might see in this photo to, you could end up developing several artworks. That is one image. When you take your photo, it helps if you know what you want to draw so you can frame your object with enough space around it for your illustration. It also helps to try and take a photo from an angle that gives your object at cleaner, simpler background that isn't too busy. And so your object will have enough contrast from the background. This way it won't get lost in the overall scene. Edit this photo to create new fuel mash up and posted before and after photo. For example, if you plan to turn an object into a bird on a pond, you may want more blue cool tones in your photo to create the effect of water. Or your everyday object might need a darker, more moody background to make it stand out or to create contrast. I'm excited to see what you choose and I'm happy to provide supportive feedback to remember to create and post your quick sketch. You may already have ideas already about what you wish to draw. I usually research reference images of the new object that I'm choosing as my mashup. I can draw it more easily. It's rare that I only draw from my mind's eye. And don't forget to set a timer and try to keep your sketch under ten minutes to begin with. And if you comfortable with sketching, set of five-minute timer or challenge yourself to a one or two minute timer. Remember the idea is to keep your sketch loose, simple, and mostly an outline. And most importantly, quick. This is to ensure that you don't get bogged down by any pressure you may place on yourself about creating something. Perfect. Imperfection is a foundation for excellent. I'm looking forward to seeing your sketches and if you'd like to help, I'm here to provide creative support. Don't forget to share your mash up in a quick sketch form. Or if you choose to try to develop your sketch further by adding details and more color posted here and to use social media. My community really enjoyed the fence, small creatures and scenes I've created now town and I'm sure yours will too. I can't wait to see your new worlds.
22. Final Thoughts: Congratulations on completing your class milestones and your barrier in photo mash up. Through the exploration of creating photo mashups, we have covered everything from the basic tools of procreate, how to find inspiration online. How to find inspiration in your everyday surroundings. How to solve copyright-free images. How and why to keep sketches simple. We broken down complex objects into basic shapes and put them back together again to create a new and inspired illustration. Through learning these skills, you now have a new strategy to add to your creative toolkit. They'll keep you moving forward in your creative journey by knowing a new way to push through a creative block and keep creating. If there's one thing I hope that you take away from this class, it's this. By keeping your simple, I hope this helps free you from anything holding you back from creating, whether you're new to drawing or a seasoned artist. It's always good to keep adding new creative techniques to keep evolving. And I really hope that these quick sketches are a useful tool for your creative process. I'm really looking forward to seeing your class milestones and especially your very own photo mash up. So please do go ahead and post them in the project section. I'm really happy to answer any questions you might have and of course give you lots of encouragement. I want to thank you for letting may be a path of your creative community. Remember to tag me in any of your class projects that you post to social media. So I can give you a shadow as well. You can also use the hashtag, hashtag photo mash up class to see all of the class posts online. If you enjoyed this class, I would really appreciate your class reviews and feedback. So I can also learn from all of you. Your feedback helps me to continue to grow as a creative teacher. And it will help me find the best ways to continue to share my artistic experience with more creatives in our community. I'd love to connect with you and continue to see your progress. You can follow me on Skillshare. And of course you can connect with me on Instagram to create a underscore, underscore design. All my links are also in my Skillshare profile. Thank you again for allowing me to share some of my creative tips and tricks with you. And I'll see you all soon. Bye.
 Genevieve Staats, CreatEVE Design