Transcripts
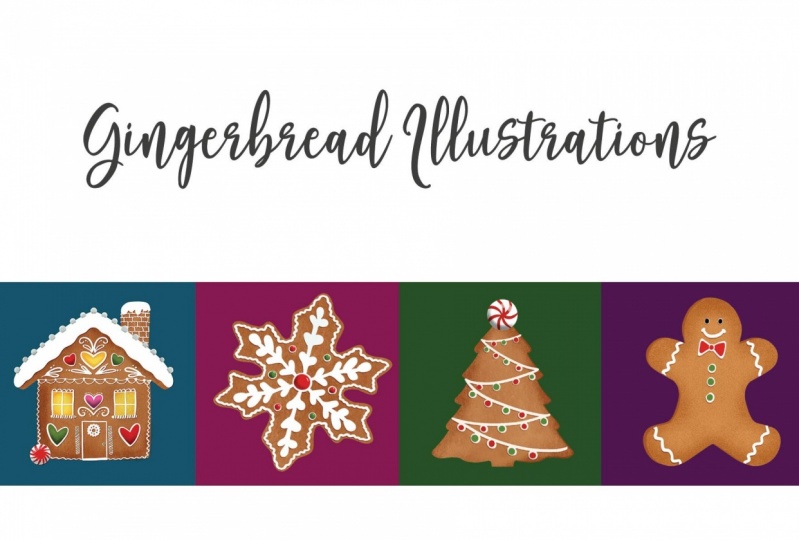
1. Intro: Hi. My name's Jennifer Nichols from Les Lamppost Studio. In this class will be learning how to make Cem somewhat realistic gingerbread cookies and have a three D look on frosting and the Candies. You can use the skills you learn with the blending modes and clipping masks to make all sorts of gingerbread house designs. I used my designs to make 1/2 drop seamless repeat pattern. I have a class on how to do have dropped seamless repeats and regular, seamless repeats. It's pretty fun, so let's get started on these gingerbread houses.
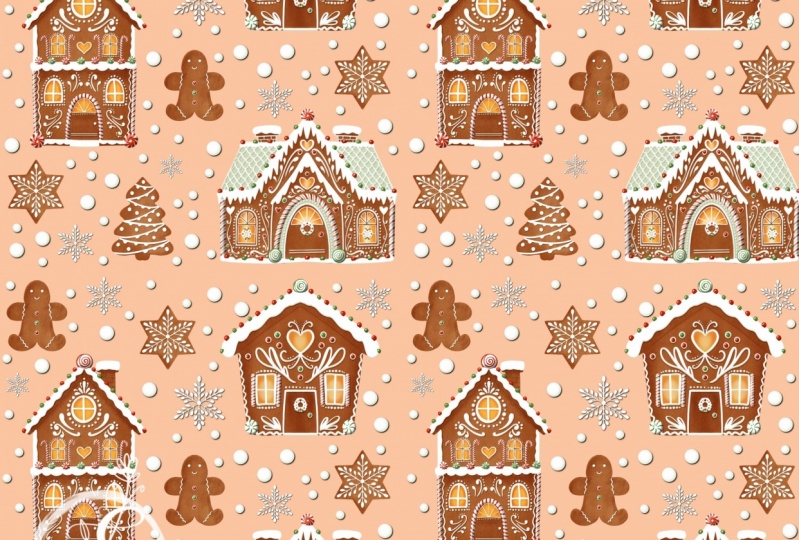
2. Gingerbread House: I'm really excited to show you how to do the gingerbread houses that I just figured out myself and they're pretty fun. I looked online for some inspiration, but we're just gonna do some basic house designs. And I think that we can kind of figure that out along the way. 10 by 10 at 300 d. P. I is what the chemise eyes I'm going to use because if you're going to do multiple houses in one design itself uses a lot of layers. If you need to create that canvas, you can go into custom canvas. Go two inches with attend height, 10 dp I 300 you can title it. It will give you your maximum layer number right there and then tap create. The first thing I'm going to do is dark in that background color. I had fun using a kind of a cranberry red. Um, the other popular color from my feedback from my friends is ah, Navy Blue. That will stick with this cranberry for now. And I'm gonna give you this icing brush, which is just a brush that I made some changes to from a lettering brush. And it's really great for the I seen has the pressure sensitivity. If you use the apple pencil, we'll give you a color palette to figure out how to download that and to, uh, maybe an image in the about section of the class and give you some of the browns that I've found that I really like for the gingerbread houses. We're going to go into the wrench tool and go to campus and turn on the drawing guide, edit, drawing guide and go to symmetry, and it will automatically be on this vertical symmetry. I'll go ahead and lighten up my line, although wouldn't really need the line too much. We just need the symmetry on, but I think you'll be able to see that with the white there with the darker background so that layer now has the assisted like drawing on it. I'm gonna duplicate that a few times just to have a few layers with the assisted already turned on. You go to the bottom layer, and she's one of my lighter brown tones, and you can just think of the basic house styles from when you were growing up with the roof and the sides and I like to do the edges a little bit rounded since it's kind of a cookie. So that roof edge is when have a rounded look to it. And I'm not doing the snap two straight lines Because again, if you think about how cookies bacon, they kind of plump up a little bit. The edges, communities and rounded and the corners can be rounded, so we'll just do a basic design. Here. You can do whatever you want. Um, I'll showcase and pictures of some of the more complicated ones that I've done. That Brown kind of looks two yellow to me with this background, but I know it's the right one, so I'm going to stick with it. I'm gonna go to the layer above it and do clipping, mask and go down to charcoal and shoes that willow charcoal you can play around and see whatever texture you think looks best for your gingerbread house. I am going to change the blend mode, Tim multiply, and if you do that and then you keep your color on this same color, it'll it'll just show up darker. Show you here when it, um, I'm pressing kind of hard to show you how that even though I was on the same color, it showed up darker. But I need to turn drawing assist off so that we don't have a super symmetrical look to that texture. And you know how cookies can ever darker in the edges when they come out of the oven. Um, if that's too dark, you can play around with capacity there. And because this is a layer heavy project, you could go ahead and combine those. If you're happy with it and just have one layer there, I'm going to actually go. Well, let's go to the six B. I have a separate my favorite section, um, that I threw a bunch of my favorites in Let's Go to the six B pencil. I'm just gonna do lips a little. I need to turn that back on the multiply and and drawing the sisters already on just a little edging on the roof there. And for now, I'm just not going to do any more shading. We'll just skip right to the icing, so go toe white and go back to the ice and rush for the roof. Just think about random, snowy rooftops or you can do icicles. I turned my size down and keeping all of that I seen on one layer. I'm gonna do a little window. Yeah, that I seems a little too thin. I wanted to look hand drawn, but I don't want it to look to cricket. So I'm trying to find a nice balance like that and let's put a door, Let's see and we'll turn, drawing assist off to get one dorn up. And I'm also going to put Let's put a heart appear. So if we do, a heart will turn drawing assist back on. I talk a lot between drawing. Assist on Enough for this project was to a heart up there. Before I do any more. I see. And I want to show you how to get that glowing window. Look. Some gingerbread houses have some melted hard Candies in the window spaces like a yellow or orange, and then it looks like some light is coming through. To do that, we're going down to the cookie layer and erasing. So if you keep it on your you're already on your icing brush here. And if you just happened, hold the eraser. It actually automatically switches to that same brush, and you're going to just erase where you want to have the yellow shining through for us. We'll go ahead and do the windows, and the heart can be kind of a little light coming in from above into the house like a skylight. And then we need a layer under the base cookie layer and go to a bright yellow. Actually, let's go to more of a golden color, and you could turn your brush size up and just you just filling in the space back there. Now I can kind of see where I didn't quite erase all the way, and I see my symmetry isn't on, but that's okay. Or my drawing assist. Go back here and get those little spots erased a little bit better. Okay, back to your yellow layer. I'll go ahead and turn drawing. This is done and they get a little bit more of an orangey color and go to the soft airbrush , which is down in the airbrush section. I just have it in a Favorites folder here and just kind of dark, and you're on your yellow layer and just kind of dark ing dark in the top and the sides. This given a little bit of unevenness. You can even go to a pretty bright, almost white and brighten up the middle's. Let's play around until you have it as bright as you like. And I think I'm gonna go back to my I seen layer go back toe white. I seen brush for my size back down. See if that's the right size. It's pretty good and start decorating and I'm seeing I have glo yellow glow coming out from the edges over here, so let's go erase that. We don't want that and go back up to your ice and layer. So this is where you can just use your imagination. Or you can look at some reference photos to get ideas. I definitely look at reference photos quite often and um, to start adding or whatever little elements you would like to add. With this pressure sensitive brush, you can start light and then have it thicker at the end, which is more of an I seem. Look, look if my door son guts to match the window and let's do a little swirly around the border . I always like to free mount my cookies and maybe a little welcome mat in front of the door . And if you want to add Candies, you could be thinking about where you might want the Candies to be well at the Candies on a separate layer. But I think I will go ahead and add a peppermint swirl candy here and maybe some candy canes that will be on the sides of the doors like that. So once you have, you know what, Let's go ahead and make some. You know, when you put frosting on the cookie before you squish the candy dot onto it maybe makes them frosting dots that will have some candy on them on her candy layer. For now, we're keeping the icy and all on its own layer. Okay, so have a big thing here. Will have a candy cane here. Oh, shutters air. Always nice if you have room to do some shutters. If you had a whiter cookie, you could do that. Maybe some windows on the door. Actually, since we already did her windows glowing here, let's do a wreath on the door. I'm going to start by drawing a bit of a guide here for myself and just making the kind of a frosting. I think that's all I'm going to do for the door because of the Candies. That would be good. Assman Candies on here as we can will also be put in soon Candies up on the snowy roof and instead of shudders. Or maybe instead of candy canes, I'll do little peppermint sticks on the sides of the windows. So let's go ahead and go to a new layer. Turn on drawing assist and think about where you want your Candies to be. If you go to the airbrush section airbrushing and go to the hard brush, I have mine set to a different size, but here's a look a little smaller than that. It's so I can go up really big, so those will end up being a little candy sticks, and then these will be. I'm going to let this snap to a circle, so if you hold, it snaps and then if you tapped one finger down, it becomes a circle. Those will end up being a little peppermint swirl, and I think that that's all we'll be. Adding some Candies that there okay in the next video, I will show you how we start getting that three d I c look and how to decorate our Candies .
3. Give your icing a 3D look: So for right now I'm going to turn off my candy layer that we just did the peppermint sticks and peppermint swirls, and I'm going to focus on my icy and layer for the icy layer. We are turning on Alfa Lock and then we'll duplicate it. So we have three. Always duplicate the 1st 1 The top layer will stay white. The middle layer will become a great tone kind of grayish greenish. You can play around with whatever color, so if you select the color tap on the layer, and since Alfa Lock is on, Phil Layer and it fills me. Turn this off. You can see it, filled it to this gray and then the bottom layer. We will make that black. So we will. I feel that one Alfa lock is already on. Here's the black. The black layer is going to be the shadow under the icing, and we need that to be a clipping mask for the base cookie layer. So I am. I already forgot to make this one a clipping mask, so we have the base cookie layer, that texture layer. This is a layer where I did the six b pencil line here, and I'm going to be adding more to that layer later so I won't emerge those yet. And then this black layer is also going to be a clipping mask. And the reason for that is we're going to be moving it down and you don't want shadow just in the air outside the edge of the cookie. So do, by doing a clipping mask, it'll it'll cut off right at the edge of the cookie. So clipping mask and we're going to take that. Let's assume out a little bit so I can see that the bottom of May selection here and I'm just gonna go down a couple of taps. I think that was seven taps and then maybe two three. I can count this gray layer, the great grayish greenish layer. Um, if you let that come back on, then you can see exactly how much you've moved the black layer, and I'll zoom in so you can see that and that's something you'll play around with later. You can shift it back up if you think that it might be a little too much and we don't want to leave it black. If you go to the blend mode and go to contrast and select soft light. I just found this just by playing around. It became a slightly darker version of the gingerbread color, so that's what I've been doing. Now I have the icy layer. This is kind of the main icing layer where we want the icy and toe look like That's where it's at. We're not shifting that one. We're not shifting this gray layer, and we're going to shift the white layer right now. It's directly on top, so if you select the white layer and move it just barely up and over no semen so you can see that. So I've just got it barely up in over, and I might play around with that more. But first we need to blur it. I'm gonna stay really zoomed in here so you can see what we're doing here. This white layer needs to be a clipping mask onto the gray layer so that it's not going off the edges on that side of the icy. So we'll sit said that to clipping mask, and we need to turn off Alfa Lock because we're going to blur it and it won't work. If Alfa Lock is on, so have the Alfa lock off, Have that layer selected the white when and go over to the magic wand. To that blur, however you want to pronounce it and I blur to 10%. So you just sliding up and down here? I do approximately 10% and you can see a little bit of the gray and you can see it has more of ah, around did three d i c. And look, this is a good time to decide if you want to shift that white layer more, you have tow watch when you're shifting. You have to watch any areas where you have a lot of icy and close together and just kind of look around and make sure it all looks good. I think it looks really good. So let me zoom, and I'm gonna turn that drawing guide off now. And I also watched the shadowed layer underneath. If you haven't shifted too far, it just won't look right. Sometimes it will make it look like it's floating ice in. Or if you blur that black layer, it really can look like it's floating. I seen so it's gonna shift back up a 20 bed. So areas like the roof. I see. Um, I seen across snow, I guess if you what more of a shadowed look up there. You can just add it by hand later. So that's what I'll show you. Um, next, we'll do some more shading, and we'll look at our candy.
4. Adding peppermint swirls and sticks!: one thing I forgot to mention before we duplicated or I see is you really need to be sure that you're done if you're not done. If you change your mind and you want to add more icing, you can just start over. Go to this middle, layer your grey layer, delete the other wins mn add more icy to that layer and kind of start over again because, um, you need all three layers for every single bit of icing, so adding later doesn't really work. Okay, so now we are going to add some more shadows under the thick layer of snow up here by going to this layer that I have my name Ruth lying there. I am going back to my original cooky color because this layer is on multiply, and I think I'm actually going to go back to the charcoal brush. That willow charcoal does kind of go down a little bit, and then it's kind of dark. In some areas under the roof snow, we'd be dark in the door a little bit more. It looks like I have drawing assist on, so it's do not symmetrically. And if you want a durkin your edges of your cookie a little bit more. This is a time to just fuss around with that kind of stuff. Is he my my roof line. Is that quite meeting up there? So go back to my six b pencil. Now, let's take a look at our Candies for the Candies. You can do a clipping mask if you have enough layers. I know it doesn't look like we haven't. Um we're not using very many layers at this moment, But once you start making multiple houses on the same file, you use that players coy quickly. Um, I'll go ahead and do clipping mask for these. It could be mask also needs to have drawing a cyst on. Actually, I take that back. Don't turn on drawing this This and this is why. Well, I'll show you Why. So if you go to the icing brush, I don't want my swirls on my Candies to be opposite each other like mirror images and with them all to go this way. So if that's a look you want, then you can have the drawing assist on um I am going to turn it off and and have all of them. That means I do have to do each one by hand. Go ahead and make this red and green. And if you think about I'm just kind of doing it and a sideways s, That's how you get that's world. Look, and remember these air handmade, which means they can have some imperfections. So I'm gonna do some red candy. Canes are a little bit trickier to know how to make the swirls As that curved part of the cane happens, you can look at pictures and I'm making us too close together. I'm gonna add some green in, so I want to spread those out. You could look at some pictures to kind of get an idea of the swirl direction. I'm gonna add some skinnier greens. Cute for these. I'm I'm imagining a circle here in the middle and I'm pressing lightly curving and pressing harder as I get to the edge. Not quite that roughly. Think of a pinwheel. And finally, we're doing a bit of shadowing on these to make them look three d as well. So we'll go to a clipping mask again, and this one is safe to have drawing a system No, I take that back. No drawing a system this either. Because if you did that, when you shadow this side of this candy cane and you want all the shadows to be on that side of the candy cane if you had drawing assist on, if you shadowed here, it would shadow this side of this candy cane. So we'll keep the drawing assist off, go to black and go to your soft airbrush Turn down the opacity a little bit, kind of play around with size and let me zoom in and show you. I'm just really just going to do a little bit of a swoop, and that's a little dark, so I'll turn down the opacity a little bit more. You can erase with the same brush, or you can turn the capacity down a little bit if you want it to be lighter. We're also going to shade the bottom of thes minutes. We don't want to make them look like a sphere, so then it needs a little bit of a highlight right here. These are more disk shaped. I think I'm going to stick with the soft airbrush and turn the opacity up and the size way down. See what we can Dio? Yeah, like that. We'll turn the brush down a little bit more. Could even put a bit of a highlight on these. Makes him look a little shiny. So if you can see that little stripe, I'm not worrying about how the tops of these should be kind of a cut candy cane. Look, we don't need to be that particular. I don't think so. Back to my candy layer, you can go back to this very same layer or do an entirely fresh candy layer. But if you remember what we wanted to do about adding some Candies on top of these dots and on top of the roof and the Reese, that is what I'm going to show you next.
5. Adding more candy!: so we have proportionately. Our house has a lot of snow on the roof. So if you come just gonna put some simple little green and red Candies that there just gonna stick with my green and reds. Sometimes I like to make those little silver dots like those little cookie or cake decorations that we used to eat growing up until we found out we were supposed to be eating those. Okay, so let's see. I mean that she's read. I'm on my candy layer and it is It has to be on top of your icing layers, so that will work. And it looks like symmetry is on, which makes the center when a little tricky to do if you don't get it right in the center so you can turn symmetry off if you want. The center wants to be a little bit easier to figure out for the wreath. I'm going to pretend like I have some smaller Candies that are just like those. We'll add some green ones to that, too. Make him a little bit more evenly sized and let's get some red dots about our roof here. I want to go to a much bigger size and changing the background layer to blue after all, because it'll be easier to see the red and green that's cheese green. Get some green ones on there. The other thing you can do with the reads. If you turn this assist off, you could make little. You know those holly groups go way down in size. Those little holly shaped Candies do something like that, Actually, let's do it. Sabes Look like the Berries for it. And I think we'll just leave that. Yeah, let's do that. Let's do a little candy on the door up right here in the middle. I am going to put a swirl candy. Not like these, but just something with a swirl on it. So I'm going to start with white, go to a pretty big size I'm noticing. My icy brush gets pretty fuzzy as you go big, and that might be due to the the image source. Let's check that really quick. Yep, it has a fuzzy Sorry, it has Ah, fuzzy when I mean is swap from the Pro Library and go to the hard circle. Right now, it's on the medium circle and go to the heart circle so we don't get that fuzziness. I started noticing it here on these. If you look really closely, the frosting seemed fine. But these look fuzzy. So let me show you what this will look like. Now, that's much better. It's smaller, but here. So that's the brush else. And I'll go ahead and attached to this class so we don't have fuzzy edges. Okay. Someone had choose White, go up big and make a big circle here. That didn't make a very good circle. That doesn't make a very good circle, either. I go down in size here in town, edit that and move it. Kind of just judge where the center is, and then fix this little section right there and then just feel that. Then I will choose a mentions green and actually go to Studio Brush Studio Pan because then it has little bit of a tapered start. I want to do this on a clipping mask. That's not what I wanted. I want the outside too big green. There we go. And then have a spiral. No, something like that. We're almost done. We're gonna do some shadowing on our new little Candies. and shadowing behind these new Candies. So again we will duplicate. Take that bottom layer groups. We need to turn on Alfa Lock, select black and fill the layer tap on it. I can't see the bottom here, So I'm gonna move up again and has come down a little bit over a little bit. Maybe that was a little bit too far. Turn that mode on. Contrast. Soft light. Now, I can't do a clipping mask with this because it's not directly above this cookie layer. So if that bothers you to have this black down here, you can just manually erase that. Here we go. So now our candy sticks in the window have a little shading. We don't need to do the three d look because we already gave them a shadow. The only reason why we didn't manually add shadow toe All of this is because it would take so much time to do it all by hand, doing these by him. This not that big of a deal. And now all the little candy thoughts were going to make them look like spears. So we have those dots are all on this layer. We'll go up to the clipping mask above it. Select airbrush on black Drop the opacity a little bit and I'm going to go ahead and turn on the drawing assist since I'm just shadowing the bottom Oh, and I'm seeing look and see in all of these have shadows kind of in mid air, so I'll probably erase those two. Actually, I'll go ahead and erase those right now. Um, I on the right layer. Okay. We'll go back to the clipping mask of the candy layer around her airbrush, and we're just gonna add a little big my brush a little bit bigger at a little shadowing on the underside of each one. And now we need to go to white. Go to ah, harder brush. You could go to the icy in our studio pen, go down and just do a little Oh, and now this is a good example of when to not use drawing assists and went all of my shadows on the left. So I will turn off drawing assist and put a little highlight. I should say not shadows. A little highlight on each one on the left while I'm doing my highlights. Go ahead. and do all of these down here. We need to go back to Black on the airbrush. - The last thing I'm going to do is go back to May, met my original cook a candy row here and erase a little bit of each of these roof Candies because those should be kind of looking like they're squished into the I seem. He's already look like they're squished into those little dots of I see. Okay, I think I'm happy with that. I couldn't pick that all day long, like I might do some darker edges around that yellow. Get a nice dark orange on the airbrush, kind of a bigger size. Sad, a little bit more dimension to those. And in the next video, I'll just show you a really quick way to do the little gingerbread cookies, and then we'll be done. You can create all the houses that you like with those same techniques. So for this one, I did this house that has more of a like a entryway here, kind of to roof lines to chimneys, shutters on the windows. I did a lot of silver balls on these. Here's a two story house. I think if I were to do that again, I would probably do the yellow in all the windows or none of the Windows sedans, Of course, Another look that's probably more common. This is a good example of what happens if you shift the white highlighted layer a little too much. So if I zoom in on this window here, the shadows just don't look right. I don't have enough white in the right places. You can see how far I shifted it way too far. It looked good for these. It didn't look good for the tiny bits here. Adding, the cookies is fun. Um, just thinking about where you want the edges to be darkened to make it look like it's not just a paper thin cookie gives it a little dimension. So there you go. I'll be back in the next video to show you a couple cookies real quick
6. Making cookies: for each house that you do. If you just group all the layers together, then you can easily turn them on enough. I'm going to turn my drawing guide back on started new layer. Go to my icing brush and my gingerbread color and think about the cookies. So if you want um, typical gingerbread cookie, my dryness is Does not one you want a typical gingerbread cookie? You can look it up, can get an idea of what they look like. Or you can just wing it something like that for the Christmas tree cookies. There are some more traditional looking ones. So with B tree has one example of a cookie. You just do your I seen in the same way don't have drawing. This is done and we're gonna go little bigger. However you want a decorate your cookie, you can do the red balls you can Adam like their little lights along thes strings and obviously loads of other ways to decorate the cookie. Let's go ahead and give that cookie some texture. So gonna go to the cookie color down to charcoal willow charcoal. Make this a cool, lipping mask, so I only colors on top of the cookie go to a bigger size. We need to turn on multiplying. I'm going to turn the opacity down on that a little bit. I'm gonna actually start over on that because I think I made it to dark. Couldn't really see texture. Now you can see some texture. I'm also going to go back to my six speed pencil and to some roughing up around some of the edges. Thinking about where? Where would I highlight the edges of the the cookie to make it look like it has a thick cookie shape to it. So you might want to get those ideas based stuff of some photos. So I highlighted the left and the bottom of each section, not the right, and that kind of makes it look like there's some depth on that cookie right there. And then don't forget your icy in layers. You're going to website Turn on Alfa Lock before I duplicate normally, so I don't have to do it on each one. The bottom layer goes to black. The middle layer goes to that gray in the top layer stays white, but we turn the AL flock off on that one, Actually, bottom layer shifts down and to the right a little bit, and we'd make that a Colombian mask. So it's masked onto that cookie. We turn the blend mode. On contrast and soft light. The white layer goes up into the left a little bit, not too much and is a clipping mask onto the gray layer, and we turn on the blur to 10%. That's the one I like you can choose. However, you think it looks best for you. We'll turn off that during guide down the middle, and now you have a three D look on your I seen on your cookies. I think I like the idea of going a little bit darker with the charcoal brush when my chuckles go around. Sympathies edges, lip some of the wrong layer. Go to that texture layer, not your icing layer. Have some unevenness on your cookie big around that top two. So go to, uh, the eraser brush with the I seen and just kind of cut that top off a little bit because I don't know a single cookie. Who's that? Is that pointing on top? Group those together and now you can move it. Turn on your house, Your house silver. When you're thinking about what size to make everything don't make it too much bigger than you think. You might use it. Because if you decrease the whole thing and I know it just doesn't doesn't do so. Well, we show you here. Uh, well, that looked OK, but if you go from really big to really small, it doesn't. It doesn't look so great. So you don't need to make your houses giant. If you're making a lot of them and you're going to make a seamless repeat pattern, just make him sort of medium size. And then you can maybe duplicate, duplicate your file and then keep your original and then flatten these groups and then you'll have, uh, much easier. Time said just erased a much easier time moving things around. And if you run out of layers because you've made so many houses, you can, you know, flatten the duplicates instead of the originals, and you can even save them as P and G's. If you turn off the background layer and have only one item on your page, then just go to share and P and G save image. And now you can add that same exact house. Make sure uniform is on, you know. So if you take my seamless repeat patterns class, you'll know how useful this would be to have. These are duplicates for your designs. My design. I ended up using the half drop repeat method to get the design to not look like there was a big row of houses. So I had I had a really solid row of houses across the design before I did it in 1/2 drop repeats. And now you can see these houses are not directly across from each other, None of the houses that are identical to each other or directly across from each other. And it just made everything a little bit more random looking, and I liked it a lot more. And when I did this snowflake on the cookie, I went ahead and just copied the snowflake clear to add to the page as well. And then these little candy drops just using those same techniques as I did on the houses. Here, you can see the candy canes and there you go. I hope you enjoyed the class but your projects in our project section, so we can all check it out. Thanks
 Jennifer Nichols, Artist & Teacher, Procreate