Transcripts
1. Introduction To Architectural Sketching: Have you ever show
go communicating your design ideas
visually so others can understand to essentially
make a word picture that immediately conveys
your idea to hit home. That's the beauty of
architectural sketching. Hi, I'm Brandon, your instructor for this guy to
architectural sketching. I'm a licensed architect and sketching is one of
the key skills and studio and meetings on the go to develop ideas and
communicate them. In this class you will learn the basics of archetypes sketching, how to convey your ideas and build them visually with
a tool of your choice. We'll start by using
the right media, looking at sketching and pencil and pen and
different types of paper will cover 2D and 3D sketches of
architectural ideas. At the end of this
course, you'll be more confident and ready
to use your sketching freely doing your projects and studio meanings or just
in your sketchbook. This course is for all levels as I cover some beginner and advanced techniques for you
to practice at your own pace. As an architect, I've been sketching all my life and
architectural school. I received the Fine
Arts Foundation, which immensely help from my artistic sketching
in addition to it inspiring constructed architectural sketches
in architecture school. In this course, I hope
to give you a little of art and architecture for
your sketching journey. This class project, I will give you a two-part assignment, sketching from a photo, from a prompt to learn sketching and build your
sketchbook portfolio. You're ready to take your
sketching to the next level. Let's go.
2. Class Materials: For this course, I'm really
going to be very simple. What I am using. We're starting with
a basic sketch book. This is a little
basically thick paper. I think you're going to find
out which one is gonna do. Well, it's typically
having a decent amount of weight to the page if it
has a particular weighting. So I think definitely
not a bond, like definitely more
than £50 paper. I'm also going to
use sketch paper. This is always valuable for
you to see what's underneath. That's always very useful. We're going to have
like one simple skill, it's architect's scale ruler. Be changing scales and make sure we're doing
something that's the scale strikes your life
will be using a triangle. This has helped me if I want to get like a little
construction line, do you want to do a
lot more free hand, but ideas, this can help me
if I need to have a line. I'm also bringing
for the pencil side. Whereas a lot pencils
will come at HBI. This b being black. And the ideas or
the hardness that you would want is
to have a variety. So if you have any
drawing pencil set, you can find where they
have different types of h. So like different types of hardness or different
types of levels of black. So it's going from
the Hs to the B's. So you can get a set of that. You could probably get
maybe ten to 12 pencils and they have different,
varying harnesses. And so I would recommend
that now that'll be very useful as we're
controlling what our lines are. For the pencil, you'll
definitely want to have a pencil sharpener
and also an eraser. I'm keeping that very light. Then on the pin side, I've actually just had two sets of sort of more signer
pins with archival ink. And also just a
regular ballpoint. It's a little bit
like a gel pen. So these are some things I like to sketch with and we'll
be going over in class. I would recommend getting a few different types
of small objects. It could be Montessori, it could be little objects you've maybe even a
model you've made. There'll be useful in the class
or just, just practicing. So you could be
sketching something that's three-dimensional. What you see here are paper
or trillions or paper stumps. These are another useful
tool for shading. Whereas one could use your
finger when you have a line. These will help do
a similar sort of thing with with paper. And I'll give a useful
tutorial for how to make something like
this and the resources. So those are the
elements for this class. I might use something separate, but I'll always
introduce itself. This is the basic, however, for the course.
3. Choosing Lineweight And Lead Weight: Line type is very important. You see I have here
three pencils. One is just a standard HB lead. The other one is a to H layer, which is very hard and the
other one is to be led. Start with just the HB. It's obviously it's in between. What you have with this
is the ability to draw basic lines where you can
just be pulling a lit. However, when I'm
pulling that led, that line is often more uneven. One way to get a better line is to actually roll the
lead as you're moving. You get like finer
lines with rolling. And the idea is you're pushing, you're not trying
to vary too much. Whereas when you're pulling it, you're putting a
lot of effort and to keep the same consistency
when you're rolling it. Typically especially when
you're using like a ruler, it's going to be
much more effective. That's just using this HB. You can vary the
amount of thickness. But obviously you have to be careful because you
could be saying, all, want to draw this
nice and then you hit the hard push and that's going to make it a
very thick and dark line. It's interesting to
be able to change the width as well
with these wines. Now that's just using the HB, the solid line that you know, if you're doing
curve and angles, is this, you're going
to be practicing on hitting it at the same,
at same hardness. Even doing the extra
that is where you're getting harder as
you push it down. And then you would just start to maintain control over that
line as it moves forward. Now, that's of
course, this HB lead for you have of course, the ability to go very far hard. When you're getting like
this very thickness, you start to need to do sharpening for it
to stay precise. Mind that now let's look
at using the two h, The two H very light from just simply
dragging it or rolling it. I'm getting very
light line and it's good for giving
this construction. This is what's
behind my drawing. Even when I start
thickening and up, it stays pretty light. It doesn't get too
thick and fat or fuzzy. It's a great reason
for when you're constructing to be
using things like a to H. So you can build your drawing on
these similar lines. Then when you're ready, if you're using this
beyond like a sketch, if you're going into
drawing, you can always be inking this thinking
right over that online. Or you can draw with
a heavier pen if you're heavier pencil
if you're going to be keeping that in terms
of a pencil drawing. But in terms of sketching,
this is great because I could be sketching the form that
I want to be drawing. And then just come in there. And I wouldn't use it to
age too much because it's too much effort to
really draw this. A lot of times it's easier
just to use a thicker pen. And so the thing is, with
a thicker pen like a to B, the line is thicker whether it's individualized and that's why you choose something
that's thick like this. I don't have to put
as much effort in. Whereas if I was using the HB, is it really as dark because
I want you of course, can push harder and
get a thicker line. But be mindful of the fact that you'll need
to sharpen it again. And so this, to be for sure is much darker,
it's just easier. You of course, can do
no light drawing of it. And that's of course,
general pencils. But in general, when you're doing that normal consistency, it's going to be darker. And the HB lead. There's something
about HB particular, especially like general pencils. They just have a lot of
variant for their thickness. Whereas these constructed
drawing pencils, the general have harder lead in general that
will not break out. So when you're doing
a basic sketch, you might just say
I'm using this. But if you're going
to draw over it or do some construction, you would want to use more
of the drawing pencils, drafting principles versus
just a regular pencil. And that's how you start to
control your line weights.
4. Sketching Concepts: There are some key concepts
that will help you as you start your journey
for sketching. One, definitely wait to get started is make sure you
have the initial idea. The idea will be something
that you could know roughly. Just draw something of
something you can search, you can find, you can explore, hey, what's the quality? So make sure to have
that initial idea. It's gonna be a
great help to you. The next thing you want
to have is references. This could be a photo graph. This could be an item that you can find
around your house. This could be a place to go. That's gonna be something
that really help you set aside and grasp the visual idea. Then the next idea
is to sketch a lot. That means when
you're sketching, don't ever just think
about making one sketch. Make it 23420. It's something that helps you grow in your skill
and your ability. Number four, you also
want to add your words. This means, are you
drawing something that's supposed to be
bright, to be curvy. So to be fun, like that is, how has your
sketch to be communicated? Because words can help
you find a reference. They can help you set a
direction for your sketch. On number five, you
want to preserve. I think preserving sketches is a incredible way of
keeping them nicely. Kept in your space. You can preserve them variety of ways. Obviously, you're using
a sketchbook is one way because the idea is you
can keep it in that paper. Another way, of
course, different types of places where you can store the paper
or laminated, or maybe just take pictures. It's good to have a sketch
preservation archive also like on your computer. So the idea is you'll
always be able to come back to an idea and
obviously is with a project, It's great to be able to keep track of what your progress is. And also, you definitely
want to develop. With feedback. Feedback is where
people will say, okay, this is what you do. This is I should do it. That means that you're going to be open to hearing
other people's insights. It's also teaches
you a craft of how to improve your self. If you're just looking
at your drawing, go away, come back. And it's going to help you get a better sense of
what's going on. I would say number
seven is time. You want to give time for
each of your sketches. You don't want to just say, boom, has to be such and such. You want to say, I'm going
to give some time to figure out what I'm drawing. Get used to it, connect with it. That's gonna be really
valuable for you. And I guess I'll just finish
off by saying, research. Research in this aspects of sketching versus just
thinking about our reference. It could be maybe just
always researching even like the material I've using this type of pencil,
Let's type of pen. There's certain materials
that are used in this class, but you can use any
number of materials. I think it's good
to get your feet wet by finding out
what's out there. There's also being able to know just pretty
much about the world of sketching as you might be using it for your particular
industry, your projects. But if you learn from
the bigger world, you'll always be
able to bring that back into what you're doing.
5. Starting With A Sketch Idea: Planning out a sketch is a
very simple thing to do. It means that you're
going to say, before I'm going to draw,
let me figure out what is going to be like parameters like what am I trying
to accomplish? What am I drawing? How
do I want to draw it? Even if you're saying,
I want to draw this thing or I wanted
to come up with idea. The idea is set some
boundaries you are starting. For instance, if
I said Hey, look, I want to draw this object. So let's start with this. That's a great way to say, okay, you're starting sketching,
you have a prompt. Because if you're really trying to come up with something that's gonna be a little harder. But if you're drawing
something that already exists, it's gonna be easier. In the future. You'll be able to say, Okay, I want to draw something
and I have it in mind. But if you're
starting sketching, you really want to
start with a basic, something that already exists. We'll start with something
simple. This is a little bit, maybe a little more complicated, this little model house. And that's a good little
point to start with. But I'm gonna go over
how I'm sketching and sort of things that you can
learn while sketching it. One way to make this a little
more effective for you as you're seeing it is really to change the angle
of my camera. So just be mindful, I'm going to take a picture and it's gonna be in the corner of my view so that you'll have that as you are
sketching in the class.
6. Starting The Sketch: When you're drawing
from an idea, you say maybe I want
to draw a circle. You're going to
spend your time just like crafting the
edges of the form. And I'll thank form rather than shape because you
don't want to be, boom, that's the
thing I'm drawing. You want to say, let me just Gerasa line by line
till I understand it. You're building it up. So if I say, Hey, look, what am I trying to
draw a triangle? I'm using simple shape
oriented things. I think starting this way
is it's just really easy. And it helps you
to grasp the idea. You see how I'm not trying
to finish at points. I'm doing it very lightly. Opinion page very lightly. I'm really pulling I'm
not pushing the lead. I'm pulling it. And the second polling
little, little, little. I'm fine if it overlaps as well. So I'm not even thinking about it as
a shade or something. It says me grasping
this basic shape. That's, that's how
you're going to start. And the concept of getting these basic things
as you're sketching. Then you can start figuring out different drawn particular
things of shade or line. But having the idea
of saying, Okay, I'm going to draw a triangle
and we just grasp life. Even I did a similar
to a full line, but you could just pull, pull, pull to the edge. It's a sketch, especially
if you're starting, you know, it's fine to
really just keep it. In fact, I would prefer people avoid
drying big long lines. We are starting to sketching. You just draw like little,
little bitty lines. Even if it's like
this small line, just as break it up and
build that, that line. And that's going to be where you're starting with that idea. That's going to be
just simple, simple, simple, but keeping it in focus. And even this doesn't matter
how much you want to sketch. I think trying to keep
those simple start points, even if you say there's several different shapes
you're trying to put together, or you know, like
just different types of architecture thing. Start with simple lines
at buildup, two forms. That's going to really help
you get that foundation.
7. Chapter 2: Sketching Basics - Sketching A Box: Foundation of when you're
going to draw an object, which is a very useful
way to learn sketching. From my angle. It'll look like this. Maybe to you. You are
going to start and you will go and just be achieving simplification of what you're looking at right now, looking at dislike this race
or just looking at that. You're just going to be
capturing something simple. You're looking at
maybe the proportion before moving on to
detail a specific size. So the way I'm
going to draw that and start visualizing it is
going to be really simple. What I'm first going to do
is really just the basic, just like when we were before talking about sketching a box. And I've sharpened pencil. Again right now I'm
still using the HP, being very simple, and I'm
just pulling my, my tip here. And just like you're drawing a box and
here's the best way. Because you've started thinking about how things are organized. No matter what shape or size, you're gonna be having
these particular bounds. So when you're thinking
about something in 3D, just think about, you know, I'm just taking this
bound for this object. Not even really think too
much about perspective. The same. Now I look at now from
this edge, this edge, that, that's my
drawing I'm seeing, I'm seeing a portion
of my short side. I'm just capturing these
edges and the long side. Keep these and I say the
portion between size. Now this is not
about being perfect. You start with as little
sketchy lines and maybe then add some
more stronger lines. And then you're grasping at. And that's a very
useful way to get started with a sketch. I'm not trying to
get it perfect. I'm just looking
at basic elements. It'll turn into a box. And then if I would
say, Oh look, what if there's one of these, you know what a field
is looking like this, I added, want to add this to it. I could just simply
add another piece. Maybe even at a different angle. I'm trying to just grass
being next to each other. So this getting those,
those lines out. And I'm keeping the same style and this is just really adding lines, just thickening up. As I'm finished.
8. Sketching Shape: Shame is something
that will redraw. It can be very simple. I'm going to use this
ruler to sort of organize. But essentially, you see that the constructed shape
always has a definite, definite profile and
how things are spaced. However, when you're sketching, what happens is that often because of your angles are the straighten
through your line, you will see varying
amount of precision. So how do you how do
you keep a shapes? Pristine nature? That's the question
when you're drawing. So the idea is when
you're sketching, you're going to be
expressing the edges. You'll be thinking about
those points, those lines. But you also want to make sure you're continuing
the sketching language. And that's a delicate balance. You know, there's a, there's
a difference between sketching and drawing. And so we decided to
focus on those points. We're connecting with them. But in the sketch world, we can do things like
going past the lines, went past the points. And they can create a
very beautiful effect. So you see where we're
doing a rectangle, how that look of going
beyond the edge, keeping it sketchy, how it
creates that sketchy vibe. Then even then, we could be reshaped that shade to have
that same sort of freedom. It's not just filling it. We are able to build it up. And then we're able to add
on like a thicker layer. So the layering is part of the sketch beauty for putting together this sort of visual. So I just added two boxes
just to show what happened, we start to think
about developing something like a plan
would shovel different. Now we're gonna make a little
more interesting shape just using a little
more of a curved line. Which one of the things
about this one is that it's, it's, we're sketching a curve
and we're building it up. We want it to be precise and
express what the curve is, but we're still using
that sketchy language. We're, we're a little hazy about where
points come together, but we still want to
express the intersection. And as, as we draw this
circle, you can see, no, we lose a little bit of something versus
just sketching it. So it's that delicate
balance where you're, you're maintaining
that boundary. You have an idea of where
everything starts and ends. But you're, you're
building it up. You're pushing it
to be organized. According to a whole. The drawing obviously is not doing the same
thing as the sketch. So even you can continue
drawing on top of the sketch. But the idea is when
you're building an app, you are trying this
similar approach. You being a little ambiguous and then it helps you
as you build them to even viewer to shade and
we're going into shading. In the next section. You are able to
really built with the same language as those sketched edges and
that sketch boundary. And you can even, of course, before your sketch, draw a very light line for the Shape Outline
just to help you organize and they just start building it up with the sketching language. Or you could even say
the sketching brush. That's the gist of
what's happening. And you're starting to
do a lot of things. There's on a shape where light is saying where the
dimensionality is. And that's, that can be started
even just with that line. You still achieve
the form of shape. The idea where the shape
is going to be 12. Look back to the triangle
and those straight lines. We could still have
that same sort of future as we start to build and contemplate
the straighten out. This is a 2D object, but you still have that ability to give some
dimensionality to it. Whereas like, how is
it being rotated? You're building it up and so on. I'm shading into that. I'm just using those
edges and ideas. That's where you see the
value of making a very, very strong edge without
having it drawn straight. Same thing, having the rover looking at how do we, you know, relate that inner
fill to those edges. You understand. And you have that, that ability as you're holding to what the
shape is, withdrawal. So keeping to the sketch. And then you're
building it up and you're developing the language. Okay? Those are different
methods, but they're all. I'm showing you how
to put together the sketch while using the different
elements of the line. The form. You're gonna be thinking
about this is not how larger your
sketchbook gums or how intricate you still have this stylizing the different
elements for it. And so these are going to still relating to be starting to add in
lines like double lines, like if you're
talking about a wall or like a thinner line, it's still going
to be that same. So as we're thinking
about perspective, perspective shape, that's where you're specifically
thinking about. Sure, dimensionality. You're still doing those same things that
you would have been doing with just a 2D shape here makes sure that
edge is expressed, but you're still building
up in the sketch way. And you know, you're showing
all the dimensionality. You're thinking about
how thick it is. You're thinking about
how things are built up. It's going to be relating. And that's the critical
thing for that.
9. Shading: Important when you're
drawing to consider, how are you going to
fill the drawing? For instance, we draw like
a simple box that's in 3D. And it's a great exercise. I might draw my outer edges. The thicker, heavier
weight. I'm just using HB. But there's not really a sense of this is before this one. So we start to do
things like shading. There's not really a shadow. Just choosing one of the sides. And saying, on this side, I'm going to be drawing like
many lines and I'll shade. I'm shading that side. So that's me shading immediately you see it
gives some dimensionality. But then on the other side, you always can shade
multiple sides. And which you can start doing. I'm, of course this didn't
like the general journal. Shade, quick shade. Of course it is
nice when you will do something like this. Channel quickly draw an idea. You can always be doing
like the jagged shade, a little longer shade. You can see it looks
a little bit nicer, especially around the edges. I'm ideas. I could just come on this
side and this is I'm putting less push into the line. You can see obviously I was dragging a
little hard to hear. But let's look here. Even when I shade
on top of that, there's more defined shape. You see, you can
just build it up. And you can build it
up again and again and it will get even without
putting more pressure. So that's a good reason
to shade intelligently. Then this quick shade is nice, obscene material
like a quick sketch. If you want to take more
time and precision, you could do this even
to the point where you sometime even are
taken away the edges. Now, of course I made
that, that were visible. Obviously this edge is
a little bit darker, so I'll probably clean that up. But if I just wanted to
really even see the form, go very light and essentially just build
up merely by shade. And getting to the lines and you see the LED
has been dulled, but for shading to the amino, you will be fine with it. A little more dull of a, of a lead because it's
essentially dragging. It's not like get
super precise lines. At the top. There's several
ways of doing this. But I came in and
what I'm going do now is going to really start to play with what
happens with this shade. So we start to differentiate. I started to pull
this one in to make this one come out as heavier. Then this one, I added
another round of shading. Then I actually go to my edges, reinforcement edges, but
I'm not really drawing it. Just pulling that same just
like it was for shading. And so you will see that we have now sort of
like a form of just shading. What to do though, to start to clean up
something like this. So obviously the line
one is within eyes, start to see the modality. But when you start
taking that away, you know, are you really losing them? Why you don't have to? That's why of course, had things like a
paper to a trillion where I could be
hitting this edge. I'm pushing around
lead on the paper. And this is the homemade one. But generally, there's a
particular sort of sharpness. And I can use the sandpaper
to get that sharpness back. But right now it's fine. I'm going about each edge. Can just pushing it around and I'm making specific pressure. When I'm hitting
around the lines. You can still read those lines. I even playing with
light and this is very simply pushing around
for the shading. And now you're seeing how that top plane is pretty,
pretty, pretty dark. That's when I get
this opportunity to come in with an eraser. That is not just
to erase a line, which is totally possible.
And we'll talk about that. But it's, it's been the ability to pull away some
of that element. So I can get a nice,
clean, lighter shade. Even saying that I know my little area was to have a
little thicker shade here. Now, I have plants
around and again, might have to the site where you're trying to remove some of the other materials so you're
getting a fresh project. Shade. So that's another
way of choosing and using shade to bring some
dimensionality and depth to my model, my drawing. Now whatever I'm drawing, I get two at, with the lines, different types of shades that
make it stand out. And this is, of course, it's immediately within 3D, something that you
have that opportunity to put into your drawing. This is of course
just looking at flat shades where
they talked about, what about when you're doing
like a little more texture. But in terms of chaining, like it's really,
really this simple. I use like H because
essentially it's gonna get dl for these sort of things
that you just dragging, dragging, dragging with lead. Obviously, again, this way is a quick way to get a now shade. But in terms of the
beautiful thing about just pulling in, going in the direction. So they have different effects. And obviously, this
could be quick, but there's always going
to be meaningful for you. And in terms of the edge, I will talk a little
bit of how to control those edges more with
talking about the eraser.
10. Sketching With A Pen: Sketching with a pen as much different than sketching
with a pencil. For instance, when
you're building lines. Obviously the pen is
obviously more static. Cell, it's catching a box. I still can have that sketchy
look where I build it up. But for the most part, there's not that much of
a darker or lighter pen. It's only one weight. I including when
you're setting a, you know, like, uh, uh, shading, it's good to
really be the same. So that's one reason for sure. It's what people say. It's a little different
for sketching with a pen. But you still have that
same set of dynamics when you're trying to
figure out drawing. If you want to actually
maybe create a set of lines, a set of graphics, then maybe say on top of
that when you're finished, Let's start adding pen layer. So I'm still not dry,
I'm just sketching. But the ideas though, either you could
start with a pen or come back then add it as a pen. Obviously, that's just me
just drawing some shape. But if I was saying all that, I'm drawing something
like a something like an architectural plan and I have like a few
elements to it. You see I doing another
little thing here. I'm adding a little bit
of a trickle to my live. And what that is is just
adding a little bit of a shake because
there's no reason for the line just to
be like a solid line. You can see here the
difference between this one and this one. Then when I start to shade it, this is a little different
sort of push J experience. One is like low shade. And if we go back to some
of those previous concepts when drawing a shape of saying, let's add to that edge. So to have a different look entirely for this
little plan element, I was going to go ahead
and just finish it up. They see how that can read
in this architectural plan. That sort of sketch creates out. And the idea is, I could be sketching
on top of something, just have the definition, but having a sketchy
look and then filling it in creates a very nice effect. That's a beautiful way of
using pens for sketching. Obviously, this right here is a, just a one simple ink pen. But of course I have
my variety of pens. For instance, when I'm drawing, I have this 28 here. So my O2 line, It's
this thickness. And my 08 line is a bit thicker. But sometimes I'm drawing maybe my outer edge
on my profile. I will use my 0.8108, that point, that point out to
you for the internal lines. And if I'm drawing something
like little line above, like a plan like this, I would just use my walls. And this effect that
would come back. And B, using a in a lighter line for some
of these other lines. And that's a very beautiful
way of not just building up, but saying there are
different elements. And obviously for my
little in-between way that you can choose
whether you want to use it as a color,
this one either. The fact is my
little shading and pushing are not as critical as saying
those particular edges.
11. Using The Eraser: One important thing
for sketching is also the fact that what
you're sketching minus one, I need to erase made a
little eraser shield here. I have a sketch and
I want to maybe trim this part of my
sketch a little bit. Of course is the same enjoying. But sometime obviously
with sketches, you might use a lot more
free with your elements. C, all I did was that simple, putting an edge up
against what I wanted to erase and I just pulled it back. But as you can see what this
ratio will also have ability to erase some shapes as well. Hit there. I even use that tool to draw the
little profile in there. Now this is a bit of a
thicker eraser shield, so maybe all the shapes
don't particularly work, but obviously it's more
useful for drawing. But the idea is that if you're trying to
have a controlled erase, obviously if you just
say, whoa, look, maybe I want to add
a new form in here. Maybe you sketch out what
you're trying to do now. And then you just come in
here and is simply located. This Tyler, keep that edge
pretty, pretty secure. For instance, if
I would say now, look, then I would 610 minutes. Again, I didn't
take anything away from the sketchiness of it to create that as naughty, even if you're saying
you just want to erase or reduce the shading, just simply pull it
in there lightly. You know, clean this up a
little bit so it's not too bad. So that's how you work
with that eraser, is a simple sort of pull back a little bit and
sometimes the rates would just lightens up a line. For instance, if I want to just lighten that up a little bit, just not always erasing it up. I'm just adding a little
bit of an effect. So that's how you would use
erasers for your sketches.
12. Chapter 3: Advanced Sketching - Sketching Perspective: So now we're thinking
about how we can draw a perspective using sketch. Now, it's important
to still have the understanding of
what is striking it. So I have two points at the end of my perspective line
and that's my horizon. Those are my points
that I'm organized, everything else by
those my key points. And I'm using the idea of this constructed
triangle to sort of point all my points according
to my two horizon edges. So this is a 2 perspective. And as you of course can see that this is obviously
very much just drawing. However, we want to, in the end copper
the pers perspective sketching upward as opposed
to just the regular one. But we're just going to
start by just drawing it. Were again, relating
all the edges. We're thinking about the
way the lines are drawn and we're relating it back to
our two prospective points. So again, this is how
you build everything is related and it's
a form of accuracy. It's again this just to point. There's
also a three-point. So the idea is your, you know, pretty
much being accurate. And of course the skill is to say what happens when
you are starting to construct this just
from a simple sketch. But when we're doing
this, we have simple. The first time you're
doing it, you are going to be thinking about, okay, how do I connect with these points with
the direct line? But your inner understanding of that line is going
to be important because obviously every line
you're going to draw from the two-point perspective is
not just going to be a box. You might be a cable
like, you know, an angle, be doors and windows. So you can see as I'm starting to add some different
things to hear. These things that someone was considered when living
and doing a sketch. You're sketching the, the gamut of what could be
connected to the system. And so the idea is like, this is something you'll
start to do in your head. Or you could also just be
doing a underlay with a like, wait, like to H for this and then you just build your
sketch line on top of this. Let's, let's see how we can derive this from
other droplet of an idea. When to start with
that middle line, I'm gonna draw idea where my perspective 0 points
are on both sides. I'm going to again just do a light sketch line
focusing that direction. And so you see now I have
these two horizon lines and not doing the straight, so just follow along
to where it is. And I'm just pulling
those lines on, thinking about those as
I'm adding to this form. And I want that freedom. But I want the accuracy. So I'm doing the math in my head where those
points come from. Now, as I started like a
little more unique form, I still have that basis of
those those Horizon points. And they're relating
to where my form goes and support
because obviously you want to be able to sketch it and you wanted
to have that look and feel and that's how you
organize it and grounded. So the same thing. Of course. Obviously, it's easiest to do a perspective like the first one where you have that
says a box behind the box, that front straight line. Um, but you, you
start to figure out, as you do this many times, the similar elements
that'll be operating. And you're saying
all these lines, if they are straight
and parallel, they're going to be pointing
toward those same point. This is your exercise. And the idea that
the day you have like a beautiful sketch
That's all related. Now, obviously, with each
of these little elements, some of them are, you know, if you're thinking about little, little Profiles, all elements, they're not gonna be
directly hitting to that, but they're going to still
be related to those lines. And so it's a way of relating
all the information. Then you're drawing
perspective being like the character
of the drawing. And you're thinking about, even if you think about maybe
shading a little bit, this is where you start to
play with dimensionality. So that's going to take your perspective
to the next level. And the idea is being able
to draw something that is quick and Sketch mode with that accuracy of
those perspective lines, he's going to put all this stuff together and it's going to
help you organize a dry. So that's how you will organize and really make the most
of using perspective. Perspective is not just about
Linus, about off the shape. And at the end of the day, you'll be really just aiming at communicating the idea versus trying to do too much or
perfect communication. Same time, because of
these basic origins. The more you constructed, the easier it's
going to be to add. Maybe details are
consistent way. Because you know,
that base form being accurate helps you
viewers and you're locating things like
doors and windows. You'll have that that basis of where you're
locating them from.
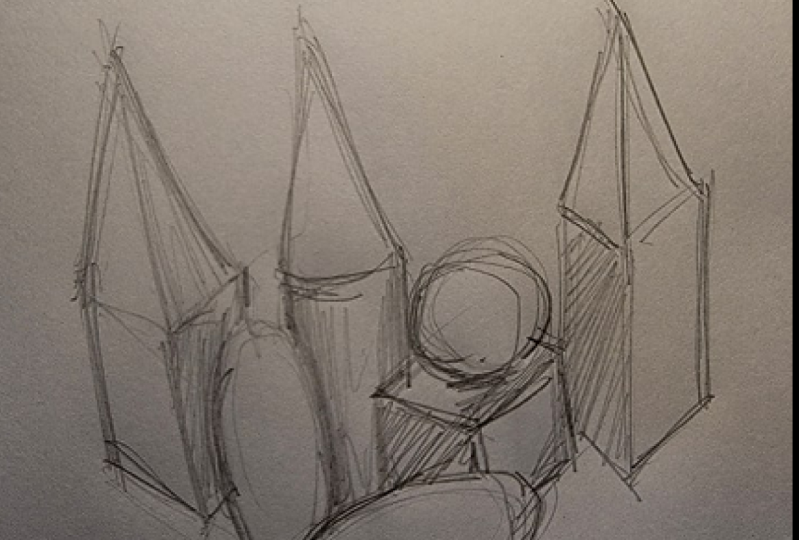
13. Sketching Class Activity: Let's look at the advanced
class sketching exercise. So in this exercise, you'll go through, have a layout exercise where you
put a composition together. You'll also start to
define the shape, and then we'll go into
deeper things for sketching it and
getting things visible. Essentially pretty much
showing the depth, not just showing the shape, and this is going
to have you get a chance to show
your creativity and putting things together
and sketching it out. The first thing
you're going to do is you're going to prepare
your composition. Then you're going to be
positioning and arranging items. So this is all sort of together. And just like sort
of the image shown, you'll have items
on a table, right? So you don't always have to put things in,
like, you know, in a row or, you
know, the ideas. This is sort of how you learn
the skill of sketching. Maybe have random positions. You know, you can
try a couple of different positions and then just sort of do the
exercise with those. Now definitely
strengthen your skill. Now, here are some key parts for this type of activity
for how you're arranging it. You're going to make
sure to all the time, make sure that you see what
is a focal point, you know? Do you have two focal points? You want to use the
rule of thirds. That means maybe you
want to have things to one side of the table or
the other, or the middle. You know, the idea is it break into a third versus, you know, maybe a little more
cluttered organization. I think a third or
the rule of thirds, is going to be a way of keeping things to have a more
aesthetic appeal. Then you'll want to
balance the visual weight. That means, like,
what's on one side? What's on the other side? Do you have something spreading around, you know, is there not
too much negative space? You know, that's where there's nothing on that
part of the table. So, you know, play around
with that arrangement. You also want to maintain
a consistent spacing. That's going to be based on
if you want to be closer, the ideas, this is not
actually always relevant. Of course, again, you can have things in
different composition. You don't have to
have consistent unless you want to achieve
the effect of that. But the idea, the ideas when you're sketching
architecture, there's a lot of
consistent elements. So the idea, there's
something to learn from that, but at the same time,
there's something to learn from irregular
spacing as well. Next, you'll want to incorporate white
space strategically. That's part of the whole
idea like the rule of thirds as well as your weight. The next step is you're
going to make sure to sketch the outer profiles of the
shapes that are on the table, and you'll define each shape.
So that's the purpose. Whether you're
sketching, you know, a box or sketching a
cylinder, you know, the idea is, you're just
getting those outer edges. And, you know, I'll
show my mouse, you just sort of you know,
following that edge. And it's good to start with
simple edges before, like, jumping into something
like, you know, it may be a cathedral that has, like, a lot of
different varied parts. You know, the idea is finding the base sketches of geometry underneath
can help you build, like, very complex
forms in the end. But getting those base sketches and having, like, you know, maybe you can see
where the center is, that'll help you understand
how it works in perspective. And you don't need to do
any shading at this point. That's going to be
just where you're just getting the
overall outline, right? So you're outlining the overall
silhouette in that part, and you next, you know, be thinking about how
the proportions are, you know, is it a long box? Is it a shorter one, you know, getting that outline is going
to help you show that. You're also going to add
some internal edges. That's your inside edge
as you're sketching. You start with outside,
then come into the inside, and then you'll strengthen
your key lines. That's where you do
your additional strokes on the outline, and that helps you
ferment the shape. Then you'll ensure your
depth and separation. Now, again, that's going to
be part of our next step, but the idea because that's
where we use shading. However, the idea is, you're
locating each element with a basic outline of
the sketch of the shape. Okay, the next final set for this activity is you'll be adding your
shadows and shading. So you'll also be grounding your composition
with those elements. So that's going to be
where you definitely are going to see a
very strong shadow. You can use the pouche messages that I've given sort of to, you know, spread
out your material. And the idea you will make sure in this exercise to identify the light
source because you know, you'll see the light
coming down on the source. So you won't be, you
know, adding as much as your shade in that area, but you add it on the place the face that's opposite or
away from the light. So you have a very distinct
difference in that. And you'll also know
that you can see residual reflection sometimes
in some of the shapes. So that's going to be something that's going to be determined by
the light source. You also shade
opposite of light, you know, just as shown. You'll cast shadows and
start to define shadows. Again, just play around
with shadows again, consider it as if it's
a derivative geometry, derivative shape,
and just try to grasp the edges of it
before just shading it in, and that's going to
help you define it. Then you can blend
for depth and Again, I'm not expecting you to
master how shading is. Again, I think the exercise is just really
getting the basic. You can run through it again with a different composition. That is going to help you make this into a really great
learning opportunity. And so let me know how it goes and if you
have any questions.
14. Sketching A Composition: Now we're going to draw a
really simple combination of shapes and applying basic idea of just drawing it very lightly. The very simple, I'm
going to use my HB. I'm trying to capture all
the elements in the scene. And the idea is
when I start off, just simply trying to grasp some key relationships
between where things are not going to be two. But everything. This will have locating and
something that, you know, I don't even see about the image that I'm aiming to put
that in my drawing. I'm correcting things
even as I'm going. So you see I'm adding
some line this again, it's my first sketch. Take my second time around. I'm adding thickness,
little more thickness. So everything is fine
if your lead brakes. Again, just trying to get that basic idea of what's
going on in that scene. As they get thicker
and harder and my lines are getting
more precise. In terms of approaching shape. Sometimes I'm just
grasping a little bit of the idea that sometimes
my edges are not meeting. It's fine. I'm capturing some of the
shadow from the image. Not even really picking up any other information about like the wood grain.
So that's obscene. Also very interesting art. I'm just really
trying to capture the form of how
they're arranged. Just very simply. I'm I'm understanding what's going on at night able
to communicate that. So that's a really
simple process. We're just getting that, that drawing out that
you're looking at. You're just really going to be starting off with light lines. You just trying to assess how things are located in
relation to each other. You thinking about,
when I see this box, you already can start to
construct some ideas about how things are related and
you're going further. And even if these are close
together or further apart, you're putting together a sense of relationship
within the drawing. And then you've got, of
course, build it closer. Again, start the sketch again. But I think it's useful as
you're going through just to be building an understanding
that what's happening. And you could do
the saying, okay, like for my relationships, when I'm looking at things, Are they a lot closer? Now one thing I like to do, It's also sometimes
just even take elements out of my sketches and just try to imagine those relationships
even more precisely. And then I'll go back into my main sketch and rebuild
that that relationship. You sketch, you'll learn
more about how things are actually working together. And that's something
that will help you really get better at it and get us get something more than once. I think even when you're given the challenge of something
like a still-life, you're going to go through
and sketch it once. Let me just make an ugly
look of what I'm looking at. And then let me
start to break down what it is I'm actually
looking at I can, in the sketching world, That's my super rough,
quick and dirty sketch. But in my sketching world, I start get to the
point of this, draw light lines and
approximate what's going on. Don't assume that
you know what's going on just immediately again, we're not just go look, I'm drawing a character
or something. I want to know what's going on. And that process is very valuable early on
in the drawing. Because then we will have
the ability to communicate what's what's being expressed and being able to
put that back in. You're not being super focused on trying to
impress with your drawing. Again, these are points
where you can make a quick, quick, let me just
get aggressive form. Then come back and really
try to craft edges. The way I did. It is
definitely closer to this way of just scrapping
and then building on that. And of course, draw it again. That's where I can focus and get a sharper edge to
maybe my triangles. And I have better relationships. But in terms of the process, you're doing a
little bit of both. Approximating your
rescheduling even closer, close to the idea. At the end of the
day, you're not just saying about capturing
something accurately. For the main purpose
of sketching. Again, that would be
more of a drawing thing. But when you get the ideas, you of course can
truly constructed and drafted the tour drawing and the sketches
just really useful, just get that idea. And I think that's what you're doing is you're redrawing it. Looking at these elements.
15. Chapter 4: Architectural Sketching - Scale: This is architectural
scale, very useful. You can see there are
numbers on all sides. There's a ruler on all sides. This is a little emotional, so it's like a little
promotional there. But essentially it has
two scales on each side. One's going this way,
one's going that way. They're typically
related like this is three-quarters three-quarters
of an inch equals a foot. This is three-eighths of
an inch equals a foot. Same on each side. Essentially. Lets you draw in scale. So this is 30-second inch. So 132nd equals a foot. So here, drawn just this. Very simply, that's
3632 feet by the scale. And the idea is that even
if you're sketching, you can have like a basis for what is the
size of my drawing. And that helps me
figure out all of the door is gonna be, you know, three of these thirty-seconds
than I already have an idea for scale
in this drawing. So I can just quickly go back and forth
between the scales. You know, if I want to
make another drawing, it's just helping me organize
these elements are placed. So that's the use of having a scale helps you really
quickly organize, organize what you're
doing in your drawing. And even as you're sketching, you know, you're
trying to figure out, okay, is my size actually
the size I want it. I can just come quickly here saying you were going
by eighth inch, but say, Oh, look, this is six feet by
like seven feet it should do for what I'm trying
to achieve in this plan. So that's using the
architectural scale. That's nice. Of course
I can always fit flat. It can rotate. Just really can quickly access. And as you're drawing.
16. Sketching A Plan: I would say this is
ten feet by ten feet, would just do the same
thing coming down this way. And so on and so forth. I would have myself a
drawing that was scale. This is again, this is
still a little sketchy. But so far is this
really getting the idea? So there's ten by
ten quarters scale gives me a starting point. The starting point for saying, I'm drawing a plan. Remember I'm thinking
about the sketch. I would really just
start coming up with the idea of what goes
where if this was a room, I said, I want to have
an entry to this room. Maybe I'd have like
a little bit of a closet on the sides. I would have in the
back of my mind. And if I add scale nearby, making sure that my
sizes are matching up. So ten by ten is not super big. You understand that
the standards of badness room that might be about five feet by scale here. By about seven feet? No, not probably like
a really small dead. But I would put
like a yellow box for mild side that maybe
have my door here, maybe I have windows. And just really
simply I've created a set of things for this room. This is a stand. Then I'd have like a door. So my door just sort of
open-end to this space. So just getting an idea of how something is organized
is really important. You understand? I have this scale now
and I have the ability to sketch over this and start to add a little
bit of detail. So when I come up with
an idea like this, one of the next
things I typically do is I've tried a couple
of different variations. Oh, maybe you do like this. Maybe, you know, there could
be something like this. Maybe there are three windows. I would work out. Like what am I scenarios. But let's just stick
with this plan. And let's start to
use some of our pins. They start to
develop this sketch. I still call it really
sketch even though I'm drawing on it
because I'm not using just saying I've just
drawn my lines to this space. And I'm exercising some accuracy and how I'm locating things. I'm just drawing alone that
this is still very sketchy. But it's the place of
having it like a pendulum. I call it sketch
because I'm not easy. The defined elements of
rulers, but it is accurate. All right? And so with this basic, I'm using my two number two for my little details
inside of the room. So I have my dead and
I have my windows. Then I just do a little
profile for Melinda, maybe like an apron. But it's that
thinner line weight so it gets head shows me that idea and
maybe even from my bed, I'll include like a little
bit of a pillow to that. So that's the basics of a room. Alright, I just
sketched it out and sketch some ideas for
how that organized. Then I could come
back and just say, if I wanted to push to be
a little more developed, this third to shade
in these walls. This is the easy way just to
be developing this sketch. So it's reading. Again, it's just a little
more developed sketch. It's still very sketchy. But it can communicate
that idea. I just try to keep an even
way of sharing these walls. Filling in other words, one way of getting back
to the sketchiness of it. This too, Let's go ahead and not really closed my lines up to extend
them a little bit, even just double the
double of the lines. So you see I have my sketchy, sketchy ability and I
could just go ahead and just still just title my room. This is bedroom number one. And even I would come out from this because it is holding
onto my ten foot by ten foot range is very simply
as my dimension to this. And just do that
same thing here. And this is very simply, I've
made an architectural plan. It's very, very simple. You keep it easy,
keep it simple. But it's accurate and that's one way that you would
start to bring some of that sketchy ideas into a 2D plan.
17. Sketching An Elevation: So I want to show
drawing pencil. Just add a little bit of
uniqueness to an elevation. If I was drawing simple
gable roof and maybe a gable roof that had a unique cable
porch came off from it. And do my overhang. And I would come down. My entrance is here
with the columns, maybe arch over these columns. Place my pencil. Just sharpen a little bit. And this is just how you would
go with a low basic idea. Sand. Maybe I have like a
little glass door here. I'm closing that off. One thing about drawing that roof is I just
know a little bit of thickness because I just
want to be accurate here. Now I want it to end at
the same place here. And maybe I'll do a little
bracket and the roof. I'll go ahead and
also show that edge, especially for the roof. The roof is made with these rafter that come down and they sit down
on the top of the wall. And you won't be because of learning the
material that's for your wall is right
on top of that. Then your roof, this
blocking of course, that close it off, but then you have
your element of your roof and maybe
some underlay meant. Then you have your
it'd be a shingle or some material at the edge of the roof where maybe
you have some sort of material to meet. Clothes were all these rafters is what these are come down. Then there's always opportunity
for what happens here. So someone could, of course, they can just go straight up, but they also can come
down with a profile. So after doing many
roofs of experimental, how to make that unique. The way these look, when in a sketch, you will see like
this little bracket coming down on those hedges. That's an interesting way of
how that would go forward. And this being of course, a section view
through the house. Now when that roof comes up, remember I'm closing
off these edges. I get to show maybe a little dashing
pattern for my single. And so that's what
I'm doing here. If we want to say, Oh look, maybe this house has chimney. I would also start to come
out say, hey, you know, this is form, has little
shimmy, it steps up. Maybe it goes to the roof here. I've put this here and I got, of course, make it
a stone chimney. I don't have to be brick. But maybe at the bottom of
this house, it's brick. Then at this upper level, maybe it goes into siting. Here. I'm putting like this,
a simple window here. My simple Dumbledore entry here. And maybe for my
door I have like a little that opening
and I'm trying to be lightened and go a little
bit thicker than Ireland. I will do a trim line here. And above my that gable, I'm adding a little
roof and that adds a nice little detail
level of my horizon line. I'm strengthening
that up, that up. And I'm going to turn this right here into a set of steps. And I'll even add a separate little window maybe of this, this
is living room. This could be a I'm not a little into my
window here as well. Maybe this is a
little laundry room or powder room, the
front of the house. This is very simply
as me just creating a bit of an experience for the
entrance to this building. And what I will do to of course, also just make an
interests and stone, stone cap here and stone
cap that chimney is saying. Let's even make
some more elements here and maybe add a little
bracket to this roof. This cable. Maybe even show it what would be
happening on the other side. That bracket of course, is what happens when
the roof comes out. You just have like a
little element that the roof would be resting on and just give it a little
bit of a profile there. Now what things we can add, because we already
have our horizon, is like a little bit of force. Are there different ways
that you can draw trees? Just going to draw the
profile ID for the trees. This a little bit
of a shaky edge. And what you can do as always, you can always go
into the computer and shade in some
of these things. The little niches here. One way, just do
around the ground. This add like little elements for the trees where the
trees are going in. Then even close to the house, you can have like a little
bush, yellow bush here. And again, I said, you can shade it here. Now live chat or you can
shade it in the computer. Some people choose jaded
and Peter have done lot of that for presentations. And we could choose maybe
one area's darker, areas, lighter, and just create
that beautiful sketch. With that in mind, then of course the
architecture stands out. Of course could add
people if you want it. You now know it's always
that interests t, whatever interest to you at
the moment for your drawing. It will place it in here. So that's just a beautiful, more traditional
architectural scale.
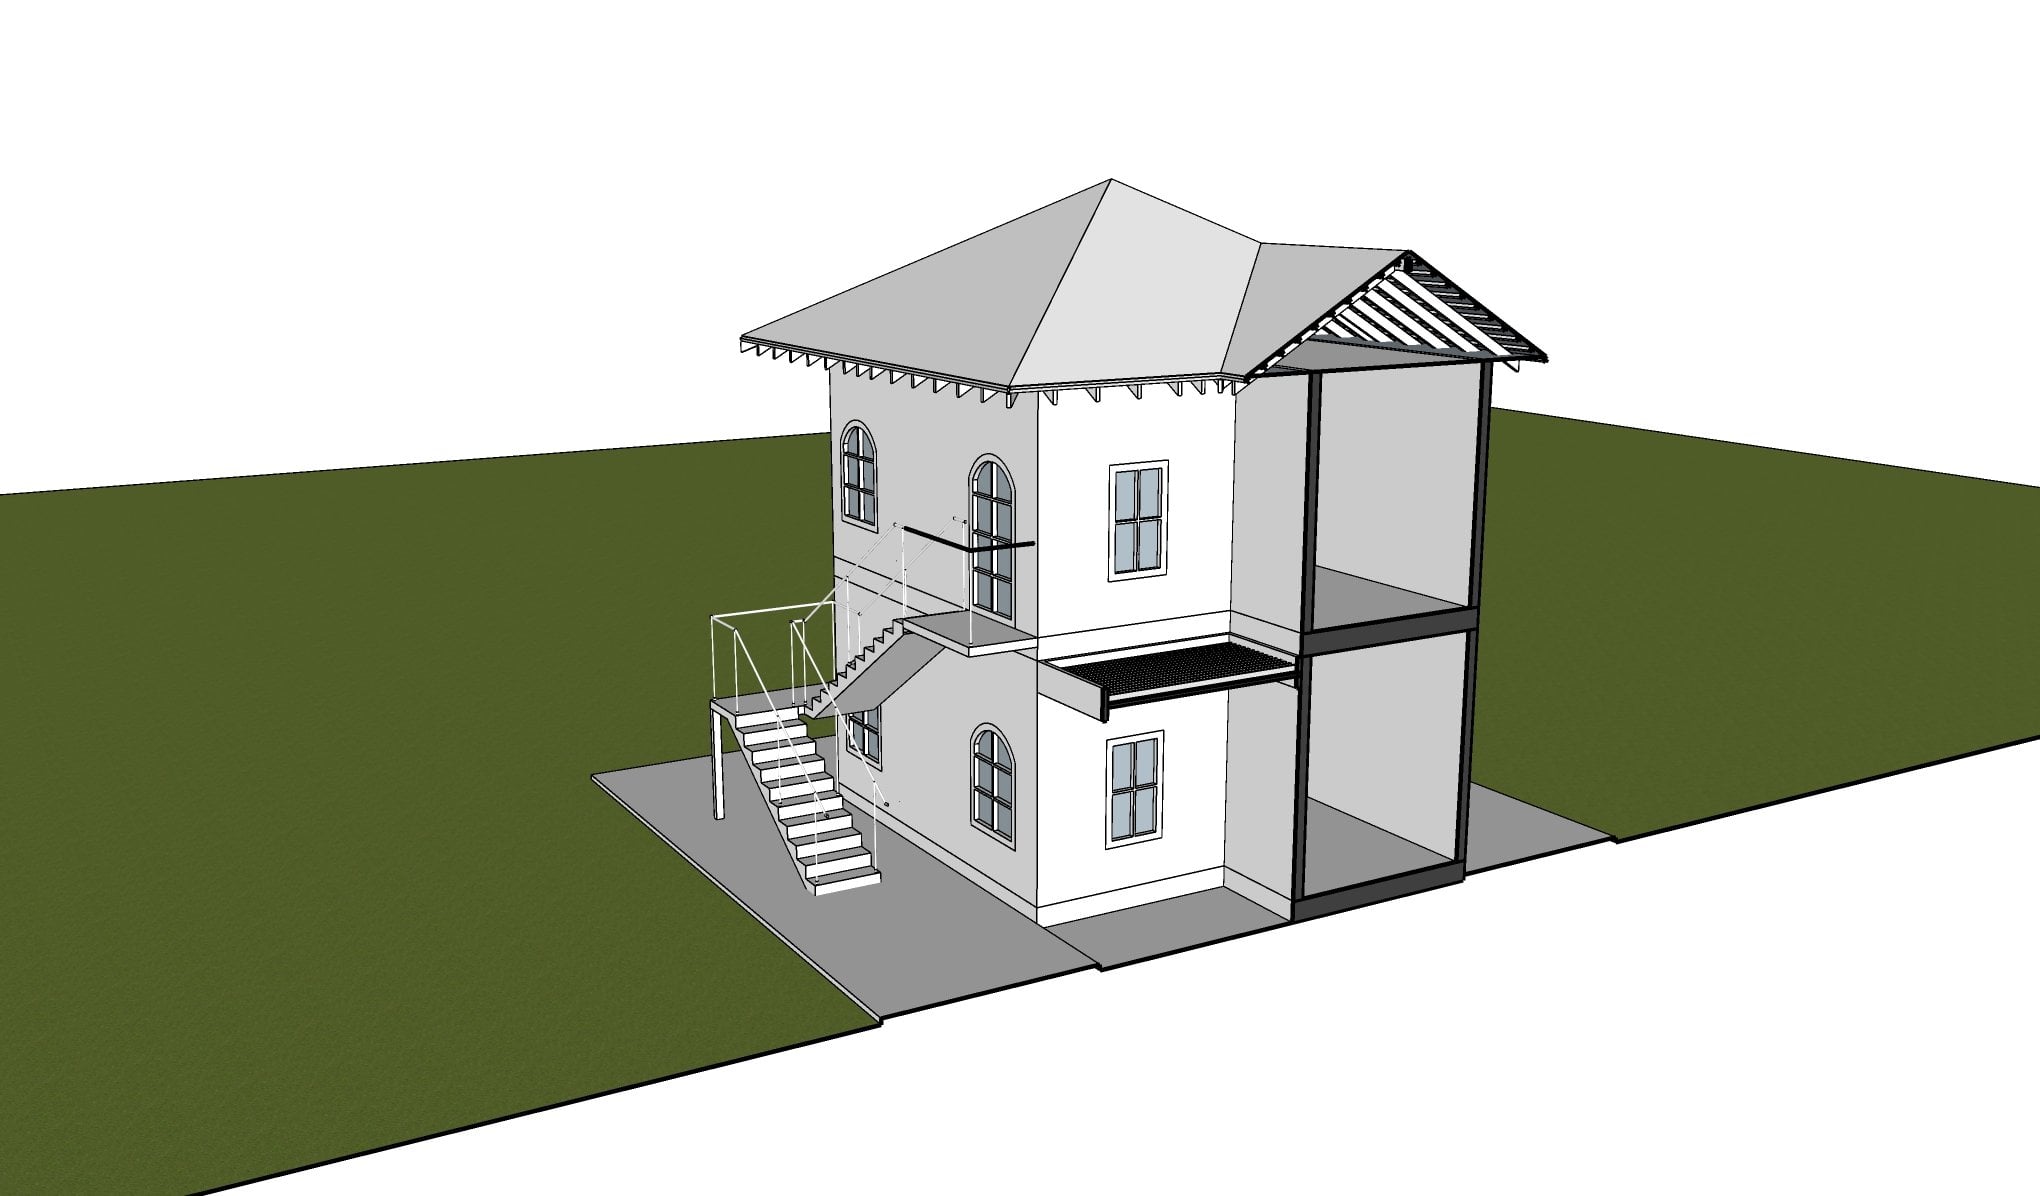
18. Sketching A 3D Building in Pencil: The next exercise, let's start sketching a
little bit larger form. Can I don't wanna
go too much into the details, but saying, if we're trying to
explore the form, we just have the idea for
how it, how it relates. Maybe you have a big form
and it's a use a box, that's what a star mine ideas. Then maybe it breaks into this type of form,
sort of modernists. And it's me just organize
it basically two forms. I've just sketched out. I can organization to it. And so what I can do here
is come back and say, now maybe there's an area
where I want Windows. I'm using this 3D. It's more like an axonometric. I have my little columns here and then have like
a little bit of a stair. I'm already starting
to define a lot of elements in this building. And I'm going really slow. I'm just figuring out different
things that are in here. Keeping a well-defined edge
to my building and my shapes. Now I'm adding a little bit of shade to the big dimensionality. I'm adding my window divisions. The very modernist. Then just again that
shade a little bit. So here I've just made
a very simple sketch. The idea is I just
started with simple form. So this is an
architectural way of just saying, hey, you know, two things are interacting to, two boxes are interacting. Didn't think too much about it. I said I wanted
something like a column. And I can of course, detail this into the proportions
and everything later. But the idea is
being able to just have an idea and
just put it into a 3D form is going to
be just element of just having an idea of making
how these forms interact. And if you have like a void, then this is just like
a little surface. This is a solid having
that understanding then when you start to define our
elements, like if you say, I want to have windows, if it's like a ribbon windows, maybe it just goes
straight across. You just can divide that out. And I am, I've
already also doing things like thinking
about levels. So here on my level lines now
allow us to say that this is 0 feet and this is ten feet. In. I would have like two
levels of windows. This is how you would
develop a sketch like this. Now, I said, it's
useful of course, to have your scale you measured. So what I wanted to be in there. But when you're doing a 3D is
a little more flexibility. There's also of course a way
to come from what peter out. But when you're just sketching,
you just have an idea. It's useful just to have
basic understanding is like.
19. Sketching A Building in Pen: And use the same elevation. And I go up a little bit. I say, Hey, I want to
show these windows. What, what happens with pen. He started to have
this new option. I'm using my use
my thicker, then. I'm showing these windows. We can get sketching is not
trying to be too accurate. One way of course, to make your lines lumbar accurate when you're talking about like windows and such like that. Do central points. But again, I'm also just mimicking what's
happening below. Making my pen lines. And instead of like
this, like shading, like this, one way
I've done with Windows, shale in the middle. Some people don't want
to do the black windows, but I'm gonna do that here. Now with elevation. One thing I would do after
this can be very interesting, of course as well, is I get to draw my horizon
line for this build. And of course you see with pencil I could go ahead and
do that same one as well. With pen, there's obviously
a different reading. So these are some of the
options that you have.
20. Sketching Materials: If I wanted to maybe
have the base has brick, I could just come here to another little lines and maybe do like a
little pretty dealt. Maybe it's too small in
this level to show brick. But you can have a
little bit of an effect. So you know that the brick, this running bond is going
to do elements like this. Now, ideate how you
show that brick. If you're doing a small
sketch like this, but I do recommend do
you like smartest, get to the foot,
go into big one. That's one way of
developing that. If you want, of course
to like a sighting, you would just come back around
and just have your lines. The vows say this
level is lines. I could just come up. You see the lines going up. And so that's just a
really simple way of starting to put like
little bit of element. And now I've made this
when is this way? This is a very useful
for how you're doing with just doing
like a pencil sketch. But if you are wanting to
start working with Penn, you get like a little
more texture options. For instance, allowed to take. Another way to draw windows is if you were just draw your line, could always just a
little little marks. See them. Now Penn
also has this, this beautiful layer of extra detail and depends
on the type of paper. This is a little bit
of a harder paper. I'll put information
about types of paper for sketching
in the class. But as you go in deeper, typically this, this
paper is actually much better with this pen. Or I can show like
certain types of details as it goes inward. So I can even show
at the edge of that window meeting
the other edge. There would just
be like a ribbon across and you can see
like little column. Now, I've started to show a, show that here as well. And just I can start
to put out some of the detail in that model. So this thing a little
subset of here. The pencil is very useful to get that idea developed
and then taken independently or more determined about what it is
that you're drawing.
21. Course Conclusion: Congratulations on finishing this course on
architectural sketching. We went through what
makes a good sketch, how to start build, and complete a sketch, whichever project or
task you have in mind. If you have any questions, please leave them
in the comments. And if you enjoyed this class, please leave a review and
enjoy here whichever Say. Again, this has been Brandon. I've enjoyed helping you
improve your sketching. You can check out my
profile for more courses on the latest design tools and techniques and see you
in the next class.
 Brandon A Gibbs, Architect & Innovator